…aaannnd, the wrong type of paint can trap moisture inside the brick which will cause endless problems …
1 Like
Use brick stain, not paint.
1 Like
… to be applied one brick at the time to avoid staining the mortar in the joints …
jeez …
I’d tell the wife I have a headache and let her stain the wall,
… one bl–dy brick at the bl–dy time …
4 Likes
i was thinking of using bitumen rather than acrylics lol
2 Likes
Just mask it!!! Break out the tape, mask it, and then let her shoot it!!! LOL
1 Like
I have one of those goofy looking grips. I zip tied an Aztek 3000S to it and amazingly it works quite good with the Aztek. The airhose as it comes out the back of the Aztek is annoying and this holder allows it bend enough that it interfere with your wrist movement. Also has a better trigger feel. Cheap fix. LOL
ok folks I’m having an issue with the stun gun and that is when i pull the trigger the paint splatters. once the paint is flowing it’s fine, it’s just that initial squeeze every time i use it.
could my air pressure be to high?
Type/Brand of paint?
Thinning ratio?
Does it splatter the very first time or is it the second (and third et.c) trigger-squeeze?
I am thinking like this:
First time OK.
Paint is left on the tip.
Second shot splatters the accumulated paint.
That first burst is air pressure accumulated behind the trigger . .
you can either pull the trigger when not hovering over the paint surface then continue moving over the desired paint area or keep a paint rag in you other hand and burst into that then begin the paint process (this will also keep your nozzle tip clean).
Cajun ![]()
2 Likes
@Uncle-Heavy @agincajun yeah it’s just that first squeeze of the trigger every time, i don’t have a ratio for paint mix i do it by eye and the airbrush is brand new and has hardly been used so there is no paint build up on the tip of it.
i’m not used to gravity fed airbrushes so i thought that it might be to much air pressure as you need higher air pressure for siphon fed airbrushes, so i have been reading anyway.
Siphon feed needs the vacuum created by the high speed air-flow to lift the paint.
A gravity feed airbrush gets the paint fed to the tip by, wait for it, ta-daa: Gravity
Higher pressure would just “rip” the paint away from the tip even faster and into
the spray onto the model.
With a dual action airbrush the needle rests inside the nozzle and keeps it closed until the trigger is pulled backwards. When the trigger is pushed down the air starts flowing. This mechanism allows for two different approaches:
- Pull the needle back and let paint seep onto the needle tip and then push the trigger
down to blast the gathered paint onto the model in one glorious SPLAT - Push the trigger down to let the air start flowing and then slowly pull the trigger back to slowly allow paint onto the needle tip and into the already established jet-stream.
A dual-action lets you regulate the amount of paint while painting. If one spot becomes too wet just close the needle and use the “clean” air as a blow dryer. Painting can alos be started in the middle of the model: start the airflow and then gently start adding paint to it. Close the paint flow before stopping the airflow
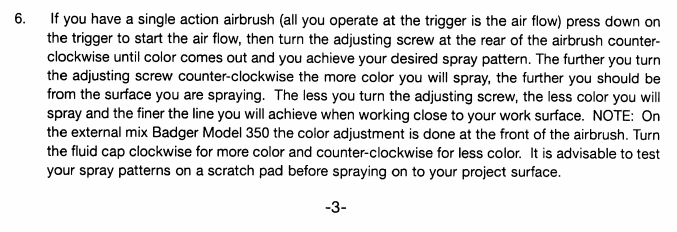
The single action air-brush is used in a different way. The needle is set to the wanted position before adding paint to the cup. This allows the user to have a fixed “line” width when spraying but requires that you start the airflow before moving onto the model and that you move away from the model before stopping the air.
Copied from the instruction booklet for the Badger 200 Detail (single action)
I took one look at a single-action, asked myself: WHY??, and then I bought a dual-action.
A nifty feature of some dual action airbrushes is that you can set a max-value for the paint flow.
The airbrush behaves as a dual action until the needle is pulled back against the stop.
Edit, airbrush trivia, could possibly be useful for someone sometime:
The cheap Badger 150 copy (brand name was Kager) I bought and the real Badger 150 I bought some months later can both be tweaked into behaving as single action airbrushes. It requires some testing and fiddling. The needle is held in position by the needle chuck, When the trigger is pulled back it pushes the tube shank and needle tube backwards, the needle chuck locks the needle in the needle tube → the needle is pulled back. The needle can be given a “slightly open” position, very similar to a single action airbrush, by loosening the needle chuck, manually pulling the needle back and then tightening the needle chuck again. Now the airbrush behaves as a single action as long as the trigger isn’t pulled back.
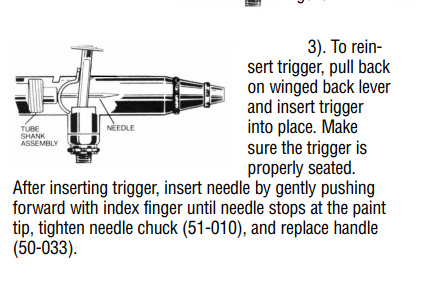
The proper way of inserting the needle:
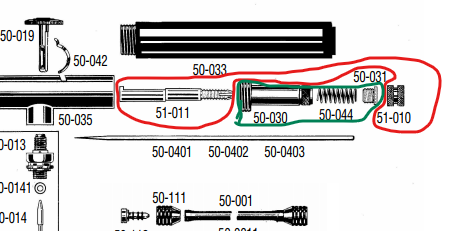
The complete assembly holding the needle consists of 51-011 and 51-010 (circled in red)
The parts circled in green contains the spring that pusshes the needle forward against the nozzle and the trigger.
I have also seen airbrushes (older Badger 150???) with a small set screw that could limit the forward motion of the trigger, somewhere by part 50-042.
This could also be used to set a fixed “single action”-ish behaviour
Edit nr 2:
I did remember it correctly, it was the older Badger 150 with the tapering rear end.
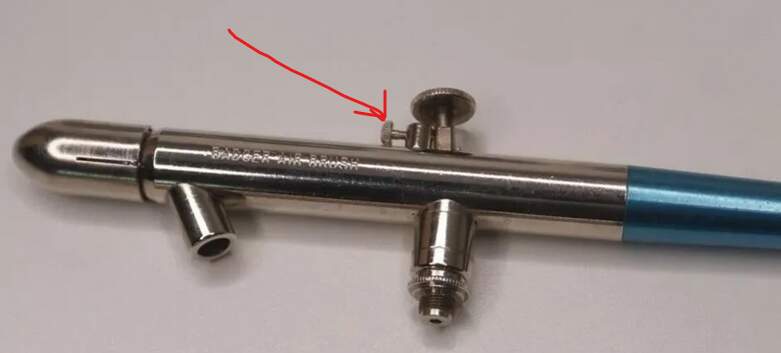
Screw by the red arrow pushes the trigger back to a fixed or pre-set “single action” opening
1 Like
Best practice is always to start and stop the spray line “off” the model - that way any splats shoot harmlessly to the back of the spray booth. If you absolutely must start in the middle of the model, try holding a bit of card in the way to catch the initial splat, then as the paint is flowing move it aside… (Old business cards are great for this!)
5 Likes