Thanks Ken. I have that image. I’m interested in the hatches etc that are under that cover that has been flipped over in the image. There’s some good detail in there that I’m trying to figure out how to expose. ie which way they would open if blown open.
I have in mind standing that cover up and exposing the rear covers. AH has given some nice pe and it would be a shame to not use it.
Looking at the image Ken posted I discovered AH doesn’t give you an underside of the engine hatch. Nor the vent opening. So I built an inside skin and opened up the vent. Green Arrows. As an aside above I told how my carousel got ‘bit’ melted! Well see yellow arrow. Now I melted right after all!!!
I have yet to add bolts etc to the underside skin. This hatch will be open but not all the way.
The second hatch has nice pe grills that are covered by the AH hatch covers. So I cut one open. I’ll do the same with the rear grills as well. Some sanding and a bit of bending of the grills should be enough.
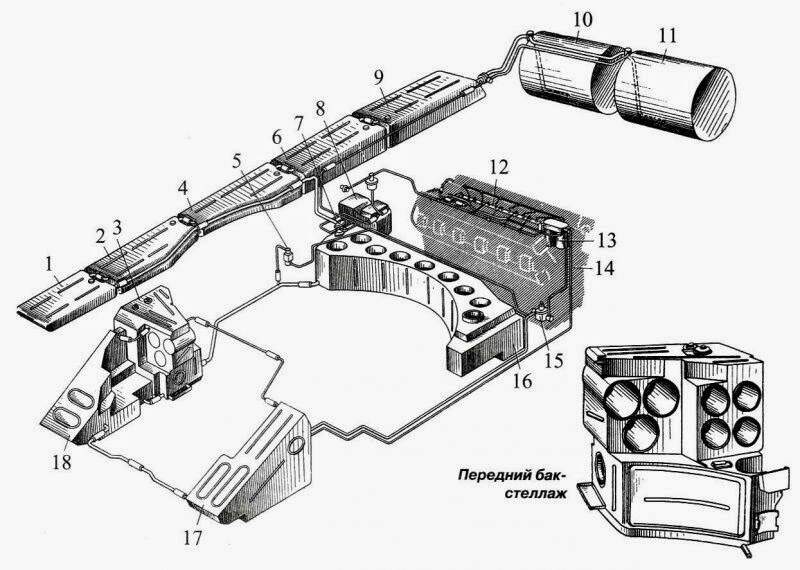
Item number 3, with a different view in the lower right corner, and item 16 are fuel tanks, with cut-outs for ammunition storage in them. No wonder the turret blows off when the ammo goes, it also sets off the fuel!
Ken
Only job left to do is the side skirts. I’m inclined to leave them off altogether but then again I may cut them up and put just a few sections on. Most images I see on the web of tanks in the Ukraine have no side skirts. Why? PITA or just not needed?
I will use Mig Ammo oxide brown primer with a top coat of Russian green. Then the fun will begin with the burnt colours.
Ken that’s not funny. I spent quite a bit of time carefully cutting away some sections of the side skirts. Now you tell me they aren’t even metal. Oh well. Back to the dreaming!
It explains why AH skirts were wavy. I should have guess there was a reason for it.
BUT the fixtures holding on the rubber skirts must be metal so I’ll cut away all the rubber and just leave the fittings.
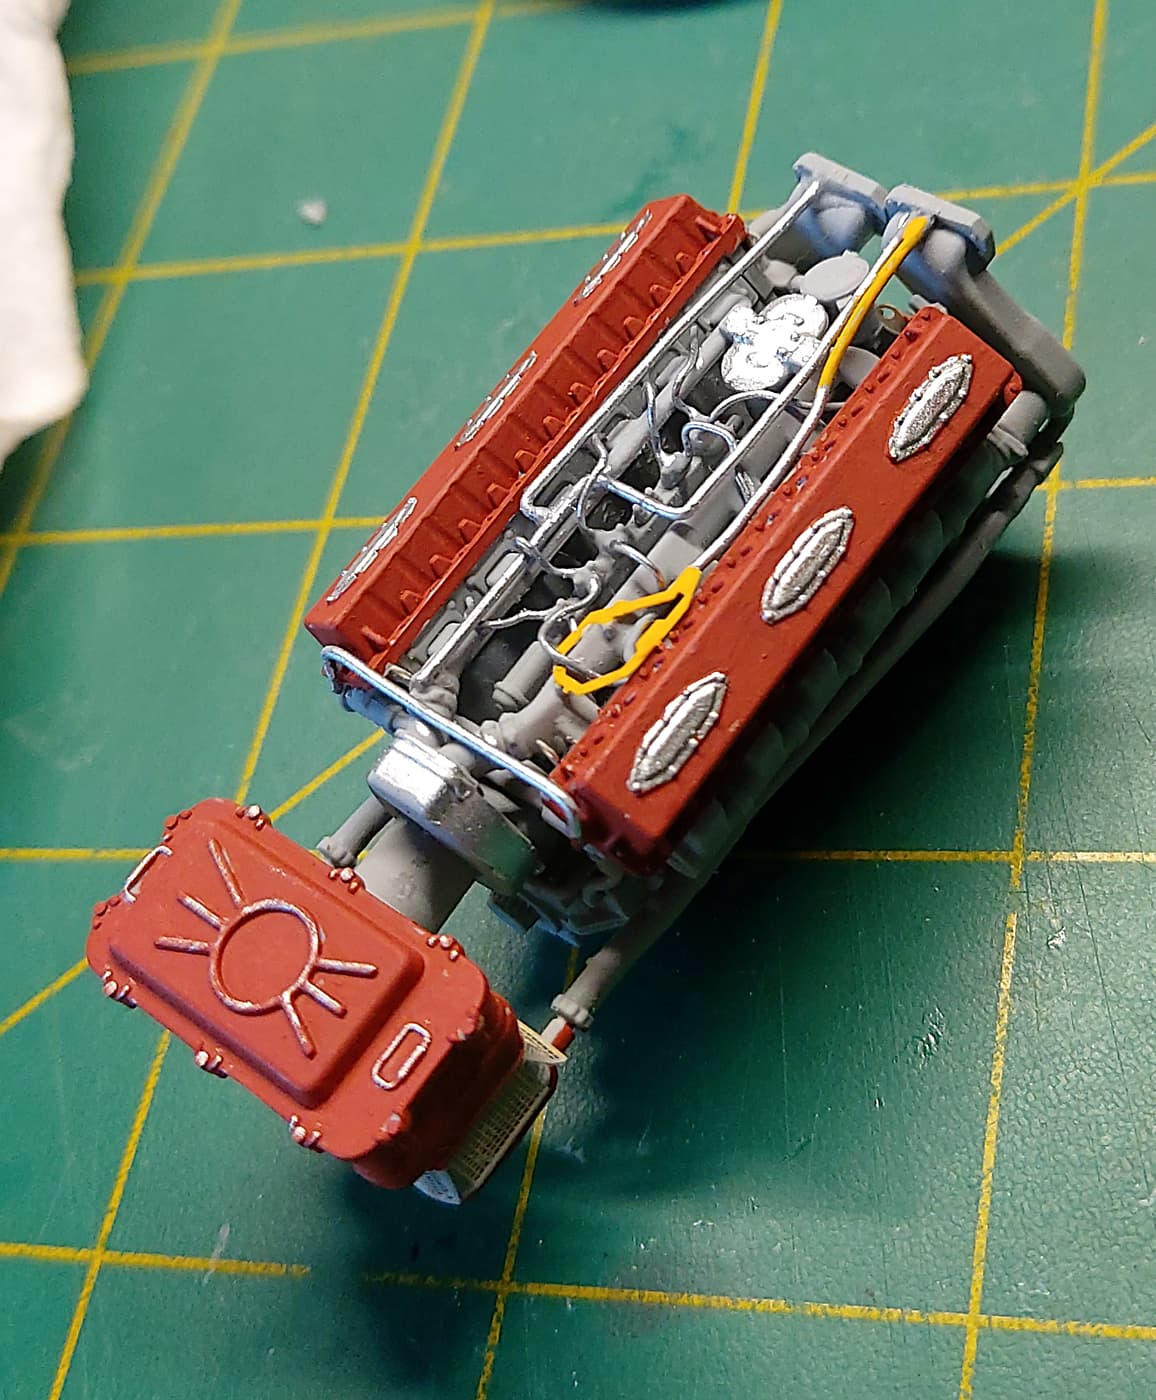
It’s cold here so I’m putting off painting. (down to 20c/70f each day). As I intend exposing the engine I started to put some extra detail on. Lead wire. BUT I started backwards. Brain failure! I put the top pipes on first. How dumb can you get? I’m blaming the cold for freezing my brain. I’m not sure how much detail to put on and how much would have been destroyed. Maybe some trash on top will covered up what’s not there.
A few more ‘pipes’. Tip for anyone contemplating wiring the engine. Drill injector holes etc before assembling the engine. Far easier to glue a pipe which is in a hole.
Yes I know I’m one pair short. But!!! Next time! Some pipes go to inexact locations but that’s just a mere detail.
FWIW I have several image of engines in the T 72. No two are the same. I’m guessing the neat ones are images of restored T 72s. The rest are a bigger mess than mine. On some images there are pipe/connections that aren’t on others. So near enough for me.
An update. I haven’t been well so progress is slow.
Today I had a good talk with my airbrush and we agreed to prime everything.
All the interior was primed with AK grey primer. Everything went fine. I wont be painting over the primer and will use the grey as my base colour.
I decided to prime the exterior with Mig Ammo’s red oxide. Now this primer, my air brush and me don’t get on. I have all sorts of issues using this primer. But it makes a great base colour for weathering. So against my better judgment I started priming. Not a good idea. The darn stuff simply wont spray well. I had clogging. I thinned it. I changed air pressure. Nothing would work. So I cleaned the gun and started again. Same story. I contemplated a world record air brush throwing record but thought better of it. Now some time back when ordering goodies I inadvertently ordered another bottle of Mig Ammo red oxide. Why? No idea. Just a brain fade. So out of frustration I opened the new bottle. Poured some straight into the air gun cup. Pressed the trigger and it sprayed beautifully. An hour later I had everything primed with red oxide. Wheels, tracks the lot. Never missed a beat. Not one clog. Never even cleaned the needle tip. Brilliant finish. Conclusion? The only thing I can think of is a dud bottle of Mig Ammo red oxide prime. What’s the odds? But what else could it have been?
Anyway the next step is Russian green on the exterior. Then assembly and the ‘fun’ with the burn weathering.
Top coat of AK Russian green. Sprayed like a dream.
I tried to ‘modulate’ the colour. ie I never tried to get a perfect, out of the factory, paint job. You can see some of the oxide red primer in some places. I’m far from an ‘expert’ in this field so forgive any booboos.
Now the fun begins. The “how would this happen” work.
My logic!
First step is to assemble and weather as per a ‘normal’ build. Remember the smoke would be on top of any mud and dust etc.
Next the ‘black’ from the smoke/fire.
Then the red/rust from the heat and early weathering after the fire.
I need to keep in mind the white as well from the alloys that burn.
Watch this space! The more I get into this build the more complicated it gets. I need to be very aware of the timeline and how and when the colours are applied. Not as easy as I frst thought. Then again maybe I never thought it through in the first place.
It’s looking good, including the paint. Don’t see any booboos.
It’s always harder to build a destroyed vehicle, but you seem to have it worked out.
Ken
OK a bit of progress. I have to work around sick days so sometimes nothing gets done. (I suffer from migraines and cluster headaches).
I have several images of T 72 engine bays. No two the same. So I’m winging it a bit. I know I’m missing a number of pipes and wires. But near enough for me.
The pity is that it looks ok and now has to be destroyed.
A note - I’m displaying it with the engine cover open but still in tact. See post above. That meant I needed to build the inside of the engine cover. BUT there is little to no clearance between the engine cover and the engine. So the option is to lower the engine a tad or thin down the engine cover. AH doesn’t allow for the cover to be both opened and detailed. So anyone considering this build and having the cper open plan ahead.
OK I got off my butt and then made a rookie mistake. I’m weathering as per a normal T72 before it was hit. So a clear coat. I hit it with the clear coat only to find the pin wash wasn’t working. Yup I clear coated it with matt. So out with the airgun and now a coat of satin. Boy dumb!! The engine and front have been pin washed in this image. The underside of the engine cover will be painted ‘burnt’.
Underneath is muddy. I’ll take an image later.
So now the oil dots and ‘normal’ weathering. Then the colour for the fire damage.