OK time for another project. Let me be clear from the start that this won’t be a rivet counting build. Sorry.
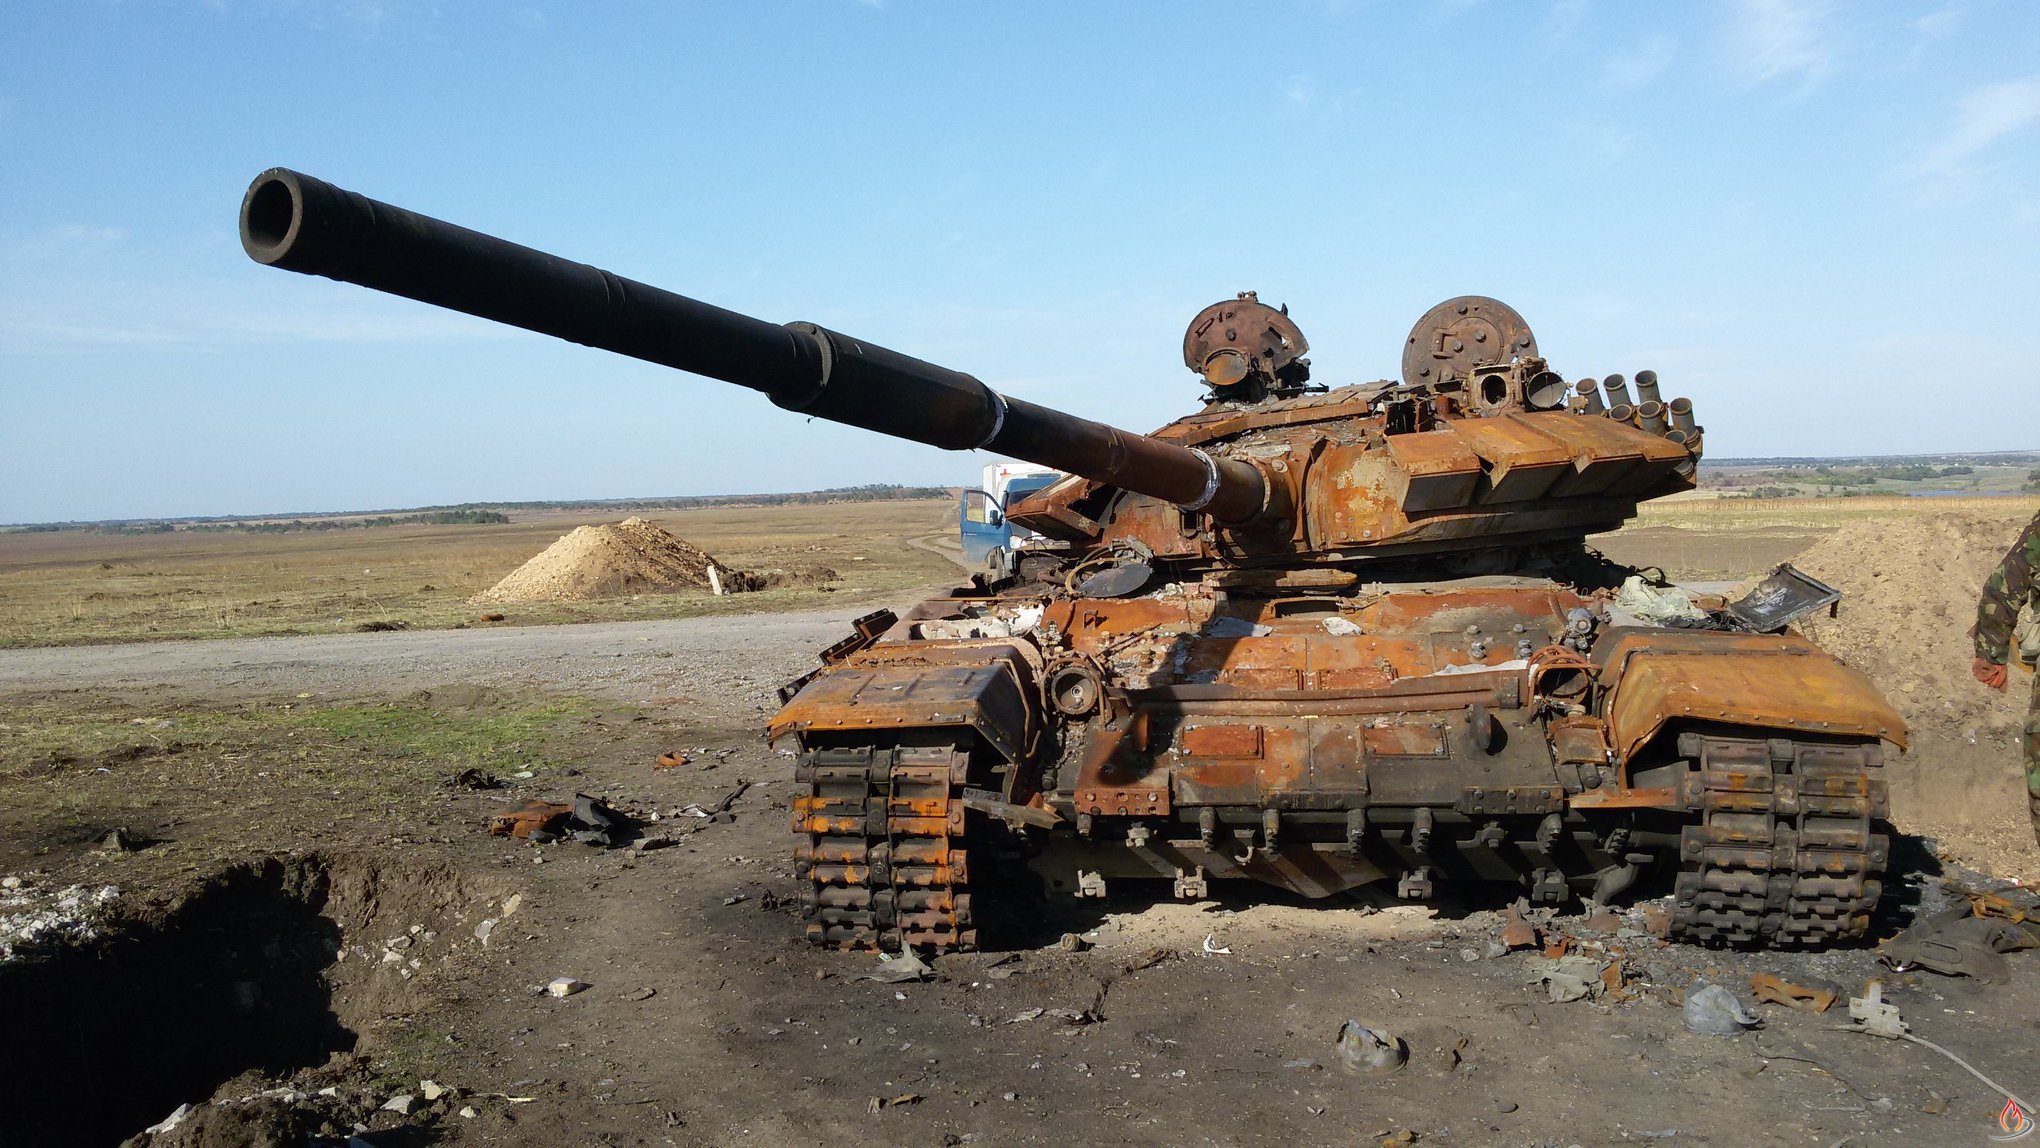
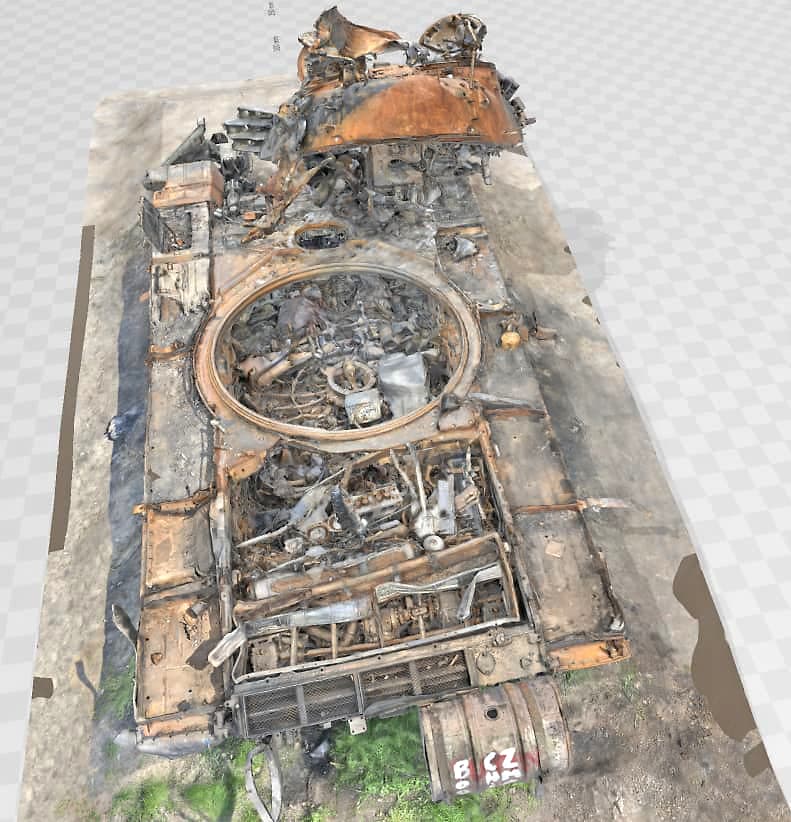
Premise. An old T72 is in the Ukraine. It has run out of things that go bang. But on the way back to reload it is penetrated between the wheels near the top of the track. Just under the turret. I want a burnt out unit with just enough bang to pop the turret out. No catastrophic destruction because there is no ammo left in it. Just enough fire to melt my marshmallows.
The challenge is to build with the damage in mind. I’m using a AH T-72 interior kit. So the interior will be on show with the turret popped out. In many respects the damage has to be done first before building the kit. Getting the burnt paint will be a head scratcher.
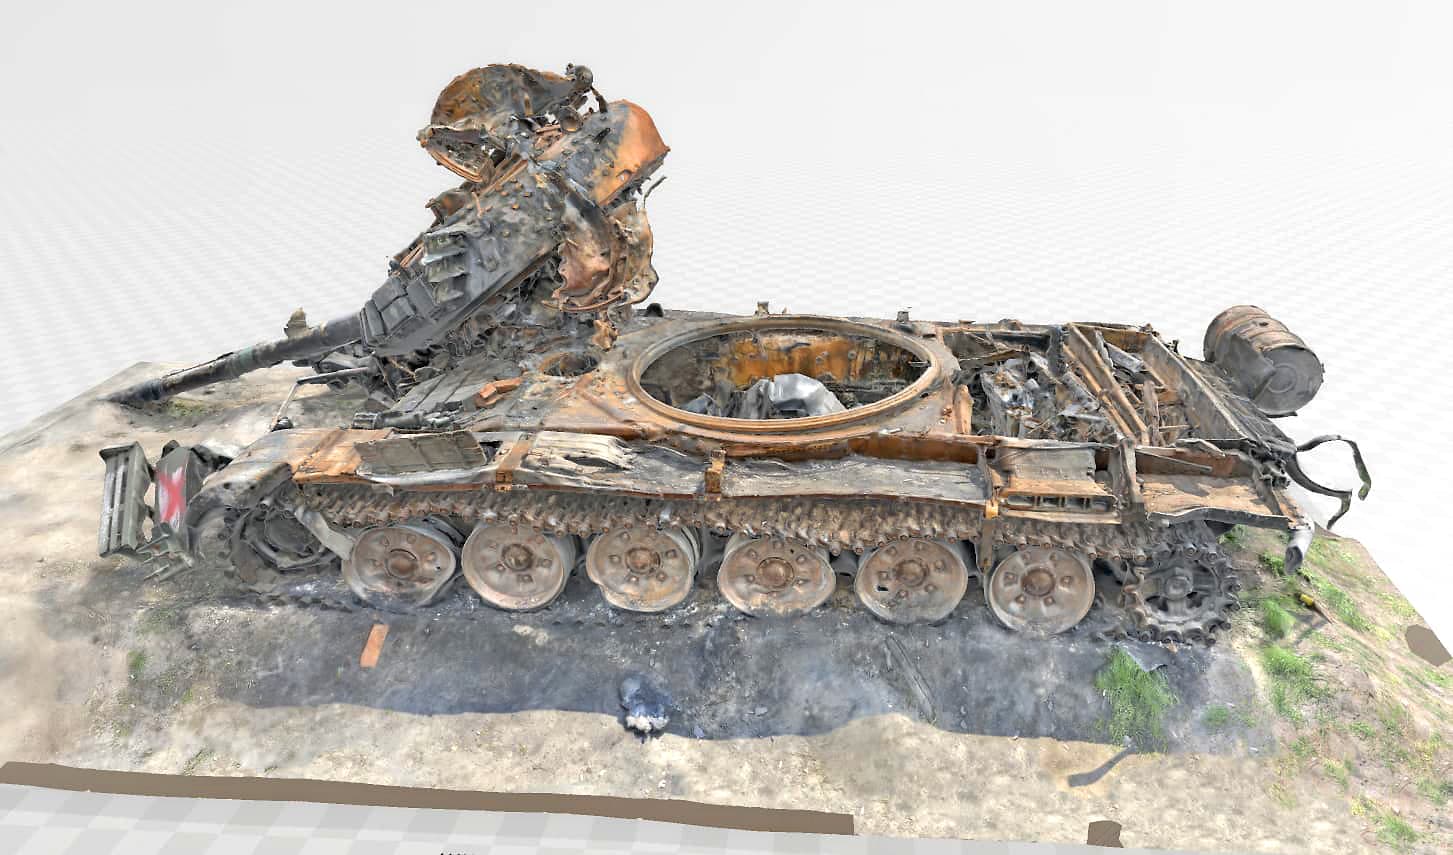
Here’s an image that I ‘borrowed’ from ‘Modelling armour in the Ukraine crisis’.
This won’t be a fast build because of all the forward thinking and I don’t think very fast!!! I’m starting with the turret because that will give me the key to the rest of the build. I think!
If there is no ammo, then there is nothing to blow the turret off. It will just burn. There are plenty of photos of tanks like that in the “Modeling armor in the Ukraine crisis” topic, but you can’t see the interior. Are you using a kit with an interior?
Ken
Yes, you have to pretty much build the interior completely, with damage and then weather/burn it out. Think ahead of how you want it damaged and you should be fine.
What Ken says, turret weight’s not my speciality but somewhere between 5 & 10 tons needs more than a couple of shells to hoist it. The necessary ammo going up would disintegrate whatever was inside to the extent an interior detailing set would be a fairly pointless expense. With good photo refs of what an intact interior looks like, I’ve found a mess of tortured parts from the spares box, plus wires & bits of lead & aluminum foil bent/riddled/torn into plausible debris does the job for free. I don’t know if the T72 had a toothed hull turret ring, but for my T34 I sliced a strip from a polythene-soft plastic bottle top, cut/turned inside out & put in a jig for a week to reverse its curving tendencies…
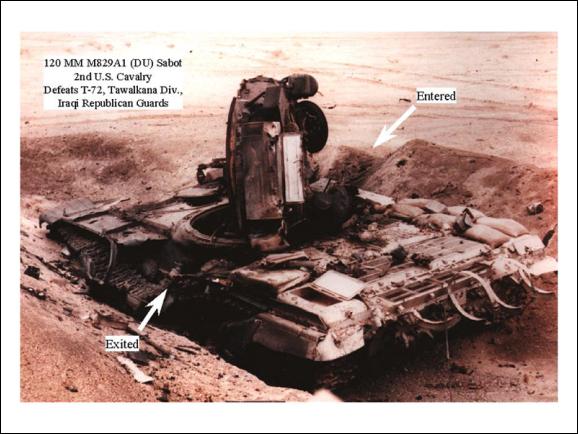
Not spoiling your fun! A few shells could pop the turret loose and just up on top of the hull, partly blocking the view into the hull under the turret. Something like these:
I’m always open to suggestions. Remember I’m after an ‘affect’ and not necessarily a real world event. So more than a bit of leeway with the reality stuff.
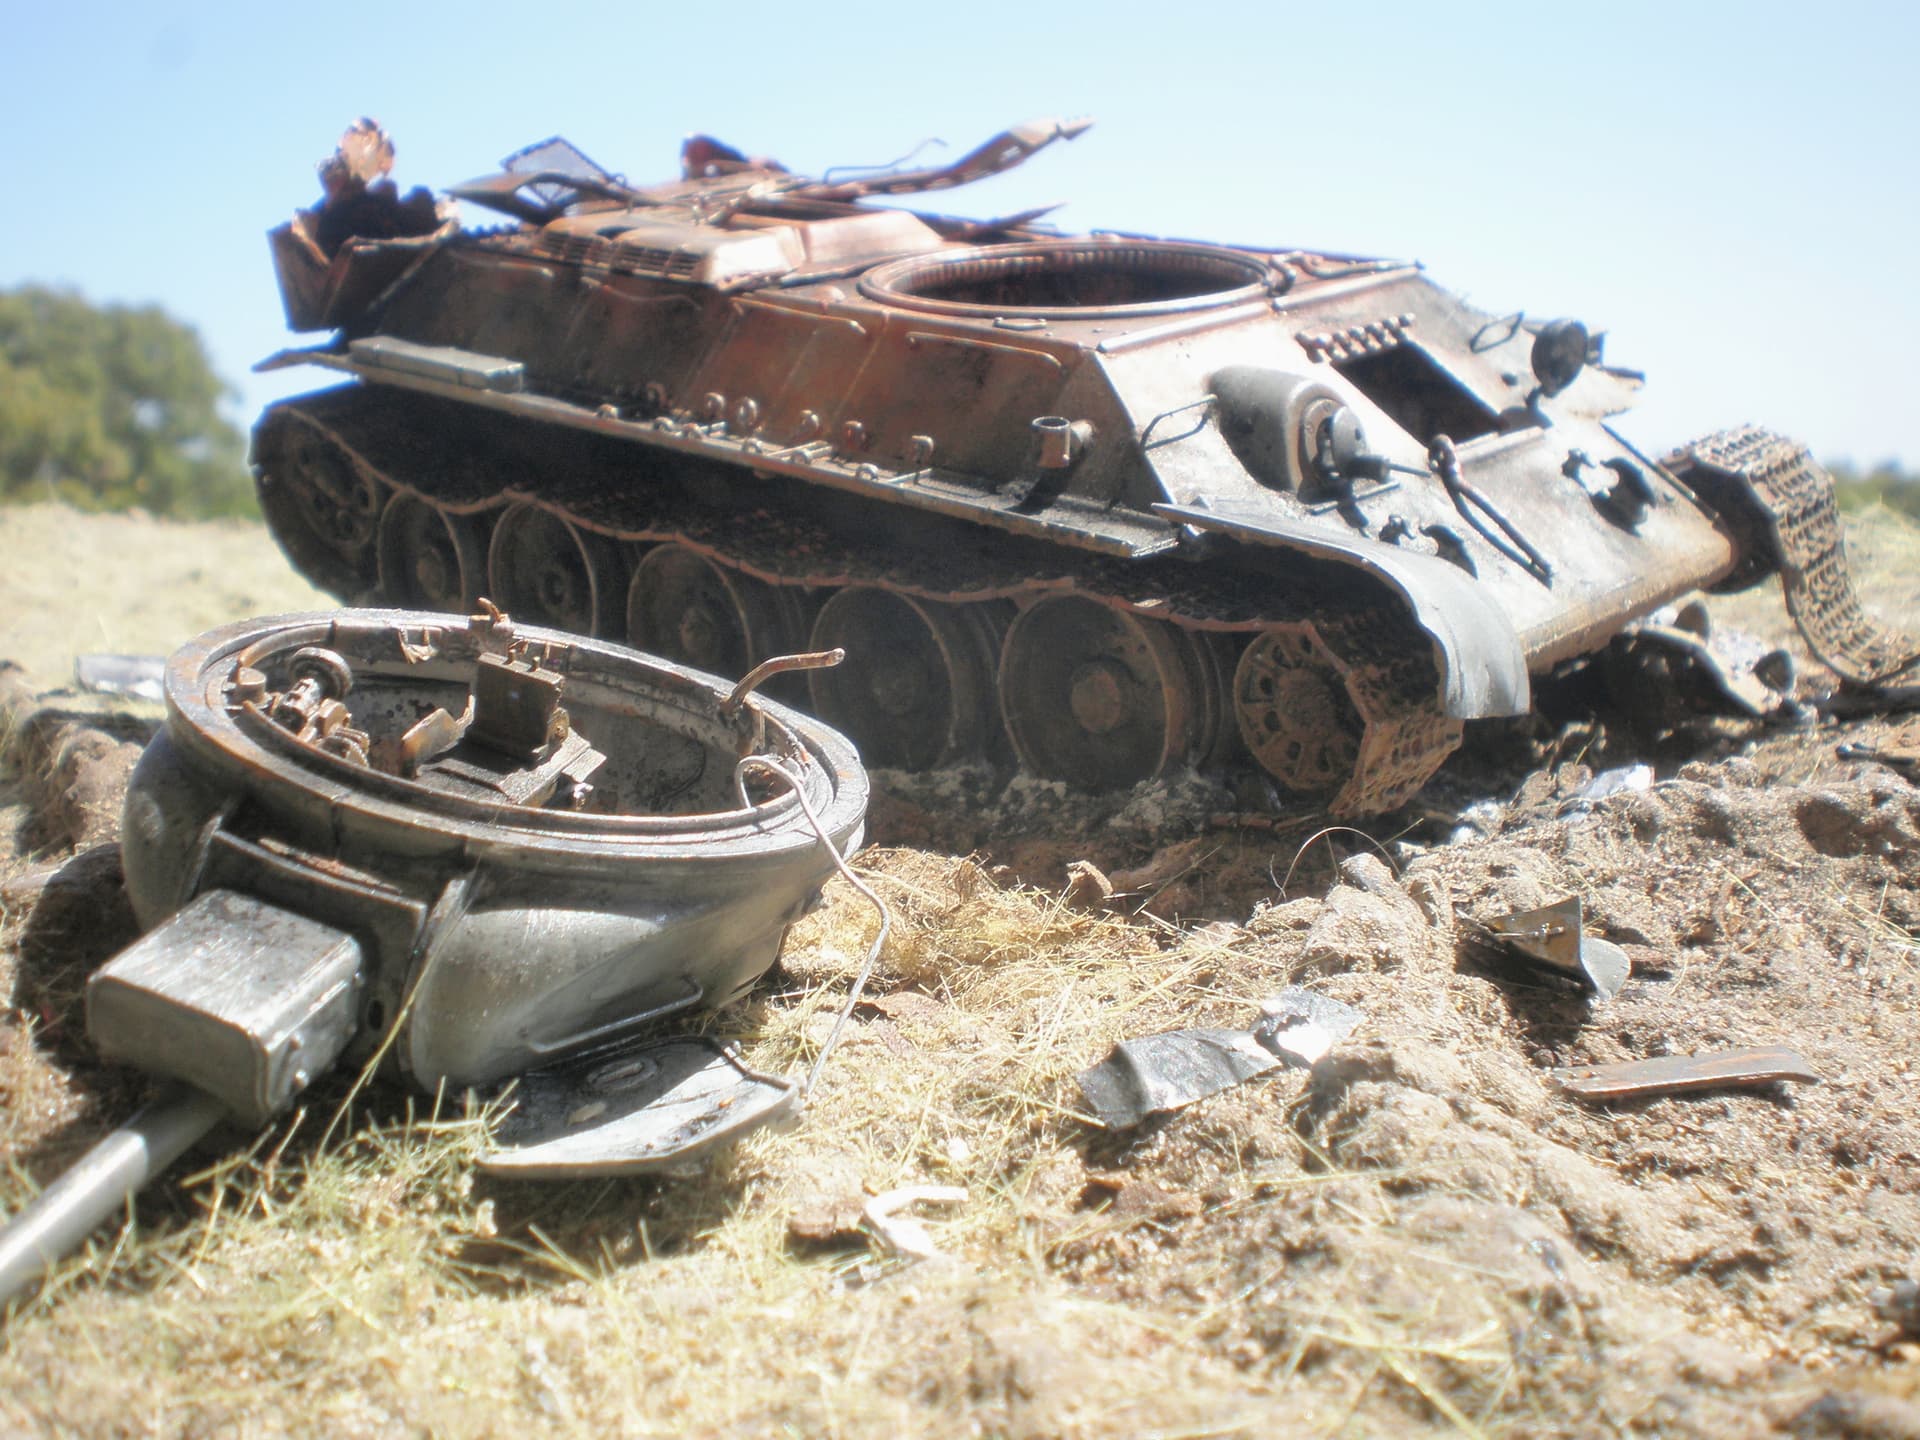
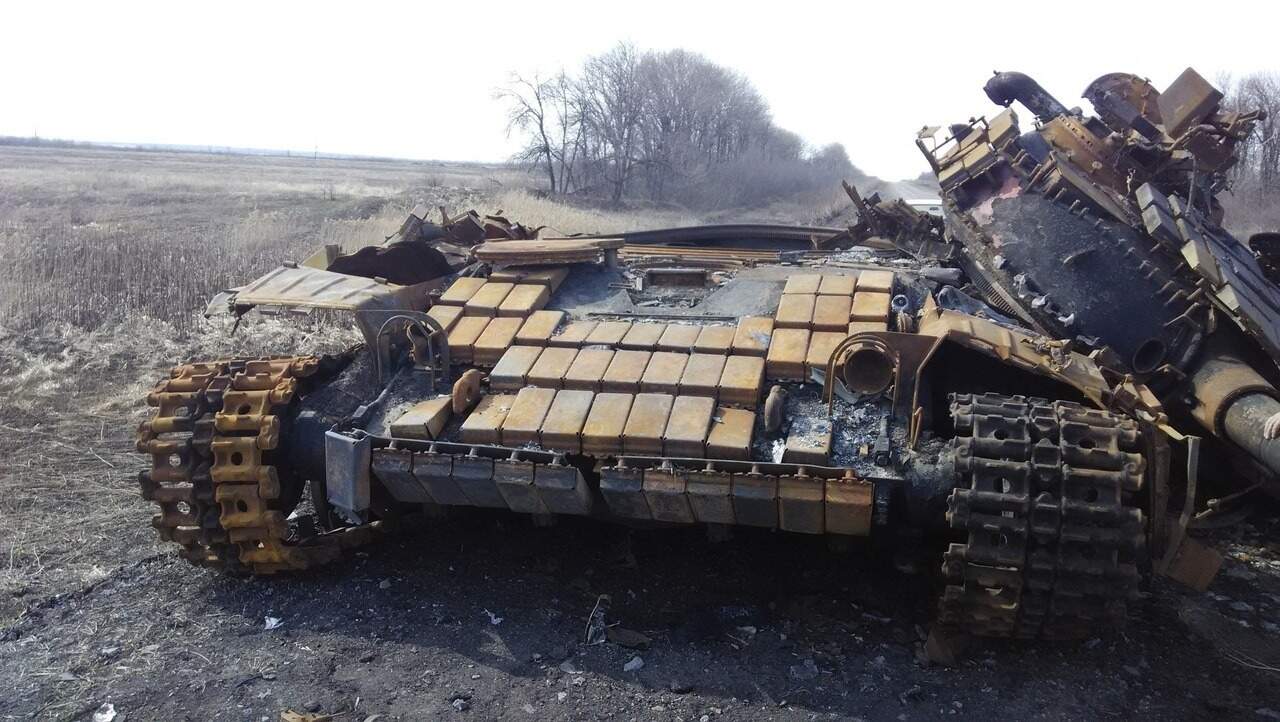
Here’s a couple more of the images from the Ukraine thread. One showing what is left of the interior. I’m not looking for as much destruction because I still want some logic to the interior. Same with the engine. Destroyed but not so much that it looks like a lot of molten metal. That’s more goal anyway.
Well, for a mostly intact interior, you will need a kit with an interior. So far as I know, Amusing Hobby makes the only T-72 series kits with interior. If you have one, or can get one, it’s a piece of cake. Go for it!
Ken
For the damage perspective, I would start at the hull floor and work my way up. Some stouter real life parts would have minimal damage. The damage will increase as the part becomes more delicate. Many items will be unidentifiable due to the amount of damage. The severely damaged vehicles that I have looked into had no identifiable remains of the occupants. Lesser damaged vehicles often did.
See above. Im using the AH interior T72.
I started building the hull. But then switched to the turret. Logic? Well I want to place the turret and thought that would give me a direction for hull damage.
I have sheet copper. Its hard to tear plastic so Ill replace some of the thick plastic with copper sheeting. Putting the turrent in place will guide me as to where damage may be.
Of coarse engine hatches will be blow off so detailing a burnt engine will be a challenge.
The more you think about a project like this the more complicated it gets. Like burning the rubber tyres off some of the wheels!
Aha, I missed that before! So you have a good plan, you just have to follow through. You should have no problem.
The engine is mostly a painting issue.
I don’t know if anyone makes any after-market “burned” wheels for the T-72, but you can do that by mounting a couple in a drill or Dremel tool and grinding off the rubber part.
Have fun with it!
Ken
Where did the back deck grates go? An Explosion making the Turret pop wouldn’t make them fly off necessarily. And they certainly wouldn’t have burned up.
I would expect the explosion of the rounds under the turret to overpressure the entire hull and blow the engine grates off the same time as the turret and driver’s hatch. I’ve seen some blown up tanks where the hull itself split along all the major weld seams because the ammo blast was so energetic.
Yep, it all depends on how much ammo is in the tank when it blows. For the effect @BGT wants, a few rounds would be about right. So maybe the tank was low on ammo when it was hit? Or, since this was a “training exercise” they were only issued a few rounds to begin with.
I just want to see how it comes out, should be an interesting build.
Ken
Damaged builds are complex and tedious but not beyond your imagination. solder, wire baking soda, aluminum foil, and lead sheet becomes part of your building supplies.
Yes I’ve found out very quickly how much pre planning is needed. You can’t just ‘blow up’ the plastic used in the kit. It’s too soft and too thick. Gluing parts on that would be hanging from nearby trees is also an issue. TopSmith is right.
I’m not so sure I was clever starting this project. But ‘we shall not surrender’ !!!
Forge ahead. I think my biggest growth in modeling happened because I had to do so many things I had never done before when I did a blown up T-62. One of my prouder modeling experiences. The detail is what is required.
I wasn’t on to the second page of the instructions before I had the light bulb moment. This is very much a project where the end result/diorama needs to be considered first.
Ie. Where and how will the turret sit? Will the tracks be still on or rolled off? Will engine covers be on or sitting on the ground nearby? On most of the images I have seen the turret is still basically intact. Yet where it once sat is a complete mess. The engine needs to be built but at what stage do you start to destroy it? And destroying it needs to be done with how it was destroyed. Was it blown apart or just burnt.
What seemed a relatively “easy” project ain’t an easy project. Its a challenge I dreaded but now look forward to.
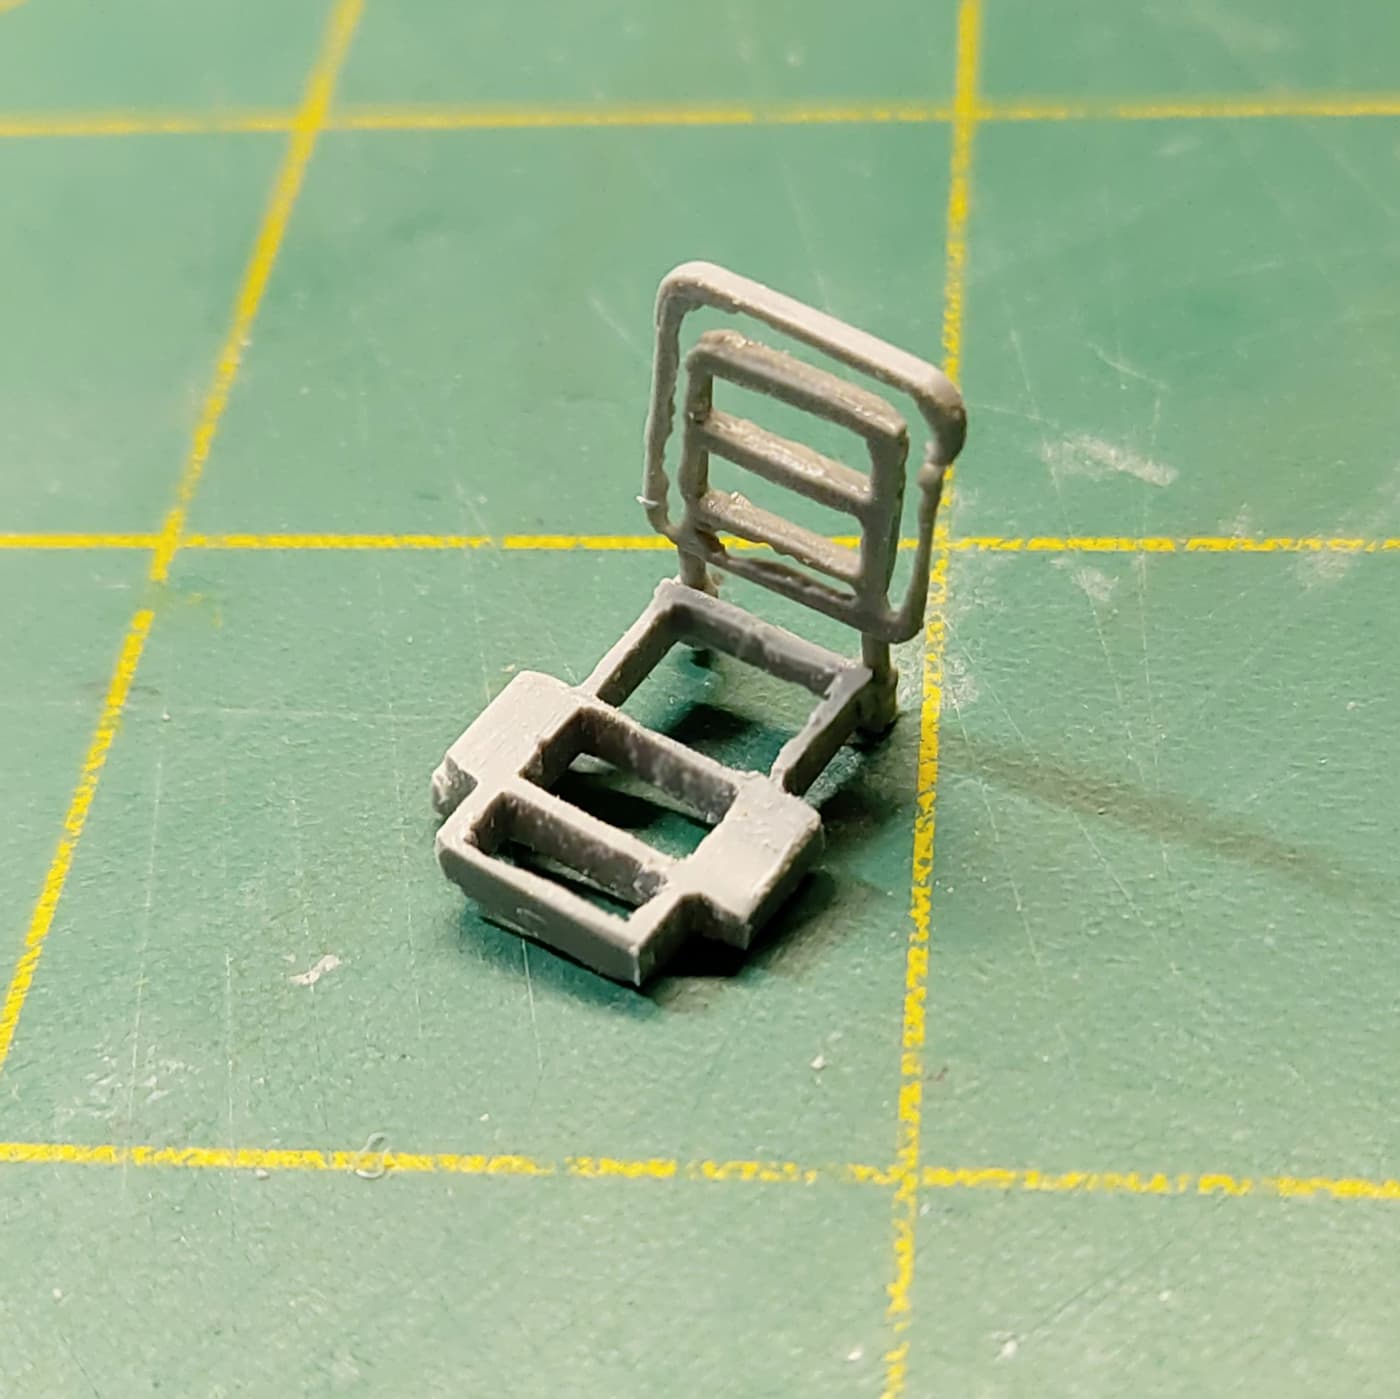
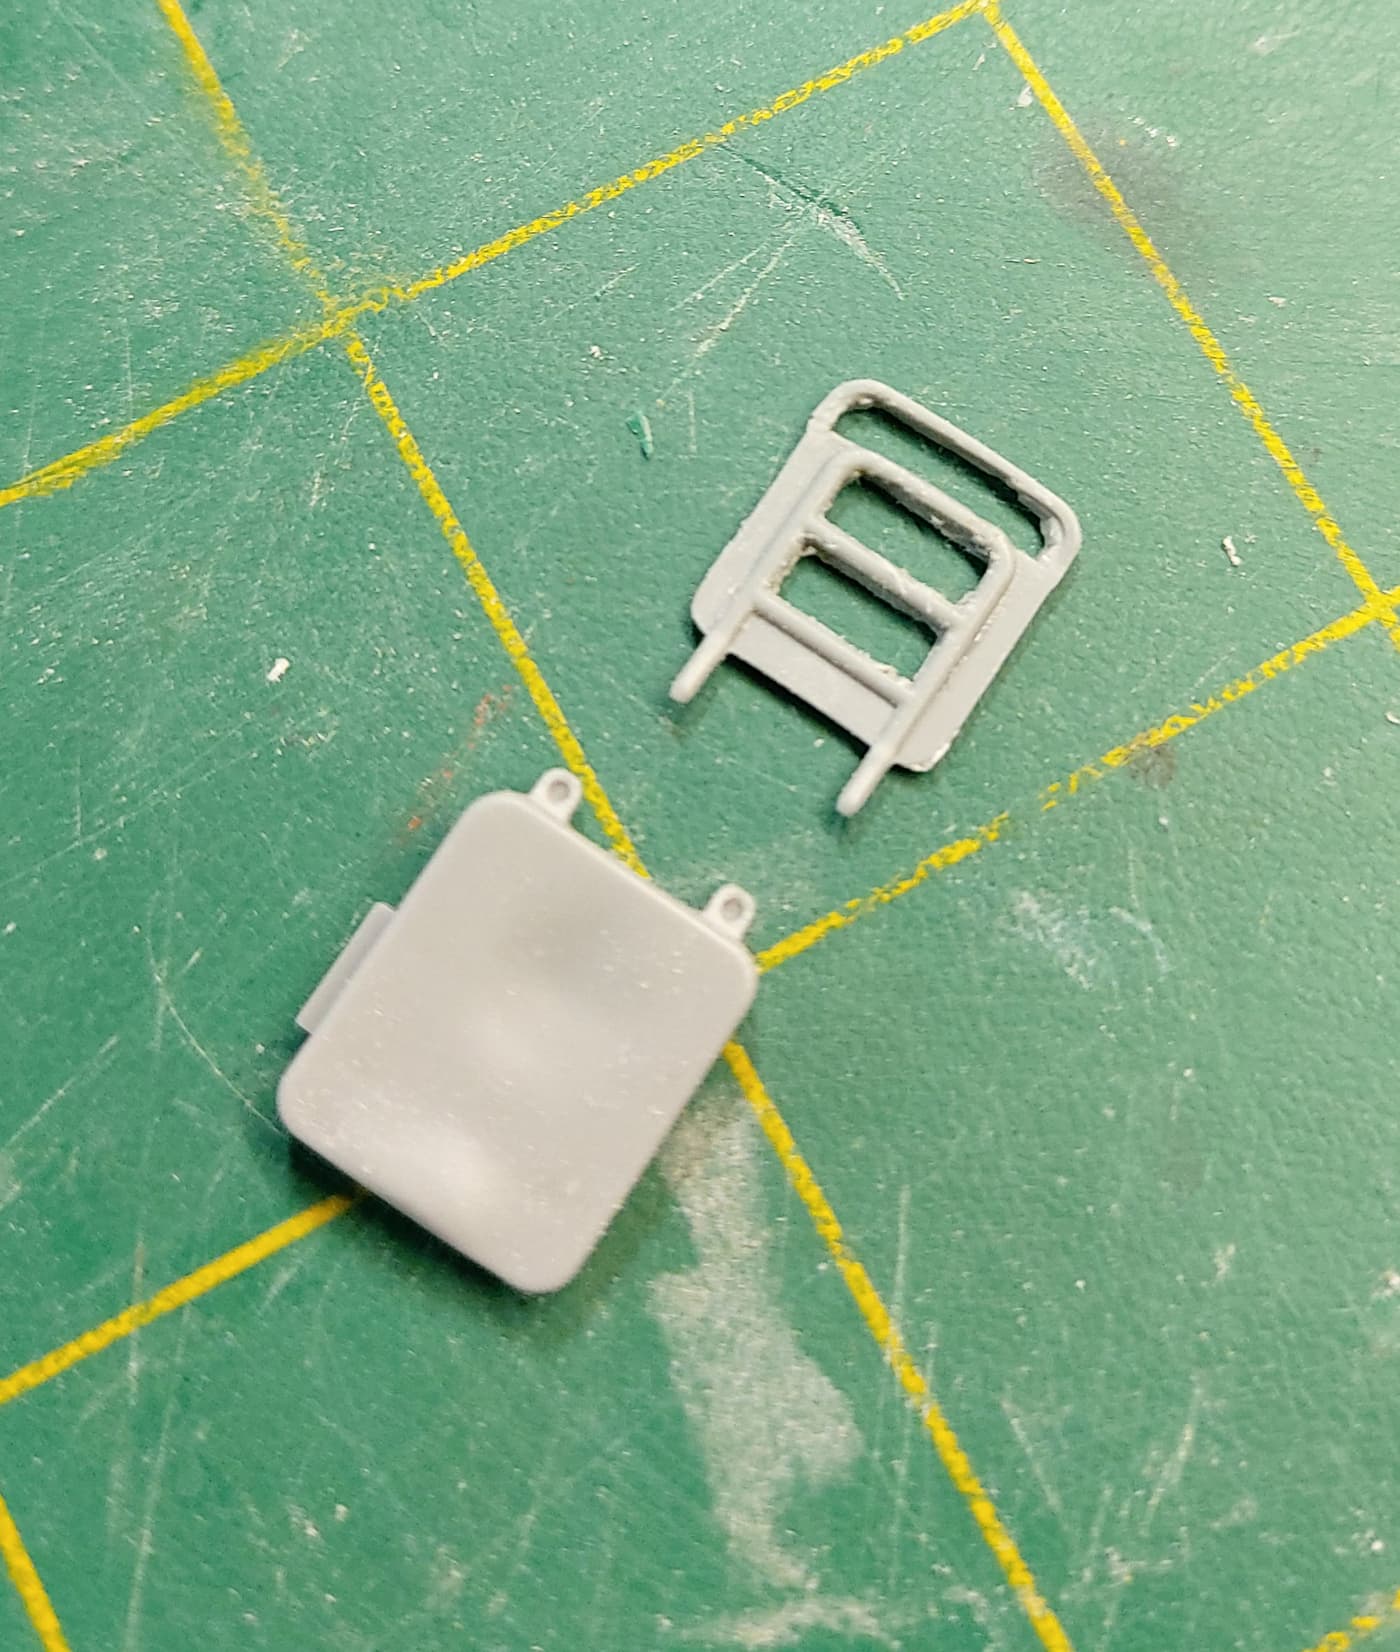
edit - Today’s task. I’m assembling the turret. One small detail is a seat. Now a wire and foam seat isn’t going take to kindly to being blown up and burnt. So I cut the foam back and seat off. Easy!! Nah took way more time than I thought. But it’s these details that will make or break a project and it’s these details that only crop up as you build. I never took a ‘before’ photo but I did take one just after I started. Then a finished frame. All melted and bent. Note I did start to clean the frame up but then thought ‘why’?
You can see I removed the seat covers and replaced them with mesh. I haven’t been real fussy with my cleaning of parts or glue. I want it a bit rough!!
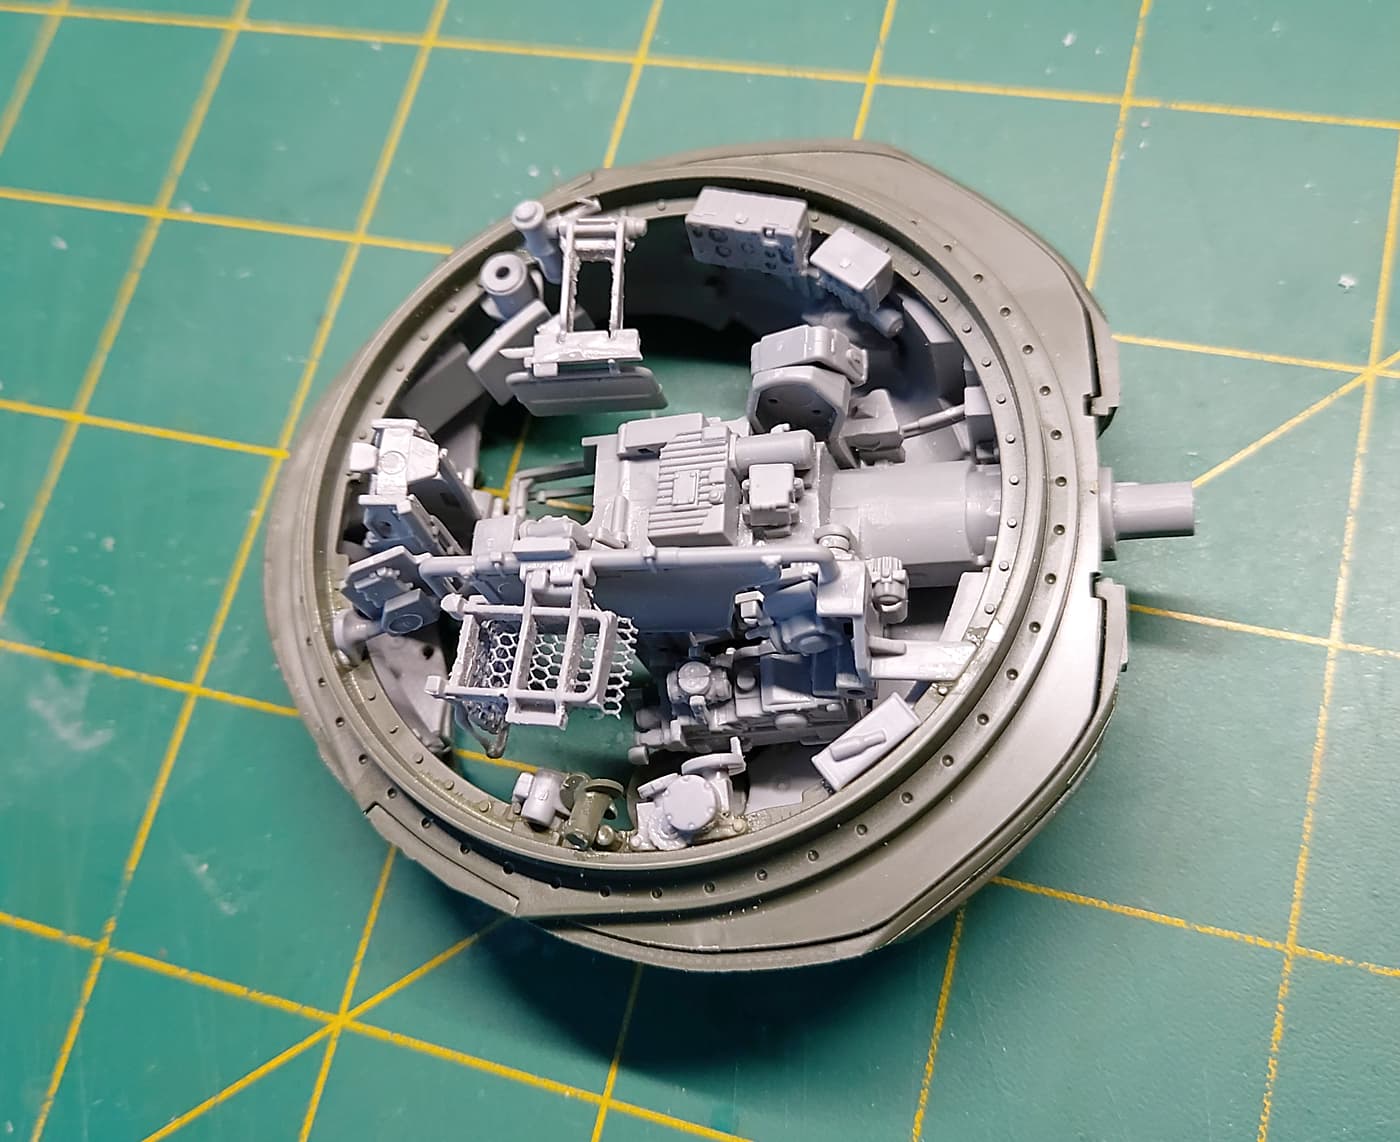
Dry fitted. Just to get an idea of how I will have to approach the painting.
Most of the images I have looked have the turret ‘relatively’ intact.
As a side note - I have found the Amusing Hobby instructions very vague and parts don’t have really defined locations.