I’d be reaching for ‘Mr. Surfacer 1000’ on my workbench. It has about the right consistency to drip from a cocktail stick into the grab-handle holes… might take a couple of applications depending on depth. After final curing, it is sandable. … I’m not familiar with the other grades, though. HTH.
I was thinking superglue for ease as I have it to hand, though my local model shop (North East Model Centre) carry both Mr dissolved Putty and Mr Surfacer in a few different grades. I might try the super glue first but get some dissolved putty in future.
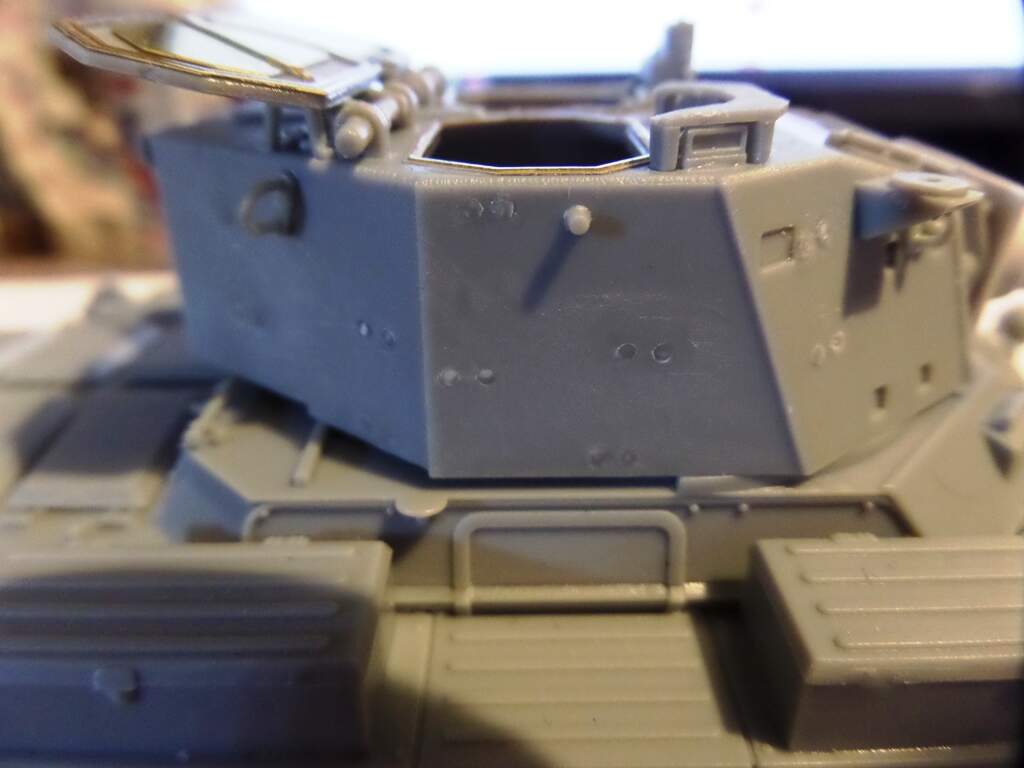
Can you take the turret loops off, fill the holes in, drill smaller holes and start again?
That has to be easier than trying to fill and clean around each side of the loop.
I once had a bathroom where the plaster was cracked. I wanted nice smooth walls so I began a tedious job repairing the plaster. By the time I was done, I realized I would have had a much easier time just removing the drywall and putting up new drywall. Lesson learned.
2 Likes
After having a closer look, I tend to agree with TopSmith. I think some grab-handle scratch-bending could be in order. There’s a really good tool for that: ‘Grab Iron Bending Gauge’ at the Micro-Mark.
Note: I have no affiliation with any vendors.
BTW: Your build looks really good!
—mike
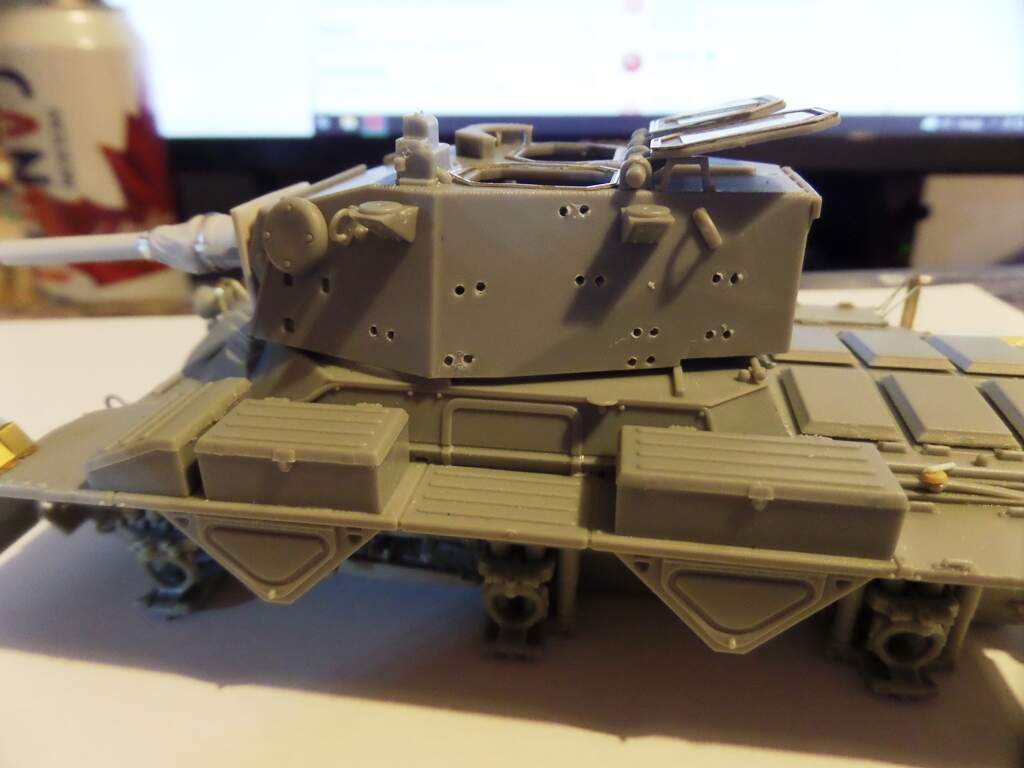
Max this is really coming along nicely. I have one of these in the stash along with resin replacement wheels too. Sucks about the handles on the turret but I’m sure you’ll find a way. Where did you get that replacement barrel? I must have missed it in one of your posts.
I was thinking of taking them off and starting again, Though with everything else fitted I’m bound to break something. The barrel and update set is from Scorpion Miniature Models and includes a new exhaust and heat shield, smoke grenade dischargers and lots of other stuff. I’ll have a look at that grab handler tool.
2 Likes
Get some Mr. Surfacer 1000. Use a small brush to fill in all the holes with it. Don’t worry about getting it on the turret. You’ll be cleaning it off later. Clean the brush in lacquer thinner. Wait for the Mr. Surfacer to dry, and re-apply as necessary (it shrinks). When the holes are gone, don’t sand! Clean away the excess dried Mr. Surfacer with a cotton bud or small brush wetted with lacquer thinner. This gives you a perfectly smooth finished surface and does no harm to the plastic parts while retaining all detail.
2 Likes
I don’t know how strong Mr Surfacer is if you have to redrill the holes for the loops. It seems like a way to fix the loops without removing them.
1 Like
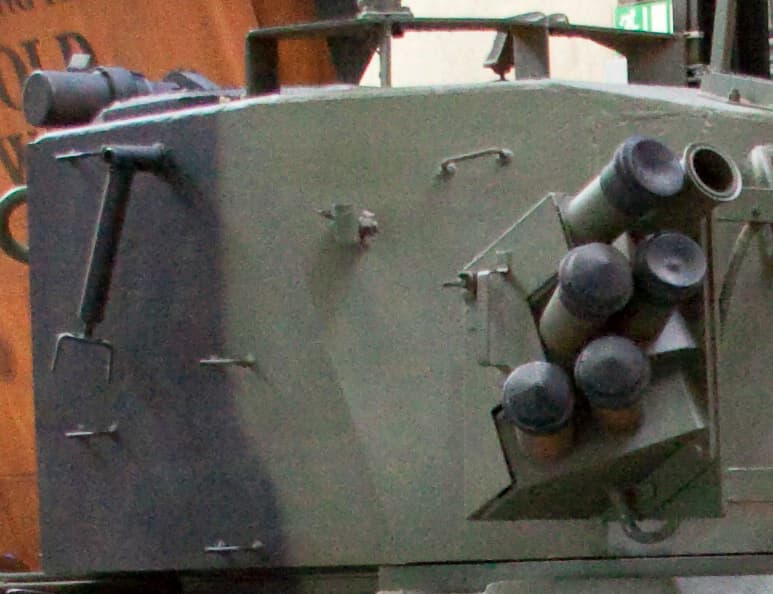
Those loops are indeed horrible. It appears that Dragon did you no favors by having the sprue gates right in the middle of the part. When will manufacturers (AFV Club, et al) learn to put them on the end? Other companies manage it. Plus they’re way over sized. But I digress…
The above works, but I’d go about it a bit differently. I’d hit each loop with a bit of liquid cement and see if I could pull it free first. Then on those and the ones that need to be snipped I’d drill out the existing holes. “Sprue Goo” is great - I like to use it to fill gaps between figures’
shoulders and arms for instance - but sprue goo by its very nature can take a while to set up. I like to stretch out sprue. The stretched out part can be used for whatever you want, i.e. filling in bogus panel lines on aircraft. What I’m after is the thicker tapered pieces at each end. Wet them with liquid cement, and twist them into the holes. Snip, let set, and sand smooth. Often you really only need a chisel bladed X-Acto. The beauty of this is that when you use your #78 or #80 bit for the new holes, it’s unadulterated plastic that you don’t have to wait on to set up. It’s just plain faster IMHO. As for a special bendy tool, I just use my small needle nosed pliers with the serrations. I mark the serration I need with a dab of paint so I’m always using the same one to make my loops. Perfection every time. And I can use that money I saved to buy a beer. Hell, I bet if I looked up that tool I could probably buy a magnum of something with a bit more of a kick to it.
If you do end up using the exiting loops, I’d use white glue. Amazing stuff, that.
3 Likes
![]() And an even faster way: Disregard my way.
And an even faster way: Disregard my way.  Haha! 18bravo, I really like that a lot! … Still like my bendy tool, since it’s already in the tool drawer.
Okay Maximus8425… back to work. 
Cheers!
Well the nice thing for the readers is that they have a heads up on fixing the loops before assembly 
You can also make your own grab handle bending tool for free.
1 Like
Well lots of different methods to choose from, however I think I’ll cut them all off and plug the holes with stretched sprue as 18bravo suggested. The only reason for that is everything is to hand although I will have to get a new set of micro drills and maybe thinner brass rod as the thinnest I have is 0.3mm. Thanks everyone for their input, I’ll probably be buying some of the items suggested in future just to have in case needed on other projects.
1 Like
0.3 mm x 35 = 10.5 mm (less than half inch)
BUT
these loops look like 6 mm (quarter inch since it is British?)
Go with the 0.3 mm drill. Insert the wire loop ends and add CA-glue from the inside.
The CA will get sucked into the oversized hole by capillary action and fill out the difference.
Hopefully it will also climb on the wire and form something that looks somewhat like a weld bead.
If you make the loops from longer wire you can bend the wire on the inside to set the desired fit before adding CA. Press the bent ends of the wire against the turret inside with a toothpick or bit of sprue to hold it in place when adding the CA.
1 Like
You may have to use oversized handles just because the actual are so thin in 1:1.
1 Like
As TopSmith writes: 0.18 mm might be so thin that it becomes almost invisible …
Adding to Robin’s technique, cut a strip of plastic the right width and thickness to fit under the loop and use it as a handy gauging tool when gluing the new loops! Put the ends of the wire in the holes, slip the plastic gauge under it, press wire & plastic against the turret, and glue from inside. That way all your loops stick out the same amount! (Old trick for adding those ladder grabs on the ends of US locomotive models…)
1 Like
All good information and techniques for myself and others to use. I was thinking of using 0.3mm or 0.5mm wire for the loops because as has been mentioned they would become nigh on invisible and also be extremely fragile when handling.
1 Like
Brass might cave in a little if you’re not paying attention and press into one, but that happens on the real thing as well, so it could look cool if you squash one or two. I’ve used both brass and thin piano wire. The piano wire is steel - no danger of accidental bending there. Don’t worry, these won’t disappear. As I said, I like to use #80 drill bits, which works out to .0135 inches. For better or worse, I replace the footman loops on every single Centurion I build. Very time consuming but well worth it.
Model railroaders are such sticklers for scale appearance the aftermarket companies actually tell you the thickness of their metal handrails both before AND after painting. Something to think about when choosing wire thickness.
By the way, footman loops use the same techniques above with the addition of the little tabs that get welded to the turret.

3 Likes
A #80 drill bit is 0.34mm so call it 0.3, I can’t work in Imperial it hurts my head  . I’ll have to get a few me thinks as most other times I’ve used bits that small I’ve ended up snapping them. I’ve cut off and drilled out the old loops completely and plugged the holes with stretched sprue. I’ll let that dry well before trying to drill it again. What thickness is the piano wire you use as although my local model centre stocks it they only go down to 0.5mm.
4 Likes
That looks good. I get the thinnest I can find. Not sure of the diameter but it fits into the #80 hole perfectly.