Many thanks Dave.
Amazing model Angel!
1 Like
Have been quite busy in the last couple of days so not much possibilites to answer feedback and questions- sorry.
John, thanks for your encourgement.
As they say- a picture is worth a thousand words 
My place of duty was the radiomen compartment, but it also happened that I occupied the HQ compartment- the banks there were so uncomfortable for sleeping, that we preffered to take our off-duty sleep in the open air(providing weather allowed it).
Matt- thanks!
I know I went- like once Peter(petbat) said- over the top with this build, but I have a soft spot for this particular vehicle.
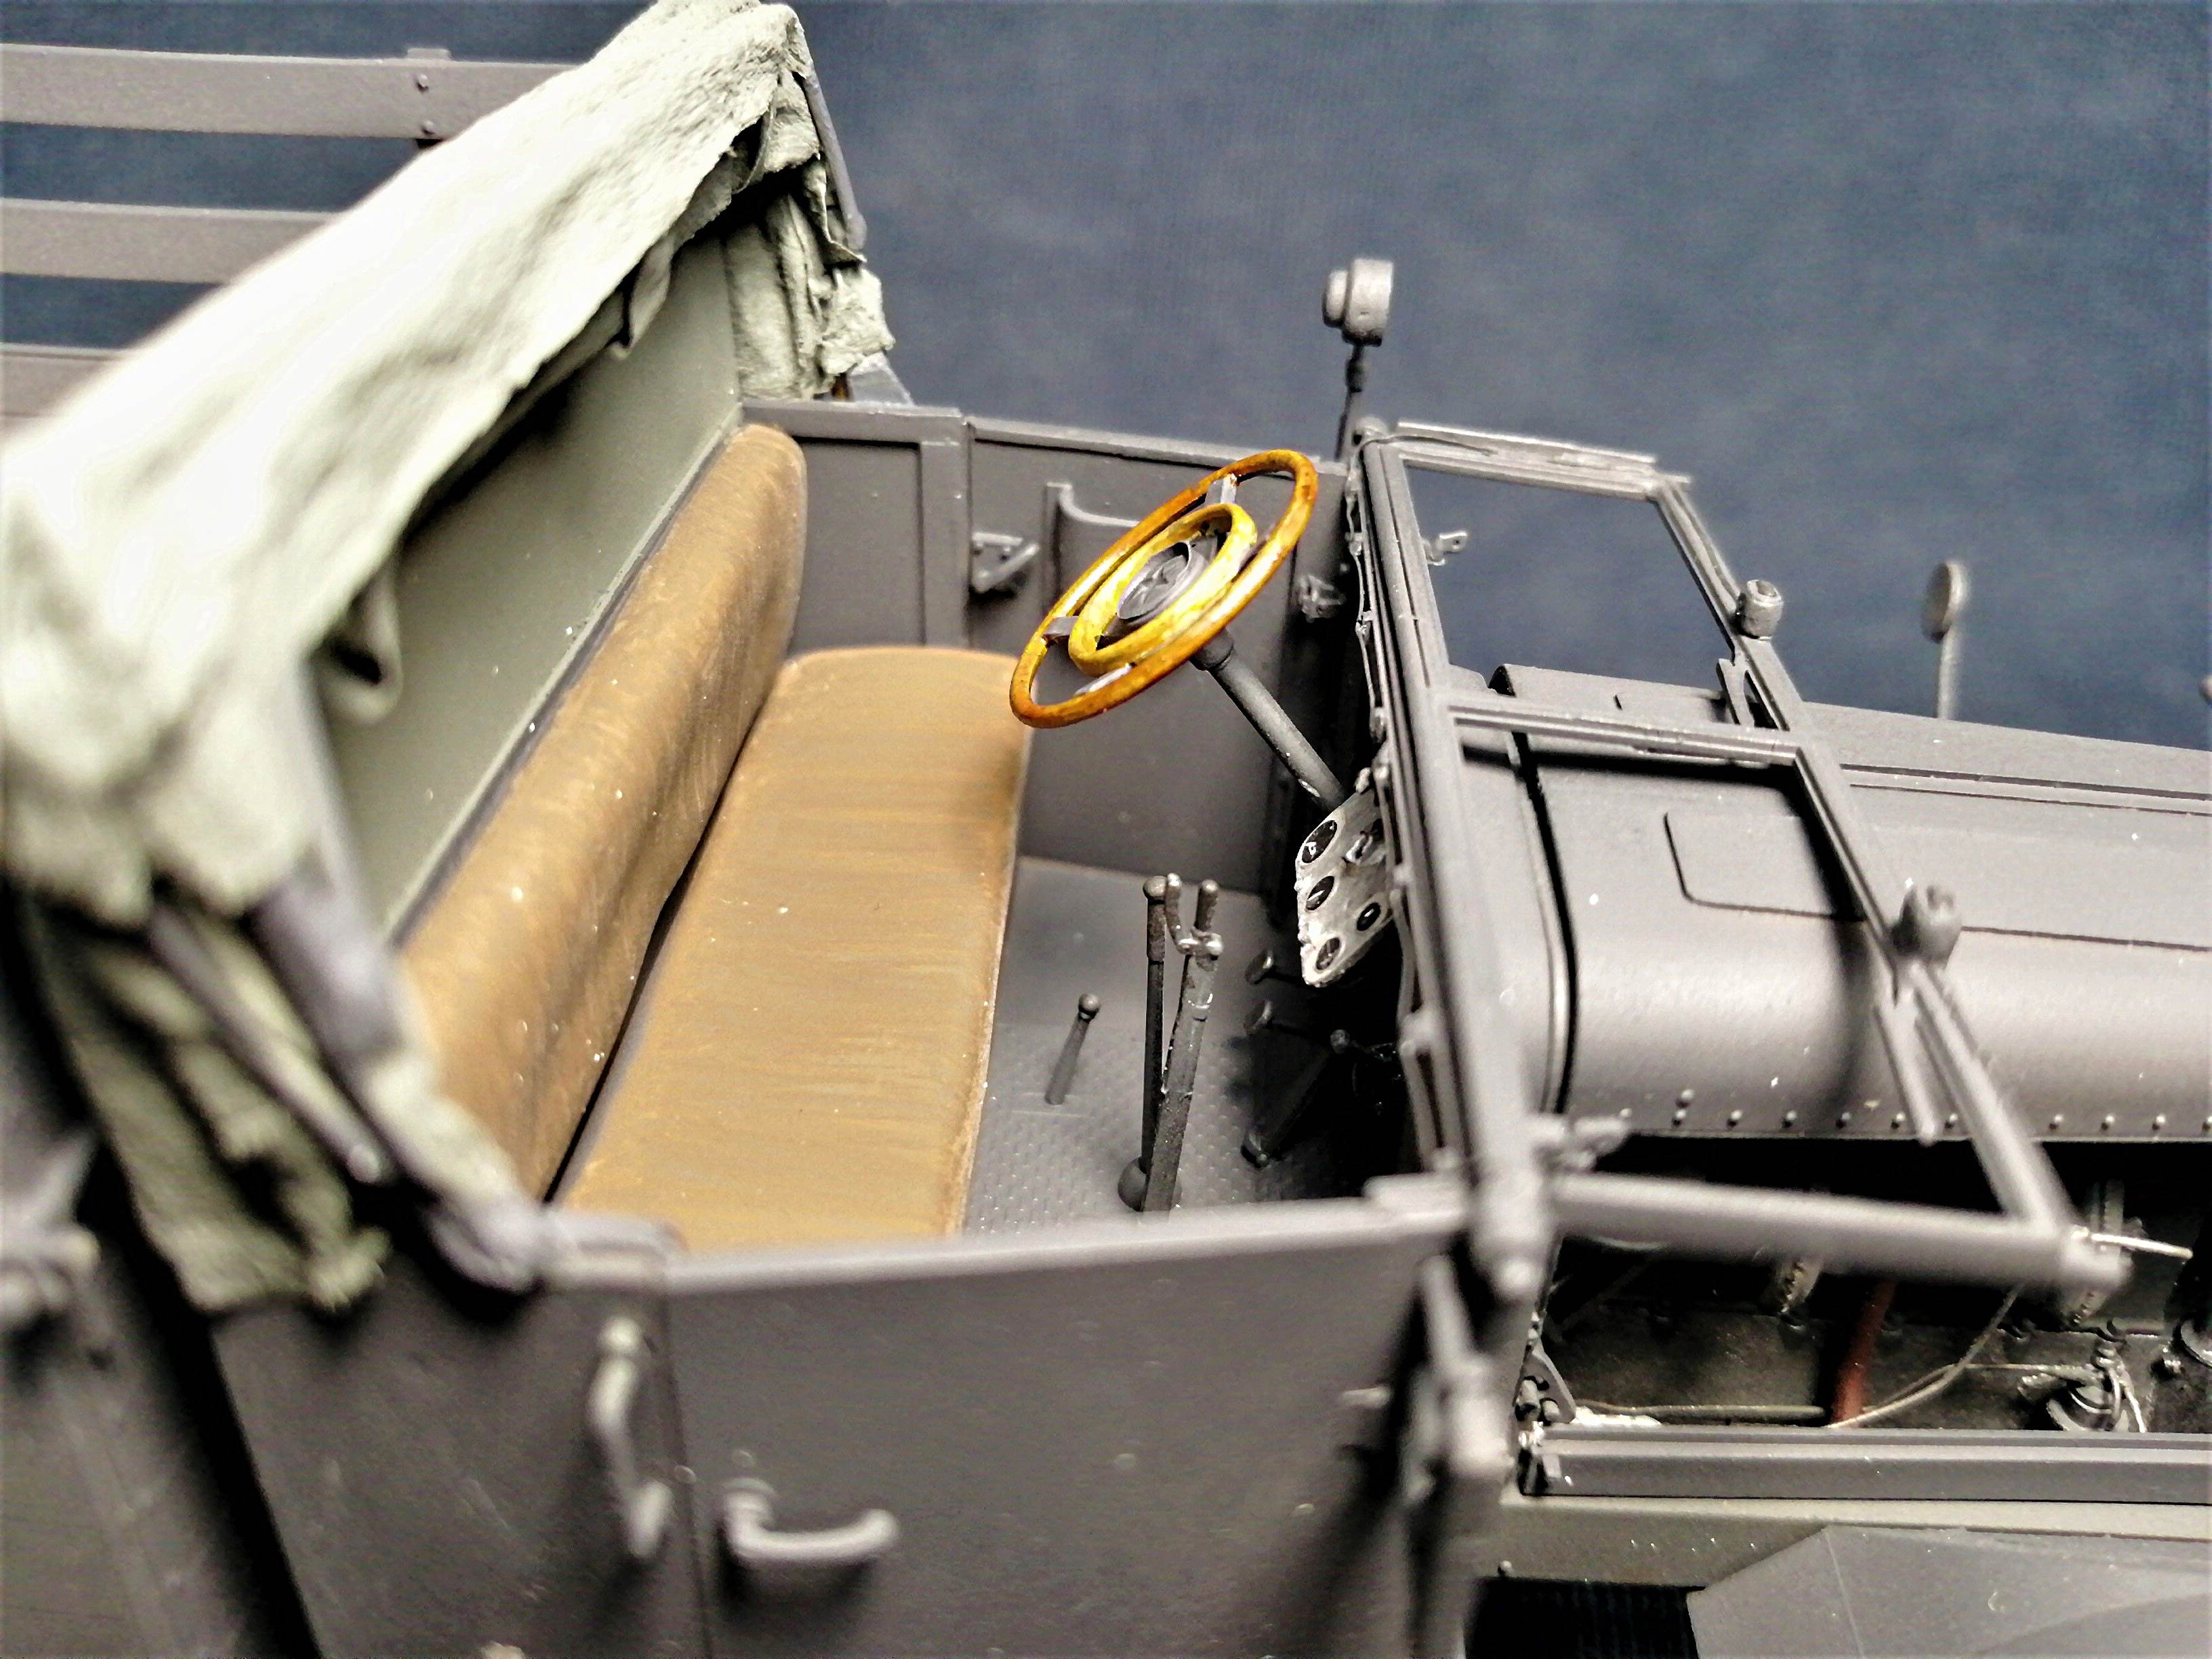
About the woodgrain- I use a simple recipe, found 3 years ago on the web:
1.I spray some dark yellow base colour(Tamiya’s Dark Yellow 2 in this case).
2.Using a heavy worn out brush( and I mean a heavy battered brush, with bristles bent outwards) I add a mild brown grain in paralel strokes, taking care that the brush only touches the dark yellow with these bent outwards bristles.Best solution here is to use oils, but I have succesfully used AK(Vallejo or MIG would also go) paints-the pro is quick drying time, while the contra’s are difficult correction of mistakes and possibility that the grain gets destroyed during next step.
3.Last step is adding some clear orange or yellow. I use Tamiya for this step and have both sprayed and brushed it in various builds.Here you can play with:
paint dilution- like adding blobs of undiluted paint with the brush to places of interest after colour was sprayed, or getting different depth of orange by using different dilution ratio,
air- or handbrushing the colour- especially if using AK/Vallejo/MIG type of paint.Airbrushing it will give a uniform coverage and allow the woodgrain to show through.Handbrushing might erase the woodgrain but still will leave a hint of brown in the finished detail,
-using yellow or orange clear, the orange clear gives a varnished finish, while yellow clear results in a wooden surface, that looks like untreated (having said that, I usually use orange clear).
Bellow some examples in various builds I’ve done through the last couple of years:
Tamya Dark Yellow/AK Wood Grain/Tamiya Clear Orange handbrushed (SKP-9MV build):
Tamya Dark Yellow/Abt.502 Oil/Tamiya Clear Orange sprayed and then undiluted blobs of Clear Orange added with brush on random places(Henschel 33D1build):
Tamya Dark Yellow/AK Wood Grain/Tamiya Clear Yellow sprayed(Opel Blitz Kesselkraftwagen build)
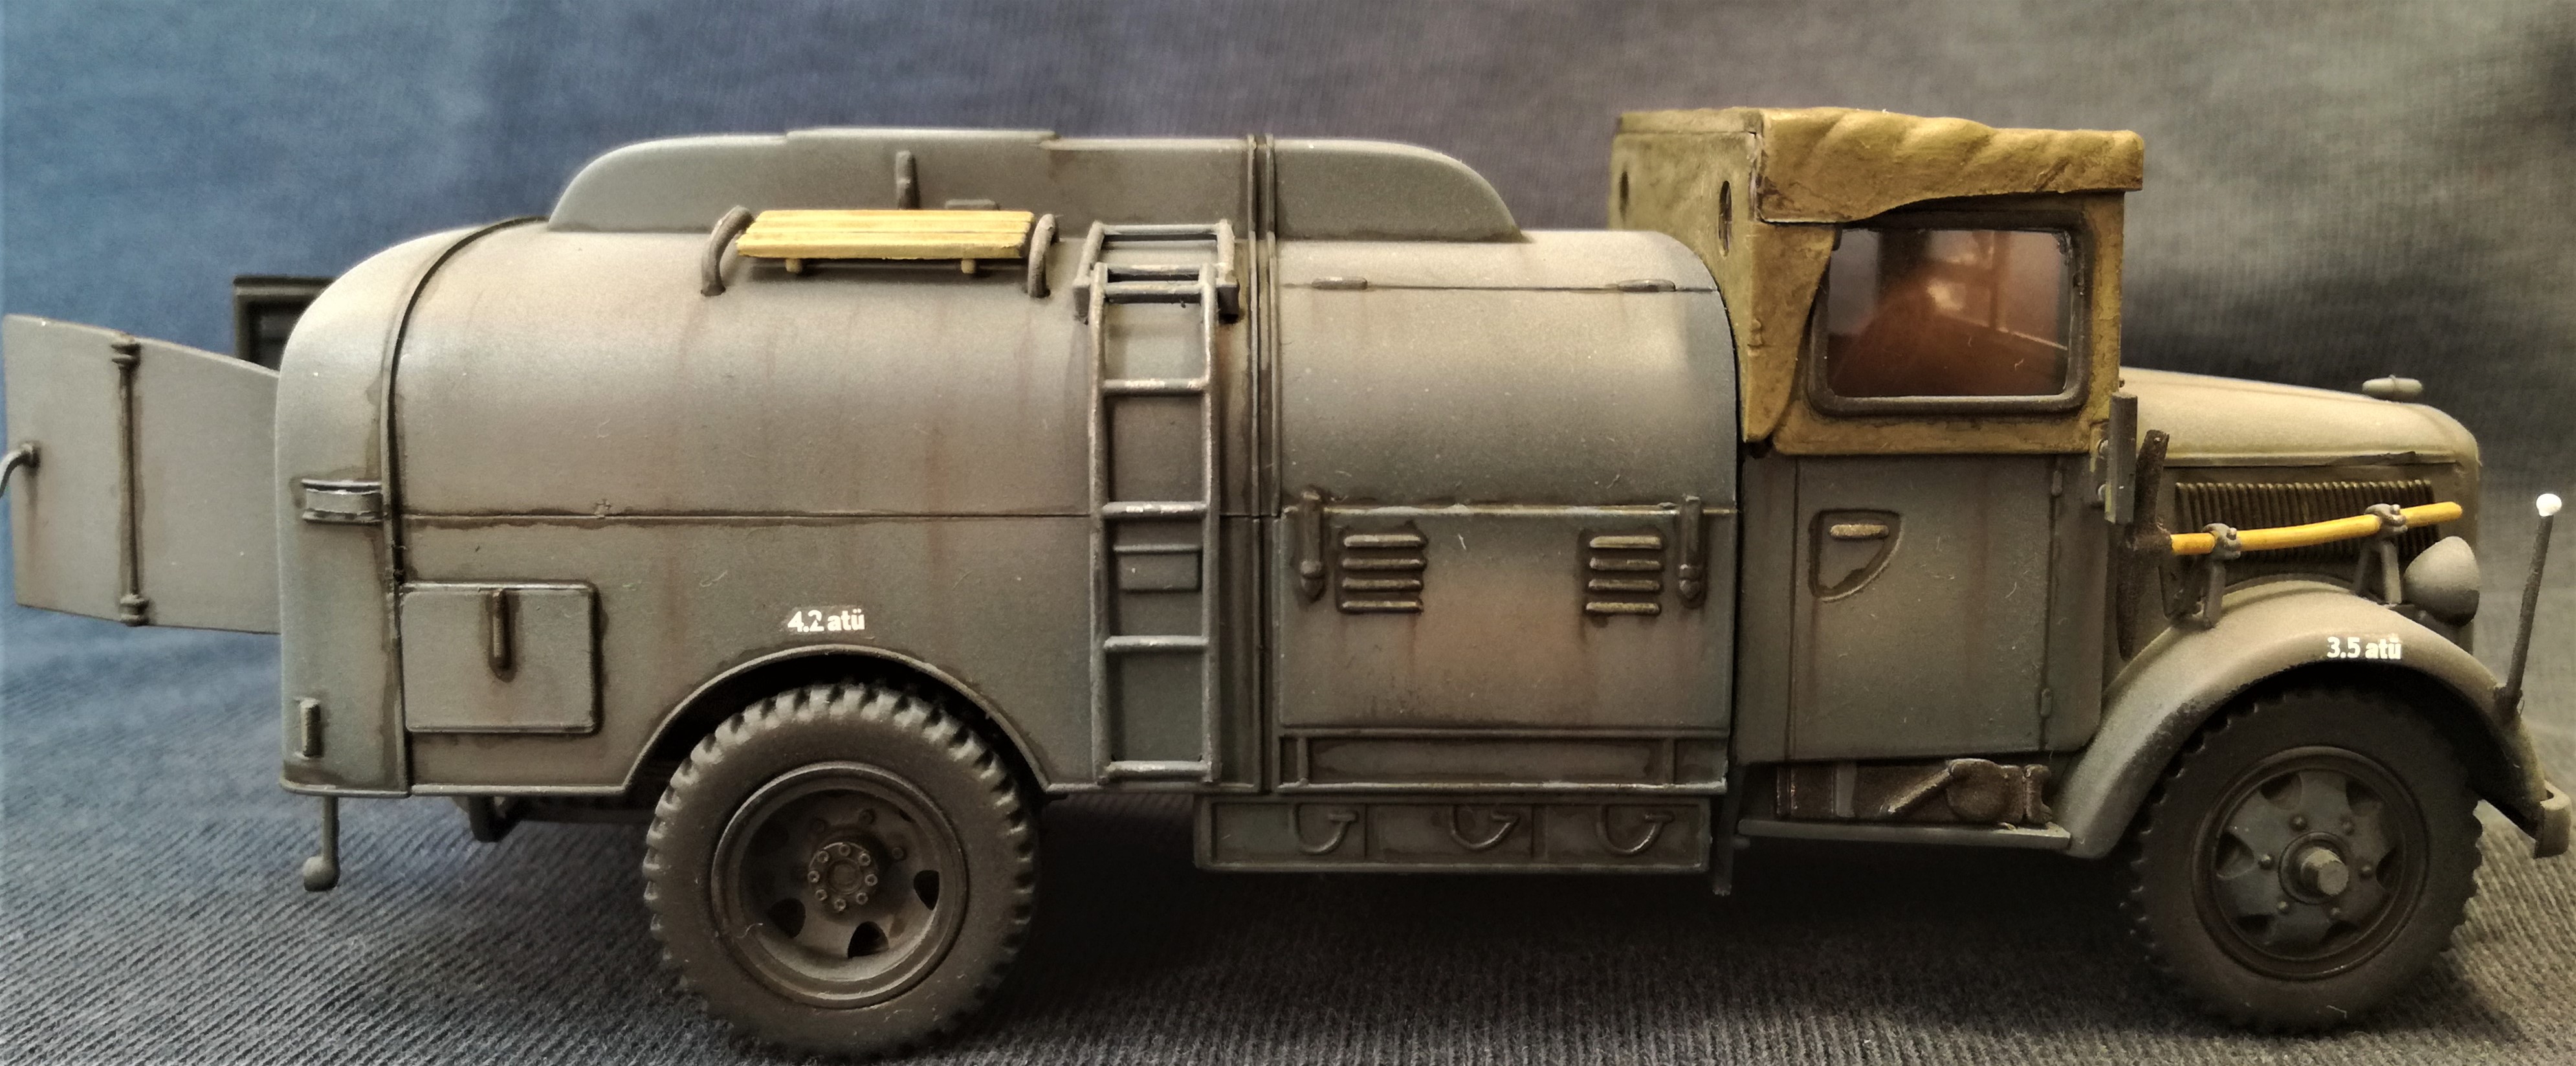
I’ll probably go with handbrushed Orange Clear in my Deymos.
Mark, thanks for your kind words!
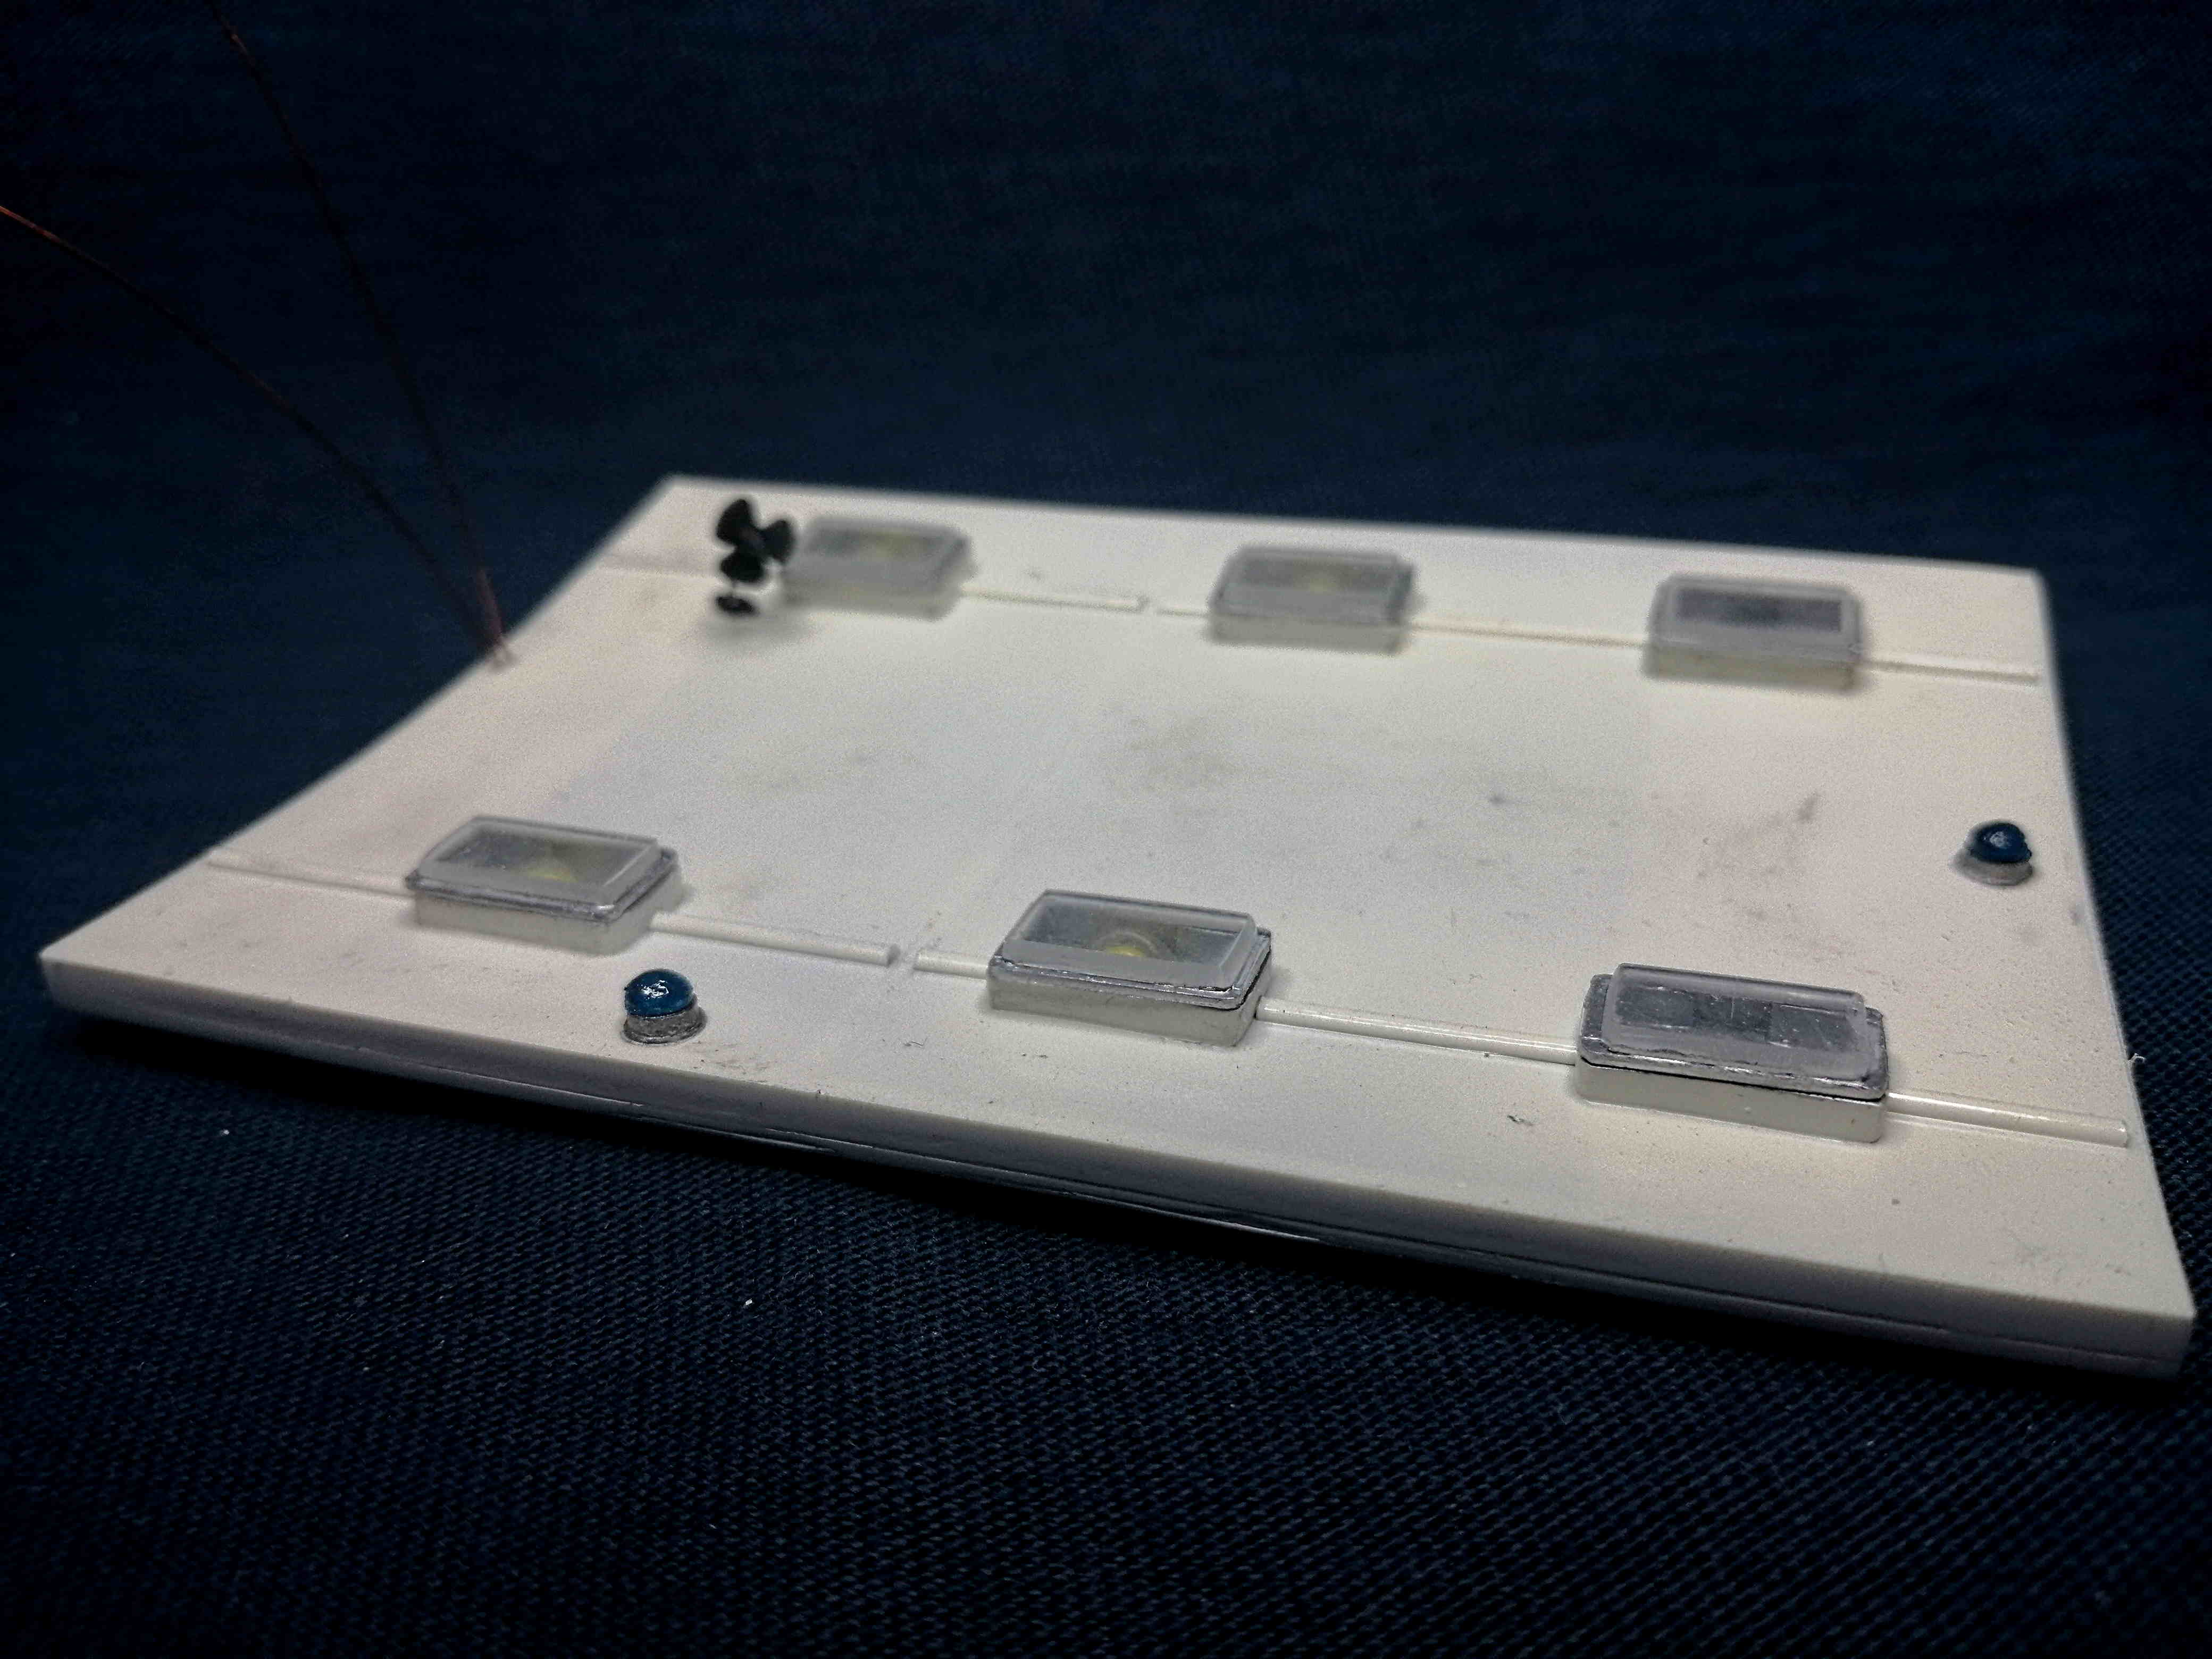
The roof won’t be removable, but with LED lighting(2 LEDs for each compartment), 2 open doors and 2 windows, I think a lot of the interior will be visible.
Peter,
You said a lot with just 7 words- as usual! Thanks, mate!
Dave,
Thank you!
Cheers,
Angel
4 Likes
Brian,
Your Land Rover dio is simply splendid in all details and by all means!
Like the story behind it- a true Golden Memory!
Extremely well done, sir!

1 Like
Angel, thanks - probably not my finest hour (viz the alcohol and upsetting my Chief Clerk sufficiently to be left behind(!)
I’ve been following your build too and am amazed at the scale features; what’s more you are really providing a tutorial in extra detailing so well done you.
Keep it up!
Brian
1 Like
Some great tips there, thank you Angel… I particularly like the steering wheel… Looks great.
It’s part of service life to upset superiors, although often this hurts😉
While operating a switchboard, I was given 15 days lock-up by the CO, for repeatedly failing to hear his request for connection😁
My failure was not intentional, for I have spent the entire day before firing live RPG rounds, that were about to expire, and I couldn’t hear anyone speaking to me at all😁
Not that I served those 15 days lock-up(we were only 2 guys covering 24 hours of switchboard operation…), but I did fire a lot of expiring RPG and 7,62 mm AK-47 and PK rounds during my rest shifts instead.
2 Likes
Angel, thanks so much for the woodgrain tips. I’ve never tried anything like that before to simulate wood. I’ll have to give it a go next time.
1 Like
Impressive! Very nice work. 
Thanks Freddy, very kind of you.
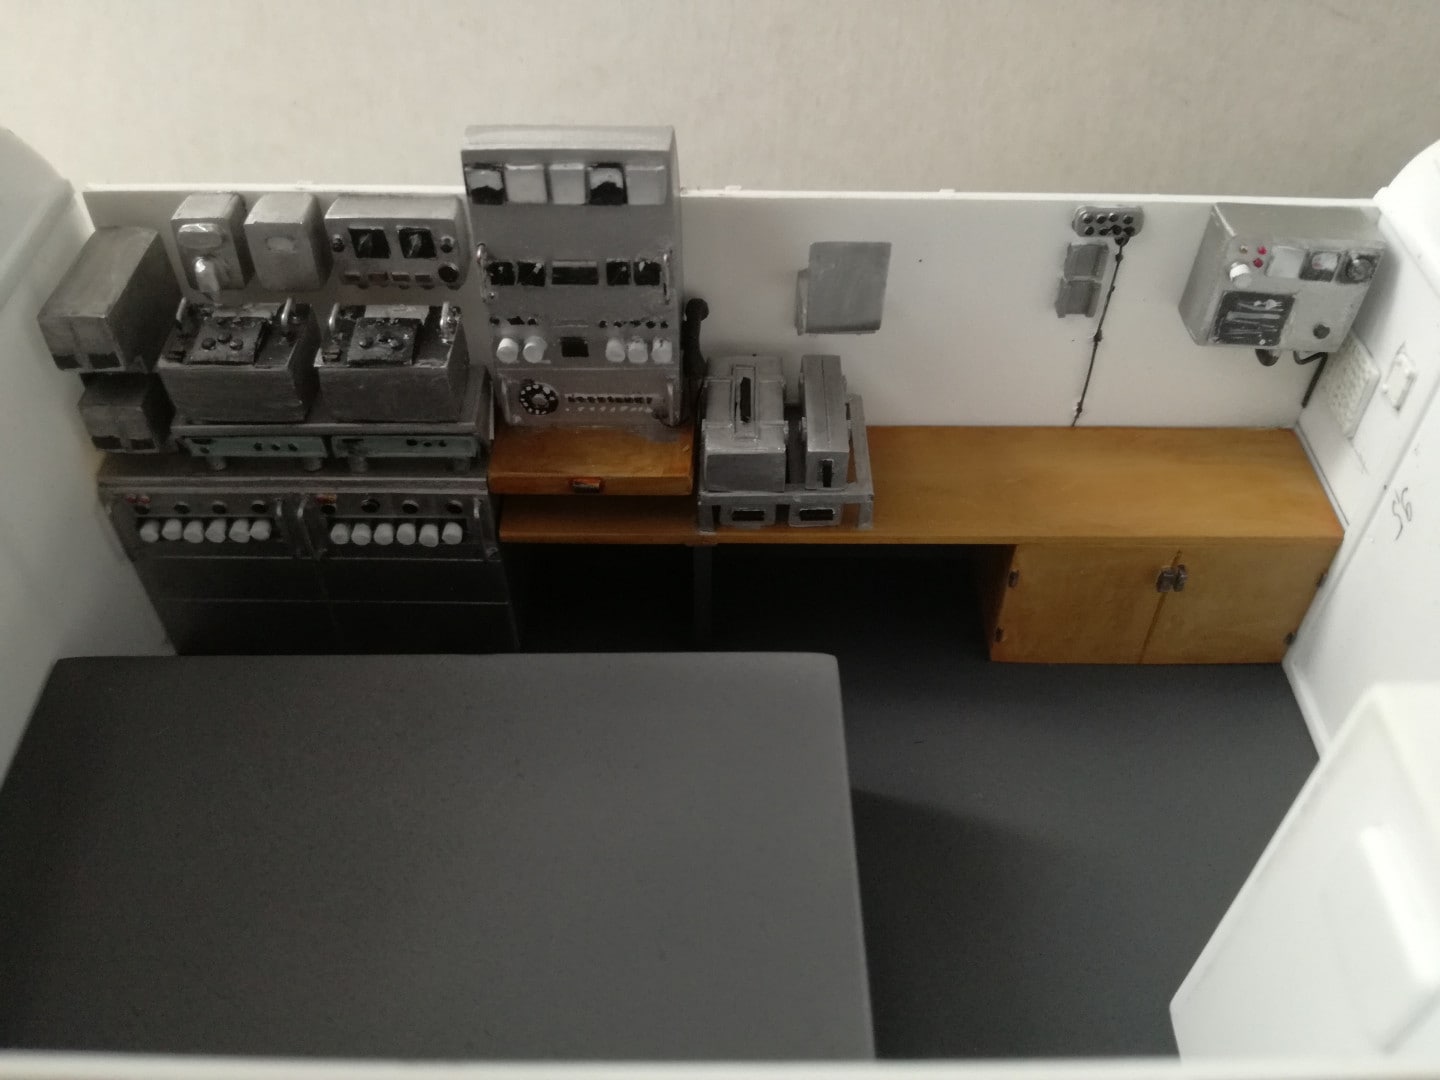
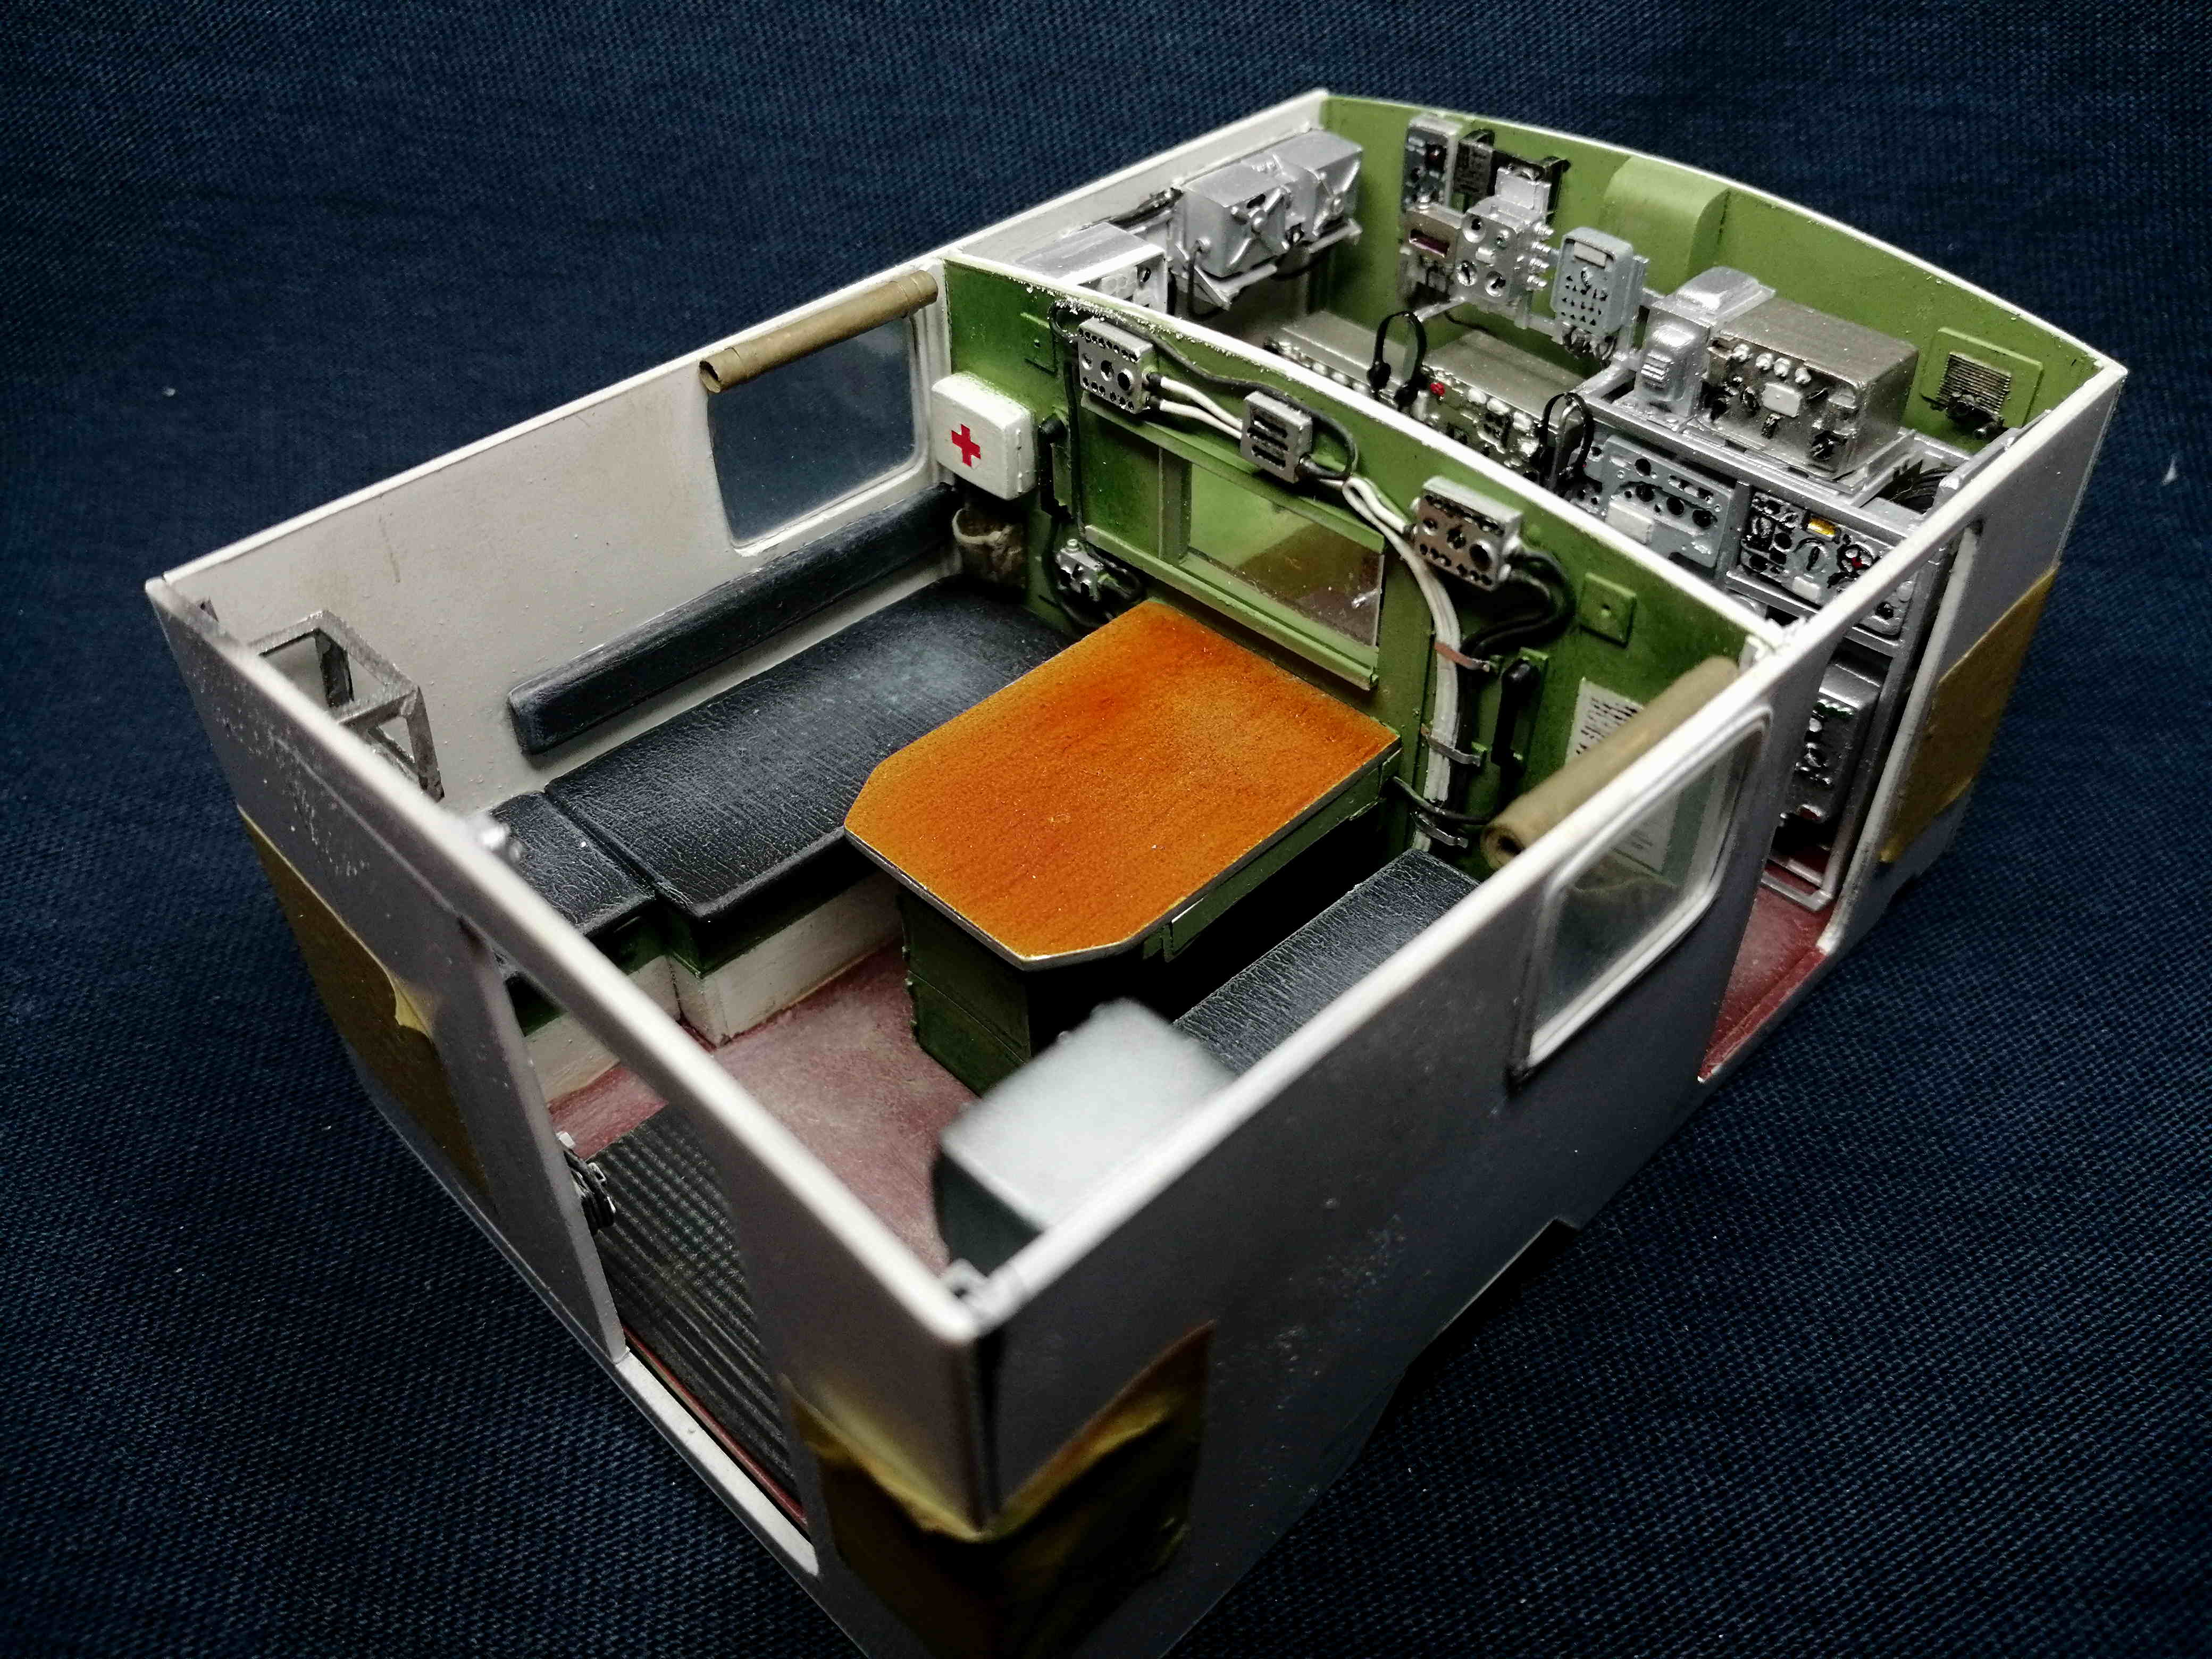
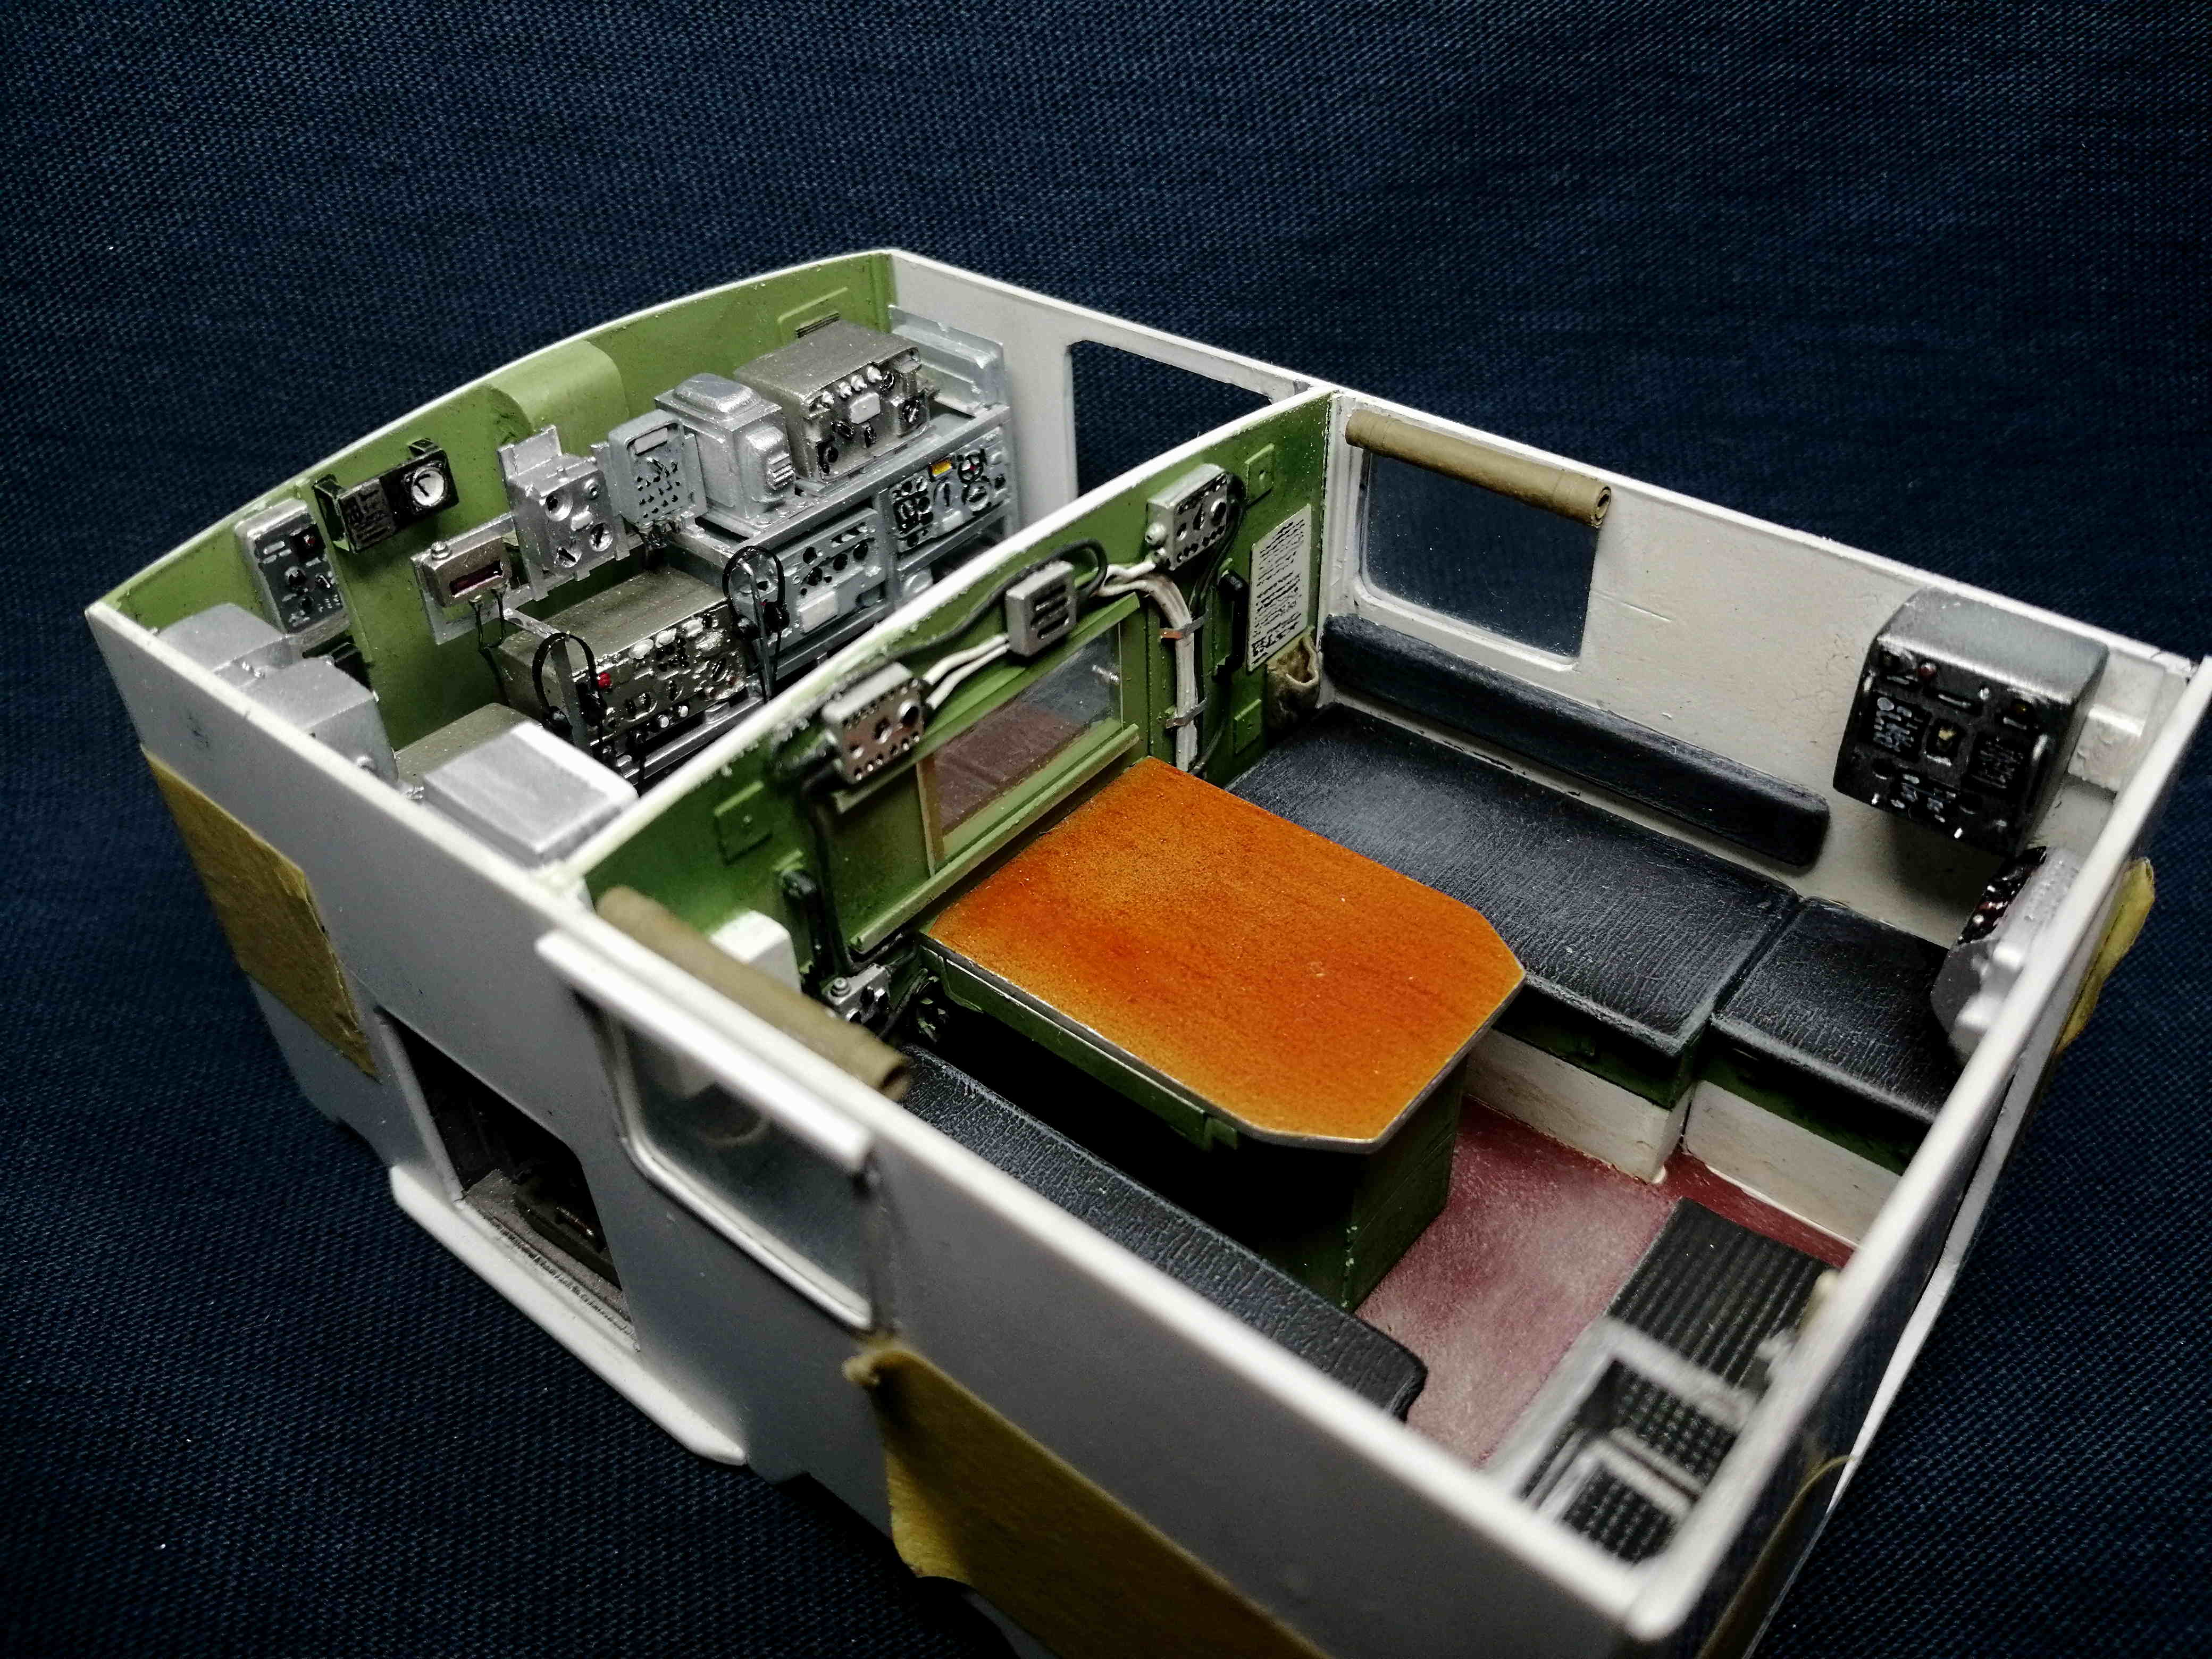
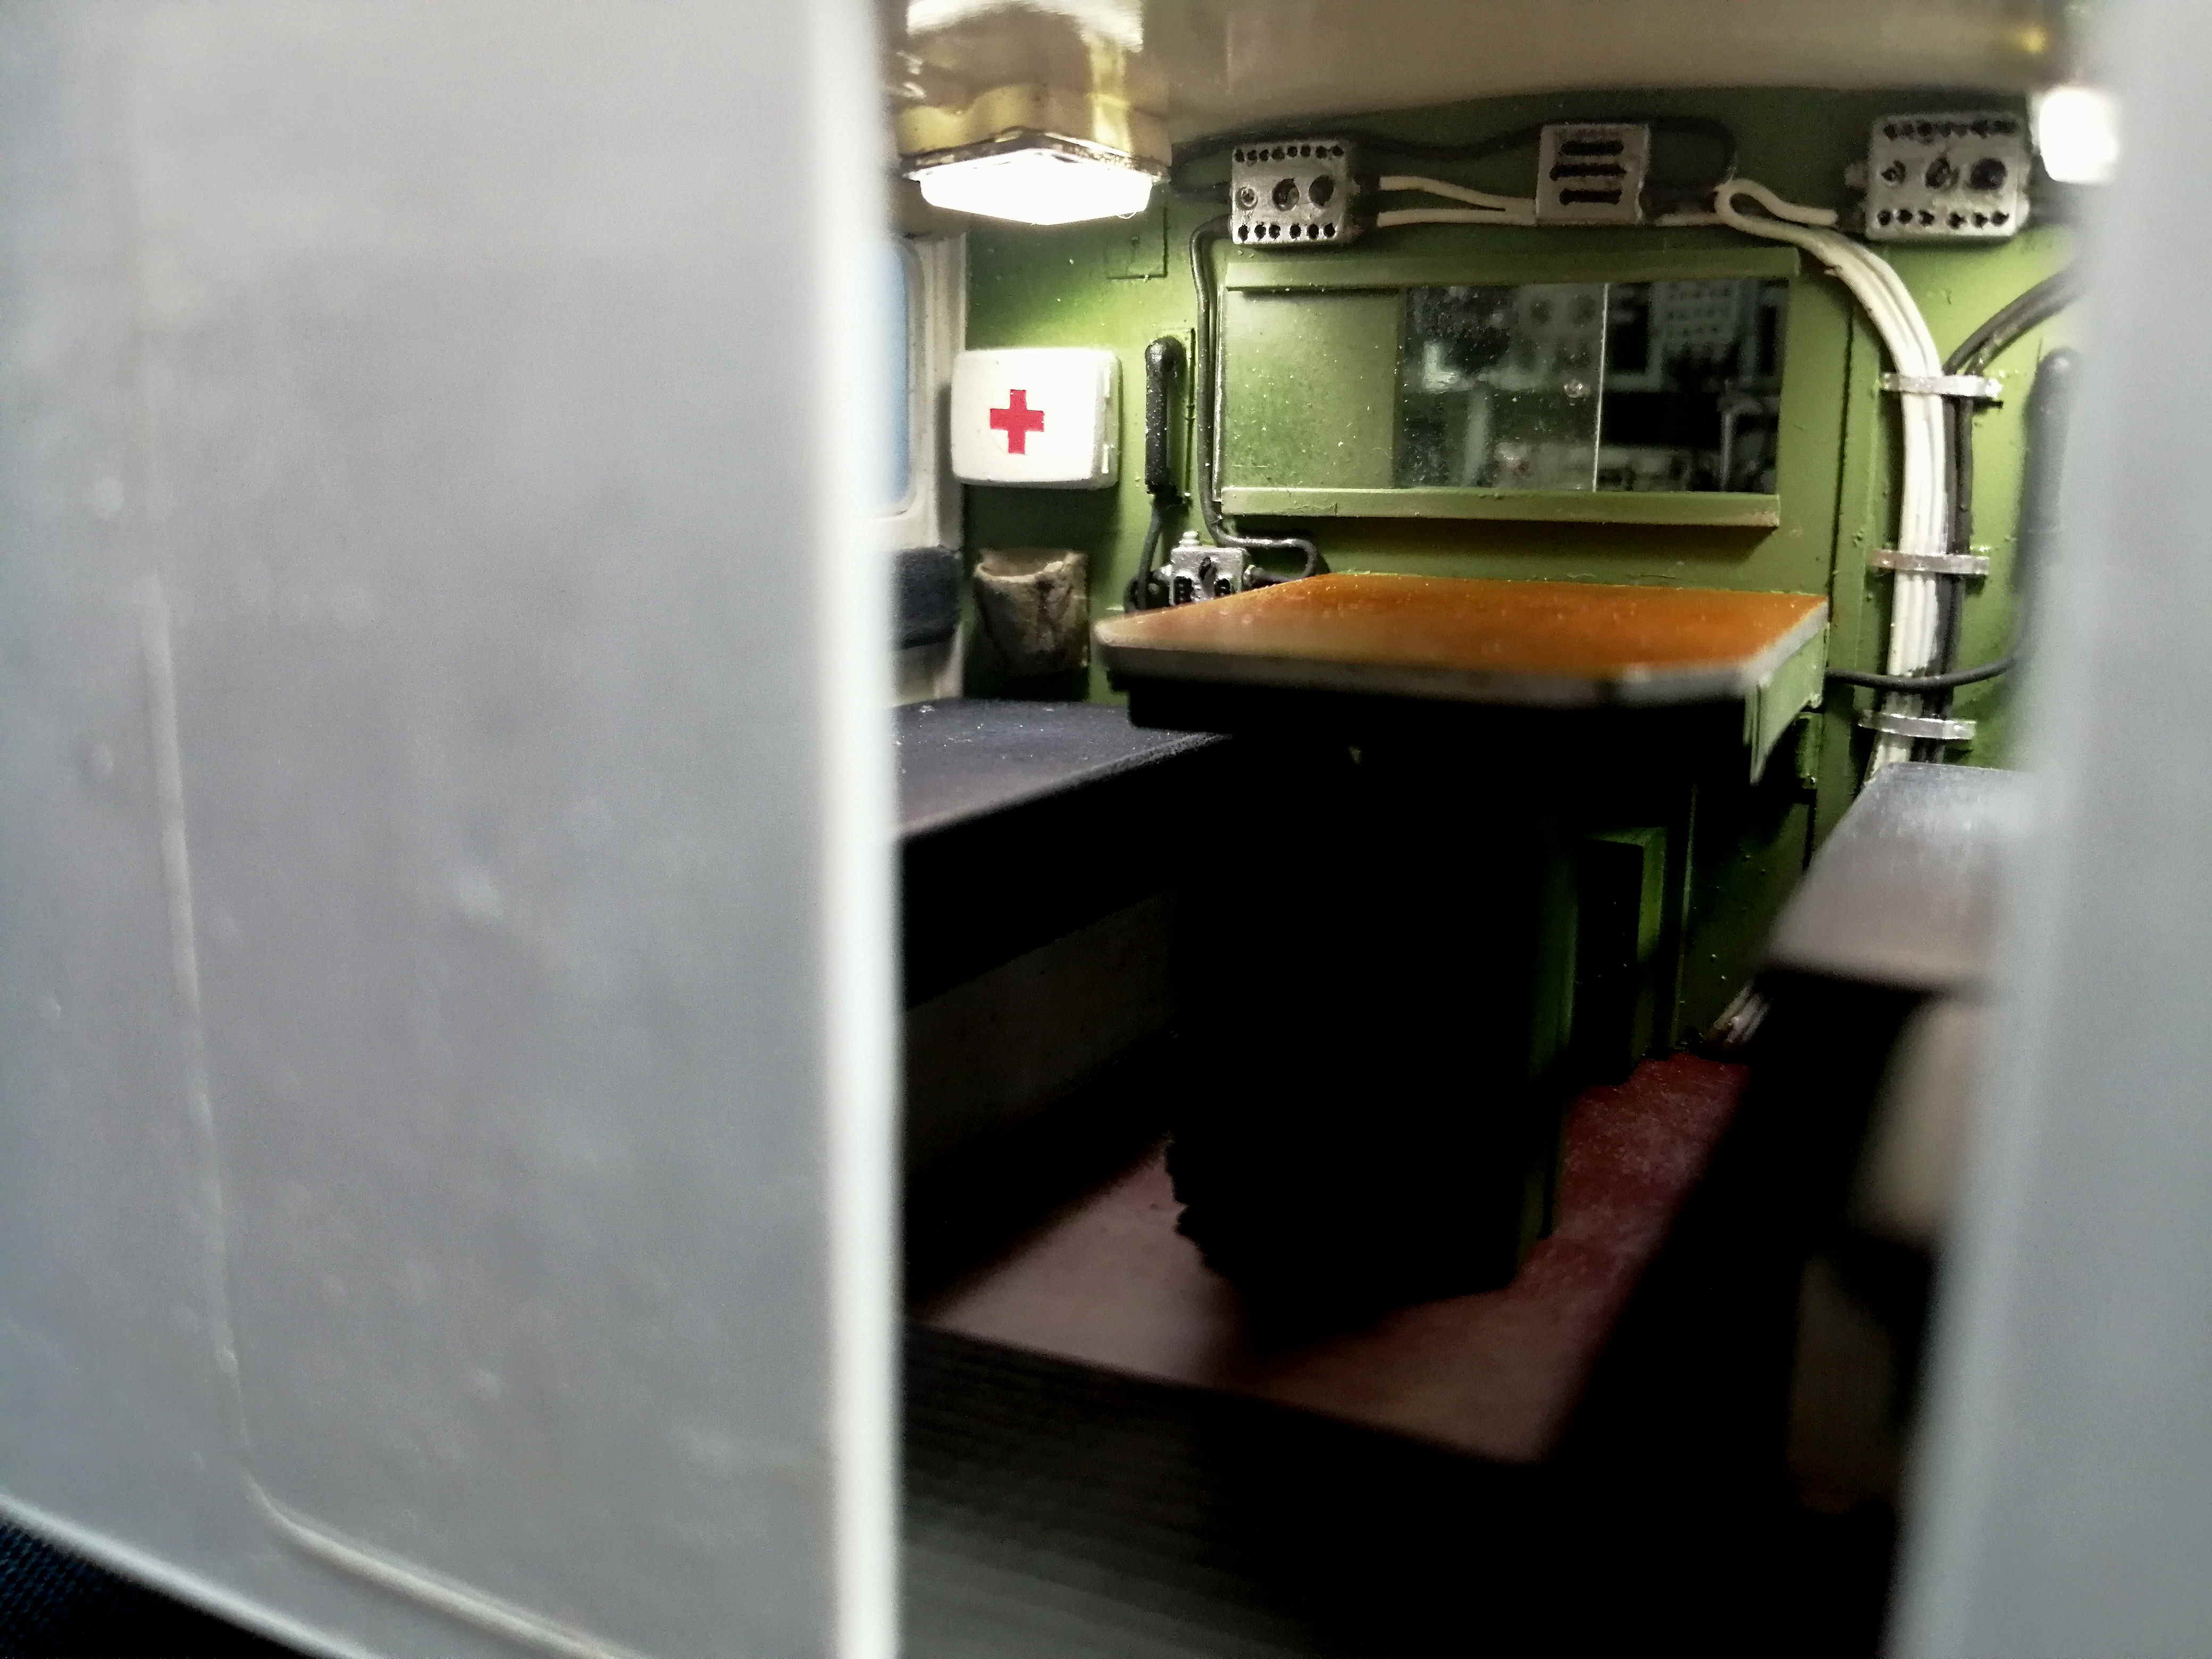
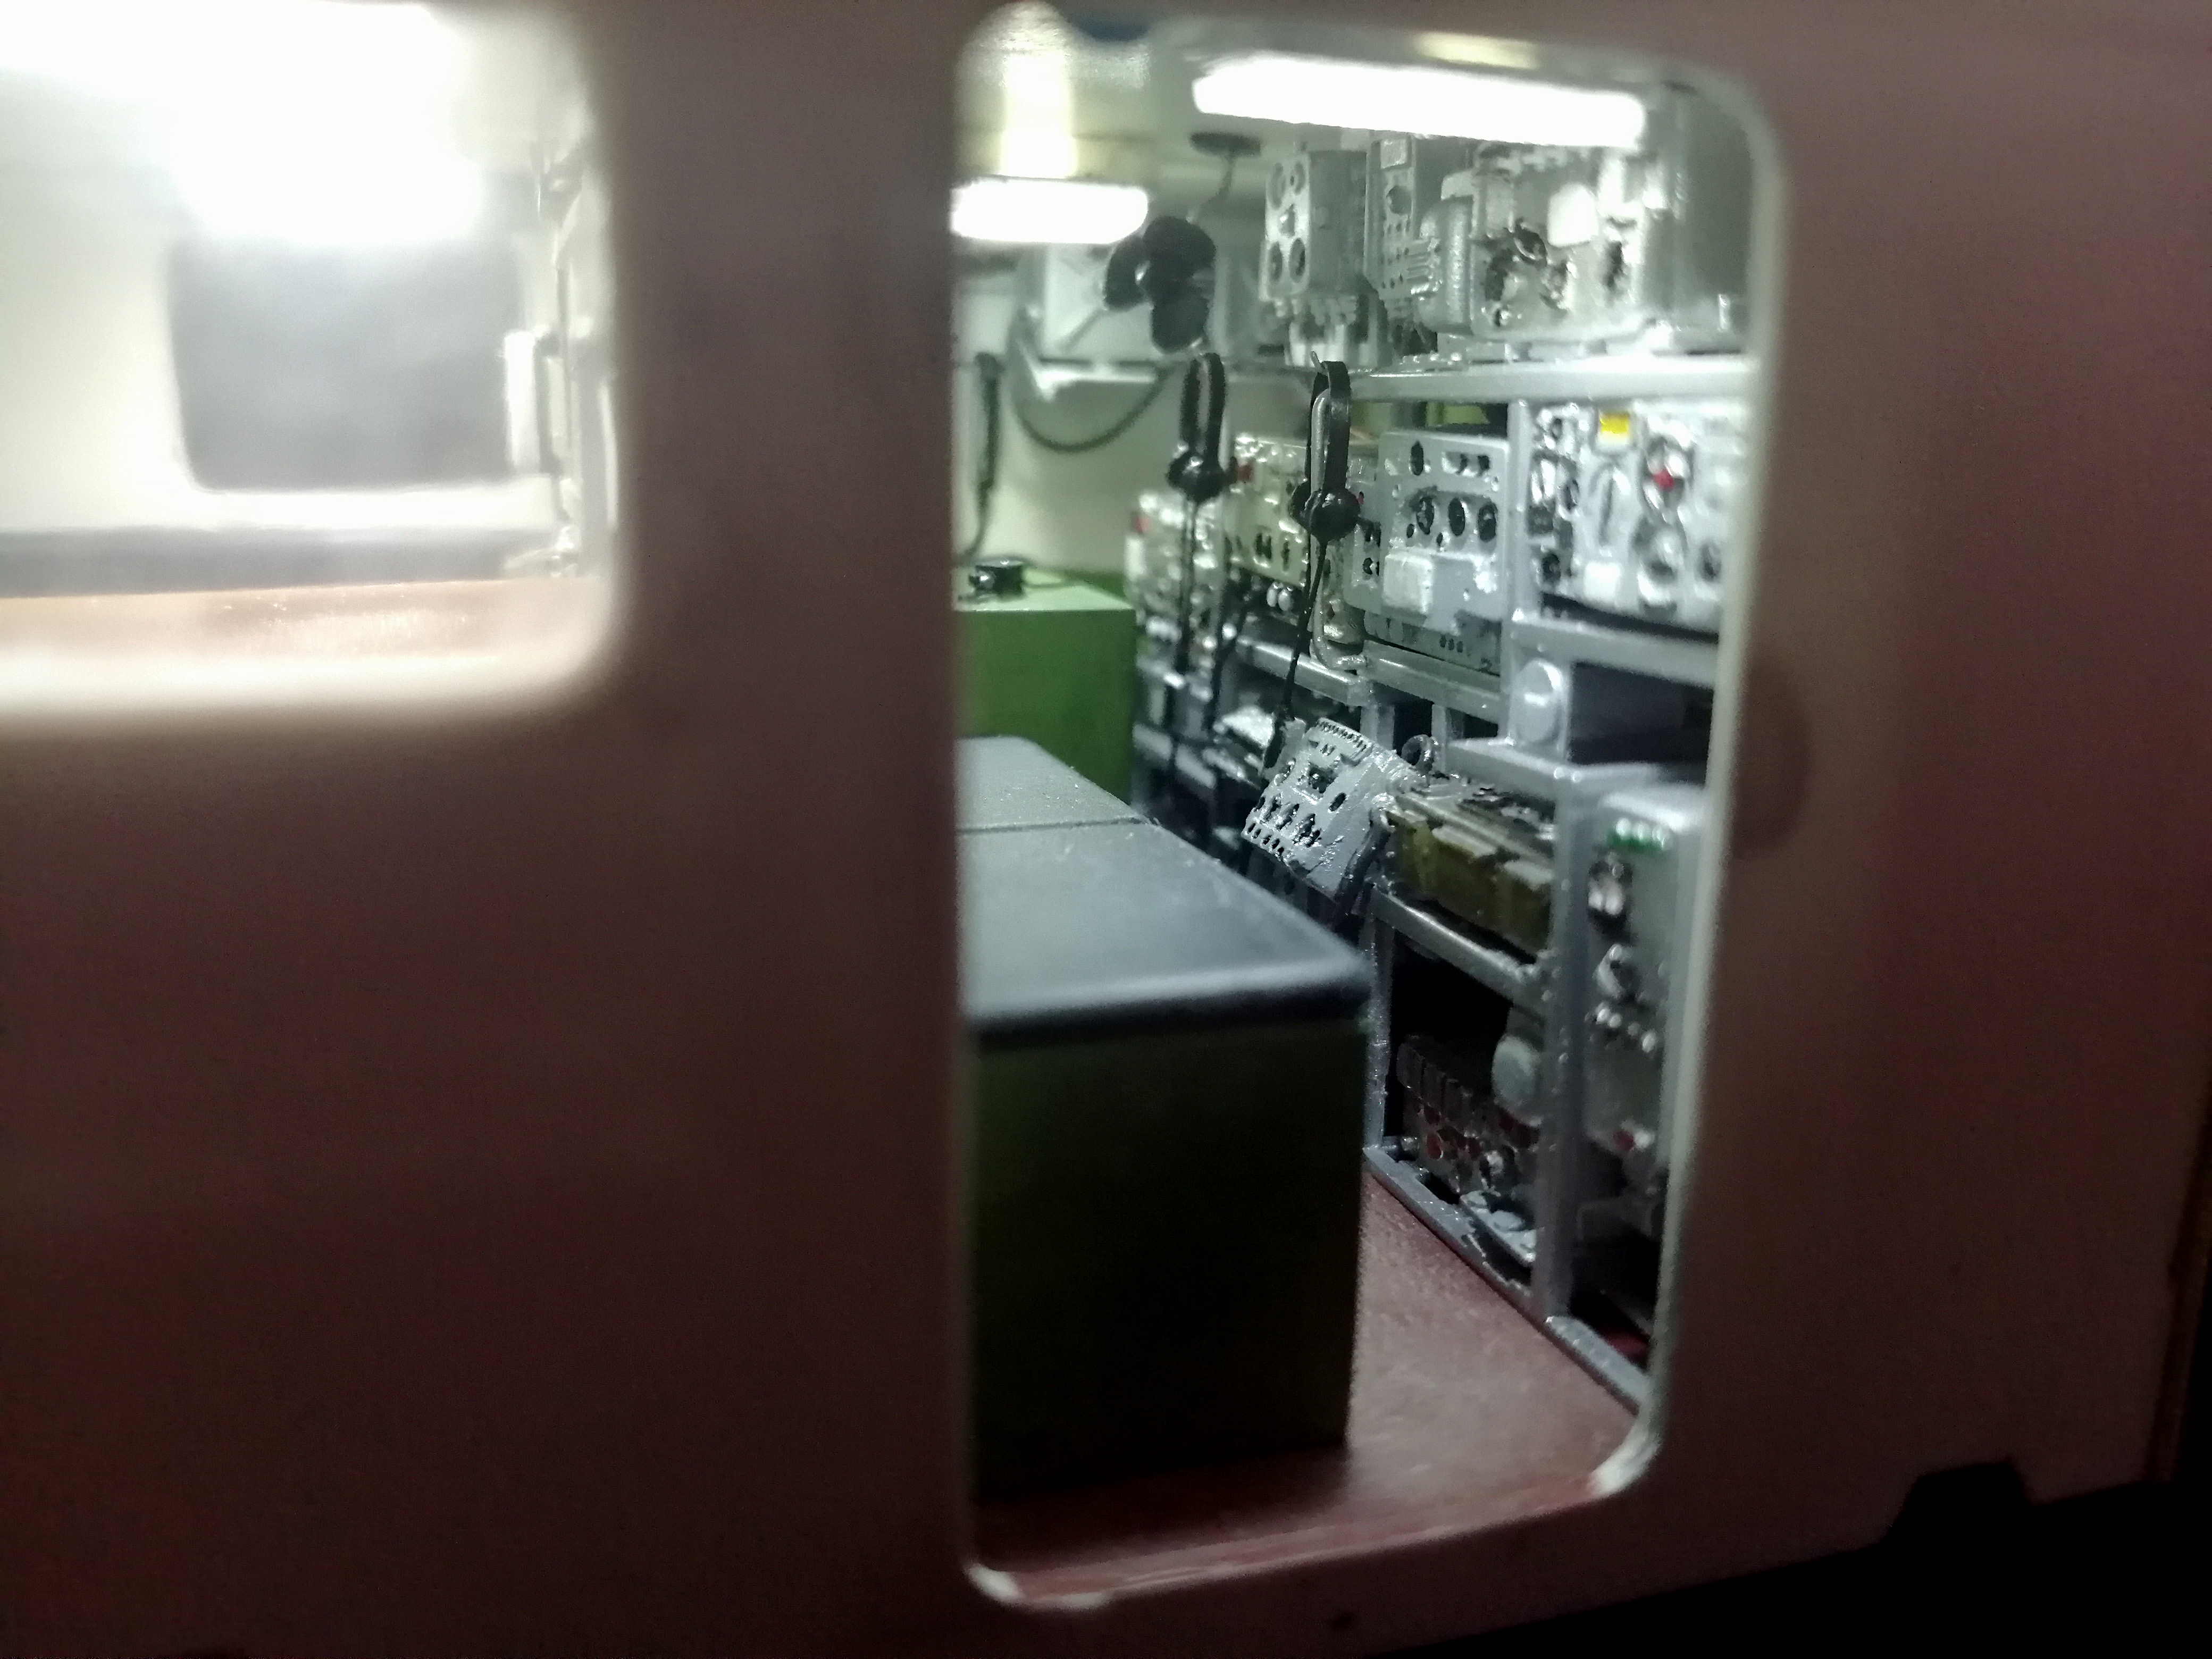
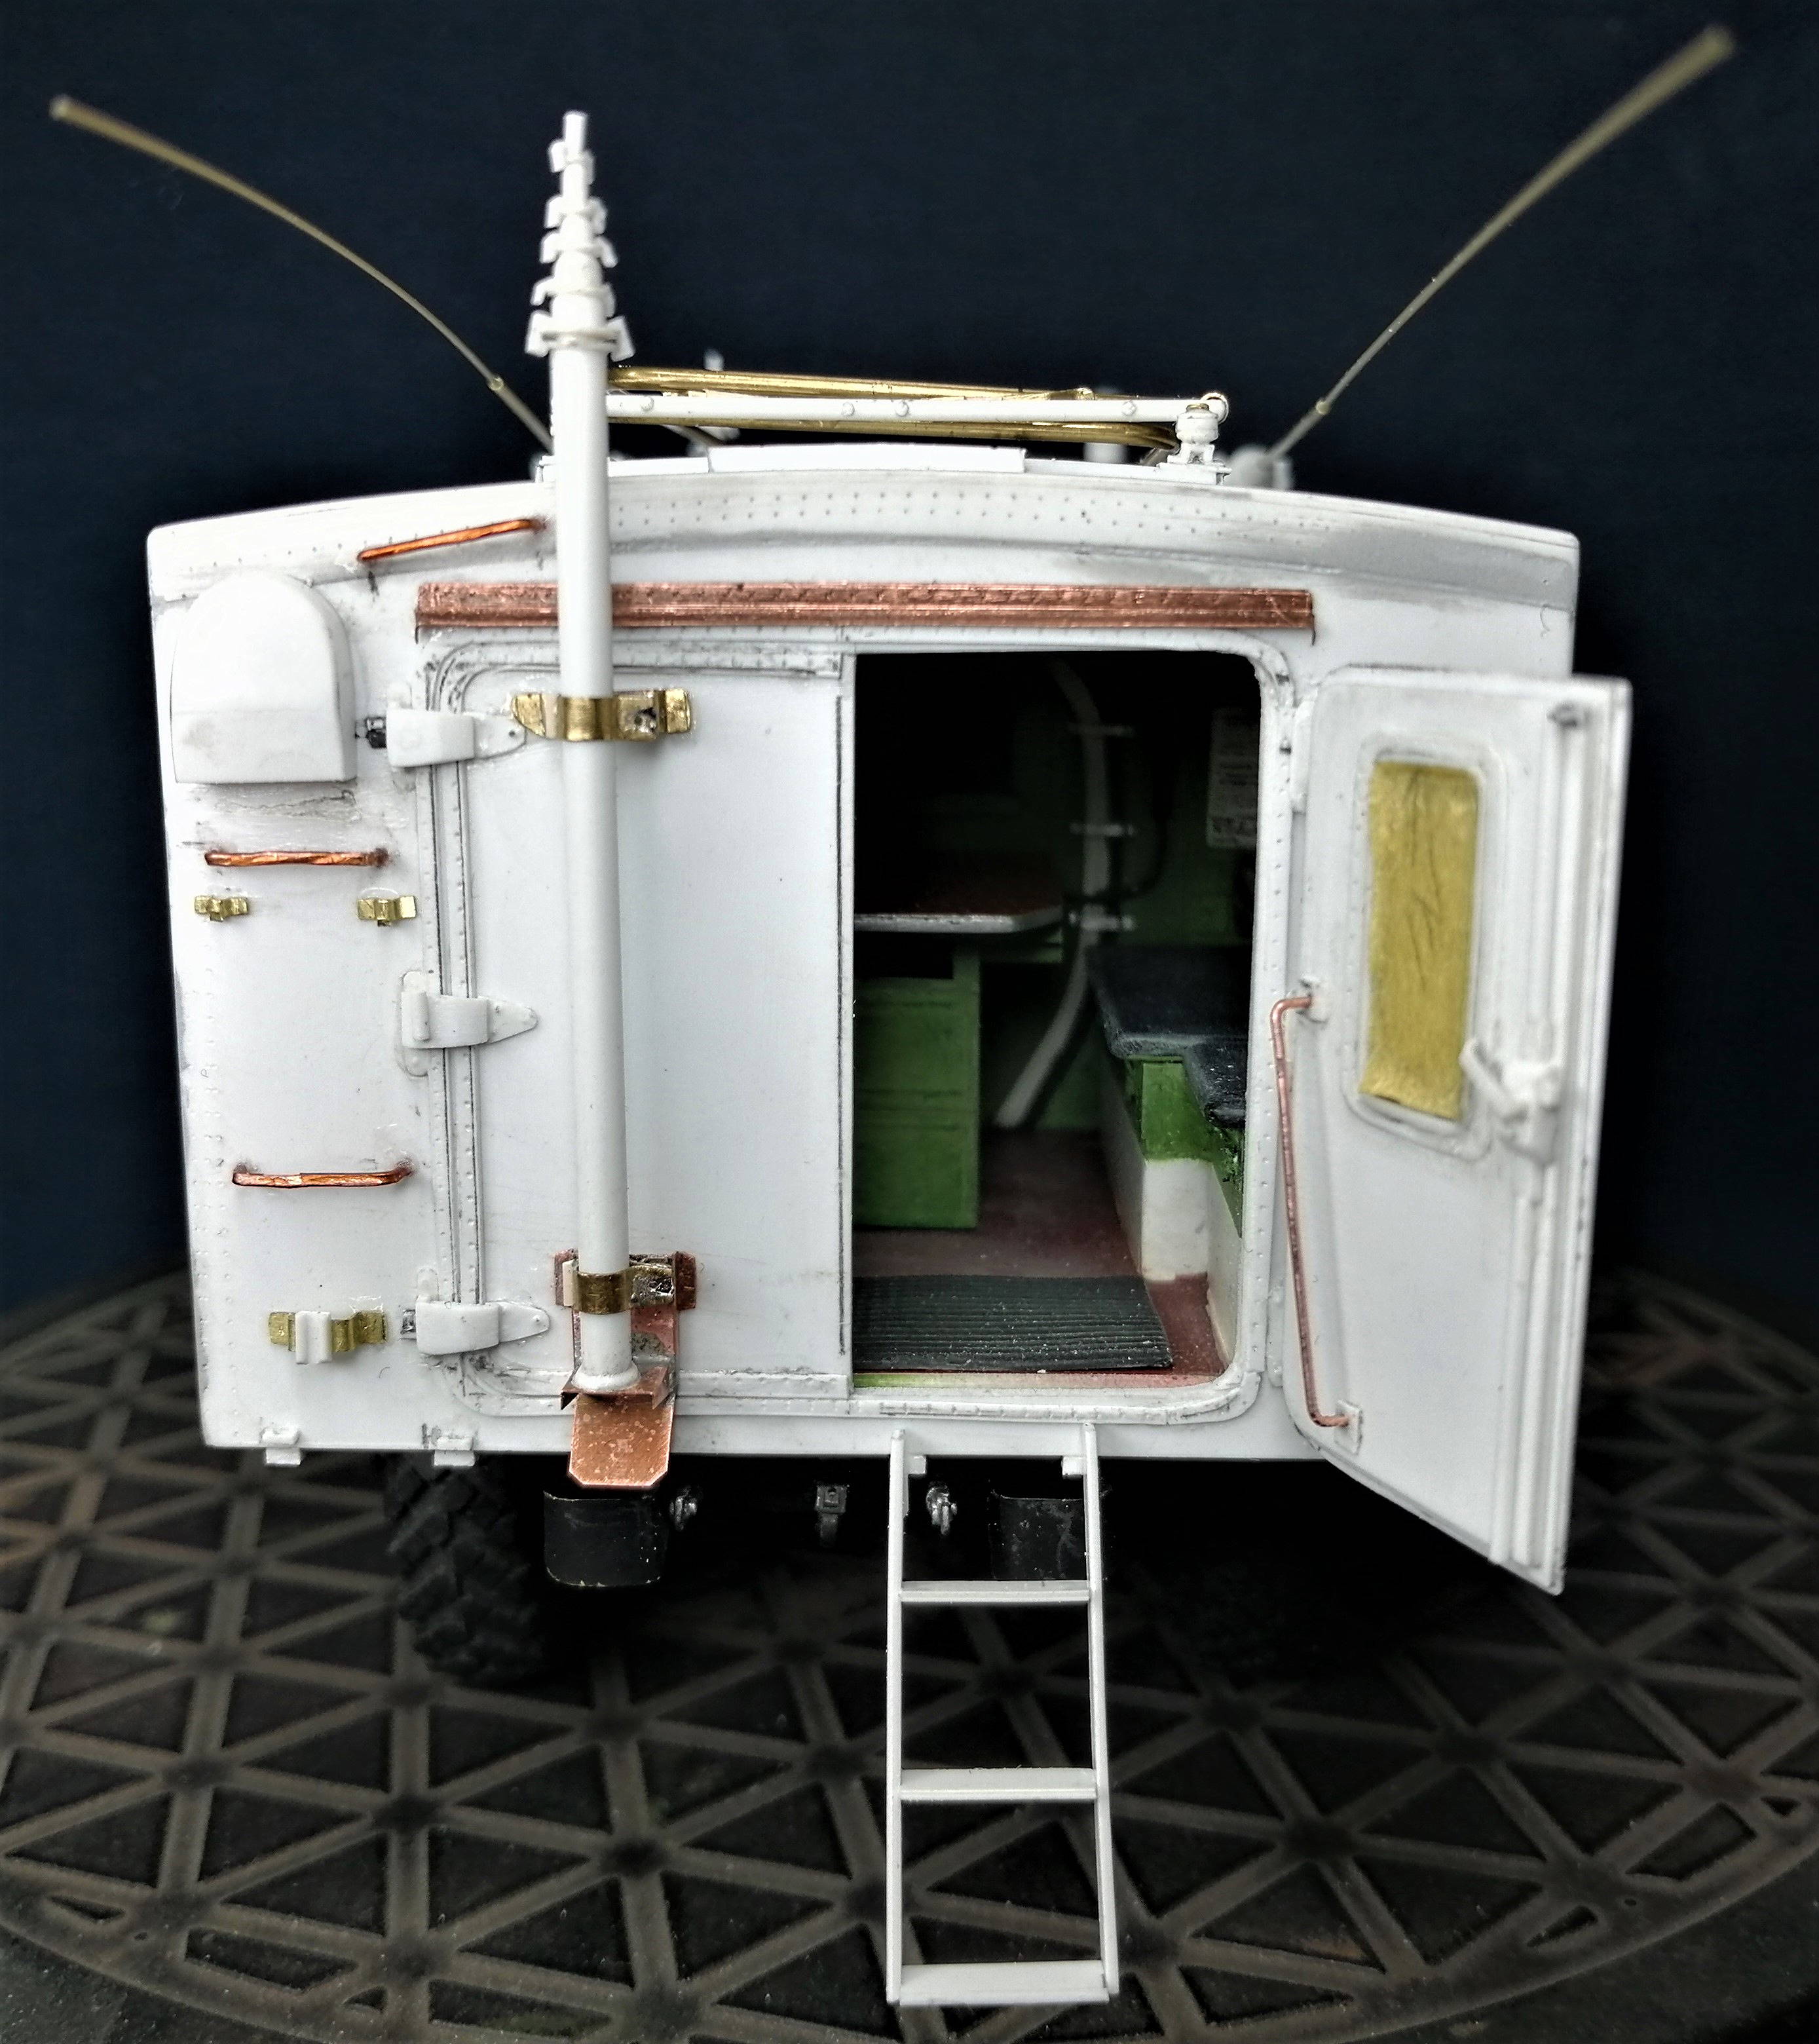
Reporting on some progress with my GB subject(R-142N radiotruck):
- headsets and Morse key added to radiomen compartment,
- fan (mounted on the ceiling of radiomen compartment) added.A very usefull device, if operating all radiosets during summer, as I found back then…
- doormat(formed with Miliput),2 mapbags(sculpted also with Miliput), curtains, windows and sliding window added in HQ compartment,
- interior painted and weathered(oils),
- roof with LED’s, their wiring and 2 blackout lights built
- body walls and radiorack glued,
- roof “married” to body,
- LED lighting checked and found to be OK.
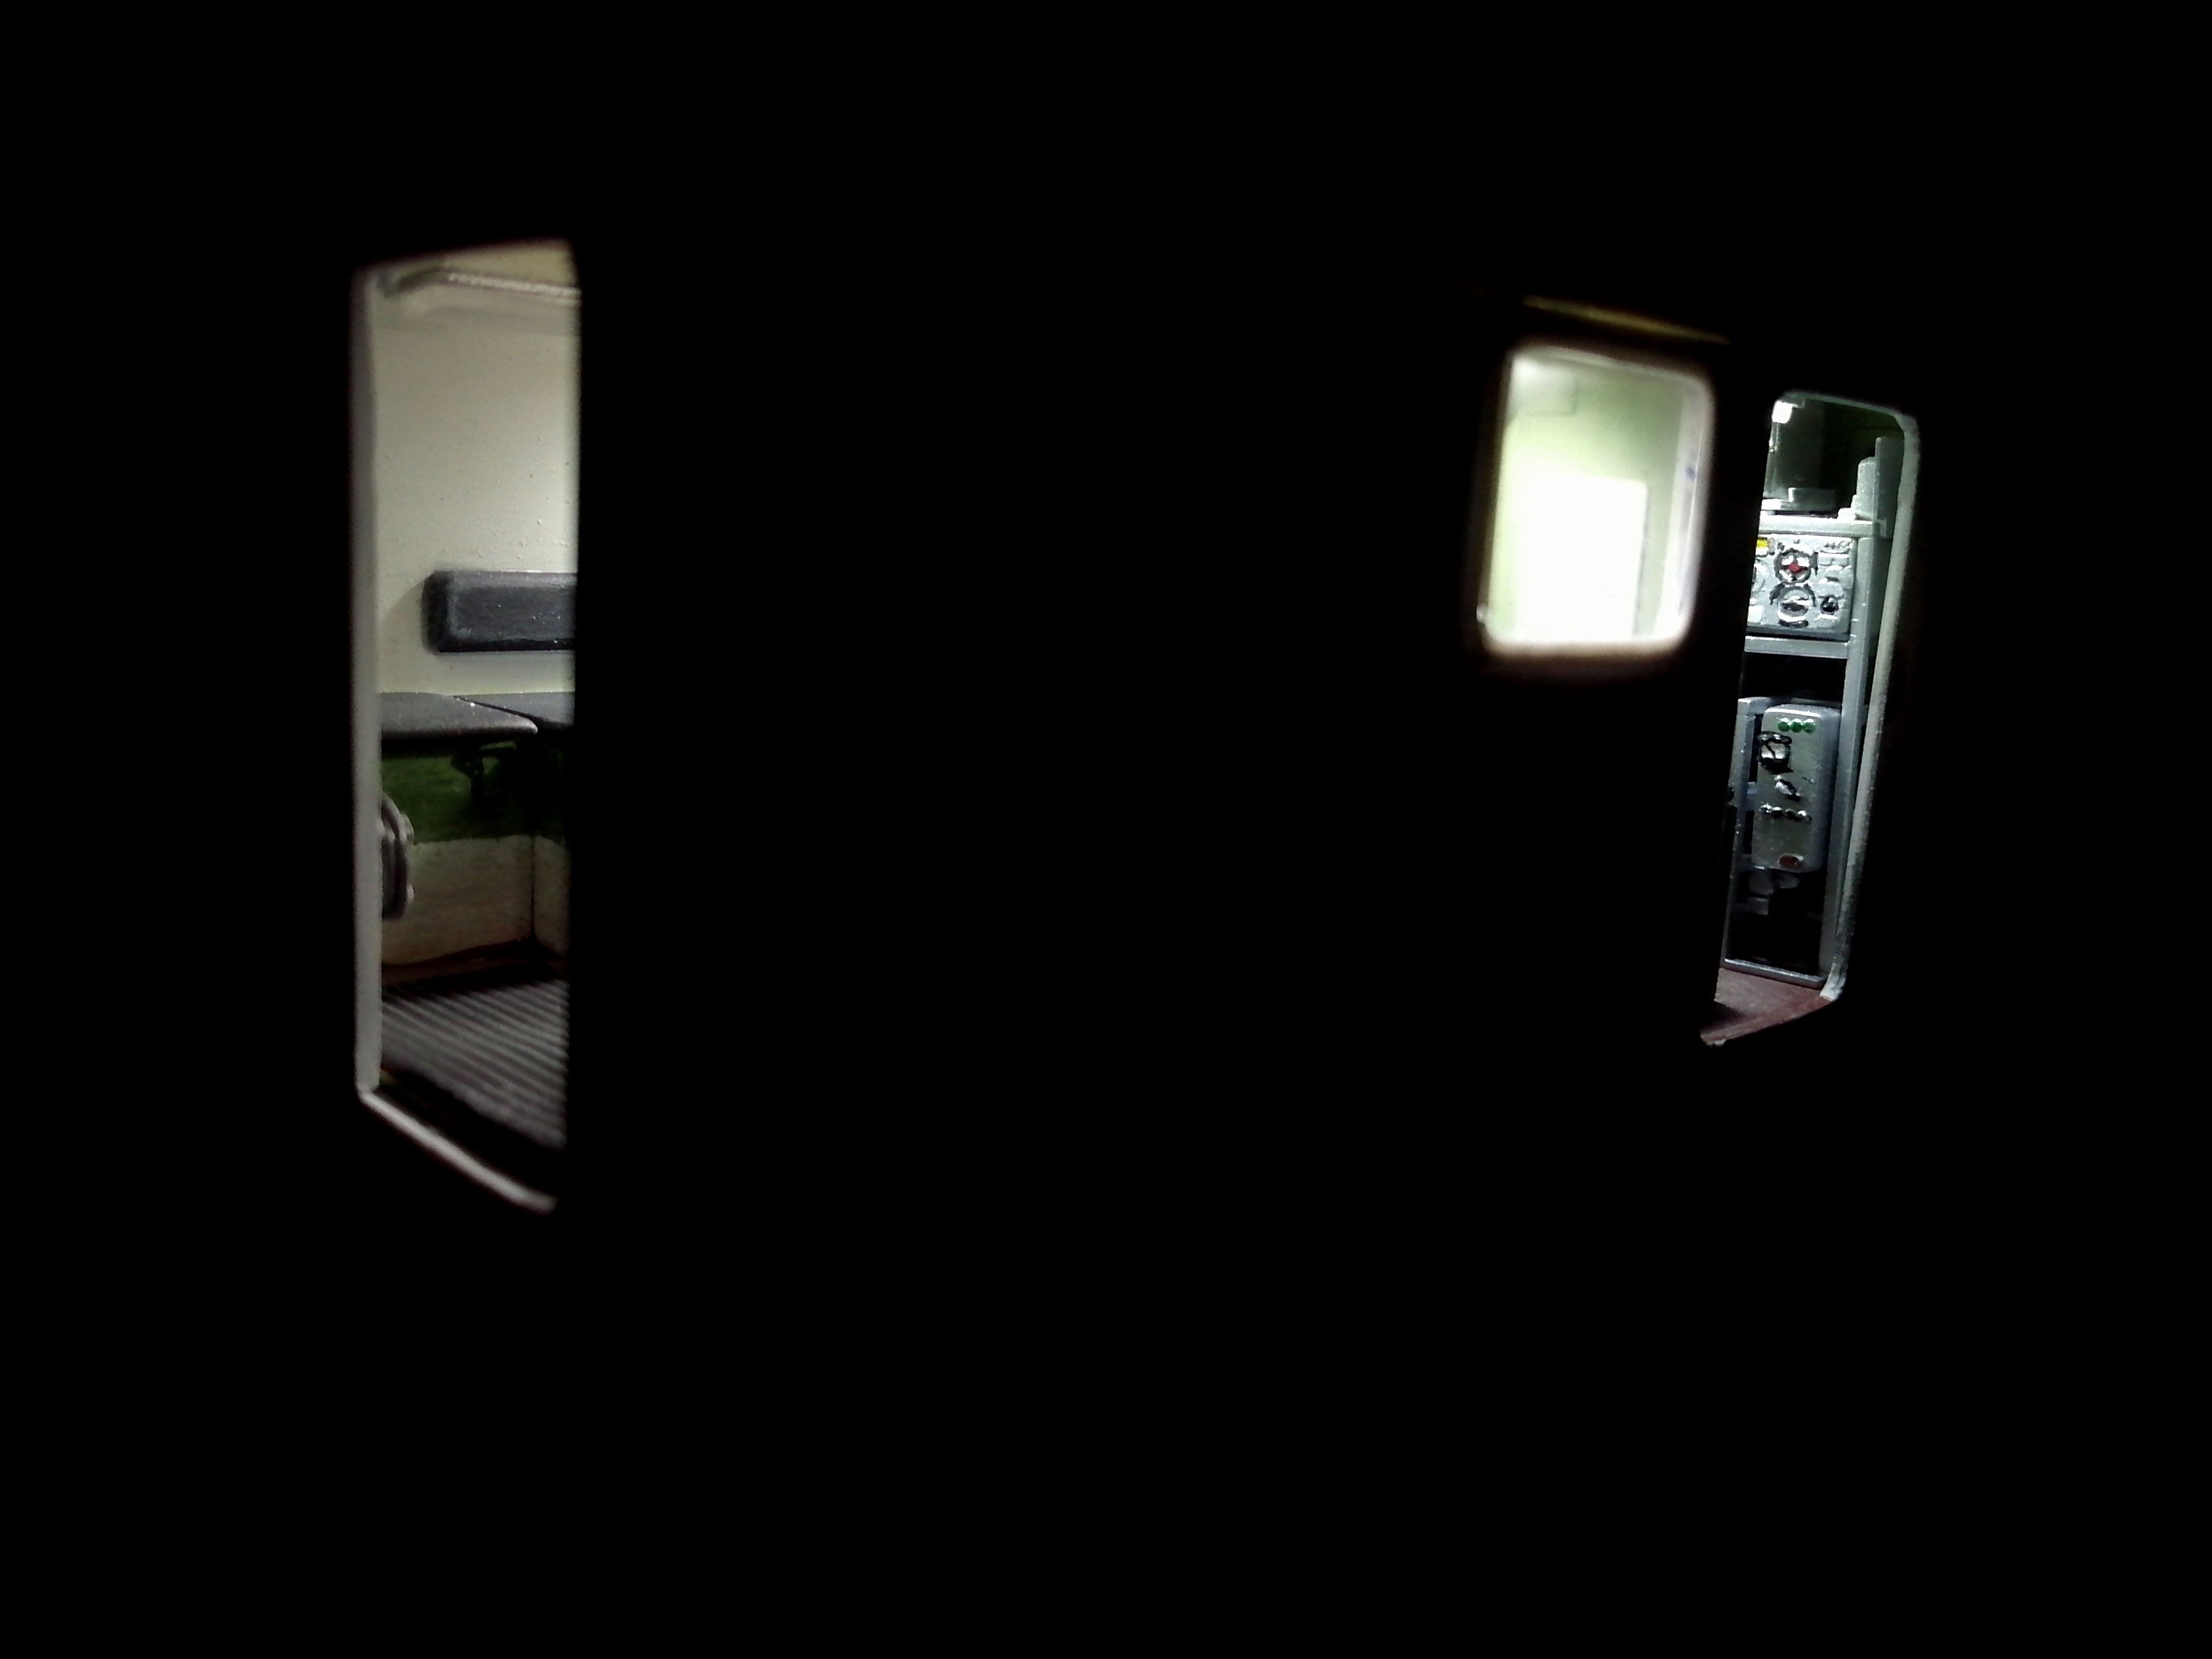
Some pictures follow:
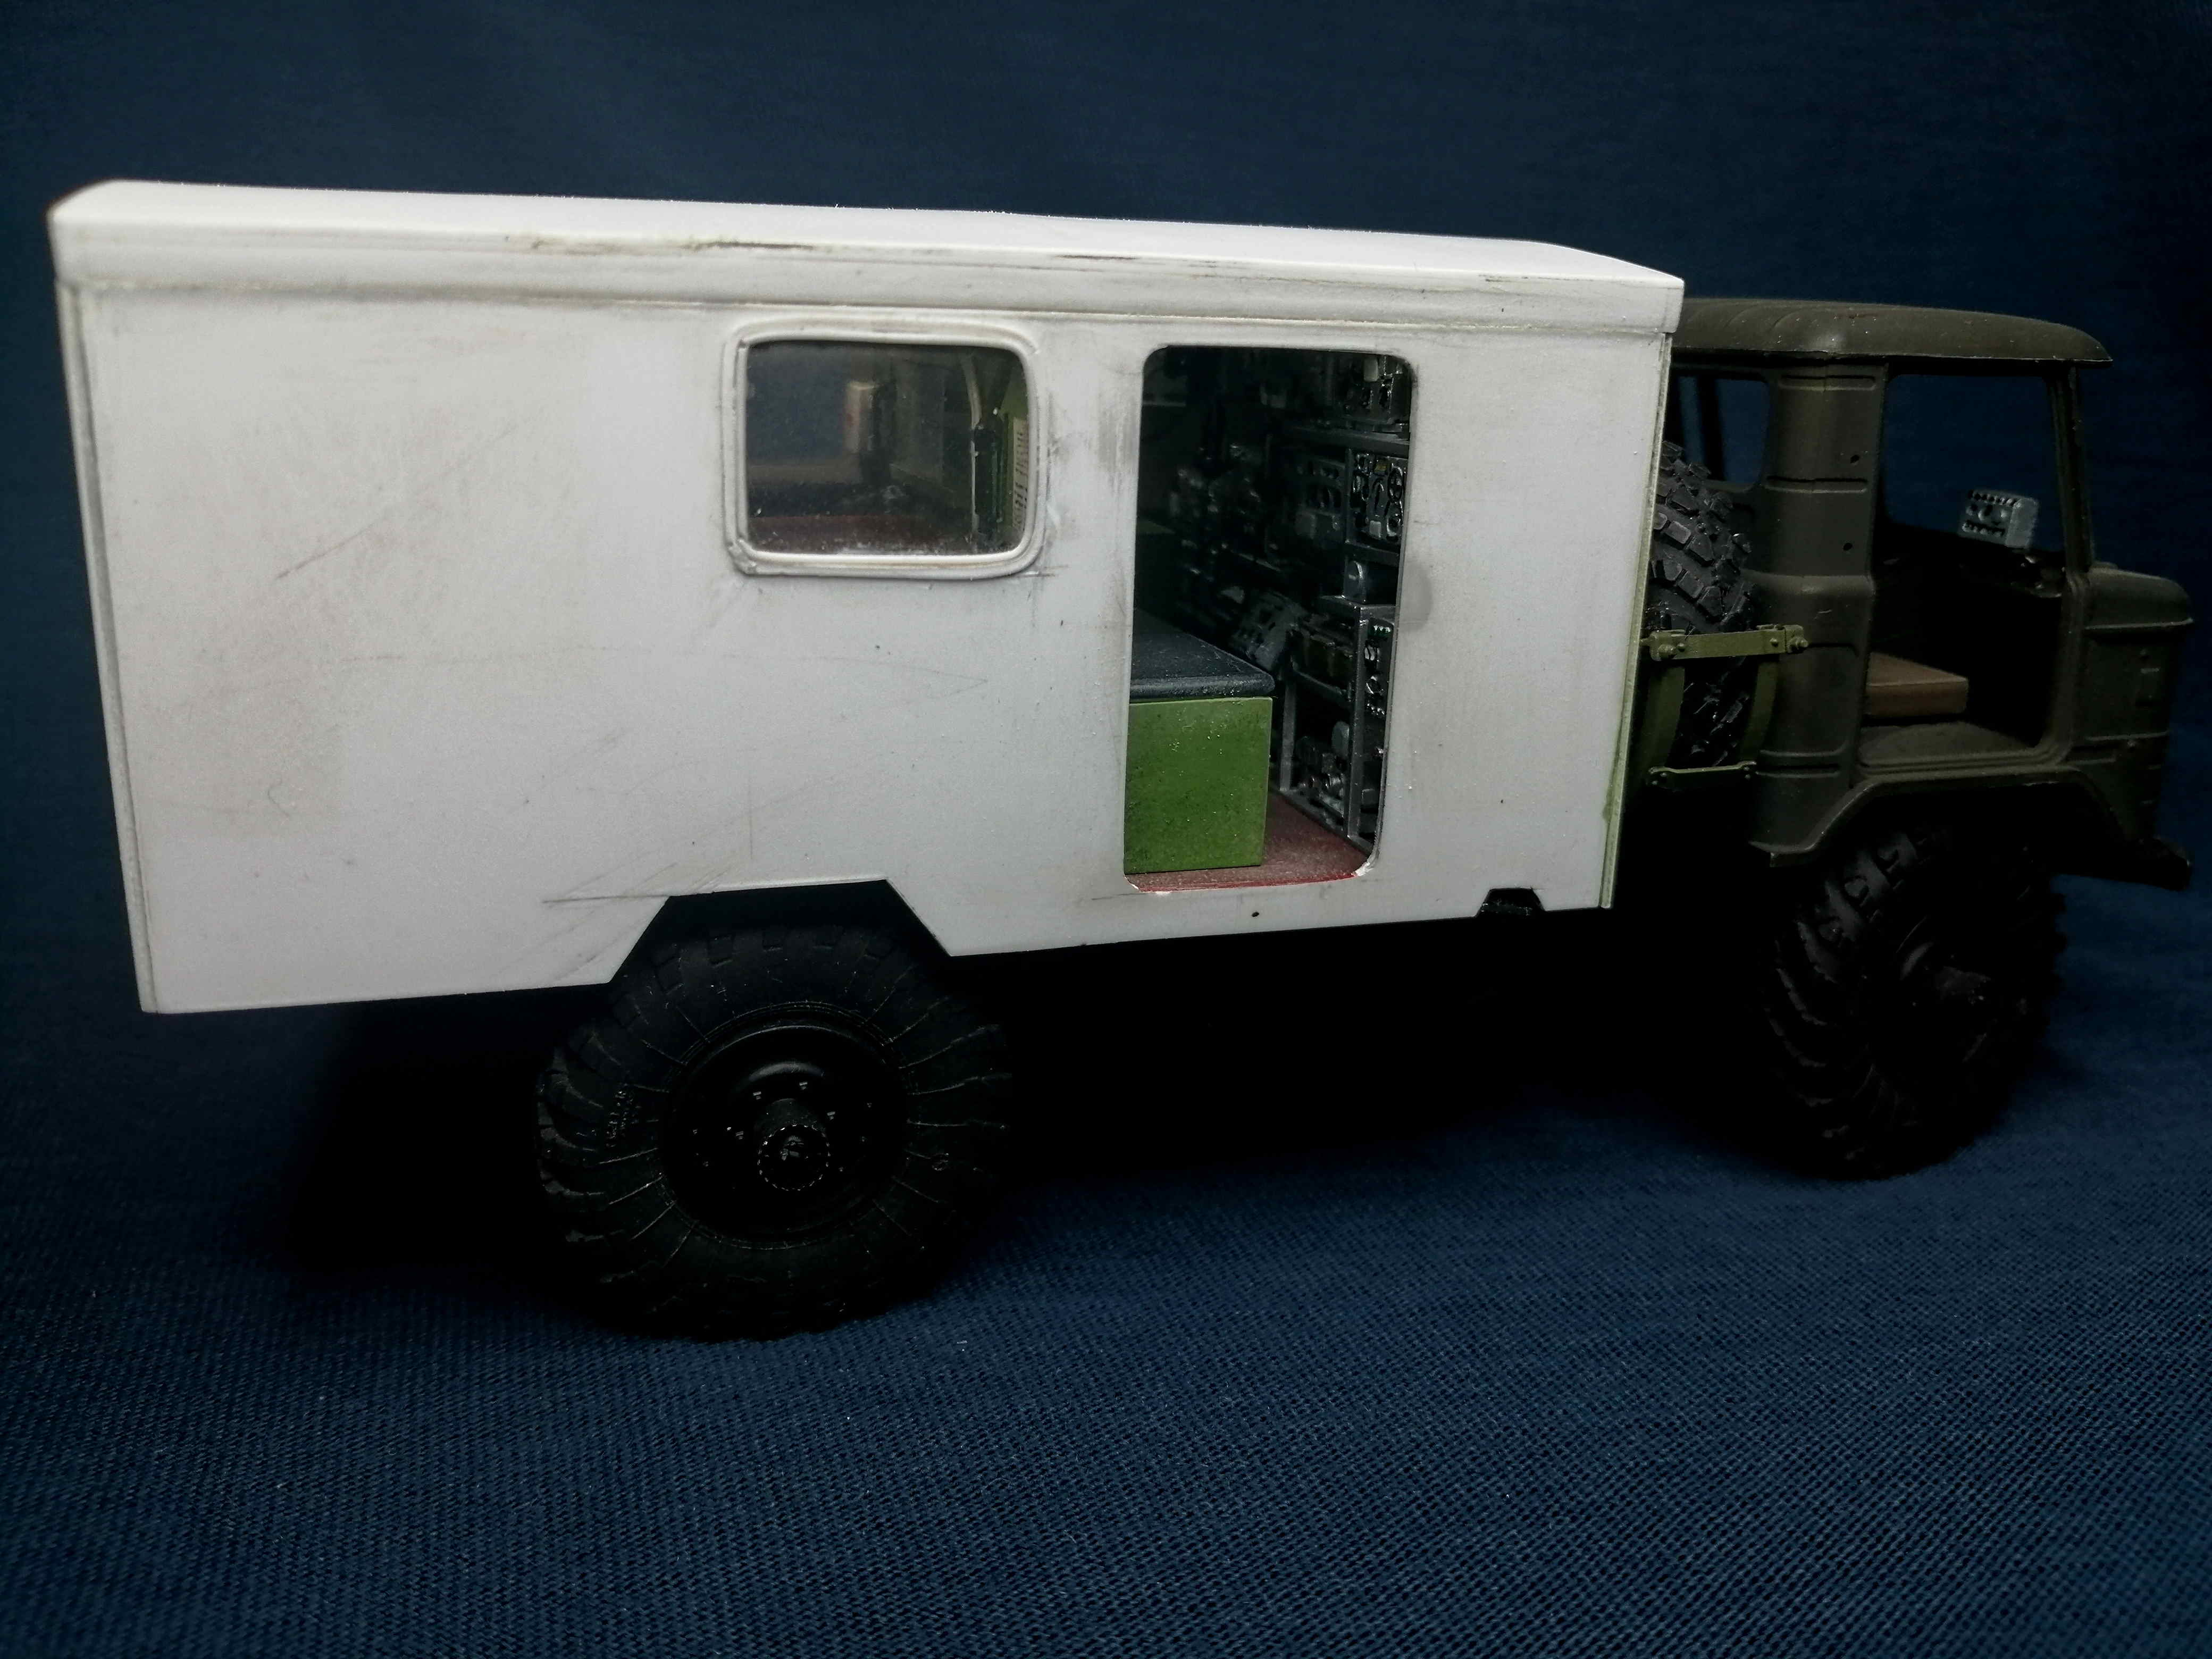
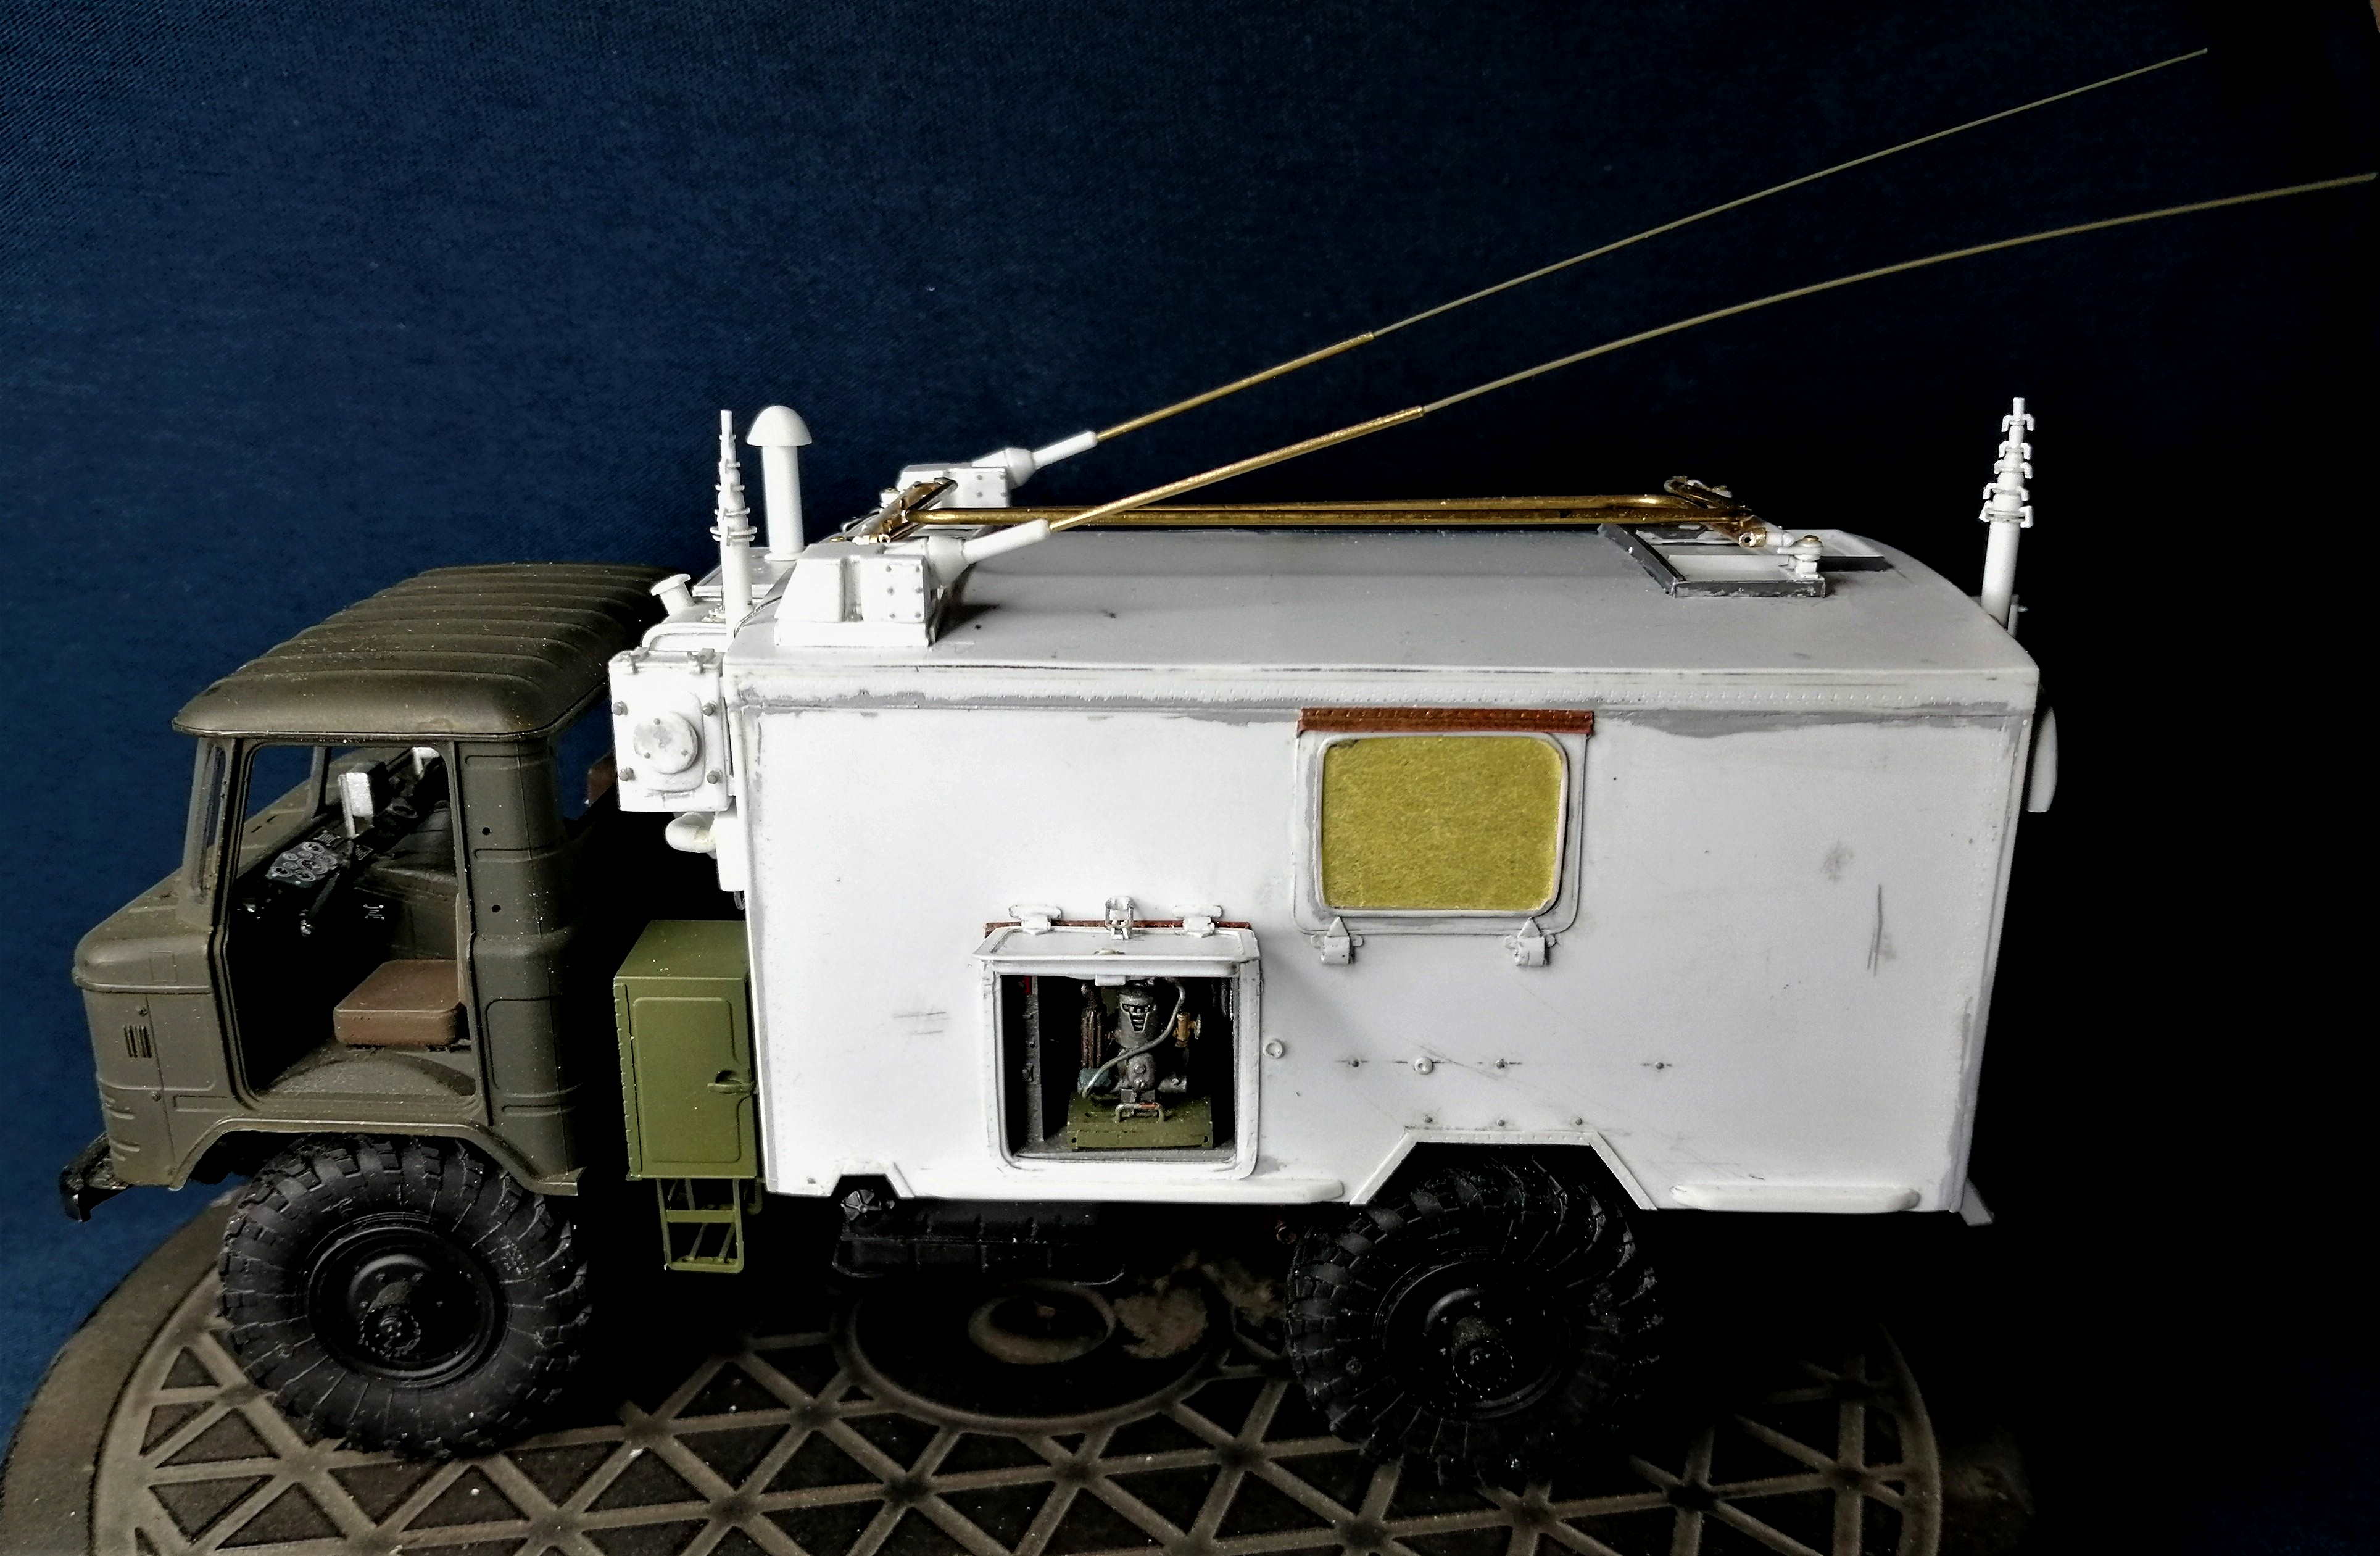
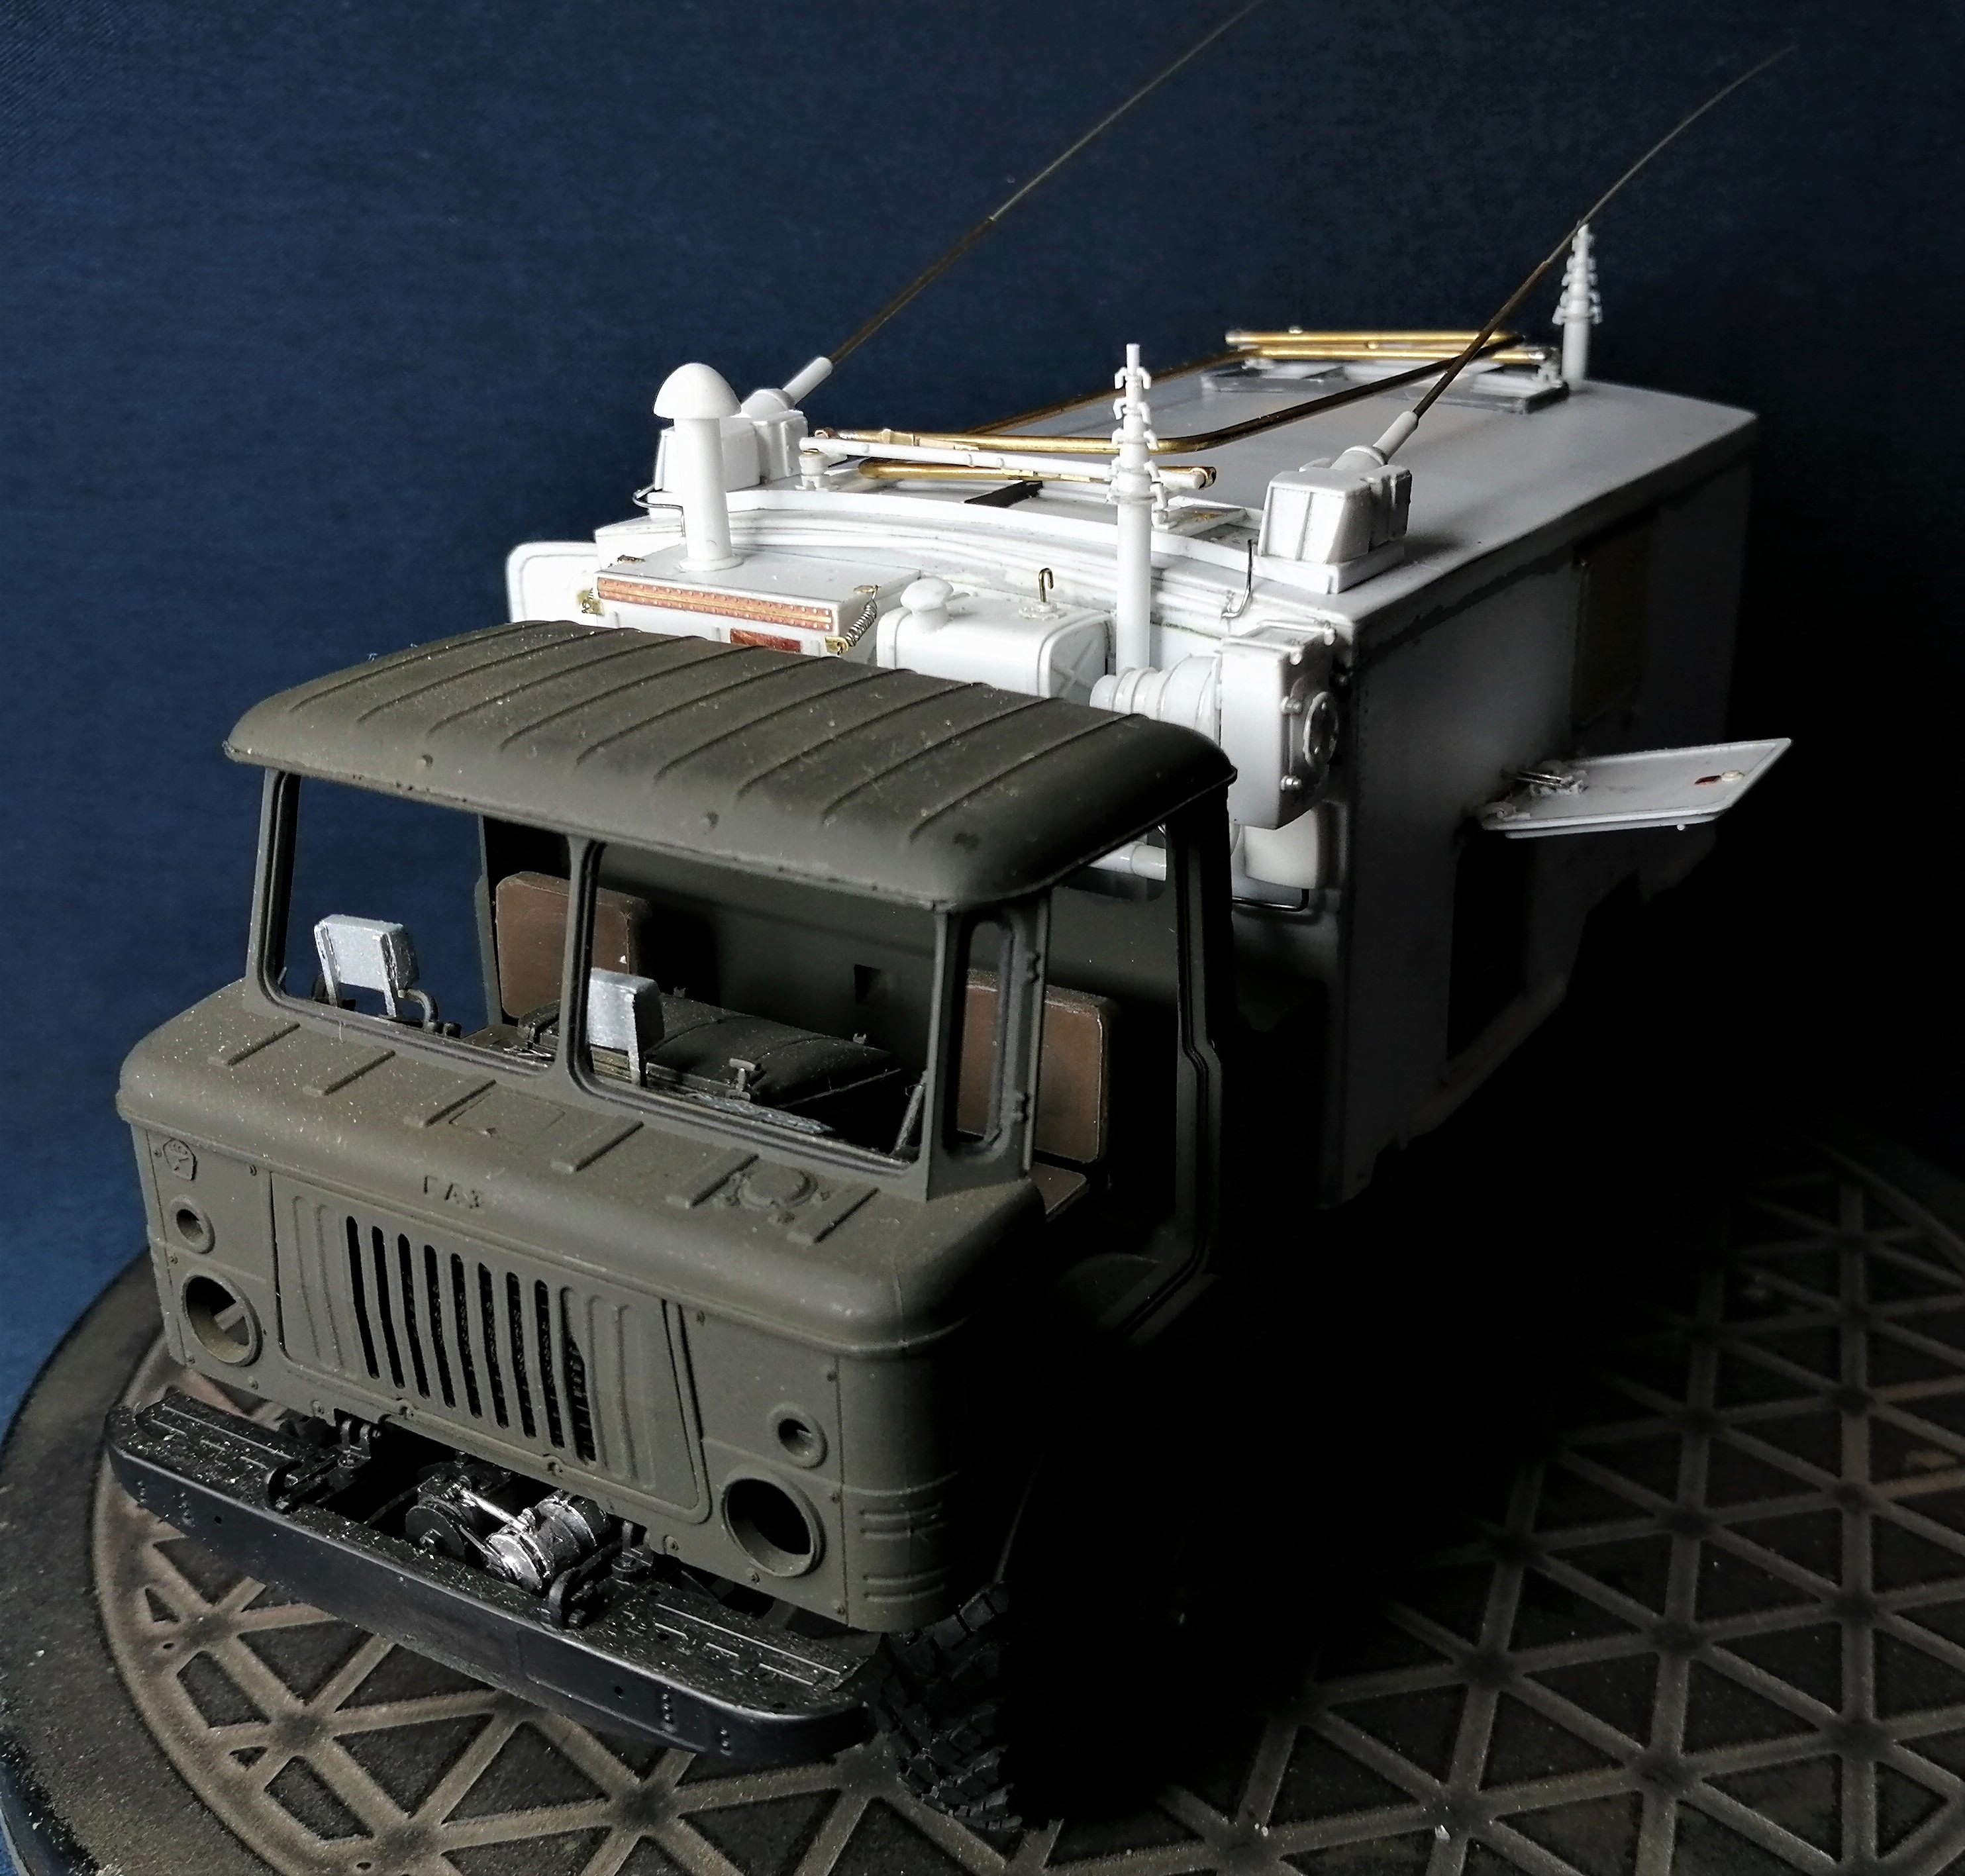
Next I’ll detail the exterior sides of the radio box and will build the antennas on the roof.
Cheers,
Angel
5 Likes
Wow… Once again @ayovtshev you have exceeded all expectations… What you have achieved is truly amazing.
The attention to the smallest detail is fantastic to see. It would surely be a Gold winner in any show it went into.
I love the Morse key, very clever and the roof mounted fan is great. You have captured the feel for it all superbly my friend.
The lighting is a touch of genius, letting you fit the roof for real, but allowing all that amazing detail to pop out…
Brilliant and scratch building skills that would be hard to surpass…
2 Likes
Some very serious scratch building. All looks very convincing to my eye. A labor of love.
2 Likes
Damn you Charlie Brown! You’re killing me with this awesome model! The lights are fantastic. I’m working on an M113 right now and I’m determined to build an OOB model for a change but you keep posting this Trophy Truck and it’s remarkable!
1 Like
Angel, simply fantastic work; you have raised the bar - possibly too high for some of us to even try and compete!
Superb.
Brian
3 Likes
I’m flabbergasted
2 Likes
Thanks for the nice words, gentlemen!
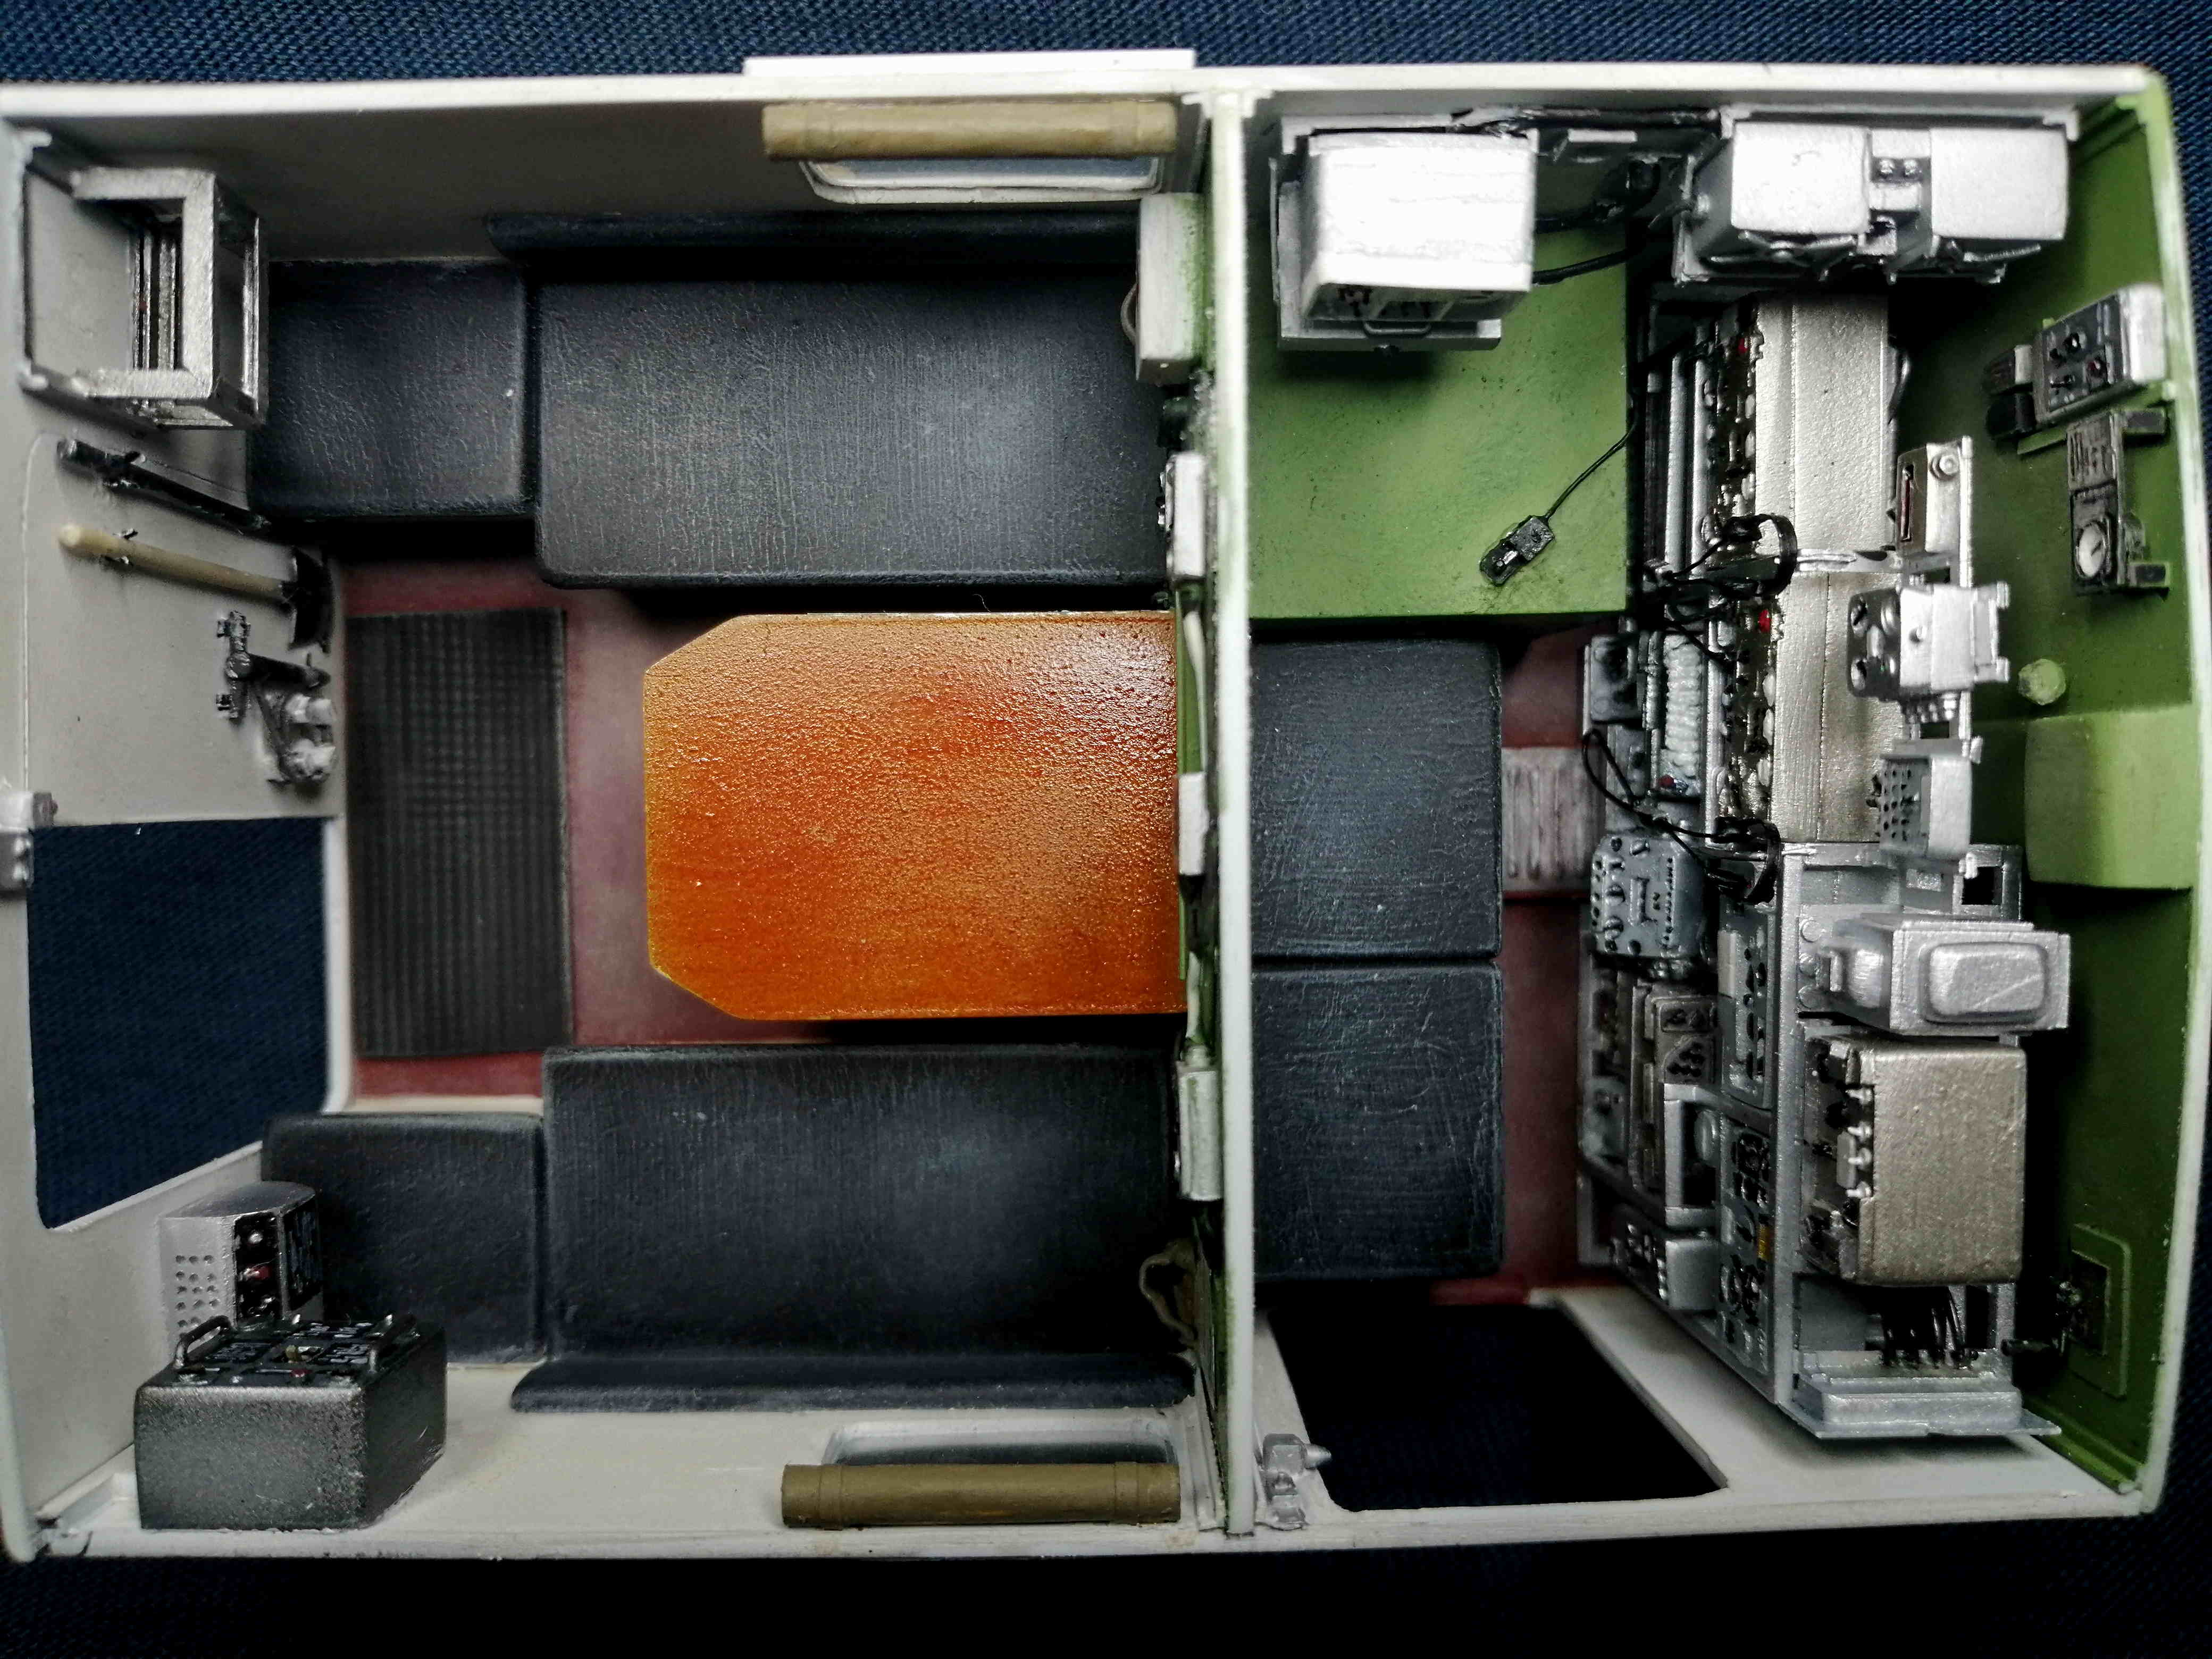
I have finished detailing the radio box:
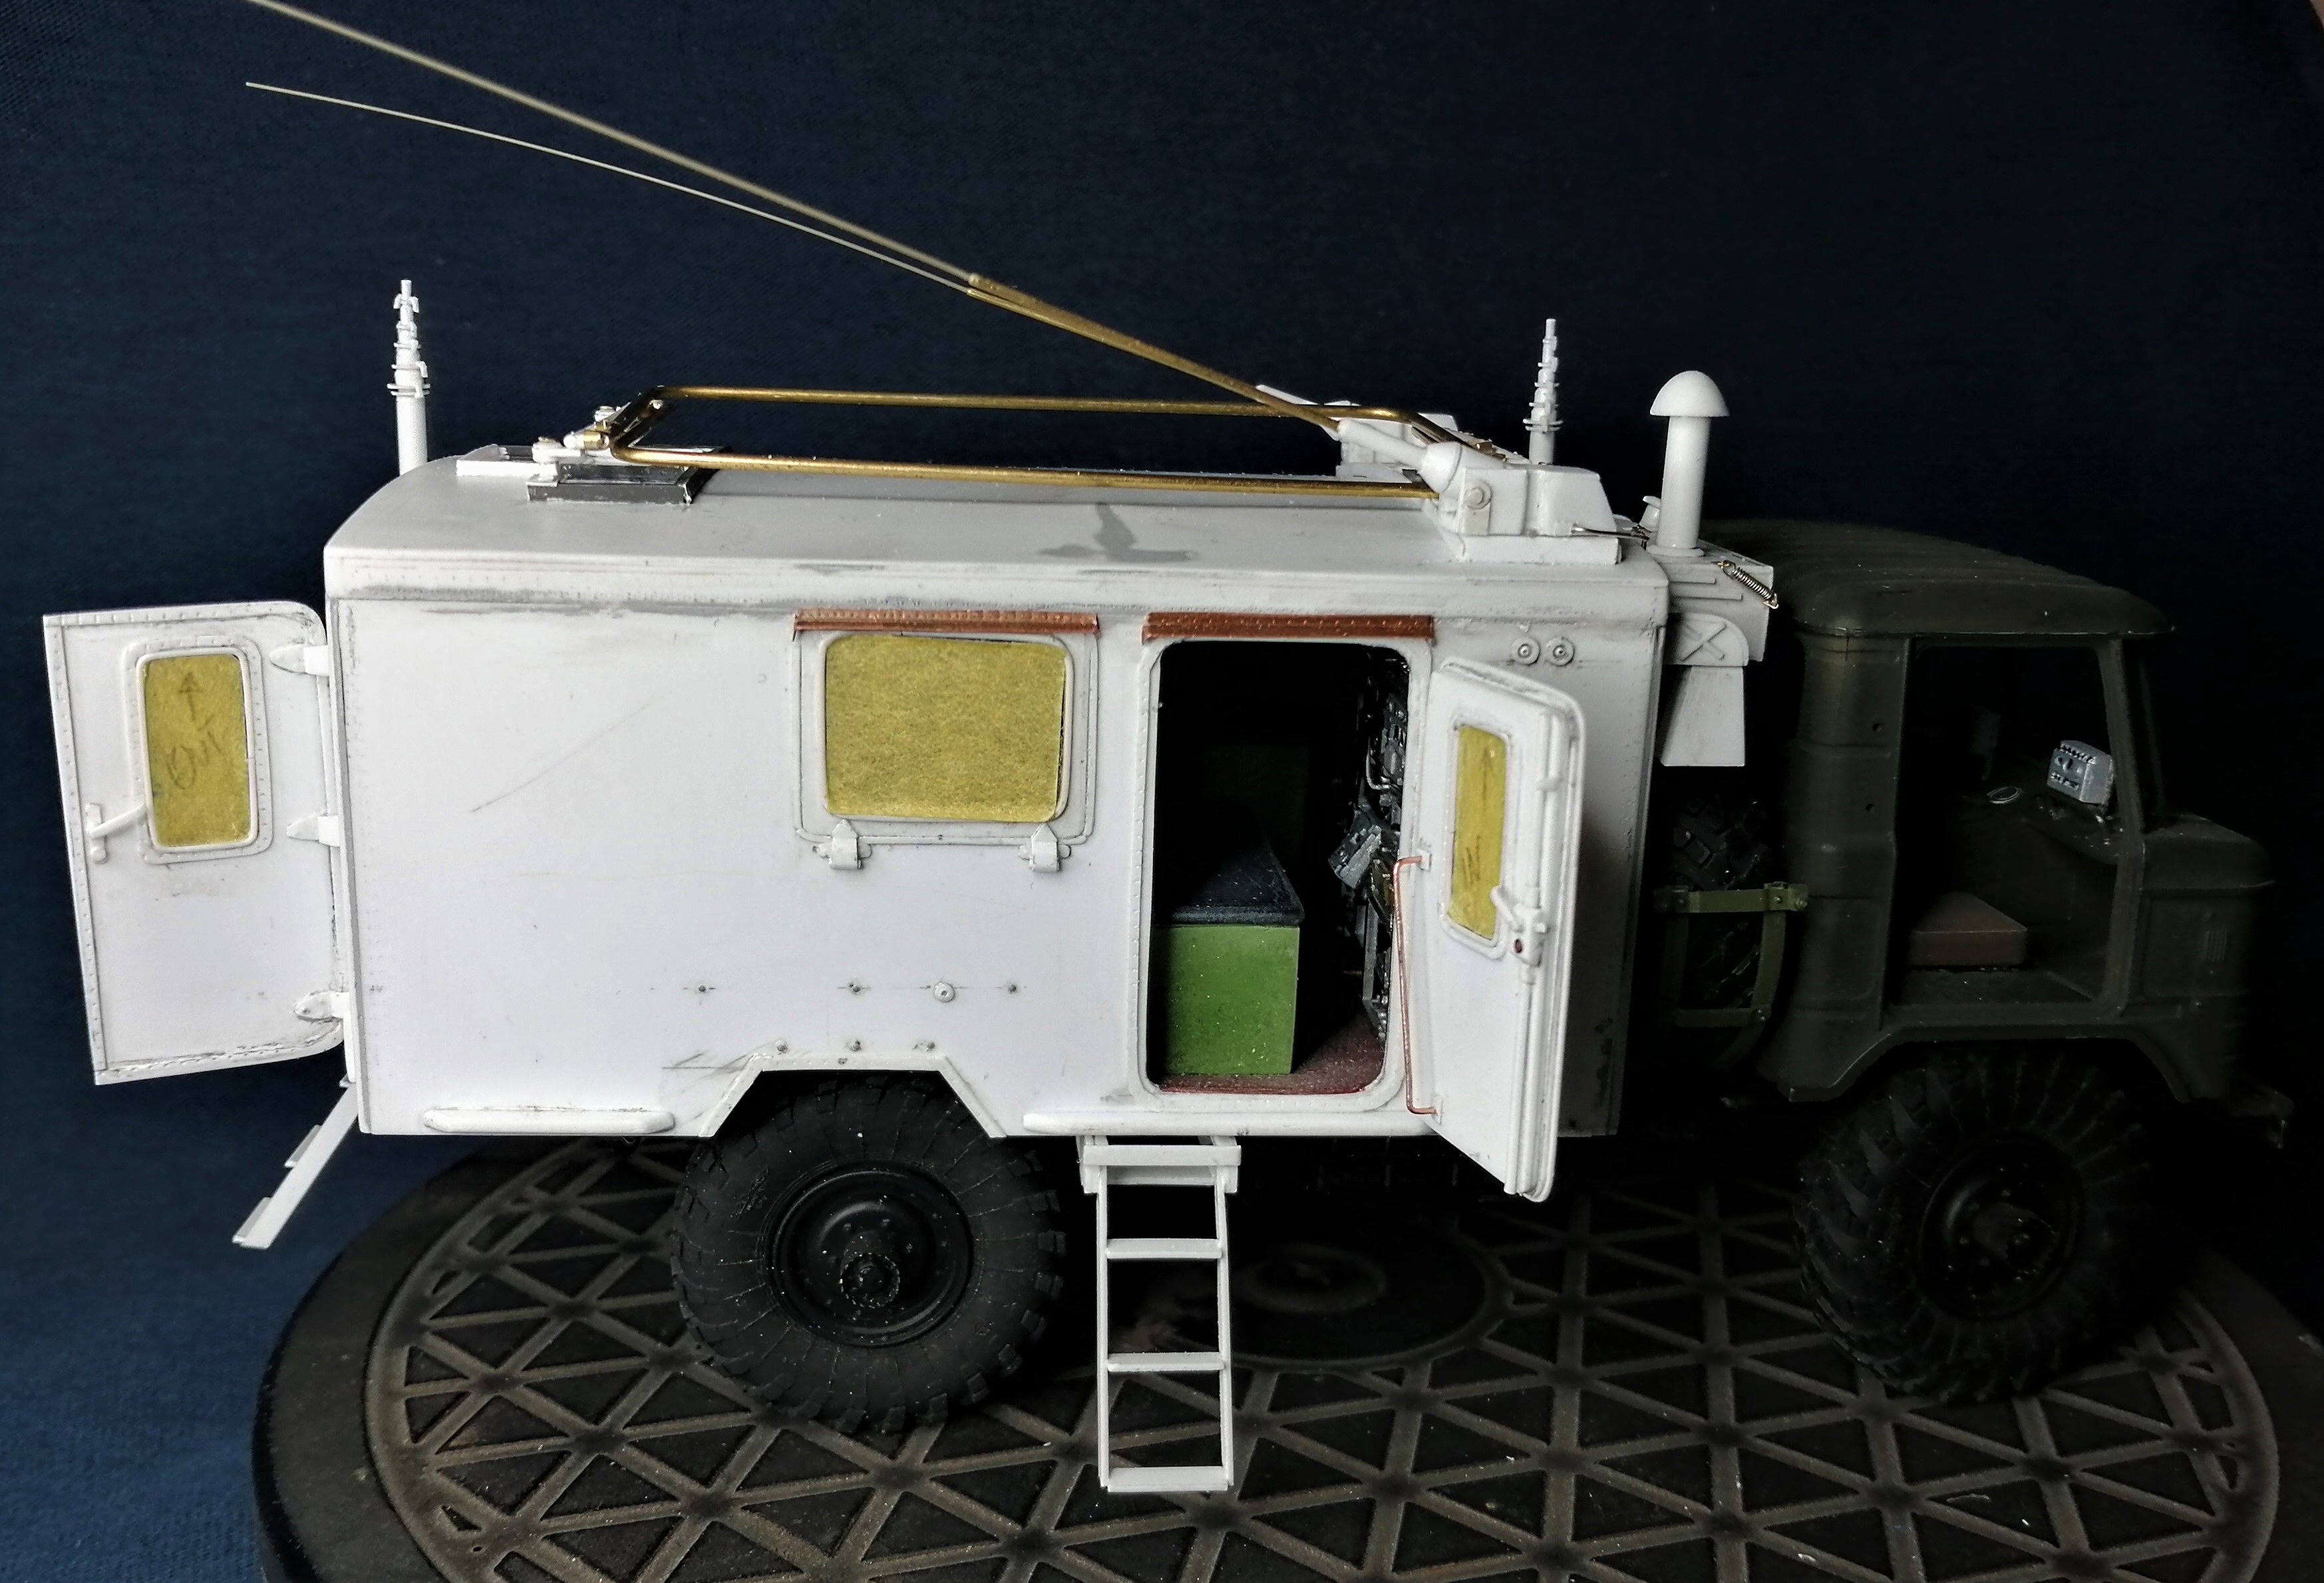
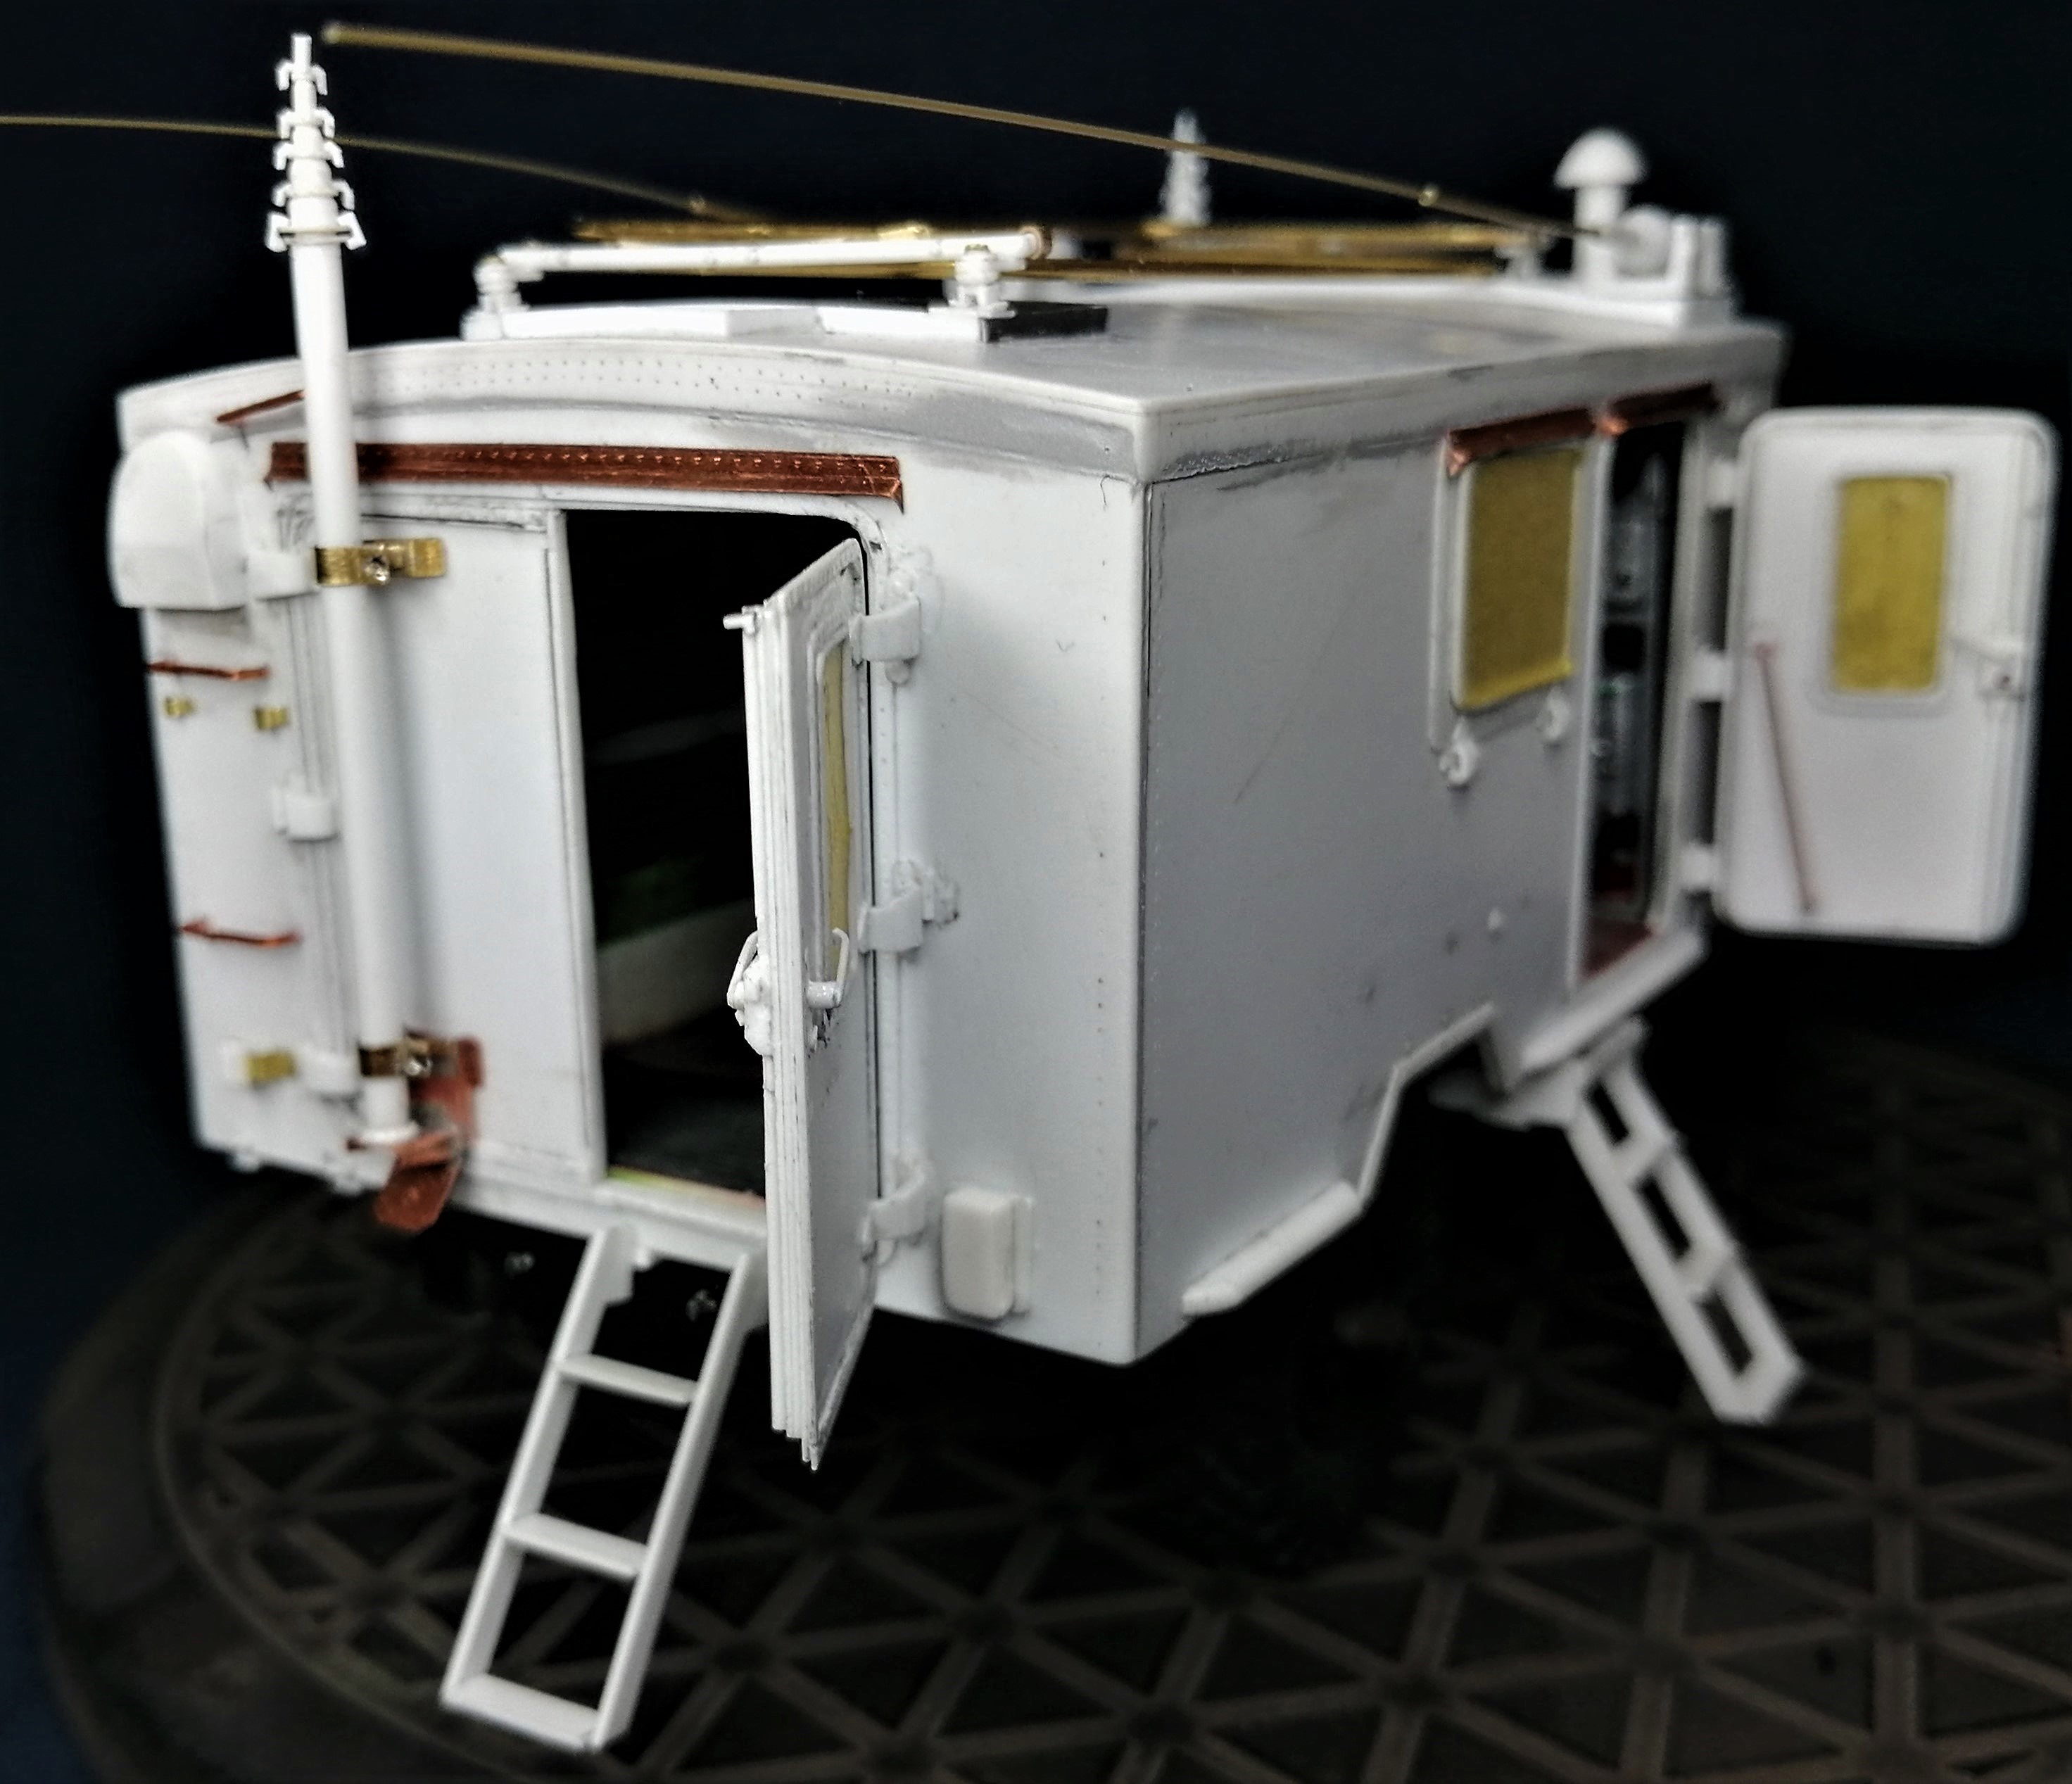

Next I will prime and paint the radio box and finish construction on the truck.
Hope to be ready by Year’s End!
Cheers,
Angel
5 Likes
Angel. Again. . WOW… I don’t even know where to begin. In my opinion, I think that is the best scratch built bit of kit I have ever seen, and don’t think I will see better. That is amazing skill, time consuming, dedication and I dare say love that has gone into that.
It is a work of art and superb at every level and angle… Inside and out. Thank you for building it.
2 Likes
Thanks, John!
And thanks for setting up this Campaign and giving me the opportunity to build the vehicle of my (uniformed) youth!
1 Like
Just gorgeous Angel. Simply stunning.
2 Likes