just guessing - would some kind of smoke canister make sense, to disguise the commandos wheel they ‘disembark’ from the forecastle? I can’t see that it is anything directly related to the ship.
Ready use lockers or something else associated with the gun? Here are two photos of a 12 pdr on the trawler HMS Stella Pegasi with the same objects.
In the enlarged image it looks very like a ready round holder w projectile protruding. http://www.navweaps.com/Weapons/WNBR_3-40_mk1.php
about 2/3 down article: clearly the same gun at high angle with ship identified:
Now that you mention it, Flower Class Corvettes had the same ready-round containers arranged in a circle around the edge of the gun’s band-stand platform. Totally forgot about that!
The 12 pdr used semi-fixed ammunition; the shell and cartridge only assembled just before firing. That allowed keeping shells in deck racks and powder in lockers.
But I’d hate to be the poor gunner fetching shells from the deck-edge on this mission with the lifelines lowered and all hell breaking loose all around.
…I’d hate to be the poor gunner fetching shells from the deck-edge on this mission with the lifelines lowered and all hell breaking loose all around.
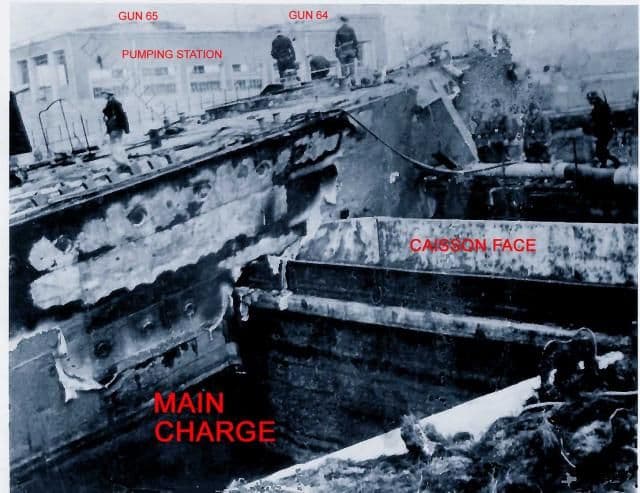
I agree, Danie - those guys definitely had guts! Things must have unfolded pretty quickly; the above photos, taken by the Germans the next morning, show that the unused shells are still in place (at least on the port side) after the battle.
Remember that was the side the enemy was on due to the angle of the dock. They would have used shells from the starboard side but I couldn.t find a clear photo of that.
The kit foremast is decently done, but the soft plastic Flyhawk uses means the delicate part is easily bent or broken when removing it from the sprue. I managed to do both.
After repairing and straightening the mast, I decided to dress up the yard with a piece from Five Star Model’s etched brass “WWII Mast Rigging Ring for Signal Flag I.” The set is actually 1/350 scale, but the parts are so petite that the smallest ones will work for 1/700. I’ll figure out how to thread halyards through those little rings later!
Despite my best efforts, that kit mast still looked crooked. Plus, since it had been broken I was concerned about its strength later when the rigging would be added… so I went ahead and built up a new one from brass wire.
Campbeltown’s foremast sported a ladder, so I added one of the leftovers from a Gold Medal Models photoetch set I’d used for a battleship project several years ago.
I also used inclined stairs and railing from this set to outfit the aft area of the bridge deck around the flag lockers. While these photoetch upgrade sets aren’t cheap initially, the leftovers will last through several models!
With the mast in place it is time to get going with the rigging.
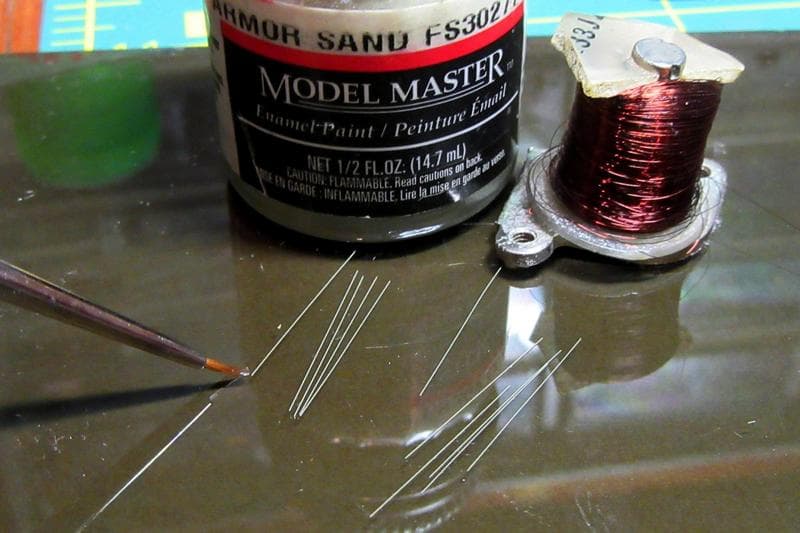
I started with signal halyards made from microfine copper wire. The wire was straightened, painted with Model Master Armor Sand enamel, and cut into ¾ inch lengths.
The delicate lines were then attached to the rings on the yardarms with tiny dabs of highly thinned white glue.
The halyards should really be threaded through the holes (which represent pulleys) and back down to the flag lockers below, but in this small scale I figured I could get away with just the single lines!
What’s micro-fine copper wire? Is that the same kind of wire wrapped around magnets in electric motors? I like it! I find doing rigging very frustrating and annoying!
I just Googled it and there are many different sizes, ie; measured in 10ths of a millimeter, or in gauges. What size/gauge are you using?
I actually don’t know the size - this spool was part of an old junked radio I bought at Goodwill many years ago. It is about like human hair (prior to this I used to raid my sister’s hairbrush for rigging - this wire is of similar thickness). I like this stuff; it takes paint better and is more durable than hair, plus the metal doesn’t flex or droop with normal heat or humidity fluctuations. I also no longer have to hear my sister tell me what a “weirdo” I am!
The copper wire’s “memory” means you can form perfectly straight or curved lines. I often use a combination, like on my USS Constellation:
On longer runs it will also naturally droop realistically. The wire is delicate and fussy to work with, but I’ve had pretty good luck with it over the years.
The rest of the rigging consists of stays for the foremast and yard.
The stays – fixed lines that kept the mast from toppling over - were made from the same microfine copper wire used for the signal halyards. This time the wires were painted with the same “scale black” (dark gray) color used for the boot topping.
Very nice work installing the rigging. I will have to try using wire next time, I can see it would be most helpful when dealing with a flimsy main mast.
Very nice work installing the rigging. I will have to try using wire next time, I can see it would be most helpful when dealing with a flimsy main mast.
Mark
Thanks guys.
Mark, good luck with the wire if you try it! In this build, the fragile mast was put under no pressure at all by all those wire stays and lanyards.
A final detail to be added was the Royal Navy’s White Ensign. Flyhawk included both the British Navy White Ensign and the Kriegsmarine Battle Ensign (both of which Campbeltown flew during her final operation) as decals. I chose the British flag.
After brushing a coat of white glue over the foil to make sure the decal wouldn’t come unstuck, I folded the flag over a piece of heavy duty household aluminum foil. I find that the foil backing not only makes it easier to shape scale flags, but it also helps keep the delicate decal films from flaking apart.
The ship’s flagstaff, normally located at the stern, was moved to the ‘midships 20mm bandstand during Campbeltown’s conversion. In battle the flag was flown high at the foremast, but the model depicts the ship in port before her departure for the operation, so I set the ensign at the staff.