Today I just have finished the building stage of my Renault R35 from Tamiya.
And I’m now at the stage that I’m going to paint my model this week.
But, I have never airbrushed a camouflage pattern like this one before.
It is so colorful and also beautifull, but I don’t actually know how to do it or how to even start with it.
So I could use some help from you.
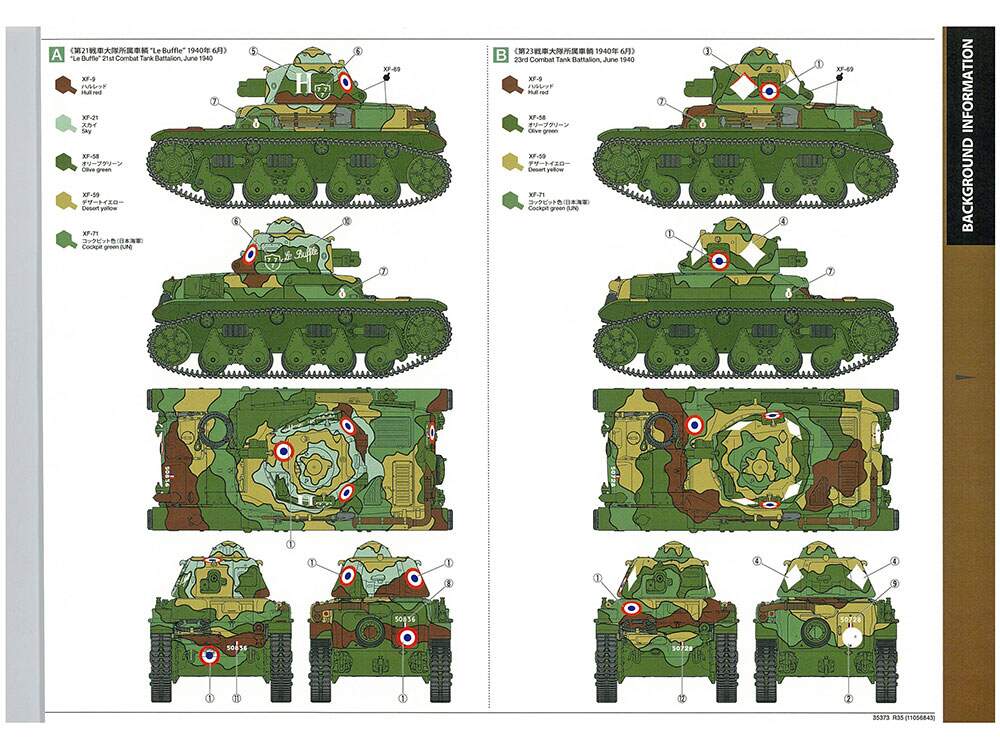
Here are the two options:
Note:
Unfortunately I did remove the other photo of the other marking option on the left, so I only uploaded this photo. I will upload the other photo on another time if needed. So tell me if you need the other marking option to see as well, because I want to airbrush that option, not this one.
Spray the entire model the lightest color from the camp pattern.
Allow that to dry and cure. No such thing as waiting too long with this.
Mask with low-tack tape or paint-on mask to cover those lightest areas from the next color. You will need to refer to your photos to create the shapes you want those lightest areas to retain.
Repeat the process for each successive color in the camp scheme.
Not everyone would agree, but I have done similar by airbrushing the basic color (olive green, or whatever) then hand brushing the other colors with acrylics. Use several thin coats until you achieve an opaque coat without brush strokes . Use a fine brush for the black outlining (or even a black Magic Marker!). Or…you could do a lot of tricky masking!
I have camouflage putty from AK Interactive.
And with looking at the photo’s, you mean that I have to look closely on the sheet I have photographed?
Anyway, thanks for the answer.
I’m planning to use my airbrush and mask with AK Interactive camouflage putty.
I did at the time specially buy it for this type of project.
I got the idea from ‘Scale War Machines’ on YouTube that showed it.
Yes.
To me the putty is less exact and may end up with lots of corrective hand brushing.
I’ve seen modelers cut out masks from card stock or tape.
The way I would do it is to airbrush the base (lightest coat) only… covering the entire model.
Then I would hand brush the remaining camo. This is a hard demarcation line pattern. To me hand brushing is the easiest and best way to get there.
I posted the layers of mask idea because your original question was how to airbrush the entire pattern.
I painted a similar scheme by airbrushing the colors and masking the demarcations with putty (knead-able/malleable eraser - don’t know what it’s called in English…). Later on i did the black demarcation lines with a permanent marker. It worked out good enough and using a marker makes sure the lines have a consistent width
This is a difficult pattern. I’m working on my 5th WW1 subject with similar camo schemes - multiple colors in small irregular patches with black interline. So far, I am happiest with panzer putty or silly putty (same thing but MUCH less expensive). I prime my models in rattle can black enamel primer, as a preshade and to unify the various materials. Next I spray Tamiya white on the upper surfaces that get the sunlight. I do this by panels starting at the center of each panel and working out towards the edges. I start the camo by using a pencil to mark the pattern on the model. Then I spray the lightest color in several light coats. I use Tamiya and AK Real Colors as they spray so nicely. I then apply small pieces of silly putty on the light colored portion of the pattern. I use a chopstick with a chisel end and the other end more pointed to push the silly putty down along the edges and push it into the confines of the pattern. I then spray the next color and repeat until all of the colors are down. I only let each coat dry for a couple of hours before applying the silly putty. If you leave the silly (panzer) putty on too long gravity will cause it to slide off the model. I have never had the silly or panzer putty pull off paint. Once all of the colors are down and the silly (panzer) putty removed, I do let the paint cure for 48 hours or more before laying down a sealer gloss clear coat.
I have tried many different things for the interline. Markers lay down ink which will look different depending on the viewing angle (it looks silvery from some angles). I’ve tried Testor paint markers and GSI Gundam markers. The Testors was too wide and didn’t cover well. The Gundam marker covered ok but was again too wide. The markers are also really hard to correct when you have errors. What I keep going back to is a fine pointed brush and NATO black paint. I keep fine pointed cotton swabs and a brush wetted with thinner to clean up my mistakes and edges. The clear coat over the camo pattern seals it and allow you to clean up the edges of the interline as you go. This is a long exacting process - I need several sessions to complete the interline. You also need to think about how to hold the model while doing the interline - either a multi-angle stand or a handle.
I’d strongly suggest some practice on a piece of plastic sheet or an old paint mule to find the technique that works best for you.
I painted my Somua a similar hard edge black outline pattern using silly putty to mask the colors from one another, and an ultra fine tip sharpie enamel paint marker to do the black edging between the colors.
There are lots of different approaches and they all have various merits.
My .02 worth…
Personally, I’d scan the camo scheme, enlarge it to 1/35 scale (or the appropriate scale) and print out a couple copies. Next I’d cut the mask patterns from the paper to use with the model. This won’t be exact but it should be able to get in the ballpark with careful trimming.
I greatly dislike spraying light colors first and then spraying darker colors. Dark over spray can be a real hassle to remove from a light colors. I find it easier to touch up dark colors with light over spray. I like shadow paint so would work from dark to light.
As for the black lines, after model is painted, I’d use a sharpie. Seal with gloss coat etc before applying washes etc or do washes before using sharpie.
Thanks for your detailed description on how you are tackling this ‘problem’.
When I was reading your reply, I was thinking that trying to first draw lines with a pencil would be interesting to try.
Especially as a guide line to place the putty and masking on.
I will see if I can fine some testing pieces to practice on.
Another option I once got from someone, is to try on the belley of the model.
Because noone, including me is looking at that part of the model anyway.
Thanks for the reply,
Thank you for replying.
Interesting to read your opinions on the order of colors you like to spray in.
I’m not exactly knowing what is right or wrong for me as I’m just taking someones advice.
Use it on my project, and if it works I keep using it.
Until it doesn’t work anymore and I start asking again, for help.
I will see what I can do to practice and test out some things, what I like and what not.
Thanks for providing good tips and tricks.
Light or dark colours first.
This depends on how well a paint covers the underlying surface.
Yellow and red are usually bad at covering any colour differences on the underlying surface.
When it comes to greens and browns they usually cover quite well.
You can test this by painting narrow light and dark lines on a piece of styrene and then
painting over with the paint you want to test. How many coats does it take before you can’t see the lines? Yellow and red usually require a monochrome white or light grey surface …
I would suggest that the original camouflage scheme was hand painted. Therefore IMHO the best way to reproduce it is to hand paint it yourself. I don’t have issues with this, as I still use Humbrol enamels which are formulated for brushing so tend to dry without brush strokes. Other mediums may be less accommodating. I should have mentioned that I did a similar camo scheme on the Tamiya B1 bis and did it by hand because I just couldn’t see any way of masking it. The scheme is hard edged anyway, so spraying it wouldn’t replicate the look of it properly. I had the same problem with the Tamiya Hetzer; the “ambush” scheme I chose appeared in a book I own and was clearly hand painted.