I also have a lot of trouble with super glue and avoid using the stuff. If a model has more than a handful of required brass parts, it gets a skip.
A fresh bottle almost always works well but once opened, keeping out contamination is impossible. Large bottles are a complete waste of money because I do not build that fast nor use that much super glue. Eventually, I switched to purchasing super glue in tiny tubes, just like what HermannB shows above. The cost drops to about $0.50 US a tube so losing most of a tiny tube is not a big deal.
Another thing I began doing is using brass parts as templates to fashion replacements out of sheet plastic.
In my opinion, most brass parts should not even exist. Mold making technology has greatly advanced over the last 25 years ago. High resolution printed parts are now common. Place a piece of plastic card on a sticky back, run it through a Cricut type machine, and cut the parts into the sheet plastic so they glue with normal model cement.
I suspect a lot of model designers include brass parts as a sales gimmick. “My model includes brass parts so it is high quality.” In many cases, the brass parts make no sense at all. I used to purchase a lot of brass parts sets from Eduard, Lion Roar, and Voyager. A very high percentage of the parts were worse than what came with the model.
In my opinion, a lot of model designers have lost sight of the ball. The object is not to frustrate most of your customers and push model construction time to 100 hours of pure Hell. If you want to increase sales and revenue, produce a model the average builder can breeze through so he buys and builds more of your models.
Keep super glue in the fridge and it will keep for a long
Time l have one in now for 2 years. My tests glue
Saliva acts like a accelerant and makes the bond stronger. test the glue out with saliva on scrap first it
May cause blooming pushing apart your etch parts
I threw away tubes upon tubes of CA until a friend who works in hospital told me that they keep the glue in the freezer since it is the humidity that cures the CA, the freezer takes it out of the equation… I have 3 big tubes of glue opened in a tupperware container in my freezer for 3 or 4 years!!!.. … and since I keep them there I have not yet trow one in the bin, when before living in the tropics I had to throw them away every 2-3 months max, the CA does not freeze so it is always ready to use…
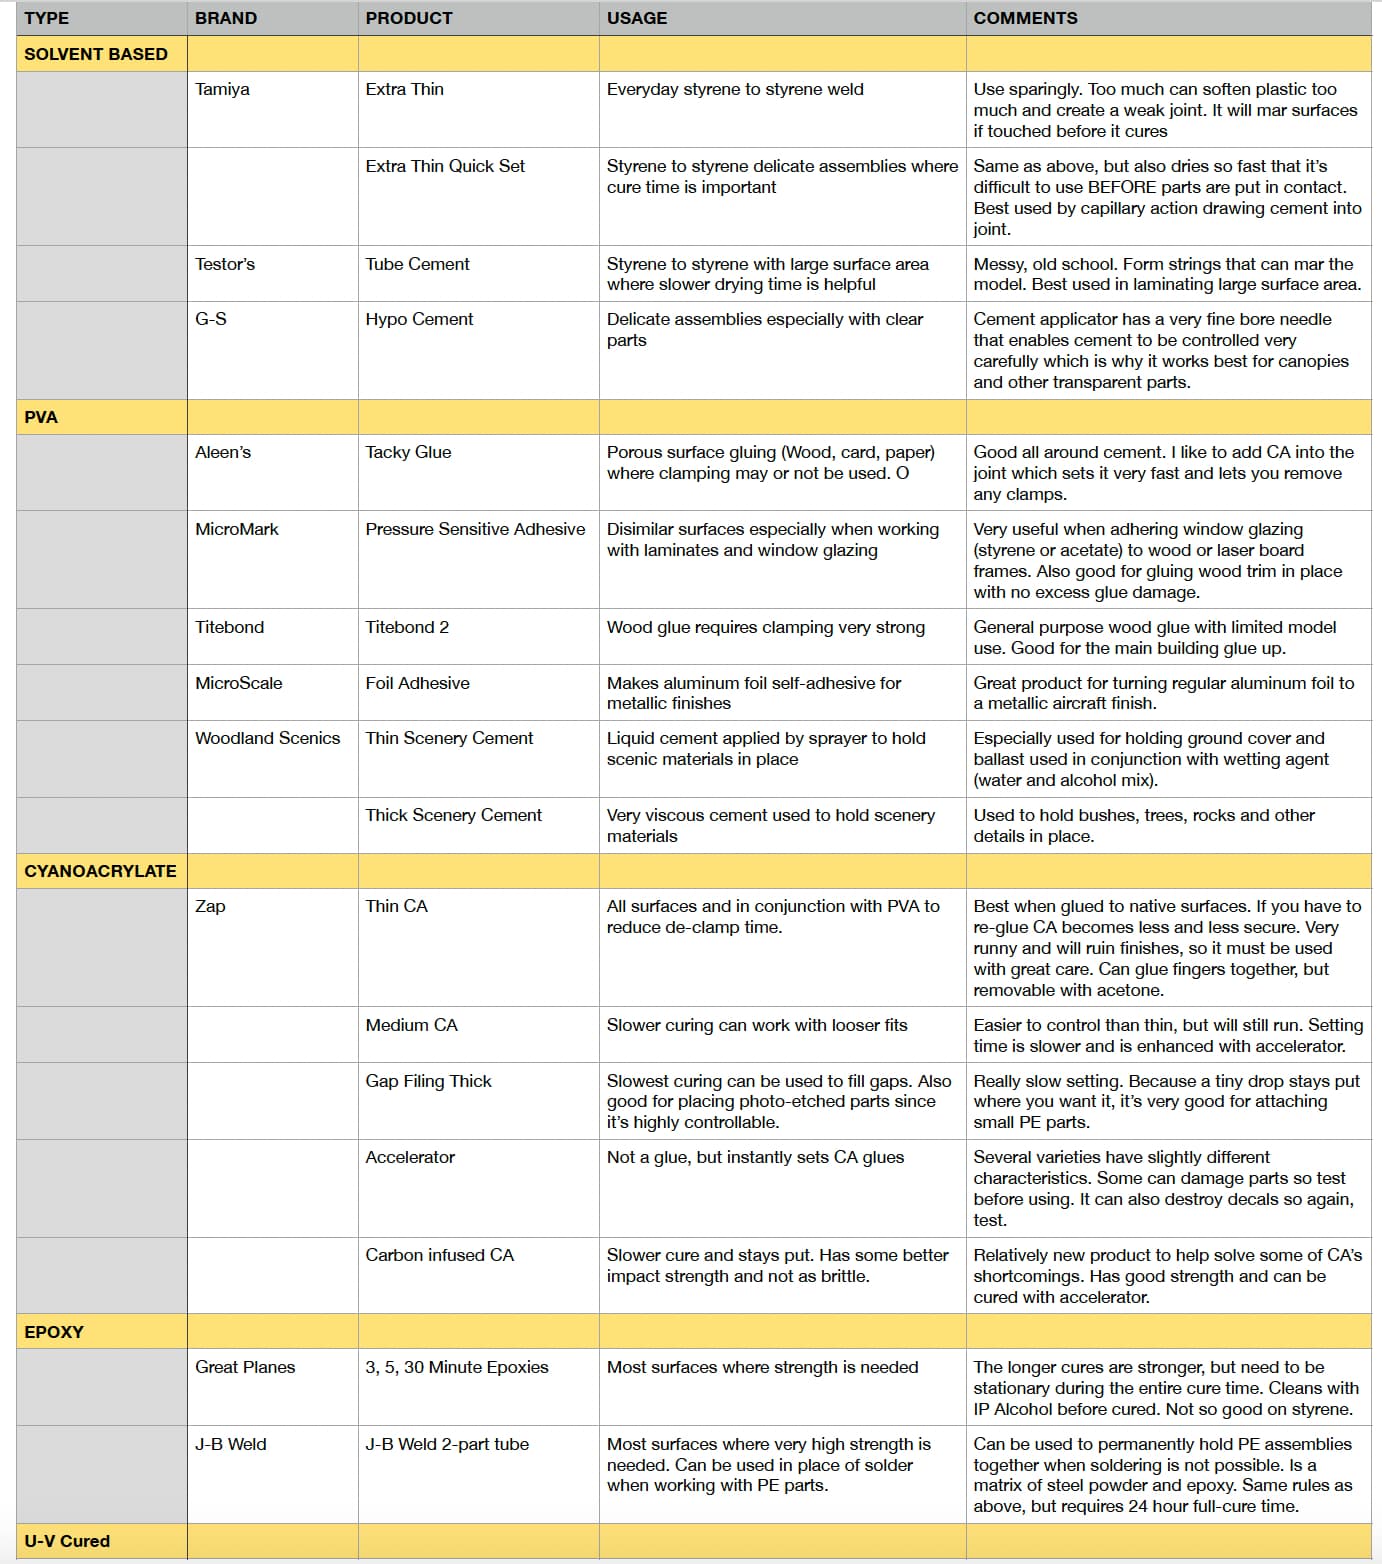
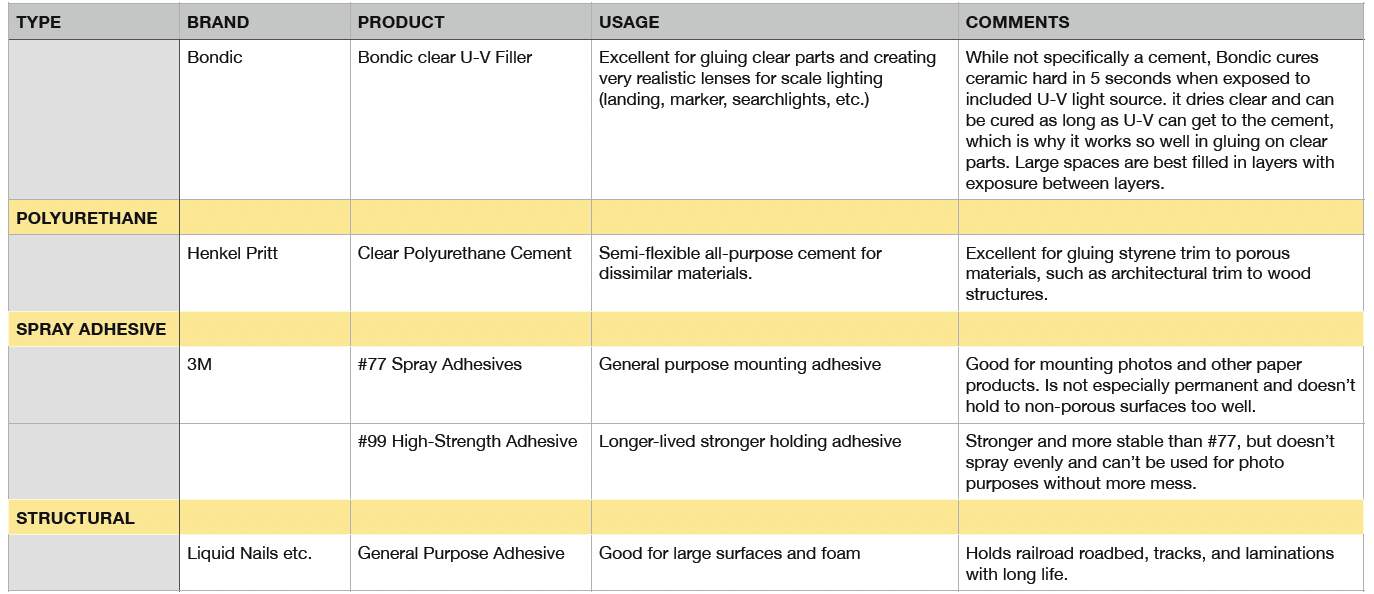
I produced a spreadsheet for our model club (Military Modelers Club of Louisville) of the glues used in my shop. The list is 22, but isn’t exhaustive, and I know there are some that I missed.
I personally have an ambivalence about CA. It’s essential in many instances. For example: you can’t glue UV 3D printed parts with solvent-based adhesives. Solvents have no effect. You can only glue it with CA, Epoxy or Bondic UV Gel. Bondic doesn’t cure where its little LED 405nm UV light can’t reach, so for blind joints, it’s no good.
CA has the ability to glue everything you don’t want to stick, but is temperamental gluing things that you do want to glue. The more critical the joint, the more dubious CA joints become. Many people glue PE parts with CA. When I do, I’m using Gel CAs so I can place a tiny dot of it and it doesn’t cure before I can position the part. That said, when I can, I solder PE. When soldered correctly, it doesn’t come apart. Also, when a joint can’t come apart, I will use epoxy.
Once CA breaks in a joint, more CA just makes it worse. If you don’t get it right the first time, the second time doesn’t make it any better. Best to scrape off all the old CA and start all over agai.
Three things I find crucial for super glue that changed the game for me.
use a needle with the eye cut as an applicator, allowing for precise application.
use starbond black super glue. It is a slower setting super glue with rubber in it. It gives the glue some flex so parts won’t fly off the kit and allows for some positioning time.
use starbond or similar debonder. This allows you to easily clean up and small patches of glue at that show under the part
I still use CA for filling and the odd part where I think I need more strength. But as other have stated I have turned to Liquitex gloss and gator glue
Unlike most of you, I also build card models. It is not exactly the same as fitting brass parts but similar. With a card model, every part needs cutting out and the edges need paint. That is much more time consuming and tedious than brass parts. However, working with white glue is much easier than working with super glue or soldering.
Many card model tank tracks look like that picture you linked. It gets really ugly. The most elaborate card model I every attempted was north of 2,000 parts. (For better or worse, the dog ate that one while I was on vacation.) A card model tank can easily go over 3,000 parts.
Back in the 2,000s, I did the brass part thing. It was not fun making working tool clamps and hinges and stuff. It does look neat. It does feel good to complete such a project. Yet, years later, looking at old and new models in display cases, I would rather have modern models without all that fuss.
It is not all about me. I respect people who like such things. I do not fault model designers for producing models for high end builders. However, I prefer when a model designer leverages available information and technology to produce an accurate model without all that fussy stuff.
One of my cheats is to glue the resin or pe part to a thin shim of styrene.
After trimming I glue styrene to styrene.
This only works for some parts/joints but when the conditions are right
it does save time and frustration.
I agree. CA glue is just one of those things that follows Murphy’s law much of the time. I have had to put my StuG’s sideskirts aside for a while because it’s hard to glue the plastic handles onto the metal plates. I put on some CA where I need to glue down the pieces, and carefully set down the handle. However, the glue just won’t dry fast enough before the handle falls over.
Have you tried doing it the other way around?
Place a small amount of CA on some hard surface.
Hold the handle in position with tweezers or flat nose pliers.
Use a piece of thin wire, a needle or something similar to pick
up an even smaller amount of CA.
Add the picked up CA to the edge of the joint, keep holding
the handle in position while the CA is sucked into the joint by
capillary action.
Edit: Someone further up in this topic mentioned cut-off sewing needles
as homemade tools for application of CA.
Cut off most of the “eye” so that only a V remains.
Stick the sharp end of the needle into a piece of wood or similar to
make a handle.