Sadly I dont have any and Im trying not to spend to much money on AM for this build. Maybe in a day or two I’ll go to a thrift store and see if there are any frames with suitable wires I can get. In the mean time I will try to remove the cable.
Edit: I was able to really easily remove the cable. I will see what I have on hand to replace it and if not go look at a thrift store.
Regarding the tow cable, have you considered stripping the insulation and winding the bare copper wire ?
2 Likes
I did but the problem with that was the wire was wayyyyy to thin and delicate so I would only be able to strip about 3 inches before it broke. Im trying the same idea right now with some other wires.
You should be about to find a package of picture frame wire for under $5 at most place hardware, grocery, hobby ect. It would last a number of projects.
1 Like
Another source of wire is speaker wire. Strip off the insulation and have at it. If your family has any electrical tools, appliances, lamps, goodies, etc. that they’re getting of, salvage wire from those things.
Yeah good idea Ill check around and see if I can find anything.
Great work Ezra, it is coming along beautifully!
Sorry Ezra I checked through all my stuff and no duckbills in rubber.
1 Like
Its okay Rich, I appreciate you taking the time to look!
Only ones I have are the individual links with separate end connectors from RHPS which I think is now Panda tracks
1 Like
Oooh ok, are they workable ( i.e. like 3 parts for just the tread then add the end connectors) or a single part for the middle and then add the end connectors? I know you probably wouldnt want to sell yours (?) so Im just asking so if I get some I know what to expect.
Look at the link I posted, it has pictures as it is the same track. For regular track it’s 4 pieces, two track pads and two end connectors. The duck bills are added on to the outside connector.
Will do Ryan, Ive been putting off getting these till near the end so I have to decide soon what to do.
Ezra I found the set of duck bills ; I also have several sets of track , not sure which particular track. I thought I had the T54e1 and 2 but I’ll have to dig them out. I’m at work right now so when I get home I’ll check.
1 Like
Thank you! I really appreciate all your doing.
No problem love your project
1 Like
Excellent progress with your details. Yaeh, looks like that applique armor came right off without damage.
And I’m with the others here re: that tow cable. Glad it was also removable without injury. If nothing found at the thrift store (one of my go-to places as well), then as suggested above you can buy a whole pack of like 3ft very affordably at a hardware store.
1 Like
If there’s a pushbike repair shop you can reach, ask for a gearshift cable from their scrap box; that’ll have 0.8 mm diameter and be of the correct material. All you have to do is anneal it in a flame (gas stove, fireplace) to make it lose its springiness and give it the right color. For a photo, see the thread “LF fine braided wire?” or enter “pushbike gearshift cable” in the search function.
Peter
1 Like
I finished the wiring last night but school prevented me from posting till now. After watching many builds of this tank and what others have done I chose to use fine black tread (that wont fray) for the wiring. It looks the part and should blend in with the colors of the tank when painted. I followed a wiring guide for this.
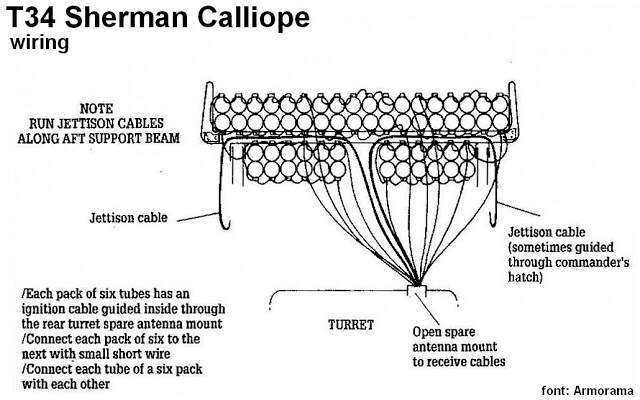
Pretty much there is a wire running through a pack of six tubes then it connects to another pack running down then runs into the turret. It took me only about 3 hours to finish. I still need to do a bit more with the wires, but Im very happy with the result.
(The two thicker wires are the jettison cables.)


All thats left before paint is:
Replace the hatch spring that I lost when the turret fell
Make a new tow cable
Make a handle for the commanders hatch
Make a bent antenna mount
7 Likes