From, The ModelIing News.
In the new Abrams Squad Vol 40:
https://blogger.googleusercontent.com/img/b/R29vZ2xl/AVvXsEhqLCzrJVzUAAY54J4G5flnIRtr5Gg5FwVrZvL0ERK2ndOD5I1PT7tHRR0NpO4zImN21a-NB9RWRWke4UMzLhgTJj8D-YvVXBz-DpM_cpBfCz4VN7_fHw9CDOb_pbonKVXnWMdotPKAd1tRNT_pLxpNndUycnxbUKKEPRHKOnL95hEoFd352BA3Xykc/s16000/aBRAMS%20sQUAD%20%2040%20(3A).jpg
Looking like the 1:1
1 Like
Ha - yes, that seems to be the best way to get a kit made - build a conversion first!
Cheers
Nick
2 Likes
Ain’t that the truth, maybe we set ourselves up for the modelling-knife-through-the-heart. Easy enough for kit manufacturers to trawl through websites looking for positive reactions to scratch-builds, to give them ideas for new releases. But in this case you only first posted two weeks ago so I guess Trumpy beat you to the drop – however there’s a good chance they’ll be gnashing their teeth when they see how you (doubtless) do it much better. Revenge of the Scratchbuilder yay ![]()
6 Likes
As somebody who awaits the utility model, I salute your scratch and the impetus it gives to Trumpeter/I Love Kits to actually release their version.
2 Likes
Hi gents -
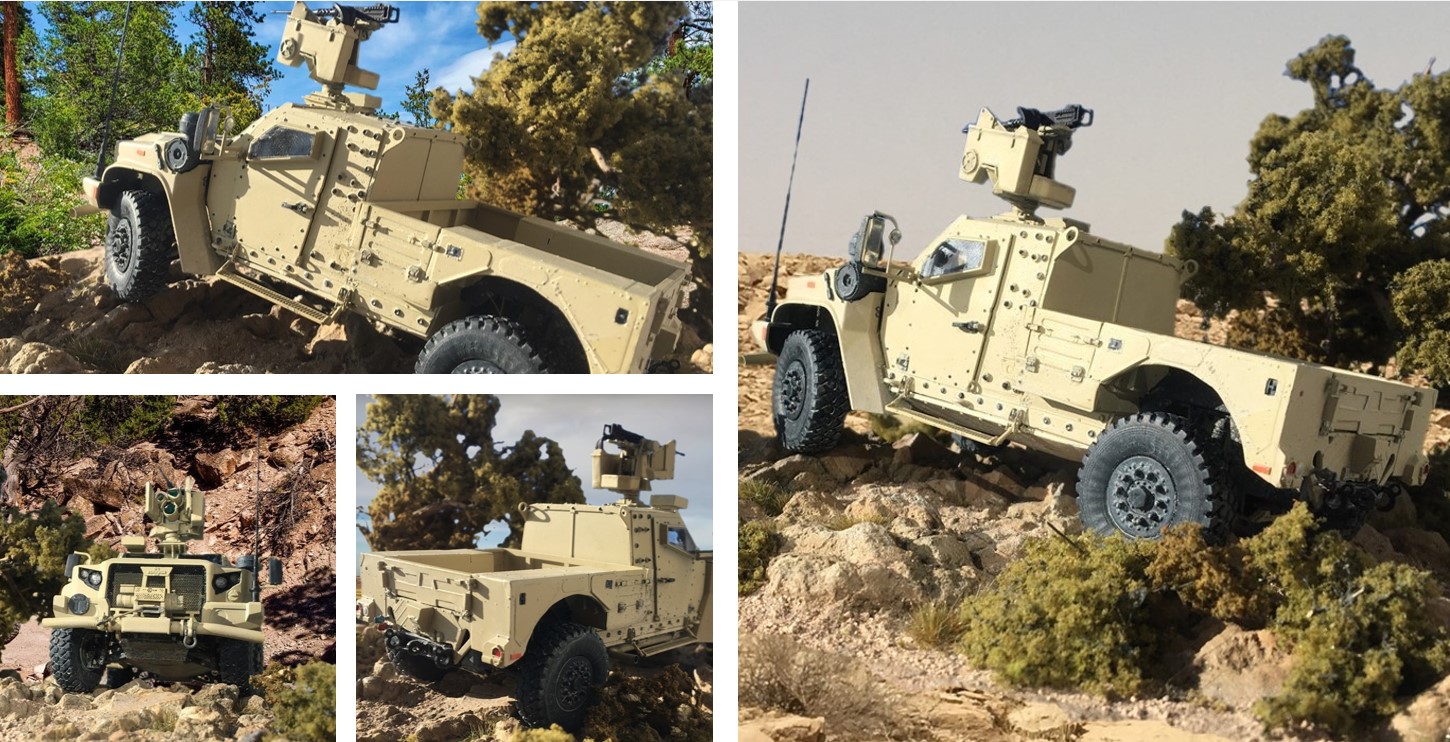
It’s time to call this done!
Before getting into the project, I’ll say the Sabre base JLTV kit is really good - there were no problems to report, and things went together like they were supposed to. My only heads up to any of you who build this kit - it comes with some painting masks which fit just right - but, when you peel them off, they left some adhesive on the windows -easy enough right? well - no - that glue didn’t want to come off - lol -weird problem. With enough fussing, it came off, so just an FYI.
OK, back to the build:

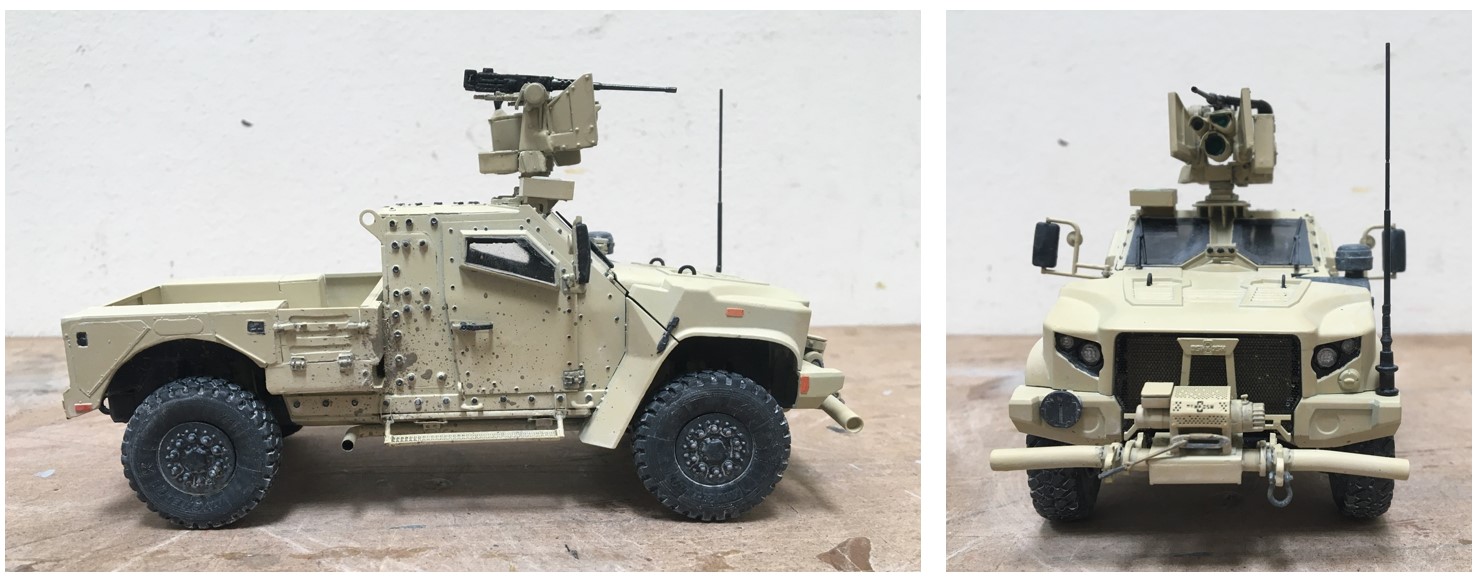
All worked as hoped! As the kit of this is on its way, I’m sure you’ll enjoy the build too ![]() I added a few light washes, some thinned anthracite grey around bolts and fine details, some camo grey lightly sprayed around the body, and an overall wash of Life Color Dust - as it was looking so nice, out we went for a trail ride
I added a few light washes, some thinned anthracite grey around bolts and fine details, some camo grey lightly sprayed around the body, and an overall wash of Life Color Dust - as it was looking so nice, out we went for a trail ride ![]()
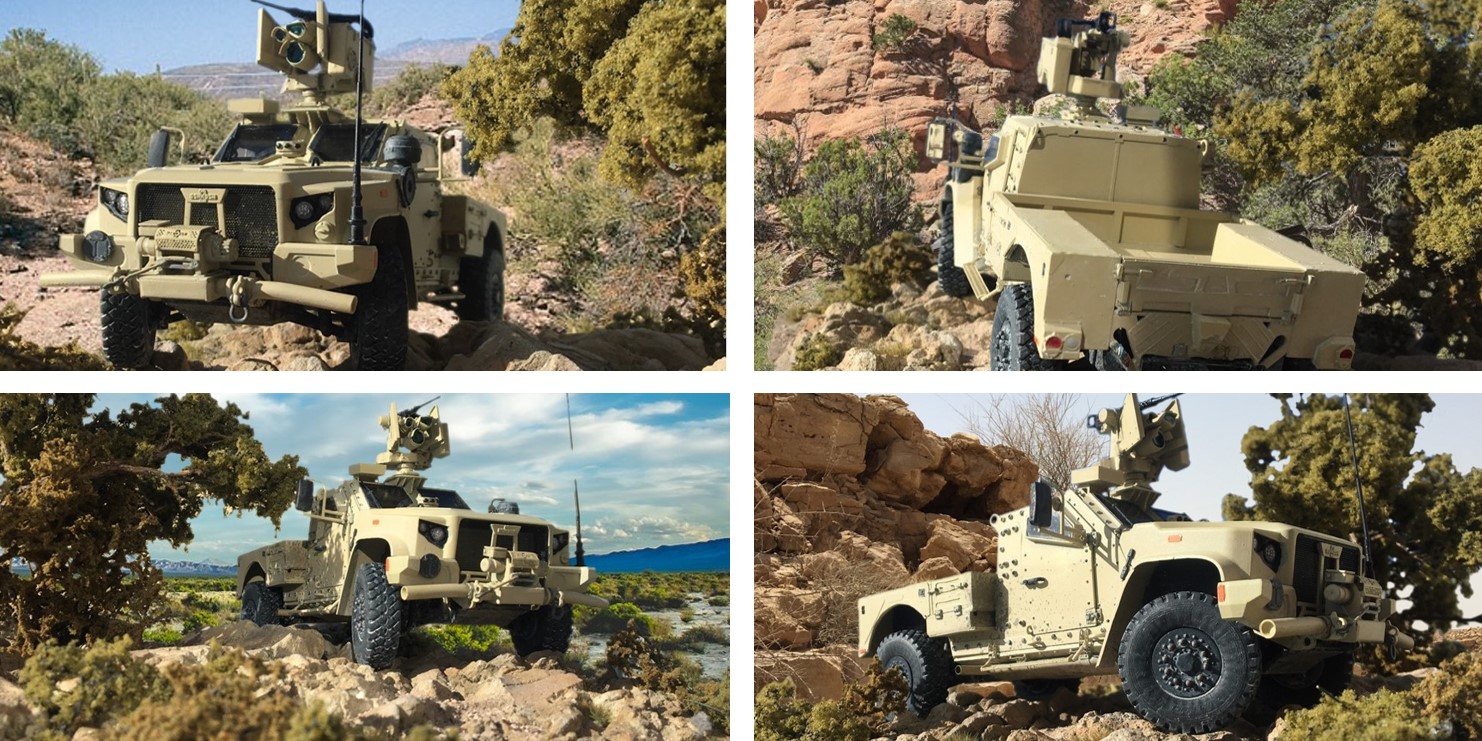
This is certainly a stout looking rig - it gives the impression that it should do really well off road, as there is a lot of ground clearance and wheel travel. I think you’ll be surprised how big this is (compared to an HMMWV) if you build the kit.
Also, another tip-o-the Xacto to @18bravo Rob for some great pictures, and @Tank_1812 Ryan - for giving me the exact length of the real thing. It was absolutely worth it for me to rebuild what I did to the chassis to get the length correct.
So, one more ready to collect dust - lol -
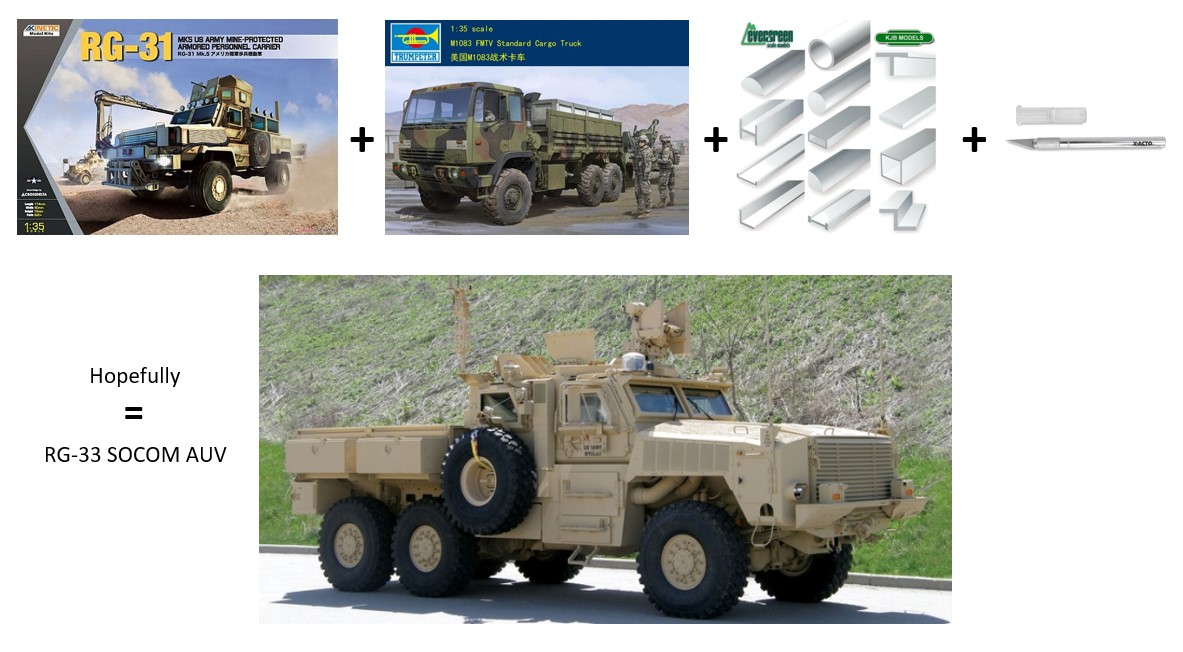
Next up, I’ll add to this thread, I’m going to try again to make an RG-33 SOCOM AUV. I built one of these a few years ago, which came out ok, but, I think I am a better model builder now, so will give it a go - and yes, this too will be informed by some pics from Rob.
Thanks for looking at this - and on we go -
Cheers
Nick
14 Likes
Man, Nick, you build outstanding models at lightening speed! This one’s just a beauty!
2 Likes
I know it sickly how he does it and that is after a major setback and redo.
Great job Nick. ![]()
![]()
2 Likes
Very nice. Great work on the conversion.
2 Likes
Excellent job!
2 Likes
Excellent build!
2 Likes
![]()
![]()
Ken
2 Likes
All those boltheads make your build look really cool and so realistic. Awesome job, Nick, and I really like the CROWS II option on top! ![]()
Do you plan to add cargo to the bed…Javelins, boxes, backpacks, etc.?
2 Likes
Hi gents, thanks and glad it passes your collective “eye test”. This was indeed a fun build.
@Trisaw hi Peter, well, no - this one is done. Time to start something new.
I’ve collected most of what I want to use to build the RG33 AUV.
I have an RG31 and M1083 kit to use as donors, but expect much of the build to be styrene and remnants from the junk box. I’m waiting for some materials to arrive and hope to be up and running in the next week or so.
Funny thing, the RG31 kit comes with several duplicate parts including a hull, two axles and a few other parts, all of which I’m sure will be useful.
I was hoping that the M0183 might be useful for the rear suspension, but it turns out, it uses a different system than the RG, which looks a lot like a Hendrickson walking beam, rather than the system used in the M1083, which uses leaf springs (which are, like a walking beam, centrally mounted). But, I think the axles maybe transfer case etc, and bed will be good for my purposes.
Thanks for having a look
Cheers
Nick
3 Likes
I have a walk around of that.
2 Likes
Hmmmm…what inspired me to build this truck about 10 years ago?? ![]()
I’ll use those pictures again! This time tho, I’m hoping that as I have some more experience, I’ll do a better job. That said, last night I went back and looked at my first try. I seem to have been a brave model builder back then - at least I think I’m a better model builder now. I plan to stick with the basic concept from the last time - which is not that easy, and do a better job of it.
The cab needs to be widened, doors added, and shortened, the hull/chassis lengthened, and fenders and rear suspension largely new - both in terms of design and orientation to the chassis.
So: a) the pictures help very much; and, b) the donor kits help, but mostly for “shapes” and not for their intended purpose. I am anticipating a lot of evergreen.
Cheers
Nick
2 Likes
Hello model builders,
Well, we are up and running on the RG-33 SOCOM AUV, and I went ahead and prepared an overview of what I’m up to:
And the idea - to cut up an RG31 MK5, add some parts from an M1083, add lots of styrene, and hope for the best. I tried this once already, and know it will not be a “conversion” per se - and instead will require a big leap of faith that will lead to a decent end result…which made me think of the last time I tried this:

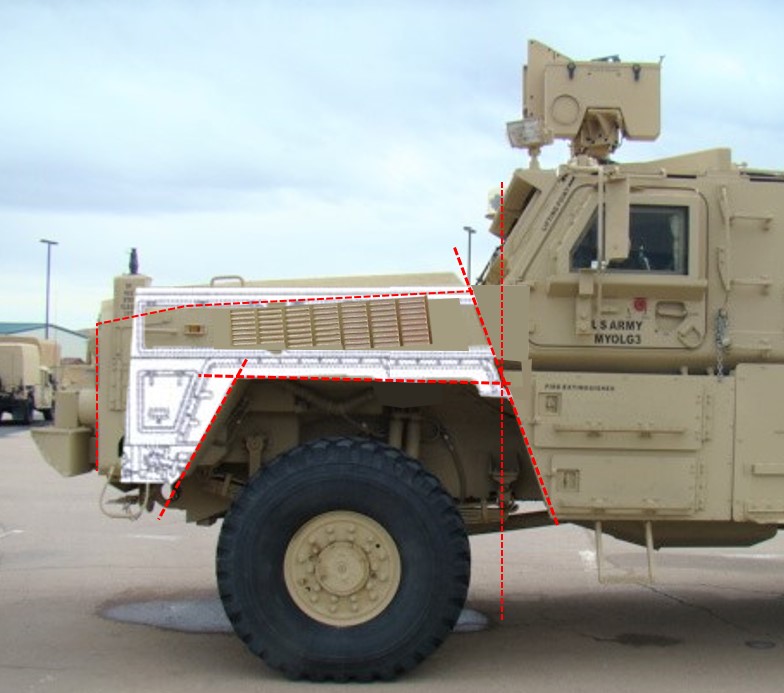
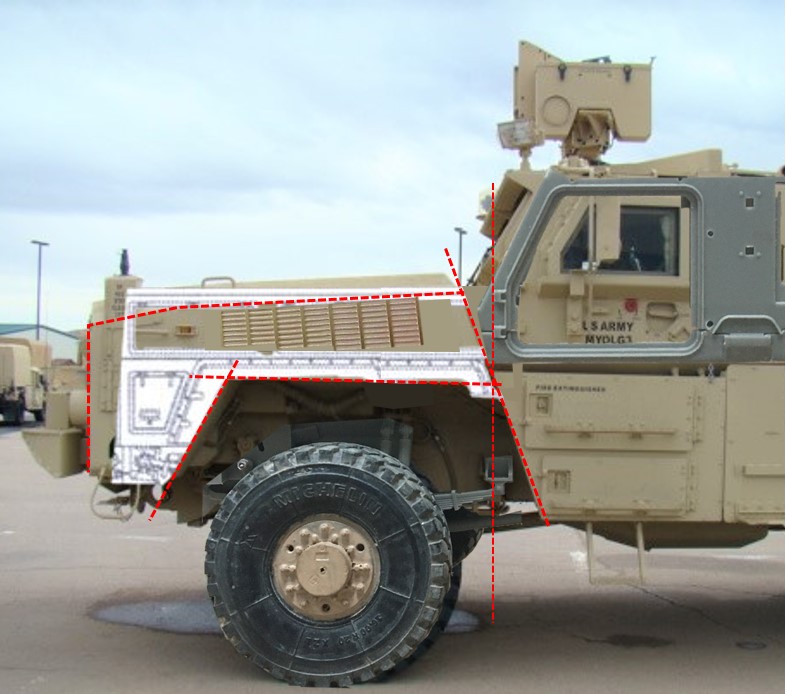
Even with some very clear photos from Rob @18bravo - well, this is what we got:
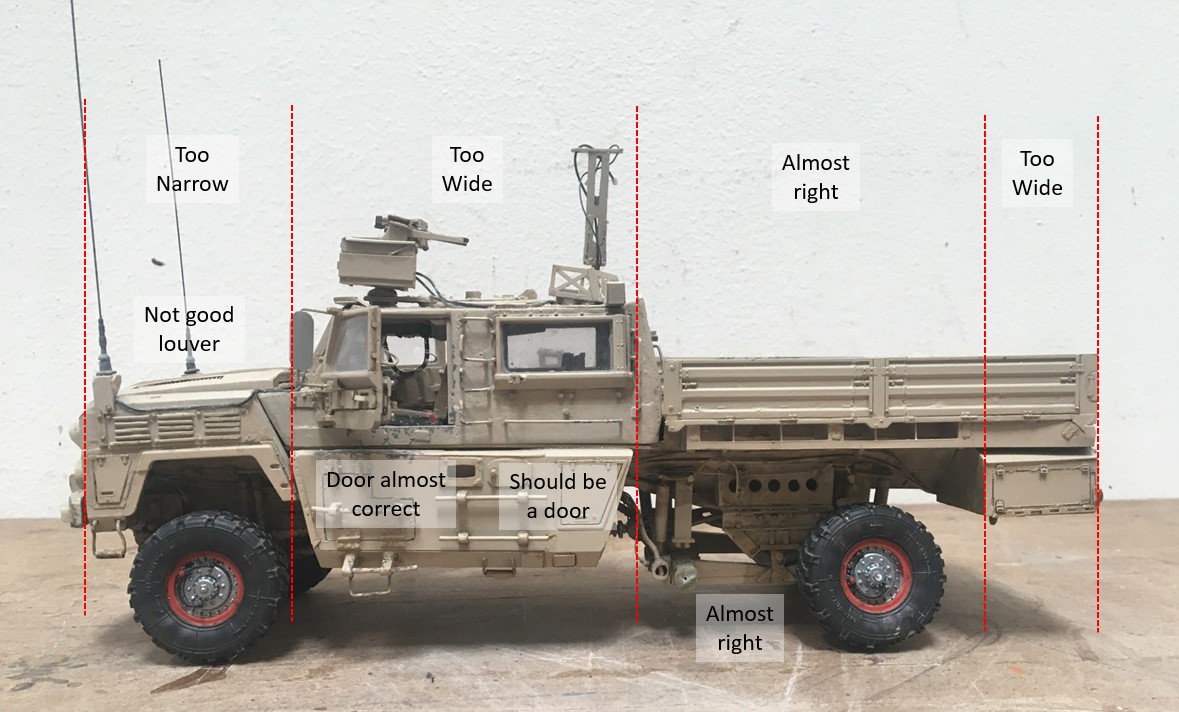
Ahh! what is that??? (in fairness, I took off the original tires and wheels, which I really like, and will use on this project) - well, it generally looks like the real deal, just as long as you don’t look all that closely. In fairness to myself, I did this about ten years ago, and it was intended to be a background vehicle for a dio - a role it played well. But, as a focused project, there are things I will change.
Starting with proportions - I eyeballed this and while almost right, if you carefully review the actual truck, you’ll see four segments of the side that I have noted with the dashed lines, that were not right.
Other things that are not quite right - the way I mounted the doors, the fact that I omitted rear doors, the walking beam rear end is almost, but not quite right, and those louvers… ![]()
All of that said, I’m sticking with the underlying concept behind the build. Which brings us to the rear end. I recently built something similar, but in 1/24 scale:
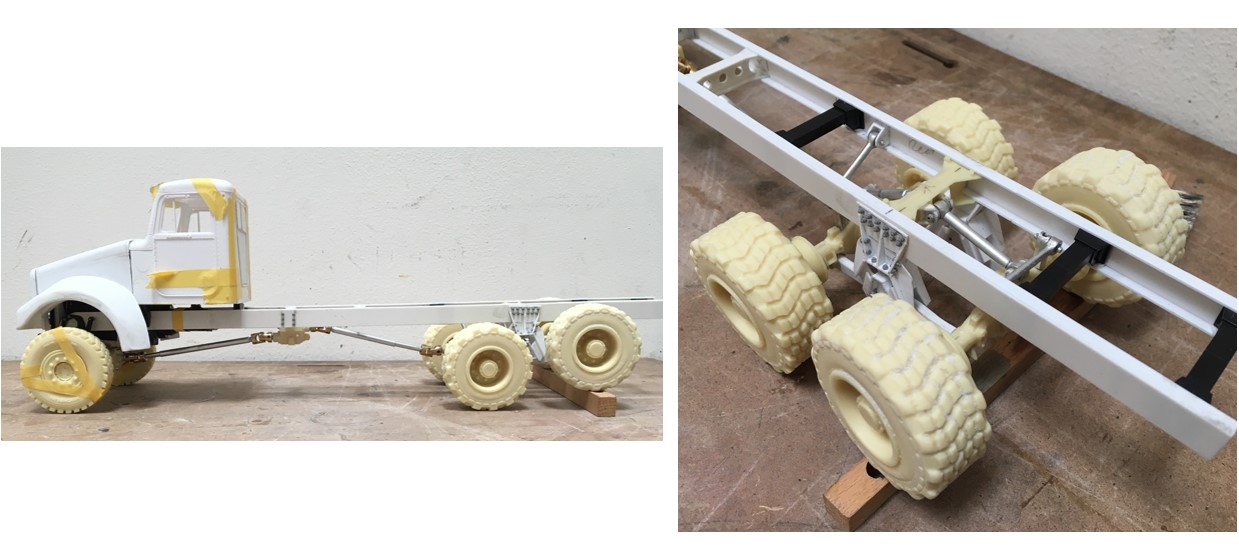
What a treat! At least one reason for using the rear walking beam is that it can handle all sorts of terrain and a heavy payload. But, building a posable version was a lot of work - while it would be cool to try this at 1/35, I don’t think I will. Even at 1/24 scale, with normal frame rails, getting all of the moving parts lined up, clocked correctly, and working in unison was tough.
There are some subtle differences between this and what’s on the RG33 including the frame mounts (as it will be mounted to a “V” shaped hull) and the torsion bars are mounted differently - and this is not the same what is used in the M1087…perfect - the axles will work but not the suspension…so this will be scratch built.
Another exciting challenge will be getting the cab dimensions and shape correct:
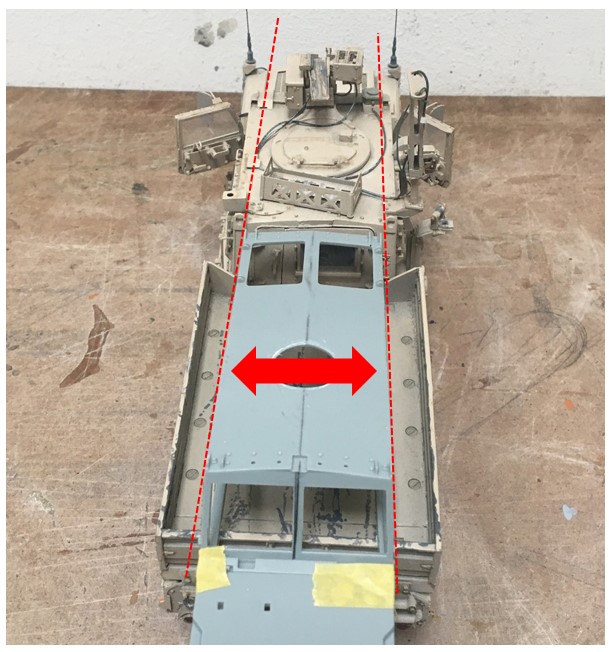
As you can see above, the RG31 cab is narrower than the RG33 cab, so it will be widened.
I’m still waiting for some parts to arrive, but have made some progress:
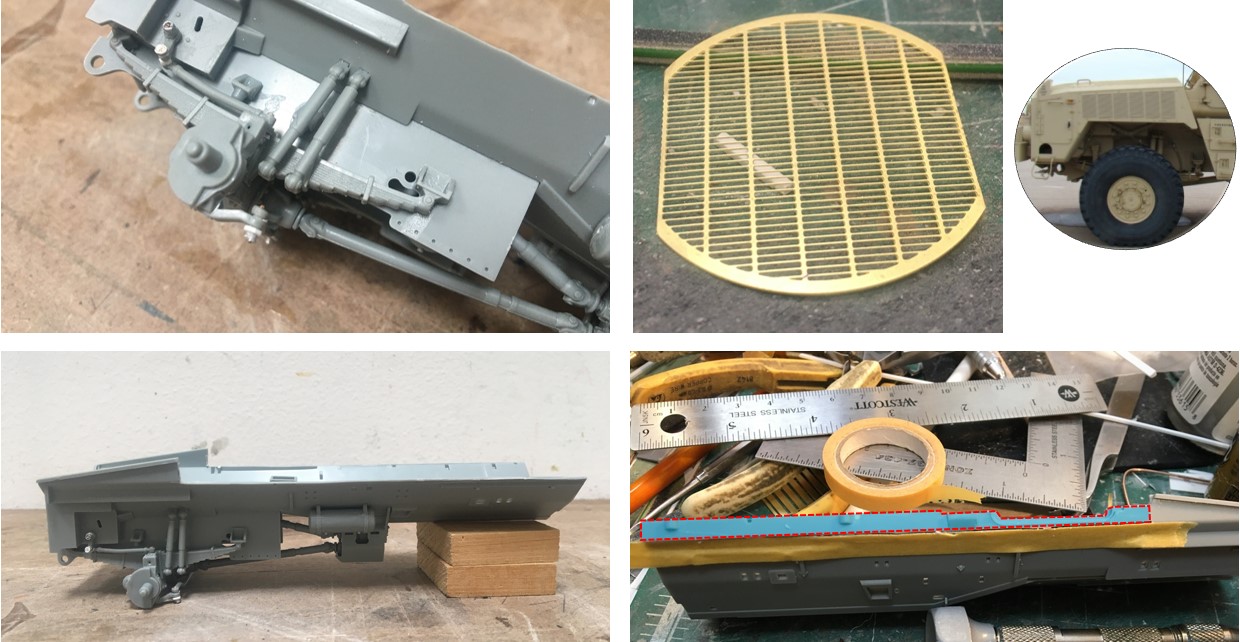
Starting on the lower right - step one, cut off a portion of the hull where the cab should sit (area shaded in light blue), keep the remnant part, and glue it to the underside of the cab. I did this because the cab will need to be widened, but the hull won’t be, and the lower portion of the door opening is attached to the hull, and not the cab - so, I cut it off and will attach to the cab. You can see the result of this in the lower left, but it’s actual significance is understated in this photo.
In the upper left, I went ahead and made the steering posable. The kit appears to allow this, except, the pitman arm and drag link are one piece, which is glued in place. To resolve this, I cut up each heim joint and added pins and caps, CA’d together - now it is all movable!
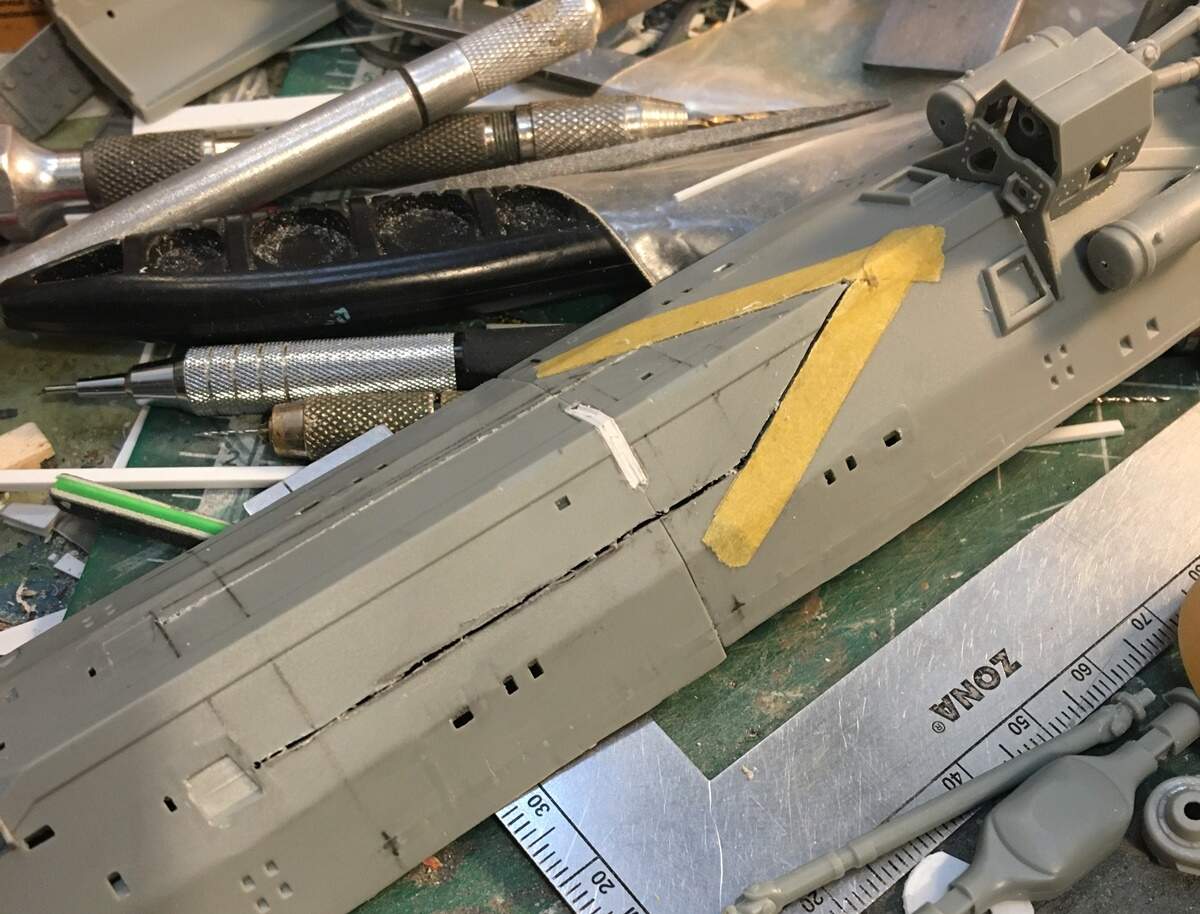
Finally, how about that nice and chunky piece of PE? I am optimistic this will help me in making the vents/louvers on the front fenders! If nothing else works on this project, I want these to look better this time. Which brings us to a few more studies:
An iconic element of this truck are the front fenders - which are majestic!
These fenders are big - and of course, nothing like the front fenders of the RG312, but, they are similar to the rear fenders, if you use them on the opposite sides of the truck. Above, a line drawing from the RG31 kit (rt rear side, inverted and widened) imposed on the left front side of the RG 33 - while not exact, it’s close enough to work as a base to make into what we want . I also imposed some of that fancy pants PE for the fender louvers ![]()
Also note, the vertical red dashed line - this shows where the front of the cab lines up relative to/directly above the front leaf spring rear shackle.
And a “visual” dryfit:
This includes three images - the base truck, and my front end with tires and wheels, and the cab, superimposed. You’ll see the basic geometry is pretty close.
There are a few reference points to look at, like the dual shocks, vertical dashed line noted above, driveline, and door location. One thing that is not right, that I won’t fix is the rear shackle mount on the front leaf springs - the real truck includes an extender, which I am not going to fool around with.
The following shows where it sits right now:
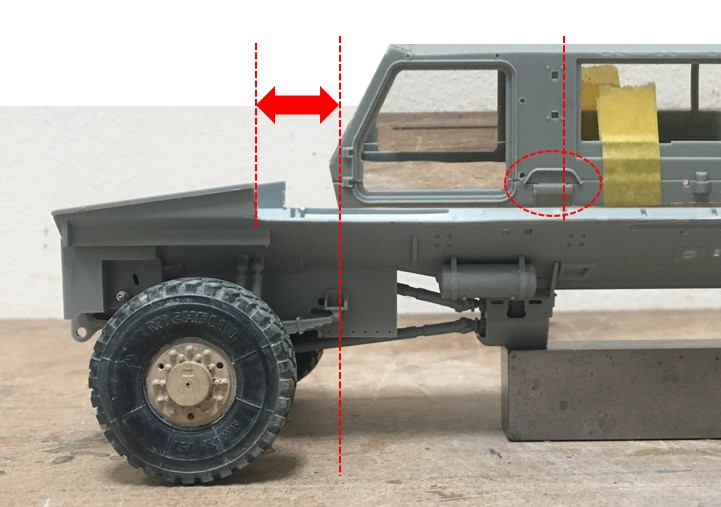
A few takeaways from this include the need to set the cab back, so it lines up over the shackle, the need to keep cutting on the cab to allow for a second door, and the need to scrape/sand/carve off the raised surface defined by the red dashed oval.
Ok - a lot of words, but now you see where this is heading - lots of cutting of plastic and head scratching to follow.
Thanks for having a look!
Cheers
Nick
7 Likes
I am certainly looking forward to this. You knocked out that JLTV in record time. You’ve got what yo need, the skills and the reference. I don’t think I missed a single square inch inside or out on that vehicle. But I have to ask, did I send you the measurements as well? I don’t send them to everyone. Some unscrupulous person sent my measurements to Panda (but I have a pretty good idea how he obtained them as he’s never gotten them from me) for the Cougar, which is why theirs turned out better than Meng’s as far as hood length. But I digress - if I did not send you the measurements let me know.
1 Like
Hi Rob,
Yes, the set of pics you sent over includes three or four with dimensions, which are really helpful. What had me fooled for a while was that some photos with dimensions are for the this version, and others the RG 33L. While the basic structure of the two is the same, there are some differences, like the front of the truck and the side/rocker panel areas. The dimensions also include correct wheel/axle centerlines - which are very helpful. If you happen to have any updates, I’d be pleased to see them.
The other images area just as helpful, especially for my scratch/kitbash approach on this project.
thanks
Nick
Well guys, I decided I really needed to get after the rear suspension before anything else.
This involved two primary challenges - first, figuring out how the real thing works and how I could adapt what I have to get something similar, and then setting the ride height.
It turns out this task become somewhat simultaneous as the parts I have between the RG and M1083 kits are close, but not right, so I mixed the two and came up with something close enough. I concluded it would be best to use the RG axles, and M1083 drive components, which seemed fine except the real truck has different type of differential on the forward drive axle which is quite compact - something I don’t have, which meant the height of my solution was too tall to comfortably fit. It became apparent that I needed to reshape the hull under the bed area of the truck to allow the rear axles to be set at the correct height:
I had already added the second hull to the rear which worked fine, and then marked and cut where I would change the hull. The location for the cut aligns with the hardware used to mount the front suspension.
Next up was to make the walking beams and set the rear axle height - to do this I made a jig:

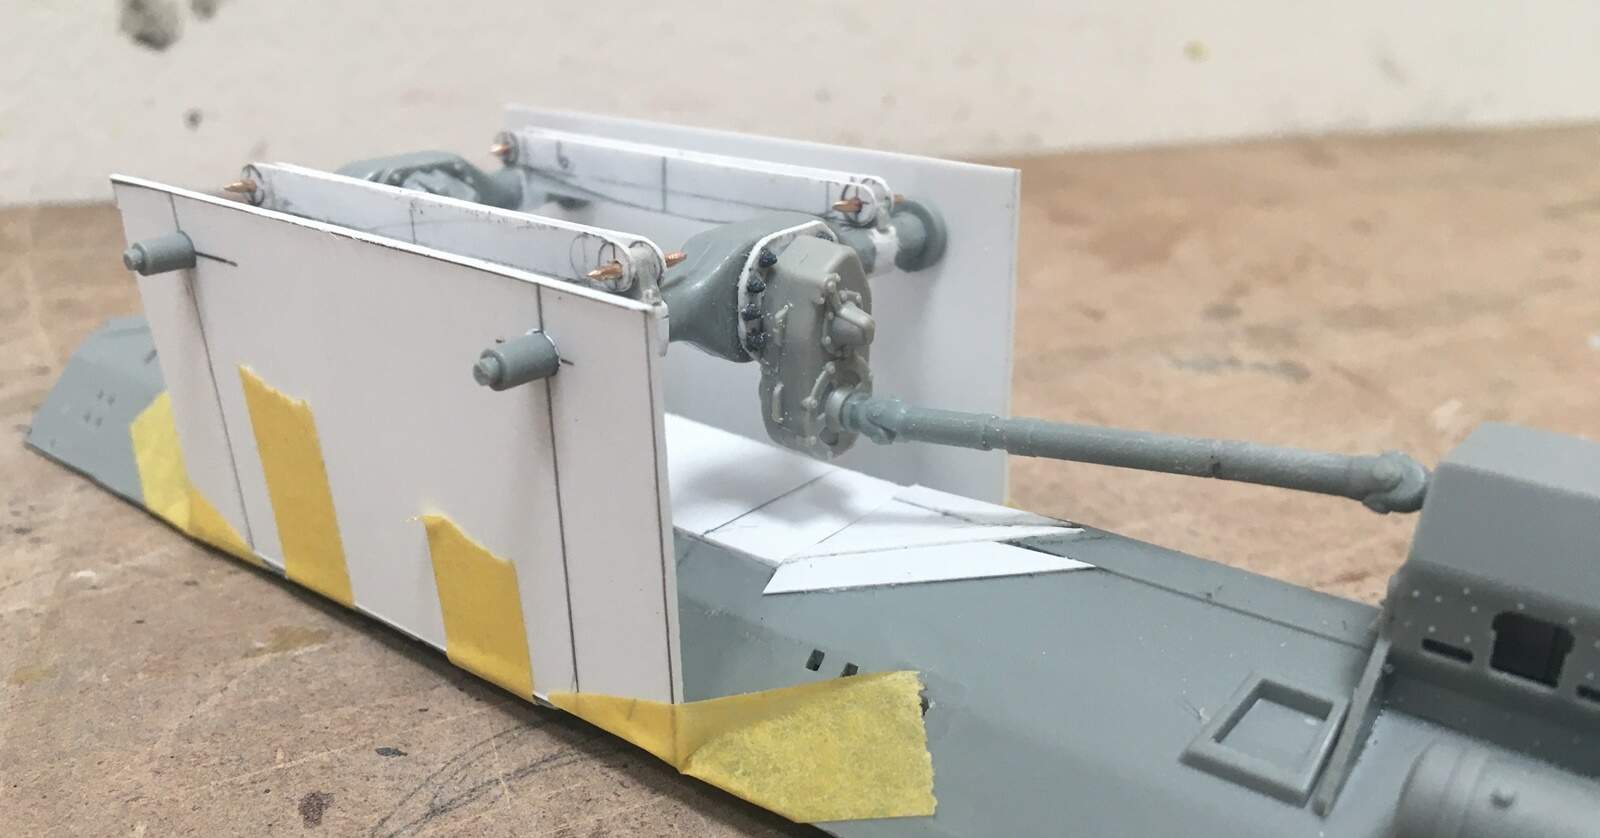
Believe it or not, I measured and assembled the walking beams and their mounting points (from the M1083) with the axles set in this. While not exactly easy, this was a lot easier than trying to do with the parts free - as the jig keeps the parts level and square.
The height of the jig holes for the axles match the front axle. You can also see what I did with the forward differential and why I needed to cut the hull to let it fit.
Next up, some small (read: tedious) tabs and brackets at the walking beam - that’s 8 tiny tabs and four brackets:
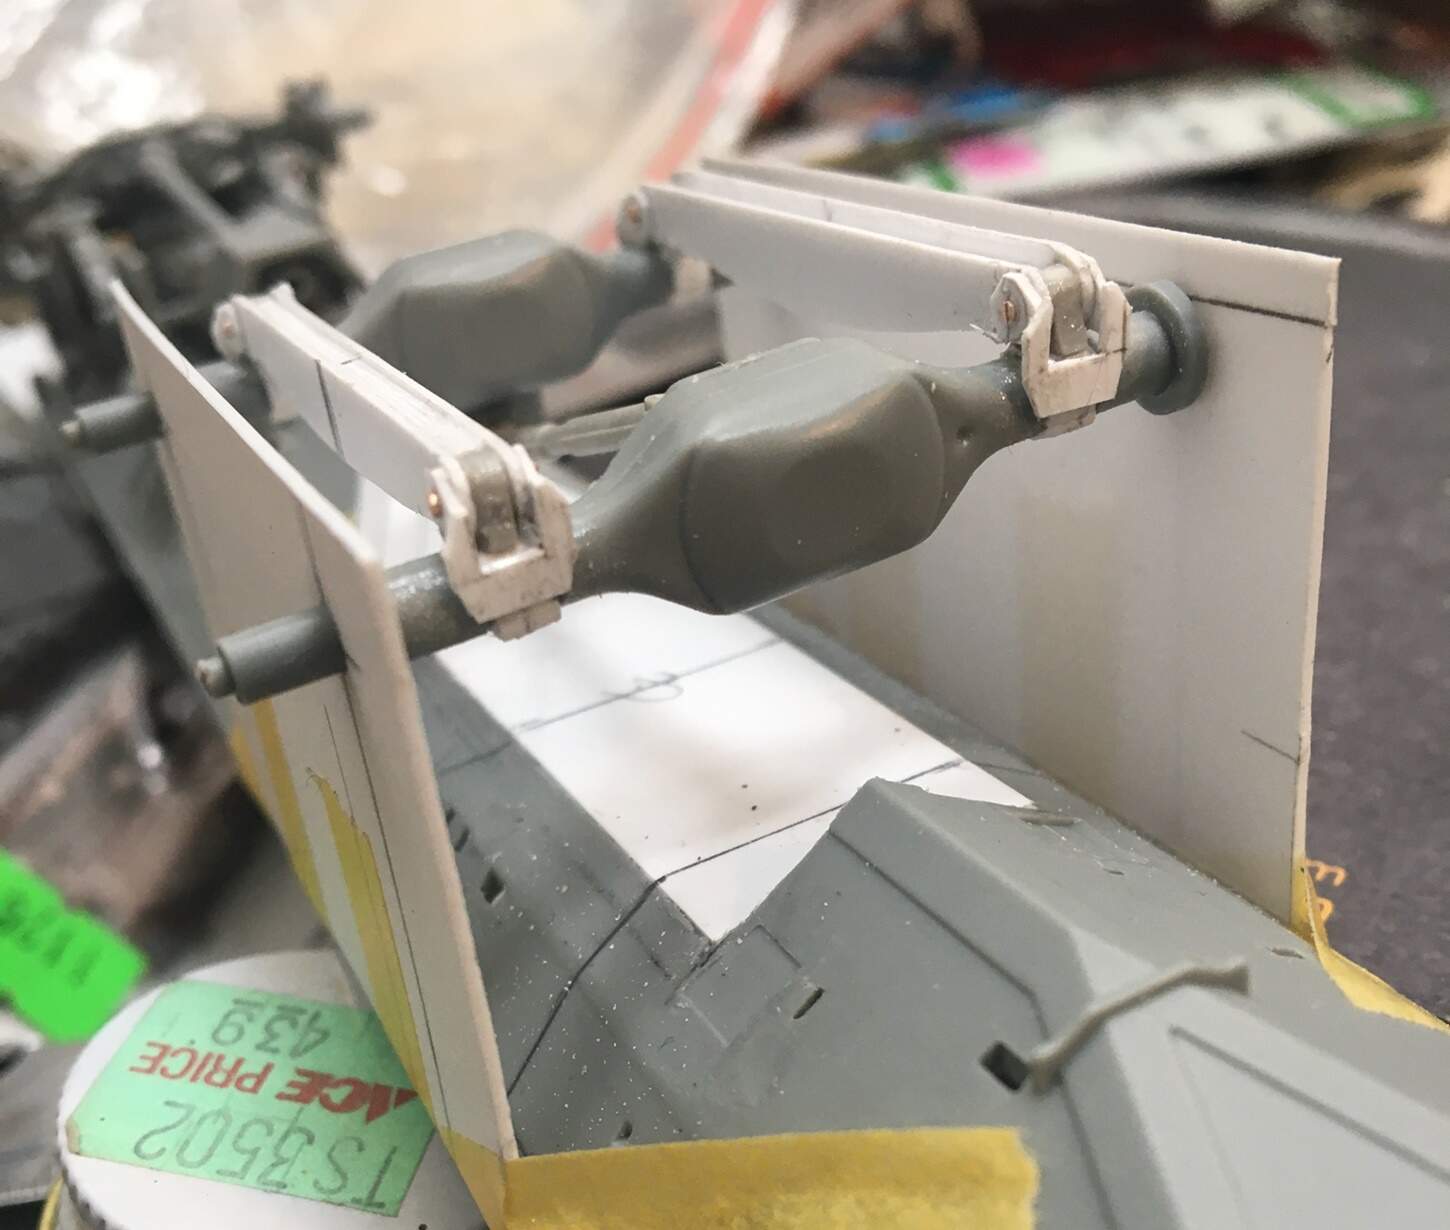

I have no idea if anyone would ever notice these, but - I will, so on they went.
And where it stand now:
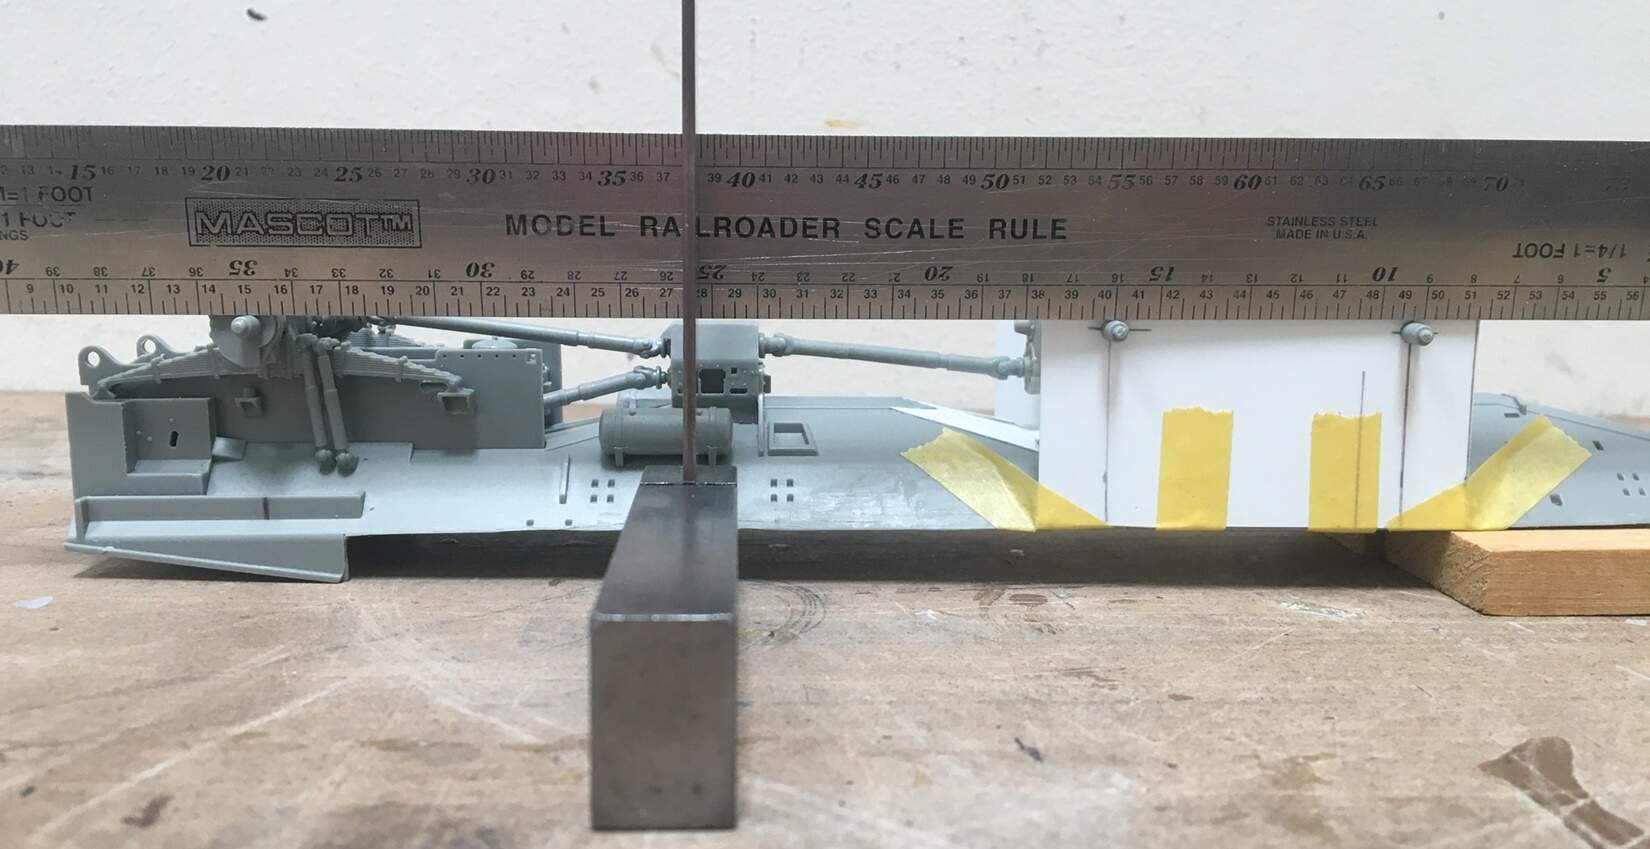
.jpg)
This is the hull flipped upside down and you can see the steel ruler running from the front spindles to the back and axles and so far, they are level. The next trick will be trying to figure out how to build the suspension under all of this -
Thanks for having a look
Cheers
Nick
8 Likes