Yep a Disturbance in the Force, donner & blitzen around Sydney. Nothing says get off the forum like a ![]()
2 Likes
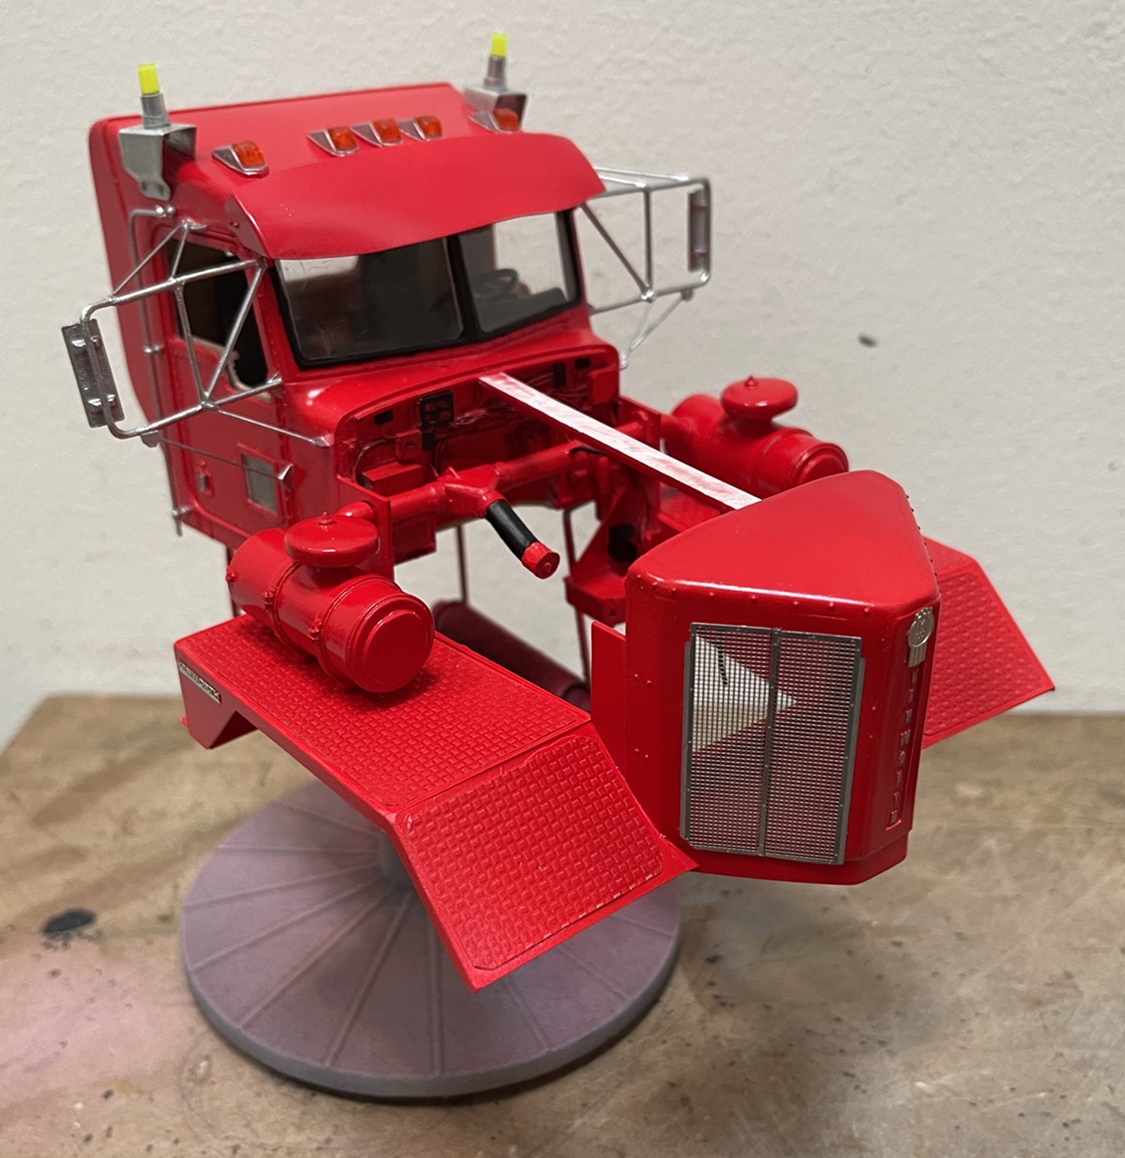
Thanks, gents - yes, the RED! It is not subtle - at all!
As for using red, I’ve painted various shades of red on models before with generally OK results, but only after learning that Tamiya sprays generally aren’t opaque when applied, and while not transparent, you, the painter will determine how close to opaque they will be by considering the color of the primer and paint you use, and the number of layers of paint you apply.
If you used a grey primer on this, the red color would be a lot darker, even warmer, while the pink keeps the red closer to a bright red, and white primer, results in more of a traditional red color. Each of these conclusions are hard and fast rules, that always apply! ![]()
Unless of course you are not painting a big truck model, and instead seeking a specific color, say maybe for an F1 car - whereupon, the color switch won’t work as noted, there will be bleeding, smears, drops, and there will be a uniform distribution of orange peel! ![]()
For now though, as this is not an F1 car, where the paint finish isn’t nearly as crucial - some pretty good results:
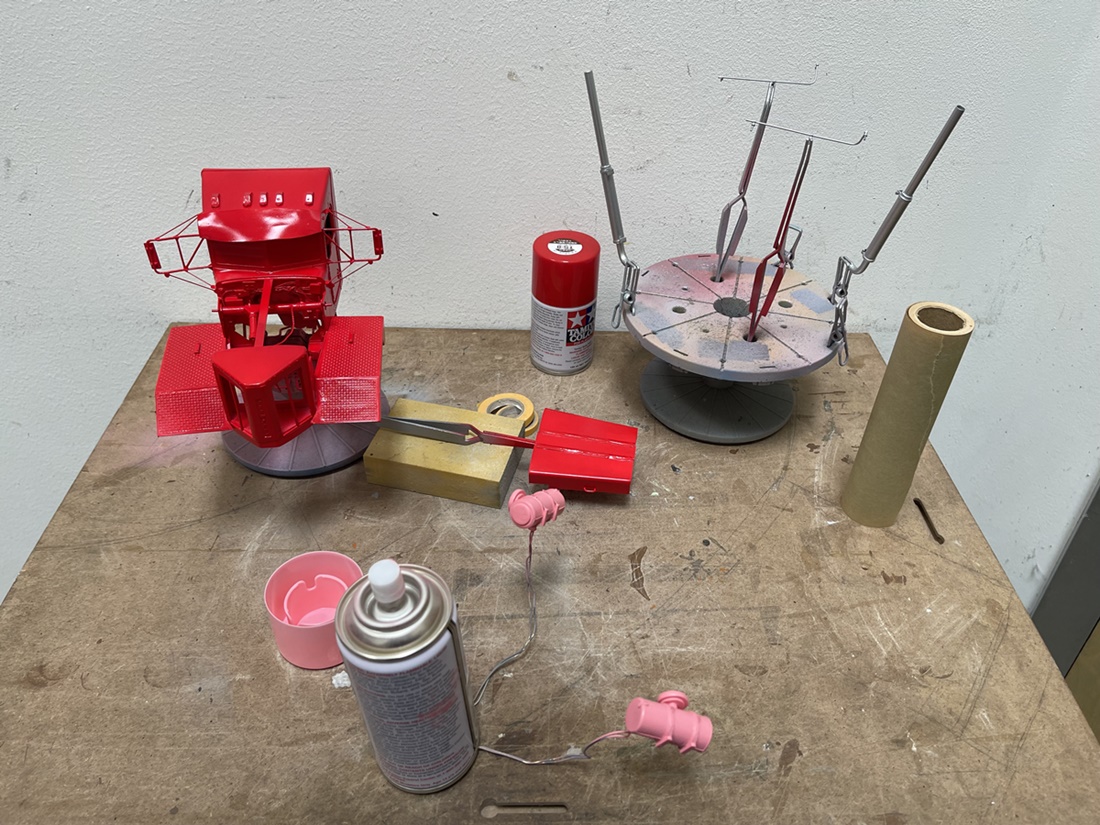
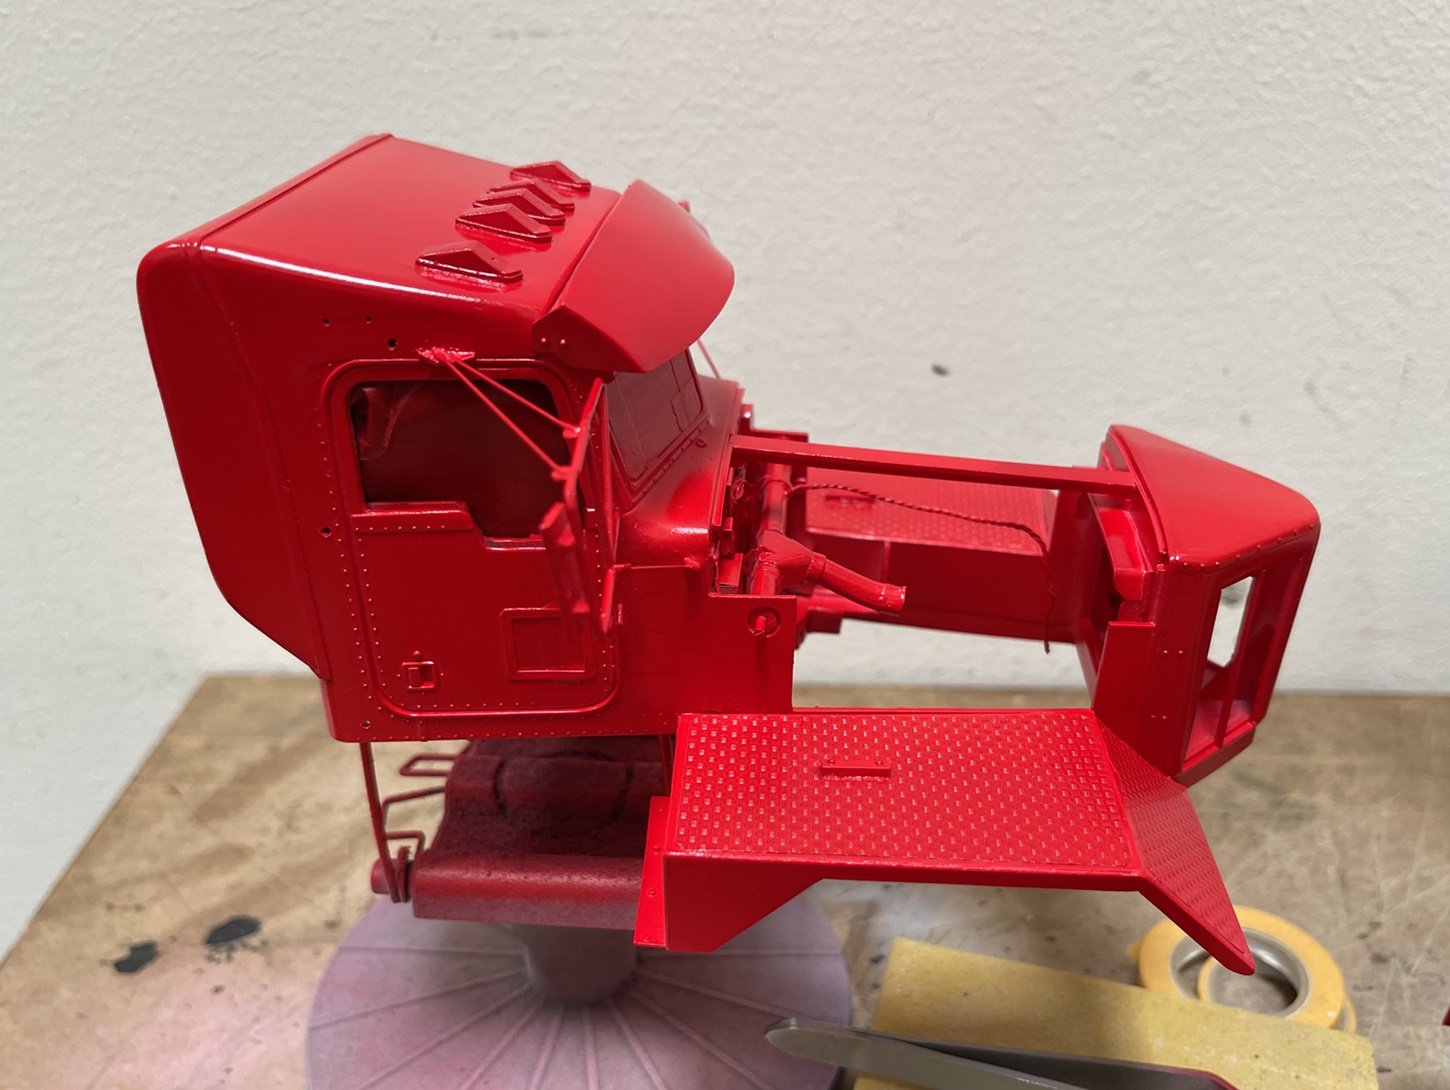
As you can see - what happened? the paint went on really well - and to my shock, no orange peel, drips, blobs of paint on the corners or any of the other hidden surprises I’ve come to expect.
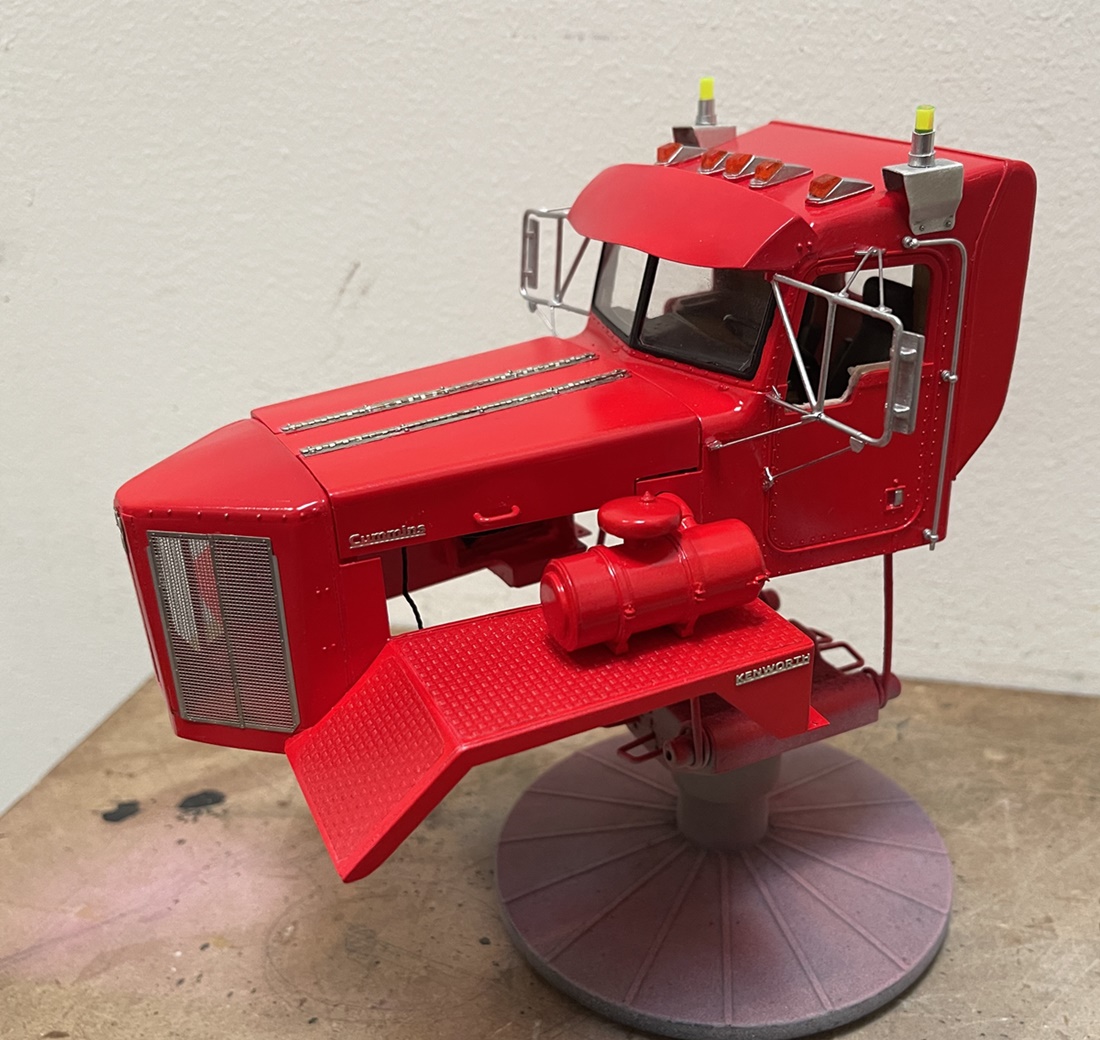
The chrome even worked OK:
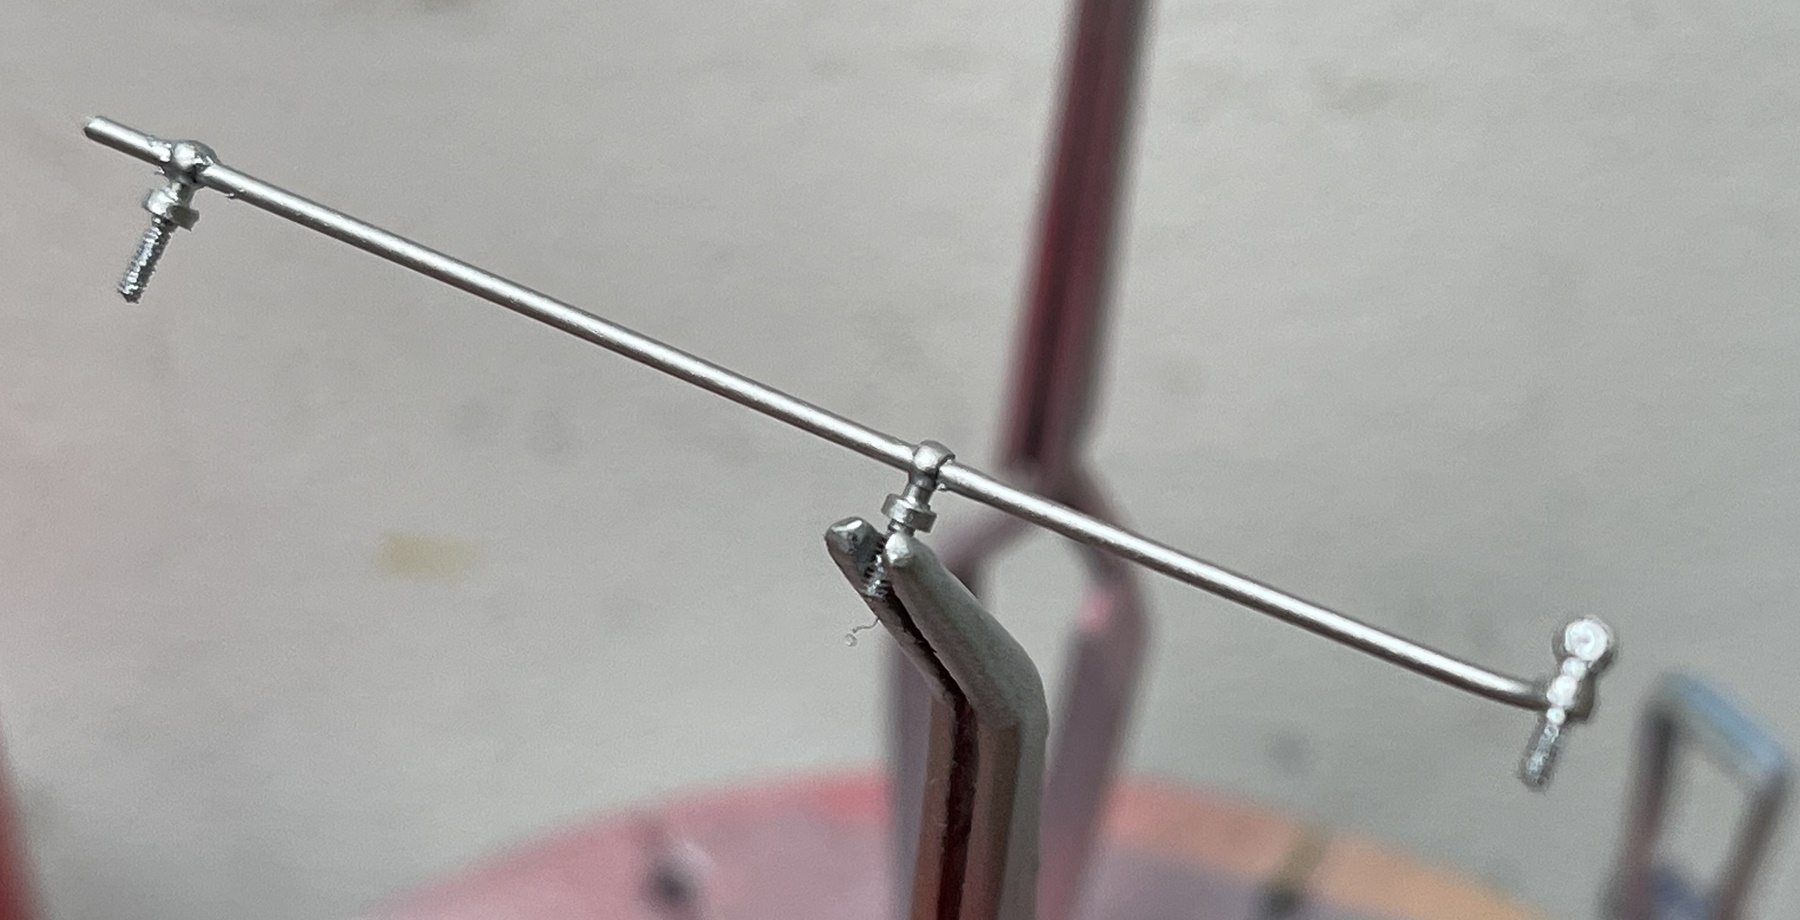
As this picture shows the work in a very magnified view, you can see where some CA crept from the eyebolts onto the grab rail, but in real life, it will be fine. As to the point I made about this build, versus what someone might do on a highly precise racecar, classic car, or hotrod - the chrome color here is just OK. It’s more like bright silver, than chrome.
I sprayed Tamiya bare metal over fine grey primer, then airbrushed on Vallejo Metal Color Chrome. It’s fine, but really looks more like stainless. I’ve heard that Alclad colors actually look like chrome, but also understand that the finish is very fragile, which as you are about to see, is not ideal for a guy like, say, me:
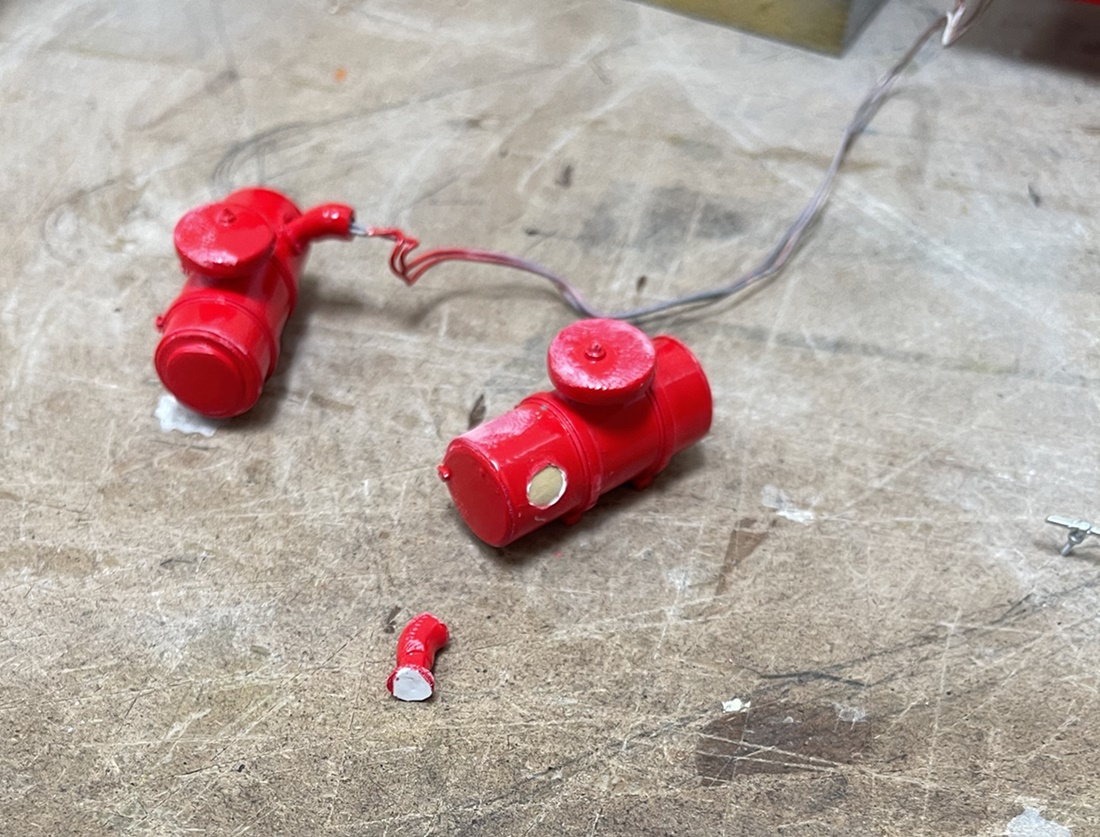
Isn’t this a nice image? nobody will notice! It’s not like these air cleaners are really big, and prominently mounted on each of the front fenders.
So, thanks for having a look - guess what I’ll be fixing?
Cheers
Nick
9 Likes
Wow man.That is unreal. Looks even better painted. A model kit couldn’t have been done that well. (Ever notice if you really look at anyone’s truck kit closely enough, invariably you’ll see mold lines on the cab? Unfortunate, but true)
What did you use for the rivets?
1 Like
Nice paint job Nick, you always undersold yourself as a painter, even on your racecars!
cheers
Michael
1 Like
The chrome tool. Shiny and real.
1 Like
Very aggressive colors, great. And Im so excited about this engine working, all that wiring. Do not forget fill tanks with gas and check battery voltage before test drive! ![]()
![]()
1 Like
HI model builders,
Glad you approve so far - I’ve carried on adding more details and paint -
@18bravo, Yes, I know what you mean about the seam lines. This basic cab had lots of them too, but as I did so much cutting and reworking, I was able to sand most of them off, or cover them with new plastic. As for the rivets, it’s a bit of a mix, in that some came molded into the cab, and others are small diameter metal rivets I added. Model Motorcar makes several sizes and types. While a bit tedious to measure, drill out, and then glue and insert, the results are pretty good. If you pick the right size, they read really well.
@cosimodo, thanks Michael. You are right, I always worry about finishes. I think I have developed some insecurities over this, as many other model builders seem to follow a much more rigorous process than me - be it using paint levelers, thinning/blending mixes, and so on. I tend not to do that - and use paint straight out of a can or acrylic bottle. If this were a racecar, I’d clear coat it with Alclad Aquagloss II which I really like - but for this - no clearcoat. I didn’t want to gum up the piano hinge on the hood, and as it is a really big model, I think adding the clear would just increase the possibility of introducing trouble. And as you’ll see below in some of the pictures, the red is pretty good as is. I did do some light polishing and it came right to life.
@Rokket2001, thanks very much - so far so good with the chrome! When this is done, I’ll take it outside for daylight photos, which I’m really looking forward to - I think the colors will really pop then.
@LOSTVeteR1, well sir, you are right - these colors are bold! I stuck with the red as that’s what many of the prototypes use, but I did change the chassis color using sea grey instead of red, because I like the contrast. And thanks! the engine took some work but, it’s coming along - and haha! Yes, this will require lots of lube! Engine, transfer case, axles, transmission! ![]()
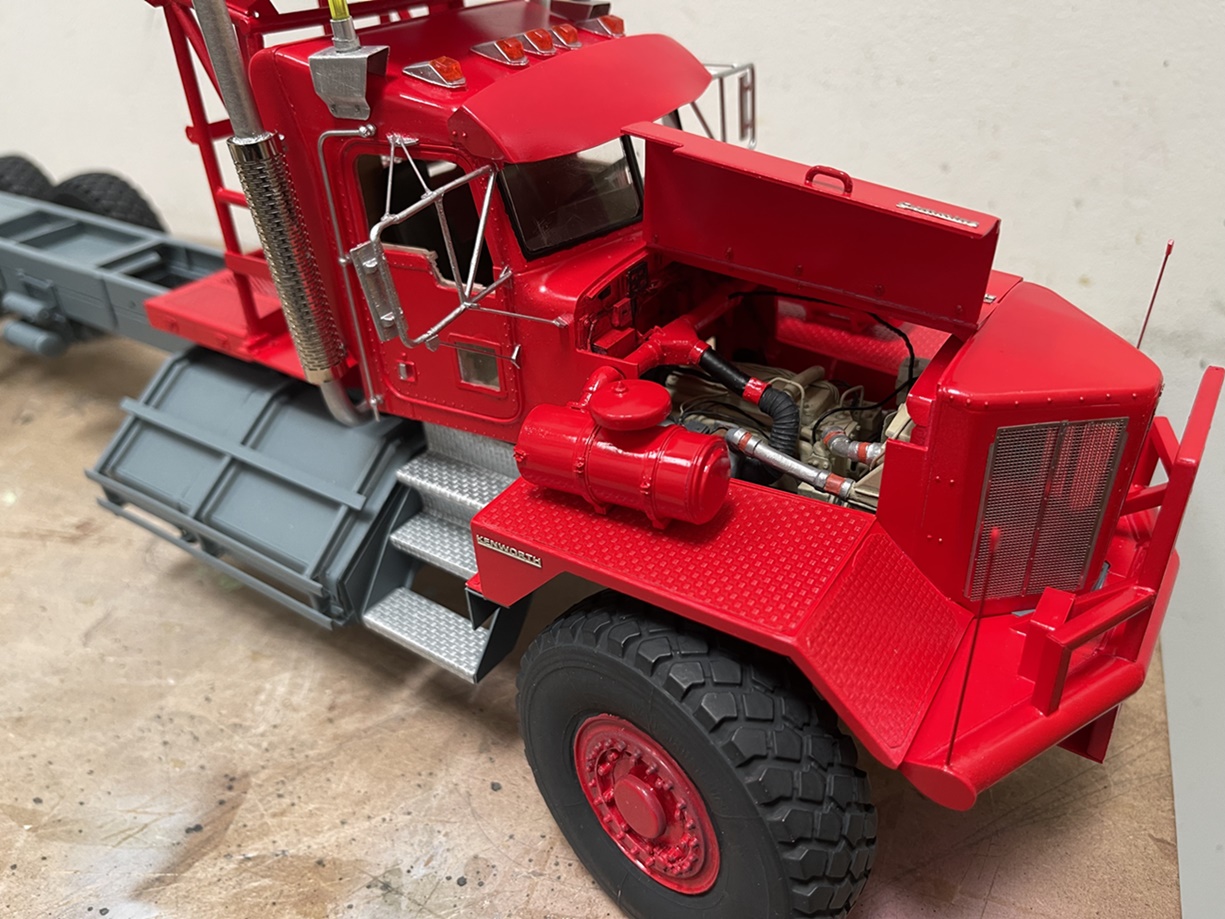
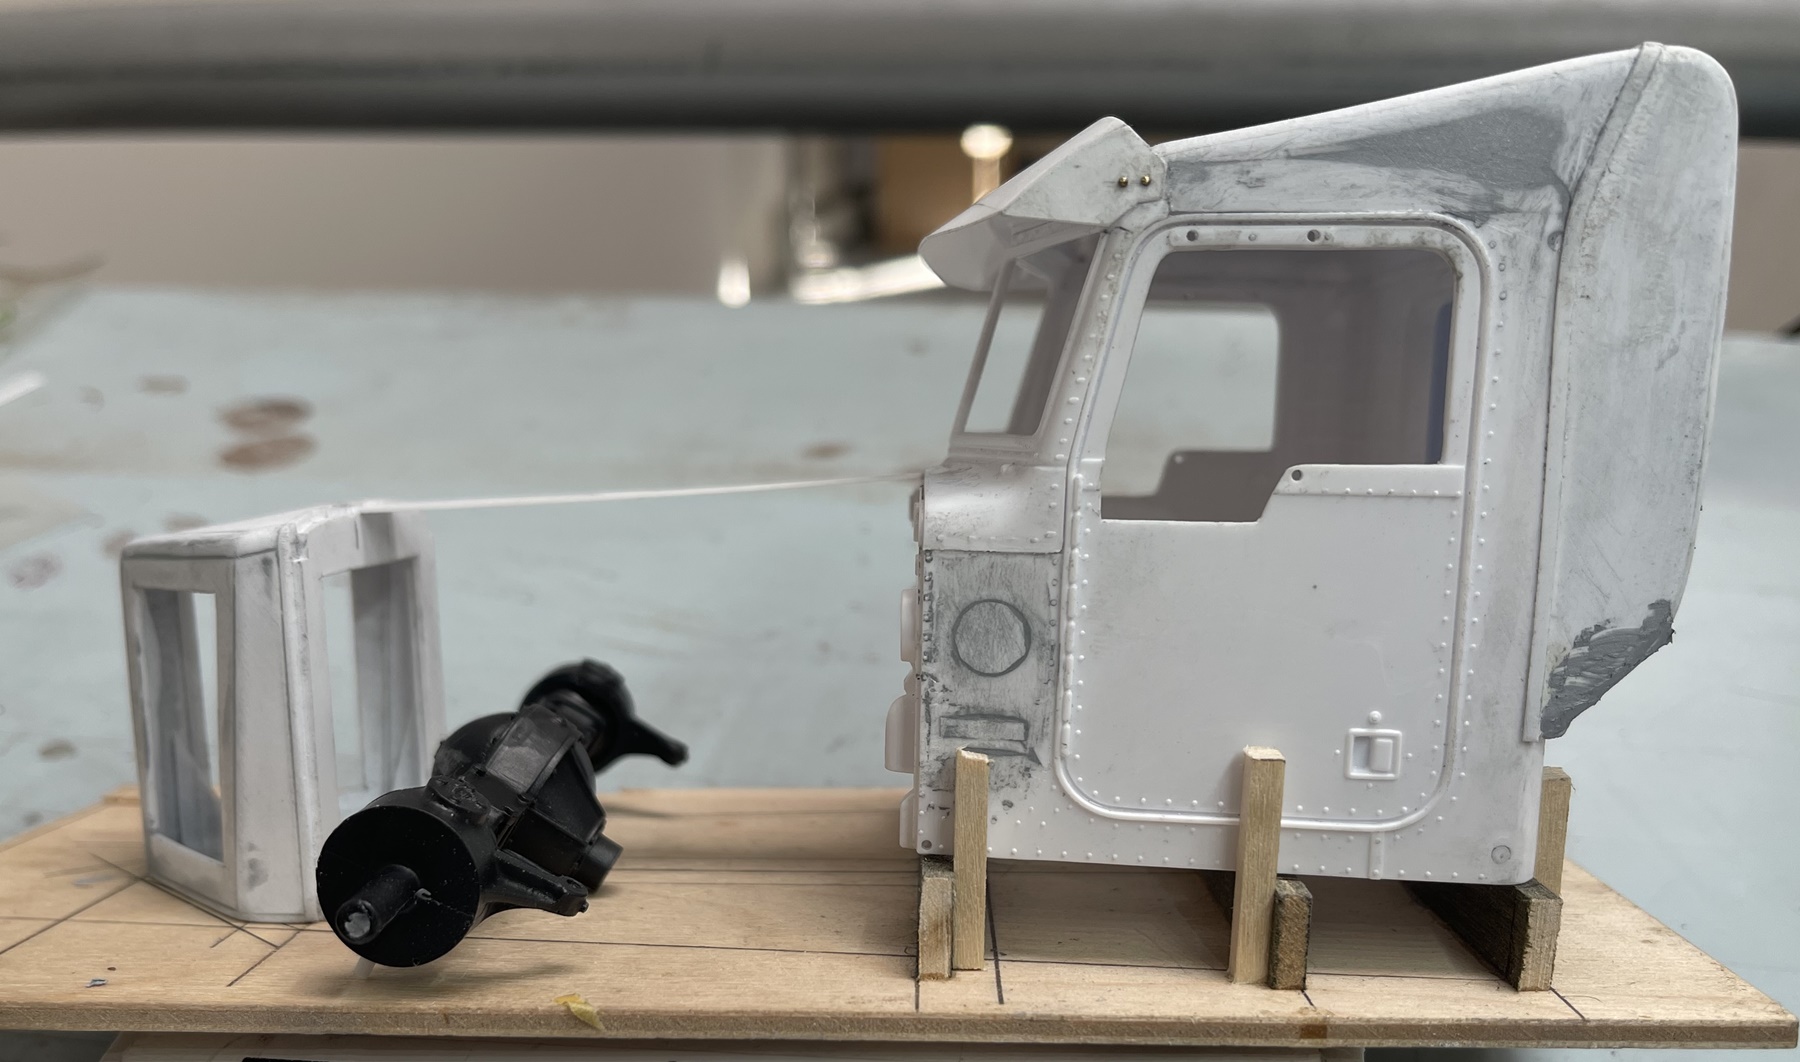
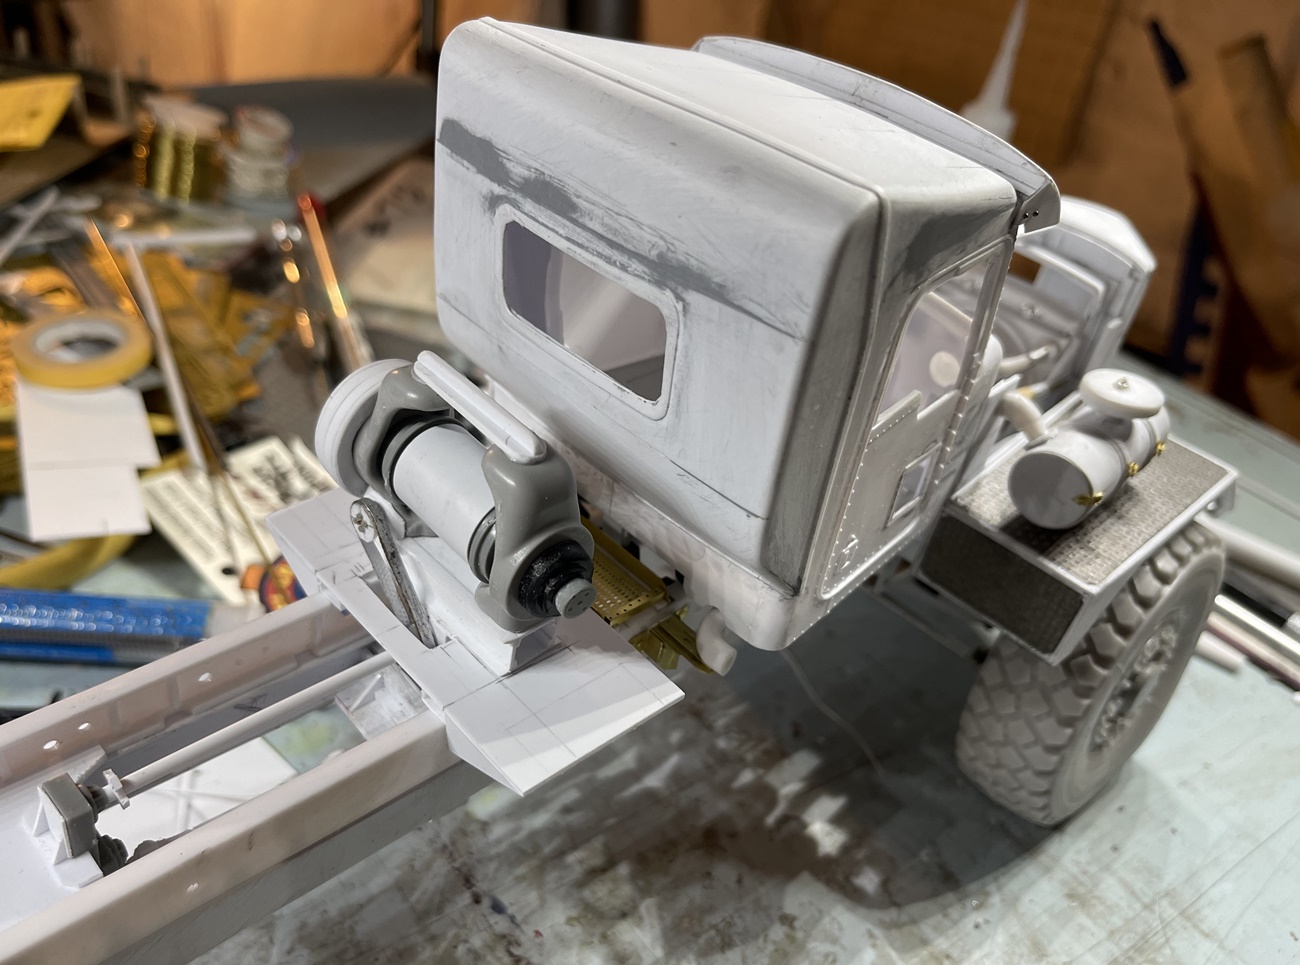
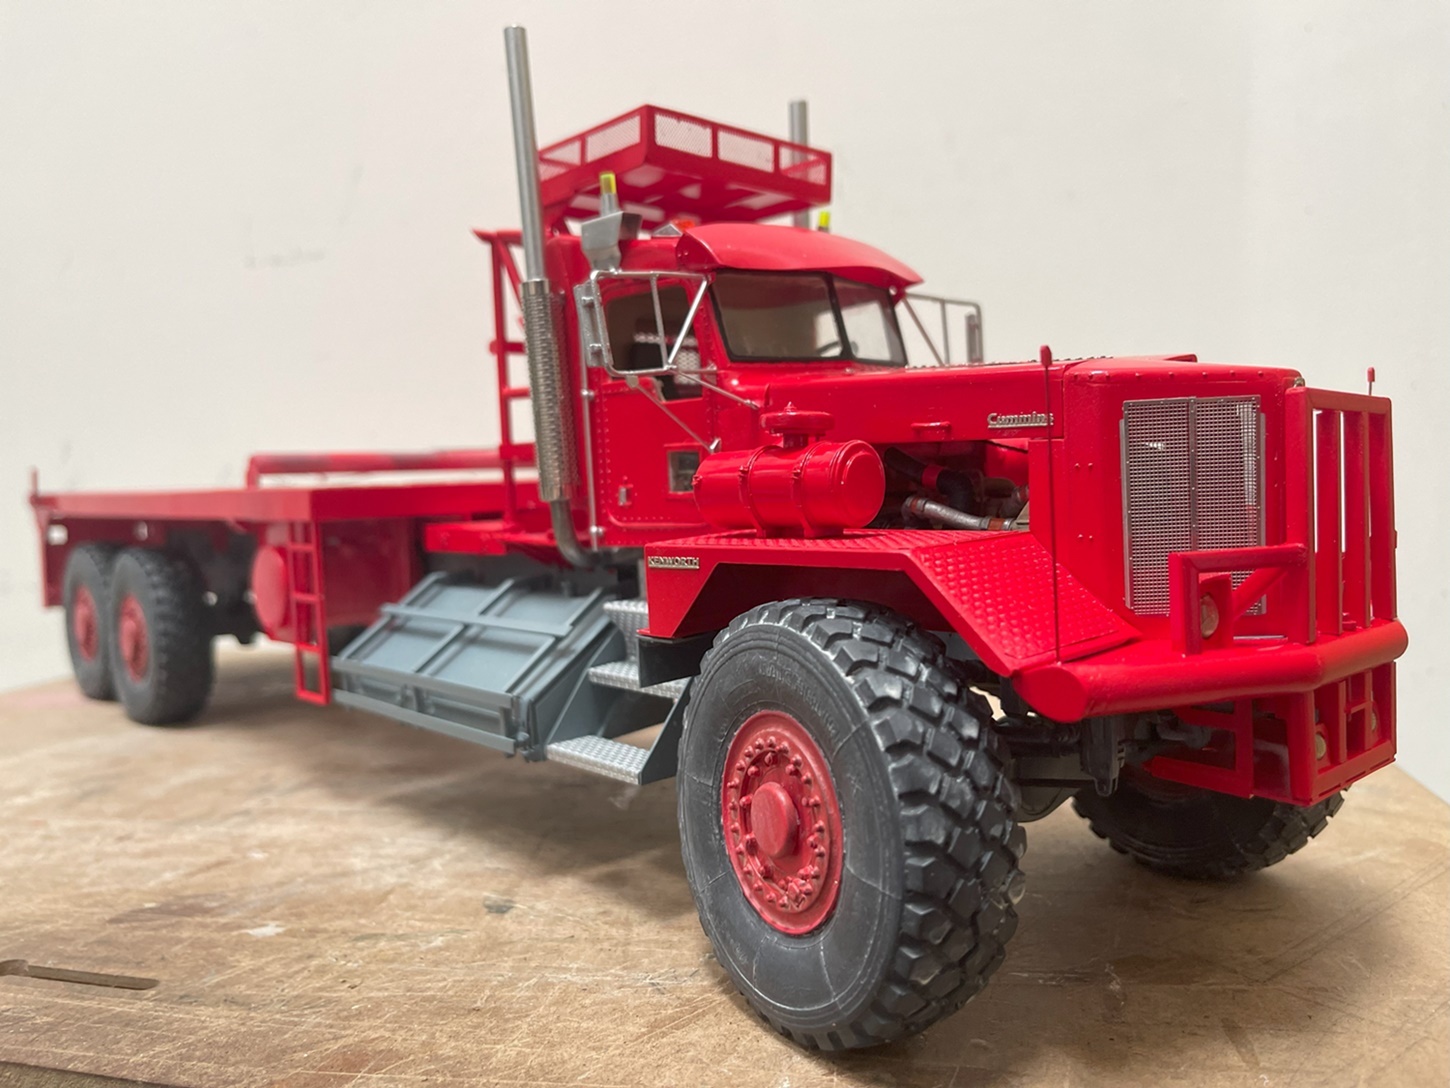
I’ve since added more details, PE and chrome to the cab:
And, of course I needed to see a dry fit:
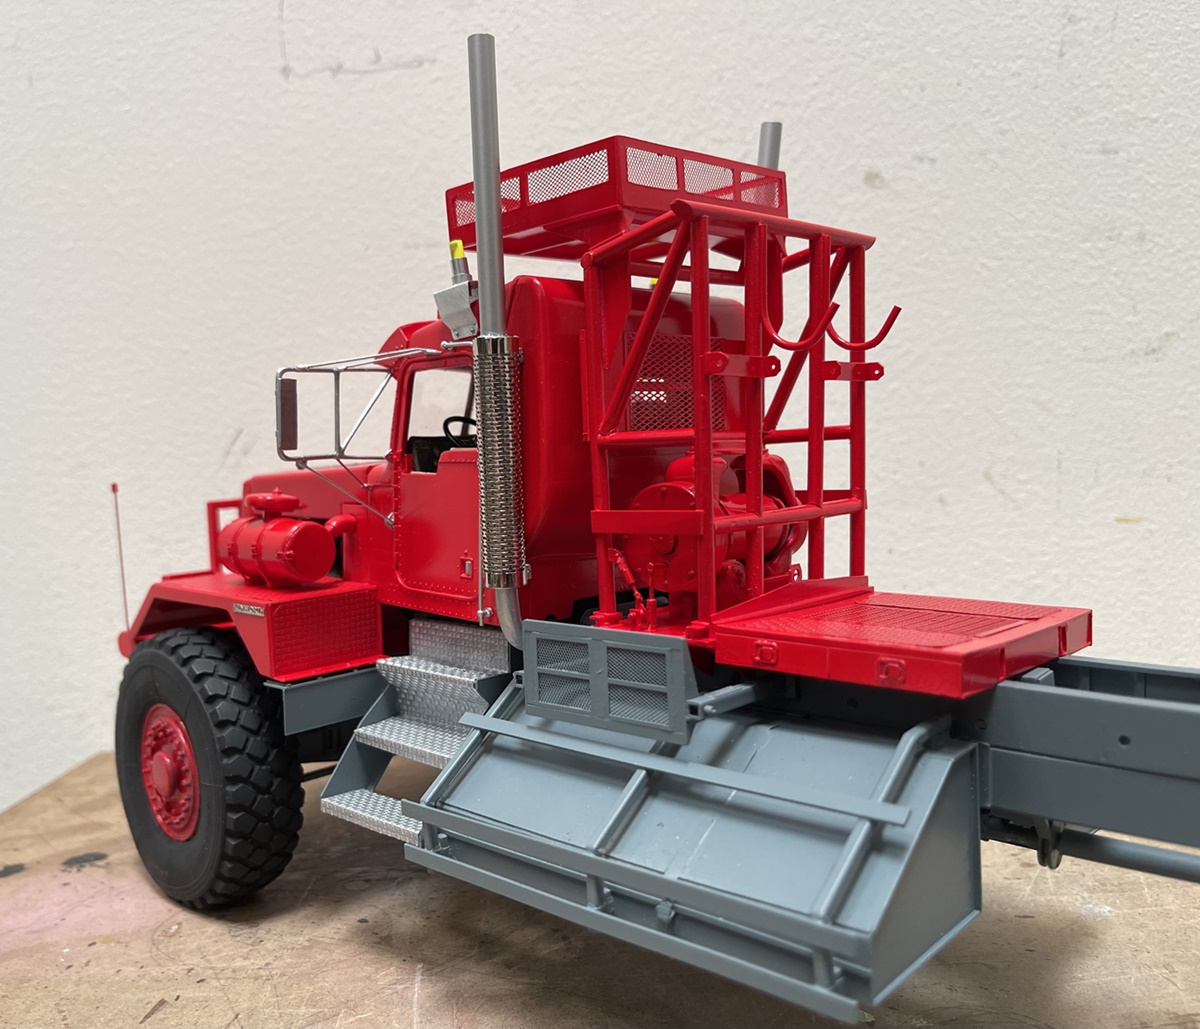

And, as I am waiting for more paint and primer for the bed, I went ahead with this study:
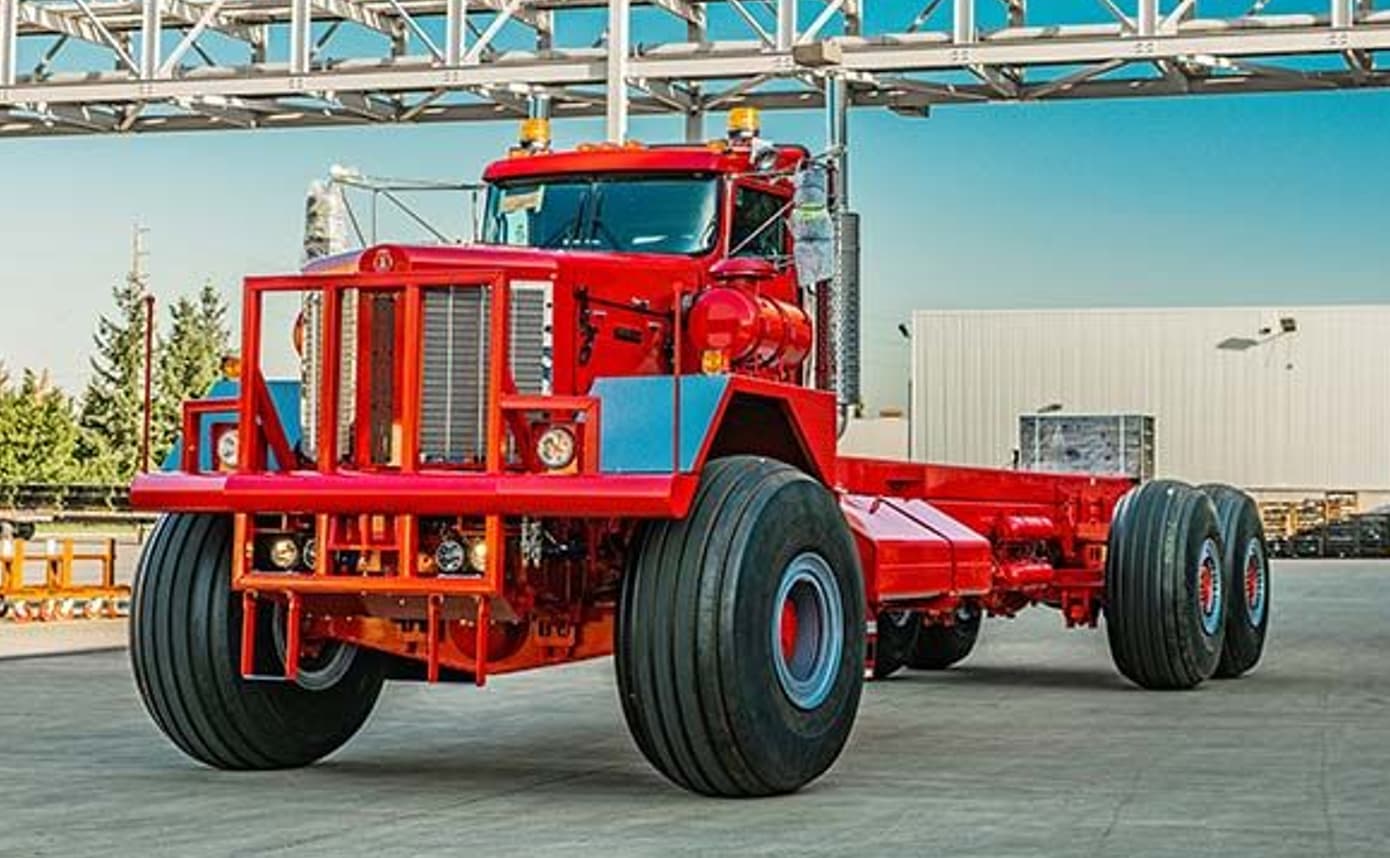
This is the real truck above (which seems to have some really saturated color!), and mine below:
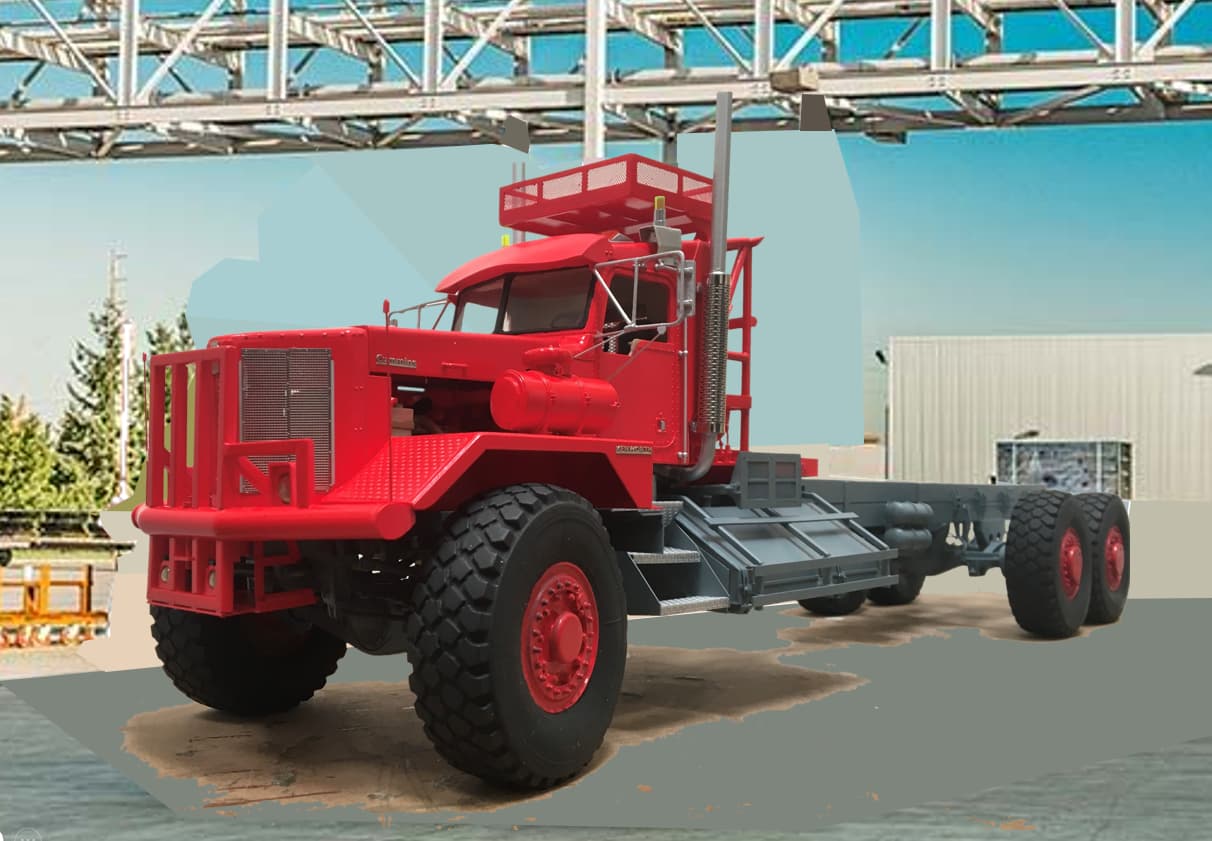
I didn’t plan to do this study, so put no effort into matching the perspective, and as noted above, the photos were not taken outdoors, so the colors are not as bright and crisp as they could be (and will be with final pics). The red is indeed quite RED! The indoor pics understate how strong it is.
Mercifully, there are versions of this truck with a tire tread pattern that matches mine!:Unhappily, I just noticed the grey trim ring on the wheels…perfect… ![]() Don’t know if I’ll paint those on.
Don’t know if I’ll paint those on.

There is still a long way to go, but the finish line in sight! While I’m waiting for supplies, I’ll start with weathering on the tires, chassis and engine -
Thanks for having a look
Cheers
Nick
11 Likes
It seriously just keeps getting better and better … a real labour of love and hard work. But its worth it … Superb work.
4 Likes
I came to the party a little late. I thought the whole cab was scratch built as well. That doesn’t take away from a fine build though, But just to be clear, my comment was intended to compare yours with stock cabs you see at contests in which the builder neglected to notice the seams at all and left them on.
2 Likes
HI Rob,
Yep, if you go back to the start, you’ll see the cab started with a donor - in fact, it was a 1/24 Peterbilt cab and not a Kenworth. If you go back you can read about the reasoning behind this decision. It has worked out as hoped. I dug up these pics to show what’s kit and what’s been changed:
You can see what’s going on. The doors (aside from changing the window openings) and the front window are basically unchanged. You can also see the there is new roof and rear wall. Both of these slope outward from the original cab form
As the hood is so different from other trucks, I built an assembly jig which allowed me to set the length, height, and shape correctly, and hold it together during assembly.
My response to your point about addressing seams might make more sense - as the seams were obvious, but, because so much of this was reworked, I was able to cut/sand/file them away - or, like with the roof and back, it’s all new styrene, so no seams. As for the metal rivets, they are used on the nose, piano hinge and cab. I have lots of photos of this project, but couldn’t find images of those.
I’ve been thinking about building another big truck, a Pacific Husky - which is another heavy 6x6 and for it, I might start again with the Pete cab, or I might not do it at all - while it’s specifically different, it’s also generally similar and I might want to try something completely different.
On the update front, hooray! more paint and primer arrived today - but, so did heavy rain, so not much will be reported until it passes and I can get back on to working on this. This also means, I now have no excuses for not doing real work!
Thanks for having look
Cheers
Nick
9 Likes
I’ve been offline for a few weeks and just catching up with things now, as usual you are smashing this one out of the park Nick. A couple of setbacks but every build has them and you handled them easily.
Cheers, D
2 Likes
Hi D @AussieReg , well, your return came just in time to see this done. Hope all is well with you and yours! Now - get back to model building!
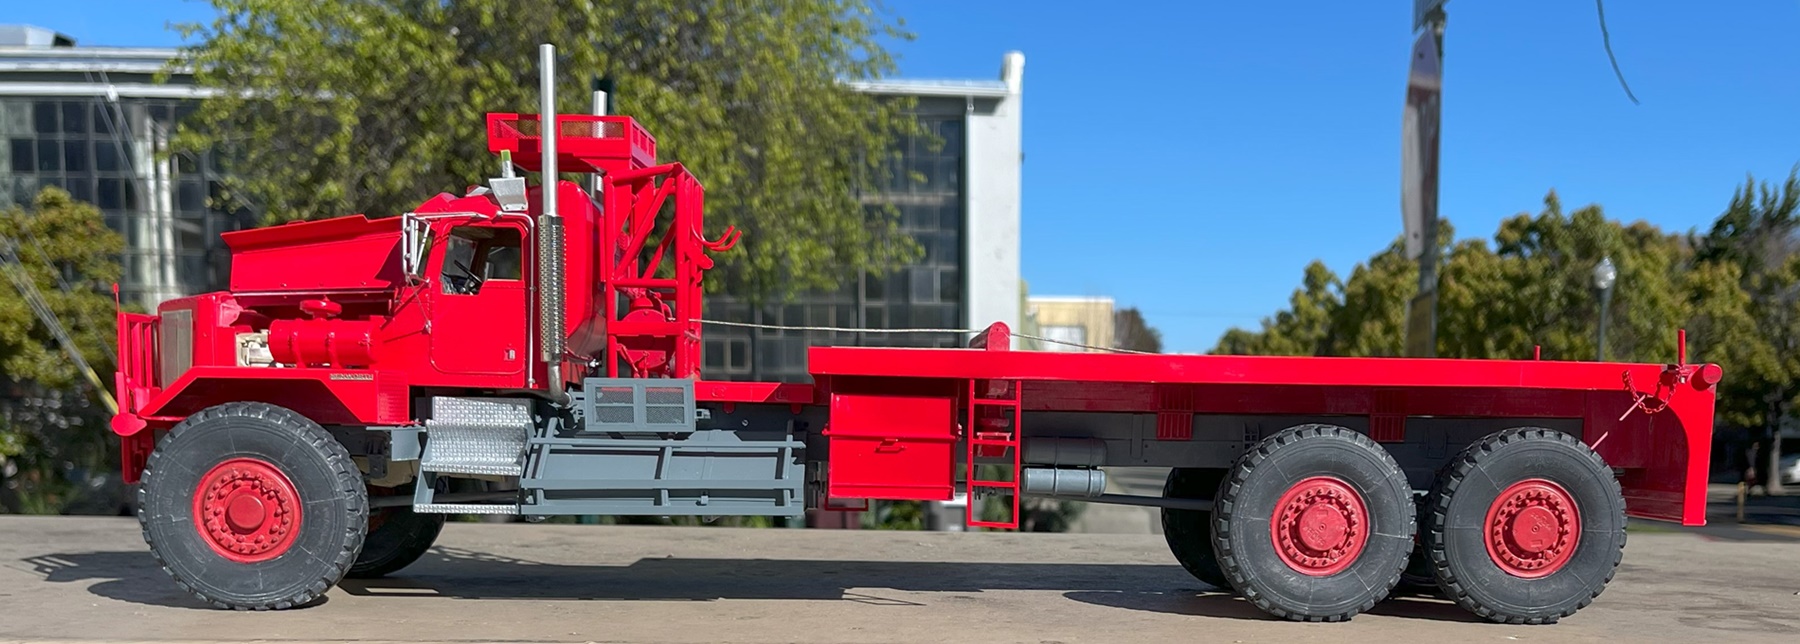
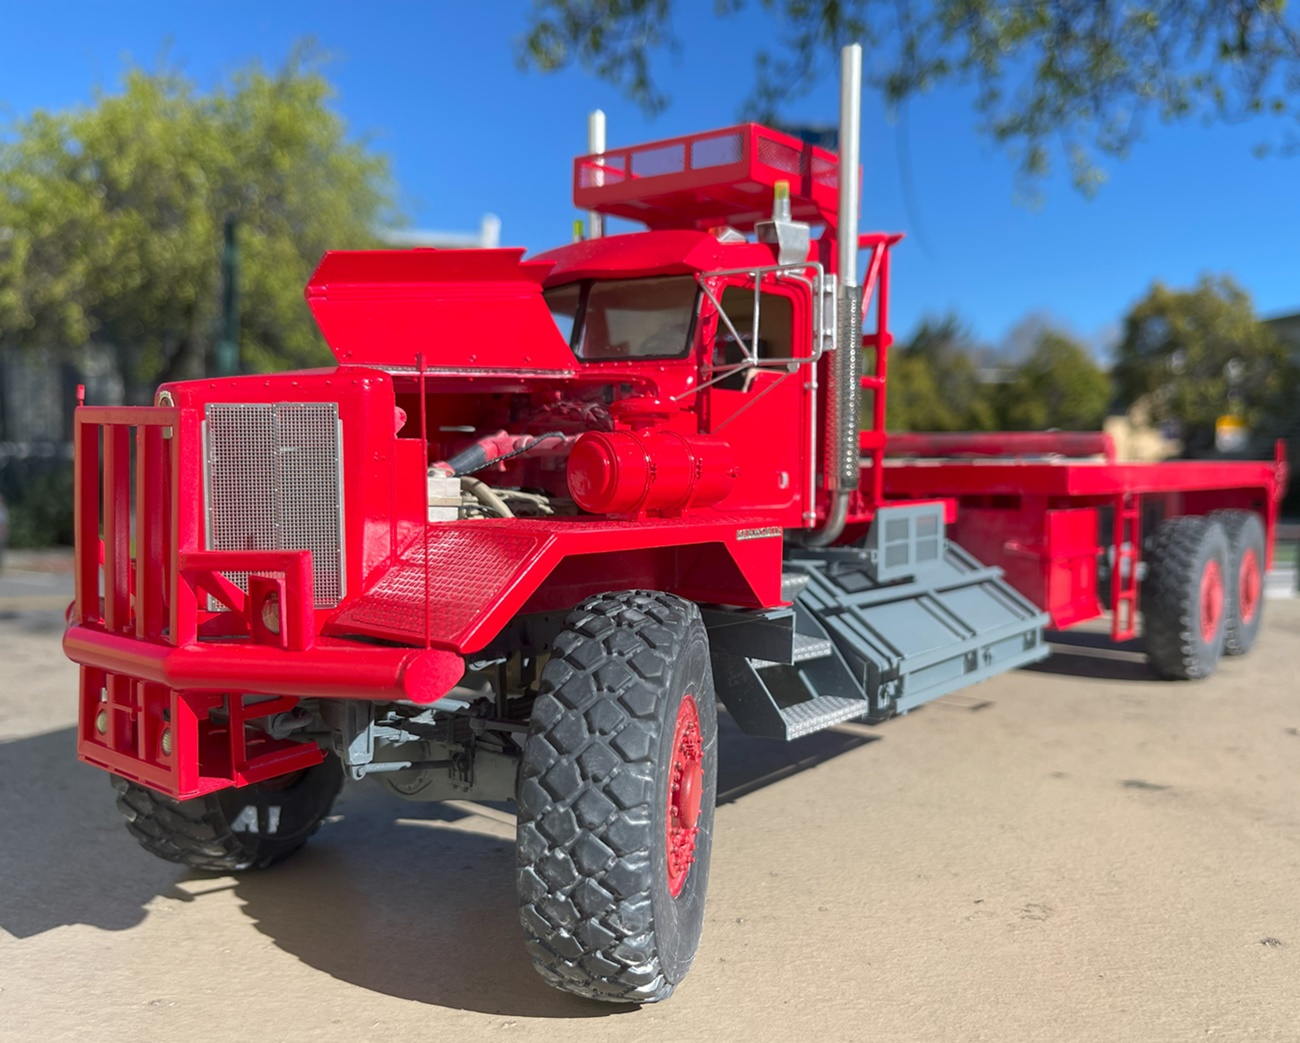
Since my last post, we’ve had rainy overcast days, not ideal for painting or taking final photos. But, today was different, so the truck and I went out for some photos, and the day did not let us down:
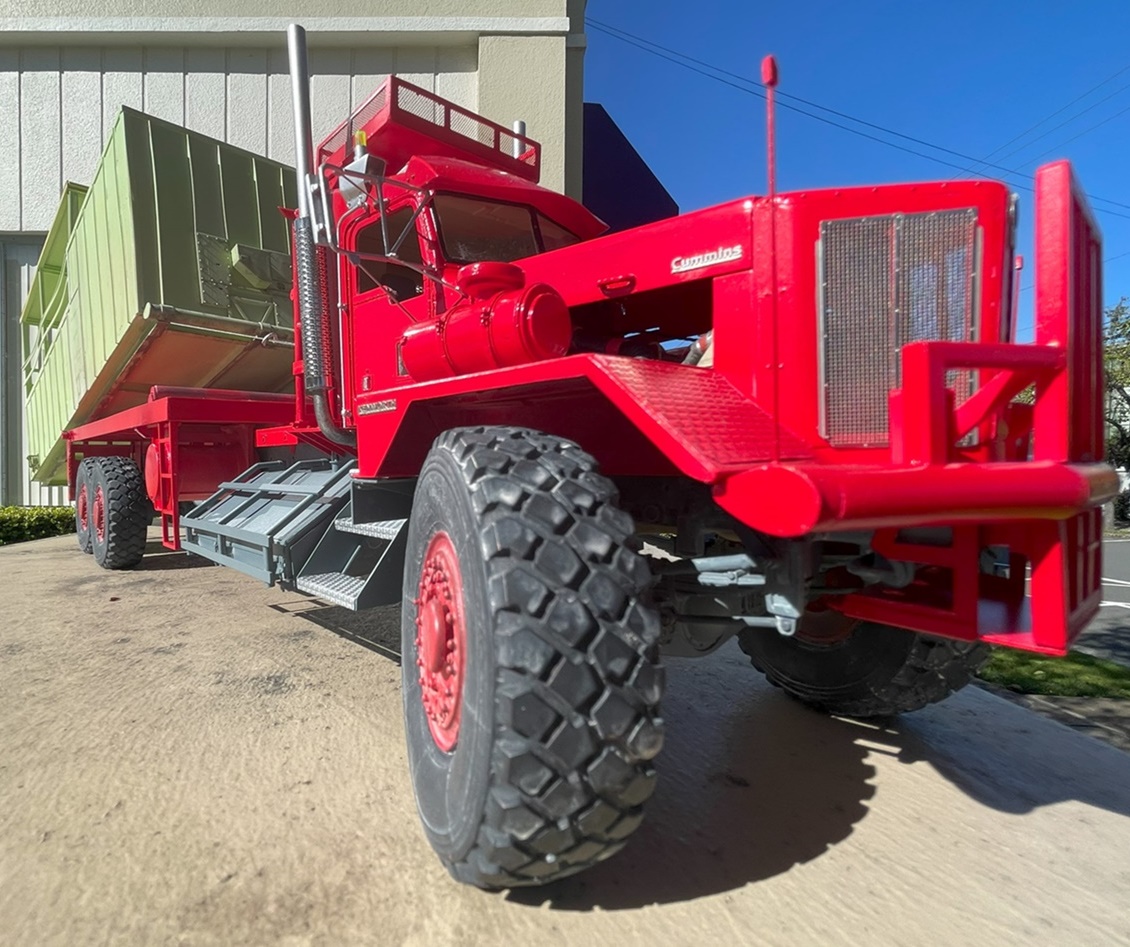

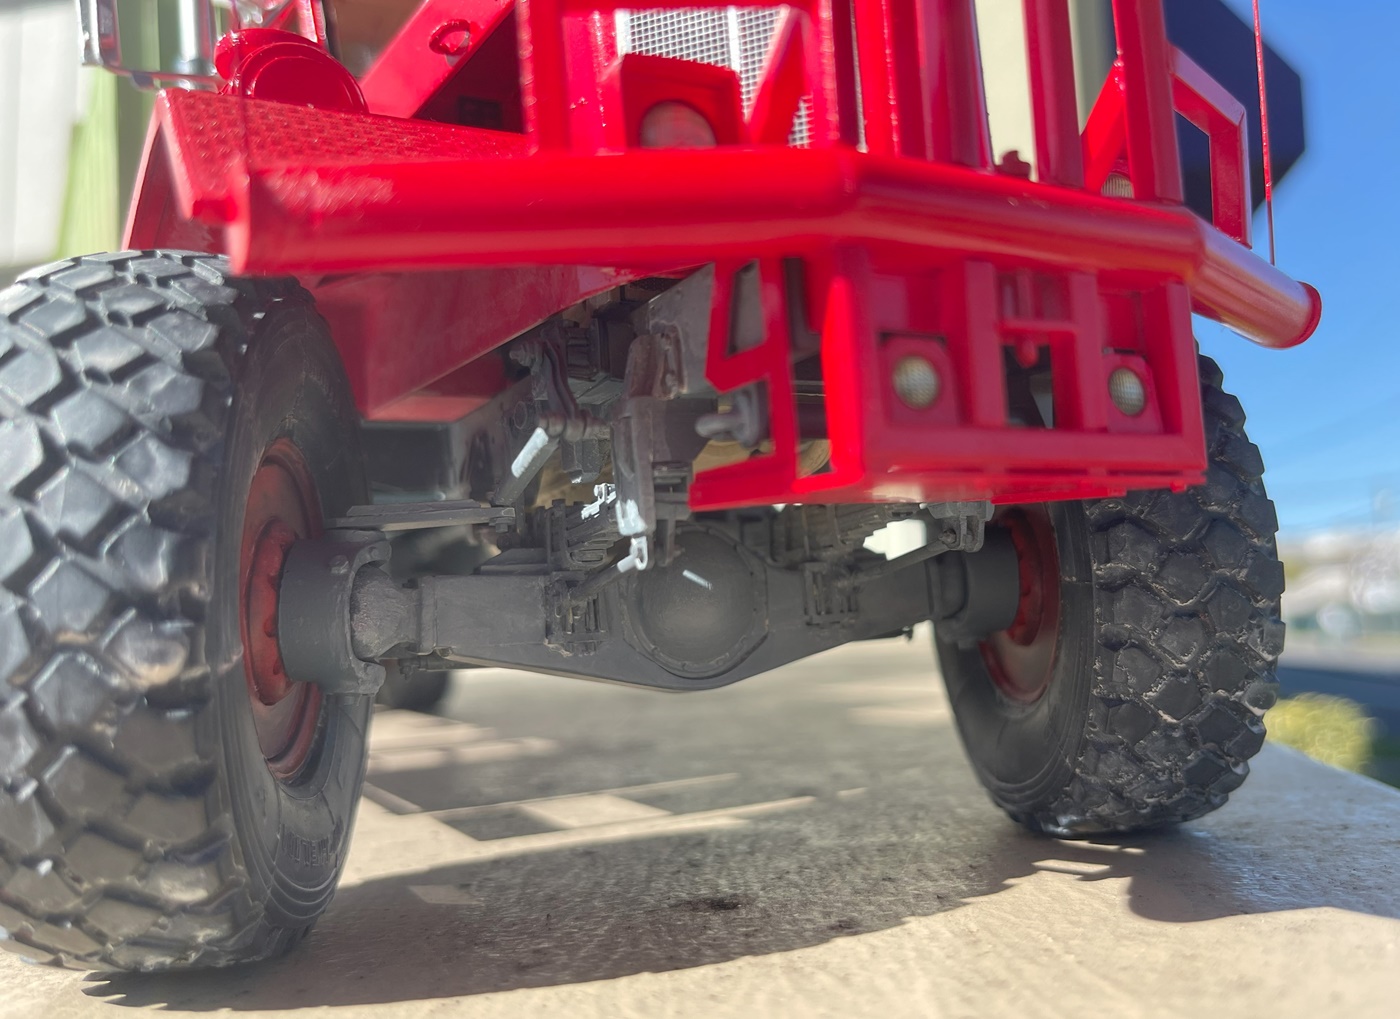
As some of you have no doubt guessed, I enjoy building suspensions, and finally, a rig that sits high enough that you can pretty easily see what’s going on up front ![]() Looking straight on, or getting a bit lower. Oh, and those letters spelling out “Kenworth” - they are 2mm tall PE…no fun to install or paint!
Looking straight on, or getting a bit lower. Oh, and those letters spelling out “Kenworth” - they are 2mm tall PE…no fun to install or paint! ![]()
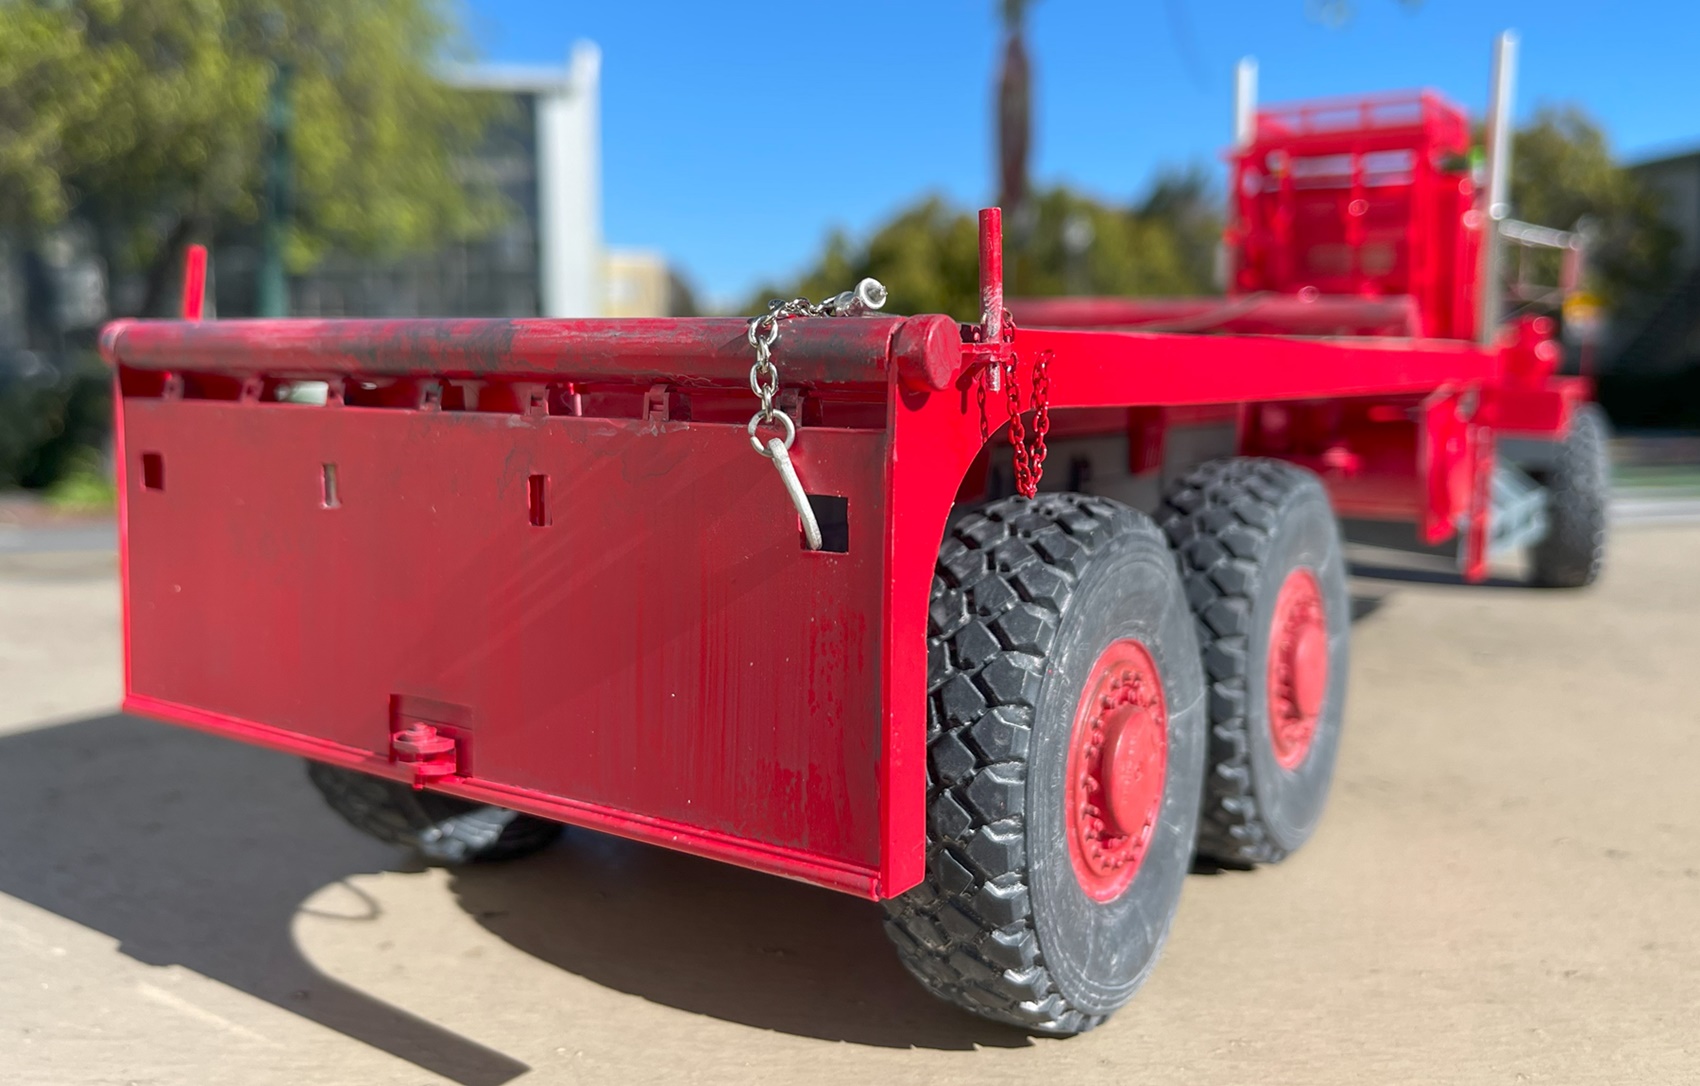
You’d think not a big deal, but the rear end of these trucks is very distinctive - as it has a main roller, that’s supported by several smaller rollers, and of course, a place for a heavy tow hook, and it follows the curve of the rearmost tires. There is a unique setup on the winch rope - there’s cable which has a solid chunk of metal at the end - inside of this, on the cable rope, is a short segment of heavy chain, with a big hook on the end, and this has that too.
And yes, the hood is indeed still operable - I might just glue both sides down, as this is beast to move, and I can imagine them flopping off, so, we will know that once worked ![]() Again, a special tip of the x-acto to @ayovtshev, Angel, for sending me some photos of how he built something similar - which were very helpful to see, and to some extent, inspired this build.
Again, a special tip of the x-acto to @ayovtshev, Angel, for sending me some photos of how he built something similar - which were very helpful to see, and to some extent, inspired this build.
And for those of you who prefer indoor pics - a couple:

I really like how the bed turned out - in fact, almost surprised all of it worked out so well
And yes, I can say with clarity, all six tires sit comfortably on the ground!
And, for our good friend, the sceptic @Dioramartin, Tim:
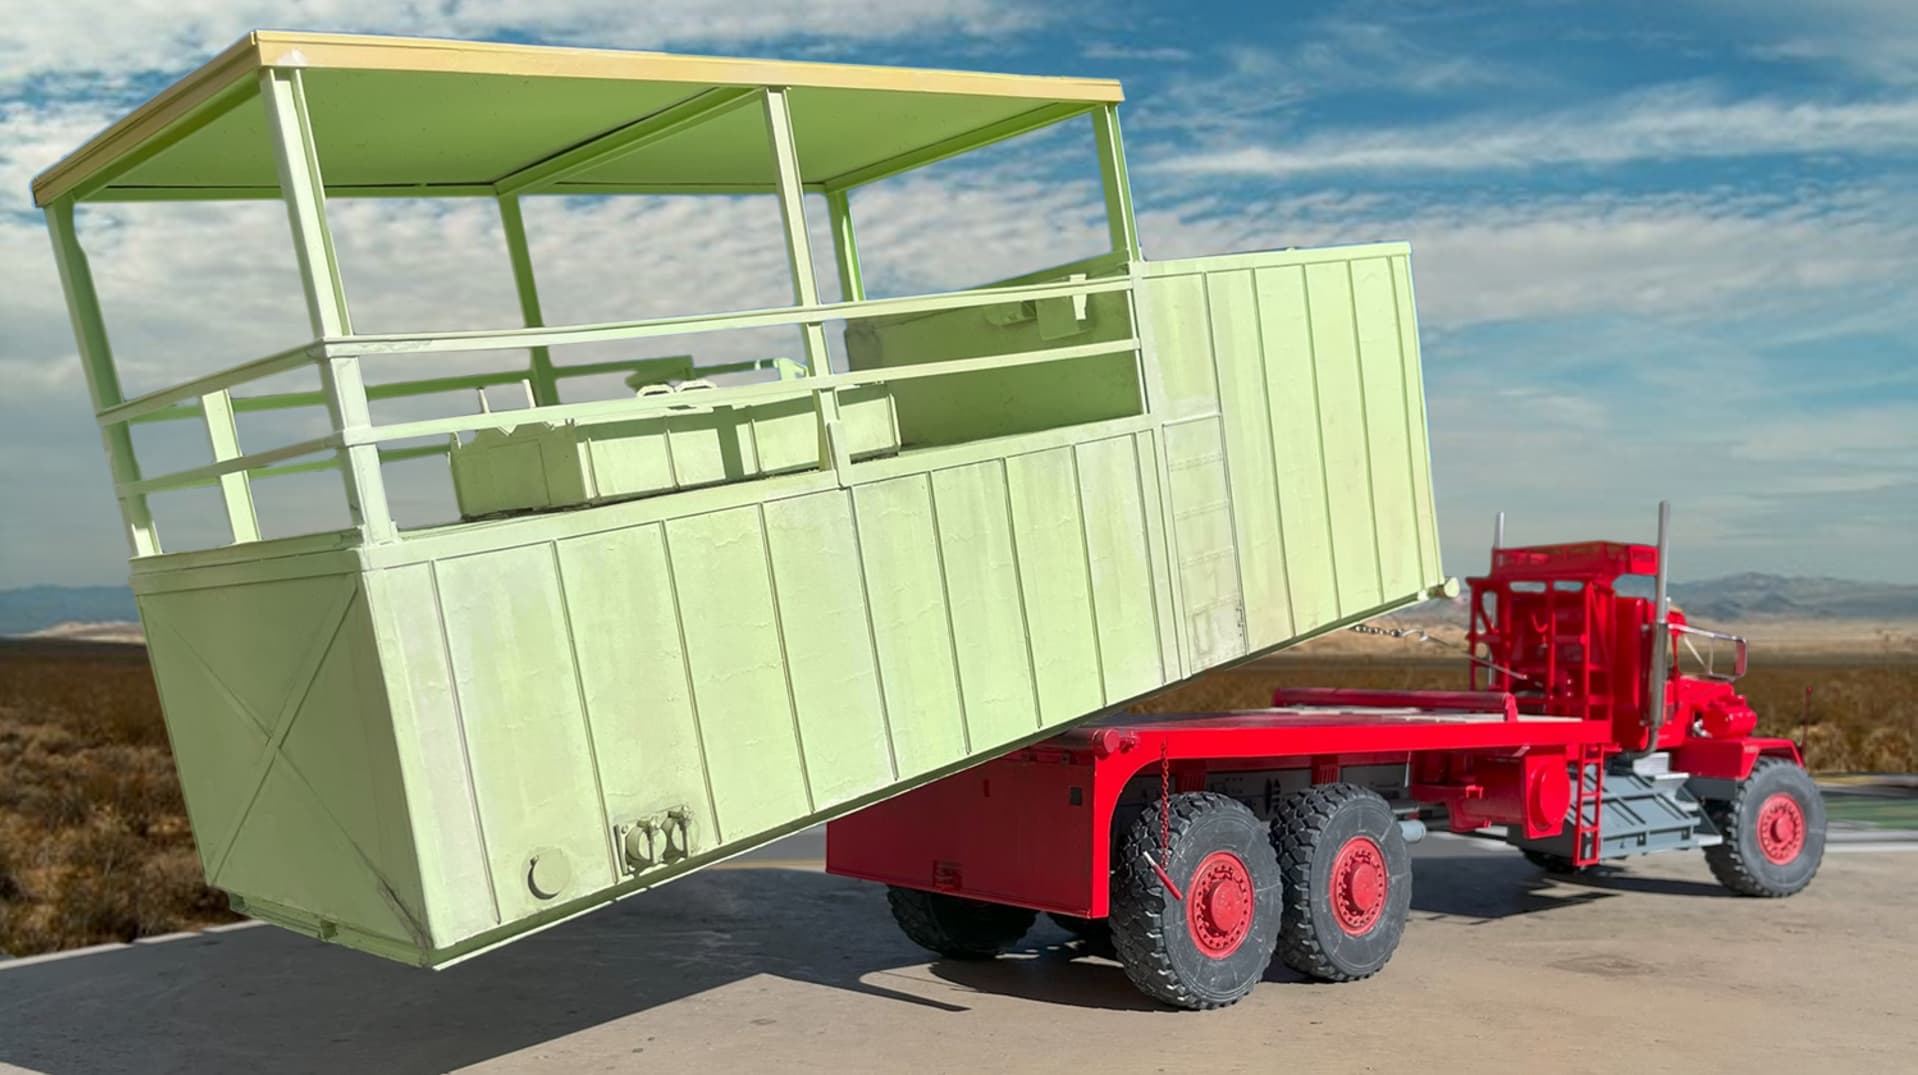
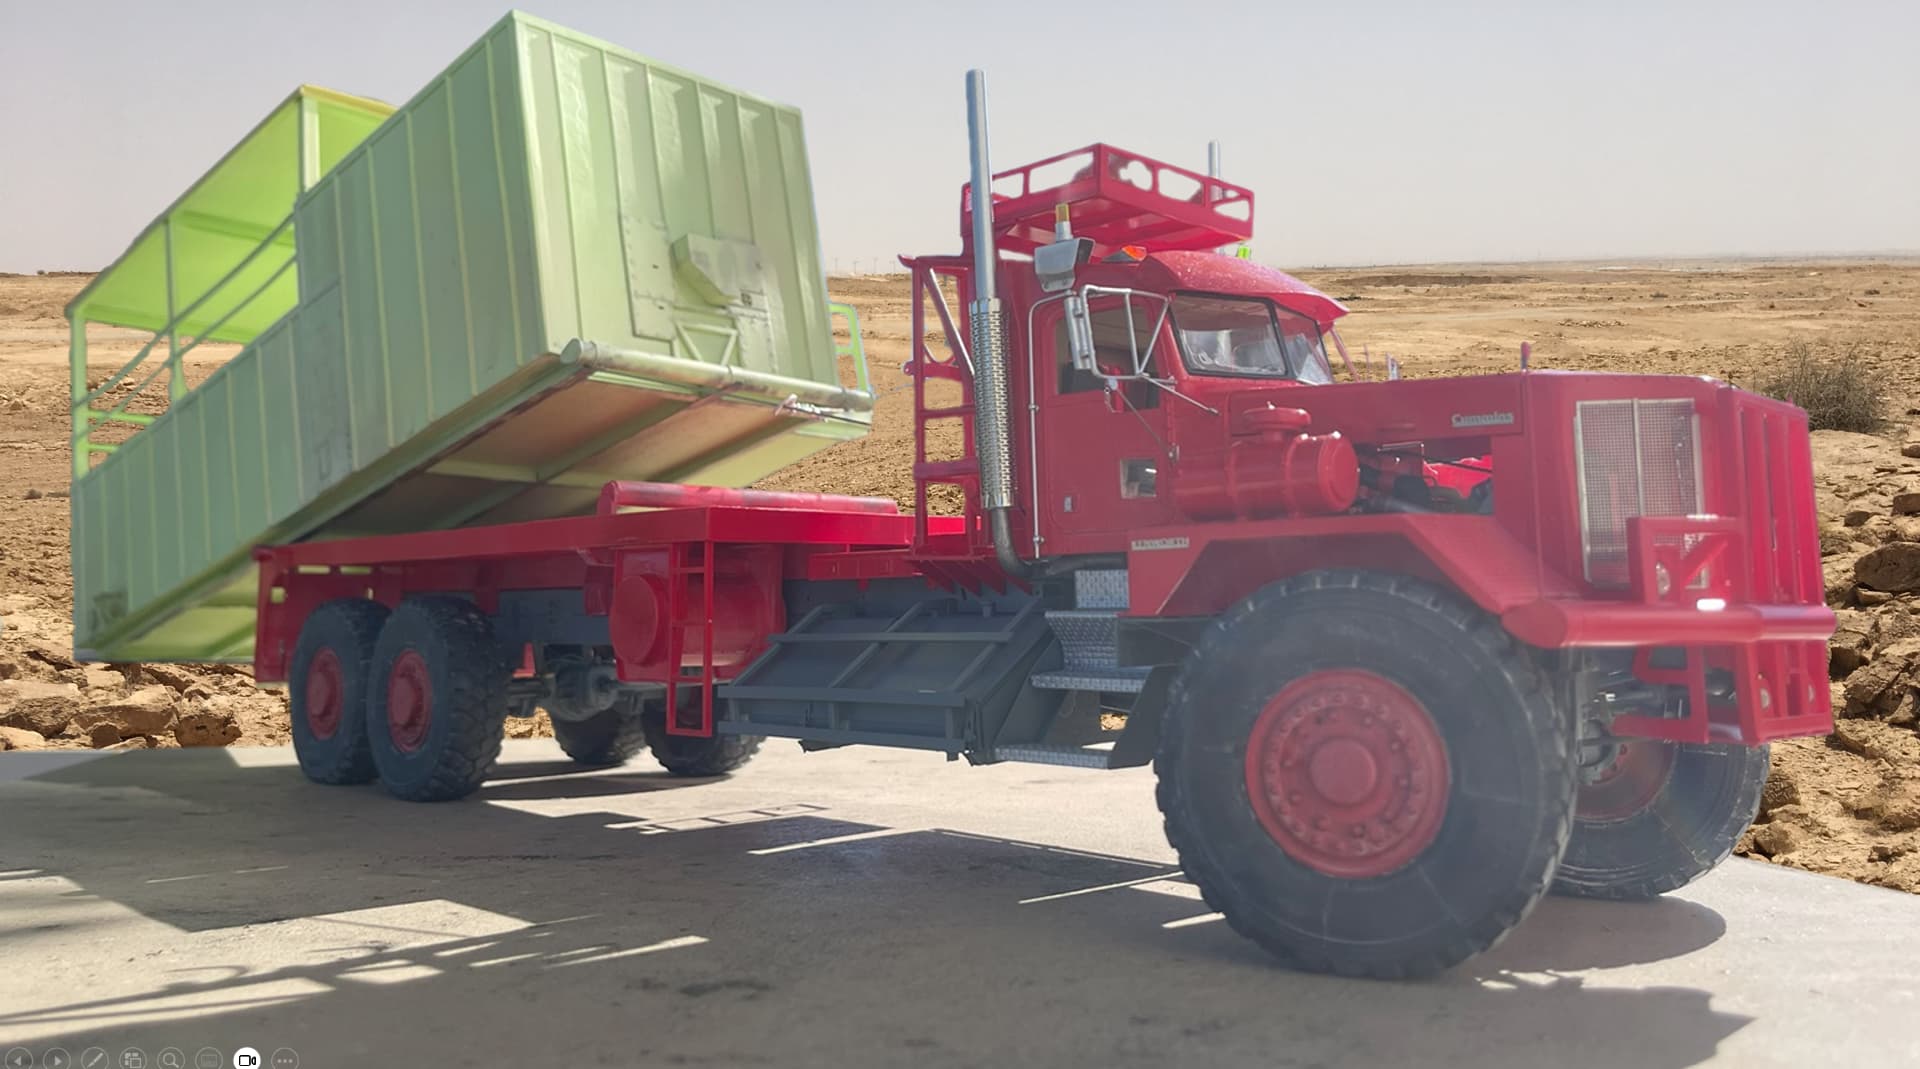
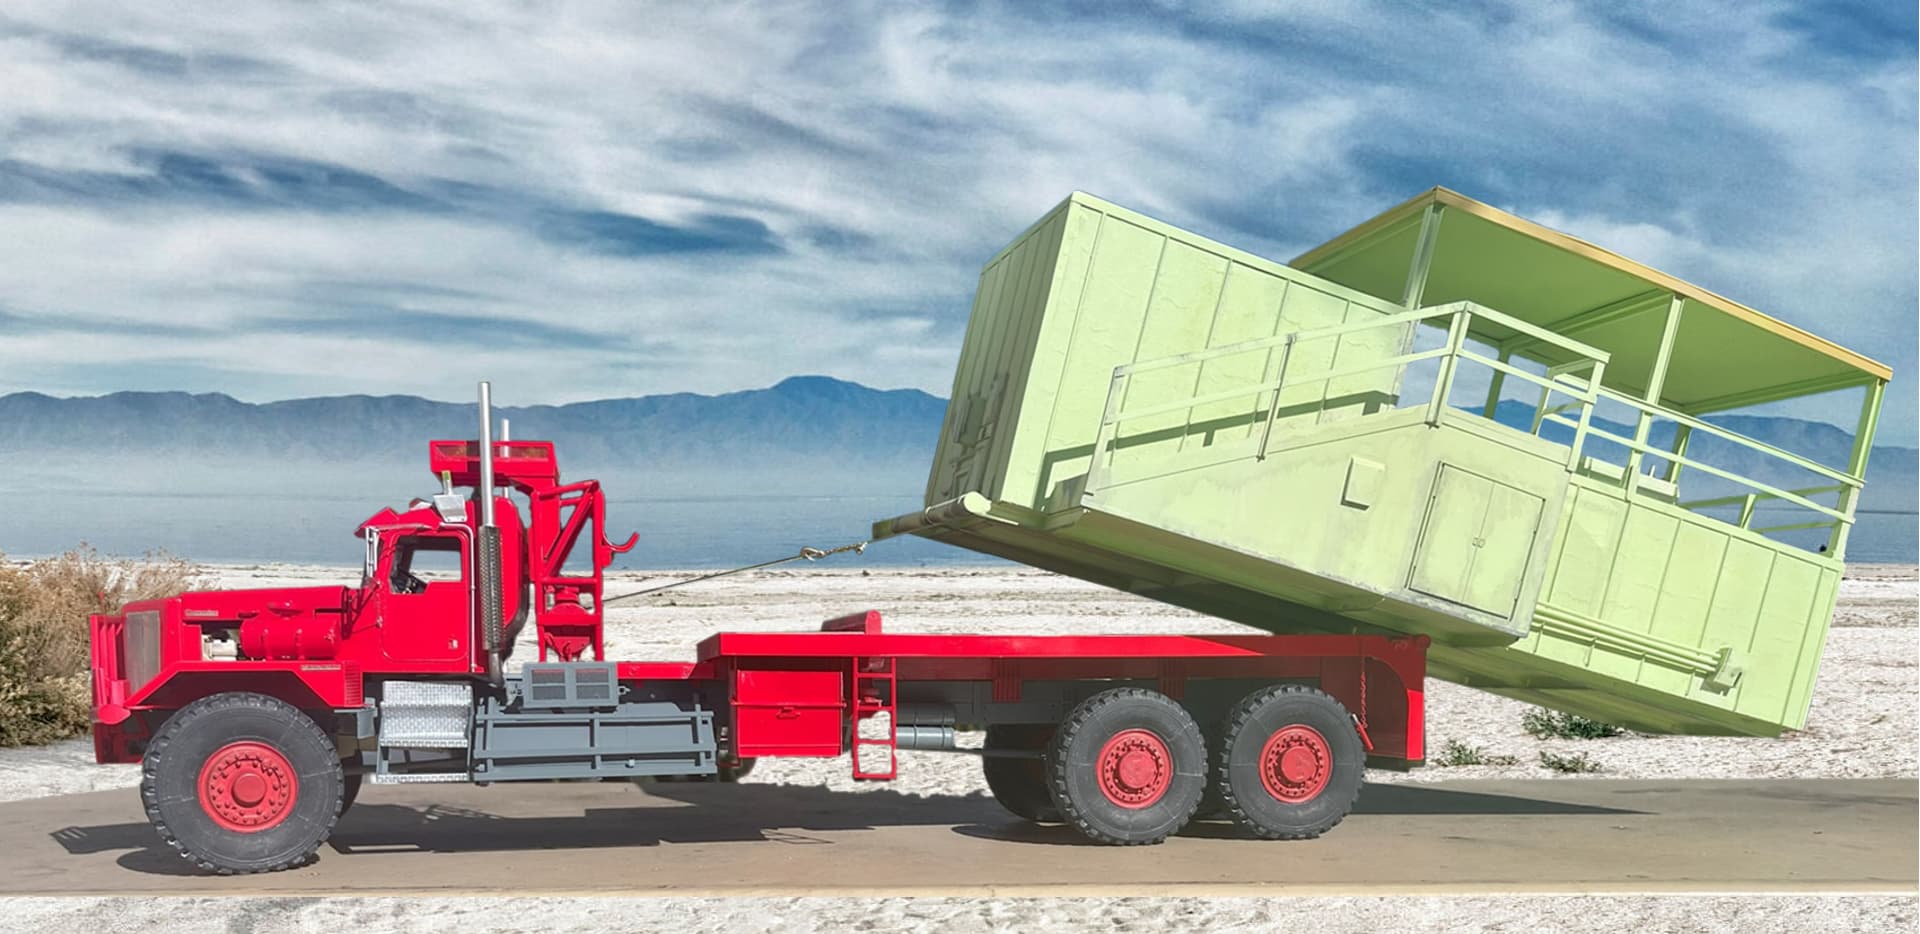
There is enough contrast in this photo to see the cable coming out from the winch, then wrapping around a beam on the box, then tying back to itself with the big hook. I saw a video of this, and in real life this simple set up seems to self align the cable during pulling - it worked that way when I attached my stunningly beautiful box! I went with what seemed to be an appropriately unattractive institutional/industrial green ![]()

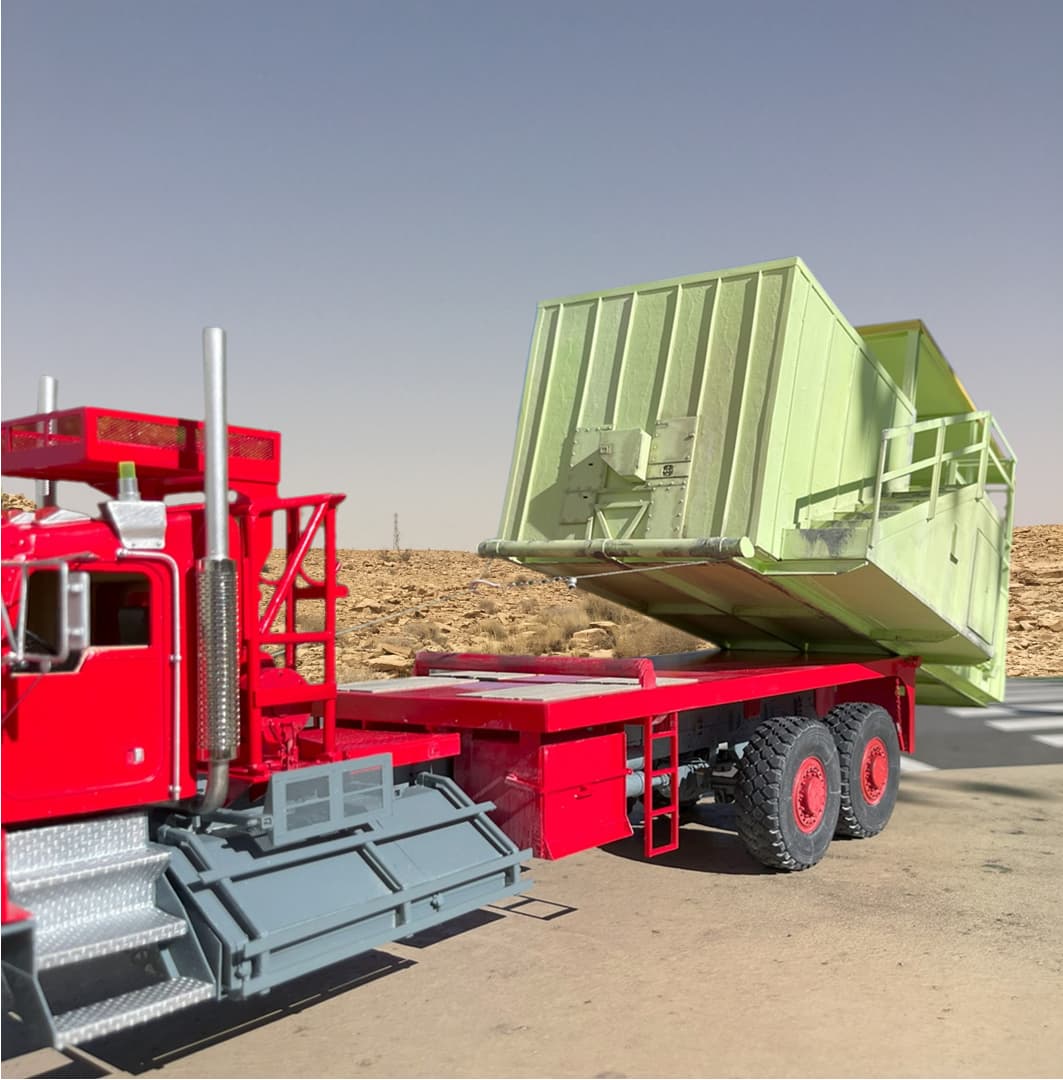
I had to put it to work on a few job sites! These images are simple cutouts of photos draped over various landscape pictures, no harm or changes came to the model or original photos during the making of the illustrations ![]()
So, the bummer is, it’s done - too bad, I really enjoyed this build -
Ok, on we go to other projects! Happy model building
Cheers
Nick
15 Likes
Now I’m a believer/not a trace/ of doubt in my mind etc. That’s just to put a Monkees ear worm in your head for taking a pot shot ![]()
Delicious images every single one. What’s a fresh adjective to describe this, another of your phenomenal builds? Let’s try “Majestic”. (But hey we’re good mates so on the basis that nothing’s perfect…well I’m really struggling to pick on anything…………….OK a little road dust on the tires/treads maybe? ![]() )
)
5 Likes
Absolutely fantastic. You sir, are the king of trucks!
5 Likes
Damn, I promised myself I would not get caught out again … but you did it … The first 2 images I would of put money on for being real trucks … very very clever photo skills … Superb build and finish… matched by bloody sneaky photo taking sorcery — super clever !!
7 Likes
Giving you a ![]() just seems insufficient as an appreciation for your builds, thanks for sharing and showing the potential of this hobby.
just seems insufficient as an appreciation for your builds, thanks for sharing and showing the potential of this hobby.
Cajun ![]()
5 Likes
Well, I looked at the first picture and thought “Oh, more interesting reference pictures!” But at I scrolled down through (being so unobservant by neglecting to fully read your post) I realized “Oh shoot, he’s done!” The realization left me speechless. Awesome job! This was a monster of a project! Looking forward to your next scratch product!
Colin ![]()
3 Likes
Once again I’ve run out of superlatives Nick - just a fantastic job on the model and the photography.
Hard pressed to discern if it is a model or the real thing . Keep it up!
Cheers- RT
3 Likes
“Red Rig Red Rig Red Rig…” 
Nick, you murdered that rig (in a good way)! ![]()
Gotta’ put on my shades now! ![]()
![]()
—mike
5 Likes