M1070 Conversion

Hello model builders,

I’ve read several posts here regarding civilian reuse of the M1070. So far, I have been left to wonder about these conversions.

The dump or water truck, seem like overkill, and not the best use of such a versatile truck. I have seen a few applications where the truck is used as a prime mover for heavy haul projects - houses, big materials, and so on. I saw one that was converted to a camper - and others converted to wreckers. Of these choices, the wrecker seems most reasonable, but that’s not what I want to build.

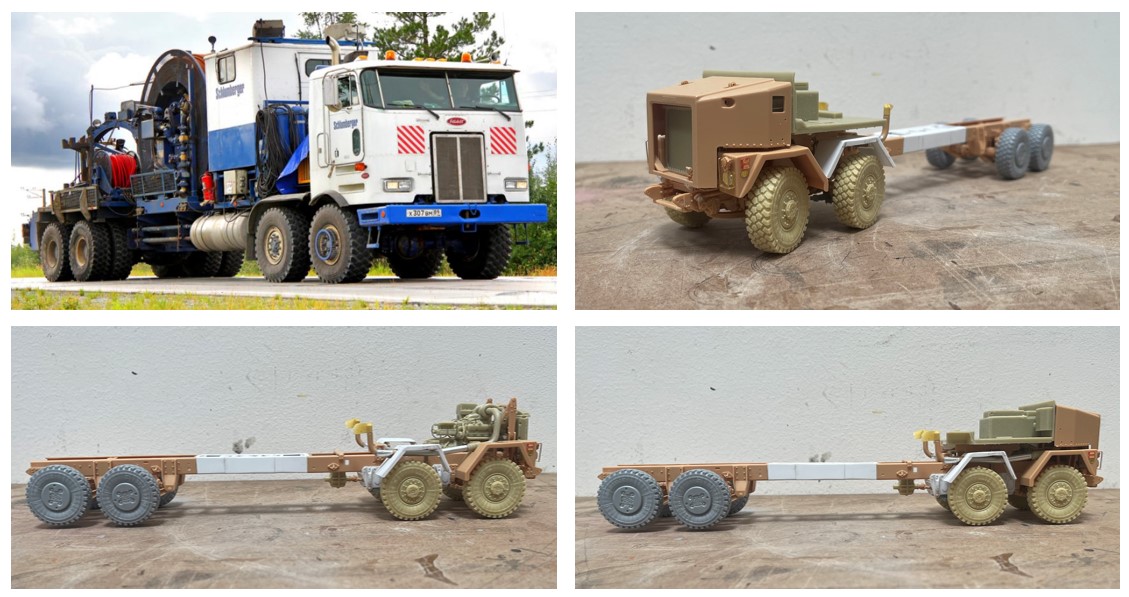
Instead, I got to thinking about an oilfield winch or bed truck:

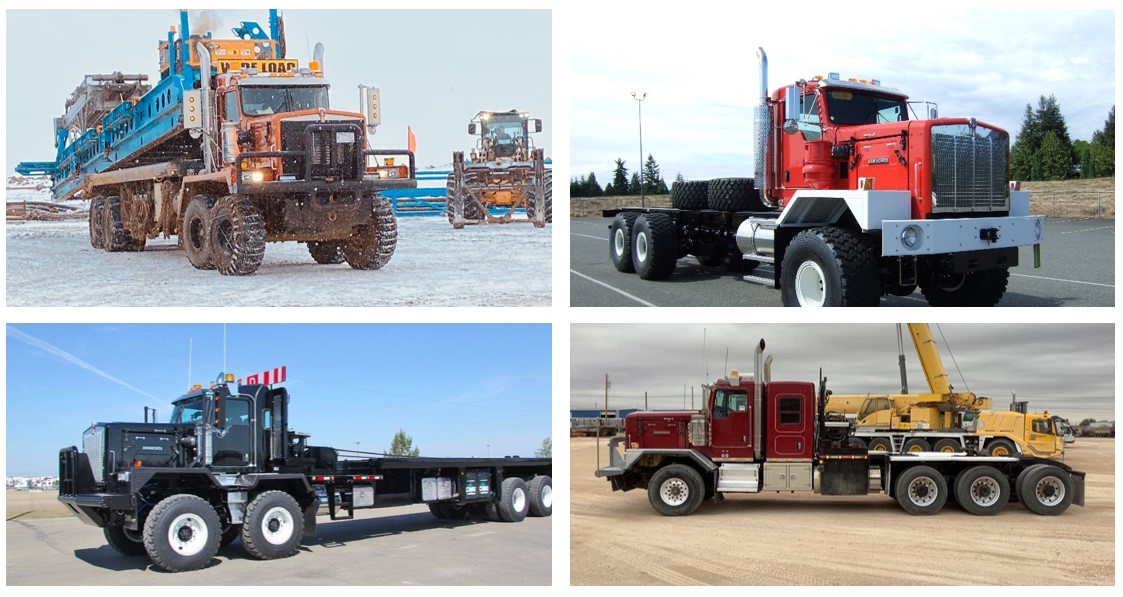
As you can see above, the oilfield truck and its variants. There seem to be three obvious choices - cab with a 5th wheel, like the lower right, a 6x6 or 8x8 bed truck like the upper right, or, an 8x8 tandem/twin steer. Guess which won? The 5th wheel seems a bit easy, and I recently built a Peterbilt 6x6 gin pole truck in 1/24, so, the tandem it is!

I realize this is totally impractical :smile: But, it will be a lot more fun to build than the other options!

These trucks (tandems) are available in several drive axle variants - 8x4, 8x6, and 8x8. While these pics are Kenworth trucks, others manufacturers make them too - I found lots of photos of a Western Star 8x8.

So, this is what I’m up to, converting an M1070 to a tandem oilfield bedtruck. I’m posting this in Armor and not Autos (ie civilian) because the subject pops up enough that people seem to be interested.

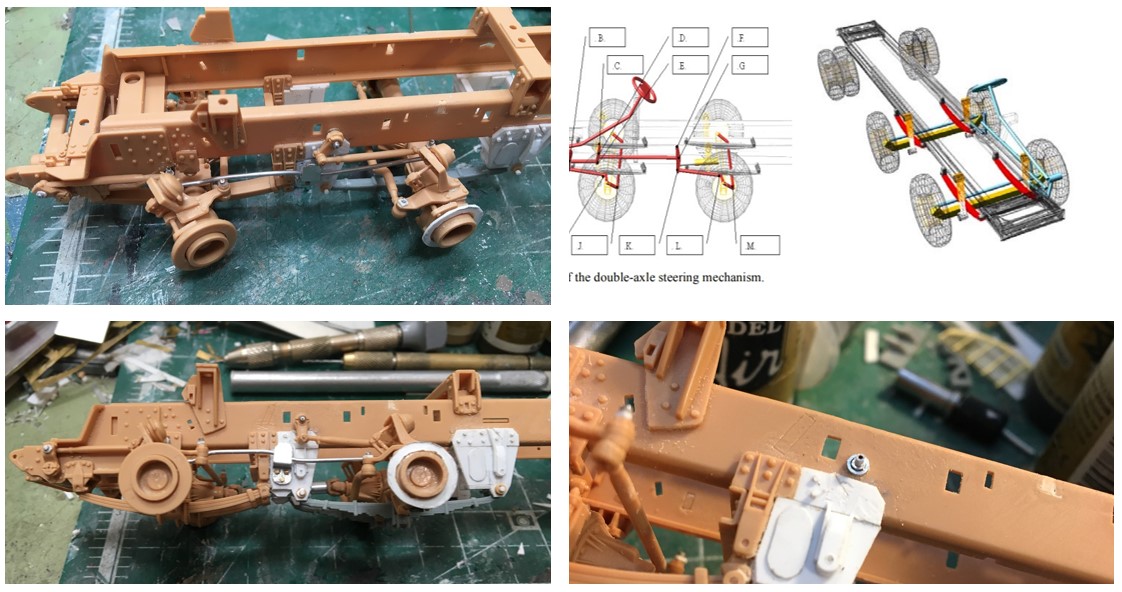
First task, some graphic studies:

The image on the left is an overlay of a KW on a line drawing of the M1070. The KW image comes from their Body Builders Manual. You can barely see on this small image how the basic geometry might work. On the right, some cut and paste illustrating the intent.

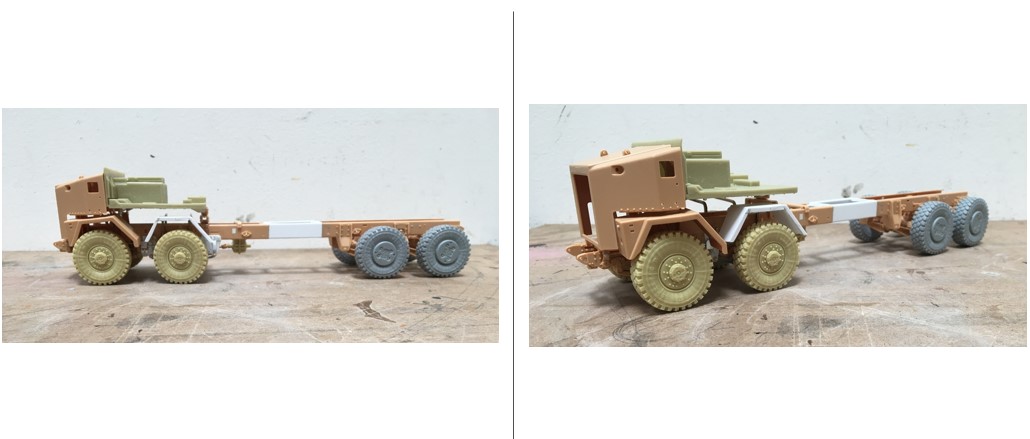
It turns out the M1070 has two steering axles, one in the front and one in the back. So the idea is to move the rear steer axle forward, and mount it on leaf springs. Then build the remaining two air-ride axles to the back, basically as intended. Then, cut and lengthen the chassis.

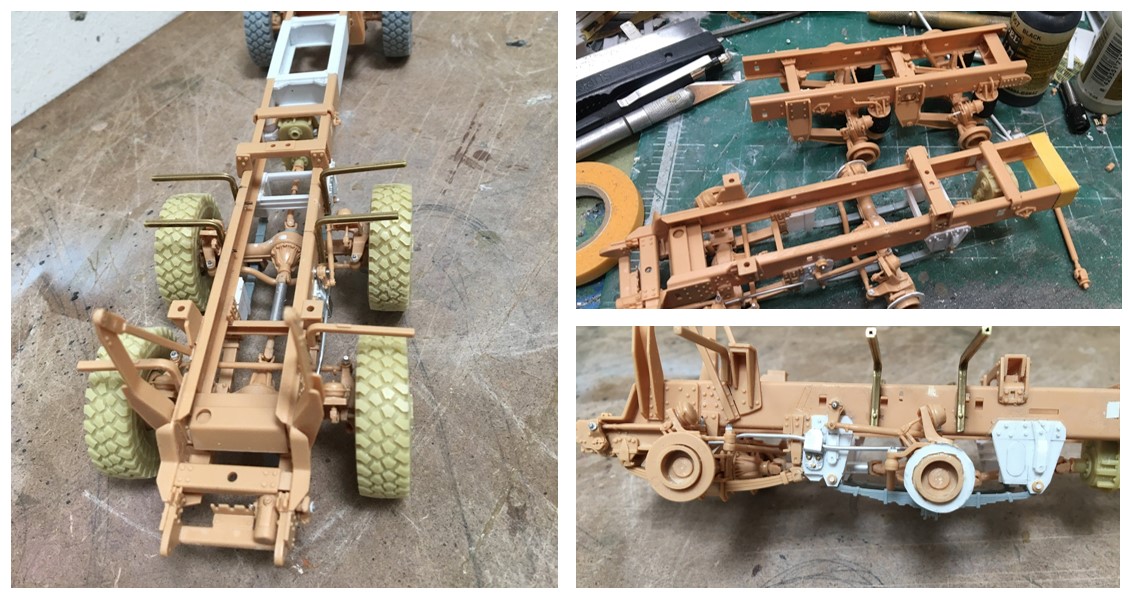
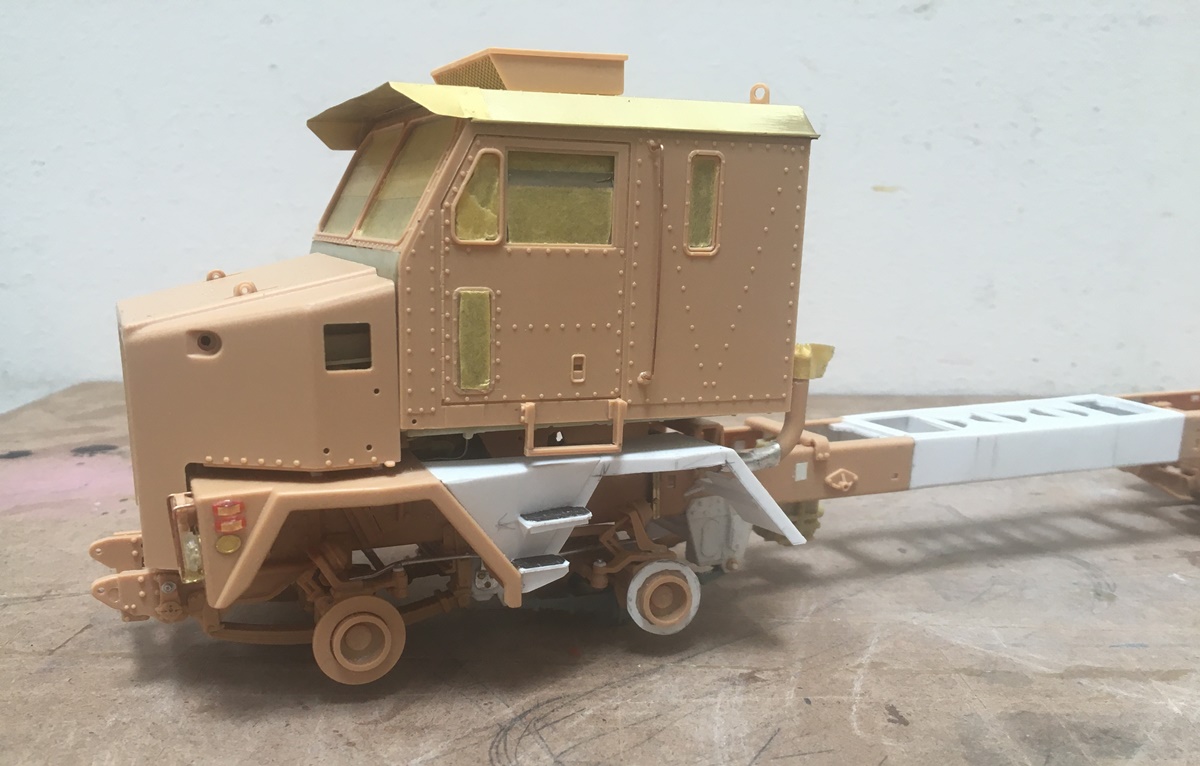
And where we are now:

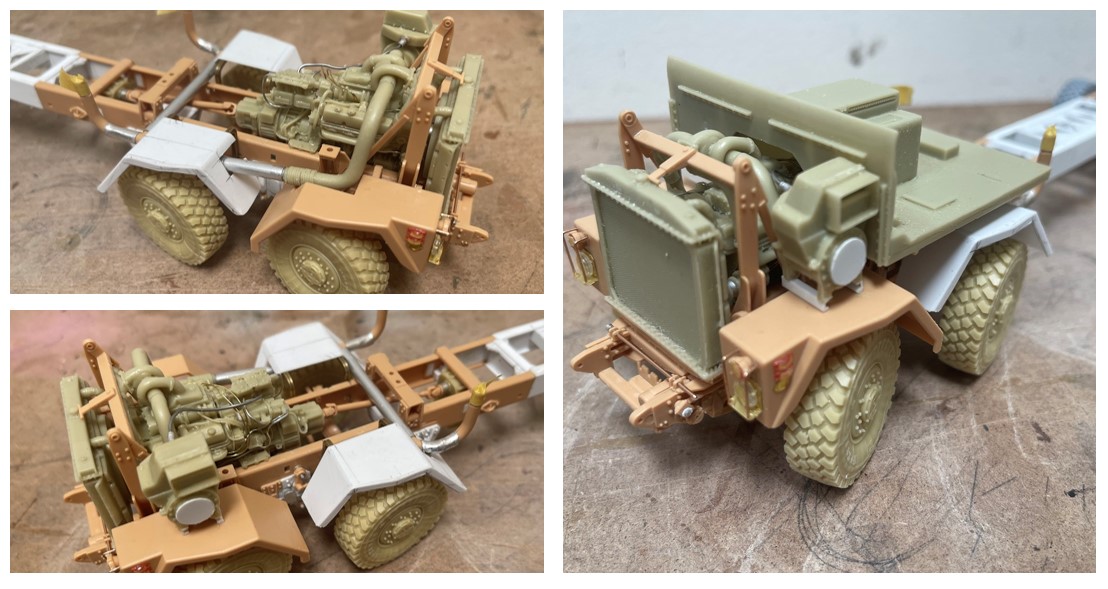
I’ve had the Hobby Boss M1070 kit sitting in the stash for a long time and decided now was the time to get after it. I’ve also got a Real Models engine and transfer case, and don’t remember who made the tires/wheels.

A brief editorial on the HB kit - while it goes together reasonably well, the parts are not grouped in the sprues - that is you’ll use parts from sprues A, E, J and H on one assembly…perfect. As there are a lot of parts being used, this gets tedious. The instructions are fairly clear, but this might not be an ideal kit if you’re newish to model building.

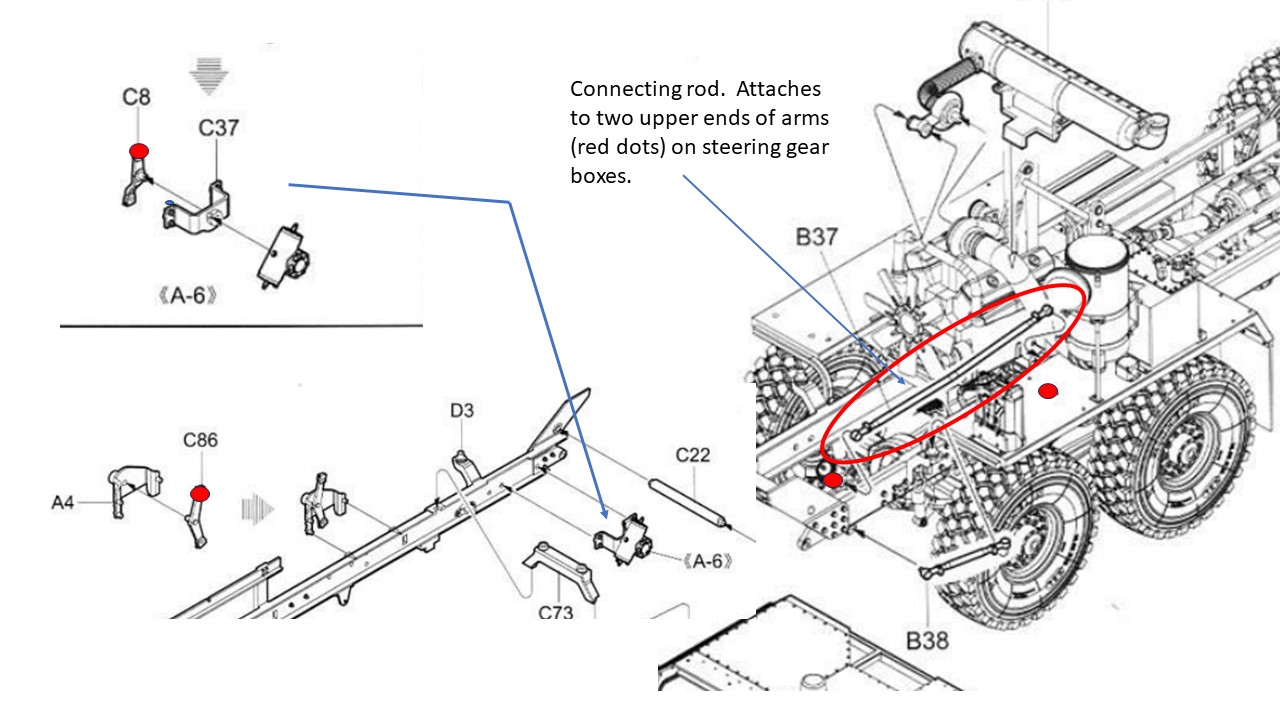
I decided to build the basic layout on the short chassis in order to get it sitting level before it gets hard to handle. So far basically so good. For the front, I added some remnant leaf springs and am building brackets - not sure yet how I’ll get the steering to work out, as this has two steering gears, and steering movement is coordinated…hmm how to address that? :thinking:

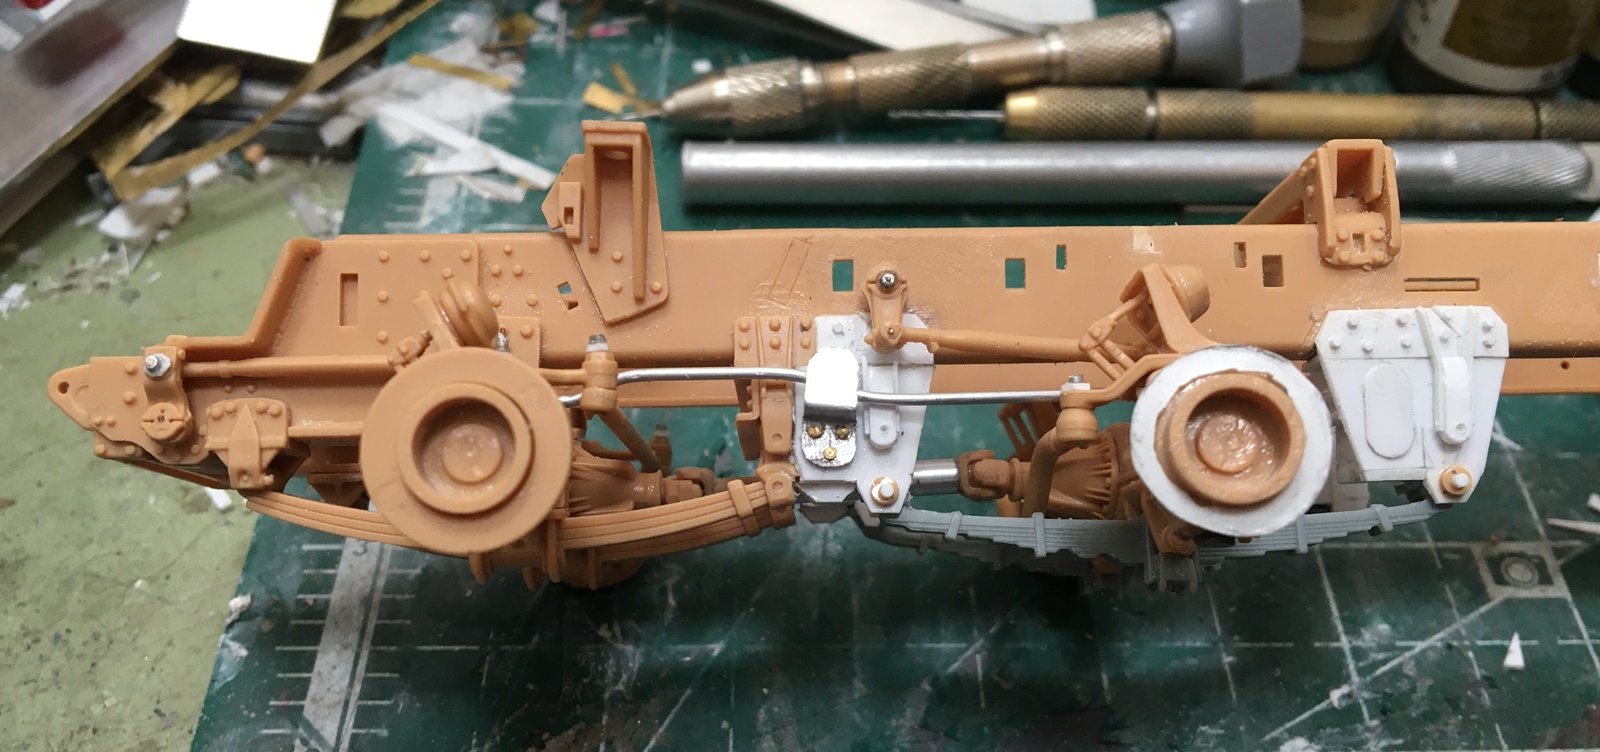
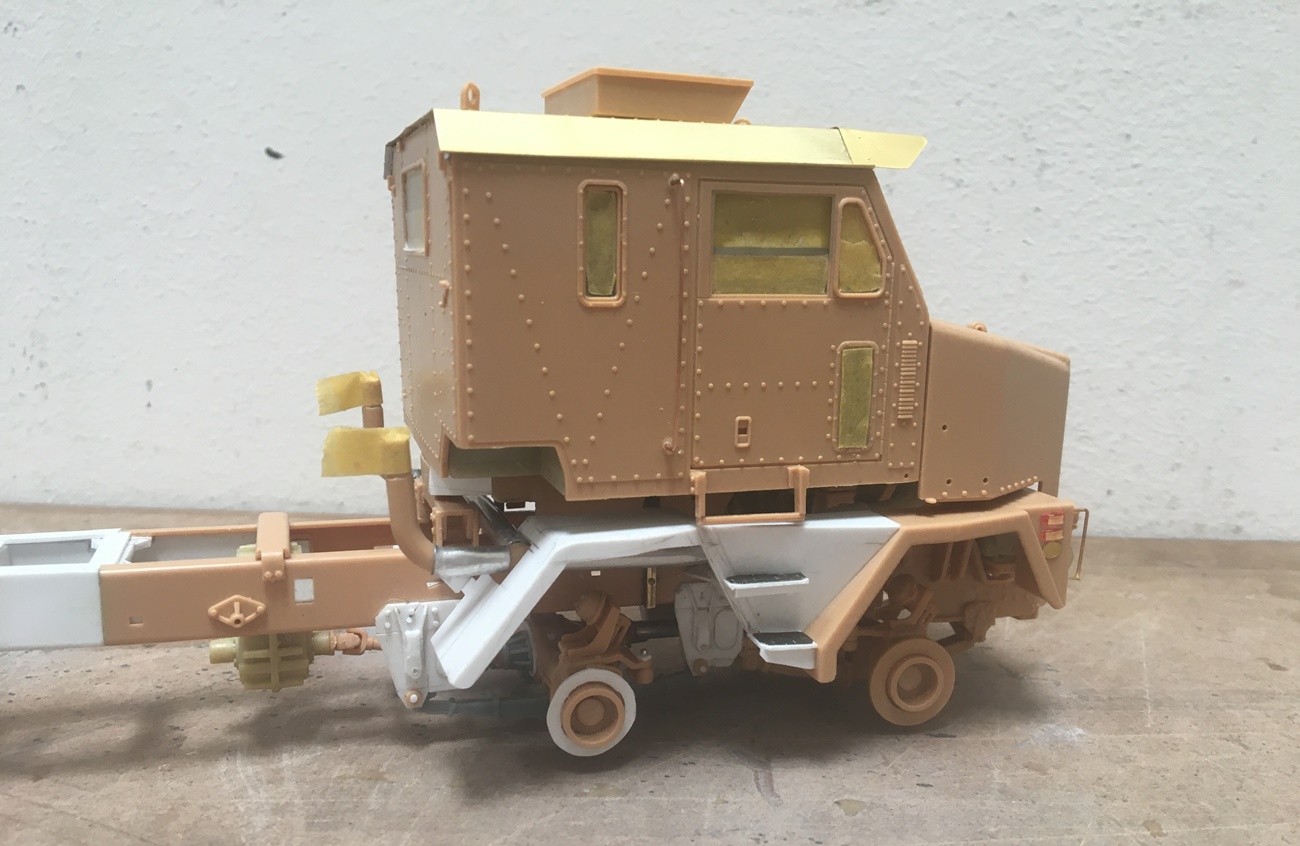
My “simple” approach to the rear end has not been that simple - as a few parts went to the front and a few stayed in the back - meaning driveshafts, torque rods, and on an on, almost but don’t quite fit, so more cutting and pasting in plastic! :smile:

The basic victory so far is that it almost sits flat - I’ll keep working on the ride height. And, again, the rear end…almost but not quite there.

Thanks for having a look,

Cheers,

Nick

7 Likes

I have a feeling I will dropping my M1070 after watching this one.

3 Likes

Defeatist lol… :rofl::+1:

4 Likes

More like a realist.

4 Likes

Another epic scratchbuild already well on the way.

5 Likes

I love Oil Field trucks, and I will be watching this build! I’ve only seen the M1070 used as a Tractor unit or re-built as a Wrecker.

2 Likes

Just like a HEMTT. The forward and rear steering gear boxes are connected by a rod above the frame to keep them moving together. Also, the forward one is where the steering column from the cab connects. On yours, I would reverse it and have the steering column attach to the rear steering gear box and then connect the two w/a rod.

Trumpeter’s M983A2 instructions show it well.

3 Likes

Hi model builders,

This has been a busy week, work and family - and have come and gone from my place several times, so not able to follow up quickly. I got home last night. I have been doing bits and pieces on the build, got after it this morning to make some progress.

@Tank_1812 and @Johnnych01 - ha! Ryan - don’t give up on your M1070! if you decide not to hack it up as I have, it’s a pretty nice kit! You’ll enjoy it! and, as I mentioned above, as-is, it is indeed a challenge - I’m also willing to bet that even though a few steps are a bit confusing, you’ll have fewer headaches than you’re having with your Mack!

@SSGToms, hi Matt - thanks, but it’s still to be seen how this shapes up. Despite what I said to Ryan above, this kit and my great idea are giving me a run for my money!

@Bigred69, I’m clearly with you. There is something about oilfield trucks I like too! no matter how many drive wheels they have :smile:

@HeavyArty, hi Gino, thanks for the diagram. I was headed in that direction, but had to address a few stumbling blocks - mostly the basics, like where to locate the second steering box, and how to tie the various links together so they don’t bind up. After looking at the image you sent, it became apparent that I’d need to keep the components outside the frame. The most obvious reason being the kit/real truck has the linkage on the outside, and as I’m installing and engine, there isn’t room for all of this to fit.

I also looked up more examples of twin/tandem steers and how they work - fortunately I stumbled across this simple formula that shed light on the geometry:

Yes, very, very helpful… :thinking: :smile:

Happily I also found some other info, which I found more useful:

The figure on the upper right came along with the formula, which was much more useful!

I set the second steering gear using the link that came with the kit and estimated where the associated pitman arm would hang - all good, except, there is a bracket nearby for the front leaf spring mount. So using concentric alu tubing I made the little pinion you can see in the lower right, which is used to locate the pitman arm a bit off the frame rail, just enough to allow for free rotation.

I got the sense that my pictures above might be too small, so, above you can see a bigger image of how all of this works. You can see the 1st and 2nd pitman arms, their drag links, and the alu tube which connects the axles. I don’t know what this link is called?

It was shaped to go over the front axle drag link, and outside from the frame, then back inward near the front leaf mount, finally ending at the second axle - and it all moves in unison! I made up the mid-span bracket using alu sheet, then riveted to the spring bracket.

Having now built a few odd-ball projects I’ve come to see in advance of where things might break or snag in the future, so the bracket went in.

Then, cut the frame and lengthened it. I waited on this step until I located the transfer case and attached the front driveline. I added a fair amount of styrene where the extension occurs. Longer frames tend to twist or snap (in kits/models anyway) so now it hopefully won’t! You can also see some brass outriggers which will hold the second set of front fenders, so we could get to here:

While this is all just dryfit, you can see what’s going on. The engine kit comes with a cab floor which seems to be (that is, it is not really obvious) cut/shaped differently than the kit parts to fit the engine. If you are doing a kit with the engine take your time and test fit this a few times. The installation isn’t as obvious as it looks.

Thanks for having a look -

Cheers
Nick

10 Likes

Jiminey Crickets, here we go again :grin:

3 Likes

Looking good. I fully understand the formulas and get it now… :thinking:nope.

6 Likes

My head hurts just looking at all that work :see_no_evil:

4 Likes

not gonna lie I quickly scrolled by the math it scared me and brought back bad memories.

4 Likes

Impressive scratch building!

2 Likes

I will keep the kit for now……

That’s a lot of math, I only have 11 digits to count with.

5 Likes

Hello gents,

Ha - the horrors of that formula. It reminds me that I made the right decision somewhere along the way to conclude that no, I should not, ever, try to be an engineer! Converting a picture to a model, well, that’s another story. So on we go:

Real work/my job has had me busy, so have only been able to work on this now and then. I did manage to get the engine in. The Real Model kit is pretty nice - it requires some clean up and thinking :smile: but with some time, it goes together reasonably well. It also requires some carving, cutting, and attaching some parts before I’d rather (like the fenders) but, that’s ok. You can see I split the exhaust, as my version of this truck will get two stacks.

Something interesting about this is as I was working on it, I realized the engine placement reminds me of a cab-over-engine tractor, actually, a hybrid of this and a standard cab, as about half of the engine sits under the cab. Which makes sense, as I understand part of the design of the truck required a relatively short wheel base, and mounting the cab like this I suppose led to that end. As a model builder I can say this is not ideal in that much of the engine, tilting hood or not will never be seen again.

As you can see in the upper left, cabover, tandem, 8x8s exist in real life too. As for mine, I extended the chassis again - it was looking short to me, so out came the saw, and on we went. There’s a bit of a twist in the frame, but I’ve already bent it back to where it should be. It’s sitting with a heavy weight (a cordless drill!) on the bed with the hope my re-twist will stay in place -

Thanks for having a look,

Cheers
Nick

8 Likes

Wild conversion, woof!!!

3 Likes

Well guys, still working on this project. Real work has been a handful in the last few weeks - on one hand, lots to do, on the other dealing with a couple of clients who have been slow to pay, so, model building has taken a distant back seat to getting after that.

I had some time today, so have worked on building the cab:

The kit cab has gone together reasonably well, the challenge has been making the kit parts work with the Real Model conversion parts, which while close, do not fit as closely as I might like. The problems are pretty small, like the resin floor of the cab isn’t quite square, and as you can see, it serves to hold the walls together. This also creates a bit of problem getting the windshield in the right location.

Obviously not impossible to overcome, but there are a few wonky results, like the floor sets a bit below the cabin walls here and there, and getting the roof to sit flat requires some patience, but it’s what you’d expect, especially if you’re not doing something out of the box.

Next came the steps up the fenders, which worked ok. Required a bit of trial and error, but fine.

I painted the inside, but it’s a bare bones effort - primer, some tan for the seats and walls and some black around the dashboard.

I figured I’d show this view too. As I installed the engine I’d like to be able to see what of it I can. The HB kit has tabs for small hinges, that were likely a bit tight for a normal build, but for this, were not tall enough to swing past or sit flush against the firewall. So, you can just see below the radiator opening, some small evergreen bits. I replaced the kit pars with some tediously small hinges of my own, and now the hood tilts. And for this work:


A clear view of about 40% of the top of the engine…perfect. Believe it or not, there are several hoses etc added in there, they just can’t be seen.

OK - happy model building

Cheers
Nick

7 Likes

I see at least 3 and possibly a fourth hose added. :+1::+1:

But yeah without magnification I would only have seen the black hose, just not sure if that is extra or not.

2 Likes

Good to see you back at it Nick. Terrific progress and my that’s a full engine bay!

2 Likes

I do envy you scratchbuilding guys… make it seem so easy… looks great already…

3 Likes