Richard,
I guess you can say modeling just runs in the family. We’ve been at it on and off since the Mid 1950’s.
But from what I can remember, you’ve got a pretty talented brother in law when it comes to Armor modeling.
joel
1 Like
Hi Richard
Not at all. My Brother and I have been building models together since the early 1050’s and then picked up the hobby again in the mid 1970’s when we found the original Squadron Shop retail store in Syosset. Hard to believe so many years have flown by.
Peter
Don’t want to derail Peter’s blog but yes , my wife’s brother is indeed one of the top armor modelers. National AMPS and IPMS winner . To illustrate, the last contest we entered together , we each entered 4 models - I came home with one trophy , Jim came home with 6 .
( I think you were there Joel )
Hard to top that . LOL
Richard,
Of course I was there. How could I have missed my opportunity to finally meet you.
Joel
If possible, a little wash/panel liner, to the blue areas; that would give some depth and some tonal variety.
Very nice progress Peter, you and Joel certainly have a great eye for detail and the skills to make it pop.
Cheers, D
Jesper
Thank you for the suggestion and I will give it a try
Peter
Damian
Thank you for the very kind comments. Thoroughly enjoying the GT40 and finding the details that come with the kit are more then enough at this stage of the game for me
Peter
1 Like
D,
Thanks so much for your most kind words. Knowing you for all these years, makes it that much more special.
joel
Meng GT40
Finishing the Interior.
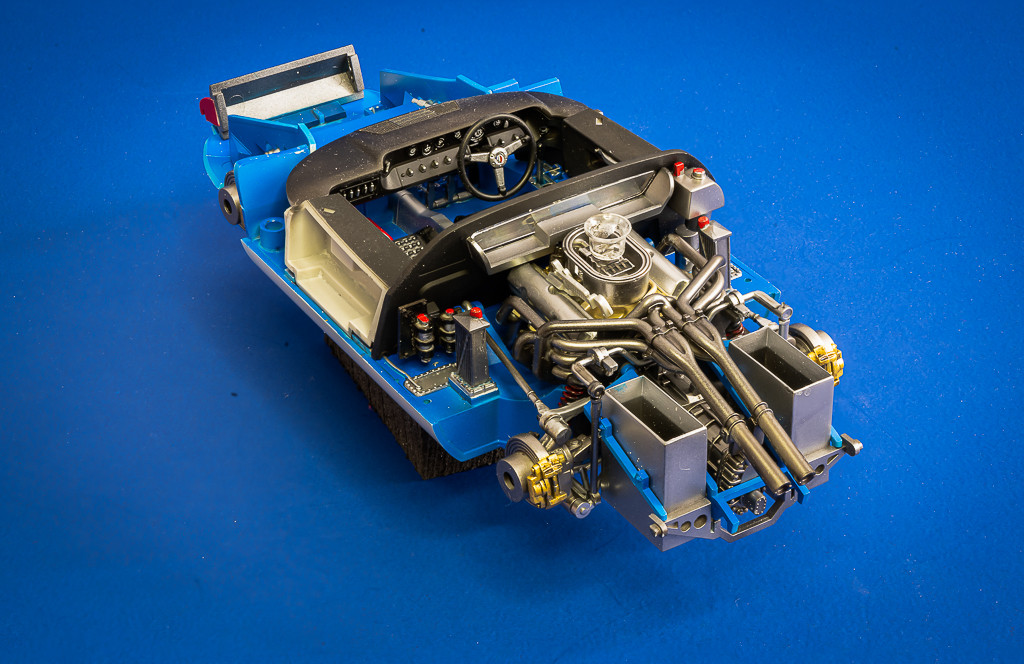
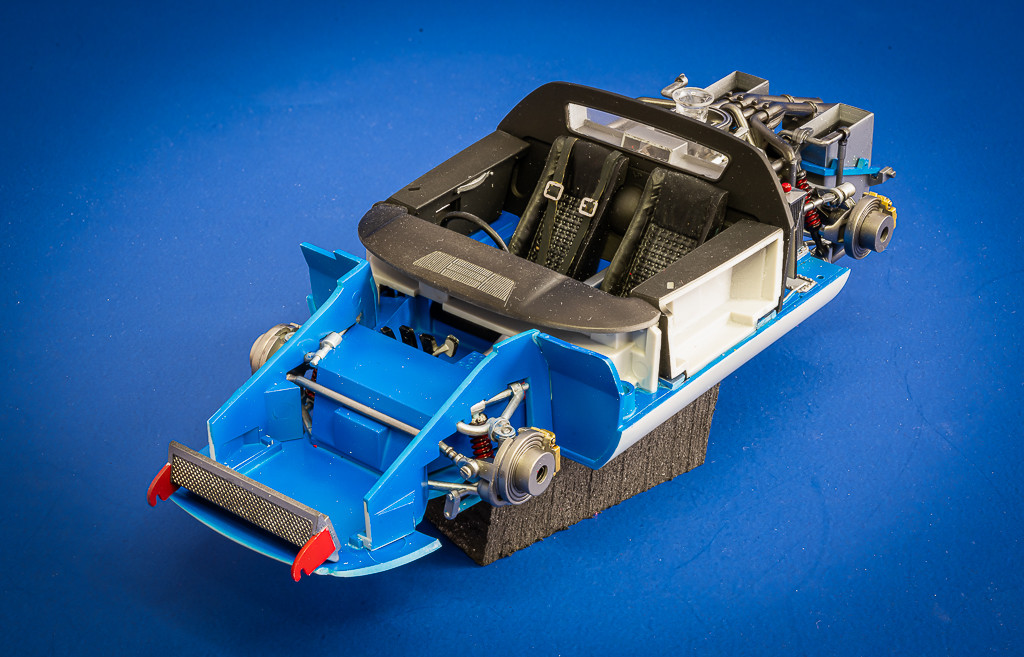
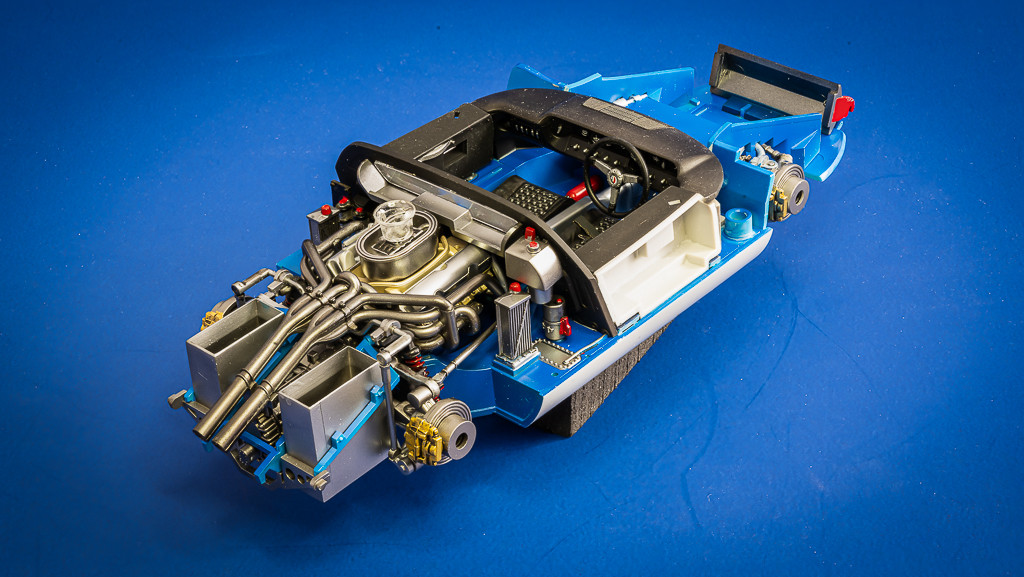
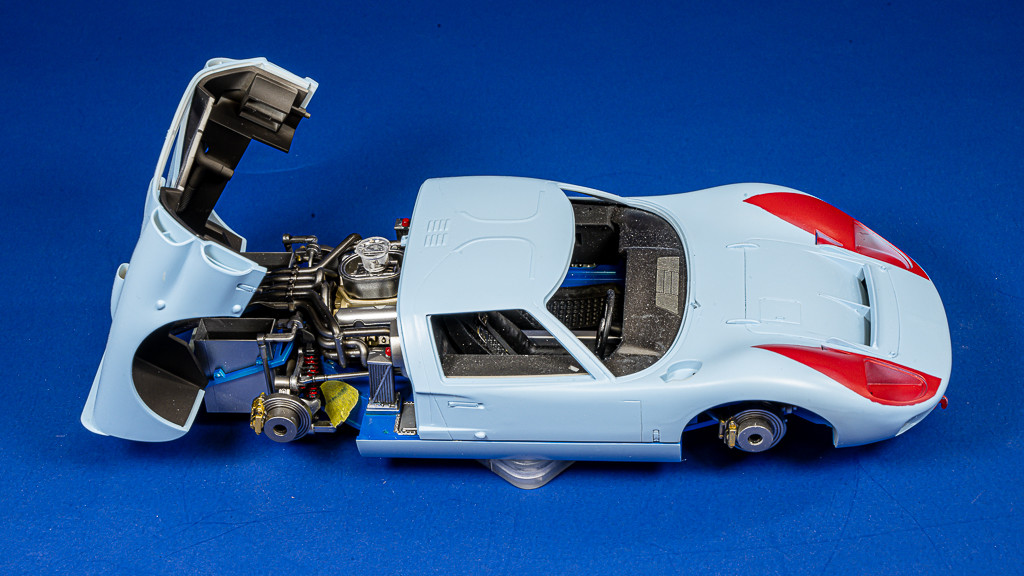
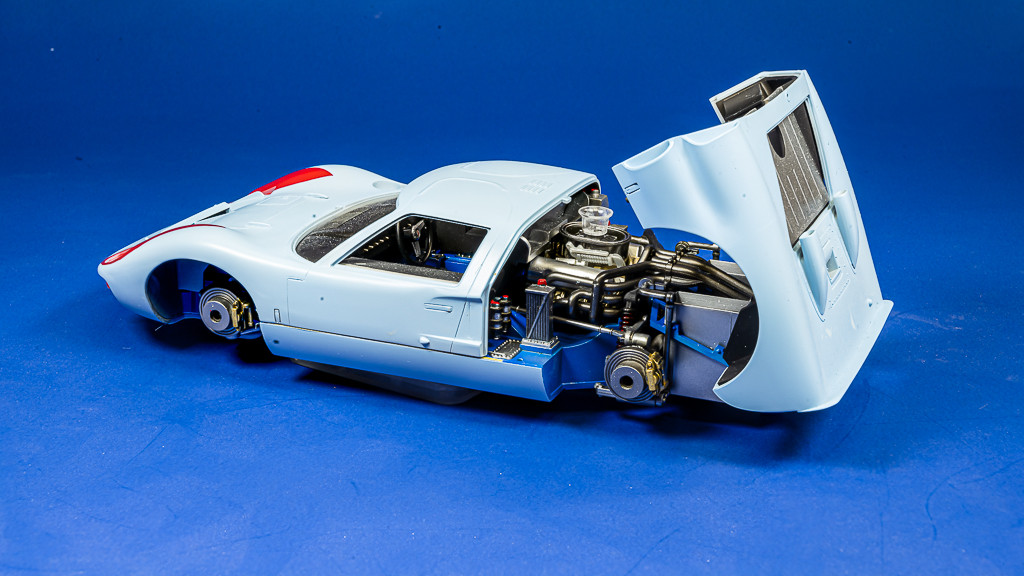
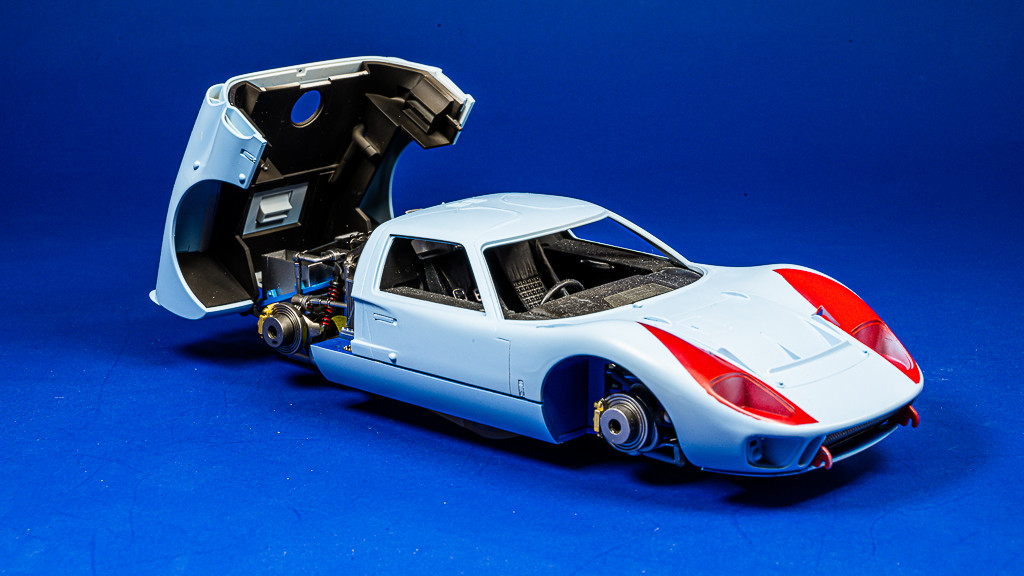
Still plugging away and learning as I go. The front clip is done. The cockpit is also now complete with the additions of the harnesses and dash. Speaking of harnesses and seatbelts, the ones provided in the kit were tossed in the trash after about a half hour of pure frustration. I just can’t understand why Meng chose to use the felt like material with glue on one side, makes assembling a nightmare. I decided to double up some Tamiya take, cut on my Infinity Cutting Matt (one awesome tool I use nearly every day) and made new belts. I wish I had some textured ribbon but of course I didn’t, so this was the next best choice. They are in, painted and done, painted with Model Air Nato Black for a slight difference of black used for the seats.
The non-operating interior door panels hide the floor sill/fuel tanks but what it is, it is: done and finished.
The rear cockpit bulkhead/firewall is finished as well and has to be installed after the 427 engine otherwise the front end of the engine will not fit.
Here I made another classic mistake and without thinking, glued the intake manifold and cylinder the heads to the engine block and then installed the assembly onto the block. Of course, it didn’t dawn on me for hours, that I forgot to install the headers as I haven’t even painted them yet. Now after painting them with Alclad dark aluminum, getting them glued into place was a bit testy. I struggled for quite some time but managed to installed the headers, the exhausts, carb and the balance of the engine parts. All the remaining parts of the rear suspension was painted and installed and figuring out how this all went together wasn’t the easiest of jobs as the instructions were a huge letdown. Getting the engine installed squarely to the chassis was another fun filled adventure but that’s now done as well.
One tip for Meng: a bit more thought on the exhaust would have been welcomed. The exhausts are added as a separate part and the seam at the rear just past the mounting bracket is poor at best. What Meng should have done is mold the ends of the exhaust pipes as a separate part and added last and no seam. I had some fancy and fun filled seam removal to do and then repaint – not the best results but learning how to think ahead.
Next up:
It’s time to face the music and get to work on the three major parts of the body shell: front clip, rear clip and the bottom of the car.
Thanks for checking in
Peter
NOTE TO SELF: before posting photographs - clean the model.

5 Likes
That’s why photographers have assistants! ![]()
The Ford is looking good as do the scratched seatbelts. I don’t think I have come across any really good aftermarket belts for cars.
cheers
Michael
Michael
I keep telling my brother that, but since he is a few minutes older then me, it didn’t fly. Yup, completely agree about the seat belts as they were a b it of a job to do for the first time out of the box.
Peter
Bro,
I’m a full 20 min older then you. So I’m the senior.
Michael,
As for harnesses, I also haven’t found a single kit that has decent belts as all are some type of ribbon that frays. What I now use is Medical paper tape. Cuts perfectly, doesn’t fray, the adhesive is just enough, and the texture really does look the part. What’s more you can get it at any drug store or drug dept, and it’s cheap. A roll should last you a life time. Plus if you cut yourself while modeling, a tissue can be used as a gauze, and the tape will hold it in place just fine.
Now on to Bros update.
For starters, dust is every modelers arch enemy, but it’s always present. Just give your model a quick wipe or burst of air from your AB and so be it. Personally, I seem to specialize in dust in most of my pics.
The completed engine/trans/rear suspension looks excellent. Your focus on using Alcad 2’s of various shades for nearly all of the metal surfaces really makes a huge difference visually. I especially like the effect you’ve achieved on the exhaust headers. Just looking at your pics, installing those headers must have been a real nightmare,
Nice job on the cockpit. As you saw in the movie last night: Ford vs Ferrari, the GT40 cockpit is basically just shades of Black as is most race car interiors from that era,
Nice recovery on those crappy kit seat harnesses. I’ve got an extra roll or two of the paper tape from my eye surgeries and will give you a roll. It will last you a life time unless you don’t misplace or loose it.
BTW, nice job on the brakes, as those calipers really stand out coupled with the Tamiya PLW to add the needed depth in the shadows.
Bro #1
That looks seriously good. Great variety in metallic colors.
I wish someone would make 3D printed decals, for 1/24-25 scale cars. What I’ve seen, for planes and military vehicles looks incredible. Seatbelts, dashboards, lights etc.
Jesper,
I’ll be right behind you with my wallet wide open. What’s available these days for aircraft with 3Ds belts, harnesses, and instrument panels would certainly be a major upgrade for what we in the auto modeling hobby have. You would think that the companies making them would have seen dollar signs dangling in front of their eyes with the addition of the same basic items for cars.
joel
All looks good Peter - glad to see you back at it .
ALIVE, WELL AND STILL KICKING
A few years before I was diagnosed with cancer, my wife Diane and I were looking forward to our retirements and planned a major renovation of our home. The best laid plans seem to always have a mind of their own and once I was in remission and well enough to allow contractors in the house (social distancing was a must and one of the ground rules my oncologist insisted on), we proceeded to hire contractors, set a schedule and off we went. We never imagined there would be so much to do, decisions to be made and my physical stamina put limits on all the preparation work we needed to do. As with any renovation we kept adding to the project, still thinking it would take about six weeks to two months; we’re closing in on almost six months and just about done.
I’ve had very little time for modeling or even hanging out on the forum as my model room/studio moved from one end of the house to nearly the other end (couldn’t ask for more) and became part of the renovation. We’re in the home stretch, all the projects except one: the new window for the model room which is on order. A huge portion of the project we greatly under estimated and never gave much of a thought to was packing and organizing and now unpacking, cleaning, replacing everything that was packed up in the beginning. Glad to say we hired a cleaning company to help us, as it’s tiring to just think about it. We’re off and running and but thankfully there is no rush to finish unpacking and cleaning everything all at once.
I’m finally back in my hobby room and sitting at the bench, getting ready to start building again and catching up.
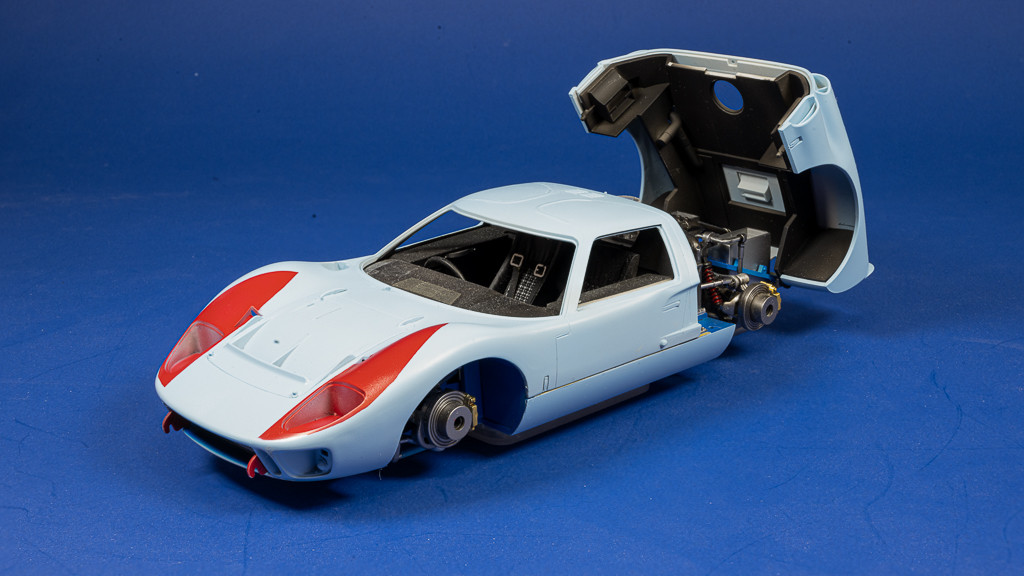
Meng 1/24th scale GT40
The GT40 was unpacked and back on the bench and the first order of business, if memory serves me correctly (good luck in this department) as to where I left off - somewhere in the neighborhood of finishing priming the body. A good cleaning of the body shell and prepping for priming was the order of the day. My primer of choice for all lacquer paints is MRP Light Gray Primer, straight from the bottle, no issues at all as the primer went down smoothly with no wet sanding being needed.
Next up was the Gravity Gulf Blue, straight from the bottle, as with the primer, no issue at all – super smooth and ready for decaling.
I decided to try and use the Meng decals at first and there were issues galore, starting with the teardrops over the headlights and front fenders. Micro Set and Sol were completely ineffective, not a chance of softening the decals and conforming to the compound curves - a solid no go. And of course, my Mr Setter and Mr Sol had not yet arrived. I ordered a set of decals for the Meng kit from Michael at Indycals which the following issues and were pointed out on Indycal’s website regarding the Meng decals: “… inaccurate stripes to roundels that are too small …”
After carefully cutting each teardrop out (Indycal Decals are silk screened and the carrier film is one solid piece), I went to work on applying the left teardrop which still required a good deal of Mr Setter and Mr Softer to conform to the multiple compound curves of the front clip. Yes, there were still a few small edge wrinkles I couldn’t remove and I had to slice them so very carefully with a #11 blade. My first time using Indycals decals and my first race car, I’m happy to have gotten to this point. Those tiny wrinkles did seem to bother me a bit more each day.
The only other issue I did have is the actual color of the teardrop. Meng’s decals are red, the Indycal website shows the model photo with a red teardrop as well and the four-view rendering shows it as orange. The actual color of the Indycal decals were a brownish color, something was amiss, I did a lot of research, discussed this with my brother who knows his stuff and Michael at Indycals; the teardrops should be red. With my original decal purchase from Indycal, I also purchased the tire decals and a mask set for the teadrop – which I should have used in the first place. For me the easiest approach to the problem and removing the two teardrop decals, the Gunz decal solutions seemed to literally glue them to the paint, was to strip the front clip back to bare plastic, reprime and paint again. Done.
A few days later, I used the mask set and painted the teardrops with Gravity Ferrari Red and all is fine. One very important point I learned from Michael is if a mask set is offered with a decal set, it’s Michael way of saying the best method of applying those markings and the correct color is to paint it on using the mask set. The teardrops look great and the color is correct.
Thanks for checking in
Peter
OOPS - some how I deleted my update and am just re-posting it. Sorry.
5 Likes
Looks great. ![]()
Thanks Richard
Nice to be back as our reno is almost done and now looking back, well worth all we went through plus my hobby room is a dream come true.I Should be making nice progress this week on the GT40, as I’m just starting the decal phase and going with Indycal - so far, they are a dream to work with.
Peter
Tank
Much appreciated
Peter
1 Like