Miniart railroad truck - bash

A few hours later! A dry fit thank god because the back ain’t straight!!

Engines in. Some more detail to do.
Fuels tanks, tool boxes, headlights etc etc all still to do.

The white patch on the top of the door window is a glue brush that got toooooo close to the window. That’s coming out if I can get it out. Otherwise it will be subjected to some heavy weathering.

FWIW. I toned down the yellow top coast with a wash. I felt the yellow was, er, ah, er well too yellow.

5 Likes

Looking rail-ly good. If you can’t repair the glue on the ‘glass’, replacement with acetate or something similar could work

You could always smear some dust or spilled gasoline over that glue damage to make a feature of it?..

The weathering looks great!

barkingdigger that’s exactly what I had in mind. Fuel spills down the window.

Headlights on. Relocated to a higher position.
Second and third fuel tanks on. One below the rear tray and one on the roof. Roof tanks still needs some bolts through the tie down straps. The fuel line is a bit rough but that’s maybe how they made it!!
Catcher still dry fitted. Oil drums etc were store on it.
Drivers door is still off because I want some ‘junk’ inside.

Some more weathering with oils and I’ll call it done. Oh and junk in the back tray.

Excuse the crappy image. I’m being lazy and just using my phone camera.


3 Likes

Ok I’m calling it done. Almost!! A bit of tidying up. Some more details in the back.

Overall I’m happy with the results. I could have done more detail on the engine. I forgot the fuel line for the fuel tank under the rear tray. Next time!! The thing is I’m not a detail nut. I aim to capture a ‘feeling’ rather than an accurate model. I wanted a backwoods, beat up rail car. I think I achieved my goal. I always appreciate feedback. Good or bad.

These images are out of my phone camera. When I get off my butt I’ll do some ‘proper’ images.


8 Likes

Looks great and grimy. The ‘fuel spill’ solved the blemish on the ‘glass’ I see

1 Like

Nice work - love the feel of the whole thing and enjoyed following along . How about some “eye level “ side / front / back shots ?
Thanks for sharing.
RT

Wow, well pending “proper” shots two words: ffffffairly brilliant :trophy:

OK here’s my ‘proper’ shots. I’m having a brain failure at the moment so here’s the best I can do today. Ever have one of those days where you do really dumb things? Yup that’s what today was like. I spent an hour taking images only to find I had the camera settings wrong. :sob:

Anyway thanks for following along.


3 Likes

The darkness/shadow underneath hides the wheels and the rear wheels are also hidden by the box and tank which makes the whole thing look like it is hovering using some anti-gravitational device.

1 Like

Robin it is hovering! Ill take more photos just to prove it. :slight_smile:

1 Like

Here you go Robin. I took about 100 images. Long time since I had the camera out so I’m a bit rusty. Model photos aren’t one of my strong points!! I know all the theory. But sometimes the cobwebs prevent the brain from working as it should.
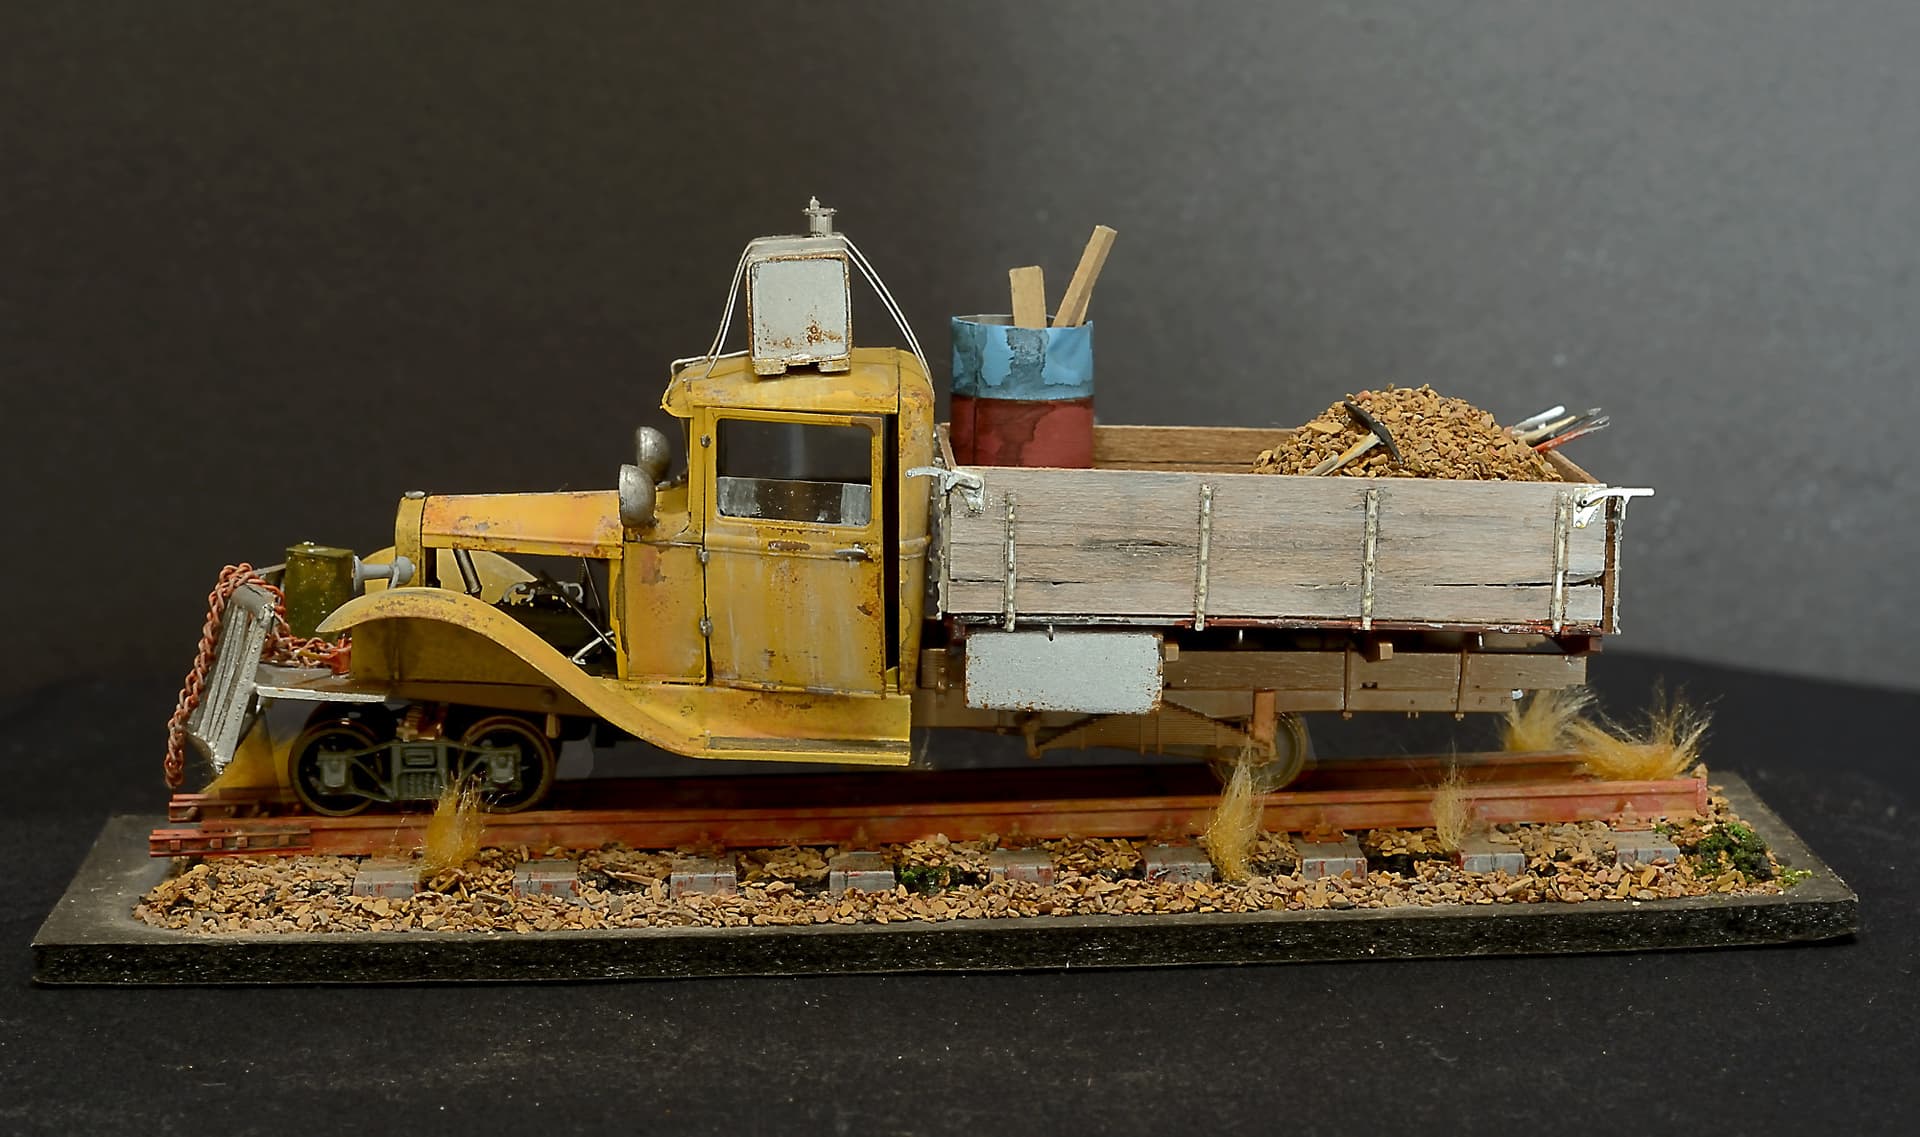
And yes there is a tilt towards the back. And that 1 tonn of gravel in the back explains it. The truth is I glued the tray on wrong and before I realised it the glue had set. But why talk about my mistakes?

6 Likes

Well I think you’ve done something really special and really well, bravo. I’d only quibble the gravel pile would likely be dumped more over the rear axle & the drums at the back. Maybe also the under-mudguard and rear chassis members aren’t dirty enough but that’s personal taste. I love it :tumbler_glass:

Railroad wheels don’t throw up dirt and dust the same way as rubber tyres do.
The mudguards could have been more worn and rusty though.

I am a wee bit surprised by the far forward position of the axles though.
The inspirational images has the forward bogie center under the radiator so
I’ll accept that position, the engine sump is in the way further back …
The rear bogie though … I would have put the bogie center where the rearmost wheel is.
A drive/cardan shaft is easy to extend or shorten in a workshop with a larger lathe

Just my two cents.
Still an excellent job well worth to be proud of :+1:

Thanks guys.

The guys that dumped the gravel in the back werent so bright. Good thing they dont have to steer it. It may be a bit light in the front.
Yes I overlooked weathering underneath. Just a brain fade.
Robin I used the axle positions of MiniArts kit. The rear axle does look too far forward. It has the drive shaft and all there. So wheel base is ok. But thats how they are.

I have many many books on back woods railroads. Some of the home built equipment defies many engineering rules. Ive crawled over and under many. Mostly in the USA. There are some very strange contraptions out there.

It was a fun build.

2 Likes

You made a good model with an interesting idea. Everyone will be waiting for the next masterpiece. Do not wait - start!

1 Like

The guys that dumped the gravel were smarter than everyone thinks - if you had to shovel that material off the back of the vehicle you would quickly learn to pile it at the back … ask me how I know…

5 Likes

Amazing work. Love all the stuff in back and the wear and tear. Many military modelers I know (me too) like tanks and trucks because of all the stuff that can be piled on them. Rail runners are great subjects for that, too.

I’m just a little late to help with this build,
Posted this earlier over in the Railway Post Office arrivals.

88d39f16022601f58df1c2f80fc822e2efd2011a_2_375x500

1 Like

Seen just yesterday at the local hobby shop: (F Scale)