Nearing the end of the build phase, I’ve finished the inside of the upper half of the turret, and the turret roof.
I’ve also finished up the fenders now that my acrylic glue is here allowing me to attach some the fiddly PE. The plan for today is to paint the upper half of the turret and then weather the interior of the turret.
All that’s left in the build stage is
- drivers and loaders hatches and periscopes
- exterior turret parts (mostly really small PE and plastic handles)
- gun and mantlet cover
- fuel drums and attachment straps
- DSHK MG
- tracks and wheels.
The goal is have this all done by Monday/Tuesday (minus the tracks) so I can paint next weekend. Kit has been absolute pleasure to build. Some of the thin plastic is a bit fragile but not too bad.
6 Likes
Thanks everyone for the tips on the engine wiring.
I’m using 26 gauge copper wire and shaping it before attaching it.
I’m painting it with VMC Dark Grey and it seems to be holding up.
It will take all week - I’m doing two at a time so as not to get confused, and I will let the CA glue completely dry before working around something that is already installed.
Your build in this thread makes me want to do an interior kit for a T-54 or T-55. Being in the middle of a T-34 interior means I won’t do that soon, but I have my eye on it.
1 Like
Glad the wiring is working out.
Happy my build is inspiring someone to do this kit too.
I’m definitely going to go another Miniart interior kit eventually, possibly a Panzer III or T-34. But I agree with you, that is a far down the road build. These are fun kits but quite the grind. Need some sub 300 parts kits before I tackle another kit like this
I have the turret roof mostly done. I just have some touch up painting to do around the wiring and periscopes since I painted them in the sprue, the detail painting of the spare periscopes and radio dials, then weathering of the turret.
One thing I’m interested in doing is keeping the turret roof removable/temporarily attached so I can remove it if I want to show off the interoior. However I am not sure if this is doable. I’d welcome any suggestions
Both the leather and pale blue of the radio are more toned down in person and not quite so red and blue
6 Likes
Its looking really good!
I think that would be really cool if you could remove the roof.
1 Like
I don’t think there would be any problem with leaving the top loose. I have one and plan to do it that way.
Ken.
2 Likes
Oh yeah, after all of that fine work, you’ve got to show that interior off!
BTW: The colors don’t look over-saturated at all on my screen. 
—mike
Another update. This is finally starting to resemble a tank.
(Mantlet, turret roof, gun, and turret halves not glued yet. Just dry fitted, still working to weather the interior.)
I had hoped to get to priming this weekend but a few problems got in my way. First the larger engine deck screen had a few bends and dent OOB so I tried rolling it out to flatten it. While I must have applied too much pressure as it ended up gaining length and was one row of diamonds too long. I had to preform surgery, cutting one length out and then matching the two halves. This took a while of careful work but I think it looks good. It still needs a little work at the top to hide the seam.
Next I was about to start paining road wheels and my compressor died. Grabbed a new one over the weekend but lost a day of build time. In the mean time i built up the fuel drums however these will remain off until the tank is painted. I also added the hand rails to the turret (one still needs sanding), and added the rear turret parts. I also added the engine covers but they aren’t glued. I am trying to make them workable but if that fails they will be glued open. I’ve also finished the hatches for the driver and loader
Just a few small things left.
- a few fiddly PE bits left perhaps 10 ish
- DHSK MG
- weathering of turret interior
- painting of road wheel insides
- priming painting and weathering
8 Likes
Can we talk about part Ca27? It looks like a piece of supplemental armor on the lower left front side of the hull. In your instructions you attach it in step 7. I have the same part in my kit. I’m puzzled as there doesn’t seem to be one that goes on the right side of the hull in the same spot. I can’t find a part for it and there are no instructions about one so maybe it was just there on the left side? Thoughts?
Yeah I found that strange as well, both Ca27 and S-15 are only on one side as far as i can tell despite it looking like spots exist for the on the opposite side.
I’m wondering if it was supplemental armor for protection of the driver?
I tried looking at references but that area is buried behind road wheels and tracks and hard to see on pictures.
It is extra armor to protect the driver and it goes only on one side.
@Mead93 looking great, maybe you should consider assembling the smoke drums and their mounts and installing them on the tank before paint, the mounts and pe are very fidly and a pita to install.
Thank you! Its probably my best build to date!
In terms of the smoke drums, I am assuming you mean the cylindrical fuel drums on the back? If so I was debating which way to go on this. I had thought to leave them off prior to painting as they may be hard to paint around, however, I agree they look very fiddly and may be easier to construct before painting. I also considered shaping the straps and mounts before painting them and then removing them to paint.
Officialy they are Bdsh-5 smoke canisters.
3 Likes
Okay cool! Thanks for letting me know. I think I may attach them before painting. They look very fiddly
1 Like
I found that by gluing the canisters to the plastic mounts it made them more sturdy and easier to work with and align.
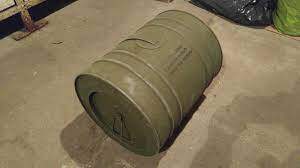
And a photo of the reall thing:
3 Likes
Any tips on setting the length of the straps? Miniart doesn’t really supply any instruction on this but I’m guessing the textured part has something to do with it.
1 Like
Haha! Sorry me! I thought that was a model!
The marked out parts are where you are supposed to bend them around the plastic rods
Okay thanks. So if I understand corrrectly, the textured (thinner) portion forms the loop?
2 Likes


