Jesper,
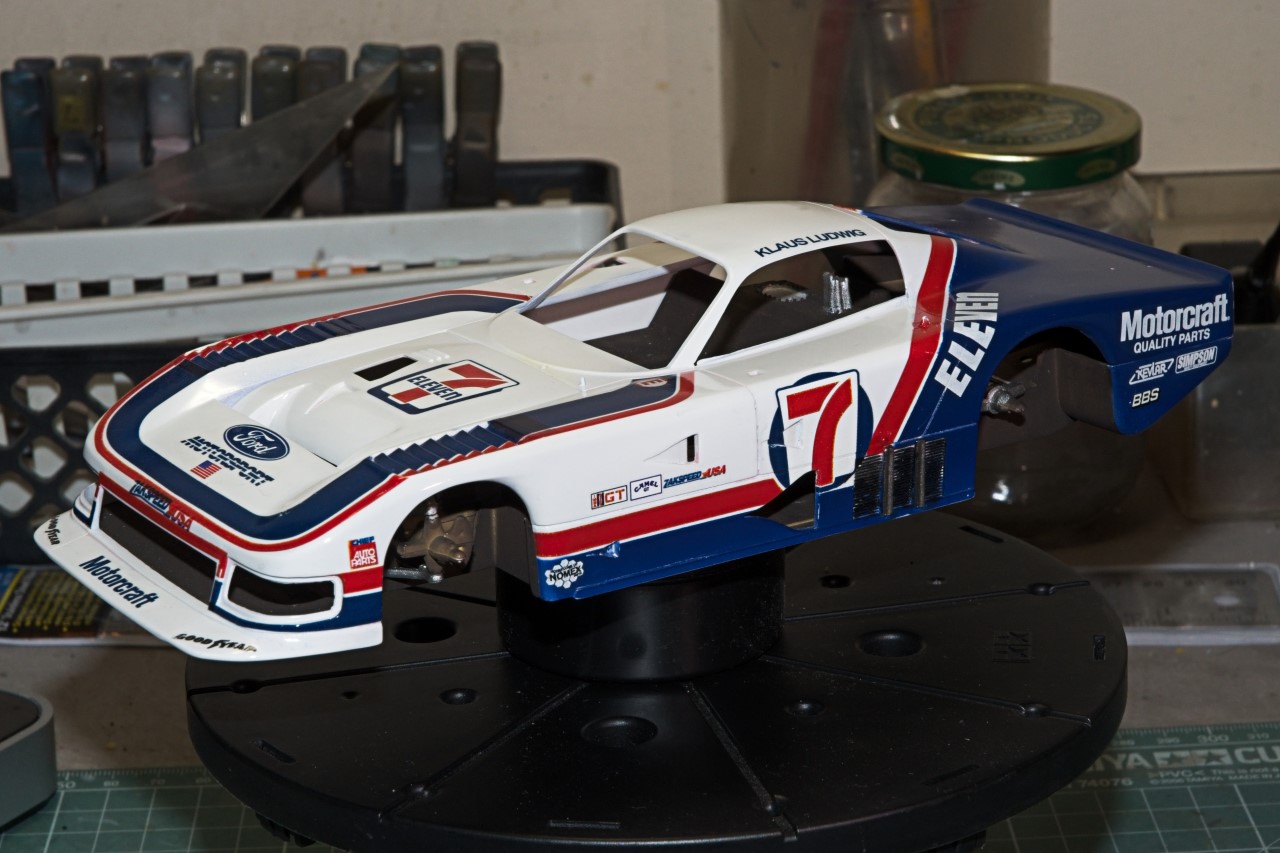
Thanks for the thumbs up on the decal effort. Just the size and angles of some of those decals was plenty nerve racking. The large side #7 decals and the red stripes are one big decal for each side. I cut them into 3 major pcs, so I could concentrate on getting the red stripes somewhat even on it’s journey from the rear window to the lower sill.
joel
1 Like
D,
Thanks for checking my progress to date, it’s always greatly appreciated.
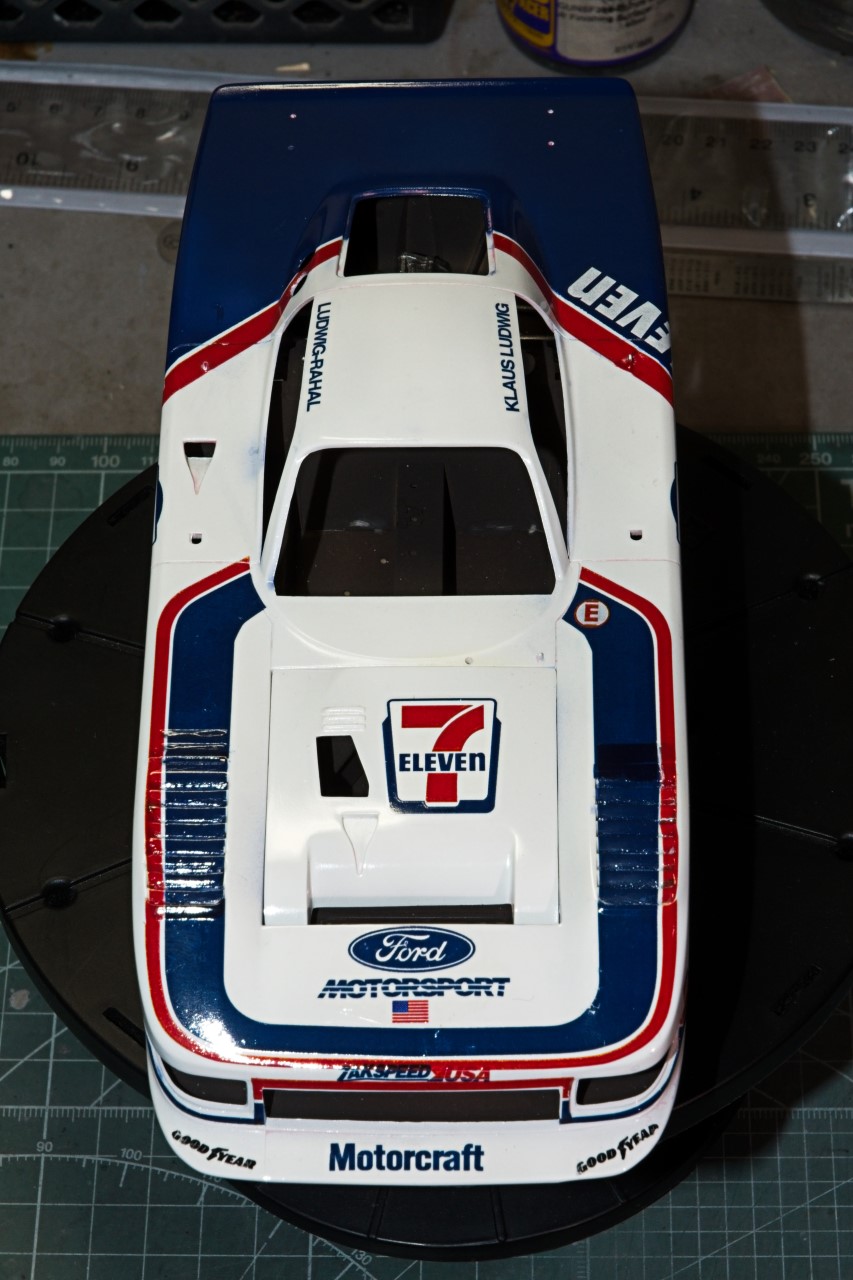
When I saw that decal for the back of the rear deck, it just screamed to me: It’s for D for sure.
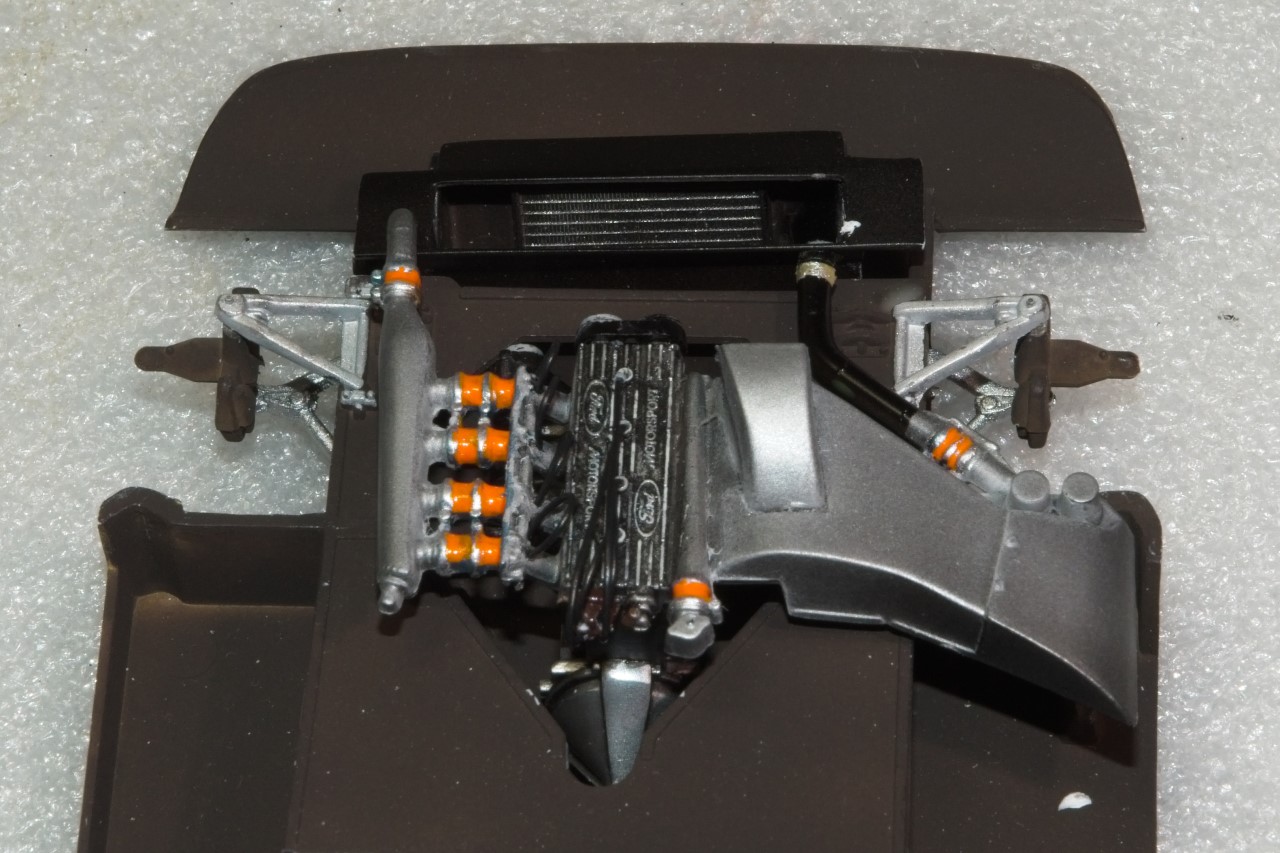
I’m still waiting for the rear wing decal. I’ve got plenty of goofs, detail painting, over spray clean up left to do to keep the body work going. I haven’t done a drop of work on the engine bay other then correct the oil radiator position which is wrong (more on that when I post the engine update), and nothing for the interior, wheels/tires.
joel
1 Like
As usual, your decaling is perfect, Joel. How did they work over the open vents? I guess that was no easy job. Hope you’ll get your “finger print decal” replaced soon.
Oh, and to answer the question in the last picture: Yes I have! Just came back 2 hours ago with my faithful old Focus from a 250 km drive through the Somme Region in Northern France, where I spend my holidays this year … ![]()
Torsten
1 Like
Torsten,
Welcome back from vacation. Here we are retired for nearly 5 years and still haven’t taken a proper vacation in the last 25 or so years. These days all of our over night trips are to the hospital. Day trips are labs and specialists. Although, we’re still planning on Las Vegas for two weeks, followed by Jamacia and or the Bahamas for a few weeks over the winter.
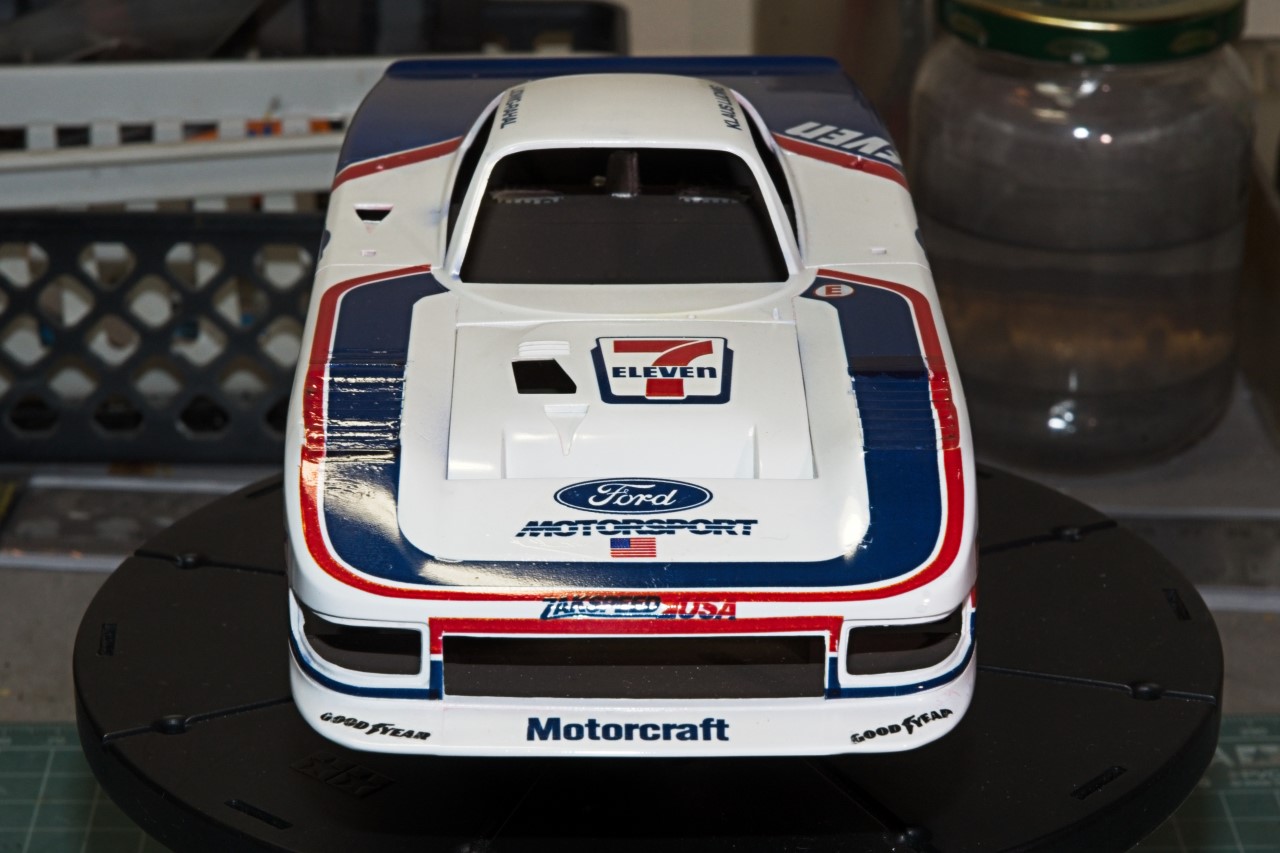
The vent vanes on the front fenders were really a massive job requiring quite a bit of touch up as the decals were never designed to stretch as far as I asked them to after the modifications I made to make them look like the vents they represent. What I should have done is buy a 2nd decal sheet so I could cut out individual decals for each vane. For just another $12 it would have resulted in a much easier decaling effort, and look better when done. I guess I’ll just chalk that up to another senior moment.
Still waiting for the decal, so I can get on with the glossing, and polishing. In the meantime I’m moving on to the engine compartment which will be mostly OOB
joel
2 Likes
Joel this is looking top notch man. All of the “fixes” you’ve carried out along the way are really paying off with this car body. Paint and decaling look nothing short of awesome and it’s really looking the part. Haven’t been in here the last week or so to check progress as our home air conditioning compressor shelled itself out. Luckily, it was under warranty but had to wait a dang week to get the parts. Got it all back together now and am back in business.
Looking forward to more on this one pal.
1 Like
Joseph,
Always a treat to have you stop by and get such a positive response. You’re being way to kind as there’s plenty of “needs fixes” in the paint and decaling. Gotta say that the vanes in those vents were the toughest ones I’ve ever had to deal with.
I really feel for you and your family when the A/C compressor shelved itself. Glad that you got it back up running in only a weeks time. We’ve also got Central air and the system is nearly 20 years old. Every year l cross my fingers that the A/C service who has our contract for years will keep her running another year. Just seals at this point as we need Freon every other year lately.
joel
1 Like
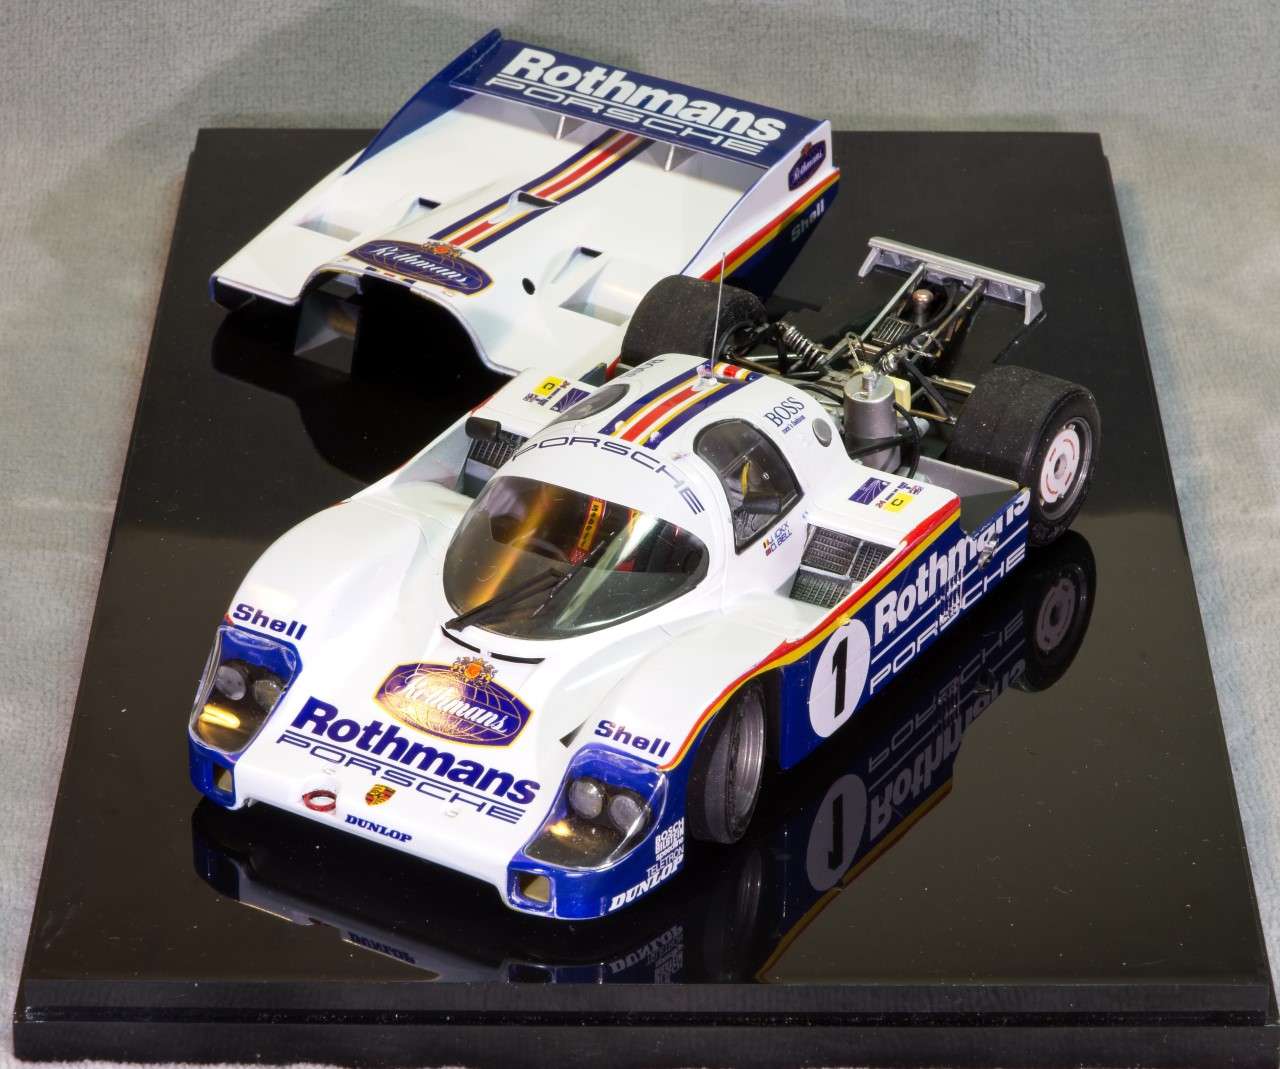
The body minus the rear wing finally left the body shop. The gloss coat was rubbed out with 6,000-8,000 emery cloth. Then polished with the Gravity 3 part system. And finally waxed with Gravity wax.
Next up is working on the 4 cyl turbo engine.
Here’s a few pictures of how the body looks wearing a coat of wax.
joel

4 Likes
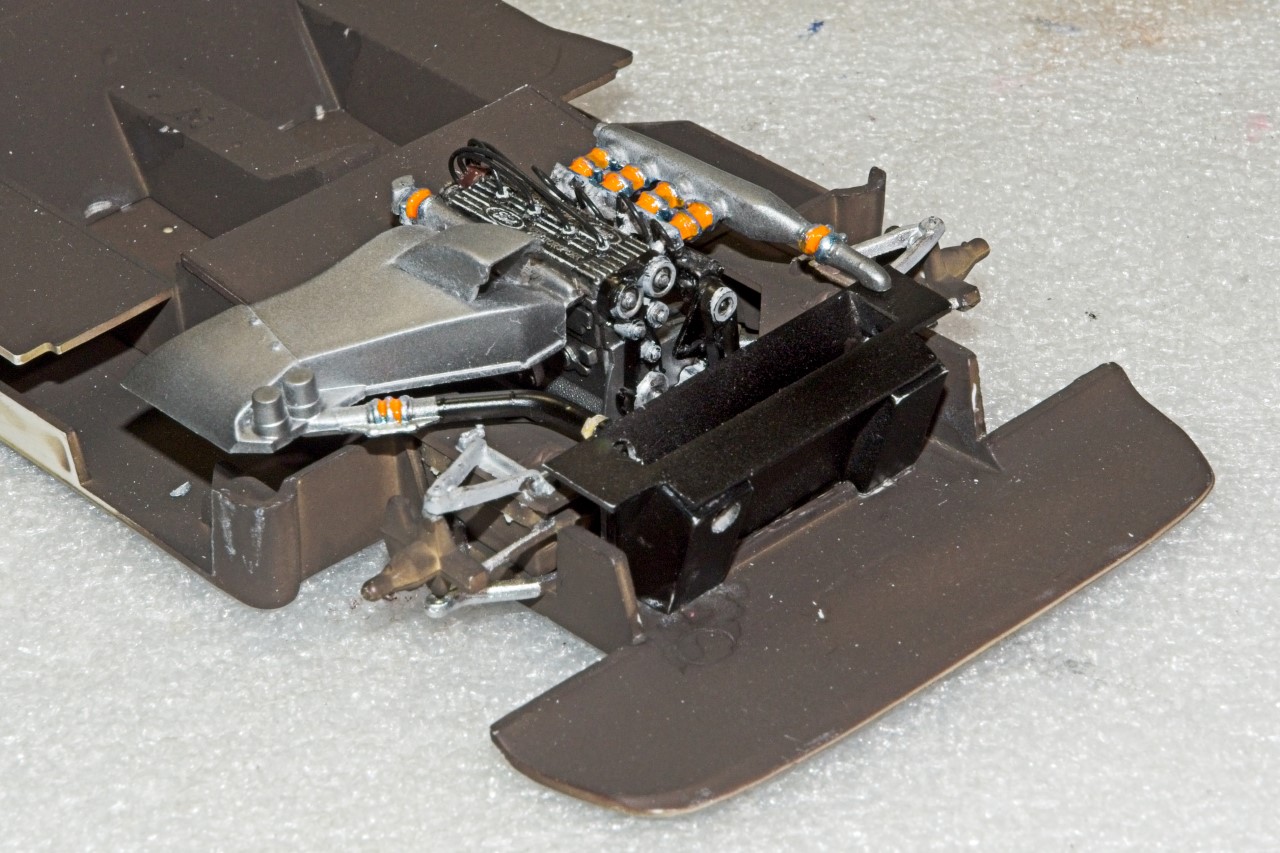
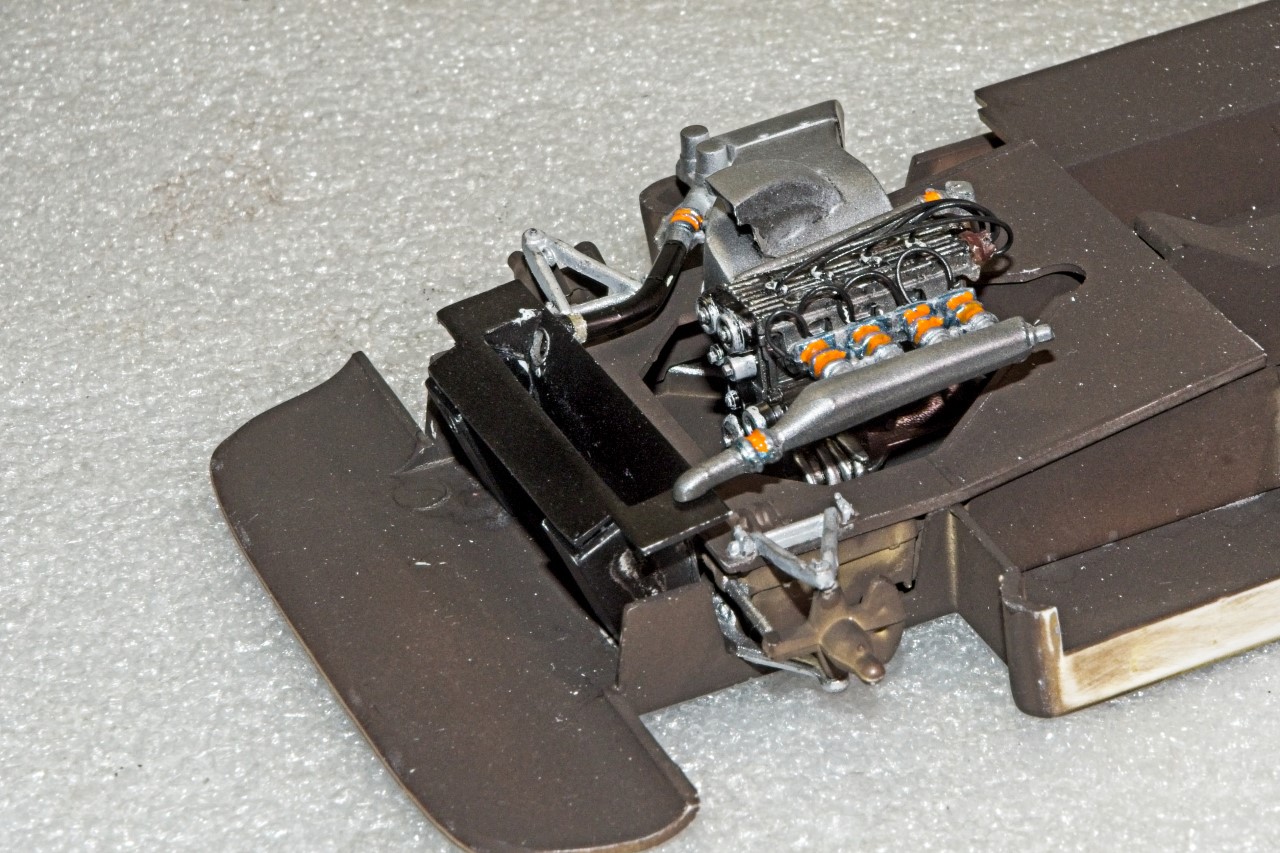
I’ve been working on the 4 cyl turbo charged engine for the past week. For a kit this old Monogram has done quite a nice job on detailing the engine. I airbrushed the engine and transmission Alcad2 flat Aluminum and Dark Aluminum. Then added the ignition wires, the fuel injection lines, and the exterior rubber water hose to the radiator. I’ve still got to install the inside hose from where the line comes in to the radiator.
For me, the hardest part of weathering the engine was the aluminum head. I started with two coats of a home made enamel wash thicker then the Tamiya panel line washes it also received as final coats.
joel
8 Likes
Looks right Joel - glad to see you are still at it !
1 Like
Richard,
Thanks for stopping by. I’m thrilled you like what I’ve accomplished so far.
joel
1 Like
That’s a punchy looking motor Joel. Those turbo charged fours were very dominant in touring cars in this part of the world in Ford Sierras.
cheers
Michael
1 Like
Michael,
Thanks for stopping by and having a look. What issues I’m having with the wiring now is that there’s literally no room for them under the hood. I’ve got them tamped down as far as I can but the hood just “almost” fits.
Those Sierra’s must have really screamed. Too bad that Ford just couldn’t make those motors more reliable, as their focus was and still is towards Nascar, and Indy Car.
joel
1 Like
The noisy end really looks the goods Joel, very nice job!
Cheers, D
1 Like
Thanks D for the thumbs up.
I’ve found what’s labeled as a lost film about the car from the 1st race at Road America, and one thing for sure, they were really loud wide open running down the straight.
joel
1 Like
Great color usage and great detailing are really bringing out the best in that engine build Joel.
1 Like
Joseph,
I always appreciate it when you stop by. So glad that you like what I’ve accomplished so far. The only issue with the wiring and fuel lines is that there’s almost no space for them so that getting the engine hood to fit has been a challenge, but I’m also there. However, I do plan on displaying the IMSA Ford Mustang GTP with the hood resting on the side of the fender as it really doesn’t alter the overall lines.
joel
1 Like
I’ve had aircraft builds that I had to do just that with. I built a Hasegawa Bf109G-10 in 2006 and by the time I got the engine all completed and installed, none of the cowlings / fairings would fit and I ended up having to display the fairings off to the side. Looking forward to more on this build Joel.
1 Like
Joseph,
Thanks for stopping by and liking what I’ve done so far. I’ve gotten the hood to almost fit which is up to the wires not wanting to go back to the original shape that the glue is trying to keep them in. Plug wires on the top of engines have always been a major issue for me.
At least I don’t mind displaying it with the hood off as the basic lines are still there. It’s displays of builds like this I really don’t like.
just kills the overall look of the car. And we all know how much I love Porsches.
joel
5 Likes
Love the look of that engine Joel. The silver detailing, on the valve cover, looks really sharp.
2 Likes
Yeah, it just breaks up the lines of the car too much when major panels are off like that. I mean, all the detailing is nice but it looks all broken up displayed like that.
1 Like