New to 3D printed parts

There is definitely room for both, they all have their limitations,resin printing definitely the reduced plate size even if now there are printers like the MonoX that the size is already much better, the smell and post production Wash and Cure,I can keep it in the garage but if I had to keep it in the house I don’t know if I would have taken it.

But I must say that mine being well closed and without internal fan while printing does not smell , it also depends a lot on what type and brand of resin I use, some stink a lot, others almost nothing,then there IPA alcohol and there is little to do, it just stinks!.. :face_with_hand_over_mouth:

This is my printer…

For CAD at the moment I do very basic things on TinkerCAD then in the future we will raise the bar … anyway a lot of fun

Unfortunately there is not much ready for “historical” modeling as it is for Sci-fi and fantasy, but there are many sites where you can download both paid and free printable “ready” files,a lot of stuff for diorama too,like here…

Interesting, I’ll have a look at that printer. I am getting reasonable results, filament seems to suit 1/72 fairly well, though it has to be said anything under 1mm freestanding or 0.5mm on a surface tends to disappear. Still I can scratch build that.


This is a 4.7” Mk1 naval gun on a Mk6 mount. I could not get these anywhere, 3D design and print has made my current project possible, not to super detail standards, but as a working model.

2 Likes

Wow :star_struck:…that’s awesome :clap:,I think the problem with filament is that the nozzle it’s mechanic and there’s limitations on the minimum size,instead resin it’s limited only on the resolution and size of the screen,my it’s 2k but now you find the 4K and they’re working on 6k…smaller the pixel higher the resolution

Except for the spot we’re I have the supports the surface it’s smooth as silk especially after the primer,I have little if not any sanding at all…but I have the curing and washing.

For that I have this station….

But with filament you have better mechanical property than resin and a big plate,would be perfect have both

Great thread. I’m disappointed in Shapeways and looking for alternatives. I’d like to learn how best to orient a model and build in supports.

Yes Frenchy, have those kits but no one makes the type 92, type 94 or type 1 antitank gun… Yellow Cat use to make a type 92 as I mentioned earlier but I need to rob a bank to buy one on EBay…LOL

They did Biggles, which I have, but as I mentioned above to Frenchy no one makes the other Japanese type guns also used… (type 1 and type 94 used in bunkers at Pelelui/ Tarawa) which I need for my Dioramas. Anyway, as I mentioned I’m hoping someone will manufacture the guns with crew similar to Pit Road/ Fine Molds.

You can change the nozzle on filament printers, I have used a .2 nozzle successfully and the quality is good. When you look at .2 and .4mm generated parts the .4 looks like a soft focus photo. Currently using .3mm as I had problems with .2mm with build plate adhesion, solved now but haven’t changed the nozzle back. For me, as a ship modeller, the ability to make a lot of identical bits to a specific pattern is the big win in 3D printing. My current project has 52 ammo lockers in 3 types, 14 ventilators in 3 types, 7 twin Oerlikons, design once, produce many

1 Like

MM
I understand your concerns and appreciate your taking the time to explain what the designer has to do and what the printer needs to produce the best results. I see the prices of printers are reasonable but in order to buy into this tech I’d want to have a good grasp of the CAD and design software. As ptruhe I’d like to understand how to orient a design for the best printing results. Just reading the many posts here I begin to see the complexity of these processes. The concept that Shapeways employs to allow designers to post their creations is a good one. Once you successfully design parts for yourself it is smart to offer them up to other like minded modellers, and if modellers are making the parts they should know where best to place the supports to get a good result. Going back to SW’s if the designers broke the complex parts down into multiple “slices” we could do the clean up and assemble with better results but it probably isn’t what we should expect SW techs to understand, for them it is just a file to be printed, they don’t understand that it is for a 1/72 cannon or such. So what tech does Live Resin used in order to get the results they do, obviously they use the support method but how do the arrive at the design?
I appreciate everyone’s interest in this, I am not alone and as someone said that this isn’t the future of our hobby is the now.

All good points.

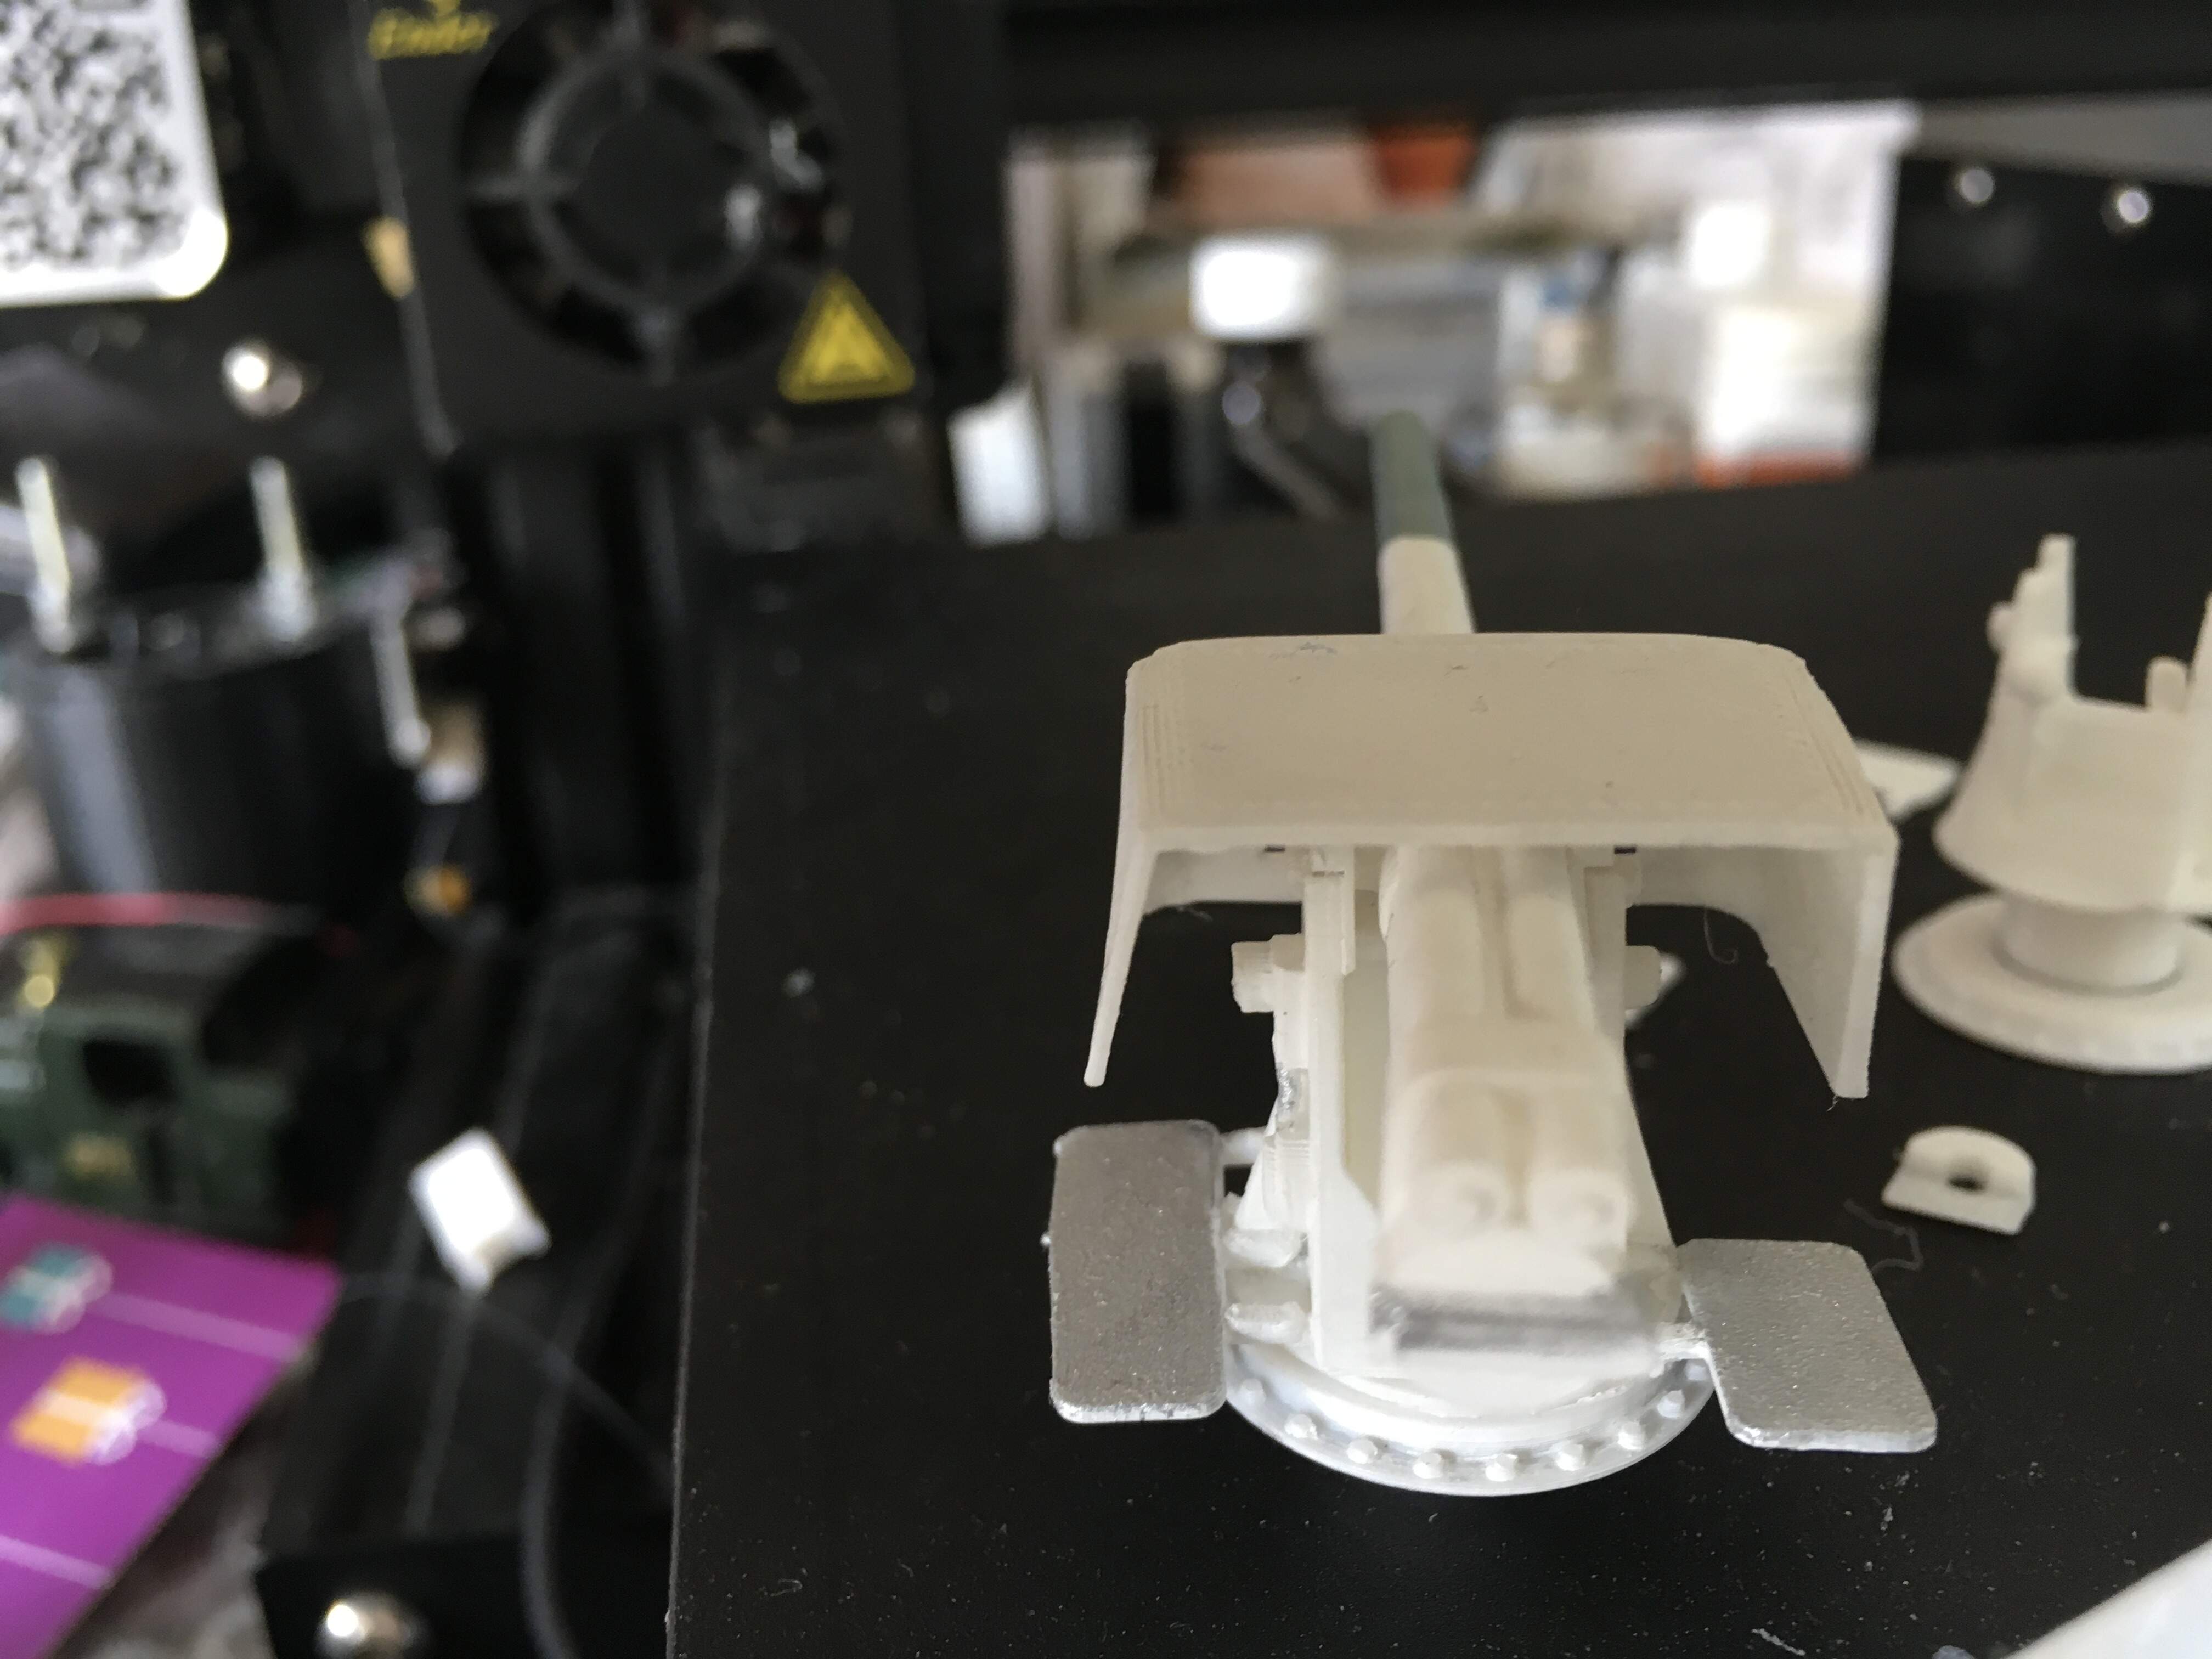
Regarding support placement, there’s both an art and a science to it. Support placement is done first with sophisticated software based on complex mathematical equations that identify where supports are needed (that’s the science). The designer can then tweak the contact point locations a bit but not much. (That’s the art).

If you would like to see how your specific 3D models would be supported in an SLA printer, you can download the software Formlabs printers use for free. The software is called “PreForm”. Open your *.stl file in the software and have it “autogenerate” supports. You can change the model’s orientation and adjust support placement manually. Link: Formlabs Software

Other printer manufacturers are likely to have their own proprietary software matched to their printer and their resin. This is key: the software should match the printer.

To get the best results and balance the needs of the modeler with the limitations of the printer, the designer must understand the model, appreciate the modeler who will be removing the supports, and understand the limitations of the specific 3D printer. A modeler unfamiliar with the printer would certainly design too few supports to create a printable model. A printing company unfamiliar with the model is likely to orient the model in such a way that the software will place supports in locations difficult for the modeler to remove.

If there are too few supports, portions of the model won’t form or worse, the model can break up during printing. When a model breaks up during printing in an SLA 3D printer, the broken pieces can be forced through the elastic layer at the bottom of the resin tank. The resin tank has a thin membrane at the bottom that permits laser light to pass through it into the liquid resin. That membrane is called the “elastic layer”. The elastic layer is easily damaged and easily punctured. If a broken piece of the model punctures the elastic layer, the resin in the tank will leak into the printer damaging the printer. A significant resin leak can even destroy a printer. Go to any 3D printer manufacturer’s forums and see for yourself the panicked resin leak posts. The responses are typically not any more helpful than “sucks to be you”.

This is why printer operators/owners require a proper support array and don’t leave that task to anyone unfamiliar with the actual printer and its requirements and limitations. A support array that protects the printer from damage trumps any other consideration, every time, hands down.

Typically, after the software places the initial supports and I tweak locations based on my experience with the printer, I add more supports. This is because sad experience has taught me that more supports, not fewer, achieve better accuracy and smoother surfaces. I understand that from the customer’s perspective, more supports is undesirable. However, accuracy and smoothness are the ultimate goals.

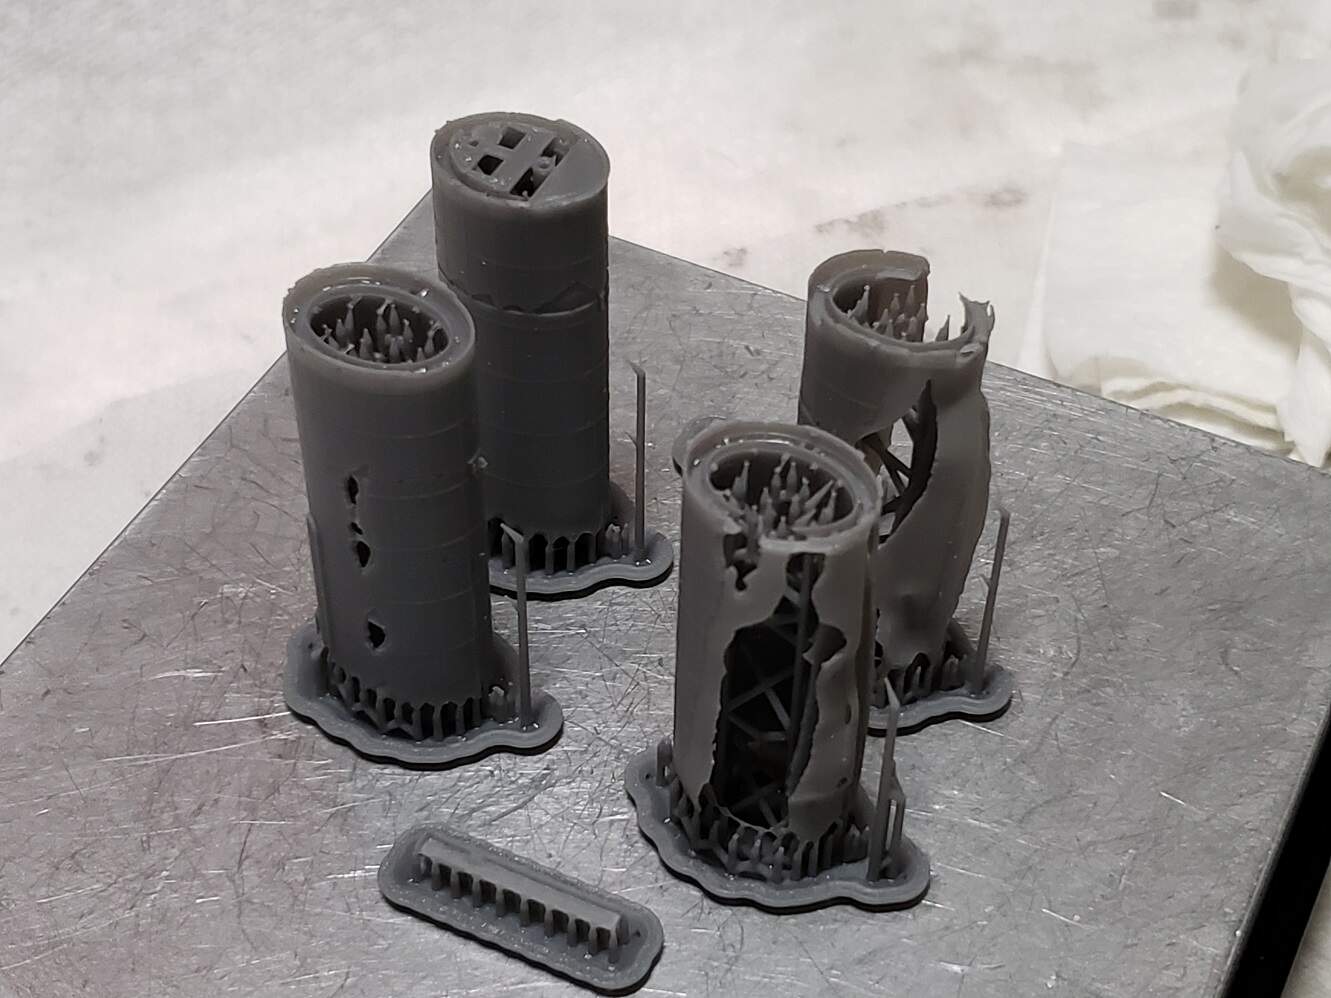
In addition to design problems like insufficient supports, models can fail to print properly for many reasons. In an SLA printer, the path the laser light follows to the liquid resin must be clear, clean, and free from obstructions. This “optical path” needs periodic inspection and cleaning. Some 3D printers use micro-LEDs which emit UV light (e.g. B9 Core 550). My printers use electro-controlled mirrors to direct laser-emitted UV light. A smudge on a mirror can result in a failed print. Here’s how a set of 1/350 Titanic funnels printed when a mirror became smudged:

An experienced printer owner can look at damage like that and instantly recognize that the models’ damage is characteristic of a fouled optical path. It is not related to insufficient support placement. In this case, the mirror cleaning took less than a half hour and the printer resumed working perfectly. All that was lost was time and resin.

4 Likes

Tell me about that!..a very tiny piece detach from the print and made a microscopic hole in the FEP (the membrane on the bottom of the tray) and the resin cured on the screen, I managed with IPA a lot of patience and a special plastic razor blade to clean most of it but now I have 1cm square that prints badly, luckily it is on the side and not in the center, fortunately the new screen don’t cost to much.

For the support i do like Model_Monkey Auto-support and than from these do my own support,the slicer of my printer is not that great, but like most of those who print resins with non-professional printers I use one of the 2 most used slicers, Lychee Slicer and the other is Chitubox, all 2 have a basic free or paid pro version , I prefer the first, Lychee have a very good Auto-support works and having the Pro version I can change,add supports and empty the prints very easily and customize them at will, these 2 programs have the profiles of most of the printers on the market and also of many resins, however resin manufacturers usually have the parameters for the most popular printers.

At a hobby level it is important to buy a popular printer, because it is easier to find information such as the various parameters for the various resins, spare parts, trouble shutting ect … because the community on the web is much larger, for mine there are groups on Reddit and forums … the bigger the community the better!

For the resins you can choose between a gazilion brands and different types, colored, transparent, hard, soft, dental, with specific mechanical properties,add Pigments, and they can also be mixed at will, as long as they are for the right type of printer. mine uses UV LED projectors and a monochrome LCD screen, others use a laser.

I am still at the beginning and it takes time and patience but seeing a solid come out of a liquid is something magical!

3 Likes

Great explanations, MM! Still not going to try it, though. Can’t teach an old dog new tricks! :grin:
:smiley:

1 Like

Again MM your understanding of the medium is remarkable, time in the saddle. So many things to watch out for and like I said the more you are involved the more you will learn. I will chalk this up on my list to watch out for. There seems to be a larger gap between printer and designer these days. Some people can make the best designs and if they don’t know how they are supported then that is why professional printers tasked with making the parts get failed results. For the hobby industry it is important for the printer to understand the parts application and that alone is a big ask, ship modellers, aircraft and armour pieces all have different applications and therefore different knowledge sets.
The reason I bought as much from SW as I did was because I was seduced by the content that was being offered, the actual pieces that could transform my humdrum HMMWV into a very unique model but now I have to spend a lot of my time messing with a variety of challenges that eat into my time at the bench. Now I use the parts for maquettes and make replicas out of styrene. No matter how many photos I look at there is always that place where you can’t see and that limitation makes the parts less than what I want. Remarkably the designers that have the inside track can make these parts spot on and that alone is worth the reference. So for our hobby we need researchers, designers, artists, technicians and retailers.
MM on those Titanic stacks how does one remove the supports from the inside lip of those funnels.
Many thanks for your thoughtful responce

2 Likes

Vicious
Good advise for us hobbyists. I have been watching You tube videos about various machines, resins but nobody is talking about slicers. Is there any software that is better with Mac’s? The world has changed in this regard as well,when I got started with computers Mac was not the favorite but now it seems that both platforms are supported. Does it take a lot of memory to add supports and operate CAD and the other various requires software? I see that some of the printers use a USB stick to provide the content from which the printer generates the model.
Thanks for sharing your experiences

1 Like

The Slicer is simply the software that prepares the file for printing, you first either make your model on CAD or download a STL or OBJ file, then upload this file on the Software (lychee, Chitubox etc …) that it prepares it to be printed, here you position your model as you want, you copy it if you want more pieces, add supports, you can empty it to save on resin, you can change the size, add holes to avoid the vacuum effect or drain resin trapped in the object, when you are happy you choose or enter the parameters for the printer and resin, the software tell you how much resin you will use, printing time and cost,when you finished the preparation you make the Slice, it is called Slicer because the software takes the object and “cuts” it into hundreds or thousands of slices, and then the printer prints one slice at a time,one over the other.

I think the majority of the software have a Windows version and Apple version,i dont have a super PC but a few year old basic laptop,some time with the CAD it slow little bit down but you dont need a super computer,the majority of the Hobby printers dont have wi-fi or if they have are little bit…meh…and when you finish to slice you put your file on a USB stick and load on the printer, sounds old school but take seconds to do that and avoid the problem if you lose connection in the middle of you print.

So written it seems super laborious but when you understand the system it’s all very intuitive.

There are also files already supported and ready for printing, especially in fantasy there are subscriptions on Patreon that give you 1 to 10 miniatures per month already supported and ready for printing.

1 Like

Another thing is that here we focus on modeling clearly, but just go to sites like www.thingiverse.com that opens up an infinite world of possibilities, the variety of printable objects is unimaginable,there are also many modeling tools, my wife broke the button of a switch of her car, only the plastic part, 80 $ to buy it back because clearly they sell you the complete kit, but I found the file nice and ready to print and it cost me 20 cents … if you have a problem most likely someone on the other side of the world he had the same problem and solved it by making the piece in CAD and share for free on the web

I do on TinkerCAD and then print the nameplates for my models…

1 Like

Couple of points, Linux is now very usable on a PC that is past it’s Windows best. I use FreeCad and TinkerCad on both Linux and Windows. I use Cura for slicing, that also runs well on both machines. I also use Octopi to communicate with the printer. This is a Raspberry Pi 4 that connects to WiFi and into the USB port of the printer. Cura talks to Octoprint directly and if you have a camera on the Pi you can monitor the print from any PC on the local net and you also can stop the print remotely. I haven’t used an SD card for months. All the above will also run on Apple. My Linux laptop is at least 10 years old and runs the above very nicely, and it wasn’t a high spec machine originally.

2 Likes

As it is often the case with Armorama forums, contributors to this thread are teaching me new things and I want to thank them for this.

The air eraser is definitely something I want to test on some Shapeways spare parts I have, to see if it can go a step further into cleaning the parts.

A couple of years ago I have asked a friend to print for me a sat radio in 1/35 scale (less than 1 cm in lenght, 0.4 cm in height); he owns a SLA consumer printer.
The output exceeded my expectations but many details were missing.
Maybe a professional printer would have produced a better result, but the cost of such a printer is not justified for my use.
Moreover, the process of adding supports in the design and then removing them from the printed object doesn’t excite me.

I want to give a try to the “Accura Xtreme” by Shapeways.
The minimum cost for a printed model is much higher than for a model printed in “fine detail plastic” therefore this is not the way to go for small items, but, for large sets like what I have designed for my GMV or Stryker, the cost shouldn’t be very different.

I want to see the level of detail that can be achieved; design guidelines for “Accura Xtreme” differ from “fine detail plastic” only for minimum embossed and engraved details.

I’ll submit to Shapeways two items (a TAC FLIR unit and the wider front glasses frames) that I have designed for the new project that I’m working on now: an M-ATV conversion to a SOCOM model.

I’m close to my holidays therefore I believe I’ll get the printed parts in my hands not before the end of August.

4 Likes

Galactica
I’ll be anxious to see the results of your experiment. The Flir looks great and I am anxious to see how the glass frames turns out as well.

Yeah I forgot about the octopi option, I had read about it but finding myself comfortable with the classic USB I never deepened, having to use an SD would already bother me more.

The camera works best on the filament printer where you have a clear view of the printing plate, with the resin there are a couple of problems, the printer is closed with yellow or orange perspex, if you have a bell cover like me it’s not bad, but other type cabinet style you have even less view, the plate is upside down, then there is the resin and the tray, until the print comes out at least 5-6cm from the edge of the tray you see little or nothing, so if you don’t make prints of a certain dimension is all a surprise, and not being able to film from above if you have many pieces on the plate it is difficult to understand if a piece on the back has failed or detached, the only way is to pause, the plate rises and I check that everything is ok but you still have to do some contortion if you have a lot of pieces with a lot of supports.

Sorry to take so long in responding. This week has been high adventure!

Regarding removing the supports from the interior of the Titanic funnels, it’s easier than it looks. There’s a more detailed explanation on the product page but the short answer is that the attachment points are made very small so that once the bottoms of the supports at the base are cut, you can twist the supports at the bottom and they will break away at the top without damaging the model.