If you do choose to try the air eraser, I recommend using it outdoors or some other location where the blown baking soda won’t make a big mess. The air eraser is very effective but messy.
Thanks x the advice.
1 Like
MM
No worries any time is a good time, I appreciate your reply.
I see Paasche makes an air eraser as well.
https://www.mapleairbrushsupplies.com/products/air-eraser
I wonder how the air eraser will work to remove the banding or ridges on a part and not the lower levels as well? With sanding you remove the upper surface but with blown particles they would remove material from both surfaces? Will these air erasers work with a good air compressor or will you need a more industrial compressor to push the material? I am certainly willing to give this a try.
1 Like
Great questions. I use a Harbor Freight air eraser which I bought for about $30 USD new directly from Harbor Freight. The grit I use is plain old Arm & Hammer baking soda. The HF air eraser with baking soda requires about 25 psi to work well. Other air erasers may require a different pressure.
The particle stream is generally narrow. It will remove material from any surface the grit stream reaches, in other words, both the raised and recessed surfaces will be affected.
Hope this helps.
1 Like
Another question for Model_monkey about the air eraser: at what distance from the model do you spray ?
Good question. Varies according the effect you want to achieve and other variables. Much like airbrushing, the closer you are to the model, the tighter the grit pattern, and the stronger the flow. The farther away you are, the wider the pattern and weaker the flow.
Hope this helps.
Just bought a cheap air eraser, tried it yesterday briefly. The instructions suggest 45psi but my airbrush compressor won’t supply that continuously, had to settle for 30psi. It certainly reduced the ribbing on the workpiece
Amegan, but you still have some tedious clean up to do or do you think the ribbing was reduced enough to not be an issue? It’d be great to see photos if you can before and after.
Thanks for trying this out.
I will put photos on, need to do more tests but I don’t have any resin prints. On filament it seems to have reduced ribbing a bit and left detail intact, quite slow to do and I may need higher pressure. Jury is out.
I will be patient, if it works then it may be a way forward, I have lots of prints to clean up.
I had one part replaced because it was poorly rendered so Shape Ways sent me a new one. I bought a few others to add to the order just because I could and here is what I found.
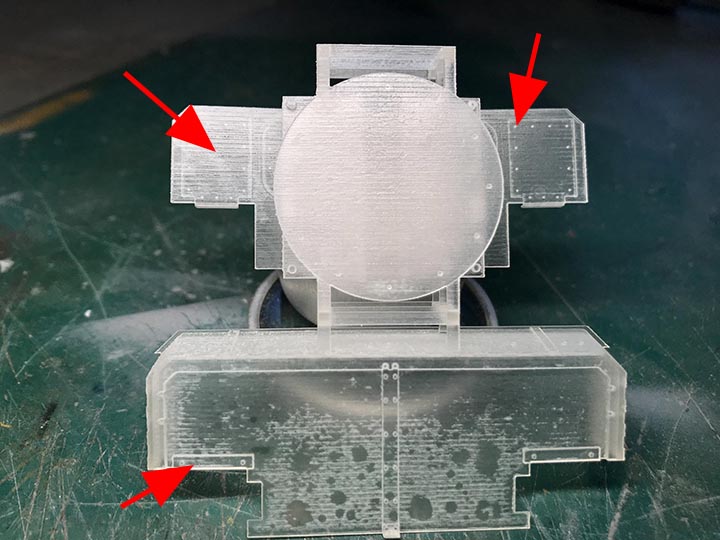
This part was designed to transform the Academy M-1152 to a M-1165, I took a chance that I could use it either as a scale model to make one for my Tamiya GMV or just use it as is. As you can see it is a perfect example of a large flat area that is festooned with printed ridges. I will not be able to keep all that beautiful detail if I am to clean up those surfaces.I might save some time if I scratch built my own.
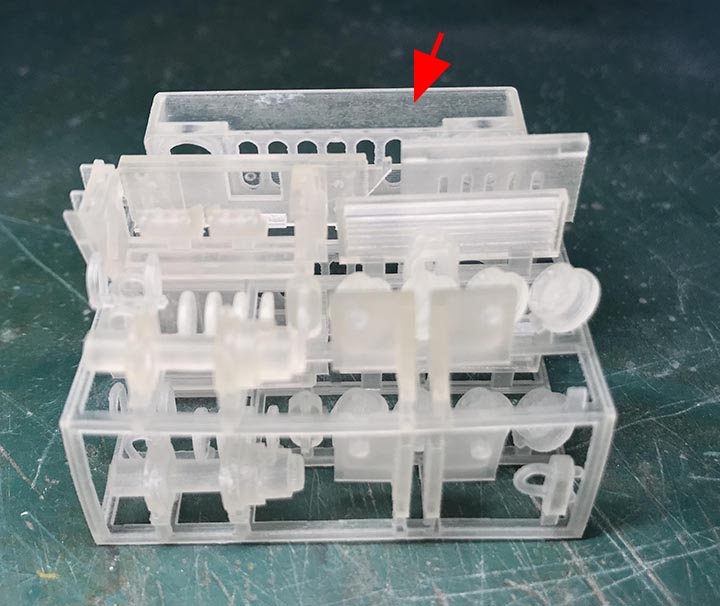
This is a cluster of parts that make up the nose of an up armored HMMWV. The arrow shows a beautiful smooth surface and this is because the designer oriented the printed piece so the ribs or banding (not sure what to call them) occur on the other face of the object.
Another side view of the same cluster, note the banding.
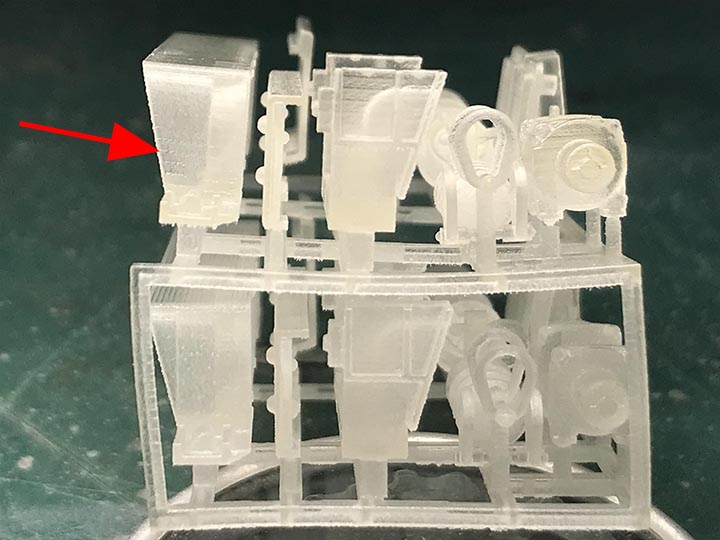
Some of those fine detailed tiny parts won’t stand filing and sanding.
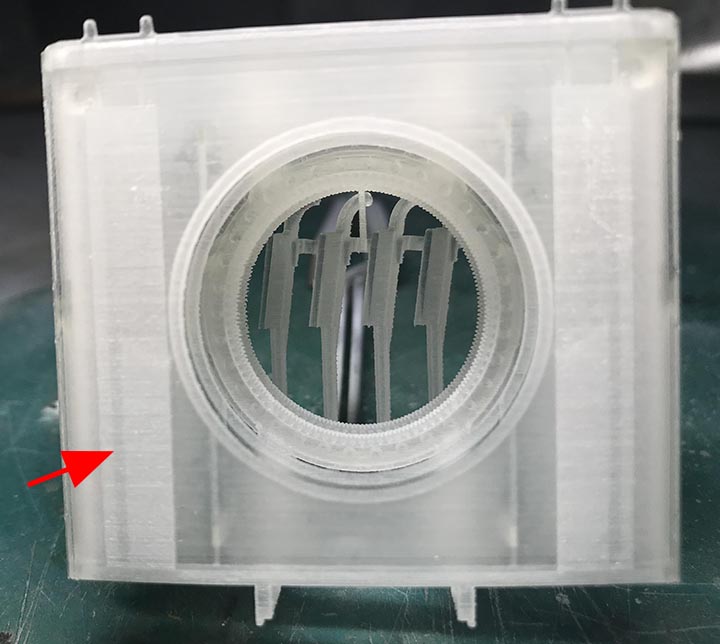
This is the piece that was replaced. It is beautifully cleaned of wax but the banding is horrible, I’ll never be able to save the fine details.
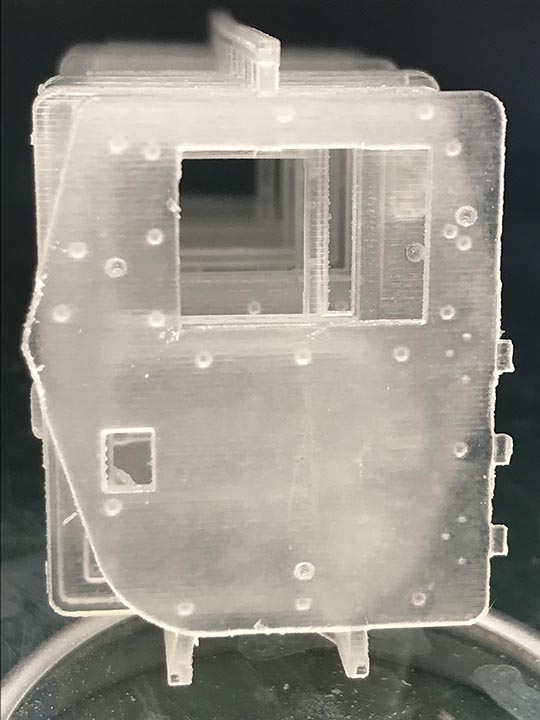
These armoured door look and feel smooth but i will reserve judgment until I begin to remove the wax. Sometimes the wax fills the gaps between the banding and once cleaned those bands become a problem. I can drill each bolt head on that surface and sand away everything then go back and add some resin bolts that I got from Plus Models, but I have already paid to have these parts, now I have to spend days cleaning them and then sanding them and then replacing the detail with resin AM parts, just isn’t worth the effort unless this is your only hope of getting those parts to finish that special project.
2 Likes
For our hobby such a quality is not acceptable, especially for what you pay, I have a doubt, is it not that their printers begin to show their limits due to age? … especially in this field things they evolve so fast that it is a moment to lose the pace, it is just an idea having never dealt with them I do not know how their system works
Vicious: I imagine that the life expectancy of these industrial 3D printers can’t be long but I expect the majority of their business is NOT for scale modellers. They do more work for industries, prototypes and the like.
It is like anything, you have to buy in at some point and that point is where that tech stops evolving. It will evolve and when it does it will change the way we model.
The 3D-printed material shown in the posts above is an acrylic plastic made from an older and comparatively expensive 3D-printing technology called “material jetting”. At the time Shapeways bought the machines, material jetting was one of the best 3D technologies available to make scale models, but not any more.
The material jetting 3D printers and associated resins were made by a pioneering 3D printing company called “3DS”. 3DS material jetting machines were state-of-the-art years ago. The printers Shapeways bought from 3DS were extraordinarily expensive to buy at the time, upwards of $70,000 - $90,000 USD each. Yes you read that right, a whopping $70,000 - $90,000 USD.
As is common with many newly developing technologies, as 3D printing technology rapidly matured, other kinds of tech surpassed the 3DS material jetting machines in terms of print quality and cost. Newer machines use a different process and different plastics.
Currently, most other 3D-printing vendors use machines that are based on different technologies called “SLA” (stereolithography) or “DLP” (digital light processing). SLA and DLP printers produce models by hardening liquid resin in a tank with UV light. SLA- and DLP-made model surfaces are very smooth - no banding artifacts.
As the technology continues to mature, it is likely that SLA and DLP will be eclipsed by other technologies, too. For the time being, SLA and DLP printers can and do produce very good scale models.
Shapeways tried using SLA printers for a time. But to make SLA printing work well, the model’s designer needs to be familiar with the specific printer’s limitation and capabilities, the kind of familiarity that only comes with direct printing experience with the actual printer. That’s because SLA printers require physical supports to be designed to attach to the model in ways and places that don’t spoil it. Material jetting relies on wax to support overhanging features during printing. The wax is melted away in low-temperature oven after printing is complete. With SLA or DLP, if too few supports are designed the model can break up during printing damaging the printer. Too many supports, and the surface of the model is spoiled making the model unusable.
What happened was that Shapeways quickly learned that designer-customers generally did not have the necessary printing experience to create a model in such a way on their own that a “Goldilocks” support array could be created. Those who have their own SLA or DLP printers will tell you that there is both an art and science to creating acceptable support arrays. Getting the array just right may require several printing attempts.
Compensating for that lack of designer-customer direct printing experience meant that Shapeways’ employees were having to guide designer-customers through the design process in order to achieve a satisfactory print. It became too labor and time intensive and costly for Shapeways personnel to try to create a workable support array remotely that would both please the customer and at the same time not have too few causing the model to break up and/or damage the printer. Ultimately, the effort became too costly to remain supported so Shapeways moved away from SLA, unfortunately.
Shapeways still offers limited SLA technology printing options with very strict design requirements, but not like that had in the recent past, and with different materials than they had. The current Shapeways SLA materials are called “SLA Accura Extreme” and “SLA Plastic Accura”.
If you are interested in models made by Shapeways using SLA, look for the “SLA Accura” material options.
1 Like
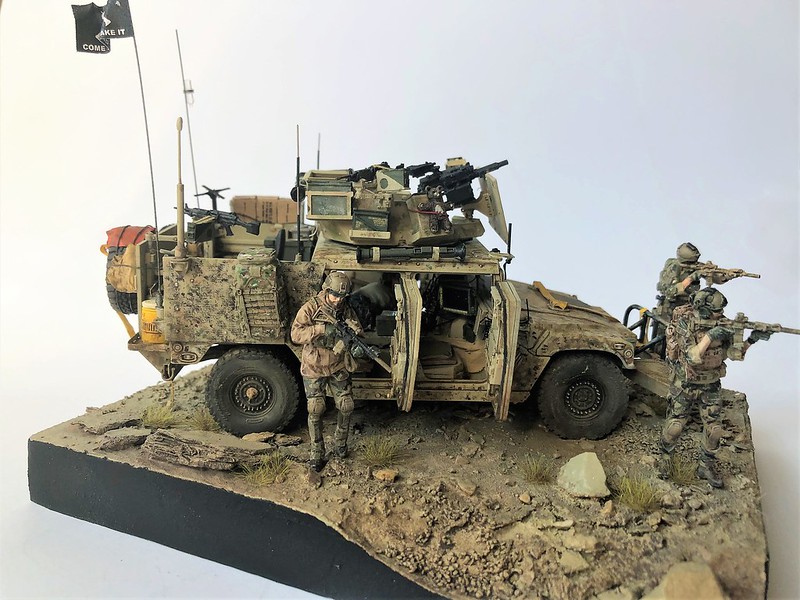
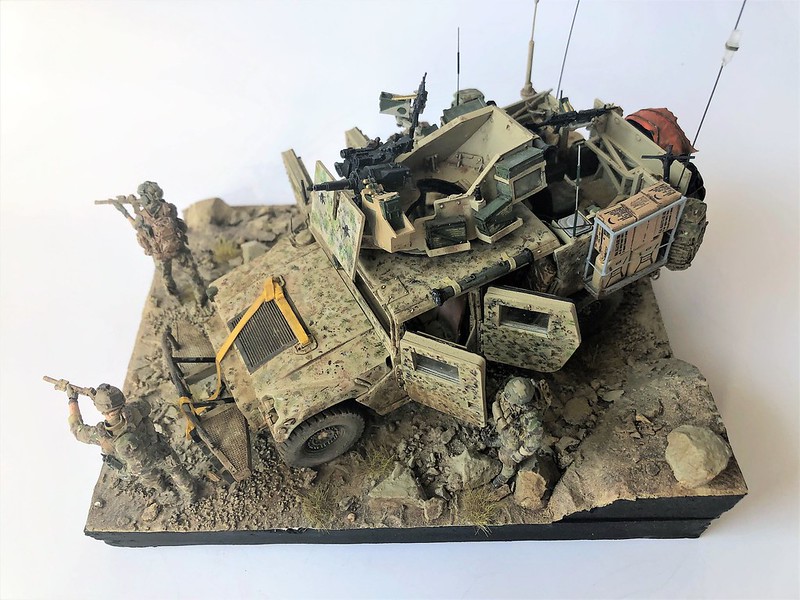
I also used 3D elements from Ettore. the effect below
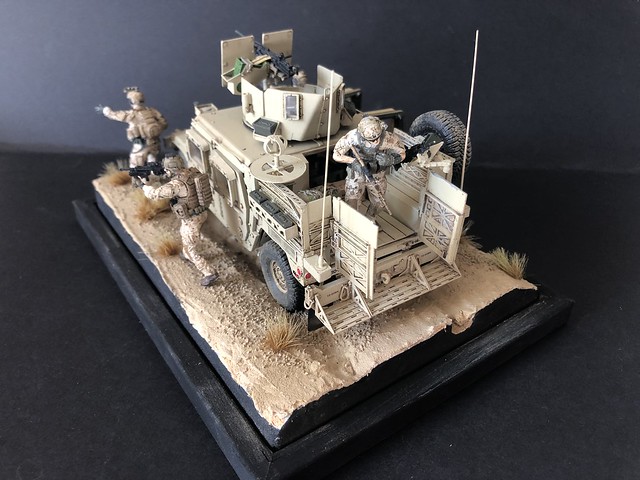
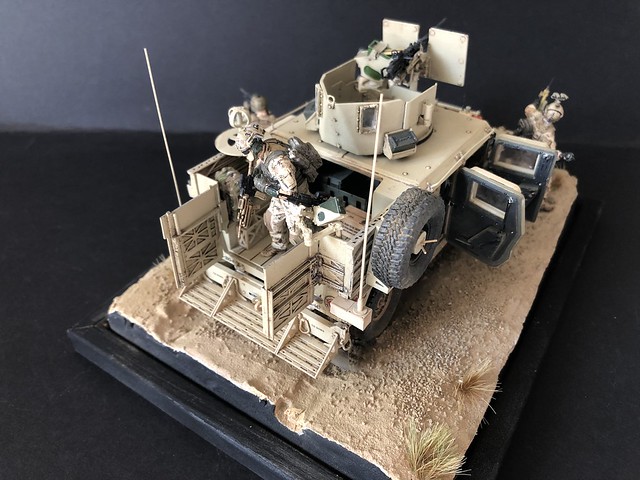
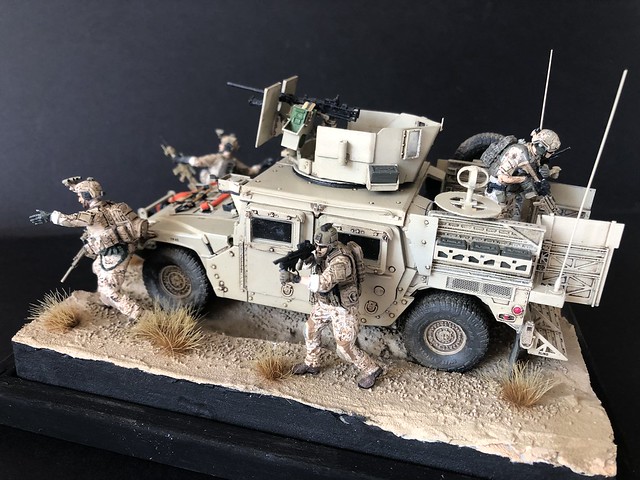
This is the M1165 GMV, but I also used the interesting conversion of Peter S to the M1113 GMV
2 Likes
Model_Monkey thanks for the explanation. Last night Night Shift presented a fully 3d resin kit, check this out.
")
Very few banding lines and the armatures you were talking about were the only issues.
I wonder what the transition will look like as 3d resin printers become more useful? Will all of us have to learn to use the technology both soft ware and hard ware or is there still a place for designers to interface with companies like Shapeways? Maybe it will become like the music business where designers will have companies collaborate with them and offer their designs for sale and when it is sold they will receive a royalty?
Makinen, can you take a closeup photograph of those rear stowage area walls and back doors? I have the same sets as you have used but I found the quality lacking. Did yu try to remove the banding, fill it in or just run with the way it was. The designing of the parts is fantastic, the printing sucks.
Are you asking for M1165? Which elements are of interest to you exactly?
I think the software will become better at working out the supports so printer companies will be able to use a wider range of drawings. But resin printers will become more accessible to home printing anyway, much like 2d colour printing did. I wonder if resin prices will be jacked up like ink so that the 3d printer companies can maintain their margins as the hardware prices fall?
The key to it all is the drawing. Anyone (with the cash) can get a machine, but without a drawing it is wasted. So how does the drawer keep control of his/her IP and make money?