Oil dot filtering

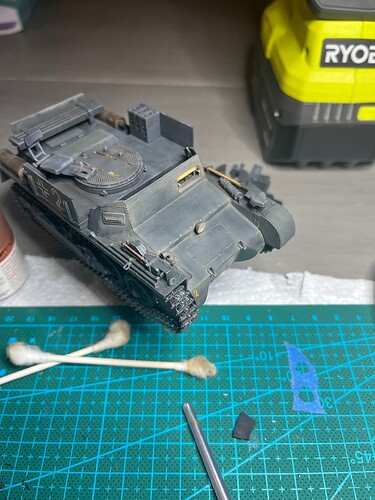
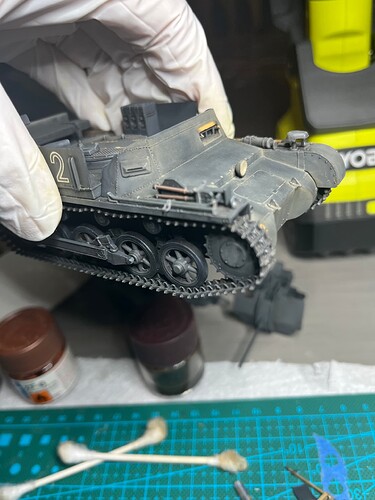
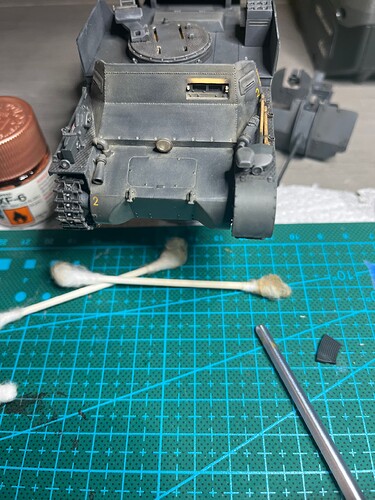
I tried oil dot filtering on my most recent build, a flak panzer IA. It was my first ever attempt…. And it didn’t go great. I used yellow ochre, burnt umber, titanium white oils over a panzer grey finish. After streaking the grey had a rather yellow hue in some spots, and a rather brown hue in others. Nuts!

I thought oh well. Everyone said the benefit of this method is that it’s hard to mess up. Don’t like it? Remove the oils and start over. Trying to remove the oils turned the finish chalky in places. Pretty discouraged. I always find myself doing pretty good with the build until weathering and then I can’t figure it out. The pin wash and dry brush went pretty well this time, but I fear I ruined what was a solid build up until this point.

So far I’ve only done it to the front glacias and hull. Any tips on where this might have gone wrong?

  1. why did it turn chalky when removing the oils.
  2. any idea why it turned into a couple monotone filters. When I watch videos people get really subtle variation but mine looked a mess

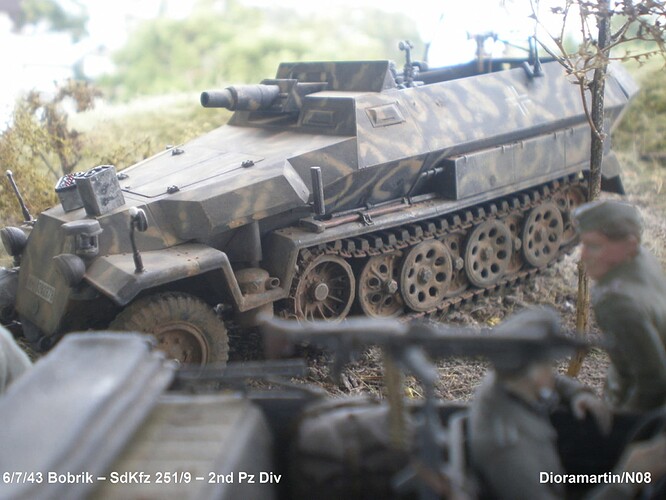
Hmmm I’ve never been tempted to try oil-dotting. After seeing several AFVs so treated in modelling magazines & on the interweb over the years, even after donning my X-ray specs I can never see any trace of it at the finish. I’m not even convinced I can see such an intended effect on 1:1 vehicles. OK maybe the photography’s not up to that kind of subtlety, but by the time a camo scheme and/or weathering’s been applied the chances of dotting being visible seem to be reduced to near zero. Random example, would oil-dotting have made the slightest difference?..

No idea about the chalky aftermath (photos?) sorry, I’d just re-prime & forget about dotting. There IS an argument for applying a variation of the overall colour (lighter and/or darker) randomly on various panels, provided the final coat is thin enough to allow those variations to show through :tumbler_glass:

3 Likes

I worked it around a lot and got lucky. I think it actually looks like a good dusty effect now.


What is your typical weathering sequence? I am trying to get better at it but don’t really know where to start. I have started to get the hang of post and pre shading, dry brushing and pin washes but don’t really know where to go from there? Straight to pigments?

4 Likes

I’m no expert. A beginner actually. But I’ve found less is more. My go to guy is Night Shift. Try this link. https://www.youtube.com/watch?v=ewnw2h2hCN8 Go to 5.55 where he starts the oil dots.
I find washing off with a good damp brush helps a lot.

Good luck.

3 Likes

Wow I’m not sure you need any help, that looks pretty good to me! The worn/faded effect on the grey looks just right and there’s plenty of panel variation as is. I’m not sure if you’re using oils or acrylics but from there, I’d brush (yeah I know…) a very (VERY!) thin dark brown/blackish wash over all, to settle in the joints/panel lines which are looking white-ish now. I usually go real thin, wait until dry and then if it’s not enough do a second wash etc - you can’t go back if the wash is too thick/dark to begin with. Dry brushing’s tricky (I assume you mean to highlight edges) if subtle enough it sings, if only slightly overdone it looks plain weird. For this model I’m not sure it’s necessary but maybe after the dark pin-washes it will tell you itself if required. Again I’d only try a super-subtle dry-brush first and wait 24 hours, see what you think then.

I’ve become a broken record about weathering – I think that’s what you mean by pigments. I use fine dry pastel/chalk dust applied with a soft brush to add further variations to panels – typically khakis to mid browns, scrubbed in. If it looks wrong, easy to remove with a damp cloth or wet brush…something much more difficult to do with dried paints & washes. I usually get it wrong first time…and second time etc. so it’s nice that revision is so easy & not irrevocable.

But anyhow I really like what you’ve done so far, good luck :+1: :+1:

5 Likes

Tried Oil dots a few times and just did not like the result. It is an artistic license type of finish, rather than real life. It is great for very old, very weathered vehicles, but for a tank in service, it looks too fake to me.

I prefer to use thinned paints on a moistened area and work that as a translucent film in very small well blended areas. This adds some subtle variation without destroying the base colour - especially on dark colours - as you just found out. It also means you do not end up with a ‘zebra’ in the collection…
or a tank that looks like it has been bombed by a flock of seagulls (no offence to those that like the look - everyone has their own idea of what looks good and if it is what you want, go for it):

2 Likes

There must be some misunderstanding… oil dot is exactly that, adding some subtle variation without destroying the base colour. If you end with a zebra model is because it has been way overdone.

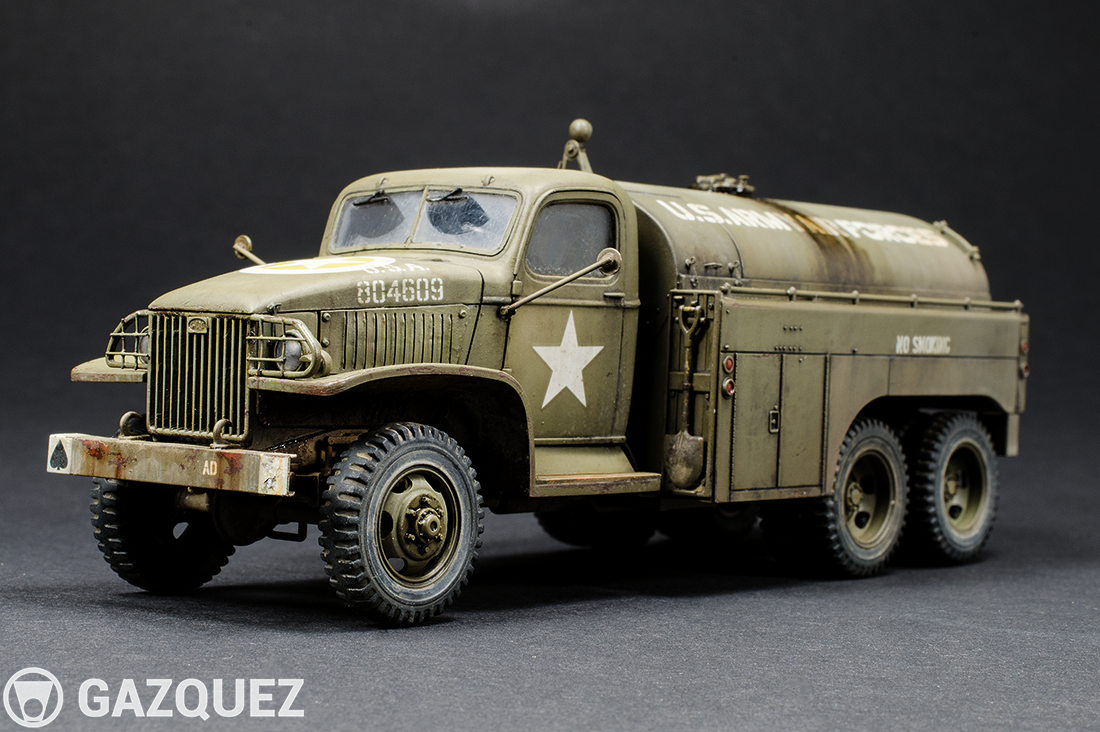
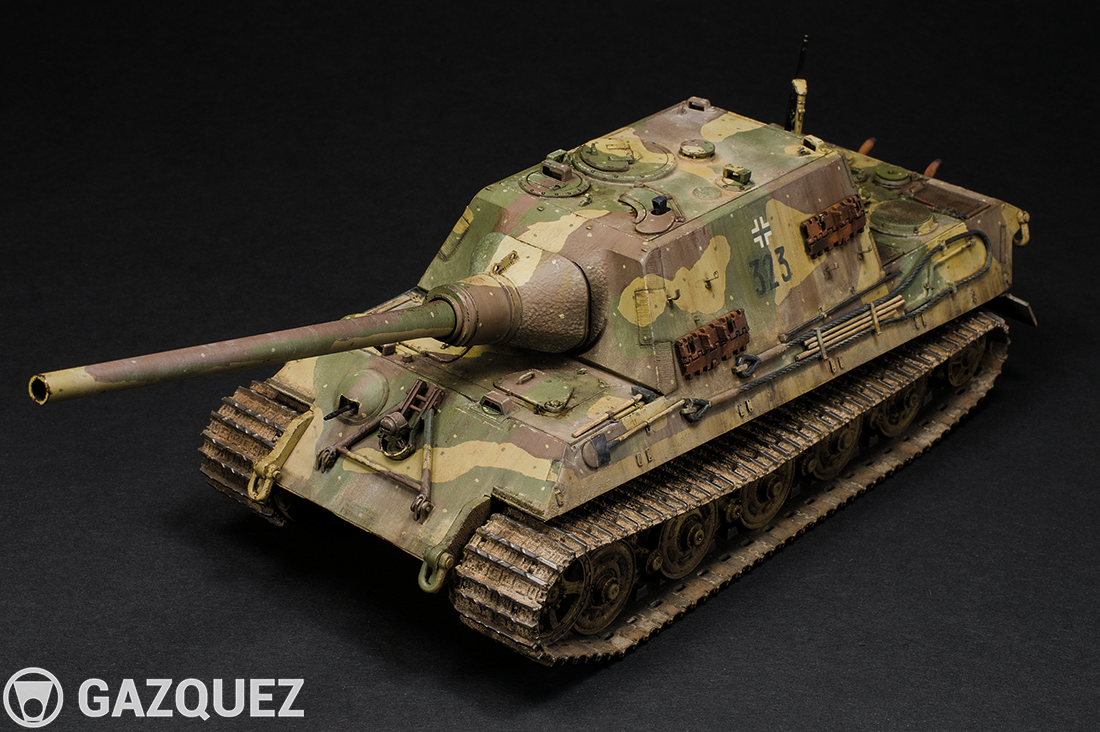
One of my favorite modellers, Joaquin García Gazquez, always uses this technique (plus several others) and I don’t think it looks fake:

6 Likes

Maybe your base is matt? Oils work better on a satin surface, matt tends to absorb them and they are more difficult to remove

Perhaps you put too much paint. Also, when fading them with thinner you should avoid mixing the dots with the adjacent ones.

3 Likes

Yes, Carlos is exactly right about this. I would also add to be very sparing with white oils on any model- it can be an overwhelming color even in small doses leaving a chalky white finish and obliterating any other color. If you want something light try a light tan or pale sand type of oil. If you must use white (and I do myself the odd time) then use it very sparingly.

Also remember two easy tips when doing oil dots- if the surface is vertical or angled downward then use a wide brush to pull the dots downward. If the surface is horizontal then dab the dots in a circular motion around the surface.

Try to work in small areas too- don’t put the dots on loads of areas because they will have dried too much by the time you go to blend them and this can cause them to stain the surface more than you want.

You can also use oils in different ways- I like Oil Paint Rendering where you use the oils to convey lots of things like wear and tear as well as mud, dirt, dust and rust- it can also be used as means to add very subtle drybrushing style effects and can do a lot of the things that enamel weathering solutions and pigments do.

2 Likes

Yeah I don’t think this technique is for me! This is my second or third time trying it, and I can’t seem to get it look subtle without it turning into a mess. I’ll stick to washes, traditional filters, and pigments

Any who, I think this guy is salvageable

2 Likes

The first thing to know about oil dot technique is that you need to start with a gloss finish. Matte finish captures too much of the oil and prevents it from blending properly.

:beer:

3 Likes

As I mentioned, I meant no offence to those that like the look, everyone is different in what they like, which is not a bad thing at all. These are very well done models for sure Carlos, and I can see why you would like them as much as you do. Joaquin is very talented.

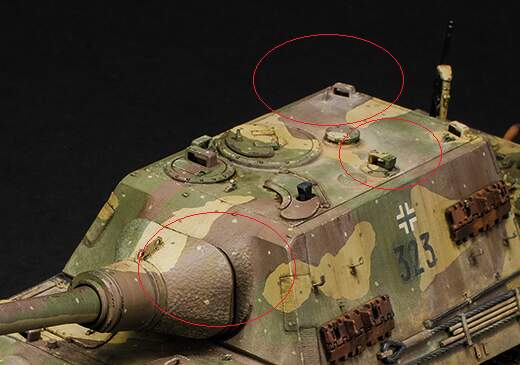
It is just that to me, the patches of white or cream like what is shown in the JagdTiger pic are not subtle changes to the base colour but more colour covering:
image

The ‘zebra’ banding down the sides shows the green streaking stopped above the ‘323’, to avoid the effect over those I guess, but the green behind the decal has a distinctly different colour to all that is evident elsewhere. To me the green itself is striped as opposed to an effect from earthy colour dust streaking.

Please don’t get me wrong, I am certainly only an average modeller - I know my limitations. All this is just viewing other modeller’s work to my own taste. I never meant to disparage anyone that does like the effect, nor discourage someone from trying it.

1 Like

I don’t mind that effect, it looks fine although as I understand it the streaks are showing through from beneath the top coat (?) OK I guess, although similar effects can be achieved by streaking on top of the scheme which to my mind seems more logical/like the real thing. But maybe I misunderstood the original premise – I thought we were talking about random bright red/yellow/blue/green/pink spots? Those are the ones I meant seem to disappear under the final coats.

2 Likes

The variation in tones is actually the exact effect that this technique is intended to create. The thinned oils do indeed function just like adding a semi-transparent colored filter. Think of this like viewing the base color through a colored lens or sheet of clear colored plastic.

If the effect is too intense, then the oil paint “dot” has not been spread out thinly enough or too much paint was used to start with. If the color of the tonal change is not what was intended, desired or expected, then the color of the oil paint used was not right.

All of these issues are totally within the control of the modeler.

Too much paint is a simple matter of reducing the size and number of “dots” applied.

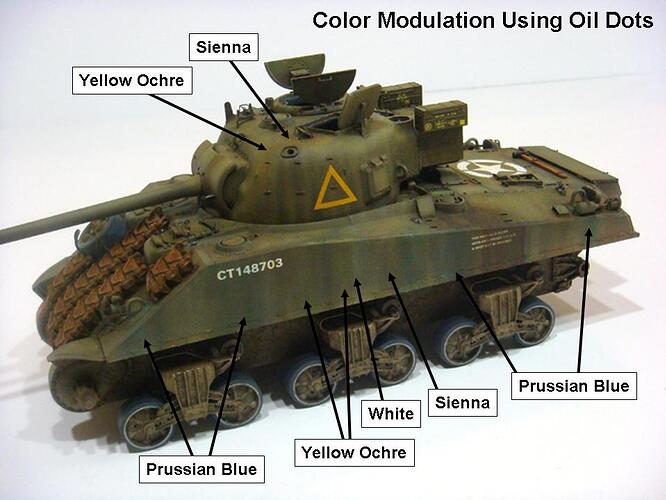
An undesirable change in tone is a simple matter of changing the oil color. A color wheel is useful in predicting the final tonal effect, and some thought should be given to this before any paint is applied. For example, a blue oil used over a green base will create a darker tone of the green. (If the blue shows too much, then too much paint was used or it was applied too opaquely.) Over the same green base color, a yellow or ochre color will brighten the base green. Reds or burnt sienna over the same green base will create a browner tone of the green. All of these tonal shifts in the base color are predictable based on color theory.

Spreading the paint used into a thinner, less opaque layer to achieve a less dramatic shift in tone is controlled usually by one or a combination of the following: pre-wetting the surface with thinners before applying the oil paint; NOT drawing out the carrier oils by using a cardboard pallet; using a semi-gloss or gloss clear over the base paint before applying the oils. Using a smaller amount of oil paint to start with also helps to control the final opacity.

A final bit of advice is to NOT apply all of the oil paint colors at one time. Doing this is analogous to mixing all of those colors on the pallet and then applying them. The tonal shift is invariably a sort of muddy brown rather than a colored filter to change the tone as if the oil color was mixed with original base color. The mixture of colors should take effect as each oil color is applied OVER the edges of the previous oil color, and the application should be modulated so as to NOT simply BLEND ALL of the oil colors together.

The intent of the oil dot filters is to shift the tone of the base color and not to make a weathering layer of apparent dirt or dust or mud (although in reality, the 1:1 scale prototype, these might be the mechanism of the tonal shift).

Another similar use of oil paints is about artificially forcing shadows and highlights to emphasize the geometric shapes while mitigating the adverse effects of scale lighting. That is, oil paint colors are selected and used in shadowed areas to darken the tone of the base colors and other oil colors are selected and used in the highlight areas to brighten the tone of the base colors. This is sometimes done to complement and add emphasis to the base colors applied using one of the pre- / post-shading airbrushing techniques.

Oil dot filters should also be just one of the many layers of effects applied, and, at least IMO, they should be should be used early on to effect the original base paint colors. They look best when the tonal shifts are subtle but over somewhat larger areas. Problems arise when modelers attempt to use oil dot filters to both modulate the original base paint colors AND create their final weathering layers. Again, IMO, these are two separate (related, yes, but still separate) operations.
5 Likes

Makes sense!

I am pretty bad at weathering, and I’ve found it quite hard to improve at

1 Like

Hi Petbat,

The areas you’ve circled aren’t supposed to be subtle changes to the base colour, those are supposed to be accumulations of dust.

3 Likes

FWIW, I suggest breaking the painting steps or stages down so that at each stage you’re attempting to create a specific, distinct effect. It is the final combination of all of these effects that creates the final appearance. It’s necessary, again, IMO, that the modeler plan and anticipate how each of these layered effects builds upon the previous stages and contributes to the final desired “look.”

I’ve often found it a useful mental exercise to imagine my desired final “look” and then “deconstruct” it layer by layer down to the bare plastic. I could then quite literally write out a plan for painting and weathering that piece of work. I would include application of the markings (both decals and painted on markings) as well as 3D weathering effects in this plan. I know it sounds formulaic but doing this helped me as I learned to add more and more techniques to my finishing process. Complexity creates doubt and confusion, so it helps to unravel the steps so that each can be considered on its own. Doing this helped me to understand and isolate how each of these techniques effected and contributed to the final appearance.

I don’t do this deliberate “written plan” exercise so much anymore (except to perhaps make notes of finishing effects that I want to incorporate or masking sequences for markings, etc. largely so I don’t forget something over a long project). However, it did help me to learn that there is no single “cookbook” formula to create all finishes. Back in the early days, weathering techniques pretty much consisted of applying a wash and then dry-brushing. However, over the last four decades scale model artists have pioneered and developed many new finishing techniques, so the range of operations and stages has vastly expanded. It’s not necessary to use every possible technique on every build, but it is necessary to understand what can be done and why such and thus technique, method or material might be desirable.

Back to the oil-dot filter technique, here’s an example of the filters applied over a base cost BEFORE any other weathering has been applied (to the upper hull and turret). The photo shows how the different oil paint colors create different tonal changes in the base OD - darker, brighter, browner, etc.

The intent at this stage was just to add tonal variation in the base OD green. Those variations show up under the later weathering layers, but they are not intended as the final effect.

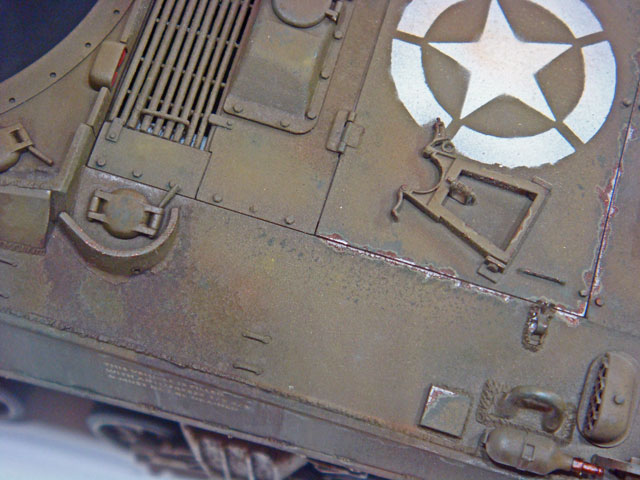
Here’s a photo of the same model showing some of the later (but still not final) layers of finishing. Here some of the chipping and other weathering has been applied OVER the earlier oil-dot filters (or “color modulation”).

19-August-Up-Date-(9)

And, so it goes…

4 Likes

I think what you’ve achieved so far looks very convincing. In my opinion FWIW many of the models I see today are “over” weathered especially the chipping. I weather most of my armor with a pin wash used very sparingly and pastel chalks. I like to see stains and scuffs and fading which I think you’ve done very well.
I totally agree with BGT that sometimes “LESS is MORE.” Nice job!!!

4 Likes

Exactly.

1 Like

This is a good tip, I was definitely doing this wrong. All the the tutorials online show doing all the colors at once, and I did think to myself it will make a beige mess (which it did) but I blindly followed tutorials.

1 Like