Jackal Hobby Boss
Many thanks to
Frenchy AKA HP
Barny
Paul Truhe water boxes and MRE designs.
https://www.youtube.com/@WoodcockFamilyOverland
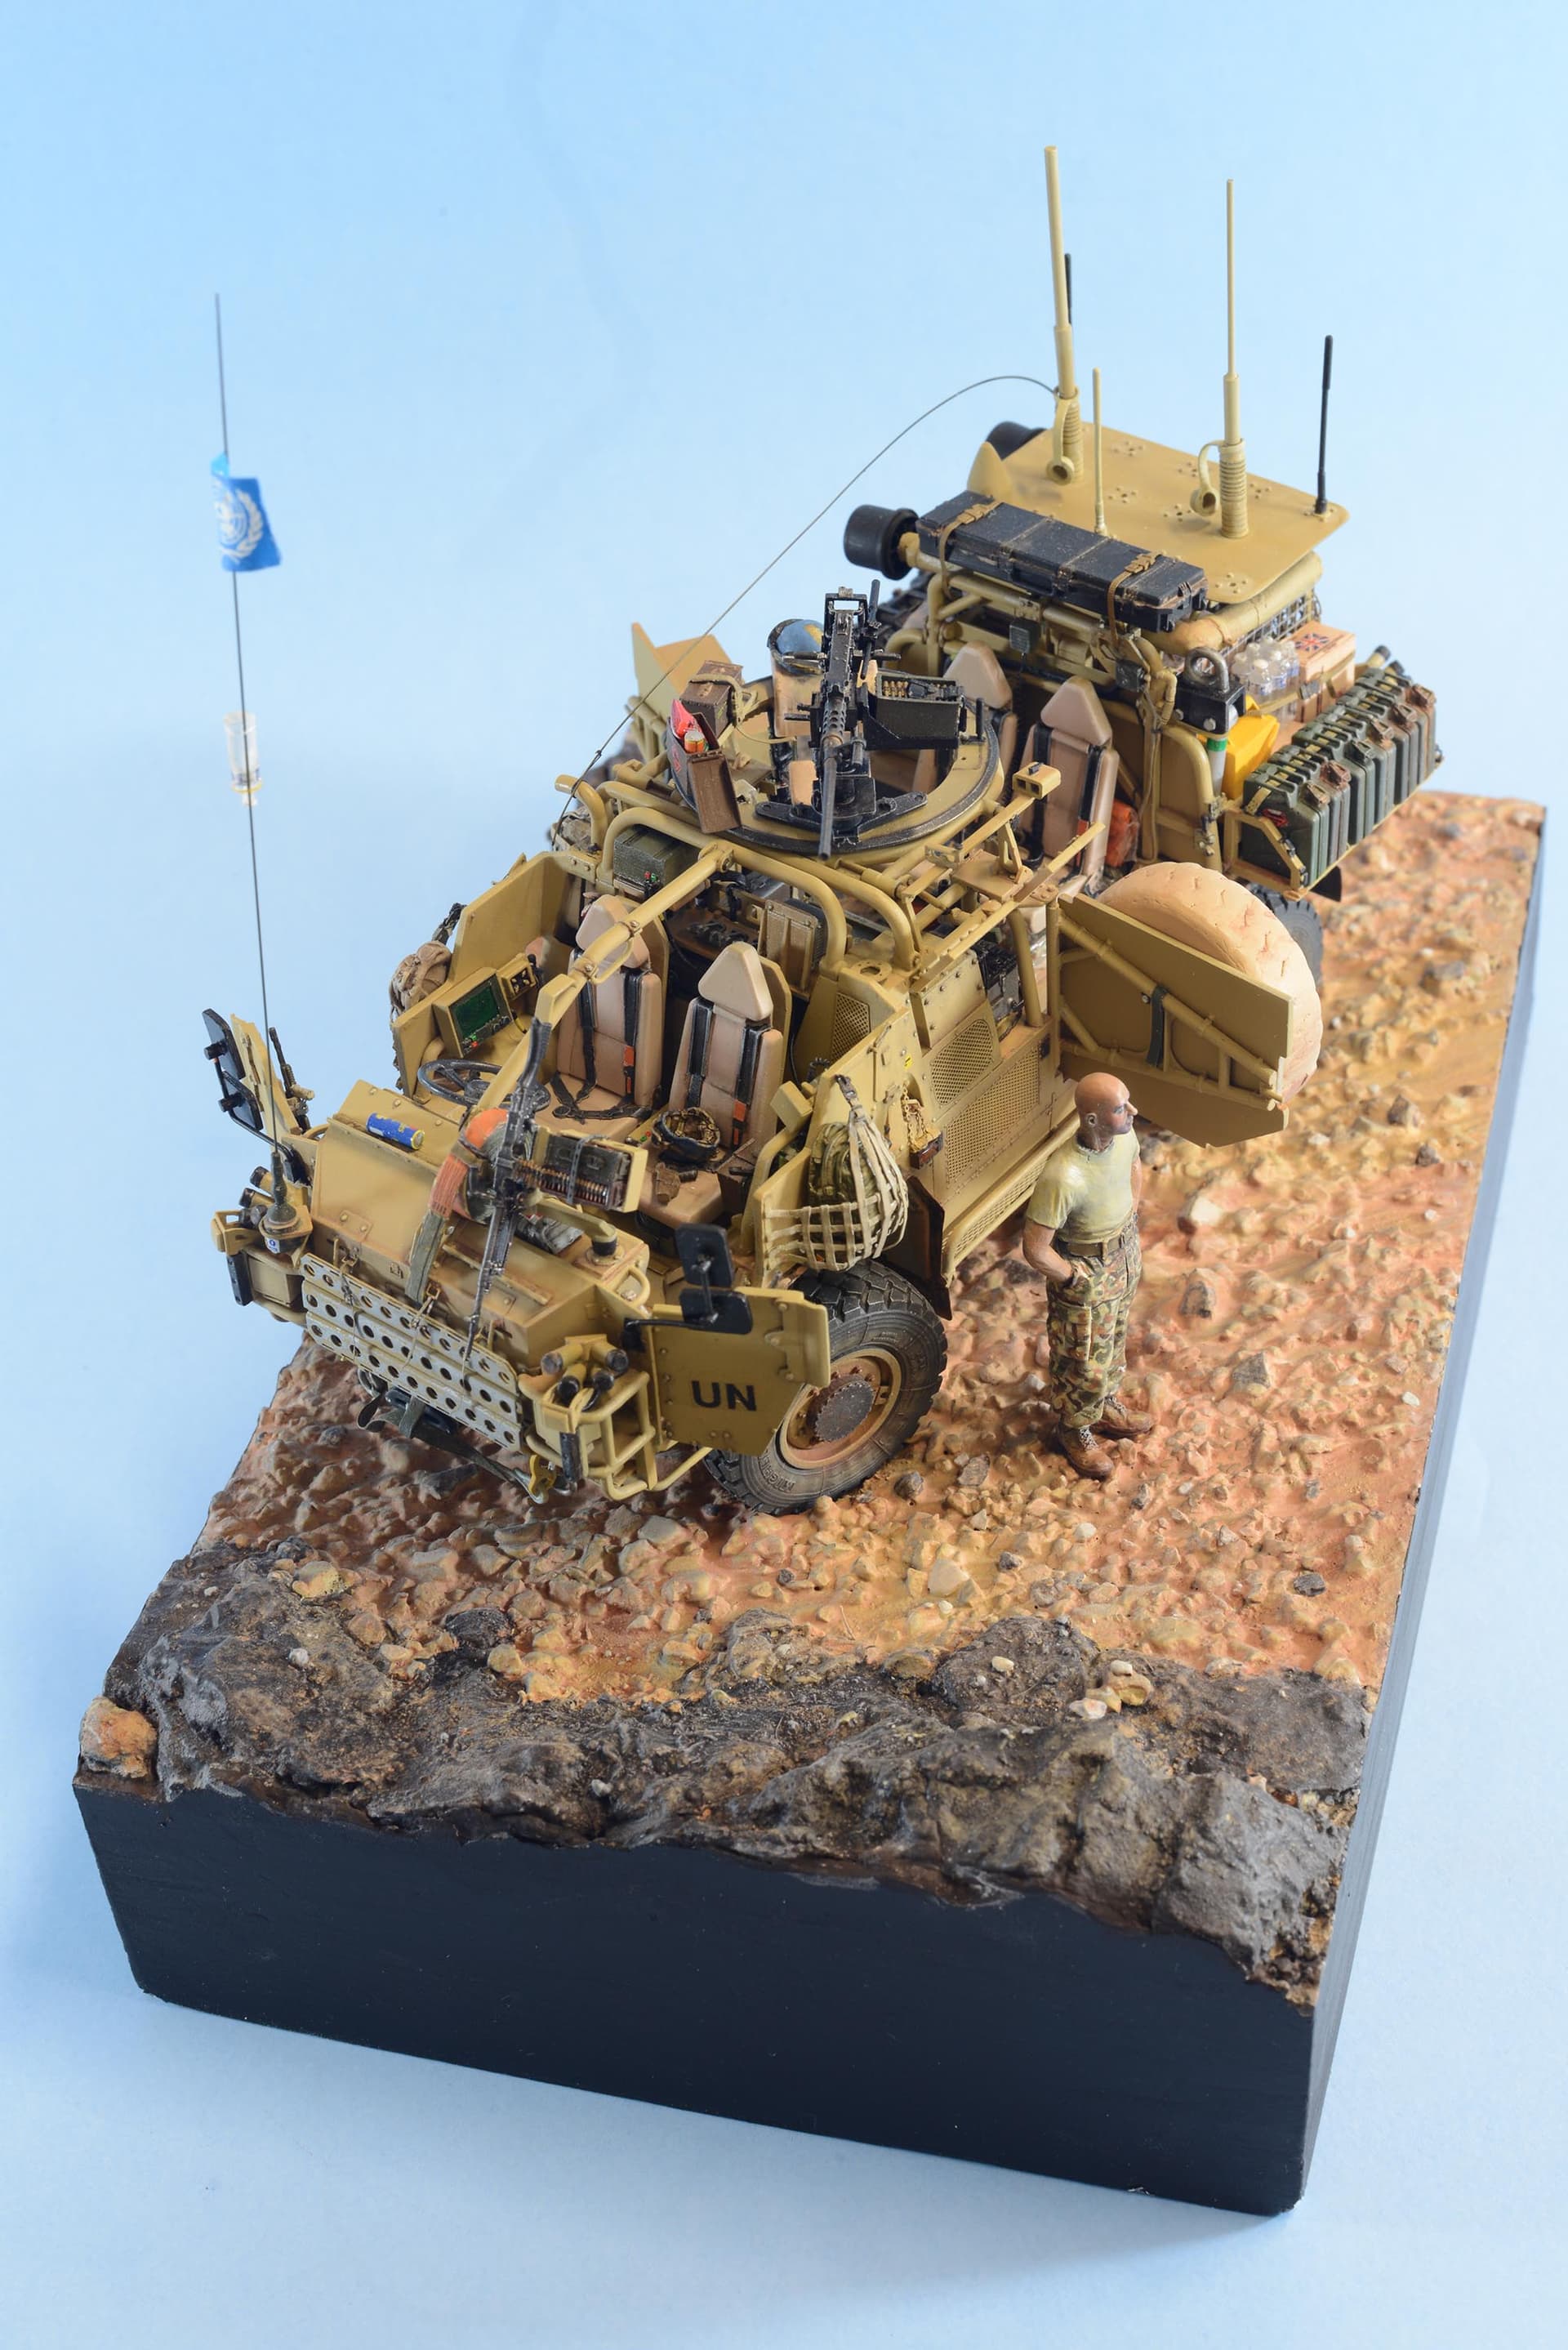
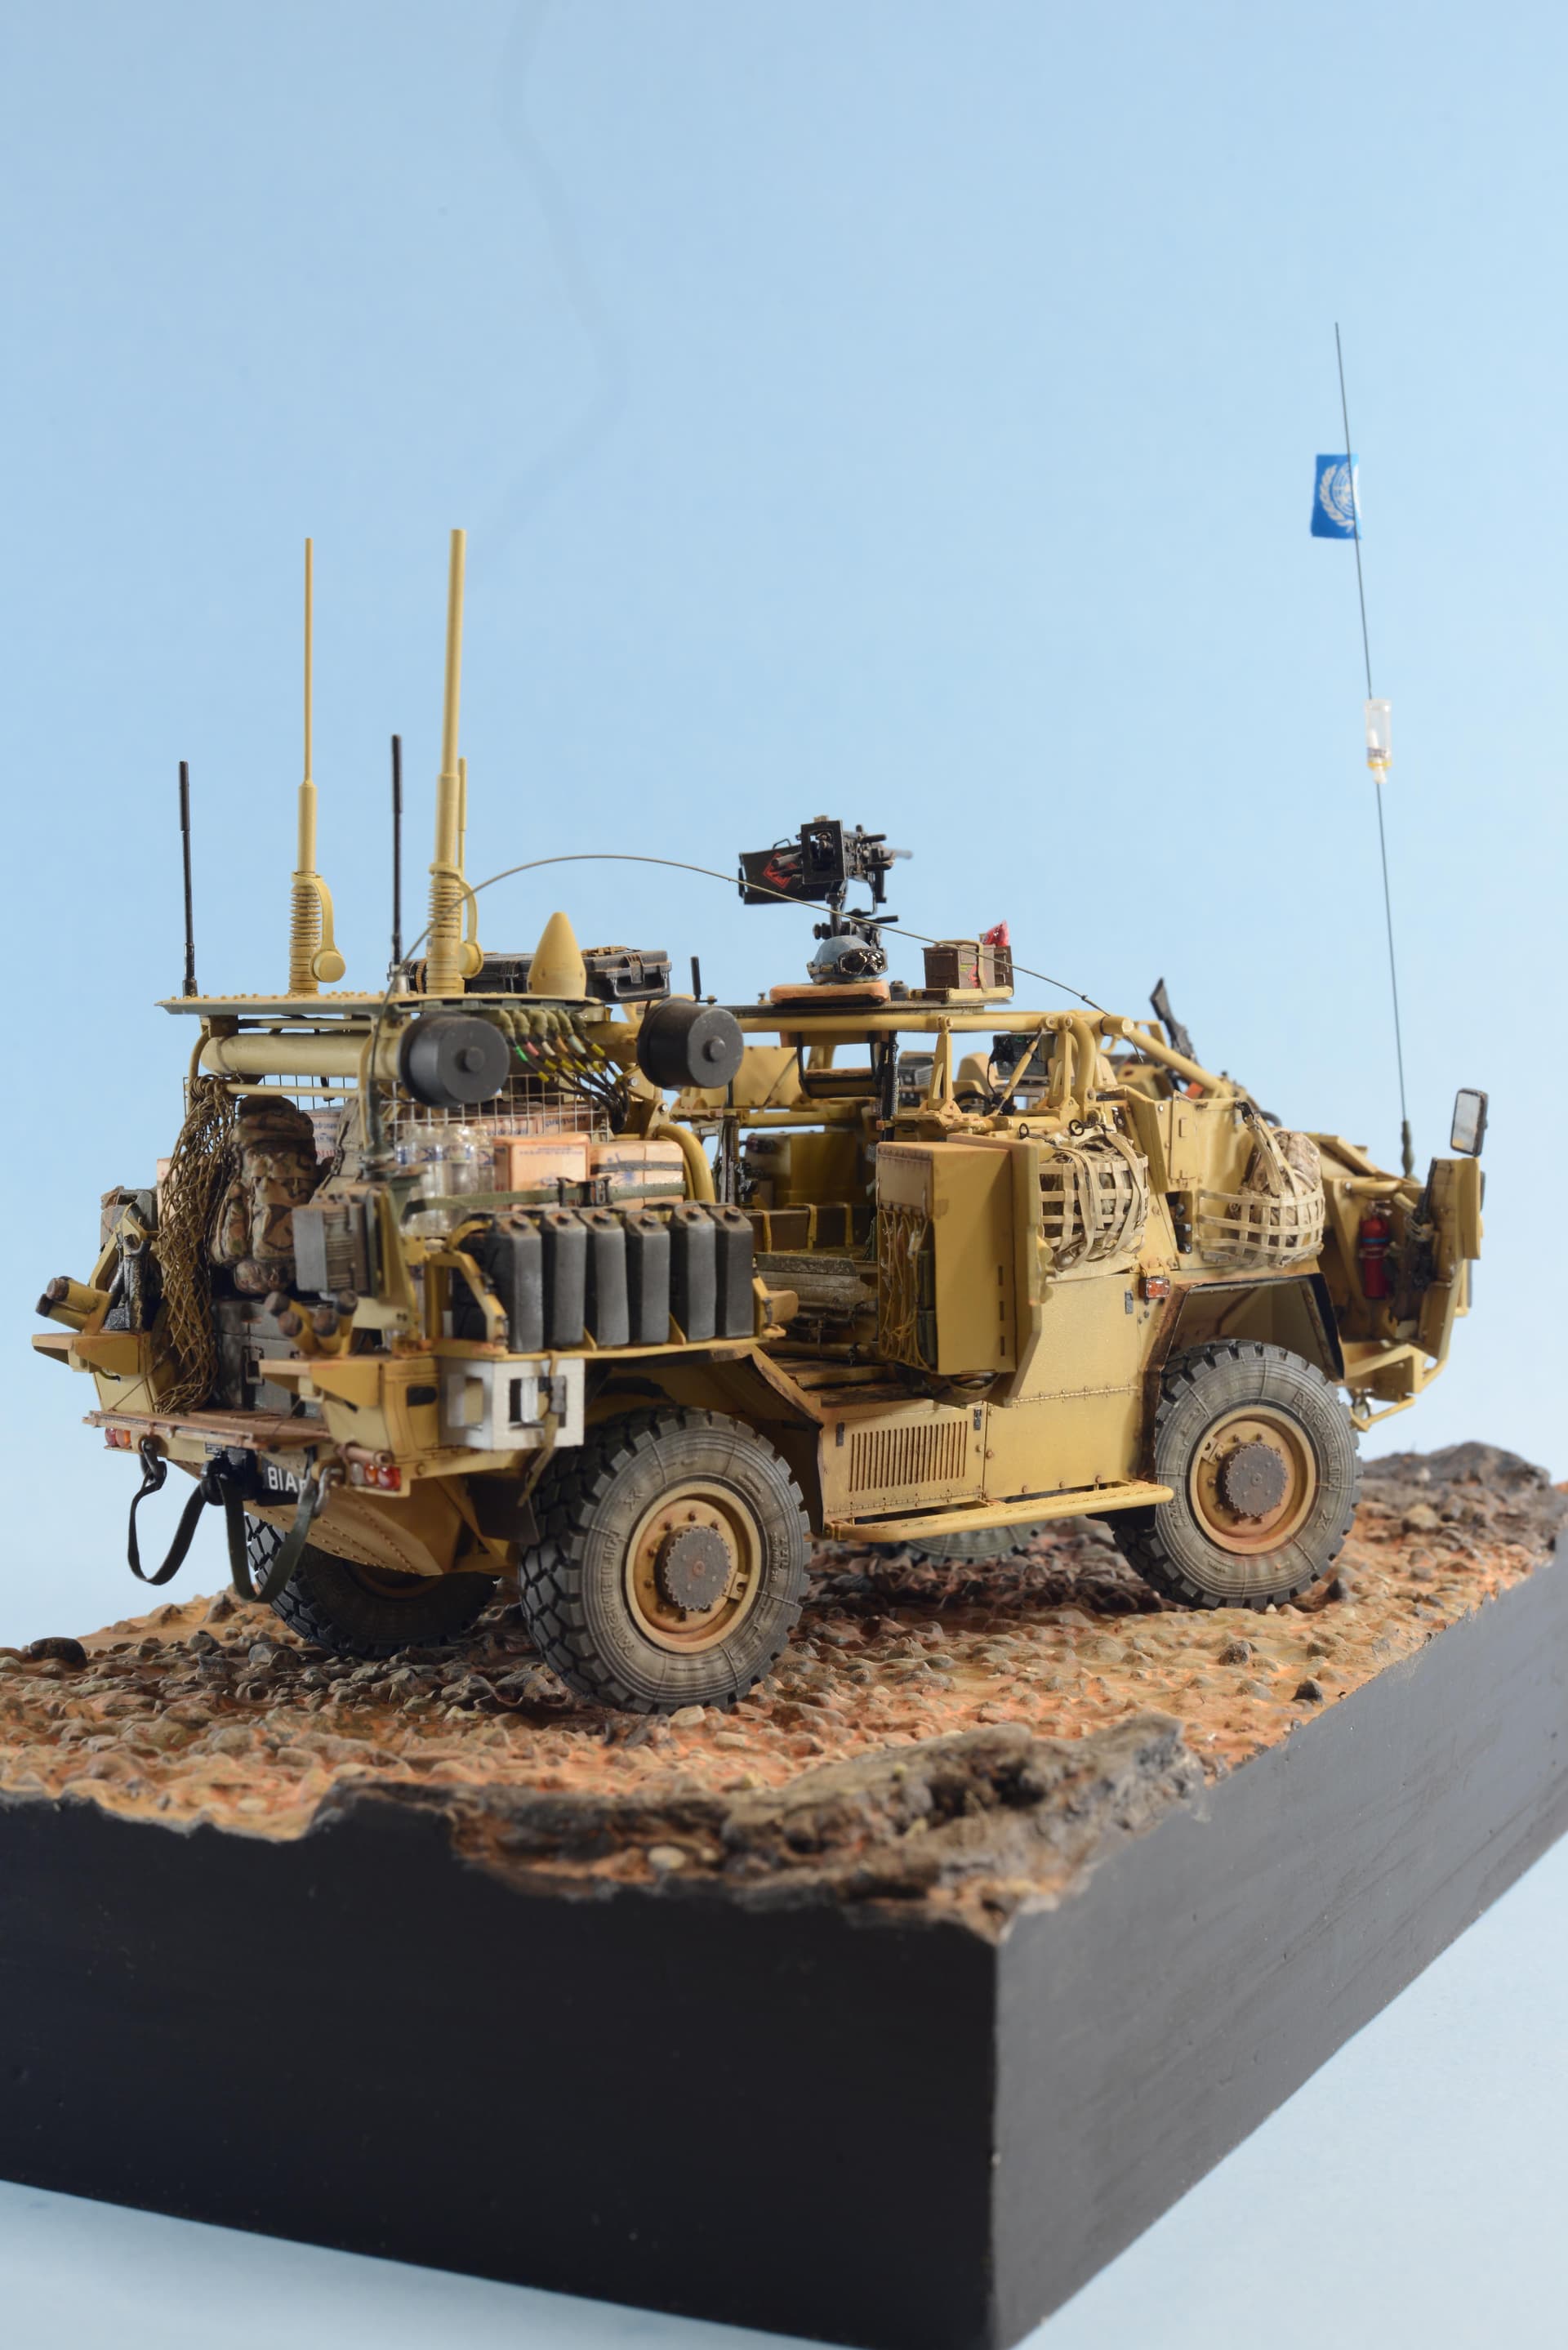
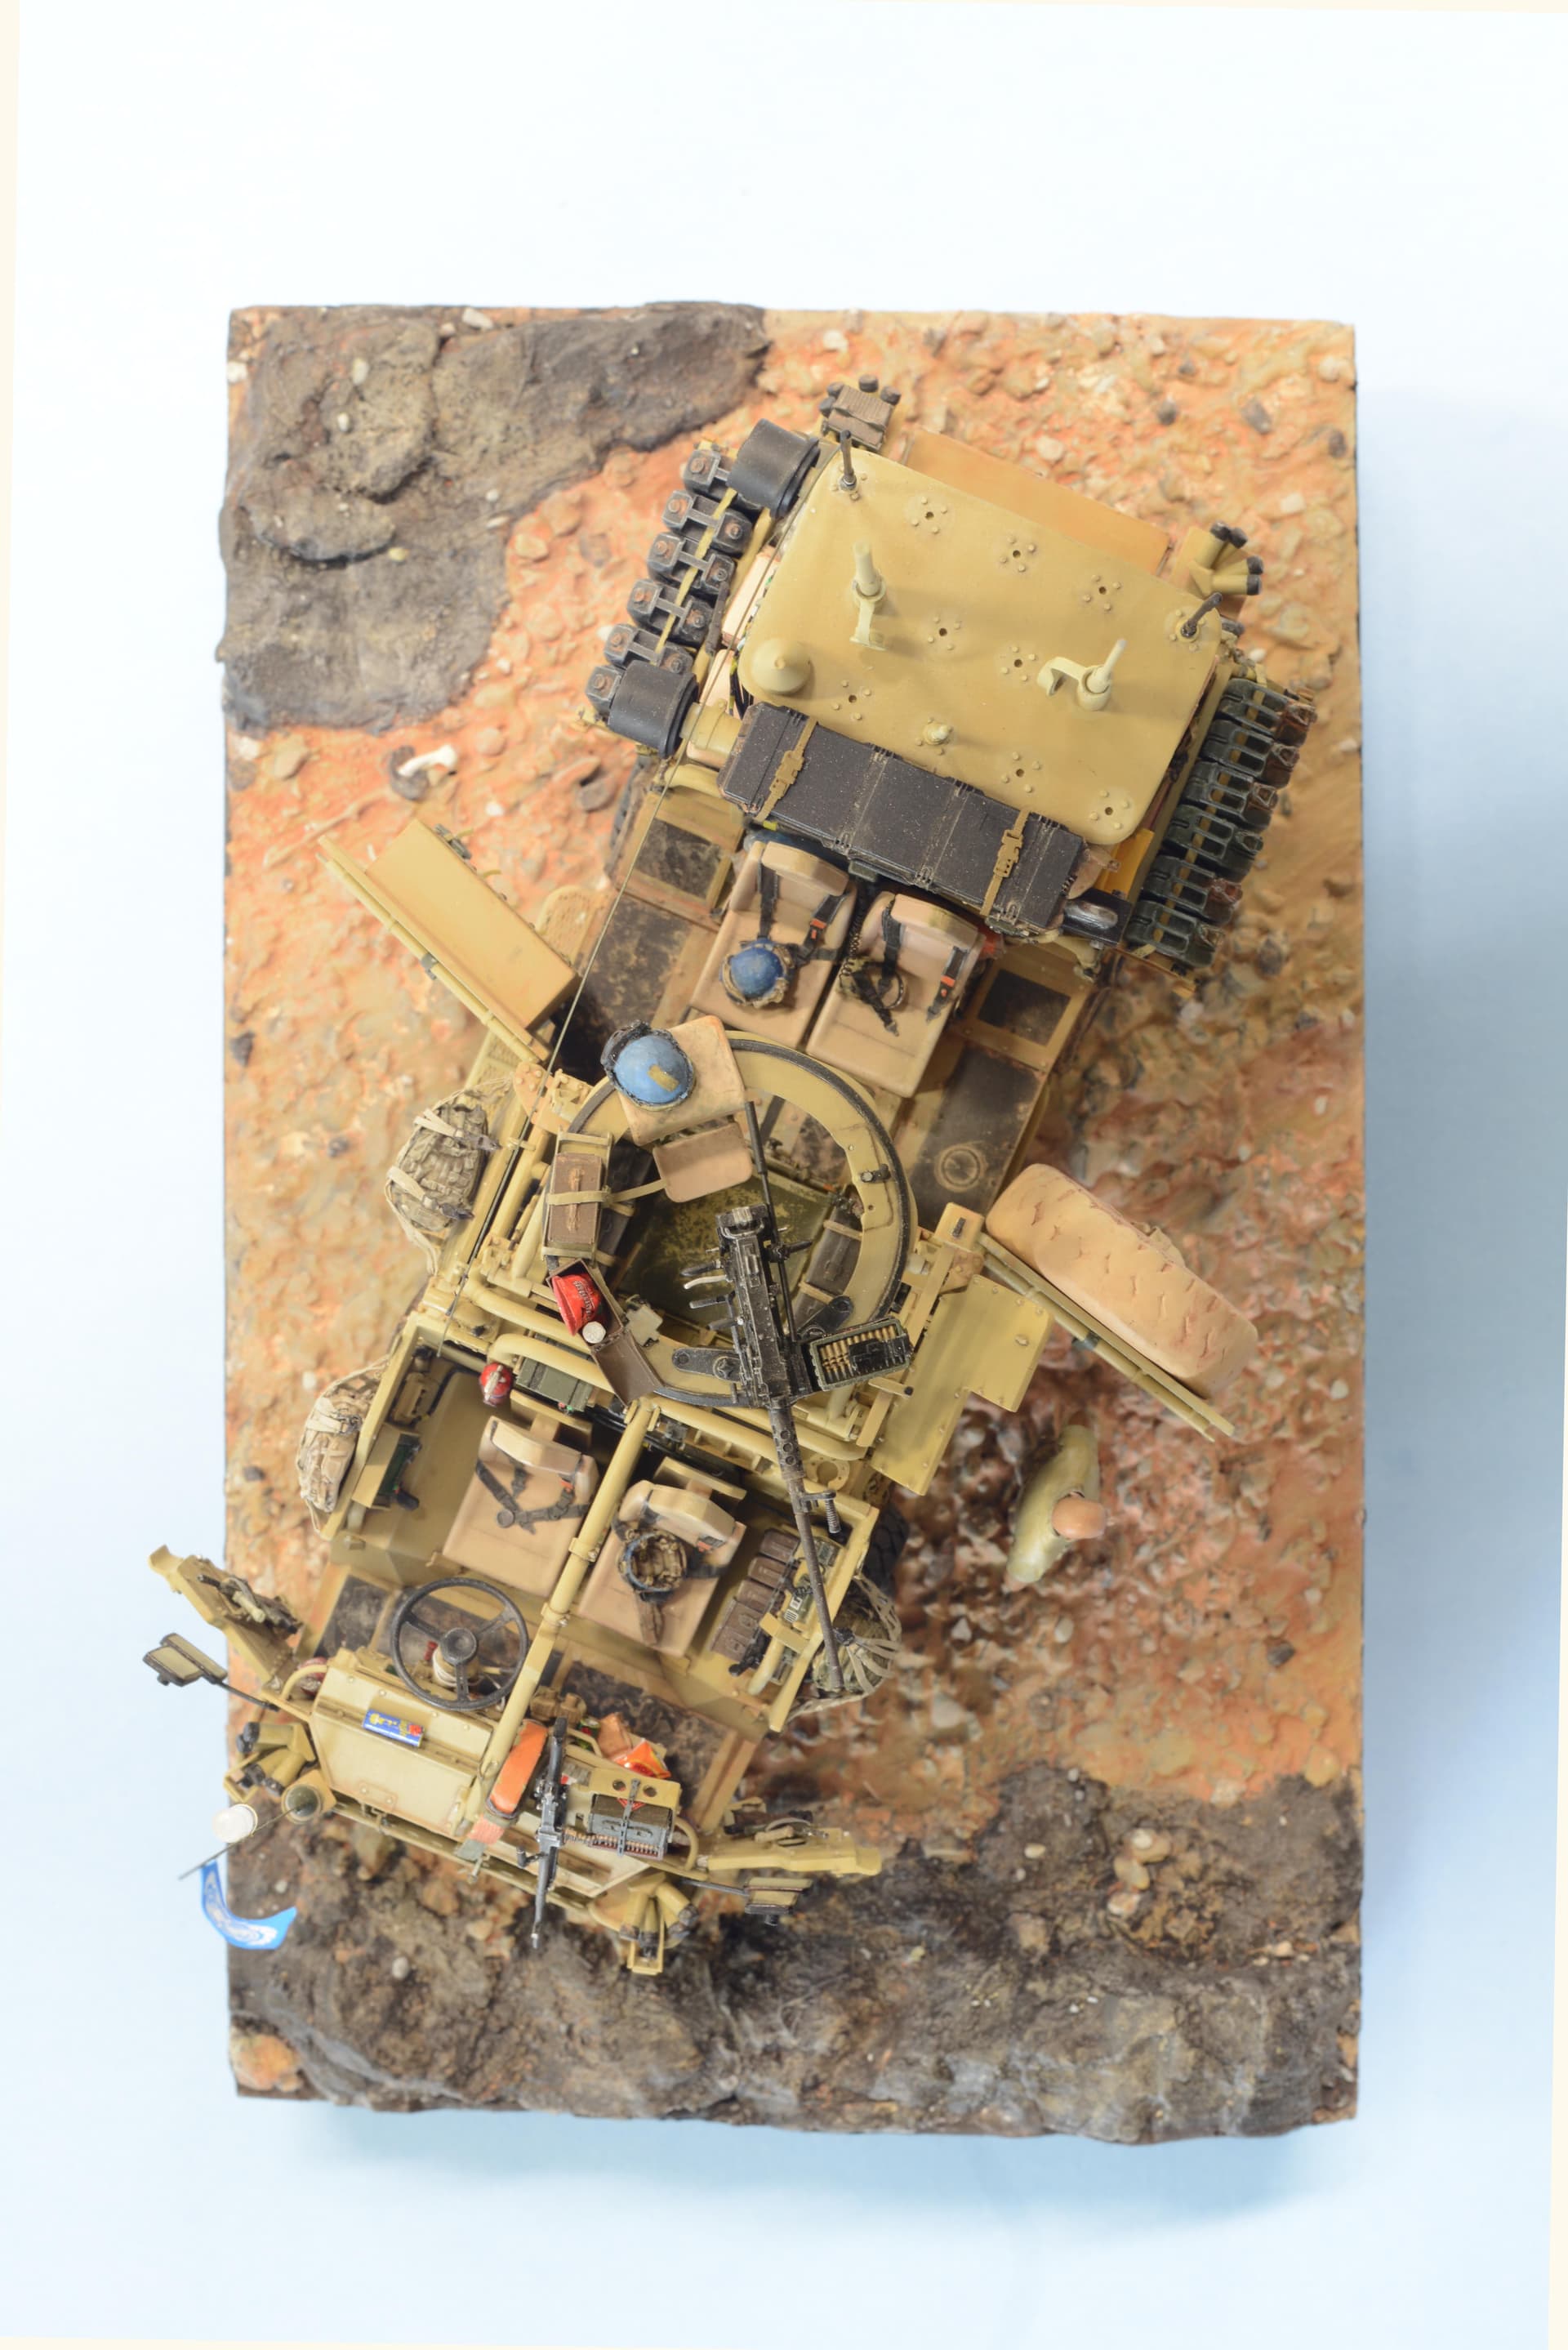
Great that Hobby Boss made this kit but one has to understand that it is a relatively new vehicle and it continues to evolve, probably to this day depending on what it is tasked for. I don’t know anything about the Jackal 1 but I saw a lot of photos of them and after a while you can identify a 1 from a 2. After some time you can tell which Jackals were used in Afghanistan and/or in Africa. These vehicles were used in a Peace keeping mission in Mali but for a peace keeping role they were still loaded for bear just in case.
The kit comes with an H&K Grenade launcher and ammo cans for same. It comes with a GPMG 7.62 in the front left seat. I decided to use a .50 cal from Live Resin. The GPMG I used a Live Resin version as well. The .50 cal ammo cans are Live Resin and Accurate Armour.
I used the Eduard PE set which helped a lot but the webbing ruck sack holders were useless so I made mine from thin lead foil.
Straps: There are a lot of straps on a Jackal. I used a lot of lead foil, but I bought a PE set called modern Buckles and straps by Voyager PEA348 and they were excellent.
Scratch building
The kit has its issues. Unfortunately I kept discovering these problems as I was going through my build process. I guess in time there will be a list like there is for the ubiquitous Tamiya T-55 kit, it saves a lot of time. The box art shows a Jackal with the rear air intake system system but it doesn’t include that in the kit. I have seen the version of this truck that Hobby Boss made in photos but all of the latest in theater vehicles have the BIG ECM BOX in the back storage area. I have no idea what’s inside the BIG BOX but it must play an important role in what the Jackal was designed to do. There is a table or shelf that covers the BIG BOX and I made that from scratch, you can’t see that now but I have photos of the table in place. The rear frame that supports the rear roof that all the antennae are attached to has to be scratch built. The air intake and the fabric wrapped duct work has to be scratch built as do the cyclone intakes.
Where the two mid section armour doors open and secure against the body there needs to be holes cut in place to receive the latch locks. The rear lights are not conical as supplied they are mode puck shaped (clear sprue). The .50 cal in British service has been mounting their Browning’s on what is referred to as soft mounts. The Jackal has what is referred to as a universal mount for the top gun. One can use the Grenade Launcher, the GPMG, and or the .50 cal Browning. I had to scratch build the mount that holds the .50 body and that then attaches to the universal mount.
In a video that I relied on (https://www.youtube.com/watch?v=A4yggGfI23k) showed the rear cargo area filled with shrink wrapped Cristaline water bottles. I tried and tried to figure out how to shrink wrap plastic over 6 bottles of plastic water bottles and finally figured it out, I used clear decal film. A friend sent me a hi rez image file of the Cristaline water bottle logo when I was building my VPS (French VPS, Operation Barkhane) that I could now use as the bottle logos on all of the individual bottles. I had some appropriate shaped bottles that I think were from Live Resin but I made most of the bottles from clear sprue turned in my Dremel tool, I made about 30.
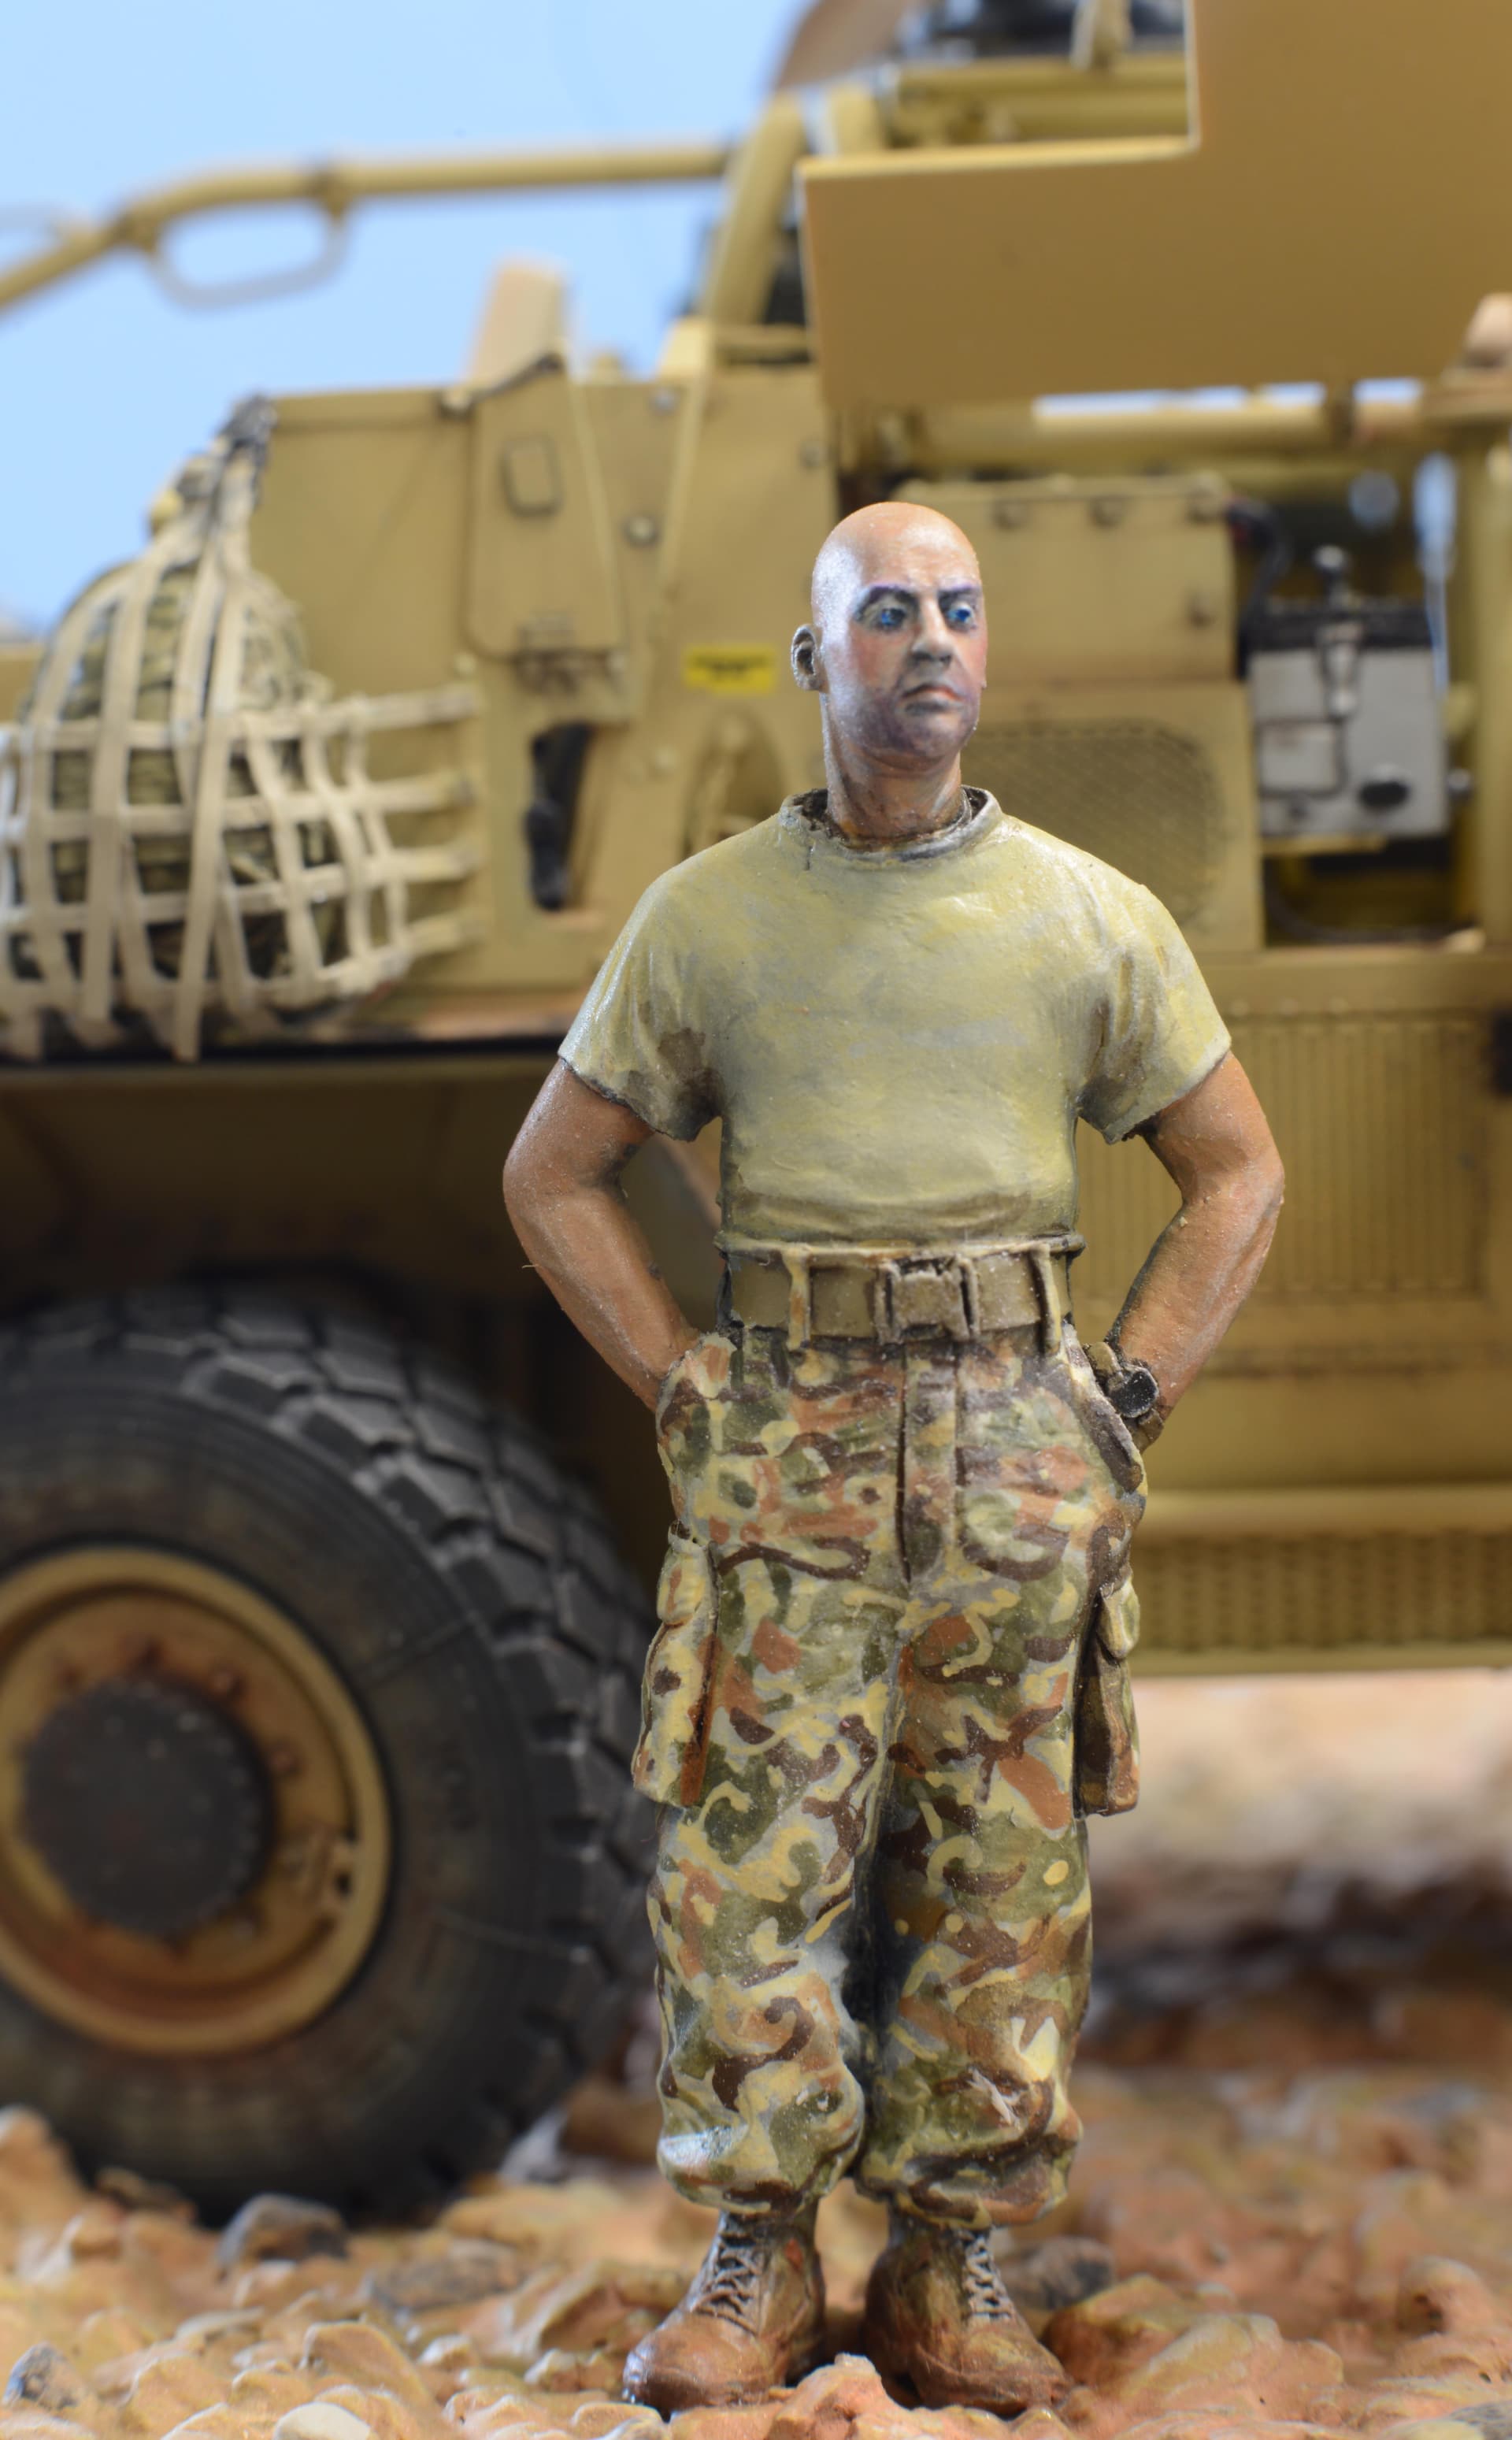
The two Bergens stowed in the rear are from Accurate Armour as is the figure, the head is from Hornet. The figure isn’t accurate for the Mali deployment, by that time the troops weren’t tucking their pants into the tops of their boots but rather letting them hang freely but I liked the figure as it was.
In the video there seems to be a “thing “about junk food”, it is preciously rare and Accurate Armour makes a brilliant set of very nice junk food containers.
Rear view mirrors. The kit gives you early Astan mirrors but it seems that later two mirrors stacked above one another seems to be the norm so I tossed the kits parts and made my own and the mounts to attach them to the body.
The front antenna is a carbon fibre rod from Accurate Armour which is very strong so I could mount the inverted water bottle for glow sticks and the UN flag which appears in many of the photographs, also from Challenger 1 decal sheets from Accurate Armour.
The UN door badge was made on clear water slide decal film and my inkjet printed. A simple Helvetica font was used and I printed a few sizes to be sure I had some to choose from. The ink took days to dry on the film so in the end I gave the film a coat of gloss coat to both encapsulate the ink and to provide some strength to the film.
Inside the scratch built webbing are Blast rucksacks. It is a shame I could not use the bags in another way to show off how beautifully crafted they are but each one received a full paint job and weathering. Two of the inverted helmets are Blast as well, they are so remarkably detailed I had to show them off, the one top gunner helmet is an Accurate Armour helmet that I reworked, removing the webbing then painting the cover with UN blue.
In the videos I saw yellow wheel chocks used so I made a pair of those and you’ll notice a fair number of tow bars stowed in various ways on the Jackals and on the Fox Hounds, I made a set of those stowed next to the chocks.
A common site is the Pelican style long gun protective case (Legend) stowed above the air collector device just ahead of the rear roof. In this Jackal there is the issued L85A2 from Gecko and the L129A1sniper rifle also from Gecko.
Weapon & Equipment Set, Gecko Models 35GM0026 (2020)
Gear storage and personal affects are most often covered and contained in plastic bags to keep the red dust off, it apparently gets everywhere. Things were stashed where ever space allowed so routinely photos of Jackals in country are full of stuff poked everywhere.
I think this was one of my most challenging builds. It took me a long time to build because you have to build from the inside outward like assembling a skinned vehicle. Often I’d build something and have to dismantle that in order to add this or that. I ended up giving up on the kit wheels and I bought the DEF wheels which are very, very nice. The spare I used a kit wheel and made an epoxy resin cover for it. The right side swing out door is full of MRE’s, personal kit and a few cans of .50 ammo. I used thin sheet brass to rebuild the cabinet to the more current configuration with vertical compartments.
The kit water and gas cans are horrible so I used accurate Armours British water cans and resin fuel cans. The water cans needed a lot of extra work to clean up which is not characteristic of Accurate Armour resin, the fuel cans were perfect.
Paul Truhe kindly provided the Armorama community with modern MRE boxes which I have used in this project. He also designed the proper water boxes for the Cristaline boxes that I used in this build, very kind of him, than you Paul.
The biggest thank you goes to Frenchy who came up with the most remarkable reference material. If I wondered about this or that he would send a photos(s) to show me the way it really is.