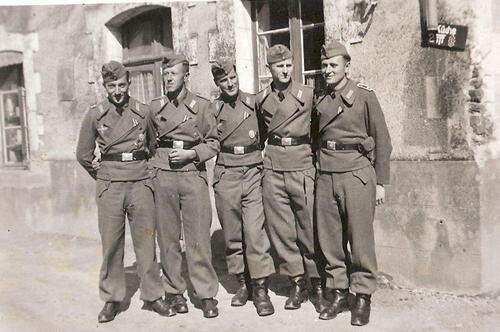
I am building the tamiya Stug IV. The kit comes with a single figure, the loader. I plan on adding a driver, and commander, and some panzer grenadier tank riders as well. The tamiya box art shows a tank crew man wearing what looks like pea pattern or oak pattern uniform. Am I correct in thinking only the SS wore non black panzer uniforms? Or would it be okay to paint the crew of a non SS tank with camo uniforms?
Stug IV is not a tank, it is an assault gun, was part of the artillery branch, there by it did not have a crew in panzer uniform. The cut of the uniform is the same as a panzer uniform though in field gray…or if wearing camo it would be a “splinter” pattern or winter camo.

1 Like
This is really one of those “just depends” kinds of questions…
The Heer and the LW both had their own camouflage uniforms (mostly over smocks) in addition to the SS camouflage uniforms (smocks and full uniforms), and all three services employed the StuG IV.
The Panzer crews of all three services wore the black panzer uniforms and all three services StuG battalions wore field gray panzer uniforms. Camouflage uniforms could be worn by any troops in any of the three services, although the SS and the LW generally issued cammo more uniformly (no pun intended) than the WH. WH troops generally only got cammo smocks in infantry units. All three services had their own camouflaged winter uniforms (LW and WH nearly identical) that were issues on an “as needs” basis.
Really, the study of WWII German camouflaged uniforms requires some dedicated effort. There are few short and simple answers.
Also, the StuG IV was employed in assault gun battalions (for which the artillery branch was the proponent) and as substitute Panzer Jaeger in some armored regiments (the Panzer Jaegers were themselves substitutes for tanks and crewed by armor branch crewmen if issued to a Panzer regiment but crewed by infantrymen OR artillerymen if assigned to a Panzer Jaeger battalion in an infantry regiment - antitank gun proponentcy being divided between the infantry and the artillery). So, StuG IV (and to a much lesser extent, StuG III) crewmen could be either artillery or Panzer branch depending on the specific sub-unit concerned.
Finally, the StuG IV was manufactured as a substitute for the StuG III when StuG III production was interrupted at the end of 1943, so it only saw service in the last year and a half of the war. It was maintained in production to the end of the war because the StuG III was considered the most essential combat AFV by that time and its production was never sufficient, especially as Panzer Jaegers and StuG’s were used more and more as substitutes for tanks in Panzer regiments (in addition to all the regular StuG units that needed them - ideally a battalion per infantry division).
All of these circumstances combine so that you really have to first select the unit that your model will be represented in (WH, LW or SS), the time period of your presentation (keeping in mind the time of year and the possible date of the vehicle’s production which determines its technical details), and the theater it was used in (for instance in Italy, during the summer months, tropical uniforms might be worn). All of these details would then suggest the particulars of the uniforms worn by the individual crewmen of your model.
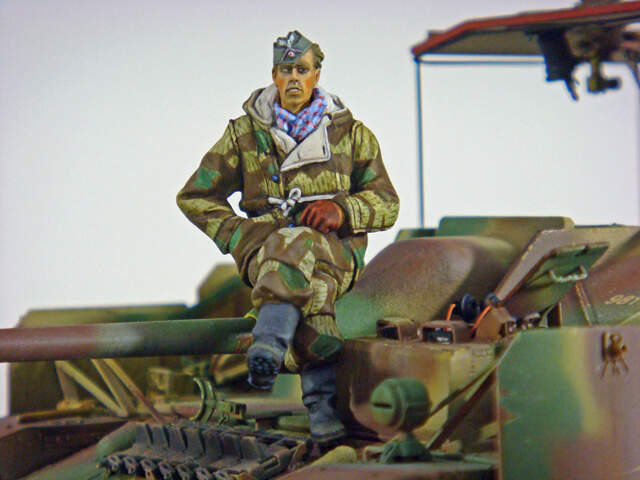
As an example, here is my StuG IV (final production version) depicted as issued to the Pz Grenadier Div. “Brandenburg” (a WH division) in Poland, Jan. '45. The crew are depicted in WH winter reversible camouflage with some regular StuG crew uniform items (field gray Panzer wrap since the StuG’s belonged to the division’s dedicated assault gun battalion and not a Panzer regiment).
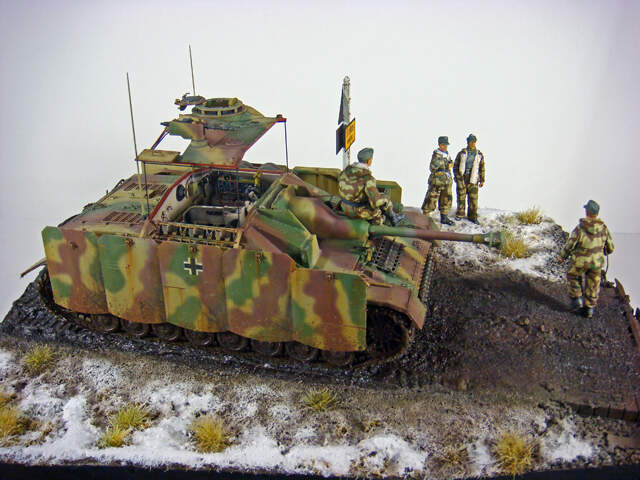
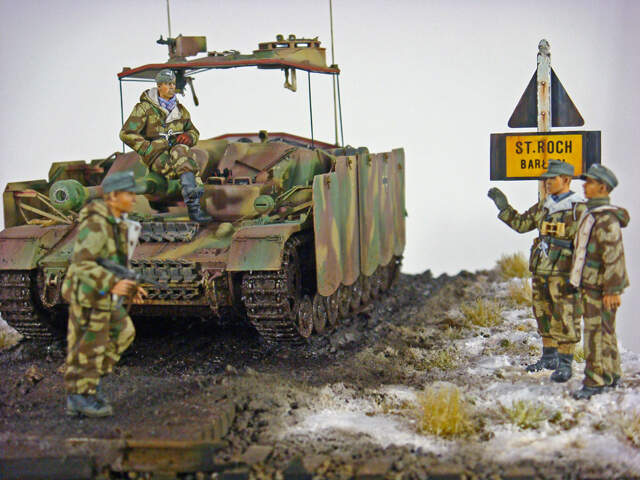
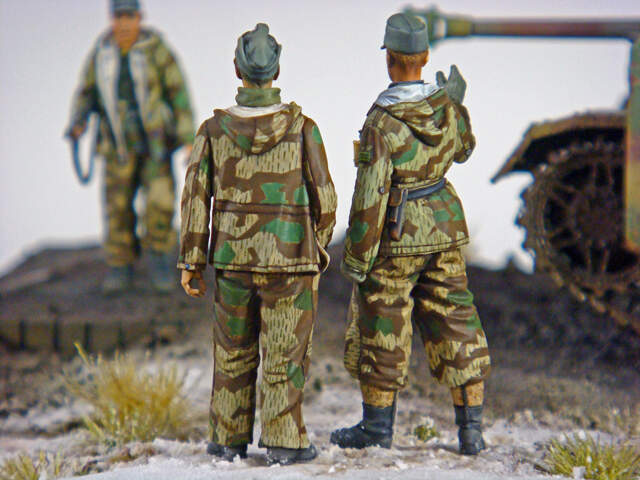

So, you have a great number of camouflaged uniform options besides just SS pea dot.
8 Likes
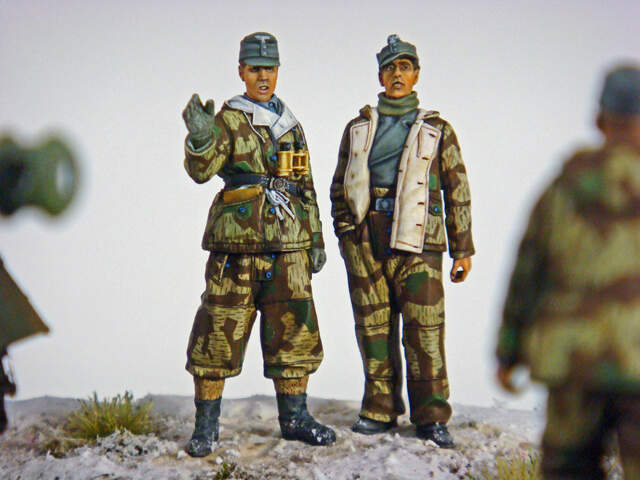
Wow, this is one of the best splinter camo I have ever seen at 1/35. Any special tip for it?
1 Like
Thanks a bunch for the very detailed response! Lots to think about. Your figure painting is stunning! The camo on the uniforms is amazing
1 Like
That uniform camo is superb… Well done on all of it 
1 Like
The camouflage was painted in acrylics, mostly Vallejo, while the rest of the uniform details were done in artist oils. I also used artist oils for the shading over the camouflage parts. I painted the camouflage when I did the acrylic undercoats before the oils.
No real secrets… Using the acrylics properly thinned is essential. Two to three thin coats gives much better results than trying to go at it with single coats. Outline the pattern, cutting in clean and sharp edges and corners, then fill in the centers. This makes it easier to follow reference photos of the pattern.
I made a very conscious effort to follow the reference photos and make pattern breaks where the sewn seams were. My references showed that a lot of the smaller parts of the uniforms were made from left-over bits of cloth and sewn on with the patterns at right angles to the main uniform pattern. I tried to replicate that.
The raindrops are a PITA and require, again, properly thinned paint and constant cleaning of the brush to keep the tips of the bristles from clumping. Painting them was just tedious and time consuming. Rushing or trying to push will just lead to mistakes. Do a few, reload the the brush, do a few more, and then probably give the brush a swish in water and a wipe, then repeat…
Andy Evans did several SBS figures on Armorama and Historicus Forma with LW field division and paratroops as the subjects, and I slavishly copied his Vallejo color mixes and general technique (modified for the WH splinter pattern vice the LW pattern). These are really worth the time and effort to look up and read. I modified his general technique to use artist oils for the shading over the camouflage whereas Andy used acrylics. That’s the only really significant difference in method. (Although Andy’s a much, much better painter than I am…)
I prefer to use 10x0 sable liners to paint acrylics rather than rounds or brights. The long bristles of the liner brush holds more paint and the tip size is the same.
Cheers!
The rain drops look awesome. I know from my minimal experience painting figures how hard and time consuming small features like that are. Truly awesome work!
1 Like
I do appreciate the kind words, but seriously, if you want to REALLY be impressed, check out Andy’s figure work. He’s one of the most precise acrylic painters that I know of.
I checked through my old modeling bookmarks and found a couple of Andy’s KitMaker threads from a few years ago:
Historicus Forma:: Andy Evans - Painting Splinter Camouflage
Historicus Forma:: Andy Evans - Painting LW Figures with Acrylics
Thanks for the links but to be honest, I like yours more 
Anyway there is a good explanation there, and the part about shadows is really interesting. Will have to give it a try, although I do not see myself doing a splinter…
1 Like
Thanks! I appreciate the props! Andy and I have quite different painting styles (not to mention working with different mediums), and while I do prefer my own style, I do admire his work for its precision, crispness and brightness.
Most modelers believe that the real challenge to painting camouflage is doing the pattern, but that’s really just a matter of polished painting technique and brush control. If you practice and paint enough figures, you’ll be able to replicate the patterns and colors on camouflage uniforms.
The REAL challenge is in shading and highlighting the harlequin colors of the pattern. This challenge has two aspects. There is the artistic challenge of putting the shadows and highlights in the proper locations along with the technical challenge of doing that while still allowing the pattern to show. However, both of these aspects are connected to the technique used by the painter.
Normal washes and dry brushing risk being heavy handed (by putting too much paint on) and obscuring the pattern (by using paint that is too opaque). Washes and dry brushing also put the shadows and highlights in the mostly wrong places. This is why, as a basic figure painting technique, they significantly limit the painter, who, no matter how well he executes them, can never get his or her figures looking really first rate. In short, using washes and dry brushing can only ever take the painter so far, and the results will always only be close, but never quite right.
The most accomplished master painters often attempt to shade the camouflage pattern as they paint it, shading and highlighting each individual color spot accordingly. As crazy as it sounds, this can actually be done, but it is usually reserved for larger scale figures which offer enough space or area in the pattern elements for such detailed shading. I don’t know that I’ve ever seen a really well painted figure in camouflage done this way in 54mm or smaller scale. (Not saying that it can’t be done, but I just don’t recall ever seeing an example of it.)
The technique that Andy uses (and which I attempted to copy) is to selectively shade the seam lines that stand out and define the details of the clothing and then use glazing techniques with semi-transparent paint to darken or lighten areas. This is the approach that most skilled figure painters use on smaller scales (and even larger scales for most painters).
The difference between washes and dry brushing and glazing is in more than just the names. It is quite technical, really.
Washes use capillary action and surface tension to place the paint which tends to darken the very bottoms of the folds and creases. The result is that a goodly portion of the shadow color is actually over what should be a neutral tone area, and a portion of the area that should be in the deepest shadow is, at best, a light shadow or, at worst, a neutral tone. The dry-brushed highlights are also placed in generally the wrong locations being on the “crests” of the folds rather than on their tops. Again, this places some of the highlight over what should be a neutral tone while leaving what should be the very brightest highlights in the neutral tone or, at worst, covered by excess wash-shadow color.
The glaze is controllable, though, so that the semi-transparent shadow and highlight tones are deliberately placed in the correct shadow and highlight locations. This is, in fact, the exact same glazing technique that most acrylic painters use, building up successive layers of colors until they achieve the degree of opacity and color saturation they want as they shade and highlight.
Oil painters can also use the glaze technique over already painted areas (if they are allowed to dry or they are painted in acrylics first). So, while oil painters generally use a wet-on-wet blending technique for general shading and highlights, they can also use a glazing technique over something like these camouflaged uniforms, if the camouflage has first been painted in acrylics (as here) or allowed to dry hard (often assisted by adding a drying agent, such as W&N Liquin).
Since my painting technique uses acrylic color undercoats under the oil paints, it was an easy concept to paint the camouflage patterns in acrylics and then use oil glazes to shade them as I painted the rest of the figures in oils.
absolutely outstanding work ! Incredible all around!
Rich
1 Like
I would have to agree with the poster who said your figs are even better , no disrespect intended of course.
1 Like
Thanks again for such a detailed explanation!
1 Like