Oddly, none:
1 Like
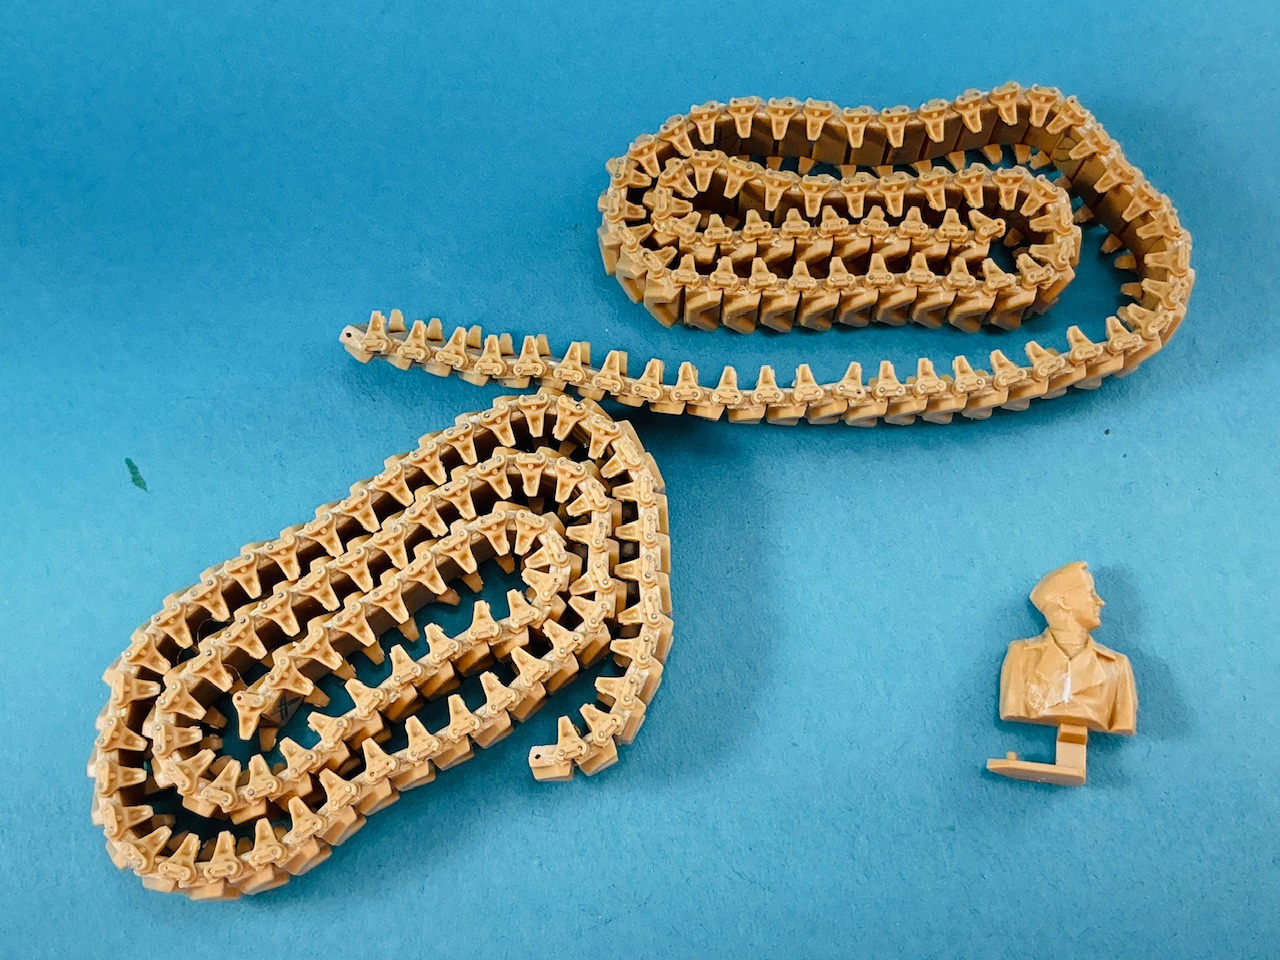
One of the tracks is now finished. A combination of it not being a fun job and heat in my hobby room makes that this took a fair while. The way the track goes together also makes it feel like it takes longer than with other types: because you need to fill the jig first, then insert the pins before glueing them in and finally fix the new section to the rest of the track, it gives the impression of being much more work than with the kind of track where you keep adding one link at a time.
Meng says to make 78 links, but there’s a Dutch expression, “having become wise through damage and shame”, which made me try the track on the model once I had reached that number:
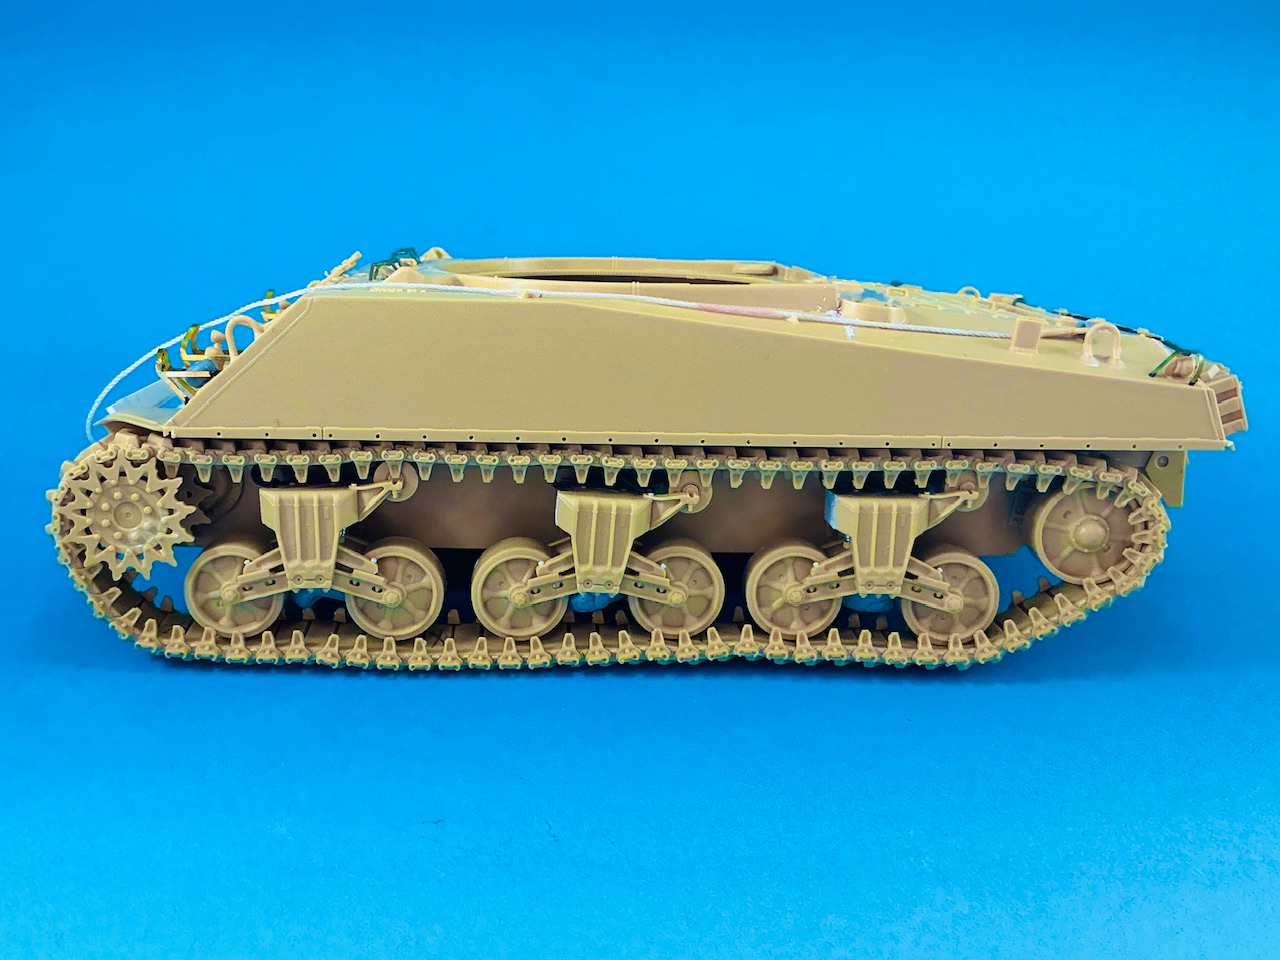
The bogies have been attached with some Blu-Tack underneath, and as the idler wheel works like the real thing, it can be used to adjust tension. I’m not sure of its exact position here — it’s probably hanging down because it’s very loose in its mounting. Anyway, it’s clear that the track is much too loose. Here it is with one overlapping link:
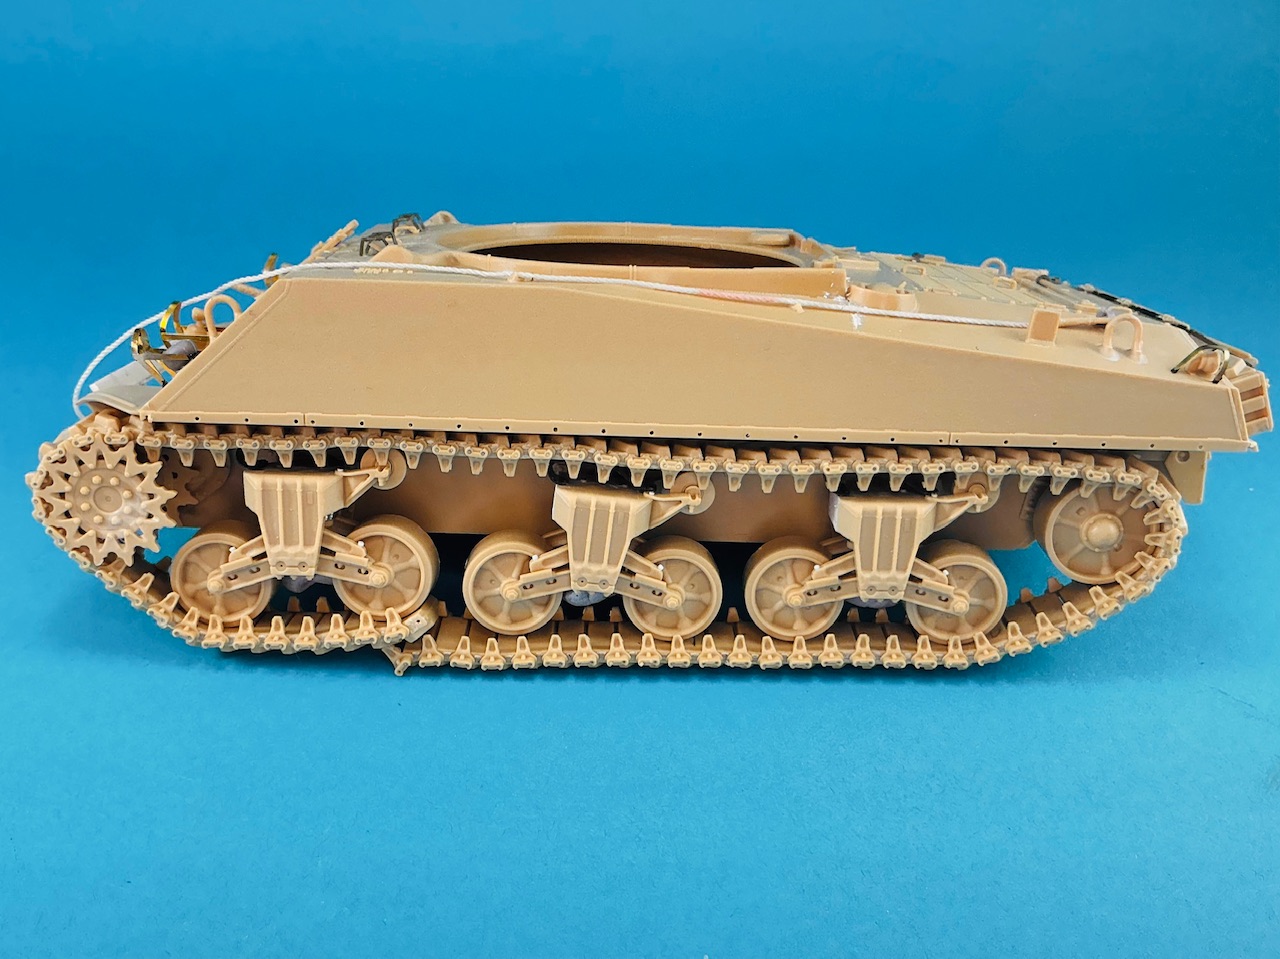
That looks a lot better, so I took one link off the end and then test-fitted it again. If I then moved the idler rearward a bit, it seemed to fit pretty well. I didn’t join the ends, though, because then you can’t fit the track if the bogies are attached to the hull.
2 Likes
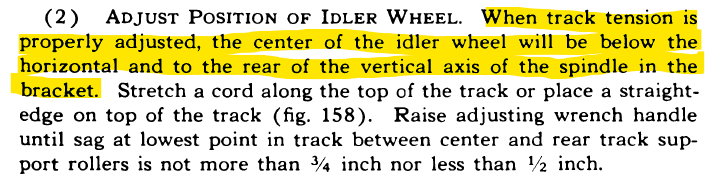
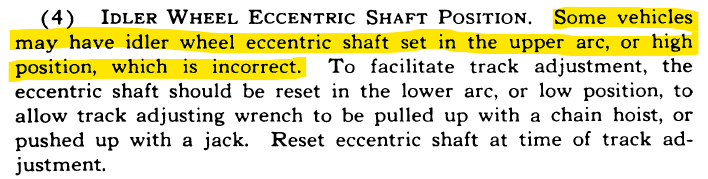
I have read about modelers who were unable to get the track runs correct using the idler adjust, or had the wheel in an unnatural position. For future reference, here’s what the TM says:
KL
3 Likes
And that makes two:
The figure will be the tank commander. He’s actually a German, from Tamiya’s Hotchkiss 39, but I’m going to put him inside the turret, so you’ll only see him from above, and in that case a few small changes to his jacket and his cap will do to turn him into a Frenchman wearing an American uniform ![]()
3 Likes
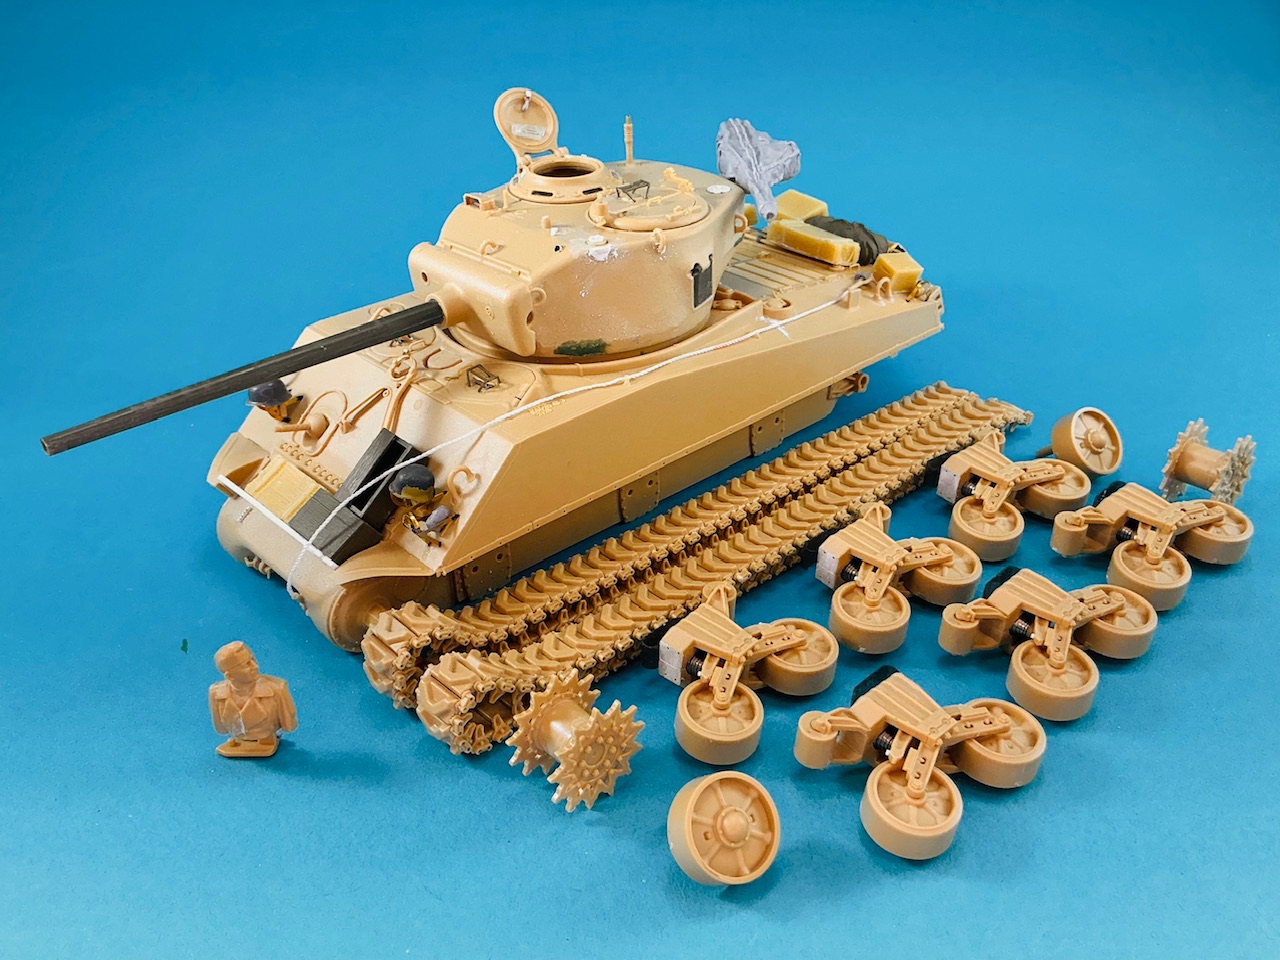
We’re now really getting there ![]() I made a camouflage net from a bit of bandage and thinned PVA glue, stuck three helmets to that (visible on the real Champagne), made a rolled-up tarp from another piece of wrapper from an Aldi chocolate bar (with a lot of extra aluminium foil inside to get it to a reasonable thickness) and went through my spares to find boxes and stuff that can pass for what was on the real tank:
I made a camouflage net from a bit of bandage and thinned PVA glue, stuck three helmets to that (visible on the real Champagne), made a rolled-up tarp from another piece of wrapper from an Aldi chocolate bar (with a lot of extra aluminium foil inside to get it to a reasonable thickness) and went through my spares to find boxes and stuff that can pass for what was on the real tank:
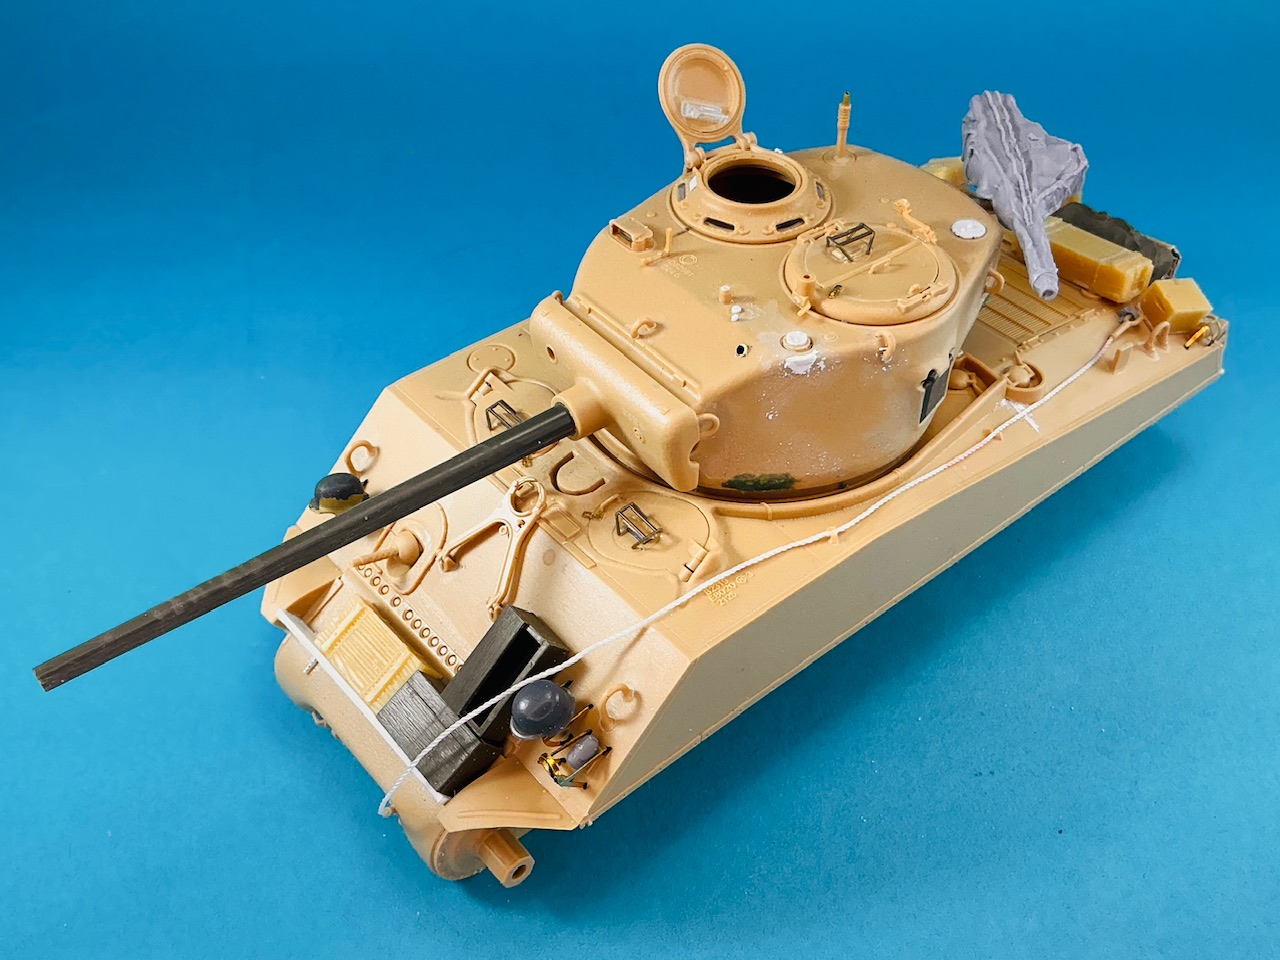
The net, helmets and tarp are already glued on, the rest isn’t. I still need to add a few straps over the tarp and a locking device on the commander’s hatch, but I think after that I can paint the model. The resin boxes I suspect to be casts taken from Verlinden parts, which I was given very long ago by someone whose name I don’t even recall, the plastic ones on the glacis are Tamiya, as are the kit bag and the helmets. The machine gun in its cover on the back of the turret is by Tiger Model Design and the German helmets on the headlight guards look like they’re from Italeri.
6 Likes
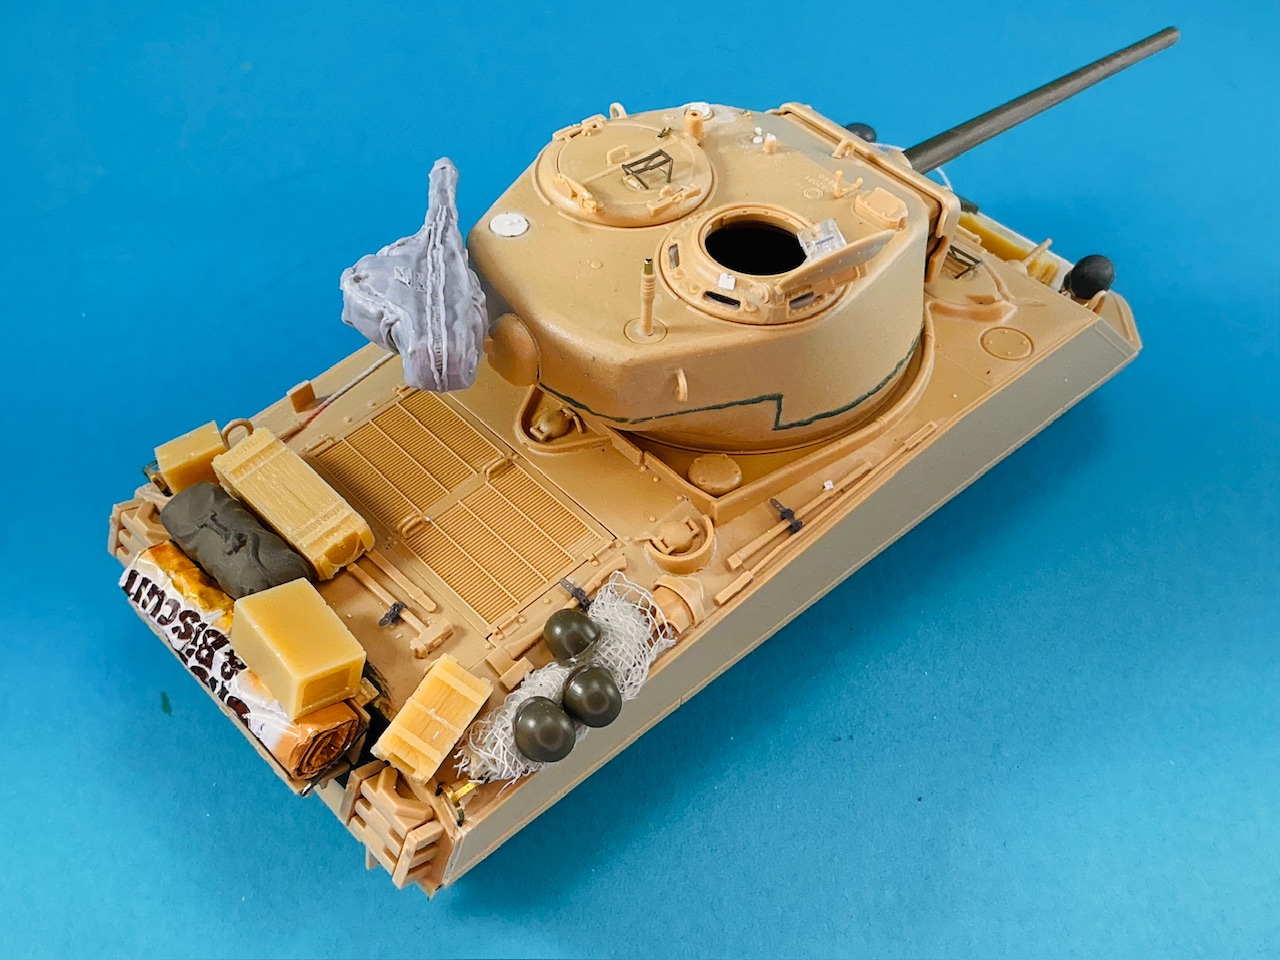
The only thing remaining was to make the clasp for the commander’s hatch. A bit of plastic strip, a bent piece of thin copper wire and a strip cut from some aluminium sheet later:
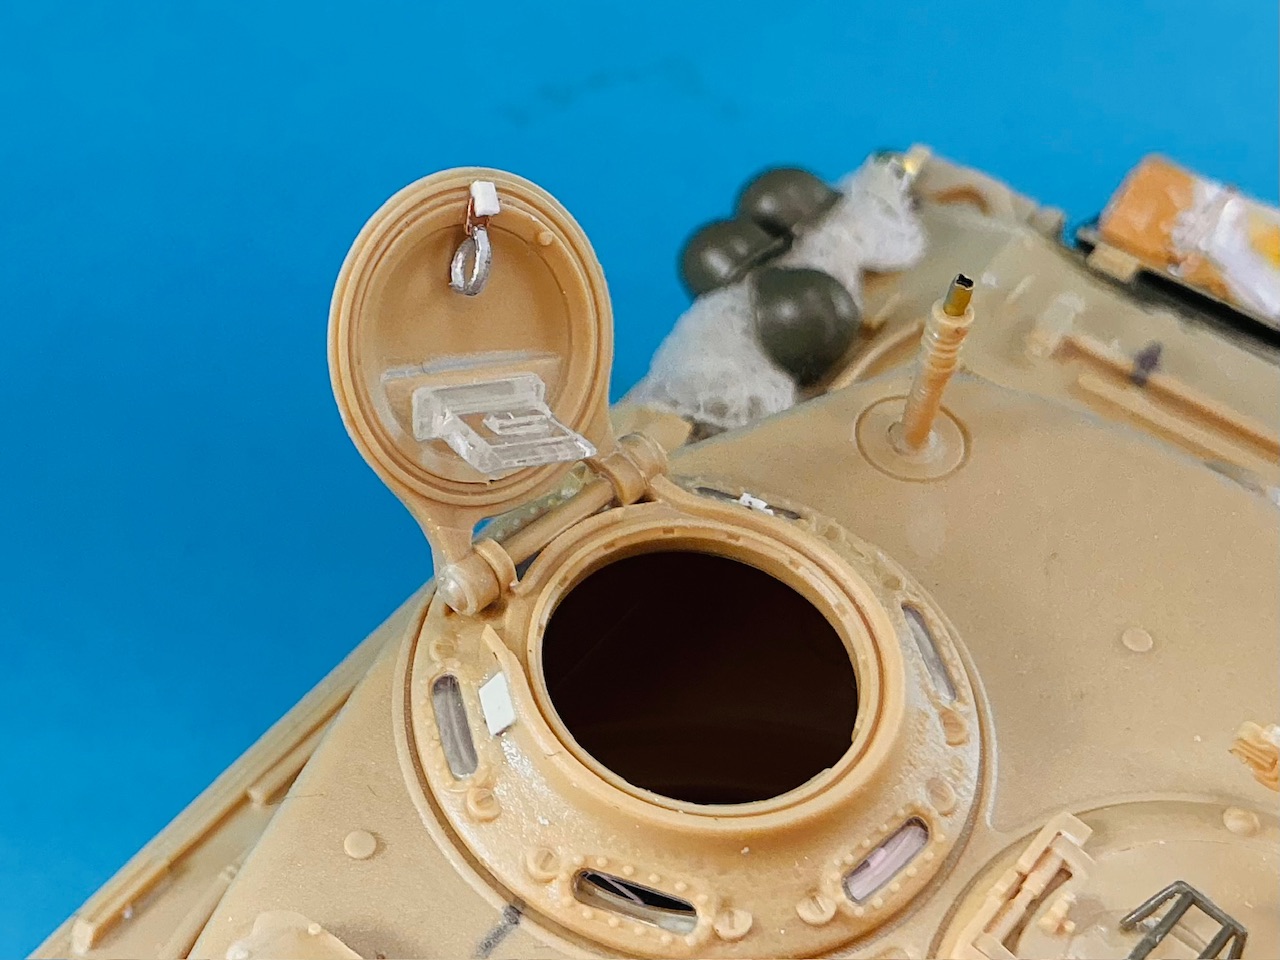
And the build part is done:
Right after taking this photo, I took my new airbrush (the cheapest pistol grip type I could find on Amazon, because I want to see if those are easier to use), put the 0.5 mm needle in, and:
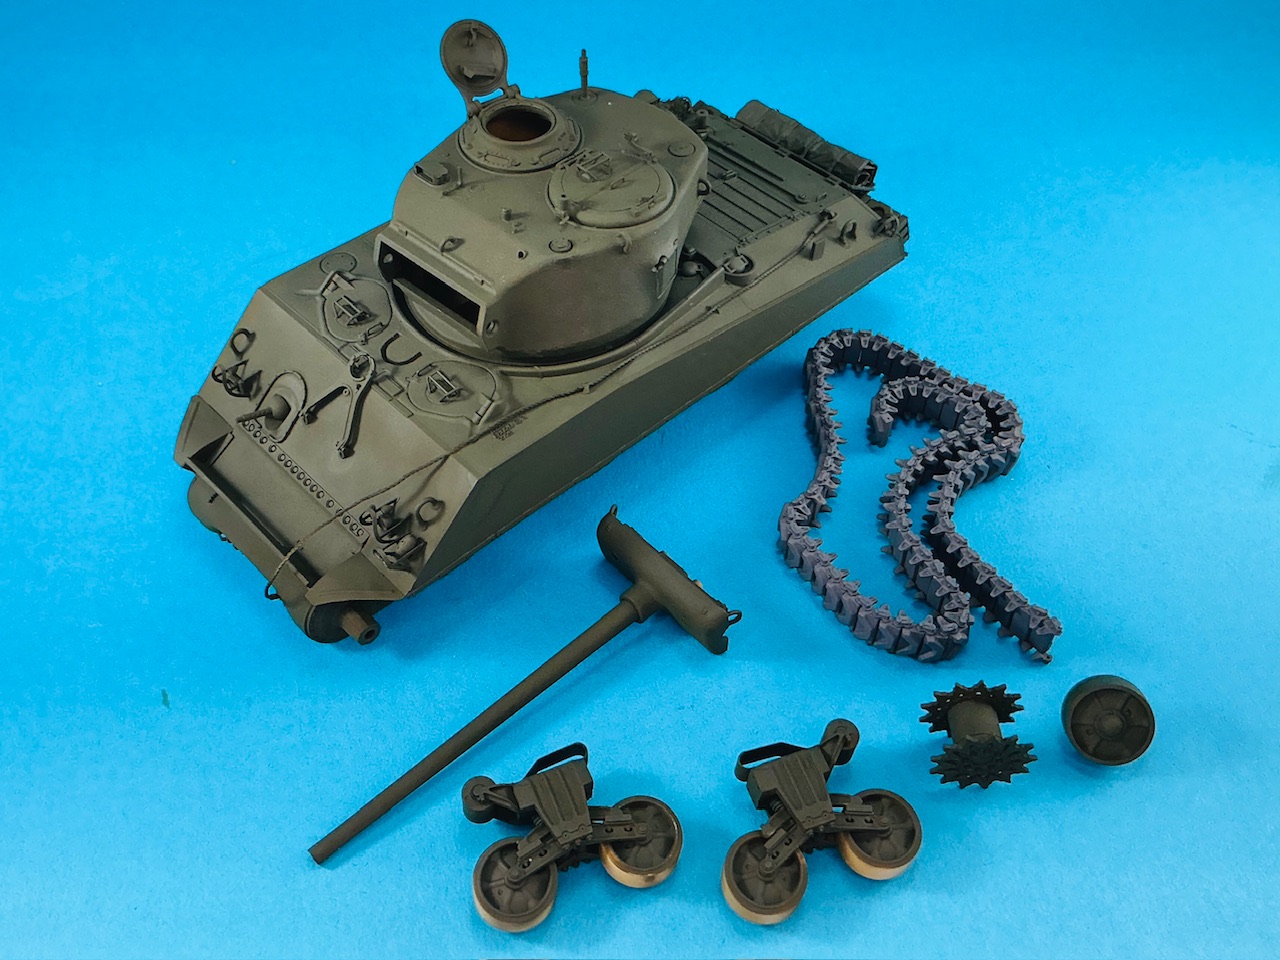
The tank is now Tamiya XF-62 Olive Drab, with the tracks XF-24 Dark Grey. Since it was almost 30 degrees still in my hobby room, despite outside temperatures having dropped to the low 20s today, the paint was dry very quickly. I’m not sure yet I that want to continue painting tonight, though, in that heat ![]()
7 Likes
And that’s why I hate airbrushes … This afternoon, everything went fine, so tonight I put in the 0.3 mm needle and some AMMO/Mig airbrush-ready paint. After a little bit of test spraying on a piece of kitchen roll, very soon nothing at all came out anymore, A bit of fiddling later and it started blowing bubbles in the paint cup. What followed was almost fifteen minutes of messing around with the airbrush (trying to spray, pour out the paint, put water in, disassemble bits, blow things through, wipe it clean, reassemble, put in paint, go back to the start of this bit in brackets) and it worked again. Good! So I took the model to hand and started spraying a little test patch on the underside, to see if the colour was right … Except that no paint came out anymore again …
Bastard thing! Ten minutes into the ultrasonic cleaner with it. That did it, afterward it sprayed water just fine again. Put some paint back in, and what do you think? Exactly: it clogged up immediately. It didn’t want to spray any paint anymore, soon started blowing bubbles in the paint cup again, etc. Another ten minutes in the ultrasonic cleaner, and then back into the box — I’ve had it with this lark for today.
This with two different bottles of airbrush-ready from two manufacturers, BTW. I think I’ll need to try this same paint in my Iwata to see if it does work in that (it always has, though), and also try totally different paint in this cheap airbrush. But not tonight.
3 Likes
Some days your the windshield and other days the bug.
3 Likes
You gotta love Mondays!
3 Likes
Second attempt, with Tamiya XF-62 plus XF-88 Dark Yellow 2 (more of the former than the latter), thinned with isopropanol, which went through the airbrush quite well:
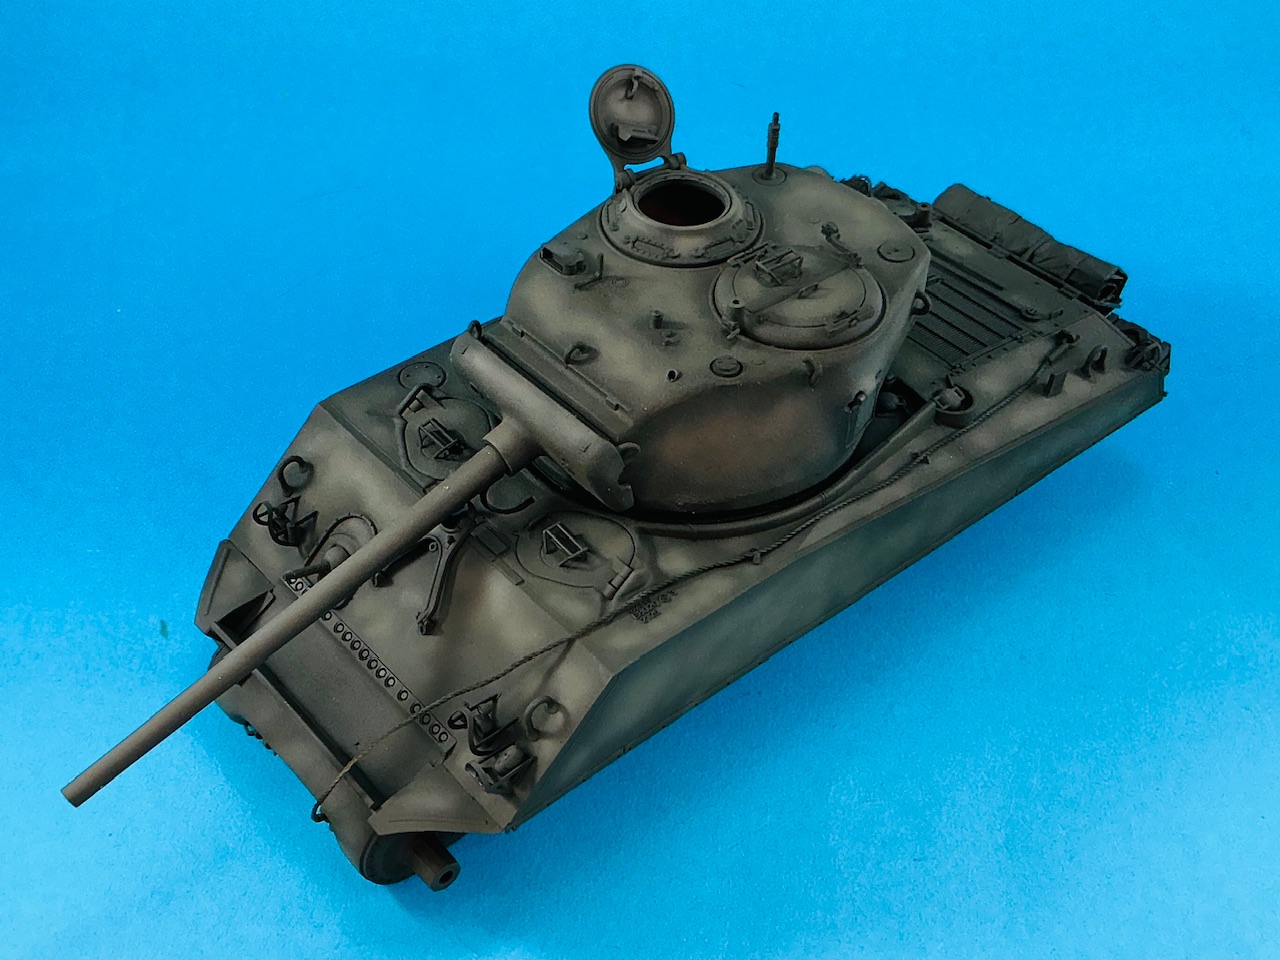
I first sprayed lighter patches in my usual manner, and then added a bit more XF-88 to enhance the highlights on the horizontal surfaces and towards the top of sloping ones.
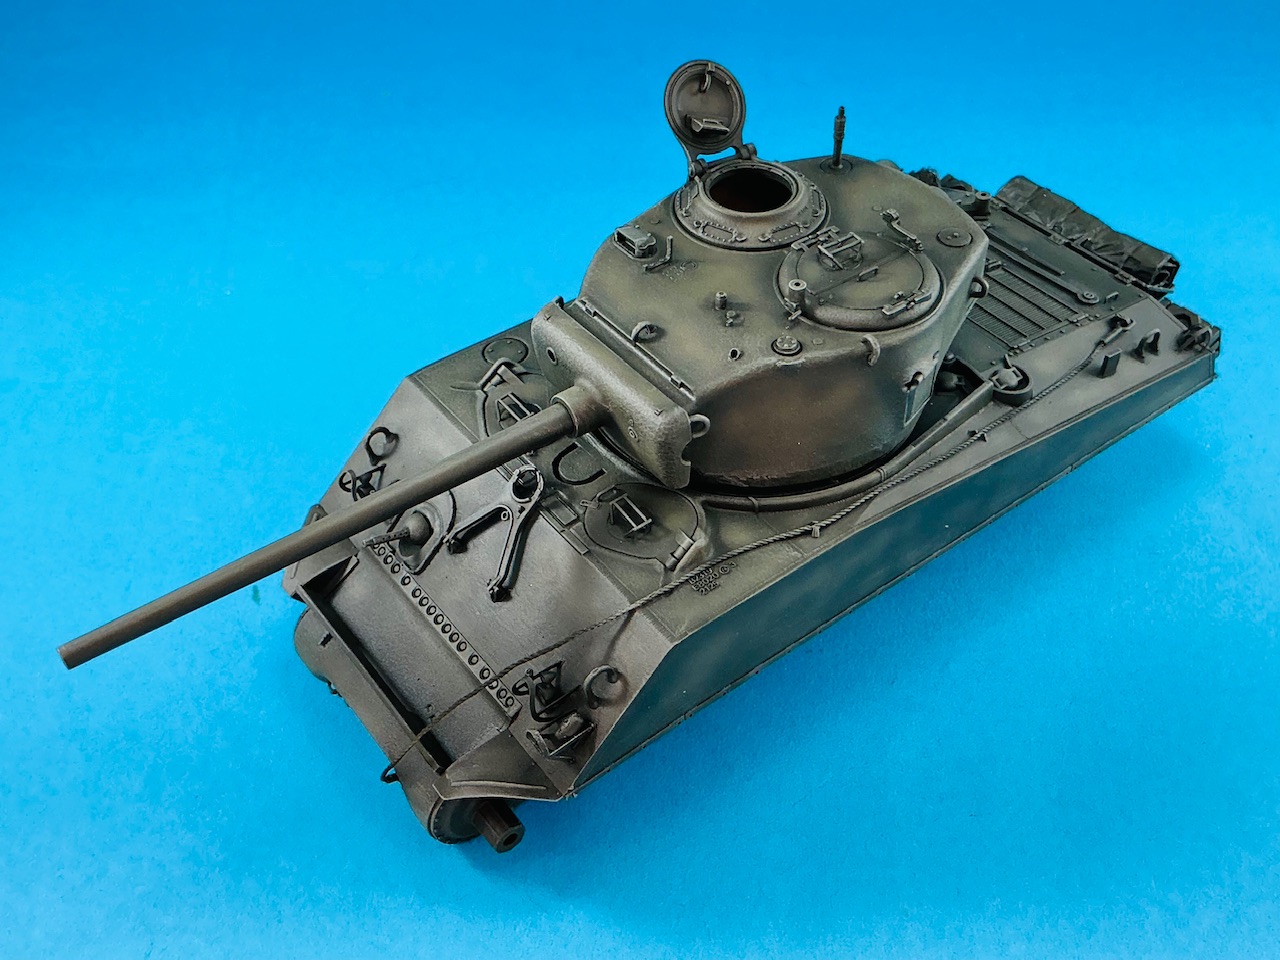
The gun has now also been installed, but it falls forward because it can freely pivot on the pins that go in from the outside. After taking the photo, I glued a bit of sprue along the bottom on the inside to fix the gun with the barrel more or less horizontal. (The kit includes a full breech, but I didn’t fit that — maybe it would have balanced the gun if I had?)
5 Likes
Champagne has now had a wash (thinned Army Painter Soft Tone) and two layers of drybrushing (first with AK 3Gen olive drab and then with Revell Light Olive):
Then came the markings, by Star Decals:
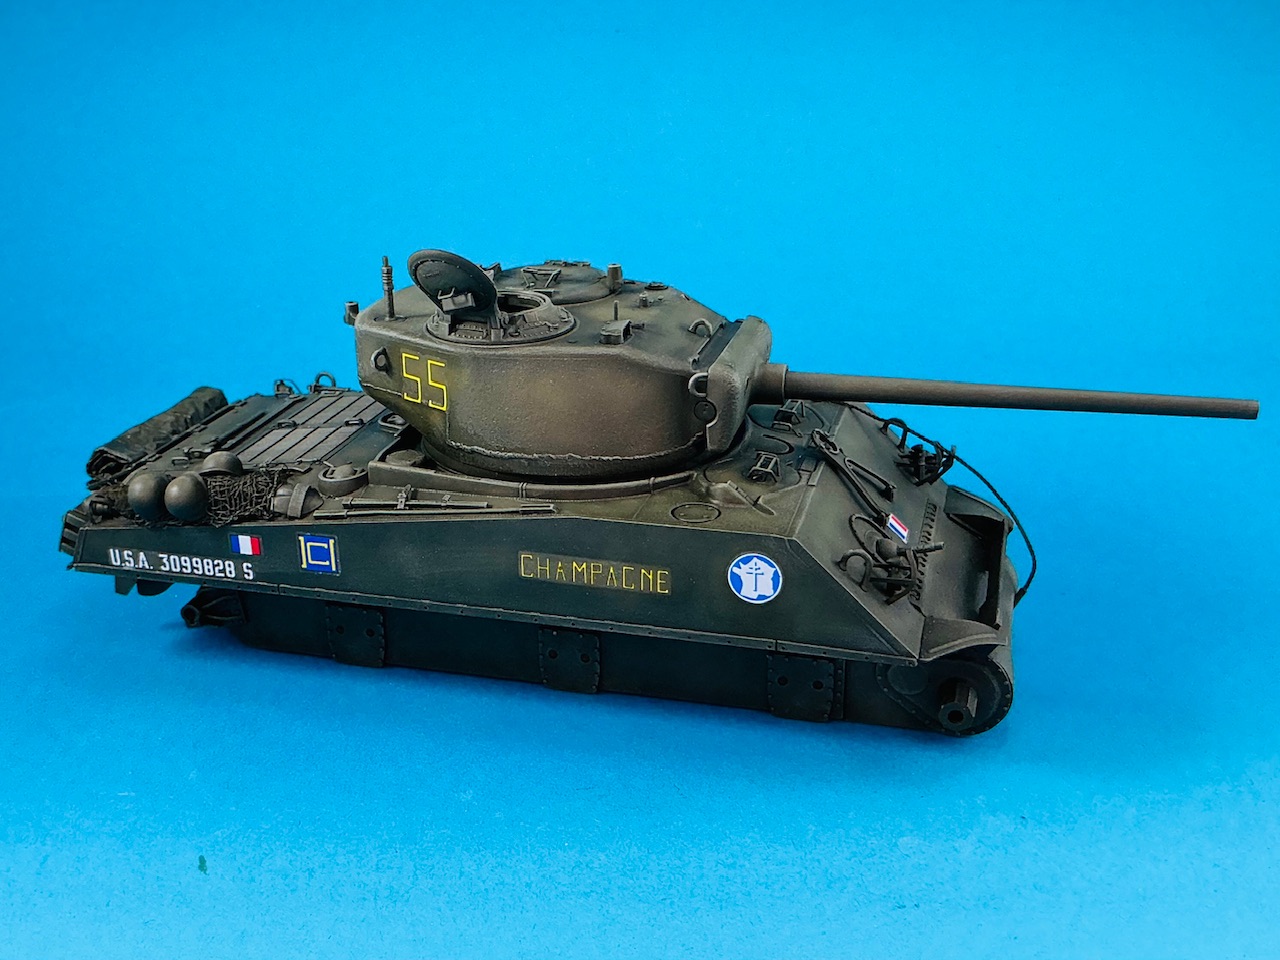
And indeed, silvering … Someday, I’l really need to learn to try first with a decal I don’t actually need, but it’s too late for that now. Other than that, the markings aren’t totally accurate: the letters of the name are too thin, the registration number is too wide, the blue squares on the sides a little too large, the white border shouldn’t be around the flag on the glacis plate and Star Decals gives you two more blue squares, matricules and a weight class disc, all of which were not on the real tank (and so are also not on my model). But these will have to do.
5 Likes
Looks darn good Jakko.Real shame about the airbrush woes.Its been slightly cooler in our flat thankfully and ive done a bit to a Leopard.My wife bought me a cordless airbrush a couple of years ago and not used it yet.This one has 4 settings for pressure and i believe it can go to 15 PSi.So im hoping it may be useful and has a trigger set up.Might be good for basecoats if not fine enough for fine shading etc.
3 Likes
You can always test it on that Leopard — that’s why I sprayed this whole model with mine, to see how it behaves for real work instead of just spraying random stuff on a piece of paper ![]()
3 Likes
It looks great Jakko, love the finish so far. Your brushing really brings out the details and is nice a subtle.
2 Likes
I like the tones you have created on this Jakko- an interesting and realistic paint job.
2 Likes
Those replies are funny if you know that someone else said, and I quote, “As it looks now it can go straight into a Verlinden’s Way book” ![]()
1 Like
Jakko!!! I love your airbrush woes. I had to look up what 30 degree celsius was…86 Fahrenheit. I live in Arizona and right now, at 12:30 in the afternoon, it’s only 101 with 13% humidity. Maybe it’s the airbrushes these days. I bought a new Paasche about a year ago and it’s worthless. I have owned 2 Paasche VL’s over the last 40 years that were worked to death. Oh…I also spray in my garage in the middle of summer where some days are 115 degrees. It’s hard to keep sweat balls off the surface sometimes.
On a final note, I haven’t sprayed anything in a few years. My go-to paints were Tamiya acrylics and Model Master enamels and never had any issues with paint drying too soon after leaving the brush.
Jeff
2 Likes
I don’t ![]()
I had to ask Spotlight how much 115 degrees Fahrenheit is …

![]() Rather you than me, that kind of temperature …
Rather you than me, that kind of temperature …
It’s mainly an issue with water-based acrylics, in my experience. With Tamiya acrylics, I don’t remember ever having that problem either, and with Mr. Aqueous — which are alcohol-based like Tamiya — that I’ve begun using in recent years as well, I’ve also never had it.
1 Like
I am going to miss my MM enamels when they are finally gone. I have always thinned my Tamiya with 70% alcohol or Windex glass cleaner and no problems. I think when I get to the point of spraying again, I am going to try the AK Realcolors line. Since I don’t use the water based paints to spray, maybe that’s why I haven’t had issues.
Here, we have two seasons, hell and late spring/early fall. Half the year it’s hotter than the surface of the sun and the other half is about 40 (4.44) at night and 65 (18.33) in the day. That ain’t a bad trade off.
Jeff
1 Like
I’ve got a fairly extensive selection of old Humbrol enamels (as in: from last century, before they changed the formula and made the paint not as good) that I use sparingly when I think they make a difference.
AK Real Colors are lacquer-based acrylics, though, and don’t handle the same as Tamiya alcohol-based acrylics. I tried Mr. Hobby lacquers a few years ago and couldn’t get along with them, so I gave away the bottles I had of it. The thing with paint is that for every type or even brand, you get as many people who swear by it as who swear at it ![]()
4 Likes