Very fine detailing Joel.
Michael, Russelle, & Jesper,
Thanks so much guys for your big thumbs up on my Lotus build, all of you made my day for sure.
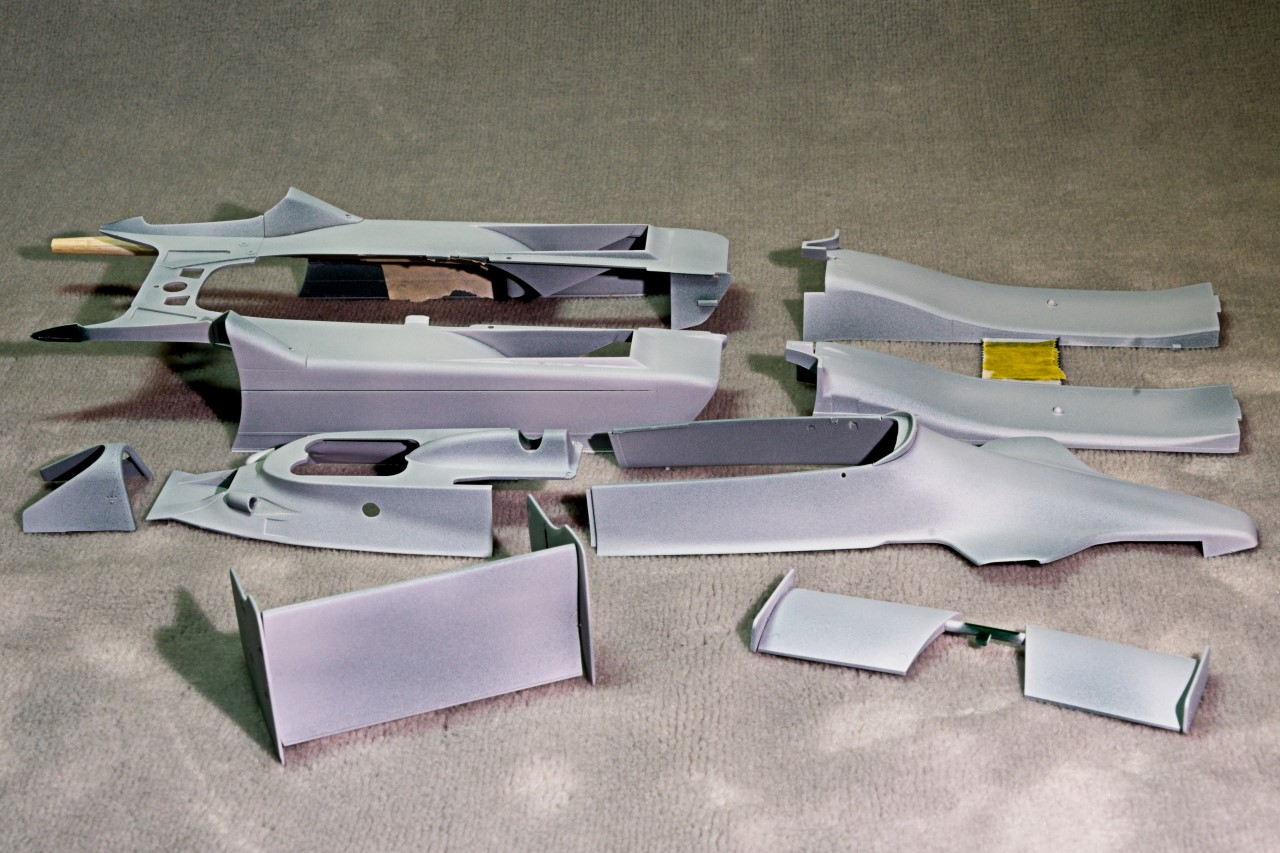
As for the body, it’s a multi piece assembly with 5 main sections, with the top two needing to be removable, but all need to be painted separately as they actually wrap around the chassis and then layer up. I’ve test fitted them as i construct and or prepare each one to make sure that the fit is perfect. If not, I gently sand and shape till it fits in place with no effort or force. The issue is once priming, painting, decaling, and clear coating takes place, I’m really concerned that I’ll have fit issues. I’m thinking of taping or even tack gluing as many of these sections together through the entire process. I’m not very fond of sanding and scraping paint and clearcoat off as chipping then becomes an issue. Then for me there’s the dreaded thought of missing with the Tamiya Extra Thin and hitting the finished body panel, ruining the finished body panel. This I’ve managed to do on multiple occasions.
joel
1 Like
Ken,
Thanks for your thumbs up, as it’s greatly appreciated.
joel
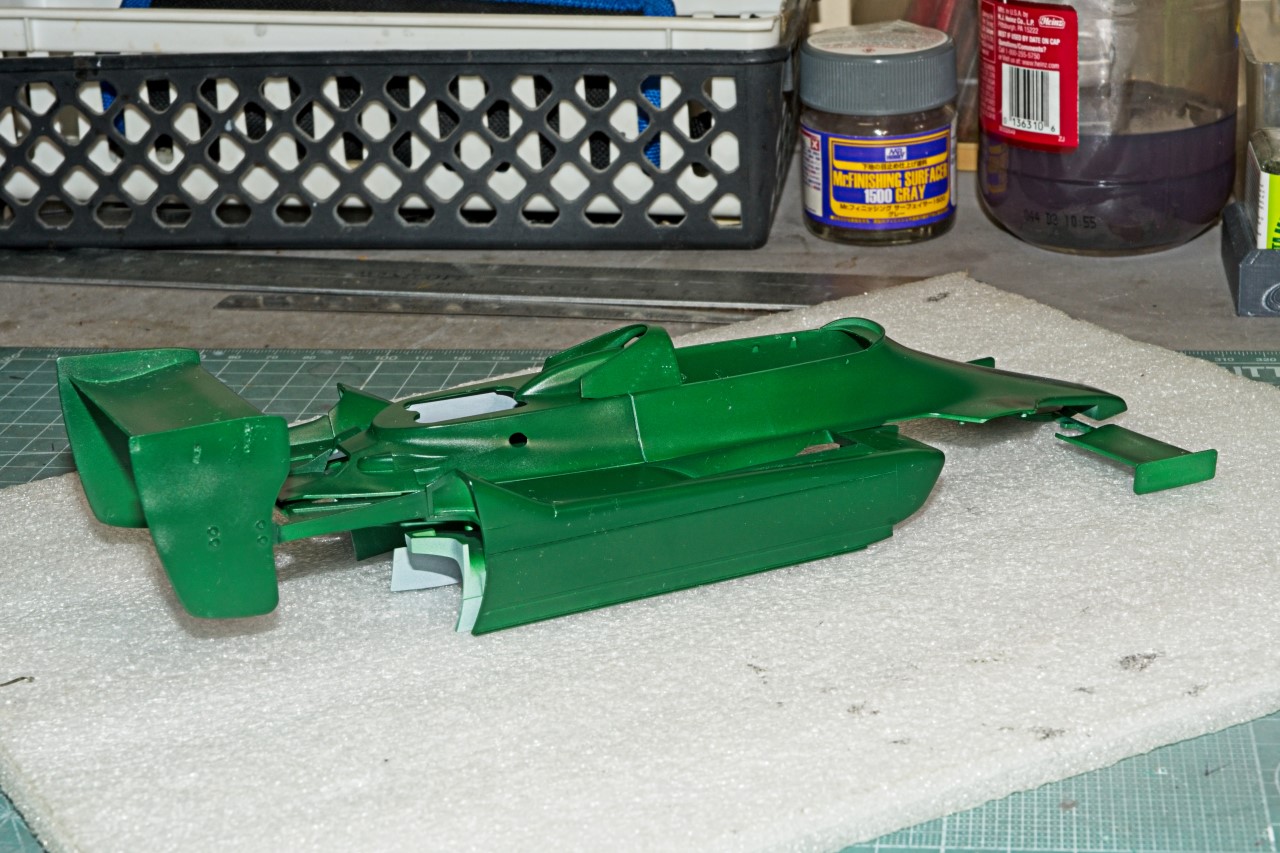
Since my last update I’ve focused on getting the body and wings ready for priming. Tamiya made the body counting both the front wing, rear wing and roll bar 7 sections. Surely it was Tamiya’s intent for the modeler to be able to display the aluminum chassis with cockpit, and the engine/transaxle and rear suspension at one time or separately. Seemed like a great idea, but as I’ve once again found out, there’s all sorts of issues and pitfalls that need to be dealt with, or a different plan to formulate.
The bottom of the body is all one piece that fits like a glove. Tamiya designed it you have two small tabs on the side for alignment, while a section of what in real life is a one pc bottom to the chassis has a very large notch in it for a cross member attaching both spontoons. The fit is excellent but the seams do show. And since the assembly takes place after painting and decaling, the seams are there to stay. Fortunately for me, the model will be in it’s own plastic display case and never turned over. The top of the body does have the front air intakes and the radiator air intakes as separate pcs. The radiator ones each ended up having a slight step that needed attention. Once dealt with you never guess that they were separate pieces. Same for the front air intakes. Both were most likely caused by my poor alignment.
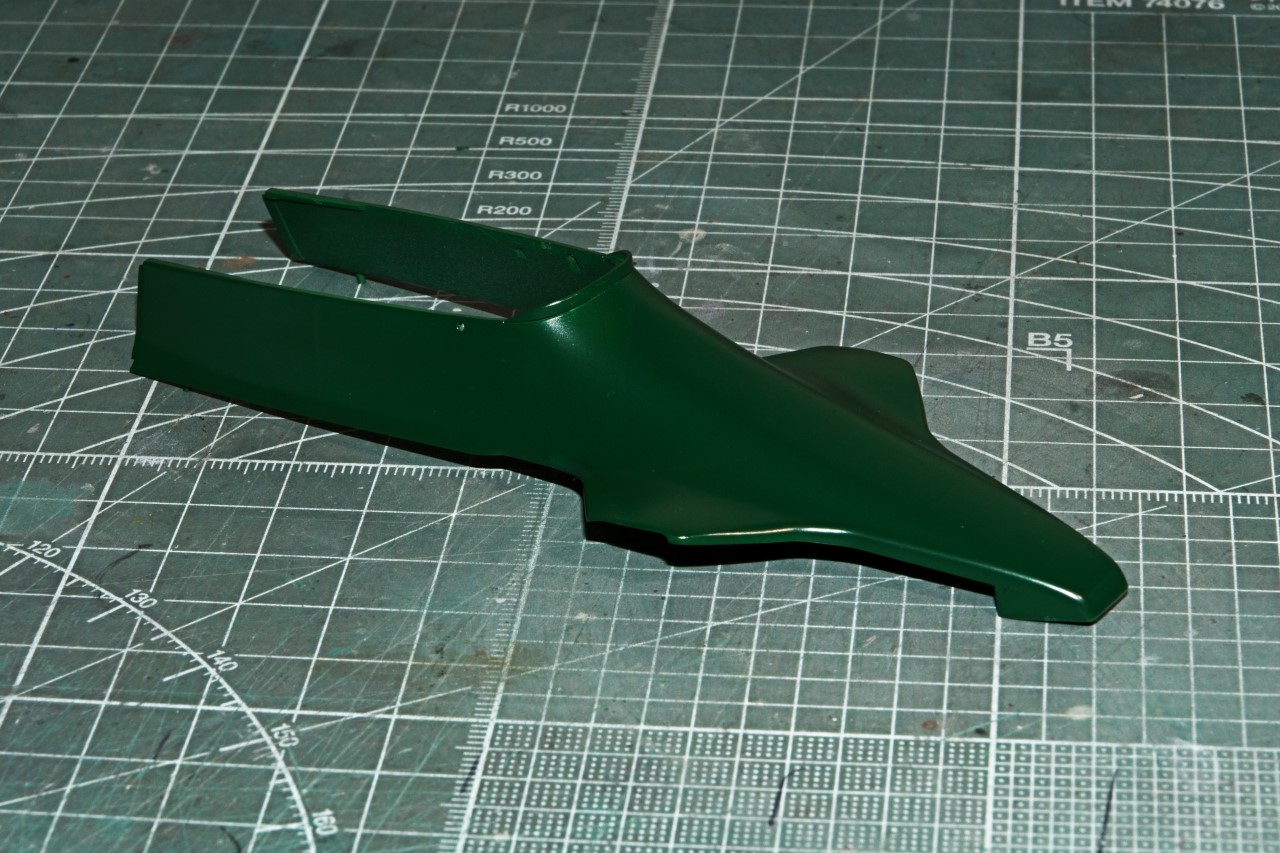
The front wing just needed the side plates glued into place, while the rear wing has a top and bottom which needed putty work to remove the seam. The side plates are huge, and Tamiya’s small lips on the ends of the wing that go into notices in each side plate just didn’t allow me to properly align them. The end result was excess glue on the plates from misalignment issues by yours truly. So I ended up re-sanding and re-polishing the plates two more times. Finally I just gave up and went with the time tested home made pins for proper alignment. I used the molded in wing adjustment for the back holes, then temporally attaching the plates, I drilled the front locating holes. Unfortunately, I totally forgot to take any pictures.
All the parts were cleaned with Iso Alcohol, then just prior to priming a wipe with a tack cloth.
Priming was with my homemade mix of equal parts Tamiya Gray and White primer, thinned with a 1:1 mix of Mr. Leveling 400 Thinner, and air brushed on.
And here’s the complete body dry fitted including the front wing just tucked under the nose section.
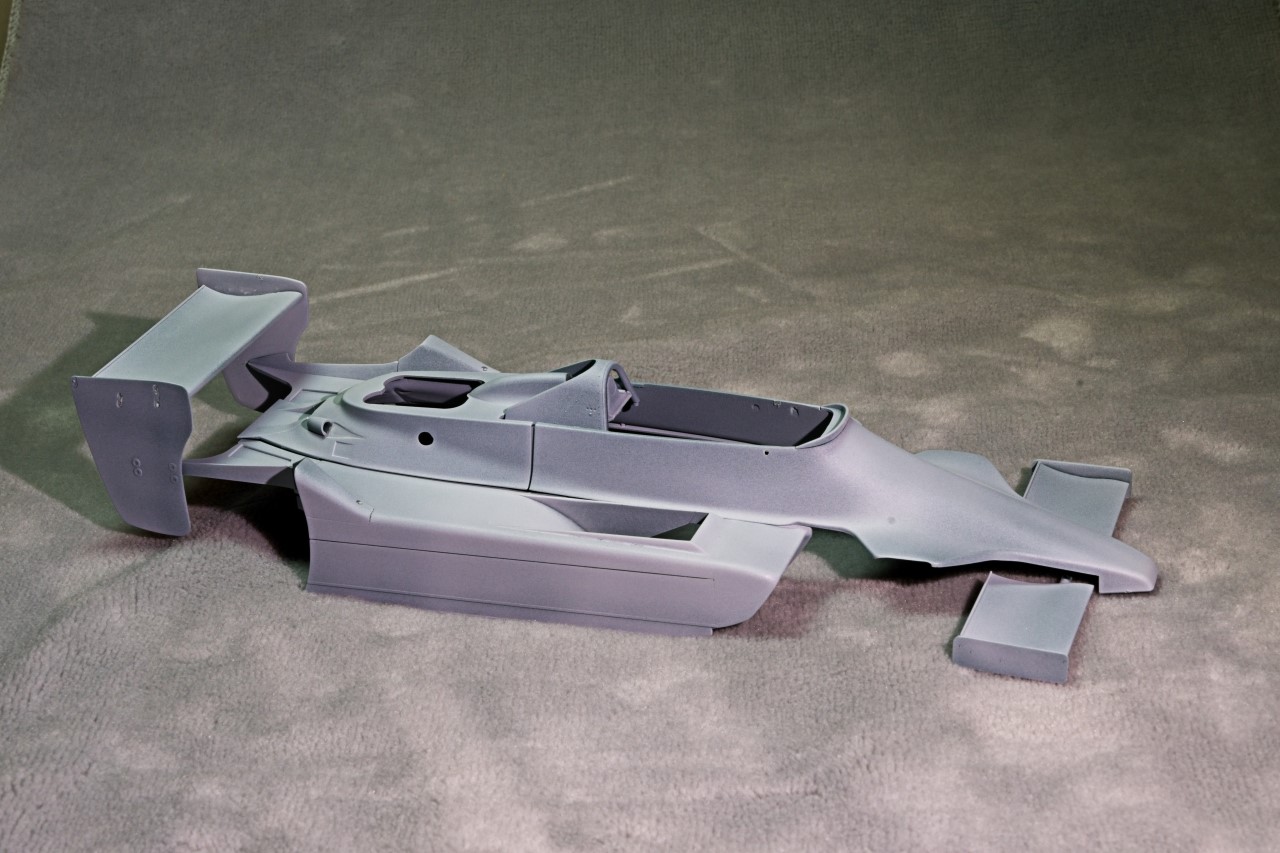
Next up is light polishing the primer coat with # 3000 Tamiya sponge, and then back into the paint booth for the color coats.
joel
4 Likes
Looking forward to your usual stellar paint & decal work Joel !
Richard,
Thanks so much for stopping by, and naturally your vote of confidence in the upcoming paint and decaling, which are by far my favorite part of modeling.
I’m still waiting for you to start your epic bike build.
joel
Update: Basic Color Coat
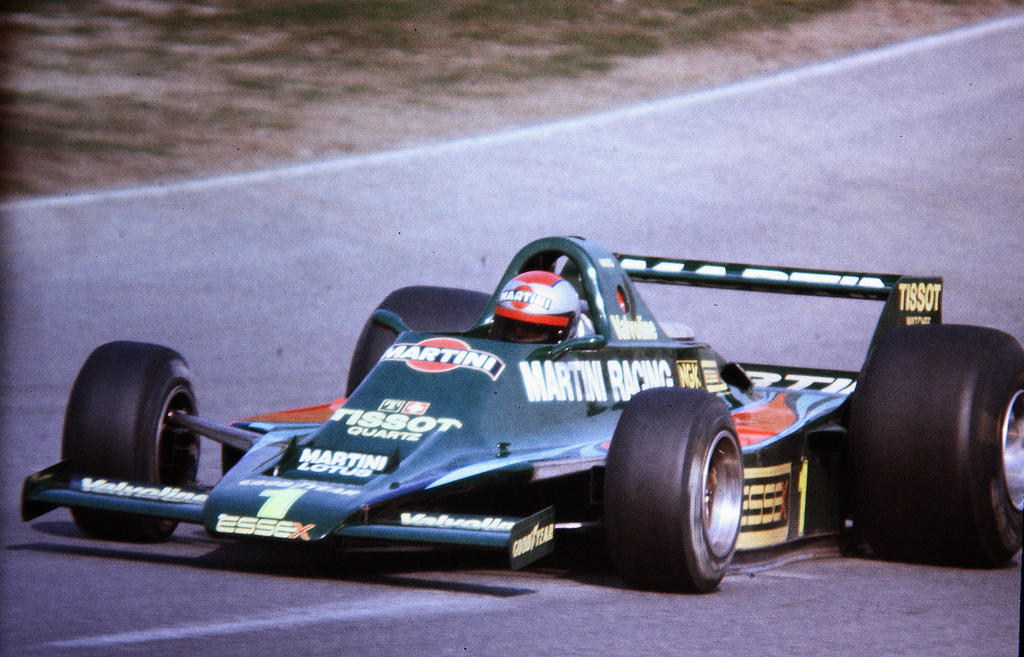
For this build rather then using Gravity BRG as that’s what I originally thought that the basic Green color was. I doubled checked the Gravity site and sure enough they had the specific Color I needed: GC1177 Lotus Martini Racing Green. It’s definitely a few shades lighter then their British Racing Green.
I must have spent a good few hours on Google to try and figure out the correct color, but it was just about impossible. Restorations varied from BRG to some really bright and to light shade of Green, and all but one picture of the car is a restoration. I got lucky and found a few pictures of what is labeled as Mario Andretti driving the actual car with his correct helmet but that doesn’t mean it’s from 1979. The color after all these years is darker then the Gravity paint, but that’s what I went with, as the pictures could have been color enhanced or corrected over the years. And I figured that Gravity would be darn close to dead on.
Here’s two pictures with all the sections just quickly dry fitted straight from my drying bin. I used the flash on my camera for these garb shots, and the color looks much brighter then it does in person. Sorry for the few sections that are clearly not correctly aligned.
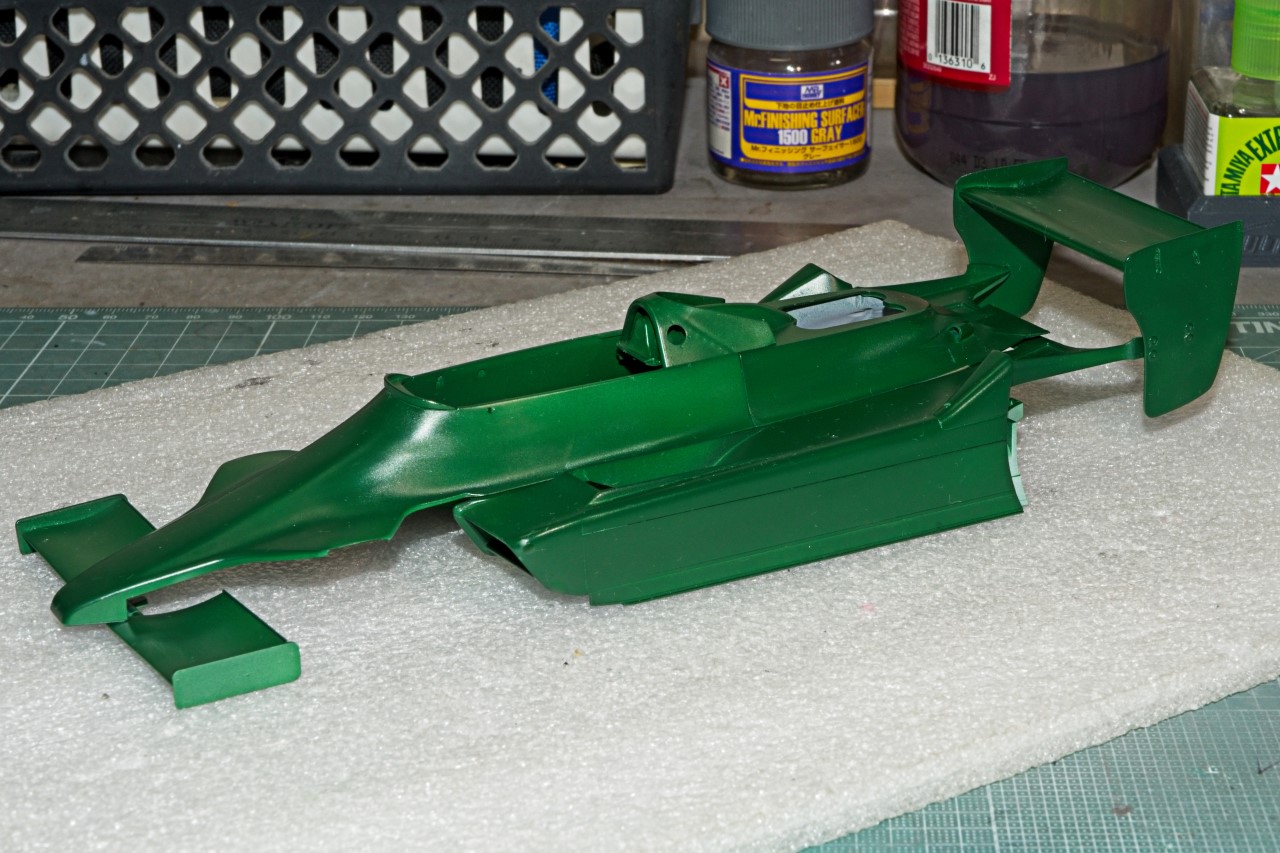
Up next is a lite polishing with Micro Mesh 6,000 & 8,000 so I can start the decaling process.
joel
5 Likes
Coming along nicely. I like the green. Working off of old color photographs can be quite difficult & headache inducing.
Jim
Thanks Jim for stopping by and checking out my progress to date. It’s always much appreciated.
joel
love the green 
Russelle,
Thanks for stopping by and checking out my progress to date. It’s always much appreciated.
joel
1 Like
Definitely a near-impossible task Joel. The same car on the same day, from one hour to the next in different light conditions, or photos taken from opposite sides, will look completely different.
Your paint job on the body looks great. Once you’ve polished it up and applied the decals it will really shine!
Cheers, D
I agree with Damian. No one will be able to argue with you on this one.
I like the Lotus 79 in green almost as much as in black and the Martini stripes on it will look great.
cheers
Michael
D & Michael,
Thanks guys for those most assuring words and thumbs up. But I’ve run into a major decal and then paint issue that has stopped me right in my tracks.
I’m using Indy Cal decals as I’ve done for years. I polished out the paint with 6,000 then 8,000 Micro Mesh and it was really pretty darn smooth. I keep all my decals by type/class is Zip Loc bags, so humidity has never been an issue. Pulled out my Indy Cal 1979 Lotus Type 79 decals, got my decal setup ready on my bench, and since I’m only across the hall from the main bathroom, I use warm tap water to soak my decals in.
Started off decaling the famous Martini body stripes over the spontoons into the radiator intakes using my long time procedure of Microsol under the decal, move the decal into position, then on the decal and let is start to work, When it’s just starting to dry I gently roll the decal with a Qtip to remove air and solution under the decal, remove wrinkles, and set the decal. Then Comes MicroSet. Same procedure, finally a light coat of Solvaset. When it’s dry, the decal is perfect.
The issue that stuck up it’s ugly head is that any decal with clear film quickly wrinkled and stretched as I tried to remove the wrinkles and set it. Took a lot more work as I barely touched the decals with just Sol on them.
Slowly the decals went down one by one. When I got to the large side white Martini Racing decals, the 1st one ended up with wrinkles that just wouldn’t come out, so I tried to remove it with Sol and water but it wouldn’t budge. So being the dump ass that I am, I picked at it to get a corner up, Got it up, but damaged the paint.
Fortunately for me, this was the 1st decal that goes on the top section of the body. I regrouped, sanded and polished both spots. Will prime to day and color coat tomorrow. I didn’t strip the paint off the rest of the top section as it’s perfect. I can’t see any reason why additional coats to blend in the patches wouldn’t stick .
In the mean time I’m trying to figure out why I’m having so much trouble moving and setting these decals as I’ve never had these issues before.
I also reached out to Michael at Indy Cals, and he looked up when I bought this sheet, it was 3 years ago. He said that more then a year, the sheet can start to dry out. Honestly, I just don’t agree with that. The issue has to be on my end.
So what do you guys use under a decal to move it into position and do the final adjustment? I’m thinking of going back to the old standard of just plain warm water with a drop of Dawn to finish decaling. Oh by the way, Michael is sending me a replacement decal for the one I ruined via his Oops program.
joel
1 Like
Outstanding customer service, that’s how you run a business!
I’m sorry to hear that you’ve hit a snag there Joel, very frustrating when a tried and true system fails for no obvious reason. I haven’t used the MicroSet/Sol products so I can’t comment there. I use the Gunze Mr Mark Setter and Softer, and just add a bit of warm water from the bowl on a paint brush if I need to relocate a stubborn decal once it’s down. I find I can usually lift an edge and sneak the wet brush under which floats the decal slightly.
I hope the next run at it goes more smoothly!
Cheers, D
D,
Thanks for the support. Trying to nudge a brush with water under the decal was my undoing. My rush ruined the paint job on that one section. So as I said, it’s back to the paint booth.
I also have Mr. Mark Setter and Mrs. Mark Softener (  ) which i use for the older Asian super thick decals. These days the decals are getting thinner and thinner, requiring some modification to my procedures.
joel
That’s bad luck Joel! I pretty much use your method for decal placement though I do find it varies amongst manufacturers. If I haven’t used particular brand before I usually practice with a decal I can afford to lose and that may be the biggest one sometimes like a single band of colour.
And it is great customer service. Is IndyCals Oops service free? That would be amazing.
cheers
Michael
Michael,
Indy Cals Oops program is free. It’s one free decal replacement no matter how bad you screwed up. As I just found out it’s only for one year, but since I’m a customer for years, Michael knows me, and that I buy decals when I get a kit, but might not build it for years. My total Oops replacement decals is just 3 and I’ve bought more then 3 dozen sheets from him.
Joel
very beatiful model! complinment for the detailing
i continue make tanks
Ken,
Thanks for the support. I’ve worked out the issues with the Indy Cal decals and stopped using straight Micro Set (Blue) under the decal as they just seem to grab hold and won’t slide. The wrinkles I figured was a by product of that issue.
So I modified my procedure and used warm tap water mixed 4 parts water to 1 part Micro Set and a drop or 2 of Dawn dishwashing detergent. as my surface wetting agent. Issue solved.
Next I turned my attention to the scratches I created trying to remove that decal. I sanded down to the plastic, then featured out the surrounding paint, primed with my home made Tamiya primer mix, and it got to this stage:

I over did the masking just to keep the over spray in check, but the important thing is that neither mark showed. Next day i repainted the whole cockpit section 1st with a few tack coats over the primer, then all told 4 lite color coats. Came out looking darn good.
Will give it two days to dry and cure, then start to decal it. Of course I have to wait for the replacement Indy Cal is sending. And naturally, we’re due for our 1st Hurricane Early Monday into Tuesday, so who knows when the replacement decal will make it, and more importantly, in safe condition.
joel
5 Likes