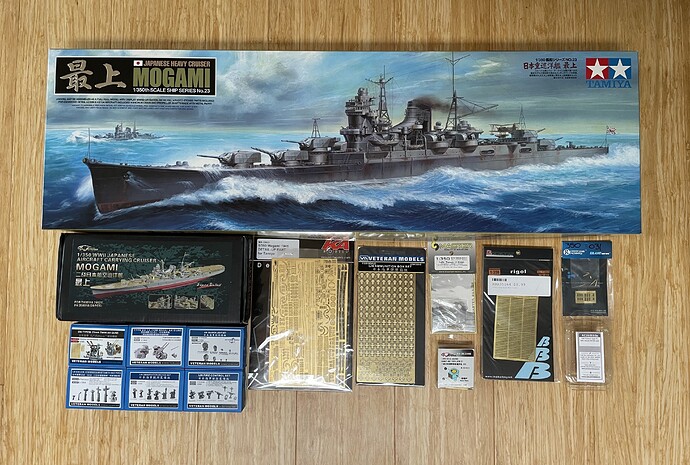
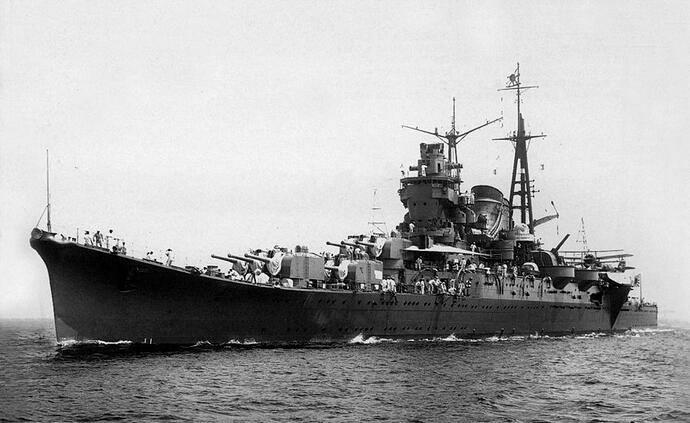
Tamiya 1/350 IJN Heavy Cruiser Mogami (as Mikuma)

Greetings shipbuilders :wave: It is time to embark on a new project I have been planning for many months! This will be my first model ship in about 15 years, and the first one with an appreciable level of detail (last ship model was the Lindberg HMS Hood when I was 8). As a newbie to the subject matter, any tips, comments, constructive criticisms are appreciated and encouraged.

The subject: IJN Mogami [最上], circa 1942 en route to Midway.

This subject was initially chosen out of a fascination for the design aesthetic of imperial Japanese warships, especially the upswept bow, linoleum decks, and unique funnel shapes.

A brief historical background from Wikipedia:

“Mogami (最上) was the lead ship in the four-vessel Mogami class of heavy cruisers in the Imperial Japanese Navy. She was named after the Mogami River in Tōhoku region of Japan. The Mogami-class ships were constructed as “light cruisers” (per the Washington Naval Treaty) with five triple 155 mm dual purpose guns. They were exceptionally large for light cruisers, and the barbettes for the main battery were designed for quick refitting with twin 8-inch guns. In 1937 all four ships were “converted” to heavy cruisers in this fashion. Mogami served in numerous combat engagements in World War II, until she was sunk at the Battle of Leyte Gulf in October 1944.

Built under the Maru-1 Naval Armaments Supplement Programme, the Mogami-class cruisers were designed to the maximum limits allowed by the Washington Naval Treaty, using the latest technology. This resulted in the choice of the dual purpose (DP) 15.5 cm/60 3rd Year Type naval guns as the main battery in five triple turrets capable of 55° elevation. These were the first Japanese cruisers with triple turrets. Secondary armament included eight 12.7 cm/40 Type 89 naval guns in four twin turrets, and 24 Type 93 Long Lance torpedoes in four rotating triple mounts.

To save weight, electric welding was used, as was aluminum in the superstructure, and a single funnel stack. New geared impulse turbine engines, driving four shafts with three-bladed propellers gave a top speed of 35 knots (65 km/h; 40 mph), which was better than most contemporary cruiser designs and the Mogami class had twin balanced rudders, rather than the single rudder of previous Japanese cruiser designs.

The class was designed from the start to be upgraded into heavy cruisers with the replacement of their main battery with 20 cm/50 3rd Year Type naval guns in twin turrets.

However, in initial trials in 1935, Mogami [最上] and Mikuma [三隈] were plagued with technical problems due to their untested equipment, welding defects, and also proved to be top-heavy with stability problems in heavy weather. Both vessels, and their yet-to-be-completed sisters, Kumano [熊野] and Suzuya [鈴谷] underwent a complete and very costly rebuilding program. Once rebuilt, the design, with its very high speed, armor protection, and heavy armament was among the best in the world during World War II.”

And some additional information off of the top of my head: :thinking:

The Mogami had the distinction of probably achieving the most effective torpedo run in history at the battle of Sunda Strait, launching a spread of 6 torpedoes at HMAS Perth and USS Houston. The torpedoes missed and sunk 4 friendly transport ships and a minesweeper.

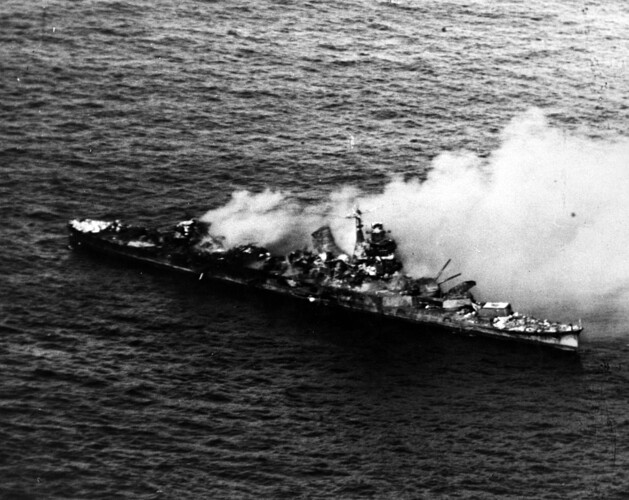
Mogami collided with its sister ship Mikuma during the nighttime retreat from Midway, losing half her bow and crippling Mikuma in the process. They were caught by American dive bombers the next day, and Mikuma was sunk. The seriously damaged Mogami limped back to Japan and was modified into an aircraft carrying cruiser.

Mogami was present at the scene of the spontaneous detonation of battleship Mutsu’s magazine at Hashirajima, and helped rescue survivors.

During the retreat from the night battle at Surigao Strait, the cruiser Nachi collided with Mogami, flooding Mogami’s steering room and causing her to fall behind. The Mogami was caught by American carrier aircraft the next day and abandoned, then scuttled by the destroyer Akebono.

The wreck of the Mogami was discovered by RV Petrel on May 8, 2019.

The model:

Tamiya is the only option for a 1/350 Mogami class cruiser. I picked the 1942 version as I’m not a fan of the aircraft cruiser aesthetic.

I have also acquired the following aftermarket parts:

MK1 Design “Photo-etch Detail-up Set” IJN Mogami (1941)
Flyhawk WWII IJN Aircraft Carrying Cruiser Mogami “Super Detail” (1943)
Veteran Models IJN 6cm, 8cm, 12cm Binocular set with Voice Pipes
Veteran Models IJN Fire Control Set
Veteran Models IJN Observation Device Set
Veteran Models IJN Type 96 25mm Twin AA Guns
Veteran Models IJN Type 89 12.7cm 40 AA Guns
Veteran Models IJN Searchlight Set
Black Cat Models 13.2mm Twin AA Guns
Master Model 203mm (10) and 127mm (8) Brass Barrels
Veteran Models IJN Ammunition Box photo etch
Big Blue Boy IJN Rigols photo etch
Flyhawk Exhaust-only Ventilators III
Orange Hobby IJN Type 93 Torpedo (2)

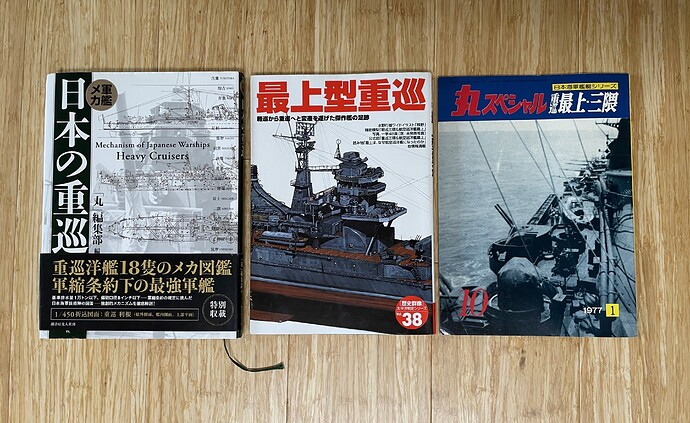
Reference books:

Mechanism of Japanese Warships: Heavy Cruisers
Gakken Pictorial Vol. 38
Maru Special No. 10

Materials I wish I had but can’t seem to get me hands on:

Lion Roar 1942 Mogami Photo Etch
Eduard 1935 Mikuma Superstructure Photo Etch
Super Illustration No. 819 Mogami (2011)
Japanese Cruisers of the Pacific War (1997, L&W)
Plans of Ships of the Imperial Japanese Navy, History of Shipbuilding in Showa Era (1975)

I fully expect this to be a multi-year project full of ins, outs, and what-have-yous, so strap in for a long journey :+1: :+1:

Marty

10 Likes

Count me in on this one Marty - I have the Tamiya Kagero in the stash that is tempting me for a while now and your build will only further whet my appetite.
Cheers- RT

2 Likes

Good to have you along, Richard!

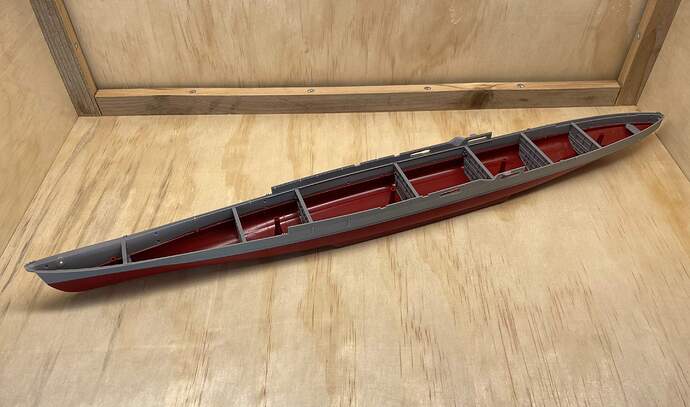
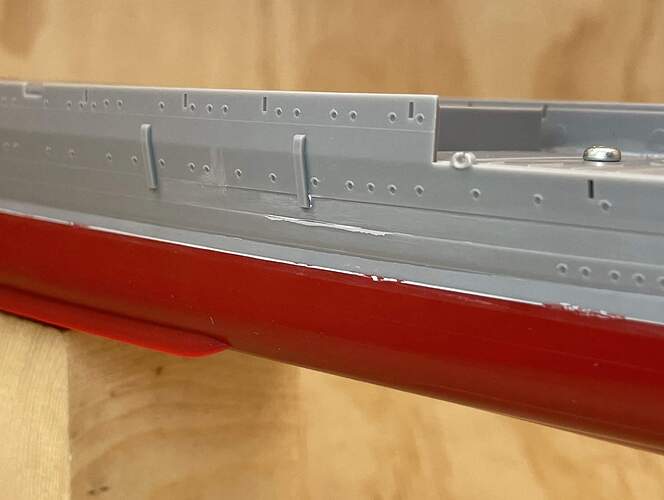
The hull went together cleanly and without any major problems. The hull is 22 1/8” long, so it just fits inside my 24” paint booth I use for taking pictures.

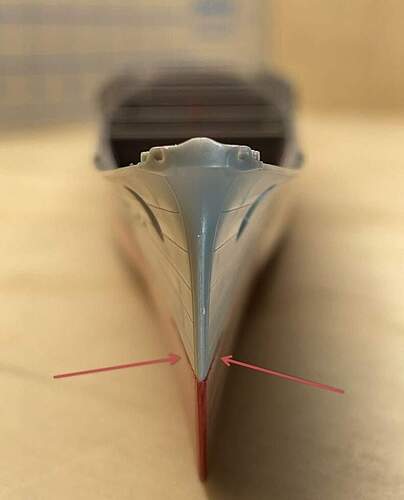
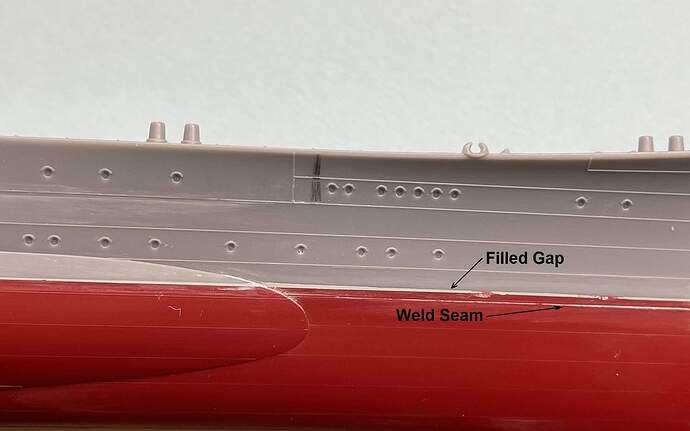
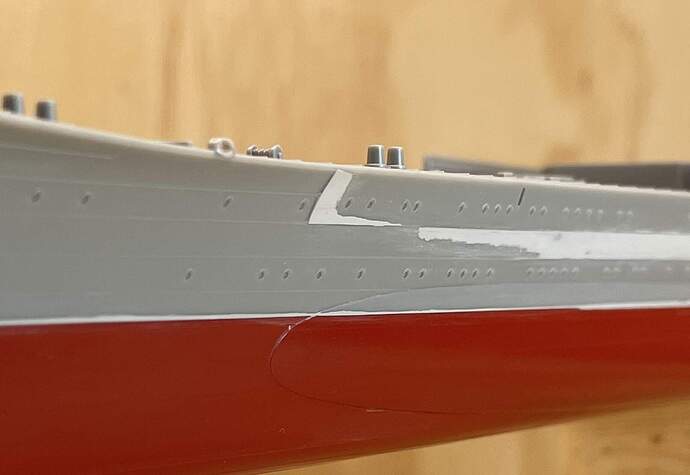
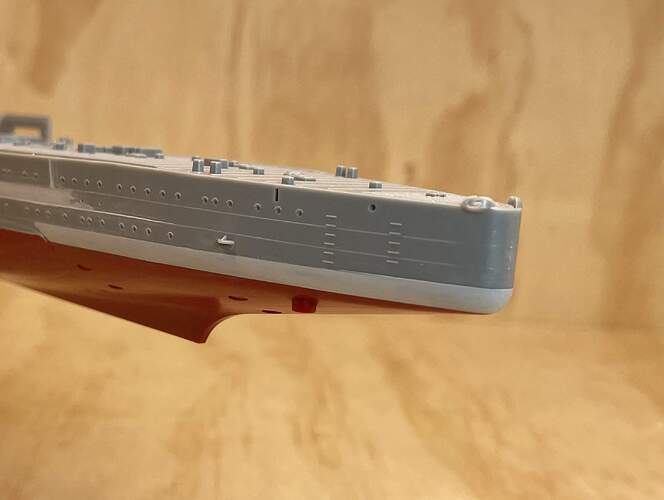
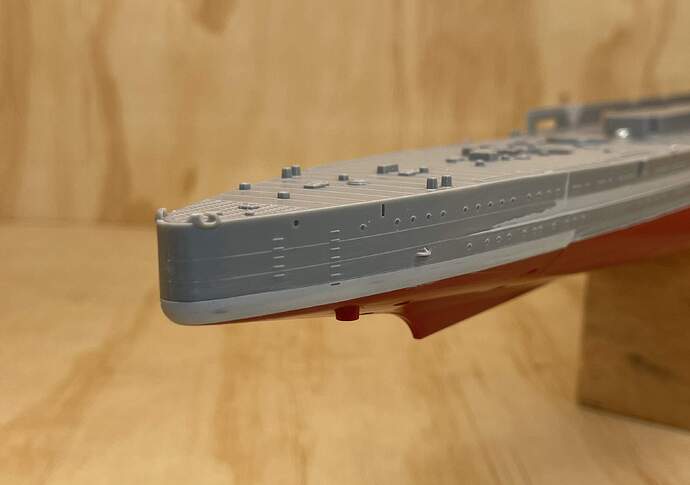
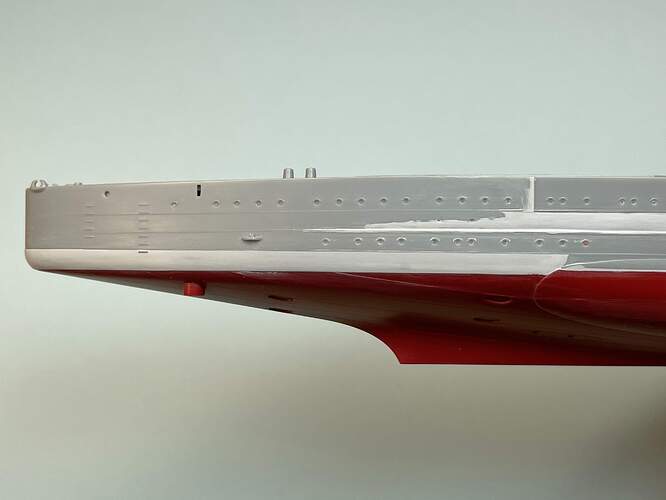
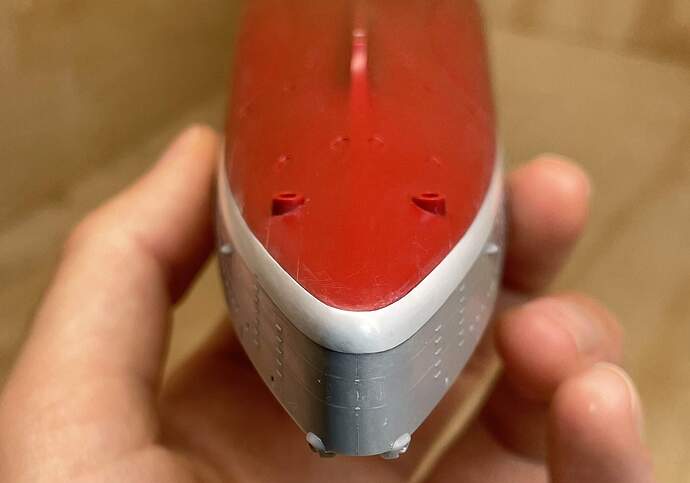
Only hiccups I want to mention involve the bow, and were due more to impatience and my ineptitude working with parts of this size than anything else. I realized after applying glue and mating parts that the lower hull (red) was slightly wider at the bow than the combined upper hull halves. I should have added a thin shim on the inside tab of each upper hull piece to force them to bulge out a bit more proud. As is, there is about a 0.005” lip on each side of the bow that will need to be corrected.

Also I noticed after the glue had dried that the lower bow is bent slightly to port. I will soften the seam with glue and try to muscle it into shape.

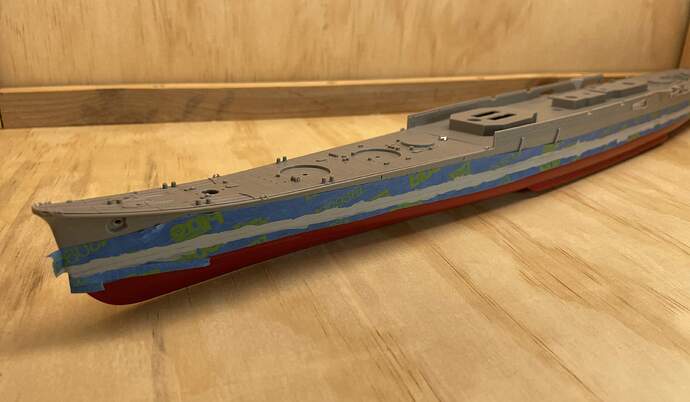
Next I masked off the area around the waterline seam and painted on a thick layer of Mr Surfacer. Deck plates are fitted with screws only to shore up the hull in preparation for sanding and rough handling.

I foresee a lot of sanding in the near future.

Cheers,

Marty

8 Likes

Marty, great choice of kit to re-acquaint yourself with the salty side of the hobby. You’ll notice this kit is a huge step up from Lindberg’s 1/400-ish Hood :wink:

The only tip I have, is not to stress out over whether the fit-out is correct or not: heck, if we as modellers can’t find out the true appearance of these WW2 ships, chances are most casual onlookers won’t be able to either :slightly_smiling_face:

Watching with interest :slightly_smiling_face:

3 Likes

Just don’t sand away those lovely molded plate lines! :flushed:

4 Likes

Hi Russell,

I would say that is always my plan, but it never seems to survive first contact with perfectionism. I spent the past few weeks researching the mid-war porthole locations for Mogami-class cruisers, with absolutely no idea what I was in for.

So… that is to say, too late :wink:

But in all seriousness I won’t stress about it. I suppose the important thing is that the build experience stays enjoyable. The in-depth research of a build subject is something I have come to really look forward to when embarking on a new project. Buying new reference books is half the fun! But as you said, it is important to remember that the casual observer won’t know the difference. (but we will)

Tim,

Yes, I have been careful! Masking tape was applied along the edges of molded weld lines and sanding occurred on the region between. Only two weld lines had to be removed on the bow due the need to recontour the area. I have been experimenting with recreating thin weld lines using masking tape and Mr. Surfacer. So far so good. I am thinking of adding the vertical weld seams on the bow and stern using this method too, as that seems to be a rather glaring omission on the part of Tamiya. They really stand out in some of the higher quality pre-war photographs of the Mogami class.

Cheers,

Marty

8 Likes

Hi all,

Progress on the hull is going swimmingly. Hopefully an update will be coming this weekend, I just need to find the time to take pictures and write something up.

In the meantime I have a few questions that my reference books have not helped with. I think they are sort of general IJN/WWII shipbuilding in scope:

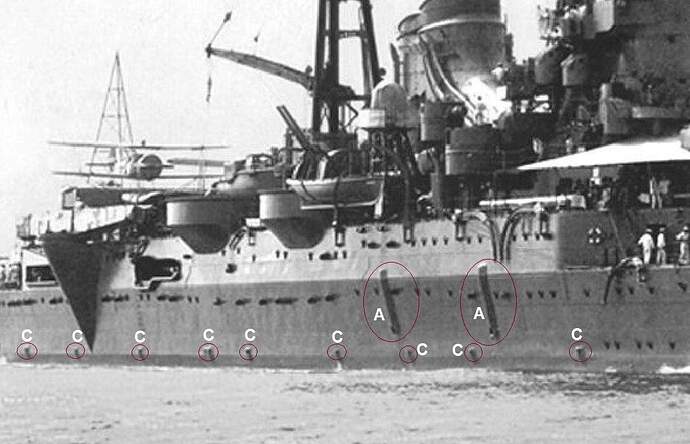
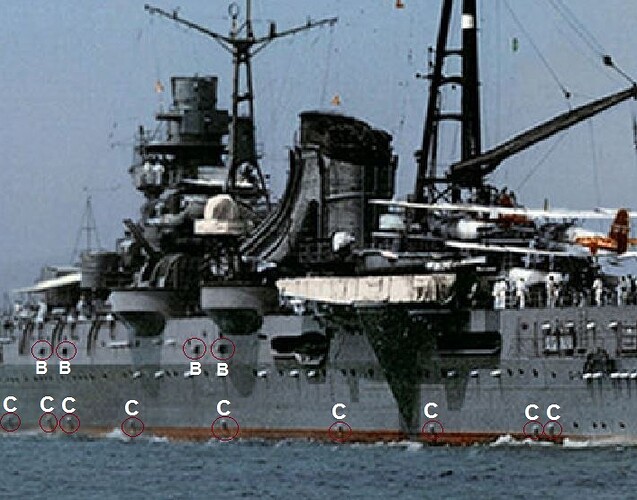
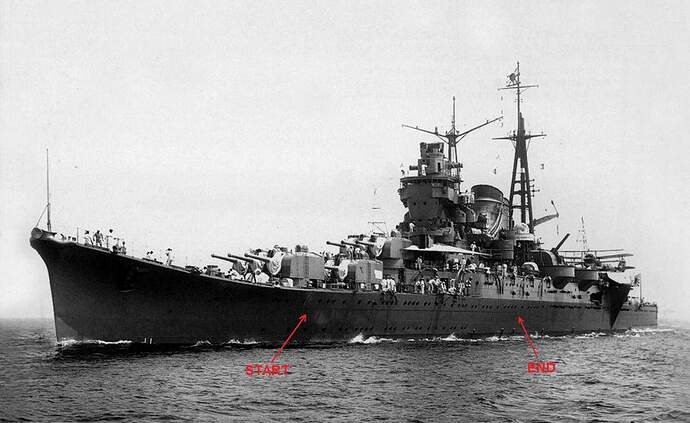
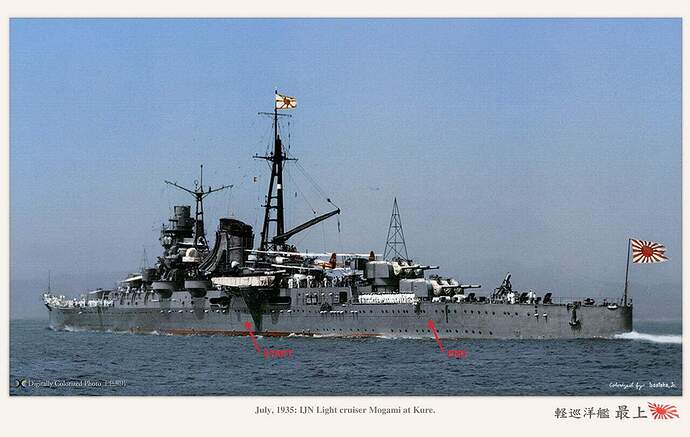
Can anyone help to identify the objects (pipes?) labeled A, B, and C. There are 2 (A) pipes on the starboard side of all Mogami-class cruisers. My resources list them as [塵捨筒], which translates to something like waste/dust discard cylinder, but I’m not sure what that might be. Is it sewage, bilge, trash, etc.?

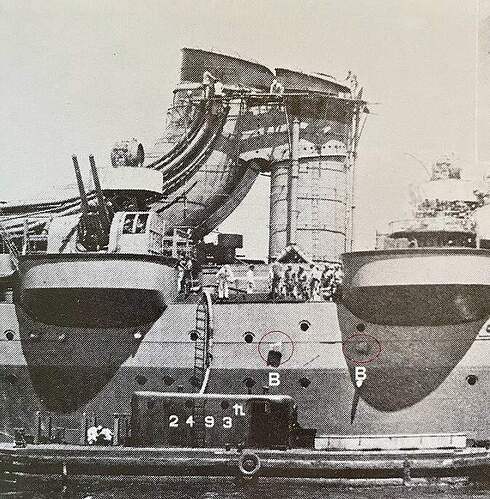
Additionally there are 4 (B) pipes are on the port side. These may be of the same function, but of slightly different form, as the (A) pipes on the starboard side.

Finally there are 9 (C) pipes port and starboard, which I was thinking may be bilge pipes?

Any help would be greatly appreciated, as knowing their function should help me model them accurately, and moreover I am just curious.

Thanks,
:beers:
Marty

2 Likes

Hi Marty,

The “A” Pipes could be really for galley waste. The navies installed the pipes, so that the hull is not spoiled and the waste falls into the sea. As for the others? Some kind of scuppers. Is it sure that “C” are pipes? Could be also some kind of support.

Cheers

Tom

3 Likes

Thanks for the tip, Tom!

I think you are right about the galley waste. At least for the “B” pipes, as some of the galleys were located in that area. As for the “C” pipes: it looks like the word I was looking for was scupper. I did some additional searching and found a whole slew of discussions on other forums about the scuppers on Myoko-class cruisers, which look similar. So it seems that the “C” pipes are in fact scuppers, and are basically very small versions of the “A” pipes. Anyway, I think I have enough information now to add these details.

Moving forward I have three goals with the hull:

  1. Add delineation between different thicknesses of armor plate on the hull
  2. Add vertical weld/plate seams
  3. Adjust porthole positions as needed

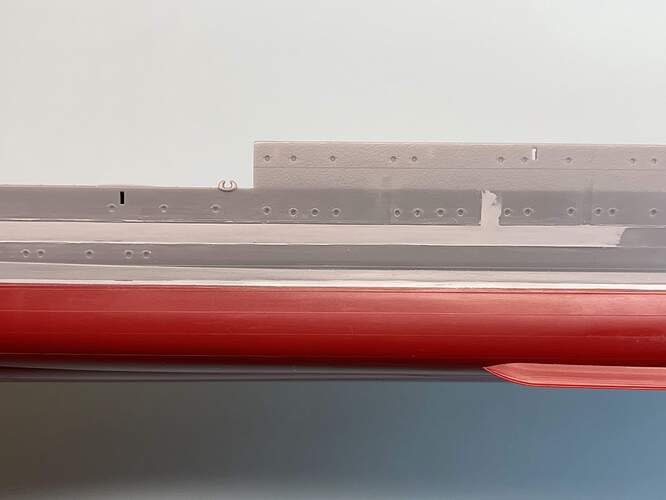
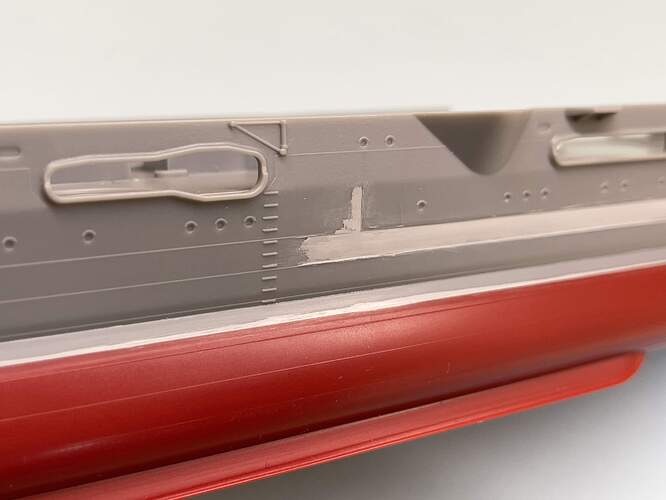
I have been working on the first point for the past week or two. Note the regions of the hull with additional steel thickness: one band forward and one aft on the level of the middle deck. These bands of thick structural plate are visible in the below pictures:

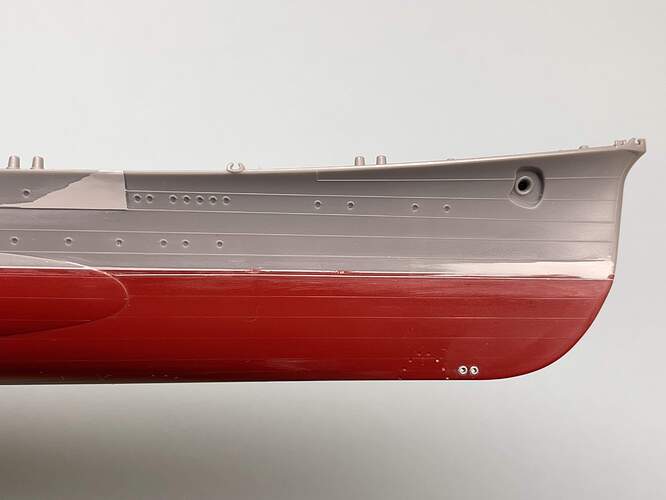
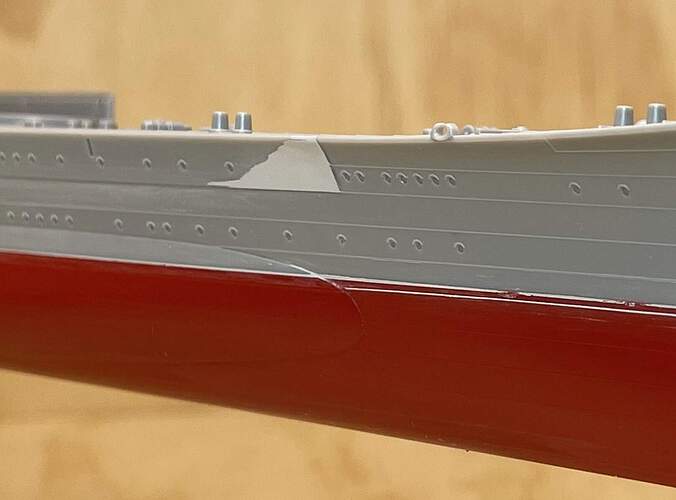
As I didn’t want to disturb the portholes, I decided to carve a shallow channel in the region below the plates of extra thickness. This went smoothly at first, however I carved the last 3 channels too deep (dang chisel bit got dull), so these were filled back in with liberal quantities of Mr. Surfacer, and much sanding :unamused:

Please excuse the all wood background, I am not accustomed to taking pictures of such a large model, and it is pushing the limits of my setup (spray booth with built in lighting). I’ll need to invest in some additional lights so I can set up proper backgrounds in the future.

The sanded matte grey of the Mr. Surfacer killed the contrast in these photos, but the areas with surfacer applied are shallow channels about 0.003” deep. All the stray bits of surfacer are filling nicks I made when carving off the existing weld lines. Looks a bit rough now, but will be real nice once primed :grinning_face_with_smiling_eyes:

I also added a thin band of Mr. Surfacer between existing weld lines on the stern section at the waterline. This detail was per an image of Kumano’s stern from Gakken No. 38, which shows that this lap-jointed plate formed the intersection between the riveted bottom of the stern and the welded upper section.

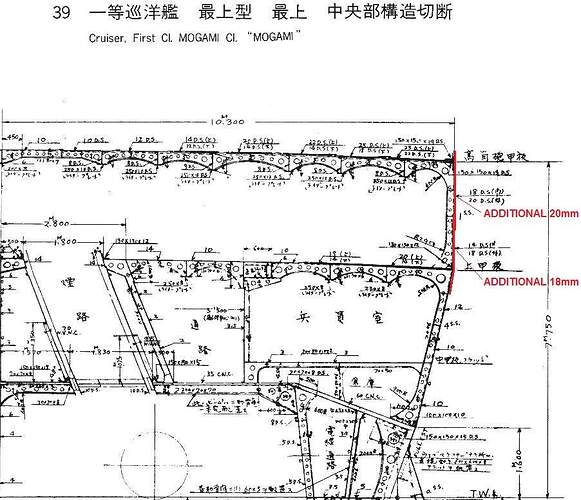
Next up will be recreating the two rows of additional plate on the upper deck section amidships, which were thickened during a refit. The only photographs that detail this change are of the Mikuma (battered and sinking after Midway), and a few second of video of Mogami from the RV Petrel. However, the upper deck plate thickness is helpfully described by the following cross section (1938 refit).

I think I will use thick aluminum foil (0.0015”) or thin brass sheet (0.002”) for these ones as they appear a bit more subtle in photographs :thinking: The carving method shown here tended to yield a thicker edge of about 0.003” to 0.004”.
Until next time, thanks for looking!

Marty

7 Likes

Hi Marty,

that work is brilliant! Are you planning to detail the underwater.ship, too?

Cheers

Tom

2 Likes

Hey Tom,

Not entirely sure at this point. I’m going to try to add grills to the engine cooling water intakes, also lateral panel lines, which are missing.

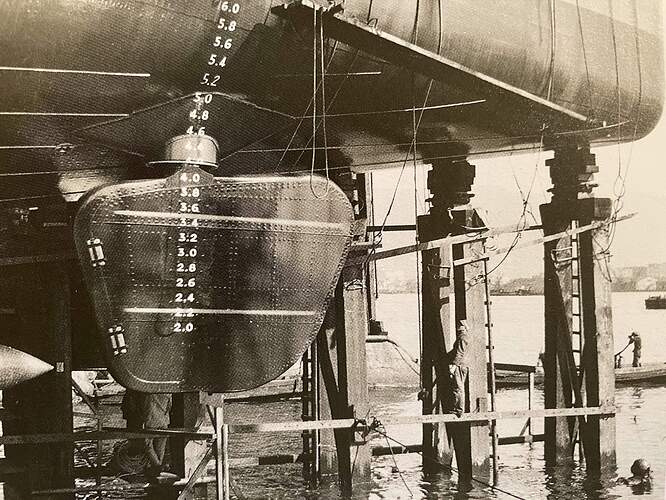
However this image of Kumano the day before her launch has me pondering the lap-jointed plating visible in this area. I’m not sure how far down the ship this reached, but I’m thinking at least to the torpedo bulges. To my knowledge the bottom of the hull was riveted from the stern up to the frame where the modular (and fully welded) bow was attached. So possibly a lot of lap joints on the hull bottom. I might experiment with using extra-heavy duty aluminum foil (0.0015") to replicate the panels. An early test was looking promising!

So, some experimentation will occur and I’ll go from there. Having quite a lot of fun on the hull so far!


From Gakken No. 38, Pg 26, for discussion purposes.

Cheers,

Marty

2 Likes

great work will follow your build

2 Likes

I wishI have your reference matererial for all of my projects :slight_smile:

Cheers

Tom

2 Likes

One can never have enough reference material :wink:

The three books I picked up are readily available online and are not too pricey. The same cannot be said for L&W’s Japanese Cruisers of the Pacific War, although I am thinking of shelling out for it since it is very highly rated and is apparently the authoritative source.

Also Miyukikai plans… Hmm anyone had luck ordering these recently?

2 Likes

Great work so far Marty :slightly_smiling_face:

If I may offer a suggestion, from this old hack: try not to get too caught up in adding details to the very bottom of the hull, as it will be very difficult to see, if at all on the finished build… And you could risk an early burn out, as your subconscious will not be convinced that you’re making progress :hugs:

1 Like

Hey Russell,

You are probably right. I just cant help myself :grinning: I think if I focus on detailing the bow and stern area I can strike a happy medium. Also I can add plating details to the bottom of the hull anytime before painting so nothing wrong with kicking that can down the road, and leaving the option open.
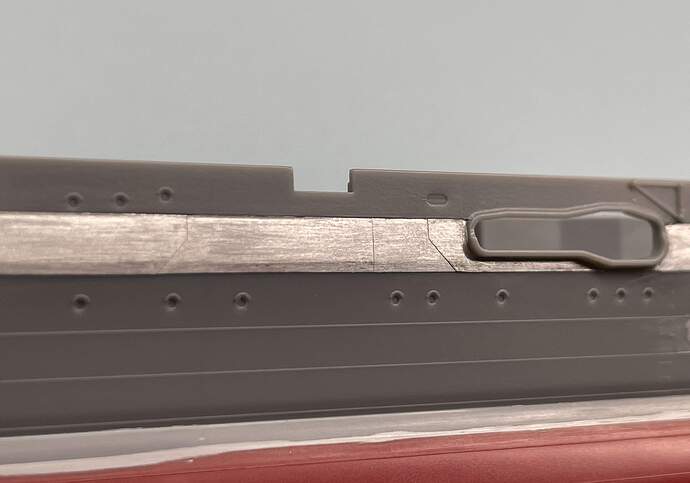
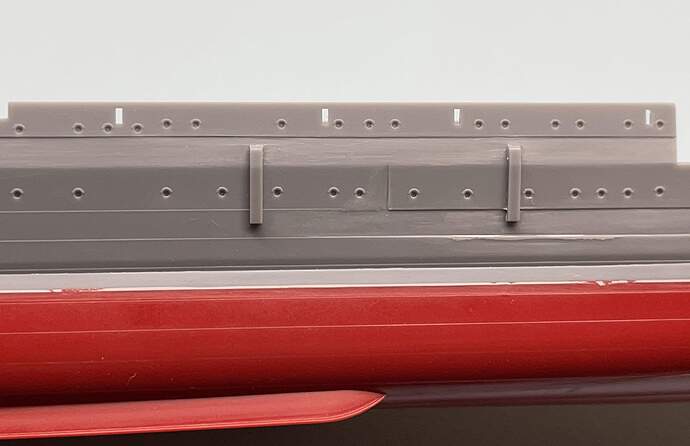
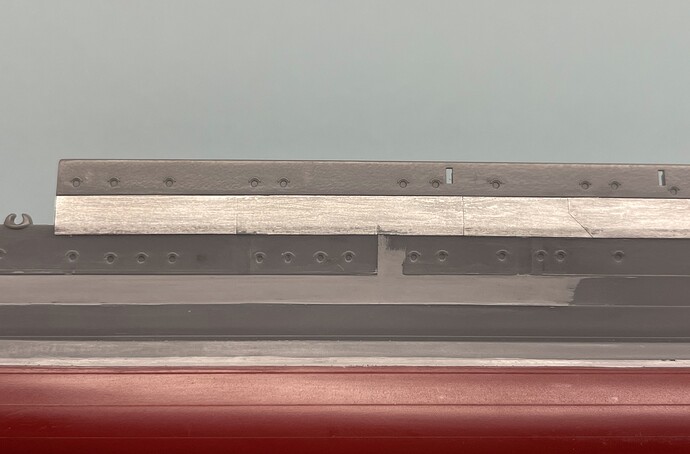
Marty

3 Likes

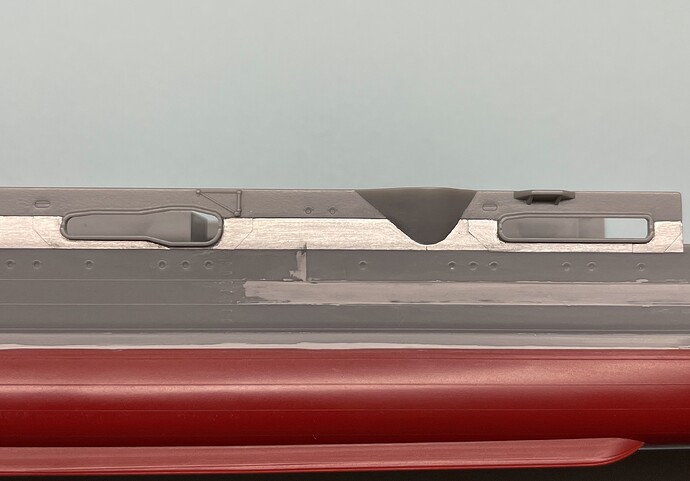
As it has been two weeks since the last update I feel that it is time for a quick sneak peek at progress. Last week was a little hectic and the shipyard was idle, but over the weekend welders were running overtime shifts.

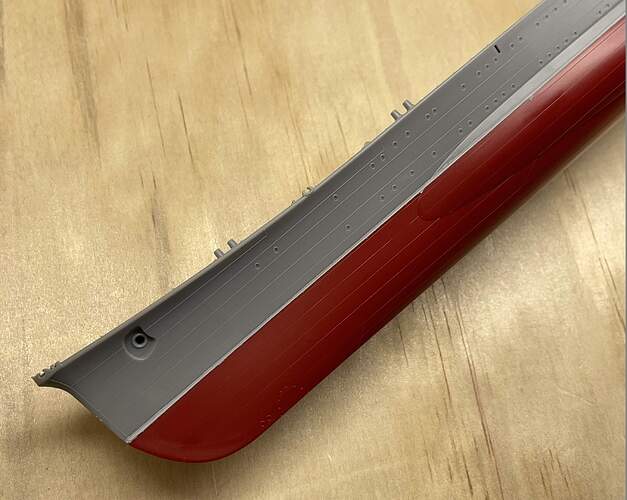
As discussed in the last update, a combination of subtractive and additive processes was used to achieve the desired panel lines. First some styrene was carved away along the upper weld line, then 0.0015" thick aluminum foil was attached with micro metal adhesive.

The process of carving away material went much more smoothly this time around. Also, gluing the individual panels into place was likewise quick and enjoyable. The difficult part was cutting these thin sheets of aluminum to the precise dimensions, especially the complex geometries around the torpedo launcher positions.

Well that’s all for now, until next time,

:beer:

Marty

6 Likes

Marty,

Knowing how hard it is to remove detail on a ship’s hull without affecting the detail you want to keep can be tough. Looks like you are achieving the effect you want, nice work.

Mark :beer:

3 Likes

Thanks Mark! Honestly, I’m more worried about the details I will need to remove from the deck :expressionless: but, all good things in all good time I suppose.
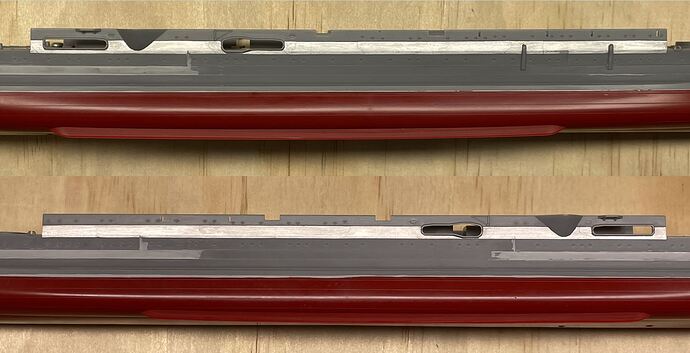
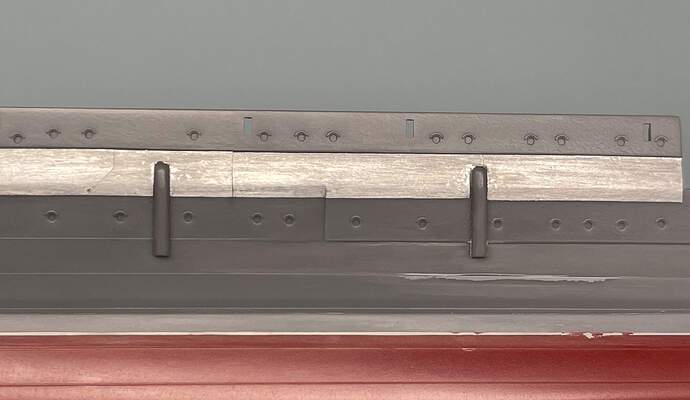
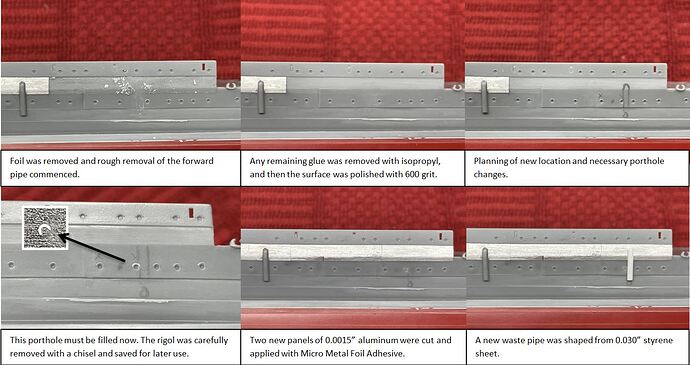
This past week I finished the aluminum foil plating on the starboard side, top deck level. This necessitated working around the waste pipes, as shown below. I also rounded the edges of these out significantly, to match the appearance of these parts in all available references.

A few days after completing this work I had a change of heart and decided to move the forward pipe slightly. After some planning and double checking of references, I was able to make the change all in one evening.

Can anyone guess the reason for the change? More on that later…

Marty

5 Likes

Nice work Marty. Serious to detail there :smiley:

2 Likes