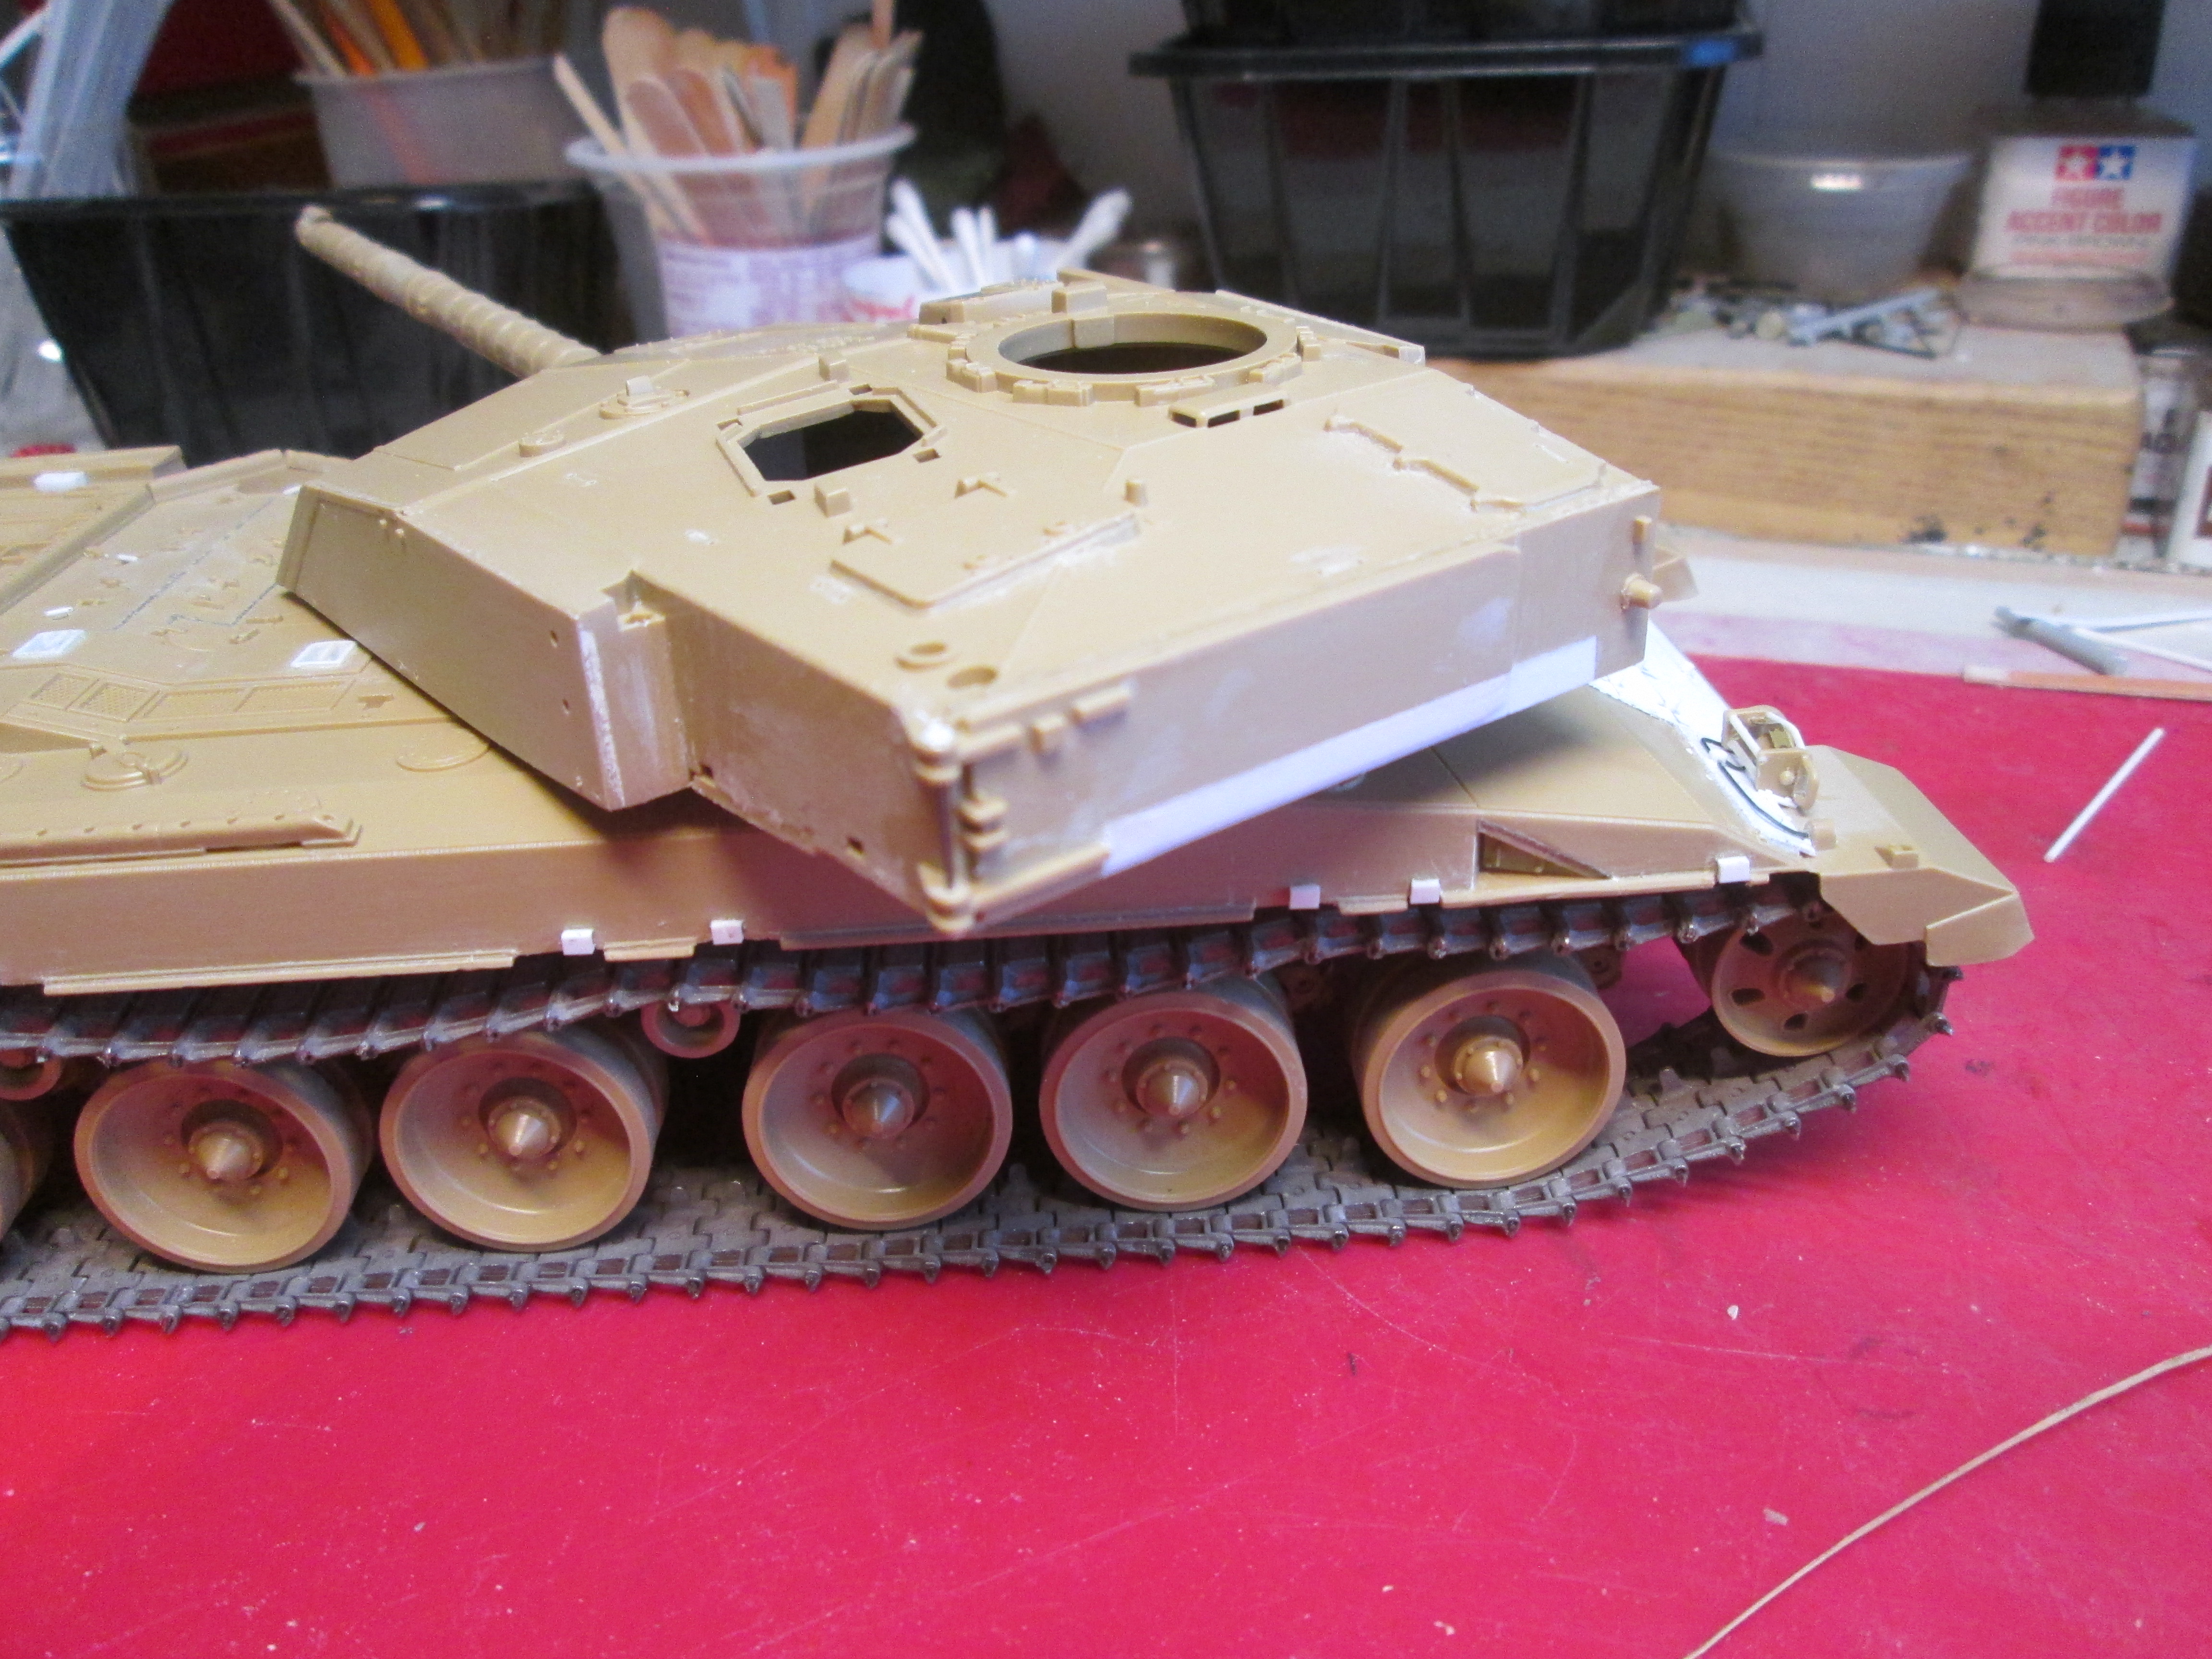
The title says it all. Instead if shelving the Cr1Mk3 kit I used parts from to finish the first one, I’m building it as another tank, similar time period but slightly different theater. And as a plus, instead of re-doing things I did a year ago, I have the opportunity to do it from the get-go. So far, I have a lot done on the basic hull and have shaved the turret, removing molded-on bits that will be replace with wire, stock and PE. Friuls are on, Eduard PE here. I am still shamelessly and gratefully copying the work posted on the “first” Challenger thread. The difference on this model will be no supplemental armor, but a tank ready to have it installed should it be needed, or as in a tank that went to Iraq the first go-round and does not have the armor currently fitted. I have the revised upper glacis in, and need to find a pic or two of the bosses on the hull sides that the side armor brackets mount to. I have a couple of pics of the edges of one, just need the amount and spacing on each side. This model will have the standard side skirts, which will hang below the mounts for the up-armored side skirts on my “first” one.
So far:
 IMG_3229 by Russel Baer, on Flickr
 IMG_3230 by Russel Baer, on Flickr
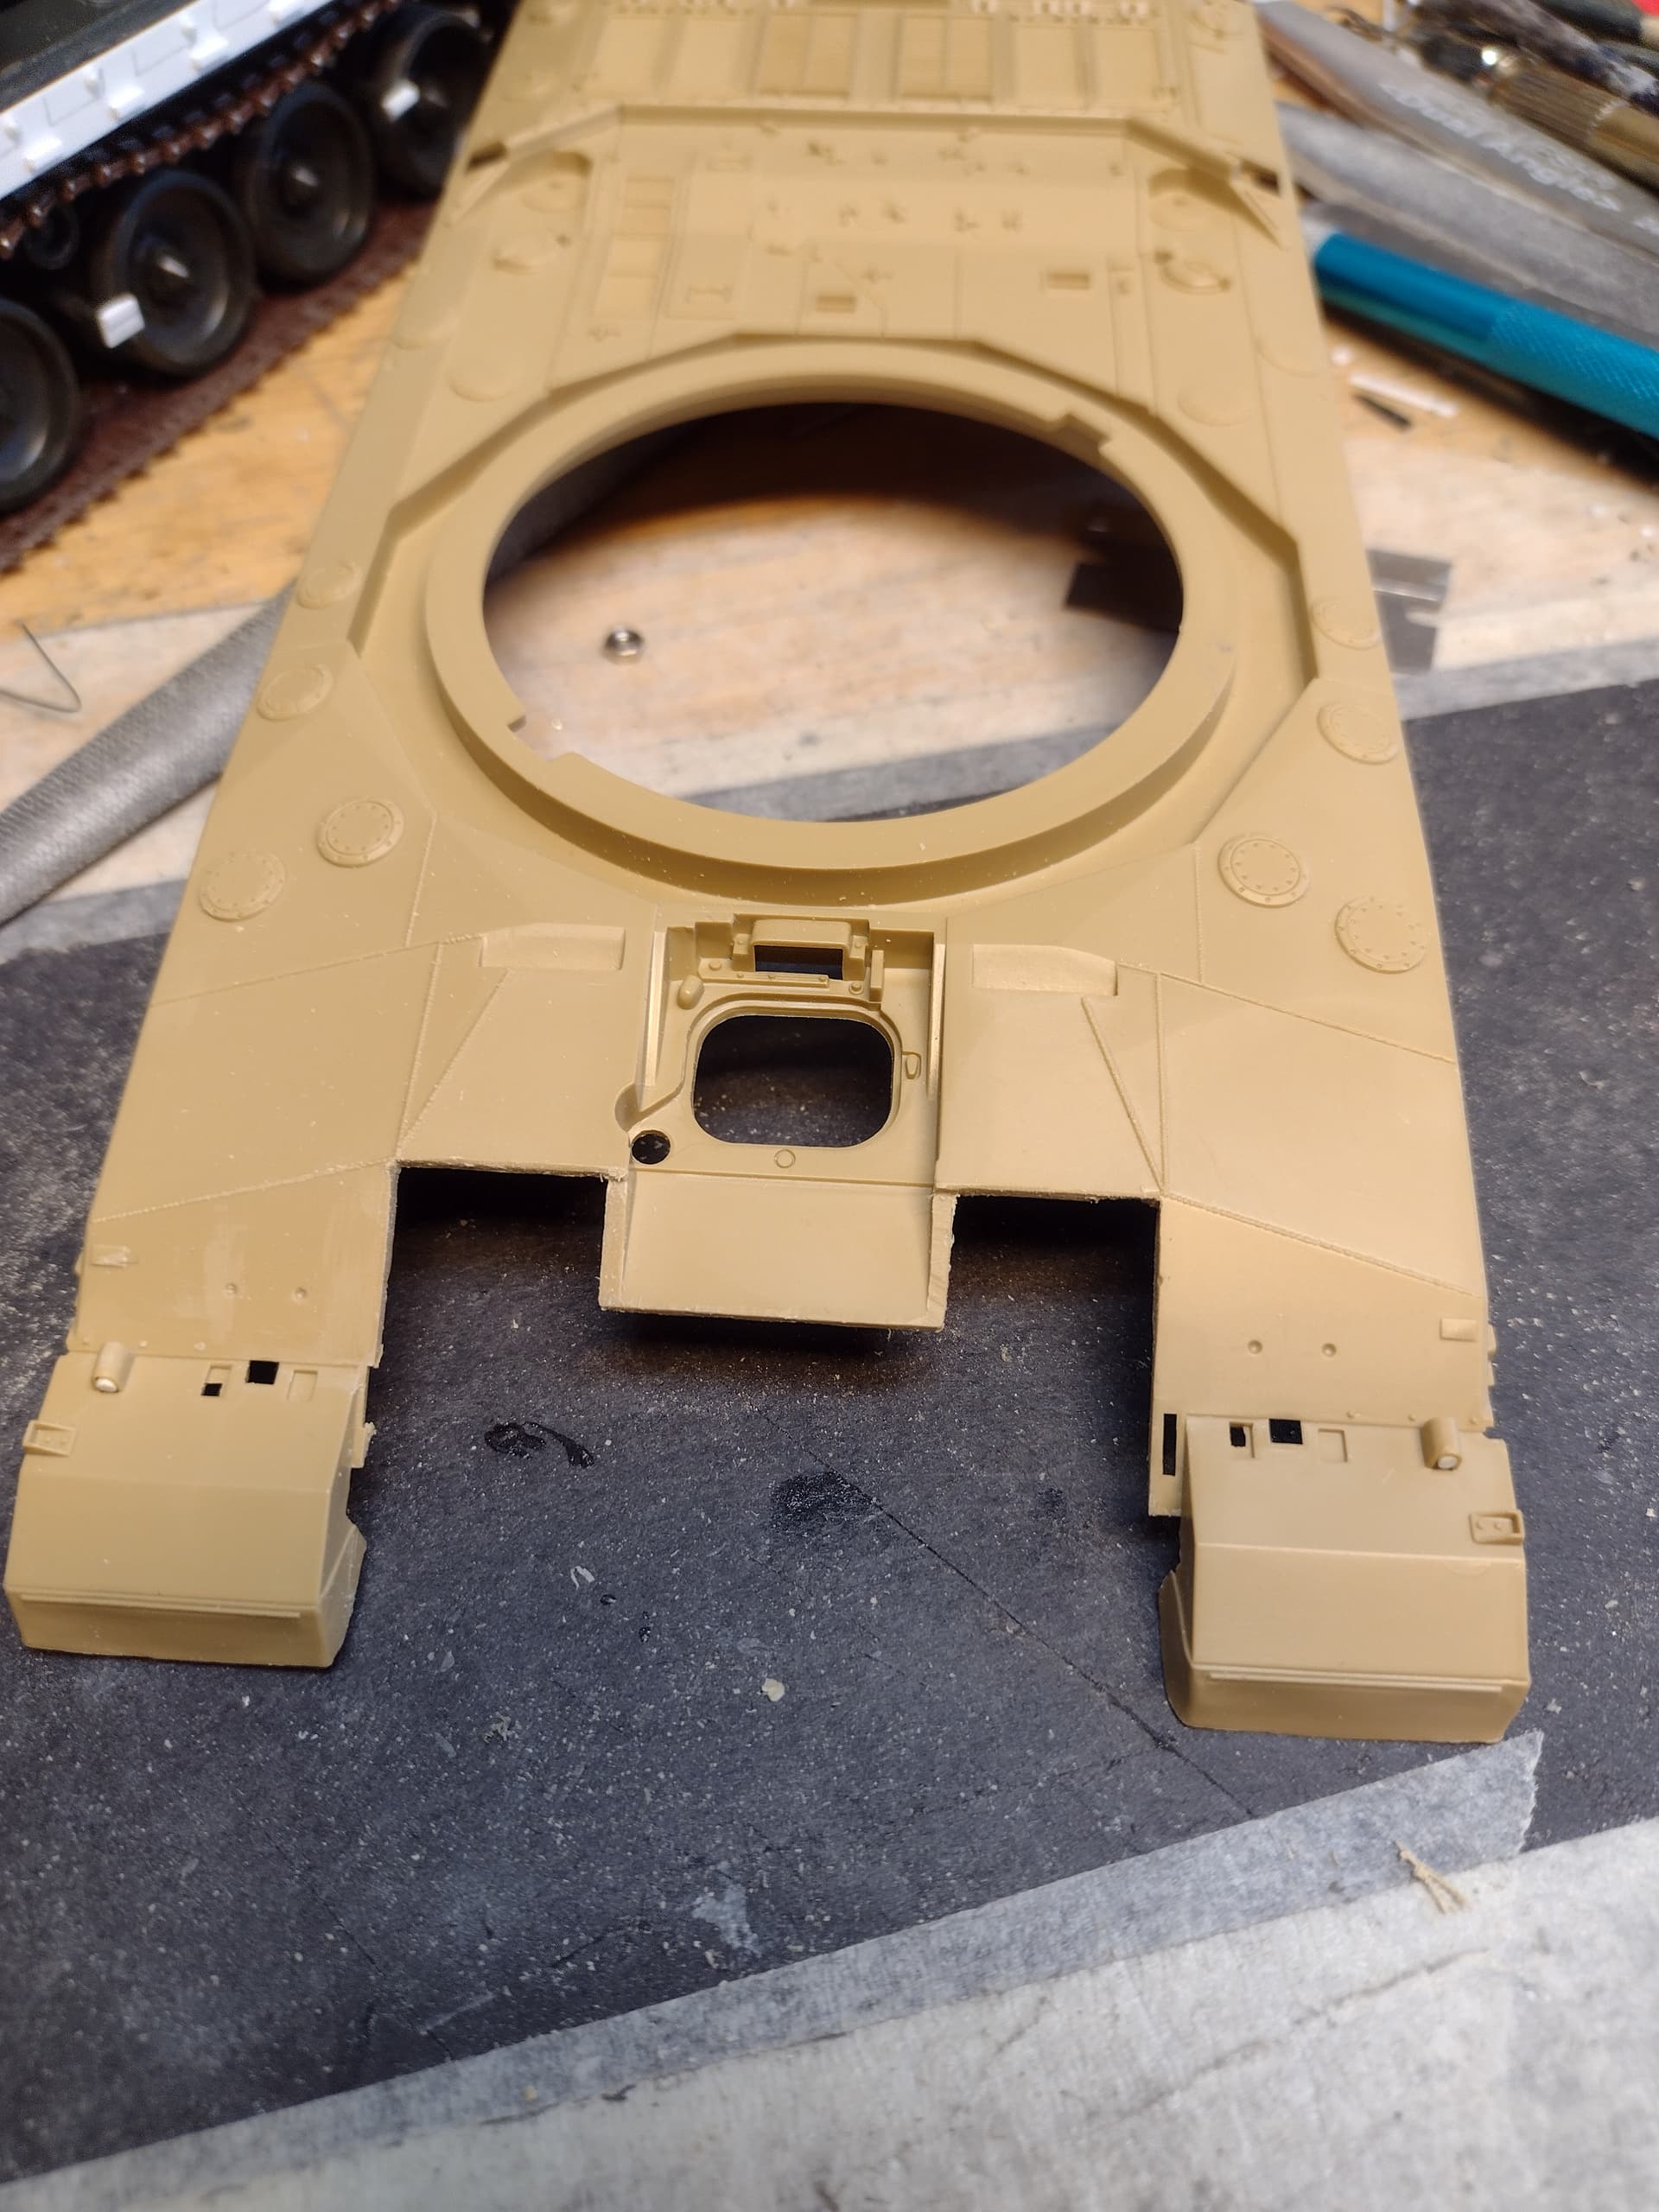
 IMG_3231 by Russel Baer, on Flickr
 IMG_3233 by Russel Baer, on Flickr
It’s a lot easier getting it ready for detail changes this far into it, rather than when it’s half-built…
I will have a look later Russ, but (excuse the pun) the idea of showing it like you want may be a "challenge(r) to far ![]()
![]()
There may be some imagineering involved.
So Russ, I have scoured everything I have or remember and there are a few issues with how you wanted to do it. Firstly though, it is your build so please just use this as info only. Not direction ok ![]()
Getting images of a wagon with the mounts fitted but no add on armour are like hen’s teeth…
The main problem being that if the wagon had the add on armour mounts fitted, then so it would have the armour, as this is used in theatre only. It was put on for Kosovo, because there was a high risk that it could of gone hot at any moment.
If you are wanting to have yours fitted with normal side skirts, you can’t have the add on armour mounts fitted as the normal skirts won’t fit.
I only ever played with the add on armour once (for real down at Bovi, and that was a demo tank) and that was donkeys years ago… when the add on armour isn’t being used, it’s stored, along with all the mounting points and brackets… Same for the front armour…
Not sure how it all helps you or how you want to play it mate ??
Good info. From looking at pics in the Kagero book, I can see a welded on boss that accepts two bolts that the mounts attach to. They’re shallow, spaced at what looks like every 18" or so along the hull sides. They’re higher than the original side skirt mounts, so as not to interfere with the armored skirts. All I need to do is extrapolate the distance between the bosses and represent them with say, .020" x .060", with two holes in each. I’ll try to dig up a pic of what I’m talking about when I’m home. It may be a stretch, but I’m on a mission.
I think I’ve got it: the mounting points for the side armor mounting system (those big flat plates the top of the modules are hung from) are actually the “normal” mounts for the tow cable brackets. The exception is at the rear, behind the exhaust outlets. Two bosses are welded to the hull on each side, and pics of tanks with upgraded side armor show these relatively clearly. So all I need to add are the two rear bosses on each side. Give me a bit and I’ll have them made up and pics posted.
Okay, I think too much. After looking at pics, it became obvious to a hedgehog that the tow cable hanger and mount points serve as the hull attachment points for all the up-armored skirt hardware.
So a little time with some square stock and I’m ready to move on.
 IMG_3238 by Russel Baer, on Flickr
I used the kit tow cables to mark the location of all the hanger parts.
Now I get what you were going for. I initially thought you were trying to have the long side mounting plates left in place. The recovery cables would still be re-fiited into their original positions when normal side skirts are mounted.
Hi!
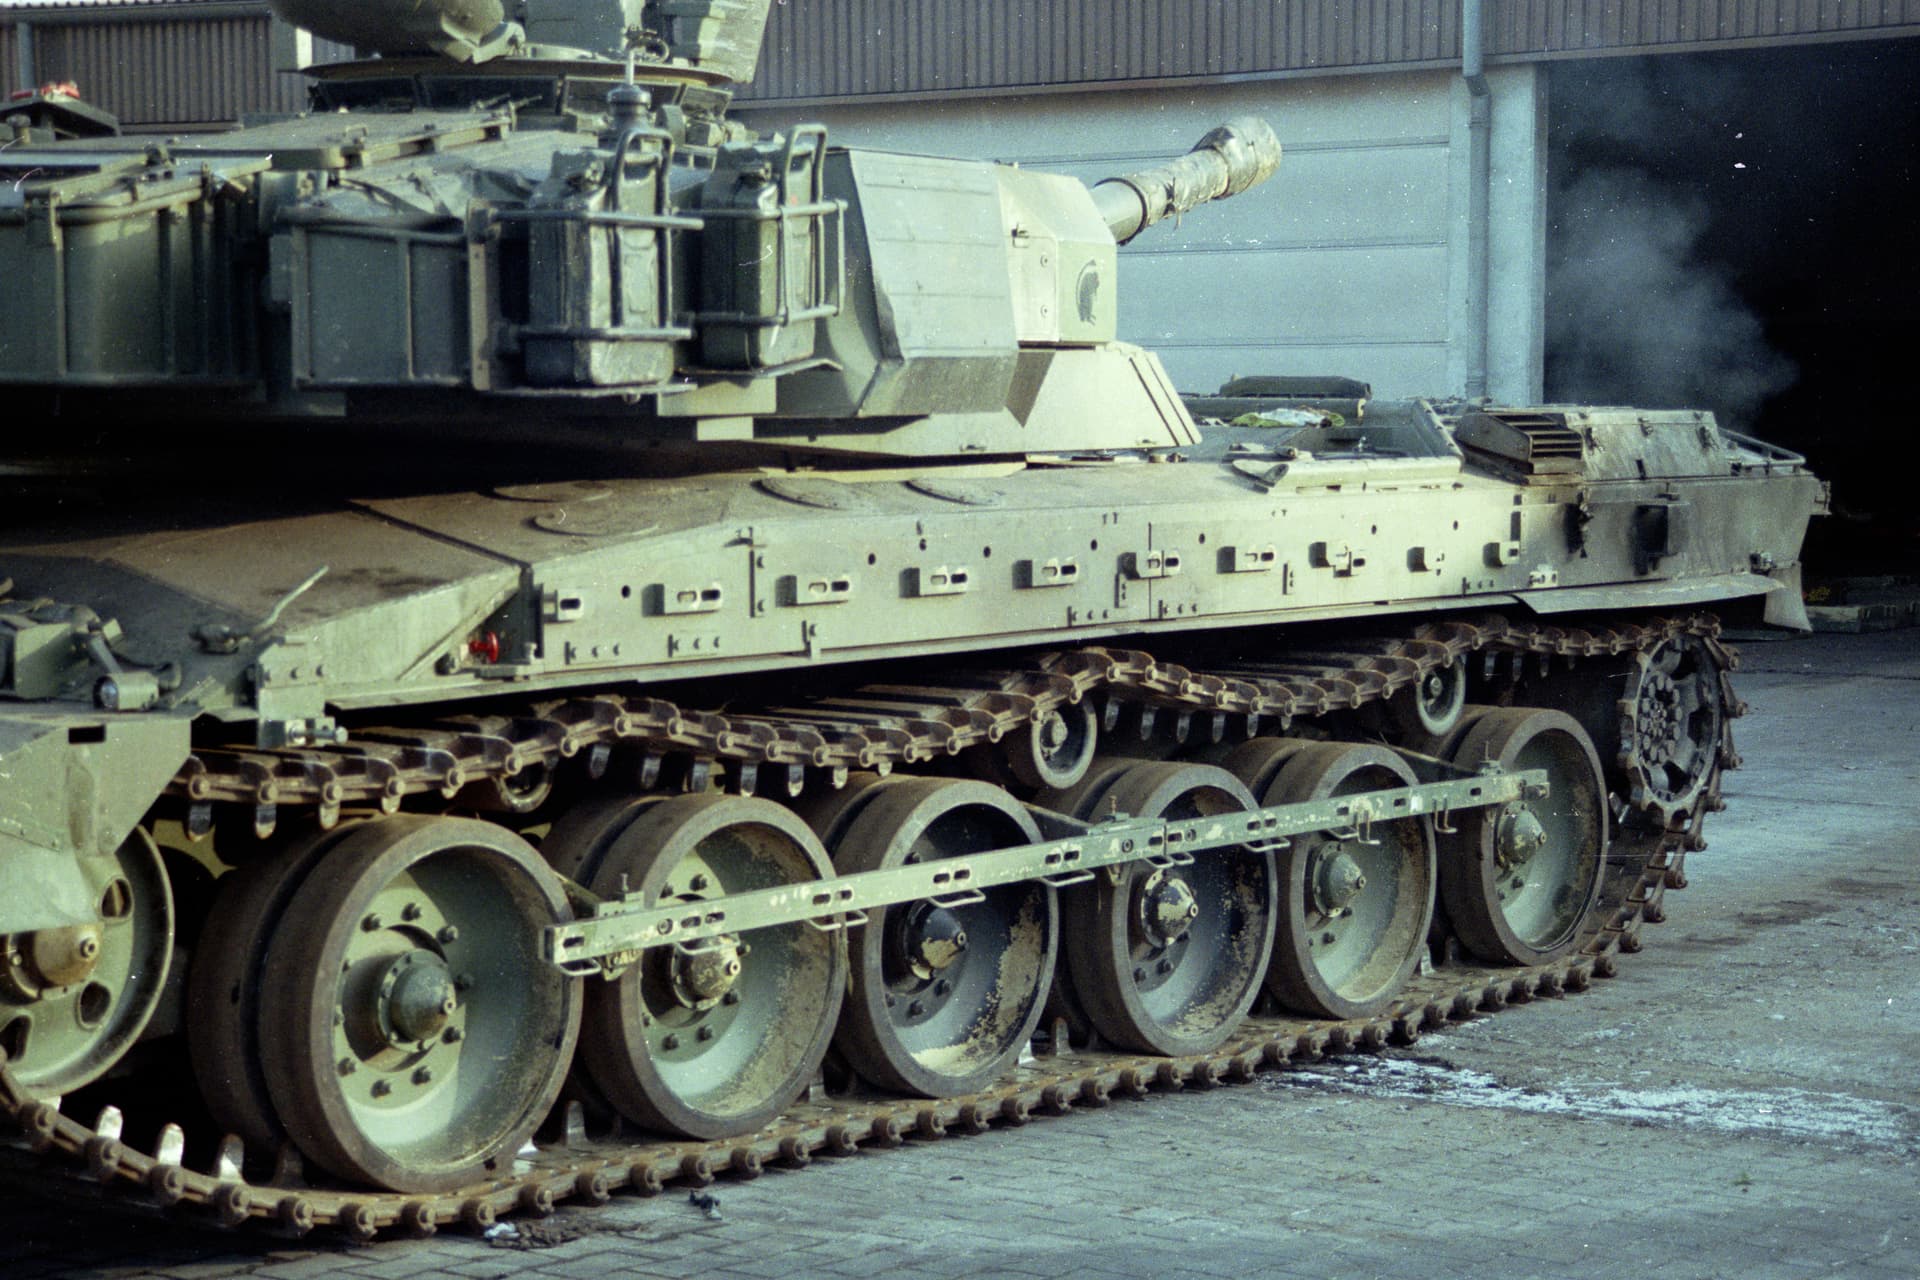
I will add a picture here that might give you a source, and…my opinion how that worked.
On the picture you can see that there are two segments of what seems to be an adapter. These, from my view (John, you crewed such a wagon, might know better and correct me) may (or just may not have) have spacers being welded at the rear surface of the adaptor. When looking at the boltheads, you can see that every standard fitting of the hull sides was stripped and every point to bolt down kit now is used to bolt down these adaptors. This means, any standard skirt mount, and also the front bracket for the tow cable and any claw that holds the tow cable in place. The bosses below these clamps may have worked as additional spacers also. The unit where I took this picture just returned from GW1 where they got these additional parts in theatre. They were fitted by the crews as far as I know, and that means no welding, but only using what´s on the wagon sides already. Beneath this wagon that I photographed, I did see others in the same regiment that had this adaptor unfitted and the normal side skirts on, and these did not have any changes to the hull sides. That said, a wagon that was backdated after the use of the side armour, will have no different appearance at the hull sides from my point of view. But-corrections from these guys who worked on these wagons is welcome.
Andreas

(Please tick sign to show picture, link doesn´t work)
Russ,
This link might help with quite a lot of details. Back in September '91, myself and some friends spent a week in Germany, visiting a number of different units (all arranged through one of the guys who had very good connections). This was C Sqn, Royal Scots Dragoon Guards who were still refurbishing their Challys after returning from Kuwait.
Hi John,
was RSDG based at Münster after the GW1, it looks to be the same unit where I also took the pictures, from which I enclosed one. However, some of your pictures are completing my own ones valuable, because I concentrated on the UDK-1 dozer when I was there, not so much on the add-on armour which was restricted for public use in that time.
Andreas
Andreas, @AKirchhoff firstly, that is an excellent image, well done for taking it… its probably the only image like it anywhere ![]()
I have done a similar one with some highlights added to make it clearer.
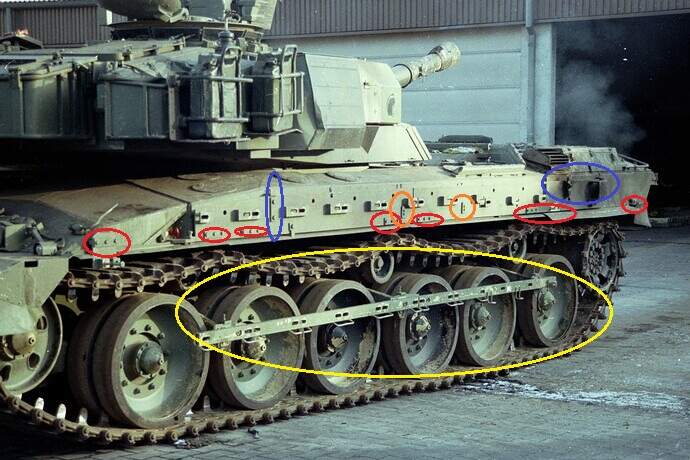
I fully agree about all the normal recovery rope fittings on the hull. They would of been used as spacers to the add on armour mounting bar and some as anchor points.
All the circled red areas are directly above the normal side skirt mounts and again in this case being used as direct mount points and anchors for the add on plate.
The large blue circle has the rear mount for recovery rope fitted direct to the add on mounting bar, and they would of simply used extended bolts to secure it to the original hull bolt holes under it.
Front blue circle is where the front recovery rope mount would be, and again, its being used as an anchor point for the mounting plate for the add on.
The orange circles are where the rec rope holding claw would be and again being used as anchor points for the add on mount.
The Yellow circle just shows the long supporting bar added onto the lower arm supports, which again would be removed for normal side skirt fitting.
Edit. @JohnTapsell , john, there are some nice images in that batch as well. Nicely done.
Also Andreas, your initial image shows the track in perfect slack sag after bringing the wagon out of the hanger first thing.
Hi Andreas - RSDG was at Fallingbostel at the time. We stayed in the Sgts Mess for the week and mostly visited units on site (RSDG, Staffords, 7th Armd Bde Workshops and the resident tank transporter unit), but we also did a trip to Munster to visit 32 AER.
They were in Sennelager at Athlone before Fally as we had the misfortune to take over their Mk10s … and I have nightmares about that still lol
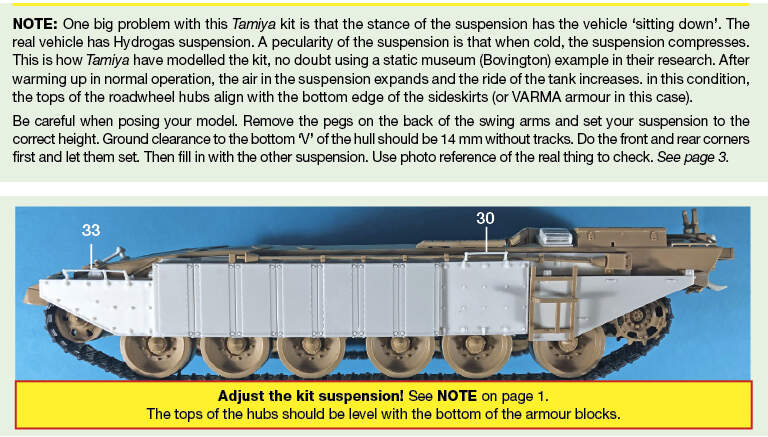
Your applique armour on the glacis plate looks like it is welded into the front hull?? It was bolted on top. Suspension is also squashed up. Wheels/swingarms should be lower giving a greater ground clearance. This is a common problem with this particular kit. See notes from my SMM3546C instruction sheet.
Michael, I dont think that is meant to be the applique - its is the actual hull which he has done to correctly get rid of the step.
Ref the posing, you are correct for a vehicle that has been moving for a decent bit of time, it will indeed ride up to its optimum ride height, however, as Andreas’s image above shows very well, just how low the wagon sits with no movement. The Hyrdogas quickly cools down if the wagon isnt moved for a prolonged period and the wagon will sink, but on further movement, the ride height will go back to normal a lot quicker. The image of Russ’s wagon above with the fruils and with the slack that they have, are just right for a tank that has been static for a long time or just been pulled out the hanger in the morning. So would look ok as is if he is going for that look.
No. The CR1 glacis does not have bolts in it. Granted it should be level to correct what Tamiya did. Those bolts should therefore be removed and the applique fitted ON TOP.
As for suspension, fine. What you say is in my notes.
Yes and no. The glacis plate wouldnt normally have the bolts in it, but it would have the the bolt holes, so Russ just needs to make his smaller as they are oversized and do look like bolts as opposed to the bolt holes.

Tamiya didnt really get it wrong as it was thought for a long time. Initial Challengers did have a raised area in front of the dvrs cab on the glacis plate as you can see below. This is an initial Cr1 which was modded to Mk 2 possibly even Mk3 standard but never fitted with add on armour.

At some point during the production run of Mk1’s, the raised area was removed and the upper glacis became level all the way from L to R, so you will have some Cr1’s that would of had the step and also possibly never had add on armour or external fuel drums fitted that went onto become Mk2’s or possibly Mk3’s on the rare occasion.
Wow. Okay, way too late to adjust the swing arms, but I can live with that now. As for the bosses on the upper glacis, that was the smallest diameter rod I could make a hole in. I may need to rethink that… From what I can tell, it looks like there are even two different size bosses for the added upper glacis armor.
@Michael: the white upper glacis on this model is actually where I removed the kit section and replaced it with plastic stock, to sit level with the outer sections. I am not adding the supplemental armor here. I have a pic on my phone…
Hi Russel! not way too late… Do you want to get a new upper hull for a new start? I may have a couple in spare…Let me know!
Ok I just noticed that you did many changes to the front already. So, it might actually be too late.
However, you could change the riding hight of the vehicle. I suffered from the same issue with a way too low sitting vehicle. (Johnny, you are right, it was in mid of december and the vehicle came right out of the hangar when I took that picture). What I did was, I took a Proxxon electric tool with a rotating razor saw and did cut the swing arms off carefully just where the swing begins and cemented them again to the place setting the hight for a warmed suspension. Was about 30min of work on each side and some hours time for the cement to cure and looks way better now. The saw only took away about 1-2/10mm which can´t be noticed.
Will do that also to a couple of finished builds.
Andreas