Hello all,
I decided to “correct” the problems with the Tamiya Challenger I Mk.3 for a Desert Storm version myself (instead of buying the SMM or other aftermarket sets). Years ago, there used to be a really comprehensive online article on “fixing” the problems with that kit to make it a proper Desert Storm version, with detailed photos/measurements/plans for scratch-building everything from the turret baskets to the corrected exhausts, fuel drums and armor panel connections etc. However, I have not been able to find it in either my archives or online searches ever again. I think I went through all the related posts here and in other forums, and pages of Google results to no avail.
Barring that, would there be any books or other references that can help with this project? I bought the Tankcraft Challenger I book by Rob Griffin, thinking it would help with both detail photos and how to fix the Tamiya kit’s problems, but it was a bit of a disappointment; not a great source of reference photos and the model sections was a big letdown (building the Tamiya kit out of the box for the Desert Storm version!). I also saw some negative comments for the “Modelling Challenger 1 and 2” book, and similar issues with the Abrams’ “Modeling The Gulf War” missing out on the armor panel connectors.
Thanks in advance
Deniz
Aren’t all the bits for Desert Storm in the kit? One of the main things you will need to do is square the rear turret bin I have posted photos of how I done mine any questions please ask

All original parts with the turret lid turned back to front
HTH
Jacko
Yes, the kit theoretically has the Desert Storm updates, but the base kit itself needs a lot of upgrades to move it from the initial production to operational state. Also, some of the bits in the Tamiya kit are overly-simplified or wrong.
Here is one of the threads here talking about the changes to the kit:
No problem😀 if you can get Dans (dads203) build up that is a masterclass in how to improve your kit👍
The turret bin is not particularly hard to do, I did a couple from scratch. It’s the rest of the adds and enhancements that can wear you out. For my next one, I have all my parts gathered and hope to start soon. This time, I purchased a few items from Mr Shackleton’s operation. In the package, they look great and I’m looking forward to using them. All parts appear to be cleanly cast with minimal cleanup necessary and NO short shots.
A pic of the one I ended up doing with all the add-on armor but in green and black for the Balkans, mostly ready to paint:
 IMG_3062 by Russel Baer, on Flickr
 IMG_3070 by Russel Baer, on Flickr
I started with the original release but used parts from the second release for the additional armor. While I was doing this build there were a couple of people doing similar builds, with LOTS of 1:1 pics posted… Johnny? Jacko’s pics show the bin mods well, I just chose to approach them from a different angle.
I keep thinking that Takom or Meng (or even Tamiya) would bless us with a nice Cr1 in several variations, but no luck so far. In the meantime, there’s good aftermarket support (SMM) and lots of good info available.
BTW, I have absolutely no affiliation with SMM, other than as a pleased customer.
Thanks, Michael. I have downloaded everything out of the Scorpion website, they have a ton of detail photos and their instructions are also great resources, but I decided the scratch-build route for this kit.
Russel,
I downloaded all the pictures and conversation from your previous thread. I am going to build two of the Challenger kits at the same time, and see if I can make resin molds myself for the big parts like the rear turret bin and the armor.
I totally agree i am super surprised nobody had released another Challenger 1 considering how many different Challenger 2s are in the market. I would have really loved to pick up all of the SMM sets, but with the total cost to US and how many of these kits I want to build, it is better to try my patience at scratch-building.
Deniz
Deniz, Hi and will be great to see a few more Cr1 builds ! great tank, very underrated.
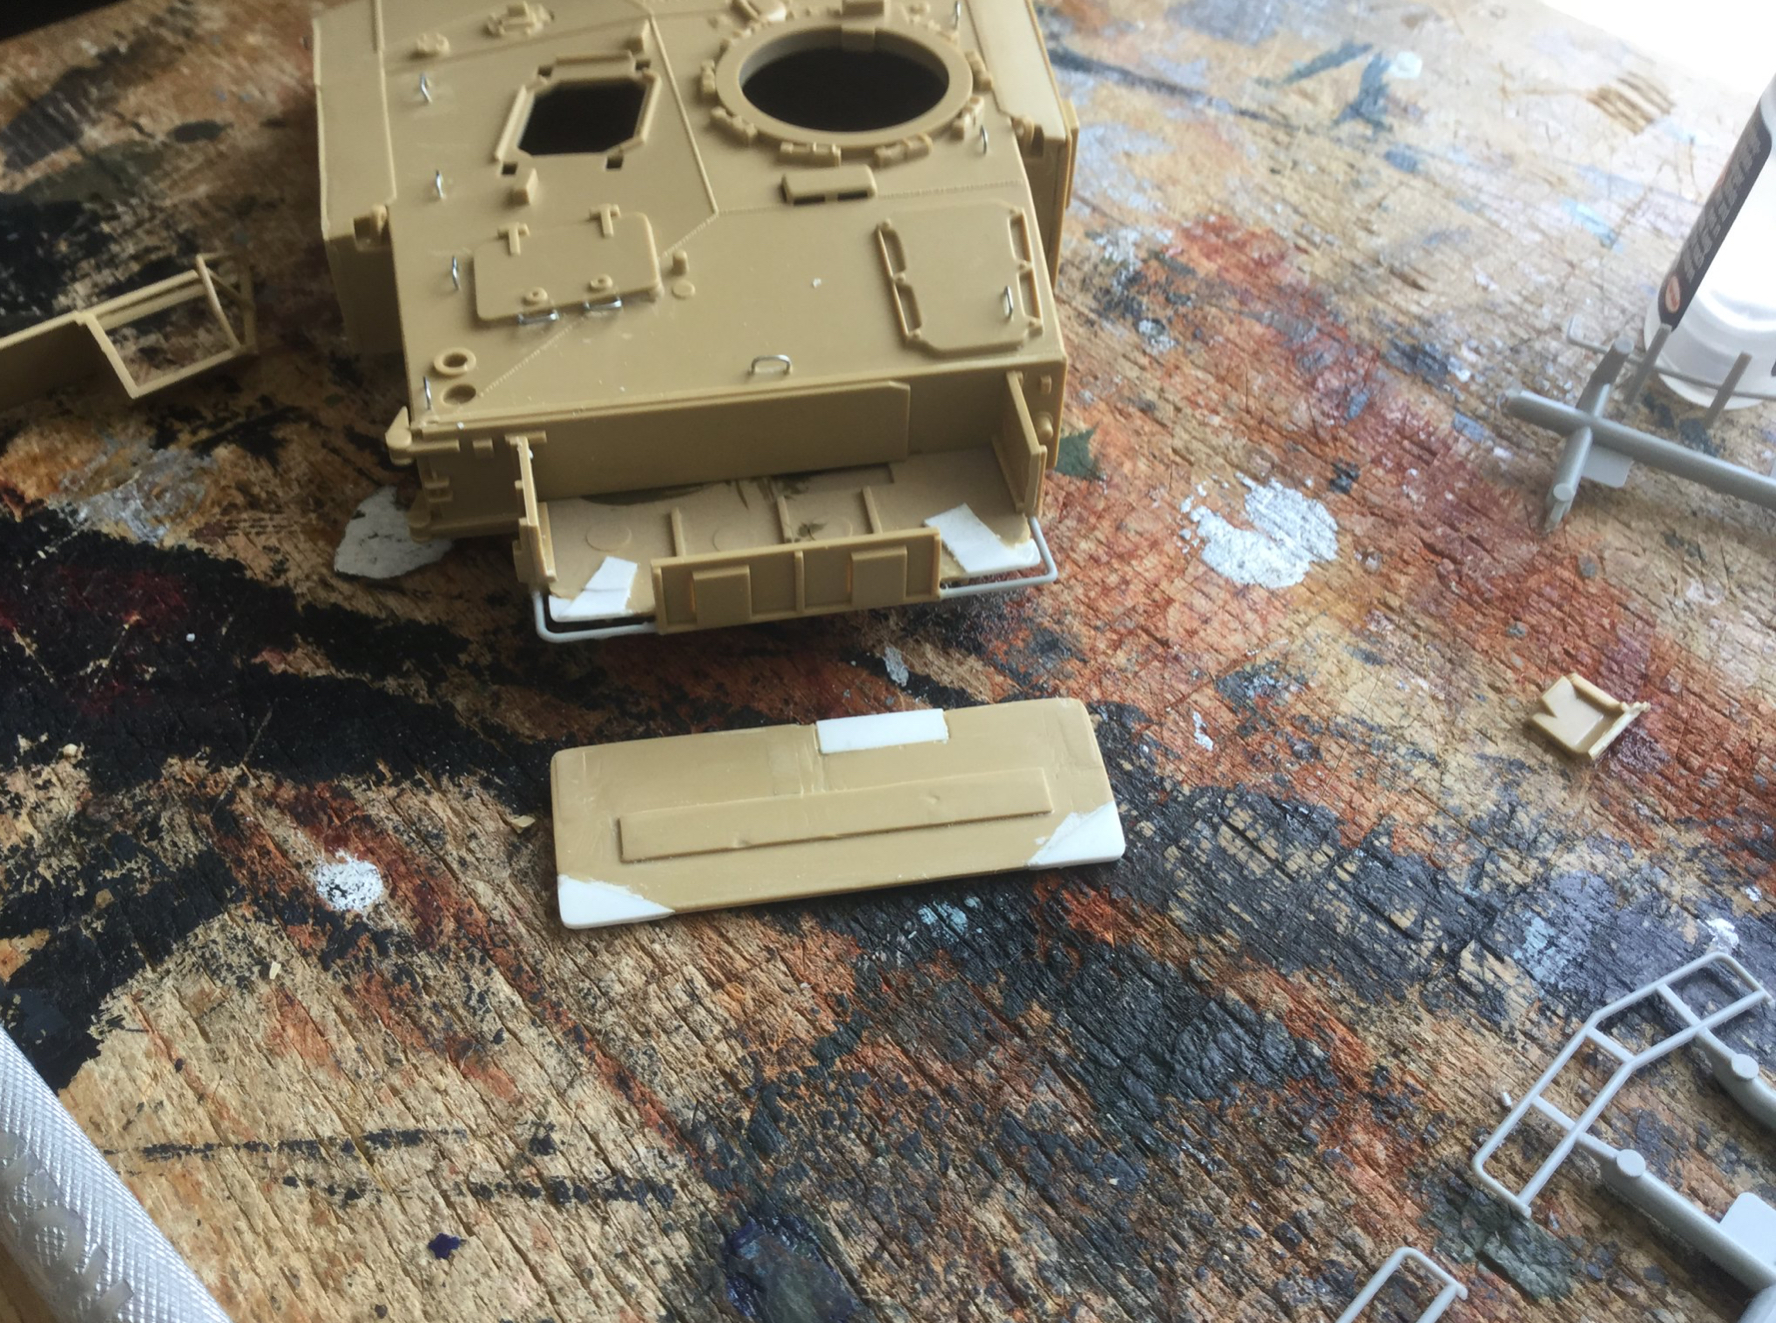
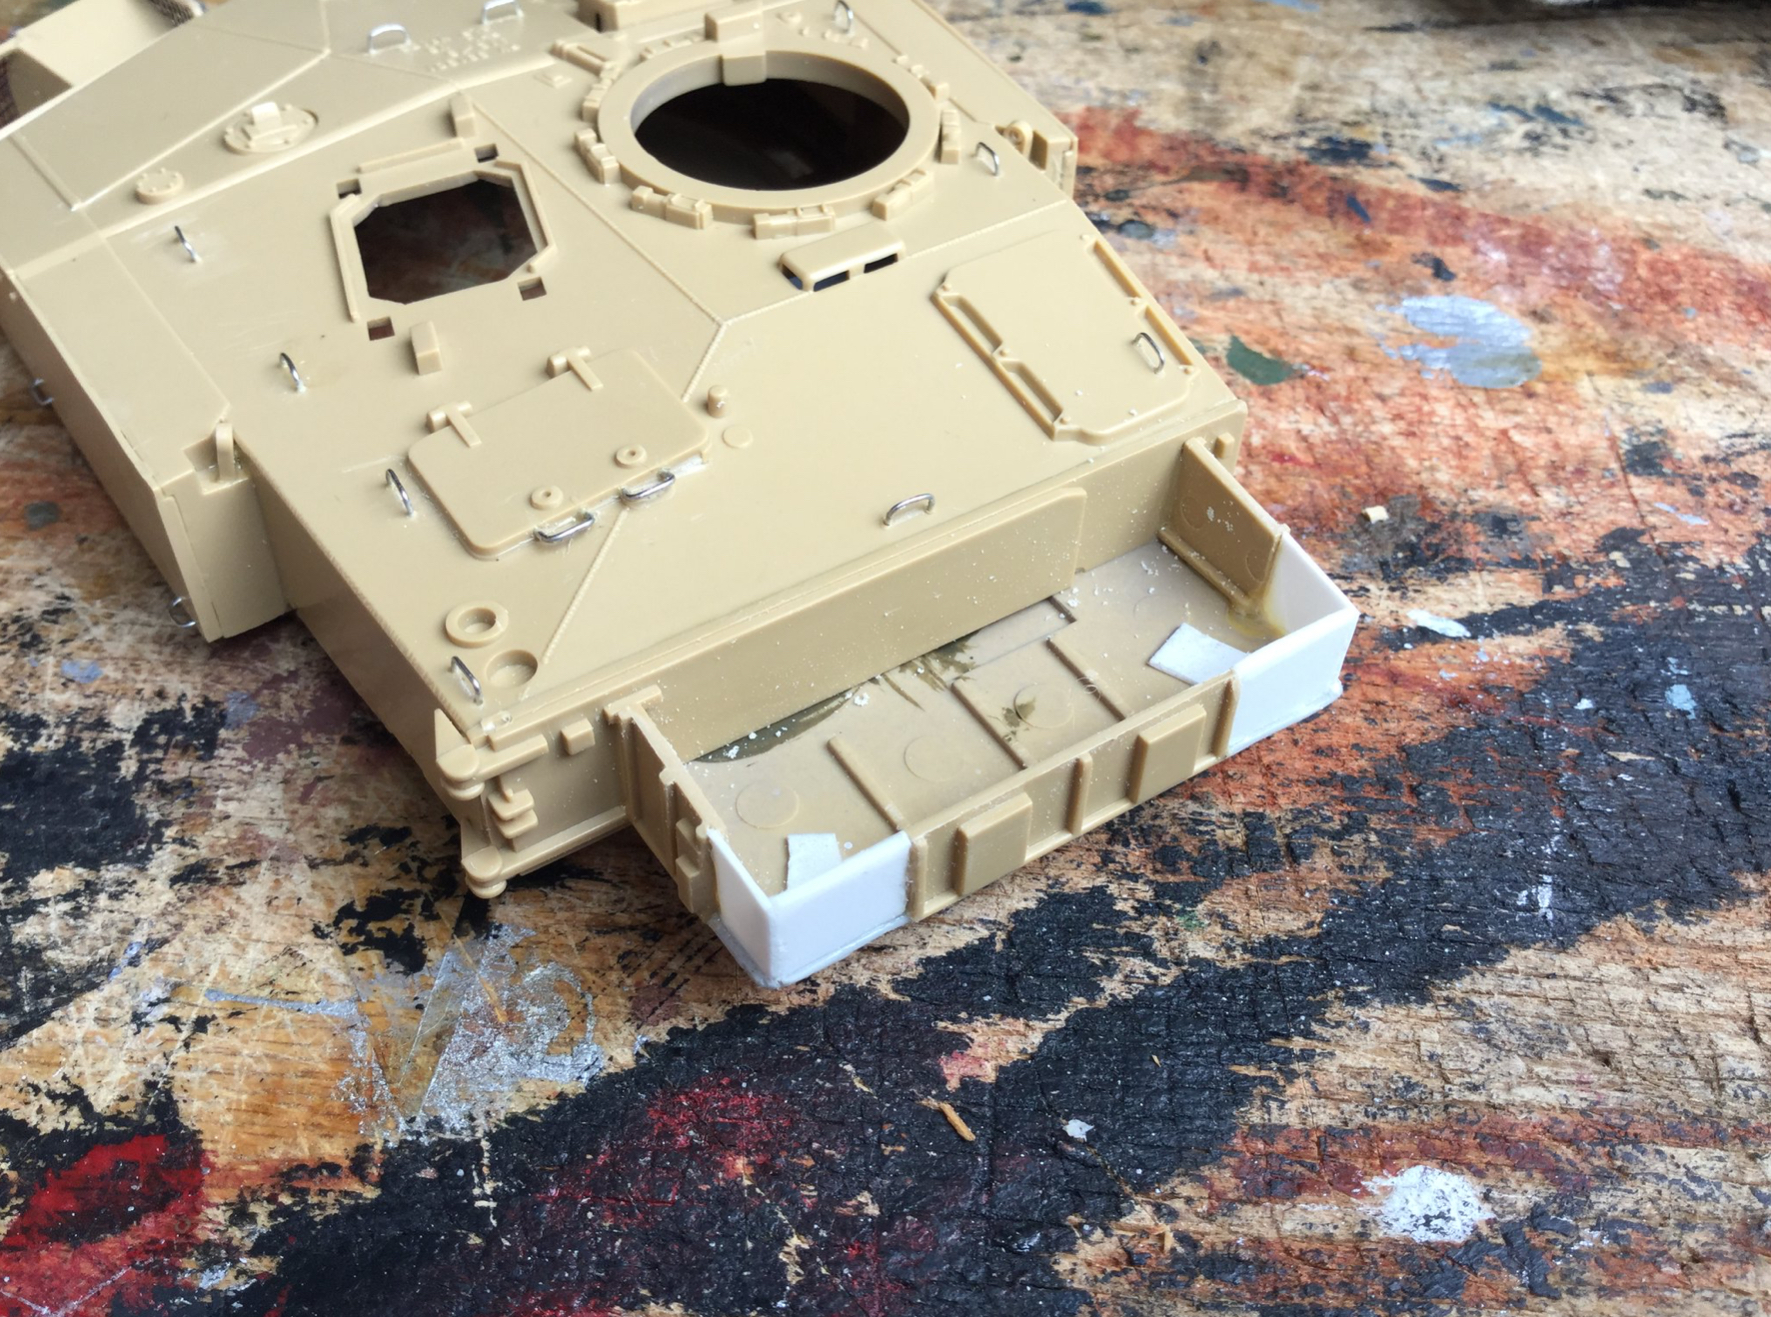
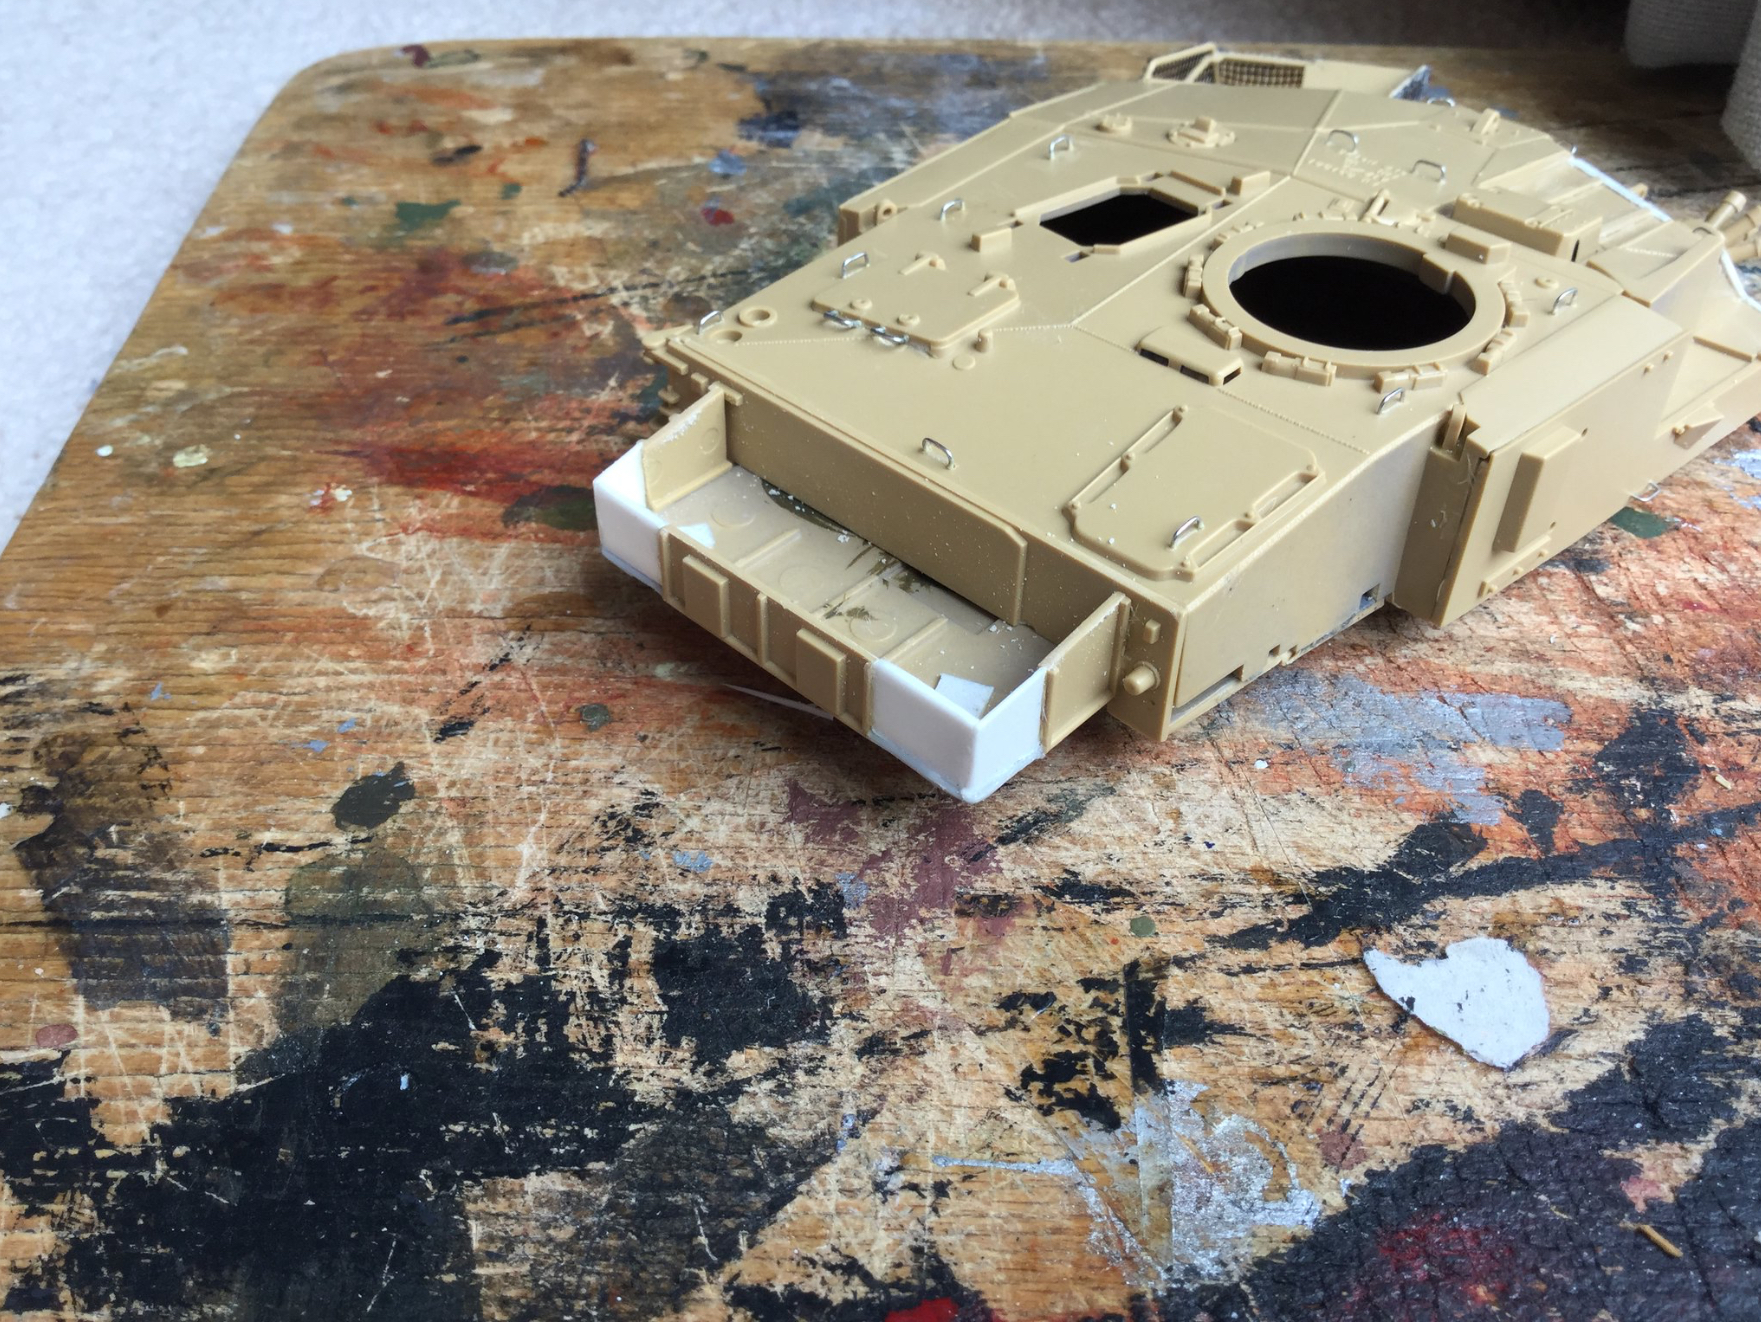
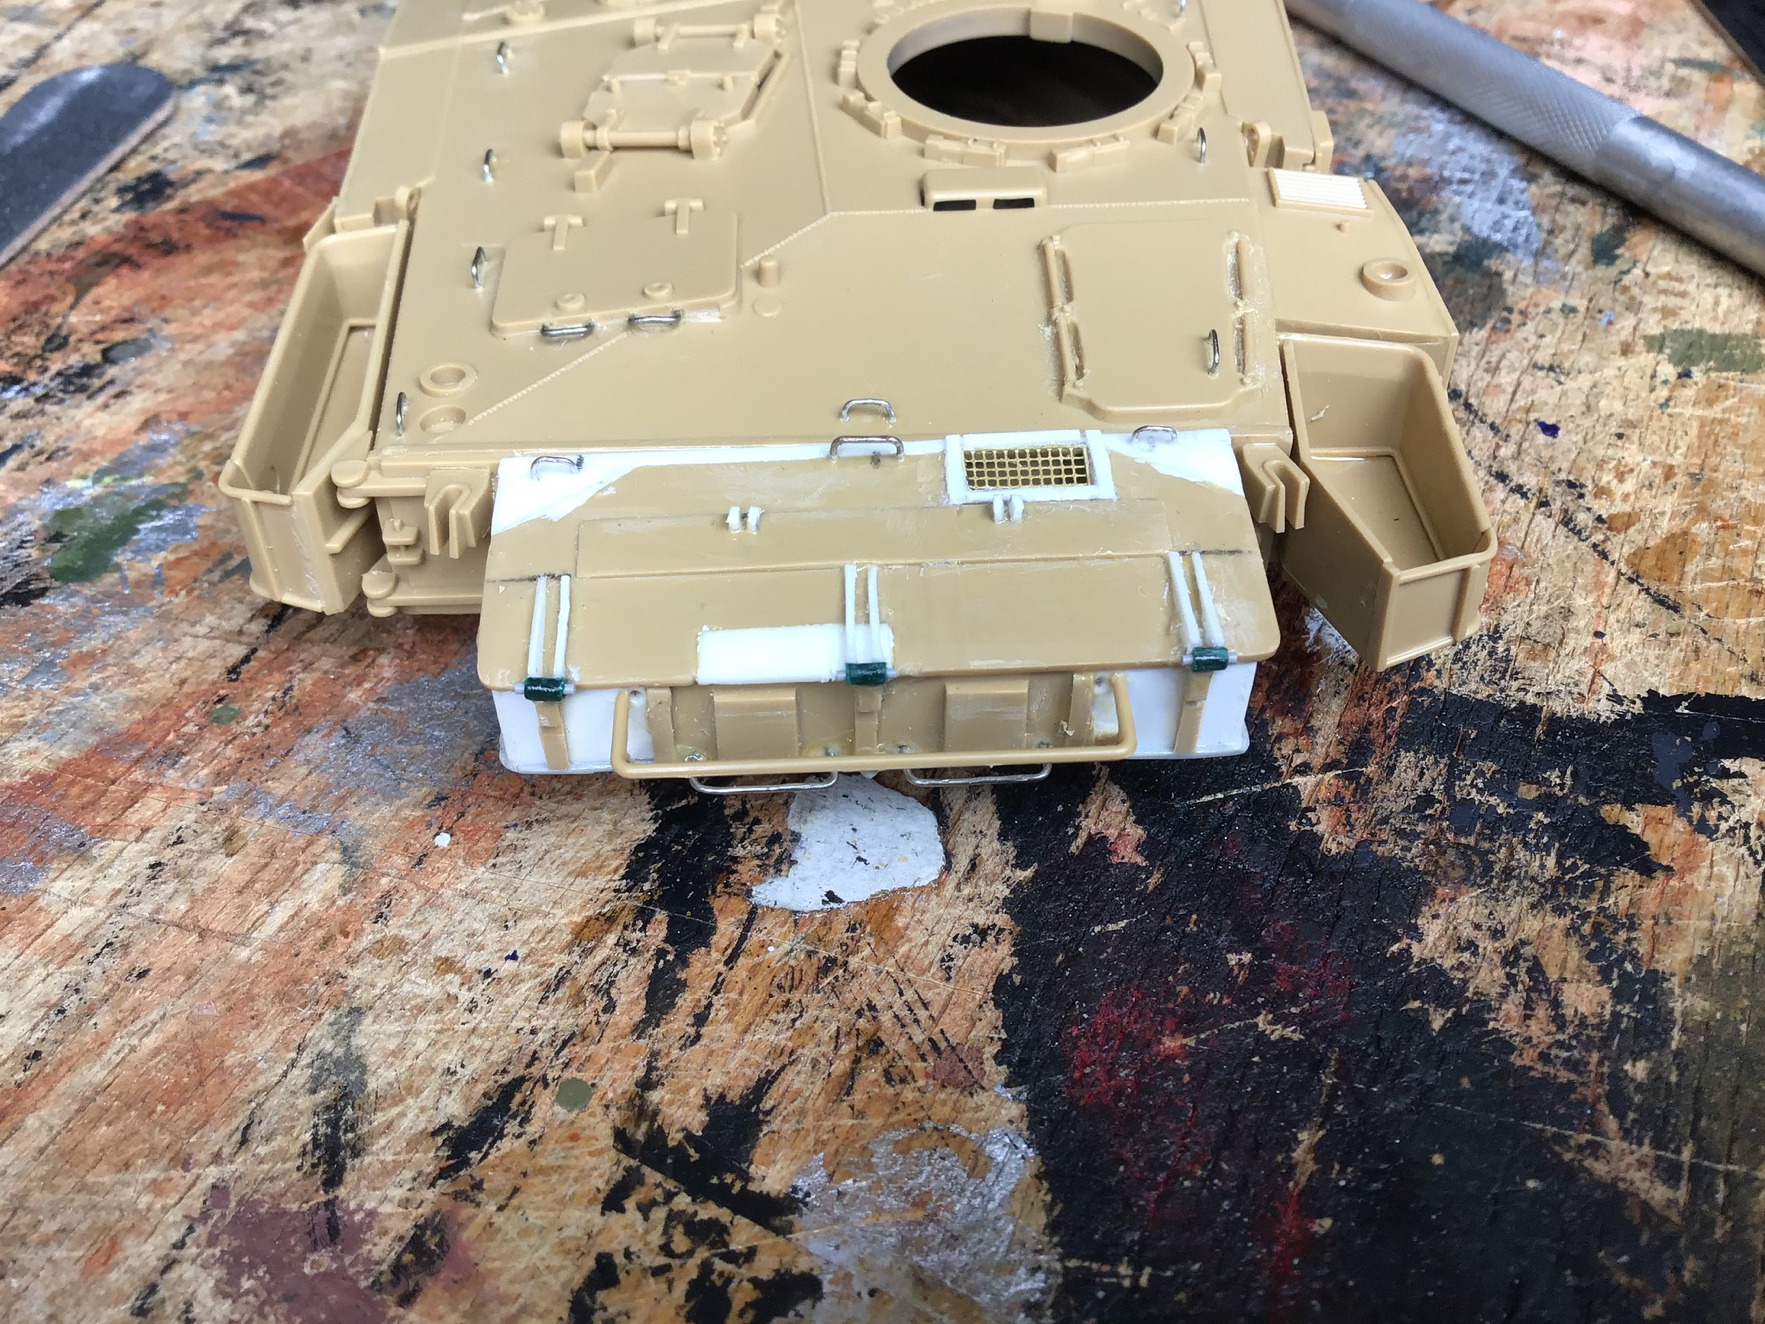
There are really 3 main issues with doing the desert version with The Tam kit (apart from some soft detailing in a few areas … rear turret bin as mentioned, and the front slope on the glacis plate in front the drivers cab and the 2 cut outs left & right to the rear of the drivers cab (simply fill these areas and re-add the weld lines.
The front slope should really be flat all the way across and not have the initial added armour cheeks - both Russ @rfbaer have corrected this and its really straightforward to do, just requires care and a careful hand.
This is how I did it in my Cr1 CTT build.
Challenger 1 CTT
Its from about post 26/27. If you want it correct, you should not just add or make inserts to raise up the level on the L & RH outer sides, this is incorrect and will give the slope a false height ( although it is hard to see unless you know about it).
Also, make sure you use the later exhausts as well (which need a bit of work to open them up).
Everything else you need is in the kit. The additional turret left hand side bins varied a lot from custom made baskets to Chieftain long bins (full or cut in half) or none at all. I would pick a wagon from an image and do it that way.
Tip: you can link to a specific post in a thread by clicking on the “chain links” icon under the post. Doing this copies the URL for that message to your clipboard, so you can paste it somewhere else to have a link to it.
Yeah, I know that - but the process covers several posts so it was easier to link the thread in this case. ![]()
Then I’d just link to the first one and say it continues from there ![]()
Deniz- totally forgot about the front slope (upper glacis) but Johnny’s right: replacing it works better and is more accurate than building up the pieces to either side of it. The second time I did it I replaced it, not a bad thing once I got over hacking out a big hunk of the upper hull.
Also, there’s been some discussion regarding the ride height if built oob, the issue being the status of the hydro gas units. It seems Tamiya depicted a tank as if parked for a bit, with the suspension slightly “low”. Others here can verify that, but I built both of mine oob. I think the difference is about 3mm in 1/35 scale.
I always follow Cr1 builds as I really enjoy building older Tamiya kits, and it’s a very “handsome” tank, if I can put it that way…
All ex Cr1 crew are nodding their heads in agreement and appreciation!! ![]()
![]()
And yes, Russ is also correct about the finished ride height OOB … It generally shows a wagon with a cold hydrogas suspension… (Which Tamiya probably did measure it like from a cold tank, so not their fault really) To me it’s not worth the effort of trying to make it look warmed up…in real life, it didn’t take long for it to cool down and return to a rear heavy look anyway …
I grew up and got into modelling around the time of Desert Storm, so I have a really soft spot for Challenger 1s. I don’t think anything came close to the look of the giant flying saucer turrets with all sorts of bins and frames boxes welded to it until Merkava IVs.
Thanks for the pointers on the glacis plate and the link to the CTT build (I saw that thread but had not looked at it that closely). I was under the impression that the protrusion could just be sanded off, but looking at that part now, it is way too much material to take off and then smooth out properly. Cutting and replacing the entire panel seems to be the way to go. Also, was the SMM solution the 2 grey pieces that go on the sides to smooth the protrusion out?
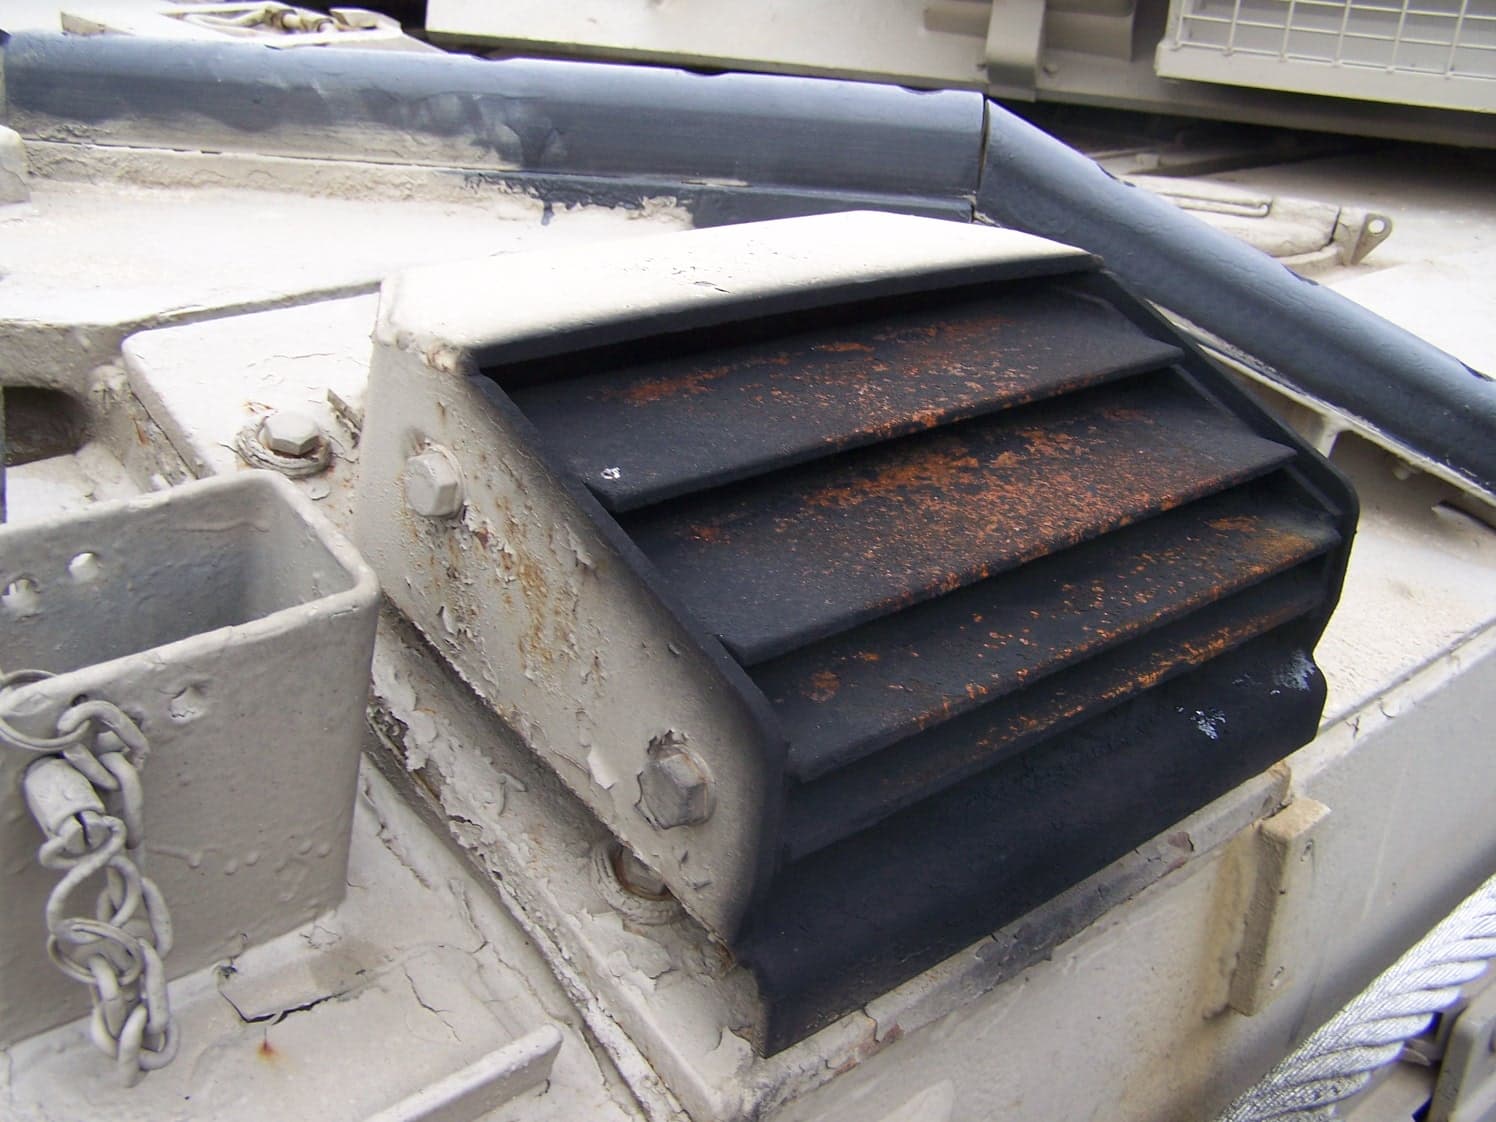
On the exhausts; are the flaps (?) moveable - meaning can they open up during operation and completely close like the one in the Tamiya kit? The Tamiya part also looks quite skinny (not as thick armored) and not raised from the hull compared to the actual photos (there seem to be internal dividers under the cover as well. That original build article, which I am still looking for, had the plans for building them from thicker plastic sheet.
Is there also a PE set that includes the interestingly-shaped braces on the turret right front edge (also what are they for, really)? The Eduard one didn’t, but I think one of the builds here had that as PE parts. I might be able to use photos/instructions of that set as patterns for myself.
Finally, thank you all again for your help…
Deniz
That was the way they tried to make it flat, however, its not correct. Adding those 2 bits gives you the incorrect dimensions for that area of the glacis. (in effect it makes it slighty higher across the whole width)
Exhausts - Fixed
Tamiyas do not show the gaps but its an easy fix.
The added bits on the RH front of the turret are just turret reinforcing strips. Easy enough to scratch or SMM do include them as PE in the Cr1 Large set.
Ah, I missed the reinforcing strips on the SMM’s photos of the large set. That is exactly what I needed. I think the photo you posted for the exhaust came from the Prime Portal Walk around here, which seems to be a Jordanian Challenger. I just wanted to check if these photos are accurate/useable as a reference for a Desert Storm version (because it is missing that reinforcement strip on the turret edge). Wikipedia says these were “donated” directly from UK stocks in late 90s to early 2000s, so I think they are, but just checking.
Deniz
The Jordanian Cr1 is a pretty good series of ref images even though it does not have the reinforcing strip … here is another DS Cr1 set of images as well.