Testing session airbrush

So, you must of course decide for yourself about taking your airbrush apart for cleaning. I can only repeat that in my experience the majority of problems modelers have with their airbrushes are the result of poor cleaning practices.

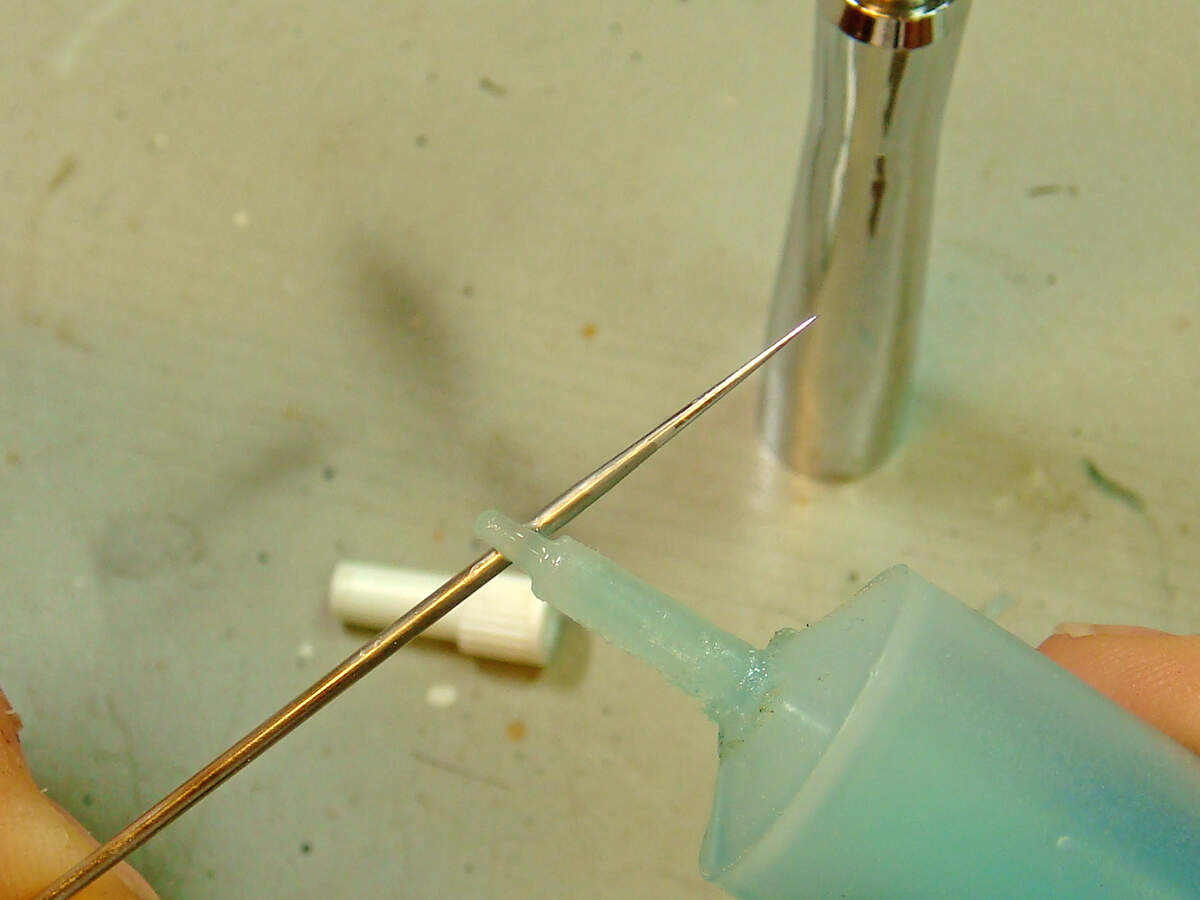
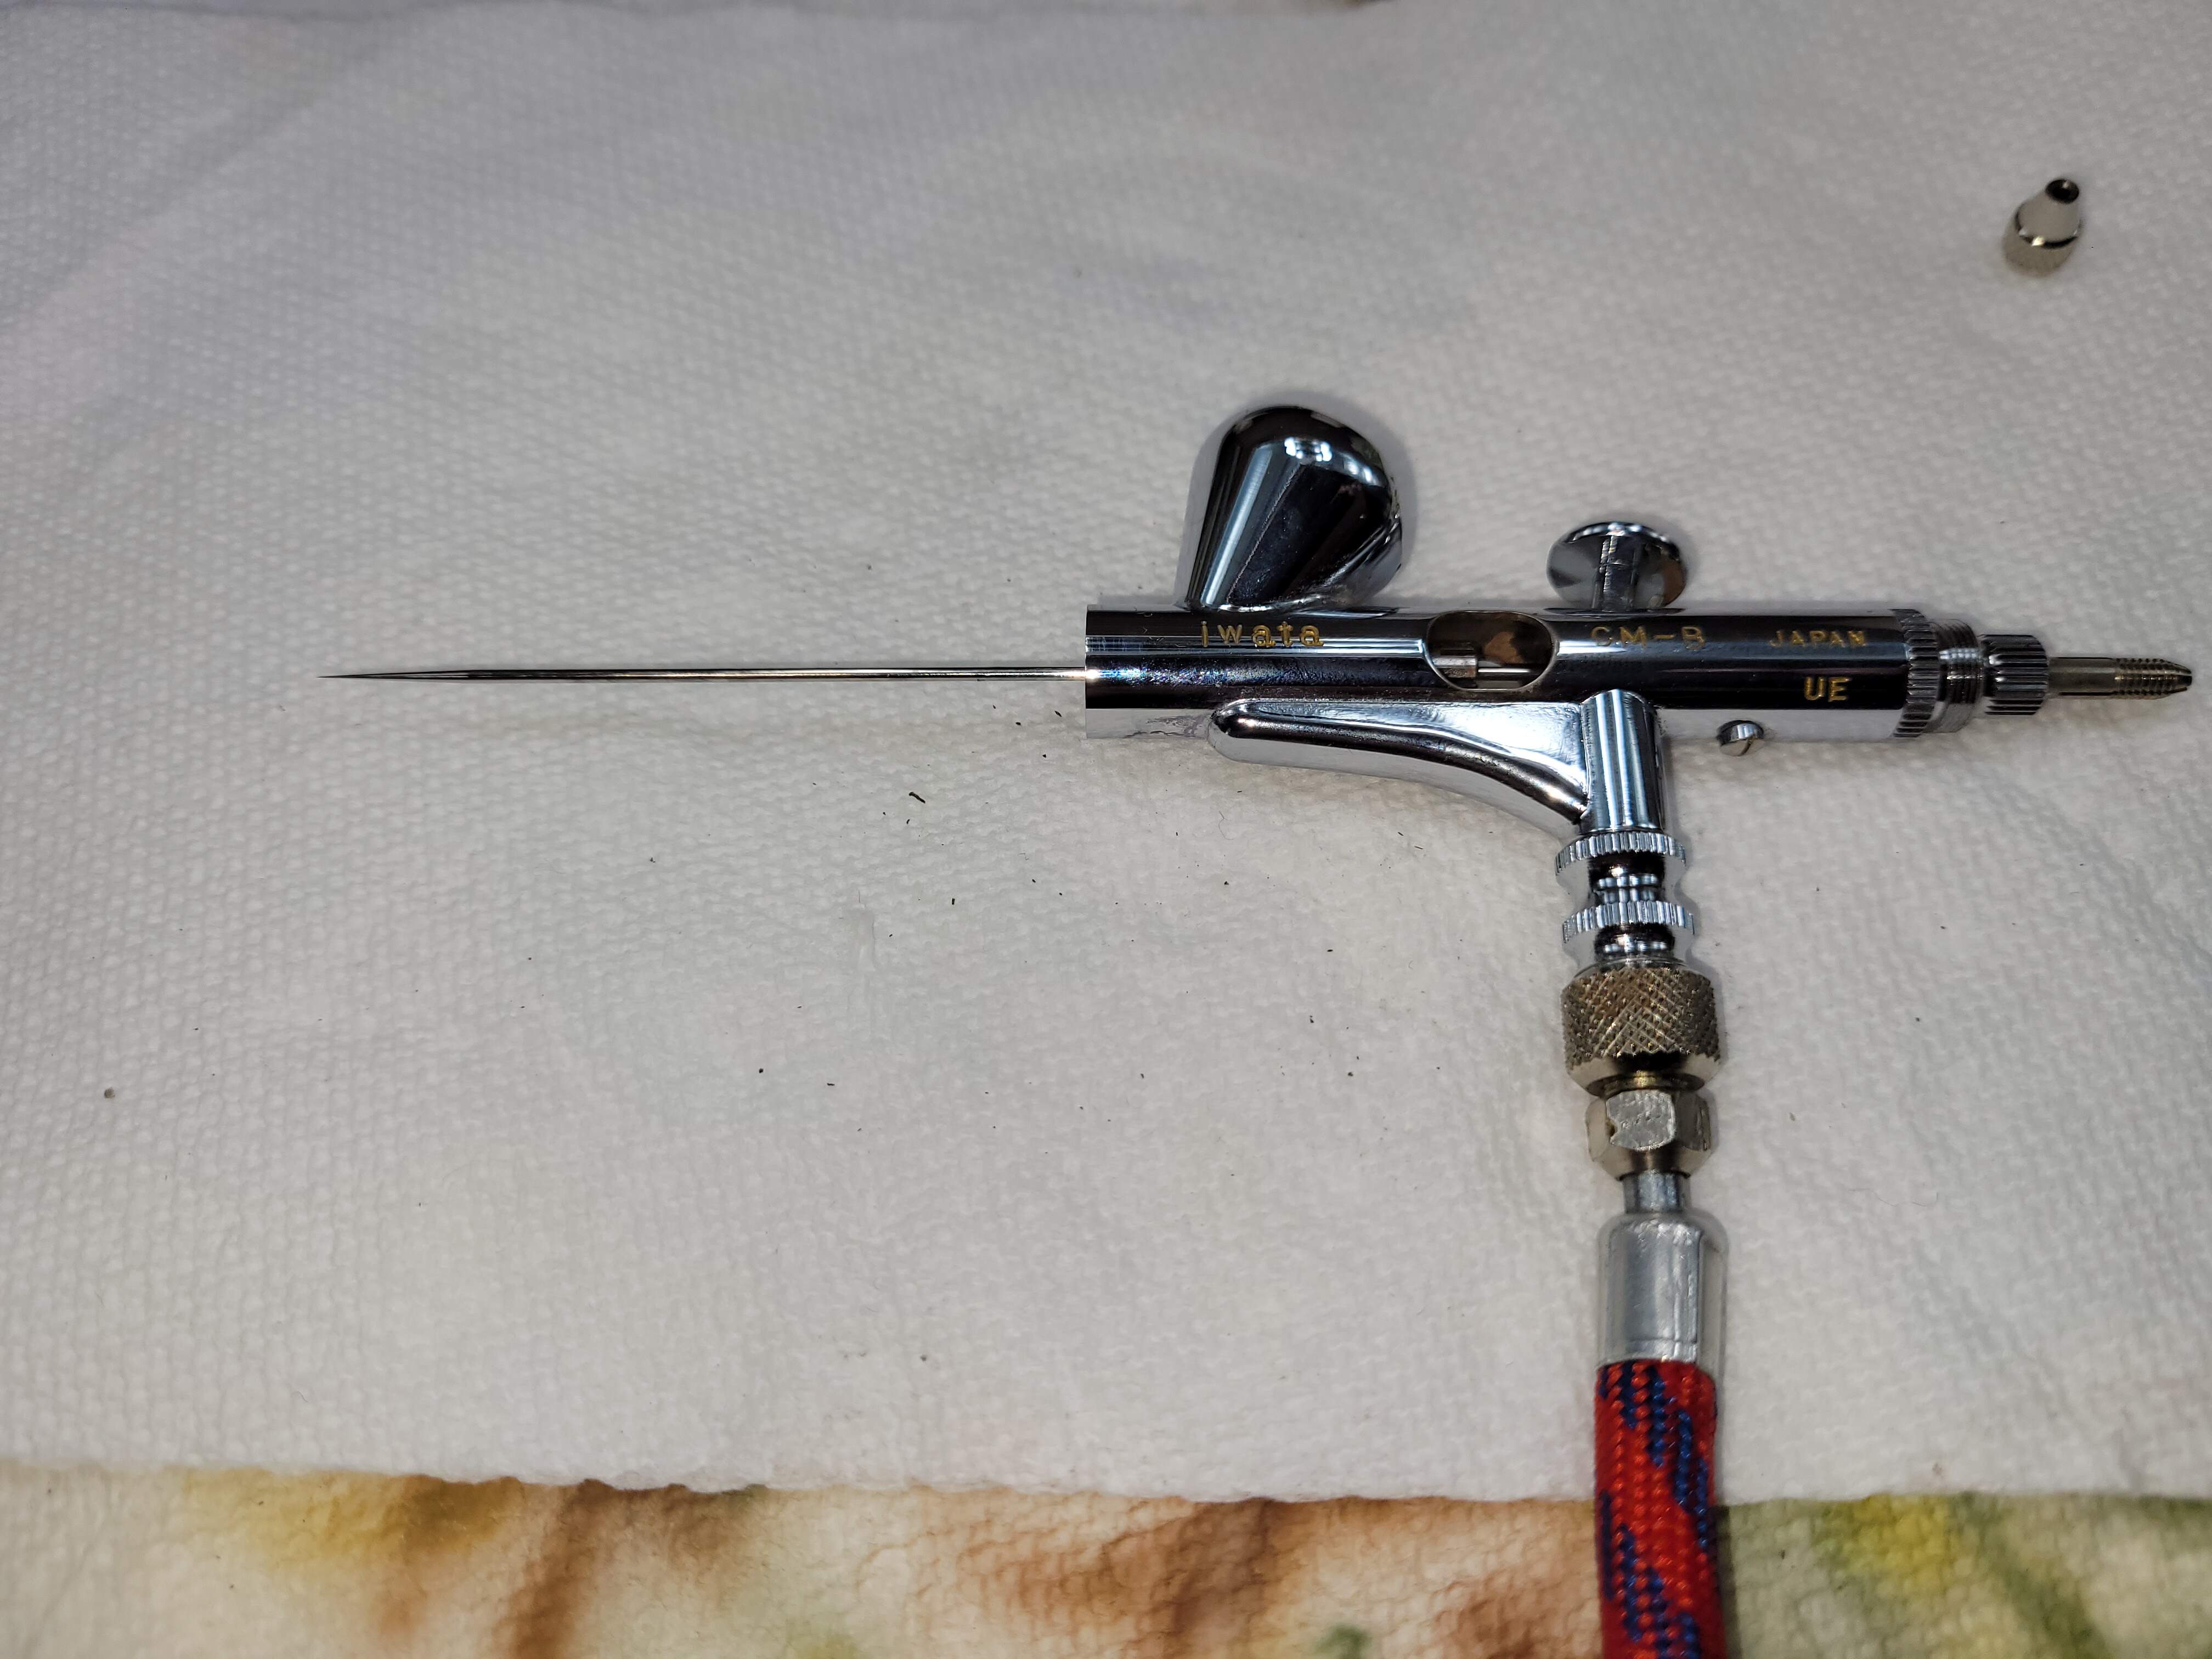
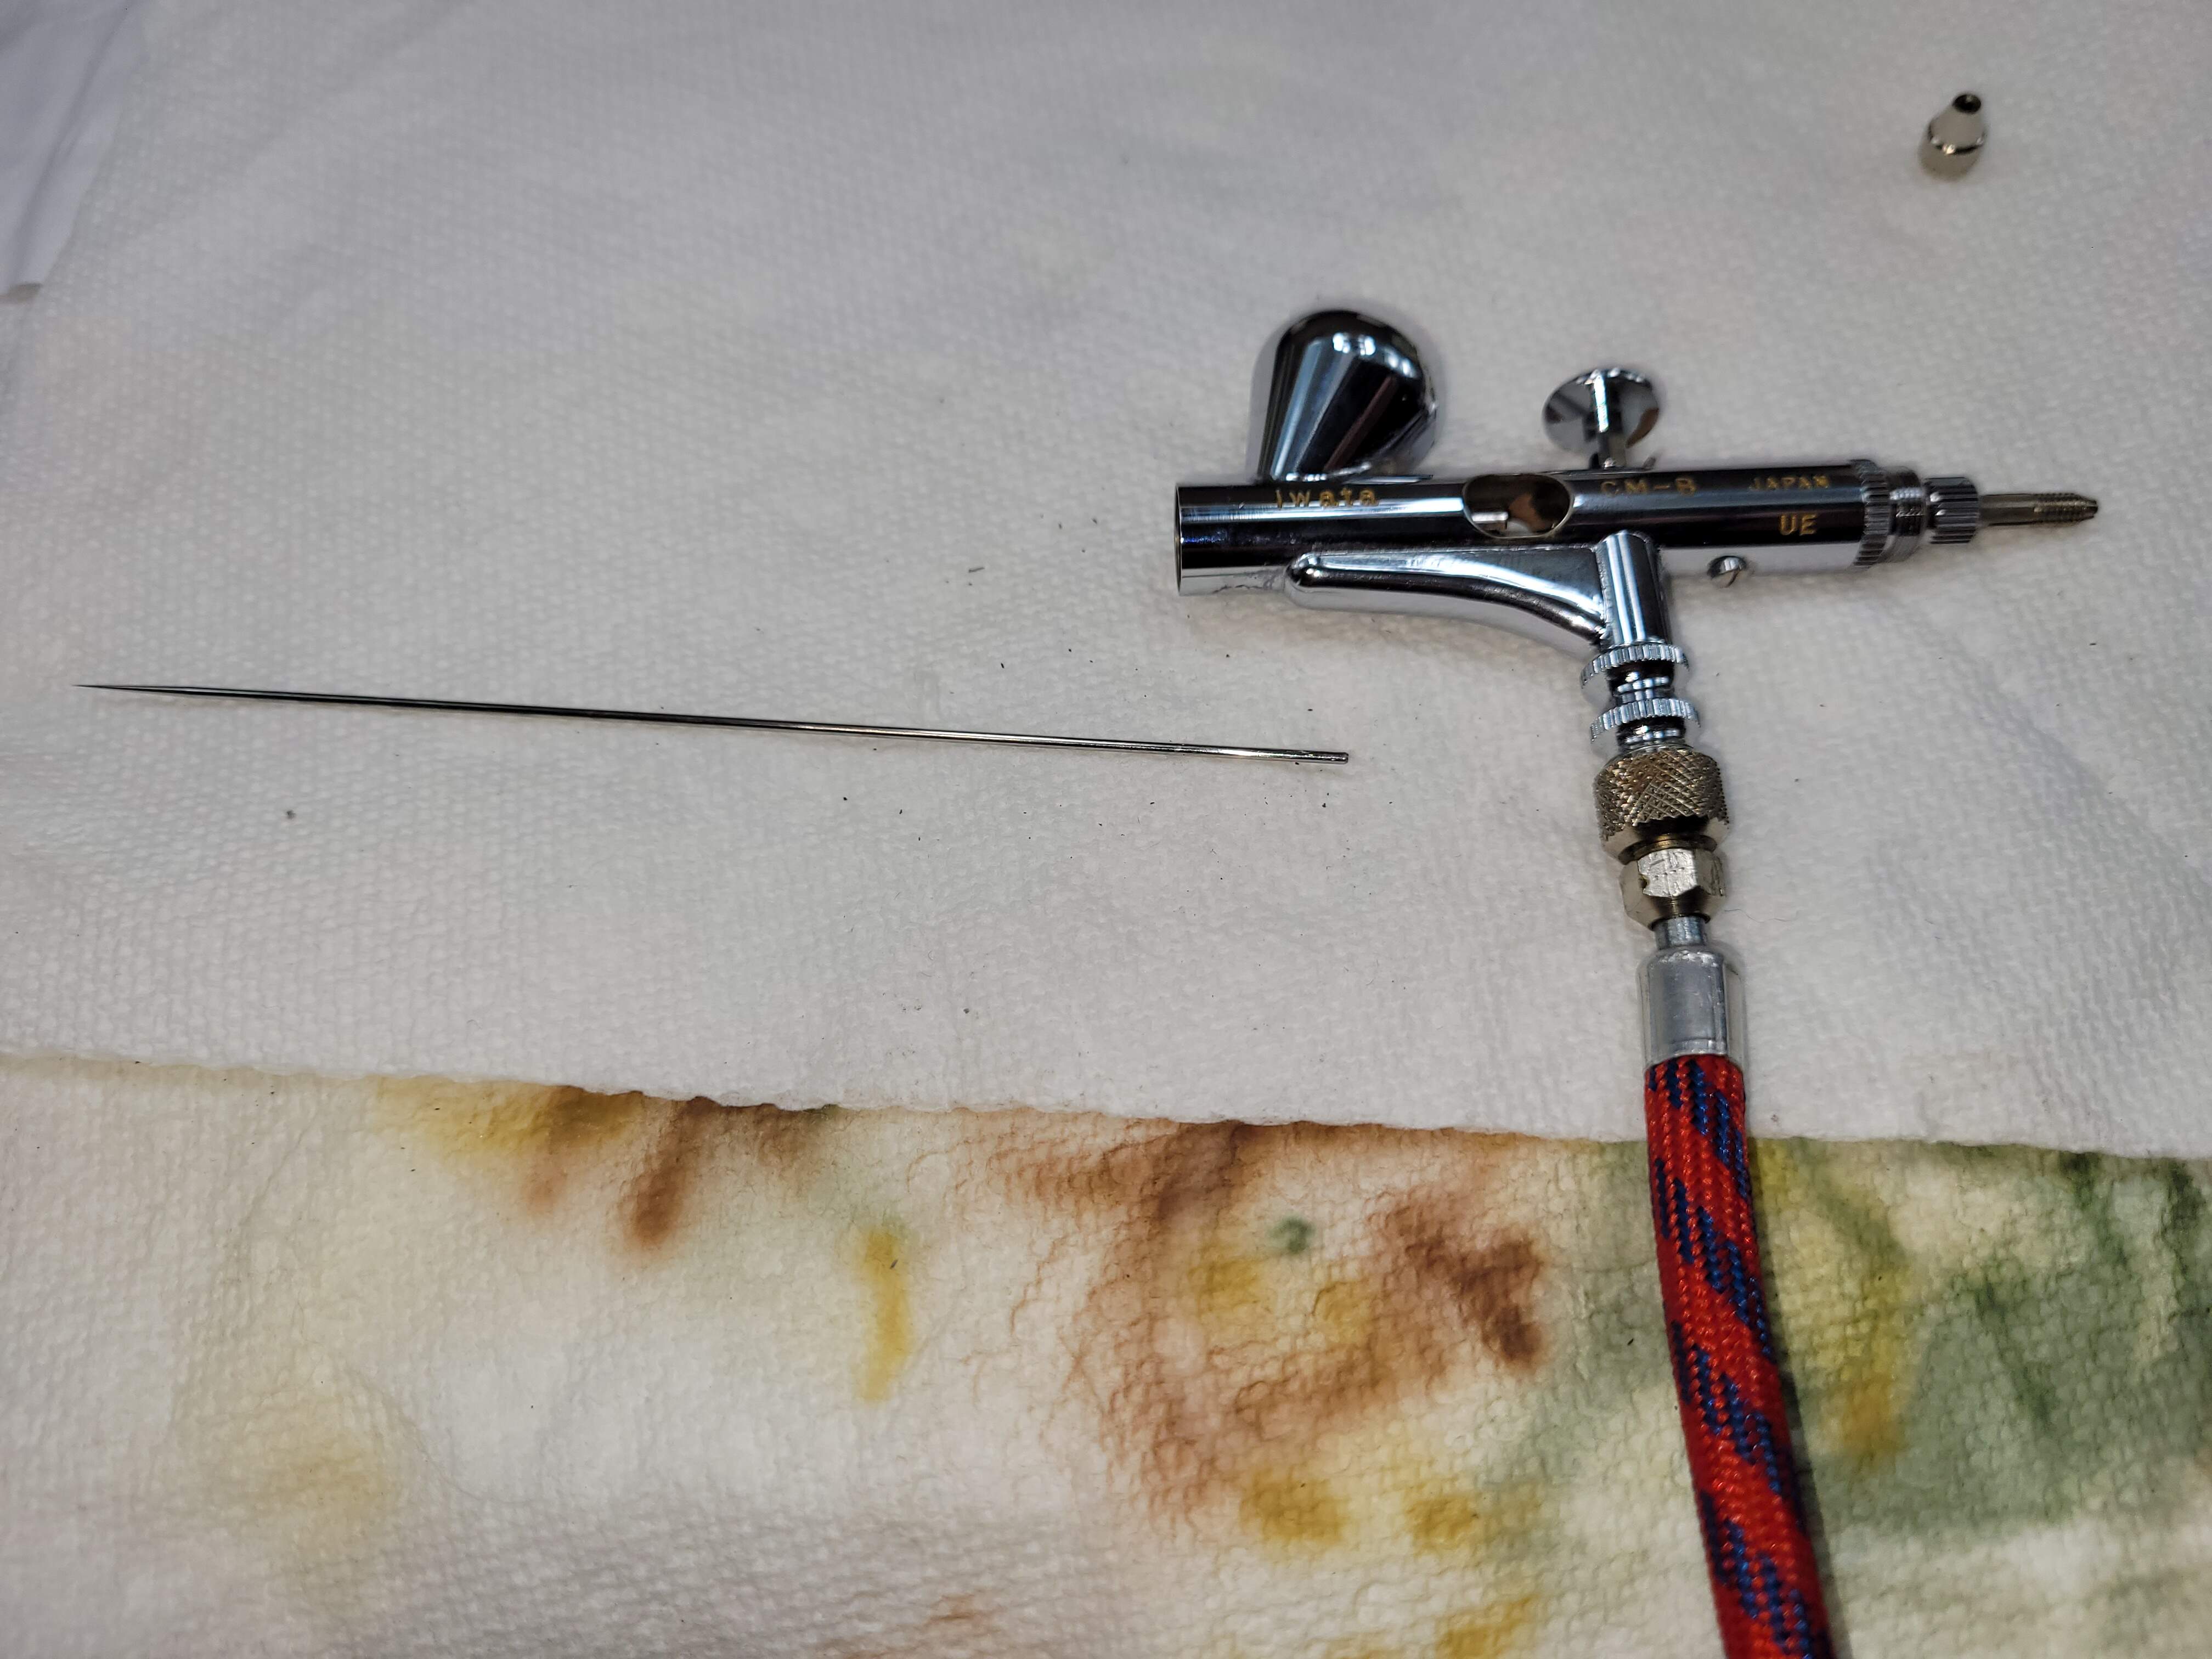
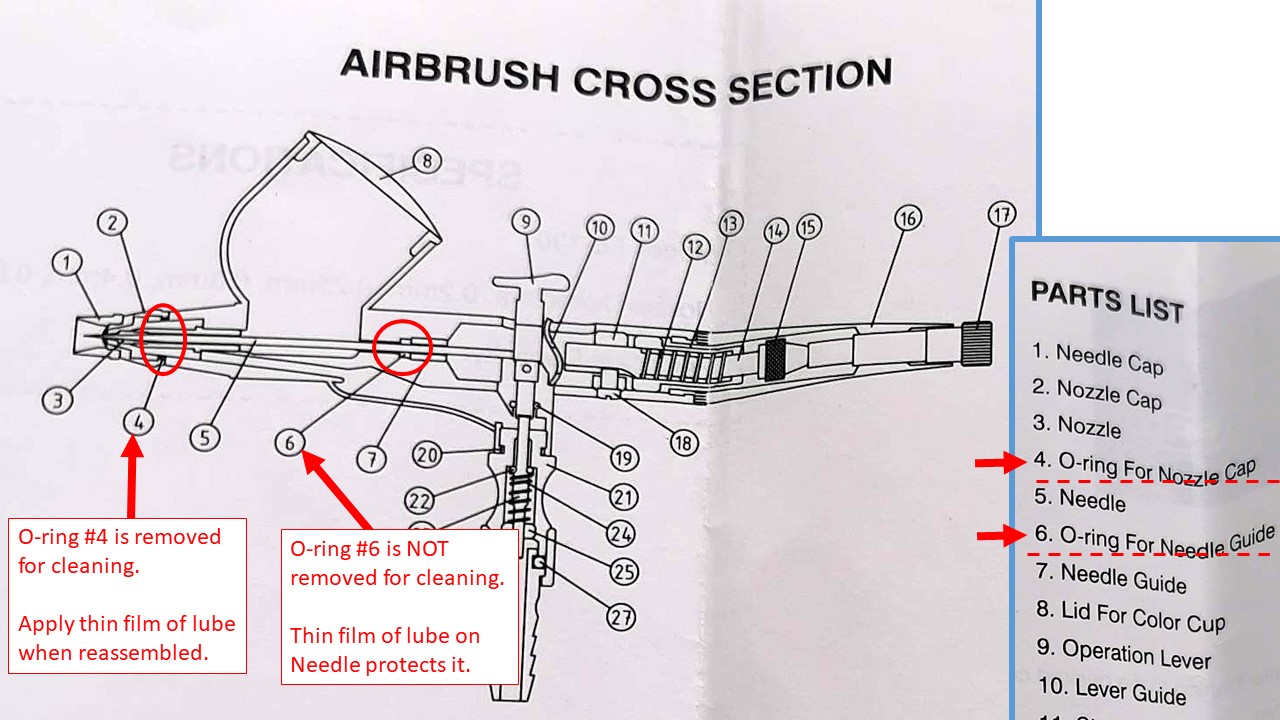
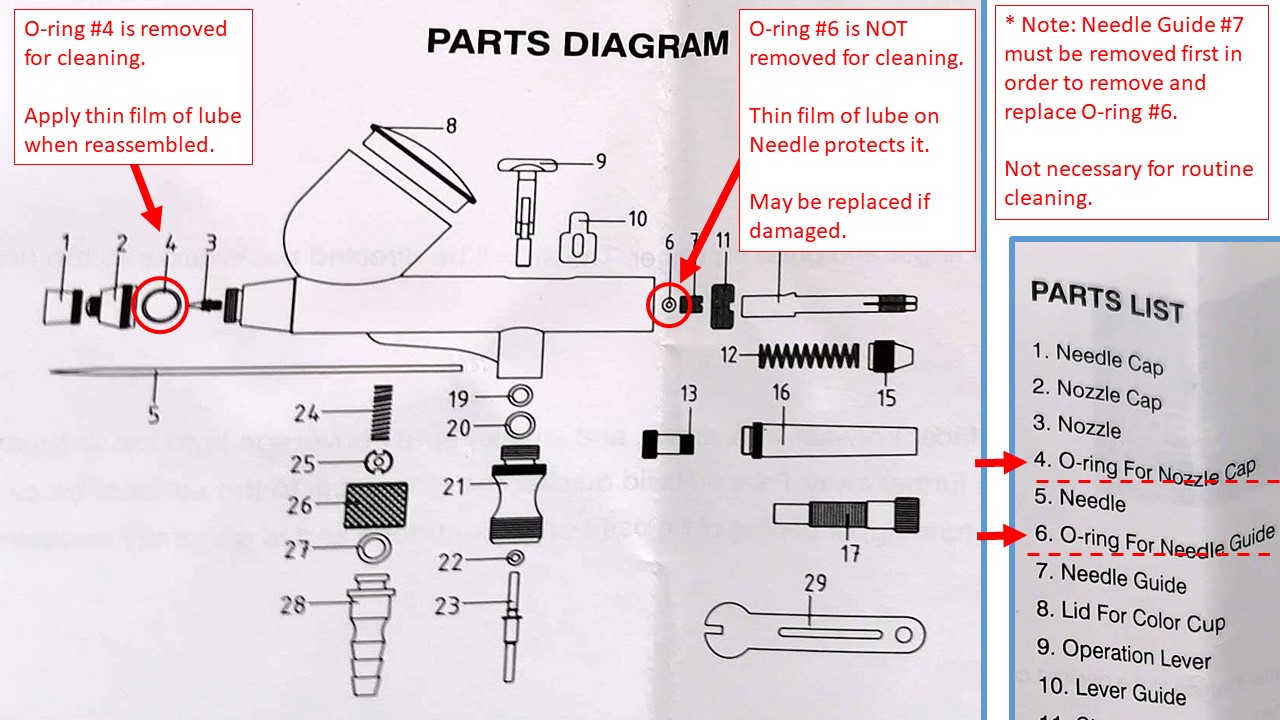
The damage to the end of your “needle cap” (part #1 on your diagram, I think) is not serious. You can file and sand the burs smooth if you like. It may be possible that if any of the burs or dents go towards the inside of the cap that they may disrupt the pattern of spray or collect droplets of paint (causing spatters). As Mead93 says, you can remove this to spray. (I don’t use the one on my airbrush at all except when storing it to protect the needle.)

This YouTube video might help with assembly. I believe that it shows an airbrush very similar to yours (the needle adjusting / limiting device is a bit different, but the rest appears pretty much the same):

Airbrush Basics:: Master G33 Assembly

I’m tempted to say watch this with the sound turned off because the presenter offers some, IMO, bad advice, but in the main what she says is good info… So here are the points that I disagree with:

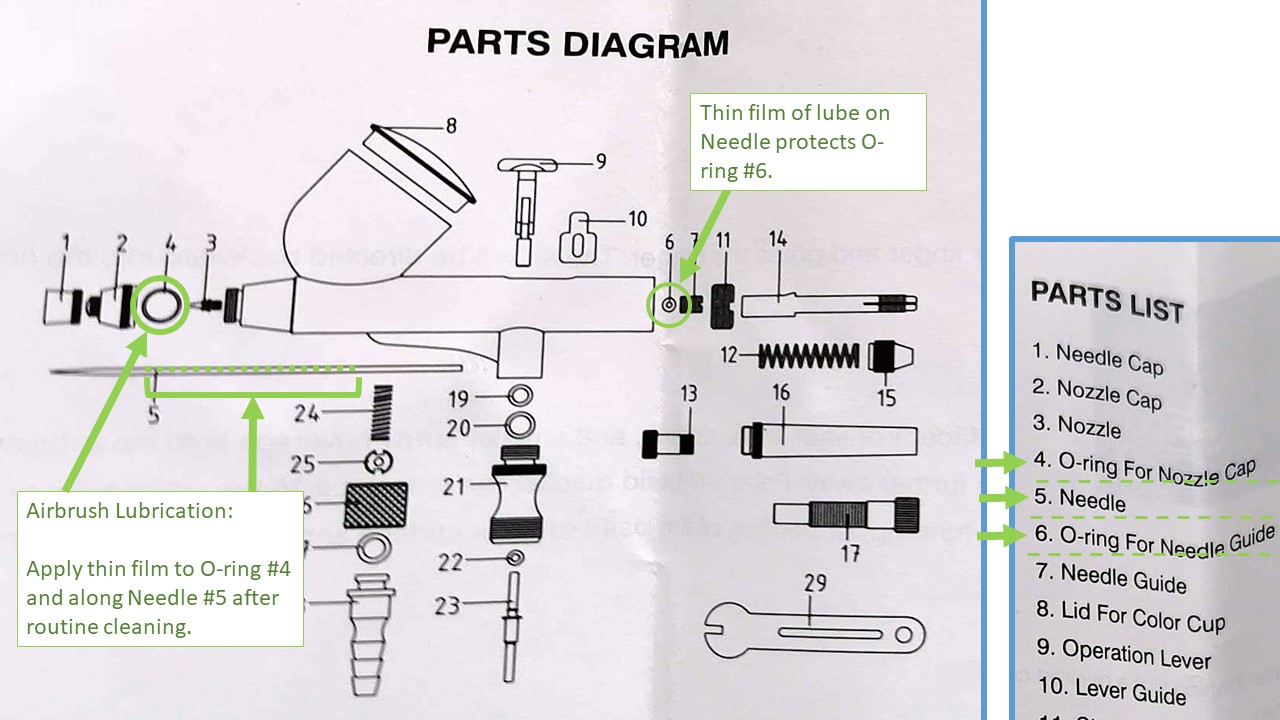
I totally disagree with her advice on using ANY type of oil in your airbrush except one of the proprietary airbrush lubes or common drugstore glycerin. DO NOT USE “sewing machine” oil or any other such lubricant. Mineral oils will give you problems with your paints. They will contaminate the paint and cause issues with uneven drying (enamels and lacquers) or “fish eyes” (water-based acrylics).

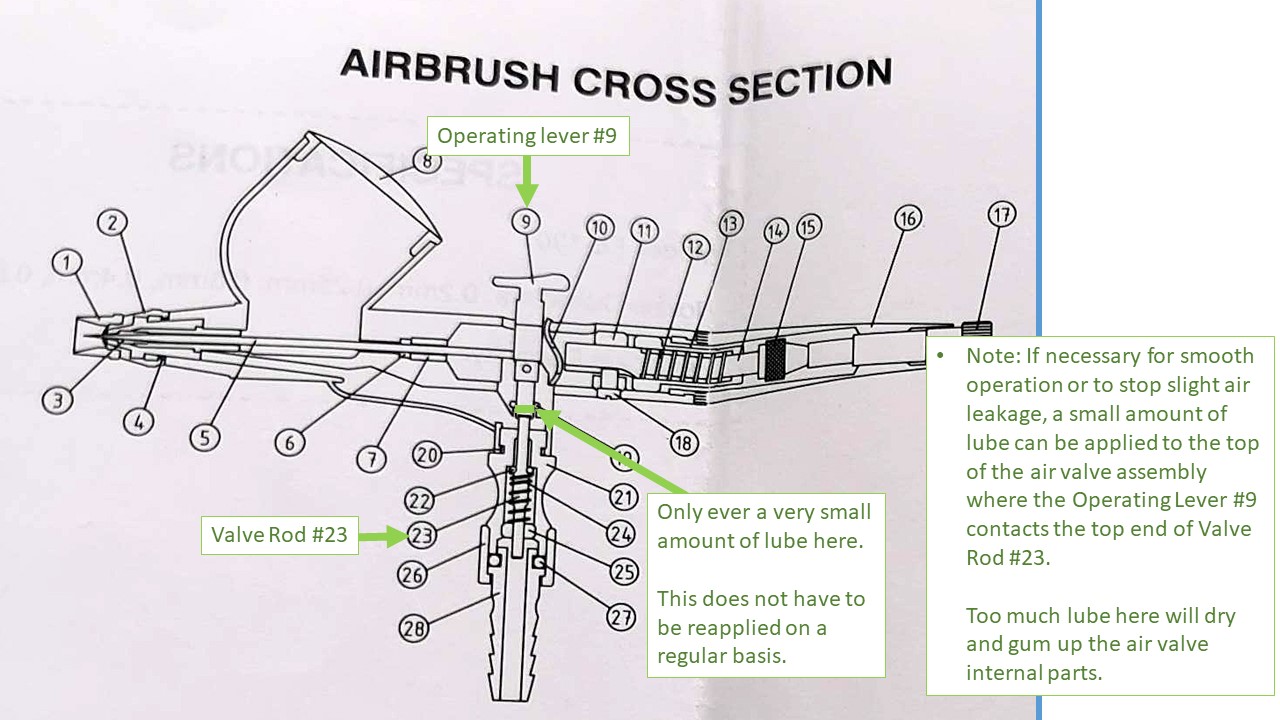
DO NOT USE so much lubricant as she does. Her problems with her air valve are quite possibly because she has used too much lubricant in the past and her valve assembly is now gummed up with dried airbrush lube. A very light film is all any of the o-rings need, and just a very small amount spread on the needle from the shoulder of the tip back an inch or so.

(You should never have to clean your air valve assembly unless you allow paint to get into the handle and trigger areas of the airbrush body. If you do have to clean it, please don’t flood it with lubricant afterward. That excess lube will simply get into the airstream and possibly cause problems with your paint. The excess will also eventually dry into a waxy buildup causing the exact same kind of problem the presenter is having.)

Find a cleaning solvent that will dissolve the kinds of paint that you spray once it has dried. The presenter uses rubbing alcohol (~70% isopropyl alcohol). If this works for her, good. I think you will find that with most model paints you will need something stronger. I spray Tamiya and Floquil paints. These are both thinned (reduced) with lacquer thinners (aka “cellulose thinners”) and this is also what I use to clean my airbrush.

Lacquer thinners will also generally remove all other types of hobby paints, even once dried. Lacquer thinners WILL NOT HARM any of the parts of your airbrush, to include the o-rings and other seals. Consider that these same airbrushes are used by commercial and industrial painters to spray automotive lacquer and 2K paints. If the thinners for these destroyed the equipment, airbrush makers would use better materials.

Ammonia based cleaners will not cause any long term problems. Many air brushers use glass cleaner to clean their airbrushes. There is nothing wrong with this if it gets the paint out. The ammonia might cause some discoloration in any exposed brass on some metal parts, but the amount of ammonia contained in household glass cleaner or even straight ammonia will not harm your airbrush. These cleaners evaporate from the airbrush and are not allowed to linger on its surface for days, months or years. This myth about ammonia damaging airbrushes comes from a false association of “brass rot” with airbrushes. (The history of the effect is too long to go into here. Suffice it say that the circumstances that cause “brass rot” are very different than the simple use of household ammonia products to clean airbrushes.)

You can try alcohol, like the presenter, but I think you will find that it will not dissolve dried on paint.

The presenter’s description of the difference between a single action airbrush and a double (or dual) action airbrush is a bit backwards, but that doesn’t change the useful airbrush assembly content. The rest of her presentation (hoses, regulators, compressors, etc.) is alright.

BTW, to avoid getting your airbrush hose in the way when you’re painting, simply wrap the hose once around the wrist of the hand holding the airbrush.

Finally, don’t be afraid to use the small wrench that came with your airbrush to remove and reinstall the paint tip. Just don’t over tighten it.

3 Likes

For cleaning my airbrush, I use Mr. Airbrush cleaner.
I believe it is from Mr. Paint?
That Slovakian paint manufacturer?

Also, I did dip the needle as a whole in the airbrush cleaner.
But nothing did come of more.
It also doesn’t help to be almost out of airbrush cleaner either.
My supply is dwindling and I’m not sure if I have the money to buy new supplies for my model making.

First of all, thank you for providing the usefull video.
I think I will find it much more comfortable to handtighten the tip/nozzly.
As I can’t overtighten the part and therefore damaging it, including the O-Ring.

When I was disassambling and reassambling the airbrush, I did use the wrench that came with it.
But I only gave it a really small turn, just to make sure that it stayed in place.
I haven’t tested it yet how it now works, I mean the airbrush.

I must tell, I never heard of any oil or something.
And also not about lubricating my airbrush, that is a really new concept for me.
I don’t even know if my model store even has one of these products.

Anyway, thank you for the detailed information and help with my airbrush.

1 Like

The proprietary airbrush lubricants can be ordered online from many sources. The shop that sold you your airbrush should be able to source one of them for you.

However, you might ask your local pharmacist about purchasing some glycerin. You would want it either pure or mixed with alcohol - not mineral oil or baby oil. Unscented and not mixed with soap would also be preferable.

However, proprietary airbrush lubricants are quite easy to find online. You should search for:

Badger RegDab Needle Juice, product #122
Paasche Airbrush Airbrush Lube, product AL-02
Iwata Medea Super Lube

There may be others, but unless you can determine the contents or makeup, I would stick with one of these or medical grade glycerin. Stay away from any kind of mineral oil based product. Definitely DO NOT use any type of PTFE or silicone based lubricant. Both mineral oils (or any petroleum based oils) and / or PTFE or silicone lubricants are possible sources for paint contamination resulting in problems with drying and / or coverage (“fish-eyes”).

Mineral oils, like sewing machine oil or hair clipper oil, used as an airbrush lubricant might have been OK back in the days when modelers were spraying either mineral spirits based enamels or lacquer paints. However, with todays water-based or cellulose thined (alcohol and / or lacquer thinner) acrylics, potentially adding an oil into the system where it could contaminate the paint is asking for trouble and ruined finishes. There is no need to do this.

FWIW, I have a small tube of Iwata Super Lube that I have been using for many years. I actually use about 1/4 to 1/2 of a drop (or less) to lubricate the needles on my airbrushes. A bottle of any of the above lubricants will last you a very (very!) long time. If it doesn’t you are using entirely too much.

Thank you for your reply.

Do you use any special tools to apply the lubricant on specific parts of your airbrush?

What you are describing is a little bit vague to me about the quantity to use on parts etc.
Because I can’t hardly believe that so few is more then enough for a whole airbrush.
And that you are able to do so long with one bottle.

Thanks again for your answer.

1 Like

It’s very easy to read all of this and then “over-think” the problem. Please do not think that this is a complicated or difficult job. It is not.

Here is a photo of my main (i.e. the one I use most) airbrush disassembled for cleaning. You will note that I have not removed the parts that control the paint flow (set the needle movement) or the trigger or the air valve. These parts should not require cleaning unless you spill or slop paint into the body of the airbrush. With care, this should never happen. If it does, then simply clean these parts, too.

Once cleaned, I reassemble the tip parts. I then apply a thin coat of the lubricant to just the shaft of the needle (that is the part that does not taper to the point). It is not necessary to lube the point of the needle since it does nothing but move back and forth in the paint channel.

You will notice how very little lubricant is actually used.

Next, I spread this small amount along the shaft of the needle back an inch or so (~3-4cm) along the shaft, The only part of the needle that actually needs lubrication is the part that slides through the air seal o-ring at the paint cup and through the openings in the trigger. That’s it.

Again, you’ll note how very little lubricant is actually needed here. This is why a small tube or bottle will last a very, very long time. The primary purpose of the lube is allow the clean needle to slide freely though the paint seal o-ring while preventing any paint from leaking into the body of the airbrush or any compressed air bubbling into the paint cup.

If you need to lubricate the small o-ring around the air tip, then the lubricant left on your finger tip is enough for this job, too. Simply pick up the o-ring and rub it between your finger tips with the slight amount of lube between them.

No special tools are need for any of this (except for the small wrench to remove and re-tighten the paint tip). If you must disassemble your air valve, you will probably need some tools for that, though. (Another good reason to take care any never get any paint into the body of your airbrush.)

If you use too much lube, it will dry and make a waxy coating that can gum up your trigger and or air valve assembly. If you use one of the proprietary airbrush lubricants made with lanolin, then this waxy build up is easy to remove with glass cleaner or alcohol (or cellulose / lacquer thinner). However, best to avoid the problem with good practices.

1 Like

Thanks for the detailed information. I never knew the needle needed lube, but this was naivety, it obviously makes sense. Curious how often you add lube? Every time you remove the needle? Or just once in a while?

I add a little dab of lube every time I pull the needle out for cleaning.

Not to really confuse the issue with my own bad habits, but I have a couple of different cleaning routines that I use depending on the circumstances:

Between colors I’ll just wipe out the paint cup and spray some lacquer thinners through.

After every painting session, I’ll start with removing the left over paint, spraying out the paint channel and then spraying through some lacquer thinners. I’ll then pull the needle, wipe it off and clean out the paint cup using lacquer thinners and a cotton swab. I’ll lube the needle and reinstall it. As a final touch, I’ll spray a few drops of clean lacquer thinner to check that everything is assemble correct and working.

Every few painting sessions, I’ll do a more thorough cleaning by removing the air and paint tips. I clean everything as above and also clean the paint and air tips and the paint channel from the paint cup to where the paint tip screws on. Again, I lube the needle before I reinstall it.

I will alter this routine, also, depending on the type of paints I’ve been spraying. So, for example, if I’ve been spraying metallic colors, I’ll always give the airbrush a thorough cleaning before I change to non-metallic colors. I might do the same if changing from dark colors to lighter colors, especially whites or very light blues. Not all the time, though. Depends on what I’m doing, really. However, light colors to dark generally don’t need any special attention.

If I’ve been spraying water-based acrylics, I’ll do the same before switching to enamels or lacquers. Same for enamels to acrylics. However, lacquers to cellulose-based acrylics and back OR enamels to lacquers and back I don’t do a special cleaning, just my normal routine. (I consider both of these “families” of paints to be pretty much the same for maintenance / cleaning purposes.)

So, basically, I clean and lube the needle between every painting session, no matter what. Clean the tips after every few sessions or when I notice any indication of clogging. I’d say “every few sessions” probably amounts to every 2-3 painting sessions. Lacquer paints tend to “self clean” since the thinners will re-dissolve any paints inside the airbrush, so I might go longer between thorough cleanings if I’ve only been spraying lacquers. However, ALL acrylics resist smooth re-dissolution and any dried paint must be cleaned out to remove it. Acrylic paints build up faster in the airbrush and require more frequent cleaning to maintain / restore performance.

The number one wear part in the airbrush is the air seal o-ring between the paint cup and the body of the airbrush. The needle passing through this seal and then being worked back and forth has to be clean and lubricated to mitigate this wear. A dirty needle with a film of dried paint is like running a sanding stick through this air seal o-ring. Once it becomes worn, air will bubble though into the paint cup, pressure will drop at the tip, and paint can work its way into the body of the brush and into the air valve.

Usually, replacing the air seal o-ring is a factory maintenance job (although Badger used to support their dealers at the local hobby shop or arts supply store with the special tool to do this for their walk-in customers). These seals can be replaced by the user, too, but it’s a real PITA (after you’ve sourced the new, replacement seal). Best to avoid the problem all together with good maintenance practices.

1 Like

Good call, I mostly follow the steps you do, but didn’t know about lubing the needle, time to start going this for sure!

1 Like

To the above excellent comments, I would like to add a technique I first saw a Paasche T-Shirt artist using. “Needle Removal - Always Push Forward”.

It helps keep paint out of the rear areas of the airbrush like the trigger assembly.

I don’t run my airbrush dry before cleaning because it’s easier to clean when the paint is still wet. I spray thinner wipe out color cup ad per normal etc.

"Needle Removal - Always Push Forward"

This avoids pulling a dirty needle back into body of airbrush. It avoids pulling paint against and into seals like pulling needle from the rear allows in some cases.

3 Likes

Hear, hear! Excellent advice.

First of all, thanks again for all the help and information you all provide me.
It gives me a real good inside on the cleaning practices of the airbrush.

Never seen or heard of the ‘pull forward’ method.
As I’m beginner and not yet fully confident of my airbrush cleaning and operating skills.
I think I stay with the methods of @SdAufKla because he clearly has lots of experiences with airbrushing.
And he is able to give very detailed, in depth answers with a lot of useful information included.
But thanks for sharing it anyway.

I must make a quick note here, I’m currently using my airbrush not that much at the moment.
I’m just having consistency problems with my own activities and schedules in my daily live.
And have to puzzle and find what works and doesn’t work for me.
As live is always changing and it could be difficult to maintain a consistent schedule.

However, I will do my best to get more active and working again in the scale modeling hobby.
I never abandon it and I will keep it running whatever the cost may be.

Thanks again for replying everyone.

While I appreciate the vote of confidence, the “pull forward” technique is perfectly sound and reasonable, so it should not be dismissed so easily.

The only drawback is that is does require that the paint tip has been removed before the needle can be extracted forward. It also requires that the needle be reinstalled before the paint tip can be reattached which also means that the needle must be allowed to “float free” to be adjusted and locked in place ONLY AFTER the paint tip has been reattached. The needle should be well to the rear to allow plenty of room for the paint tip to be screwed onto the body. Then the needle is gently pushed forward to close the paint tip, and the needle is locked in place.

(If the needle is reinstalled and locked in place before the paint tip has been reassembled, it is possible that the tip can be split as it’s screwed to the body and forced down onto the needle - which cannot move because it has been locked in place.)

If these changes in sequencing the assembly / disassembly steps are followed, then the “pull forward” technique can be used to mitigate potential damage to the air seal o-ring in the body from an accumulation of dried paint on the needle when it is removed.

If you intend to do a detailed disassembly of your airbrush to clean it then the “pull forward” technique is a perfectly good technique. What’s perhaps even more important to keep in mind is that IF for some reason you have not properly cleaned your airbrush and have allowed some paint to dry on the needle, the “pull forward” technique to remove the dirty needle should be used to avoid damaging the air seal o-ring.

It’s the end result that’s important, though. A clean airbrush will perform better and last longer without experiencing premature failure of its parts.

2 Likes

A clean needle, lubed up as per SdAufKla’s description, can be inserted from the rear end in a properly cleaned airbrush.
A dirty and paint smeared needle should be taken out in the forwards direction.

2 Likes

You can also go by feel to know if your needle is seated properly with the nozzle tip. Here’s what I feel for. When the needle come to a stop with the nozzle you should feel a metal on metal sensation. Talk a piece of metal and touch it to another piece of metal, but most people know how this feels. If, however, you feel a rubber or wood sensation when the needle stops then there may be something inside the nozzle tip.

When I get bubbles in my cup 99% of the time it is because of a tiny bit of lint, hair, dries bit of paint or even dust is preventing my needle from making the perfect contact with the nozzle. If the needle is not fitting absolutely perfectly with the opening of the nozzle air will back up. If the tip of the nozzle is deformed paint will not flow uniformly and air will back up from the point where it is damaged. If the needle is deformed then the same thing will happen. Use a magnifying glass to examine both.

I’ve been airbrushing for some time and always use a cheap hardware store brand lacquer thinner to clean my parts. Remember to always clean the screw on the needle tightening chuck at the back of the airbrush since it come into contact with paint when you are removing the needle. It takes very very little to GUM-UP your needle and nozzle from seating.

Fantastic advice from everyone. You guys are the best!

2 Likes

Thank you for your detailed reply again.

I think that the O-Ring you mean is situated in the inside of the airbrush?
And that I can’t see it that way?

Okay.

And once it is cleaned, I can reassert it again from the back again?

What I’m getting from here is that a airbrush is extremely sensitive to pollution.
And that is absolutely crucial to keep everything clean after each session.

Thanks for all the reply’s.

Really appreciated.

Yes. Slide the needle in slowly and carefully to avoid bending it.
Don’t fasten it before you put the front end parts back in place.
Fasten the nozzle and cap and then gently push the needle
forward until it fills the nozzle and then fasten it.

It might help to get an understanding of how the airbrush functions. This drawing shows an “internal mix, siphon fed” airbrush (author unknown). Your airbrush is essentially the same except that it’s an “internal mix, gravity fed,” so imagine that the light blue “paint source” portion is inverted or flipped up 180* to the top. Note also that this drawing refers to the “paint tip” as the “cone.”

f1fgbbn

Still, you can see that the needle passes through a guide and an o-ring which separate it from the “paint flow circuit.” This o-ring is the one which is most susceptible to damage from forcing through it a needle that has dried paint on it.

The solution is to clean the needle after every painting session to avoid leaving any paint on it to dry. If you have allowed a dry paint film to build up on the needle, it is best to use the “push the needle forward” or “pull forward” technique shown by @Armor_Buff .

However, with normal or routine cleaning (i.e. after every painting session), then needle will only ever have leftover wet paint on it and can be safely removed by pulling out from the rear. This avoids the necessity to remove the paint tip before removing the needle. However, the needle must be regularly cleaned, in any case.

If you only rely on spraying thinners or a cleaning solution through your airbrush between painting sessions, then a dry paint film will accumulate on the needle. This is true even if you swab out the paint cup and the visible part of the needle passing through it. (Because, you simply cannot reach the entire surface area of the needle through the paint cup.) If this is your preferred method of routine maintenance, then when you do do a thorough cleaning, you should disassemble the air and paint tips and use the “pull forward” method to remove the needle.

For regular lubrication after cleaning, the techniques are the same no matter how you remove and replace the needle.

Using your airbrush parts diagram (posted by you earlier), here are the identities of the parts in question:

You will note that the air seal o-ring (#6 in your diagram) is not removed for regular cleaning. It can be removed and replaced if damaged, but that requires first removing the Needle Guide (#7 in your diagram). With care and regular cleaning, the air seal o-ring should last many, many years before it might need to be replaced.

For lubrication, there are only a couple of places that need it. Again, using your parts diagram, here they are:

The internal air seal o-ring (#6) is lubricated by the lube you put on the needle as the needle is reinstalled. This same lubrication film will also lubricate the trigger (operating lever and guide) where the needle passes through them.

Note that you only need to spread a thin film of lubrication along the shaft of the needle. There is no need to apply lube to the tapered point. Refer back to the first picture to see that the needle point is only ever moving back and forth through the paint channel without touching any other parts (until it closes the paint tip).

In actual operation, the carrier (aka “thinner”) of the paint actually provides sufficient lubrication for the needle as it passes through the air seal o-ring. Therefore the needle lube really only comes into play as we reassemble and test the airbrush after cleaning (assuming that the needle is kept clean between painting sessions).

If the needle is allowed to accumulate a film of dry paint, then the lube on the trigger side of the air seal o-ring will help to mitigate any likely damage as the trigger is operated and the needle moved before fresh paint is added. Note, this is only a mitigation and not a prevention. A film of dry paint on the needle will increase the wear on the air seal o-ring no matter how much lube is on the back side of the o-ring. This is because the dry paint accumulation is on the forward portion of the needle which is forced through the front side of the o-ring when the trigger is pulled to the rear.

Again, refer back my comments about using the “pull forward” method depending on your airbrush cleaning routines and techniques. The bottom line is that a clean needle that has been properly lubricated is always the best condition for your airbrush no matter how you do routine cleaning.

IF you feel the need to lubricate the air valve assembly that is operated by the trigger (operating lever), then you need only apply a very small amount of lubricant to the top of the valve rod (#23) where it enters the airbrush body and contacts the bottom of the trigger. As you press the trigger, the valve rod will move up and down and the lube will seep into the air valve assembly to provide sufficient lubrication to those parts.

This is not something that needs to be done frequently. If you over lubricate the air valve assembly, the excess lube will dry and cake on the inside of the valve and interfere with its smooth operation. You will then have to clean the valve assembly.

1 Like