Hi Tim,
Thanks for the info on your tree inspirational thoughts, I’ve managed to order both books, second-hand, for a reasonable price through a well known online retailer,  .
.
Thanks again, and cheers,  ,
,
G
Hi Tim,
Thanks for the info on your tree inspirational thoughts, I’ve managed to order both books, second-hand, for a reasonable price through a well known online retailer, .
Thanks again, and cheers, ,
G
Hello Tim,
Your building is worthwhile, as few people reproduce the interiors of Japanese tanks in detail.
I will support you and learn from you.
Akio
Great work!
But; The accounting of the engagement and mention of HE for the 2lb’r guns… I was always under the impression that there were no proper HE rounds for the 2lbr - a limitation that even the Germans noted of the Brit tanks in North Africa…
Excellent news! His method does take patience but it works…
Thanks Akio,
I agree there is very little information on Japanese tanks compared to other countries. But there is a lot more than there once was! Thanks for watching…
Thanks.
I seem to recall reading that somewhere… I’m certainly no expert on 2-pounder ammo, but they obviously knew what they were firing out of the gun at the time!
However, this from Wiki: “One of the most serious weaknesses of the Matilda II was the lack of a high-explosive round for its main gun. A high-explosive shell was designed for the 2-pounder but was rarely issued, as the bursting charge was so small.”
So this suggests that the round wasn’t of much use against the sort of targets you would expect (e.g. anti-tank guns, troops) - but it certainly worked at close range against the Ha-Gos.
I’m late to the topic but have enjoyed it nonetheless. Thanks for the historical background, it has been really interesting!
And your work with the tank interior is outstanding, congratulations.
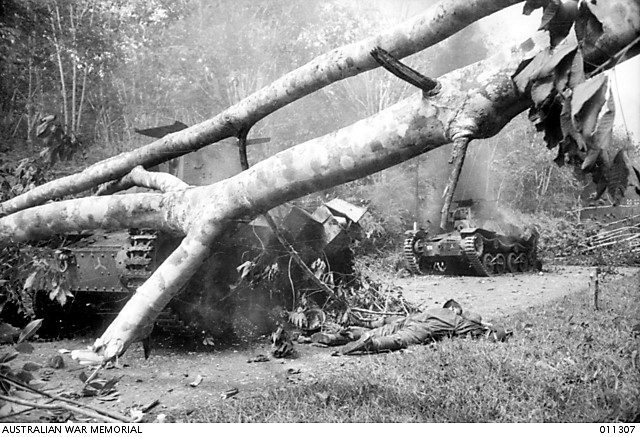
I may suggest that the fallen tree is not enough crushed under its weight?
Thanks Varanusk. Glad you are enjoying my progress.
Don’t worry about the fallen tree - nothing is fixed in place yet. Also, because I made the upper branches of this tree from a real piece of heather, it has plenty of ‘give’, so I can make sure it settles properly into place.
However, the images of the tree behind the leading Ha-Go show that it actually fell across the road so that its upper part was resting on the opposite bank. This meant that the main trunk of the tree didn’t actually fall on to the road. It was also partly held up by splinted branches.
You can see this better in this picture:
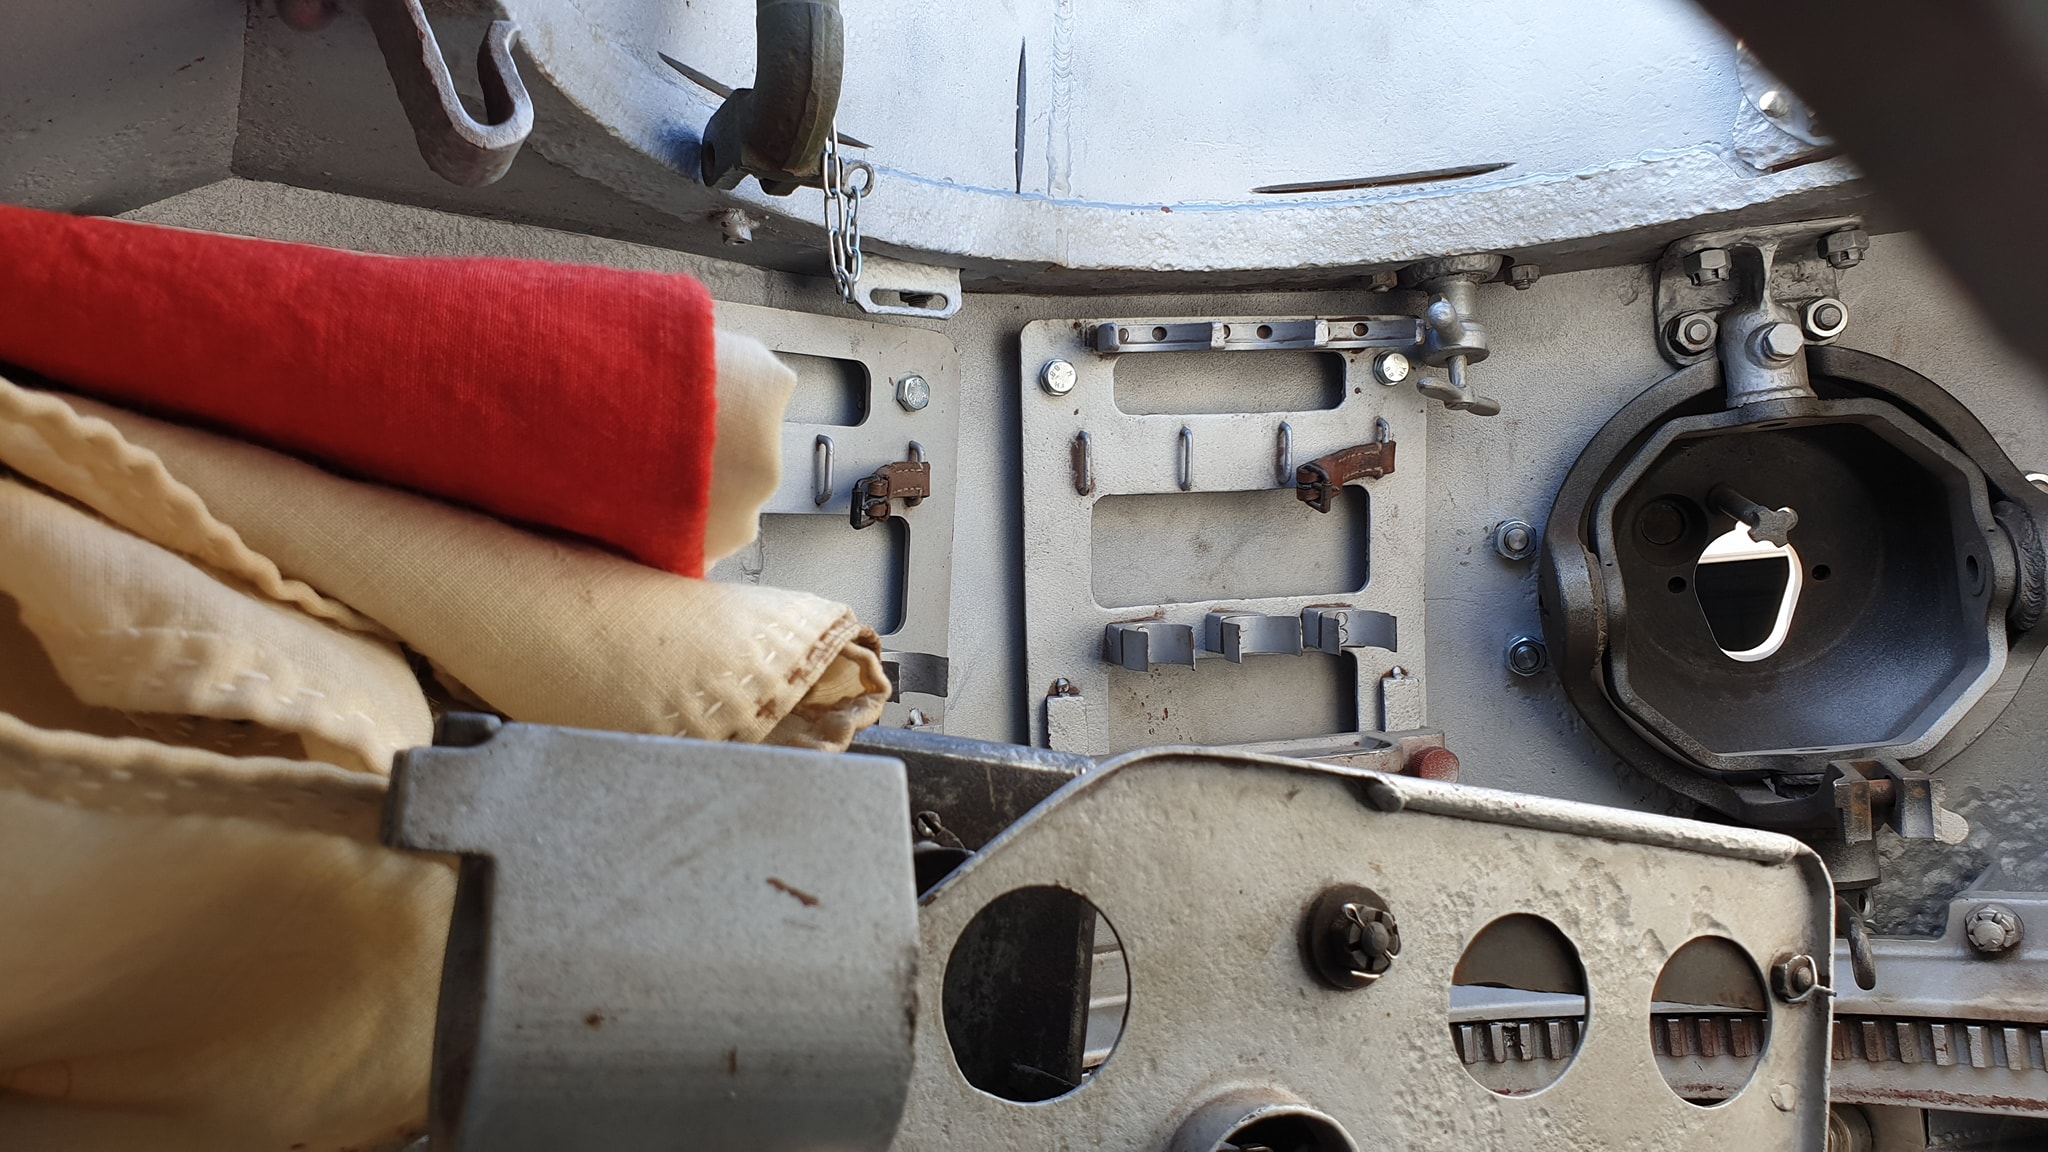
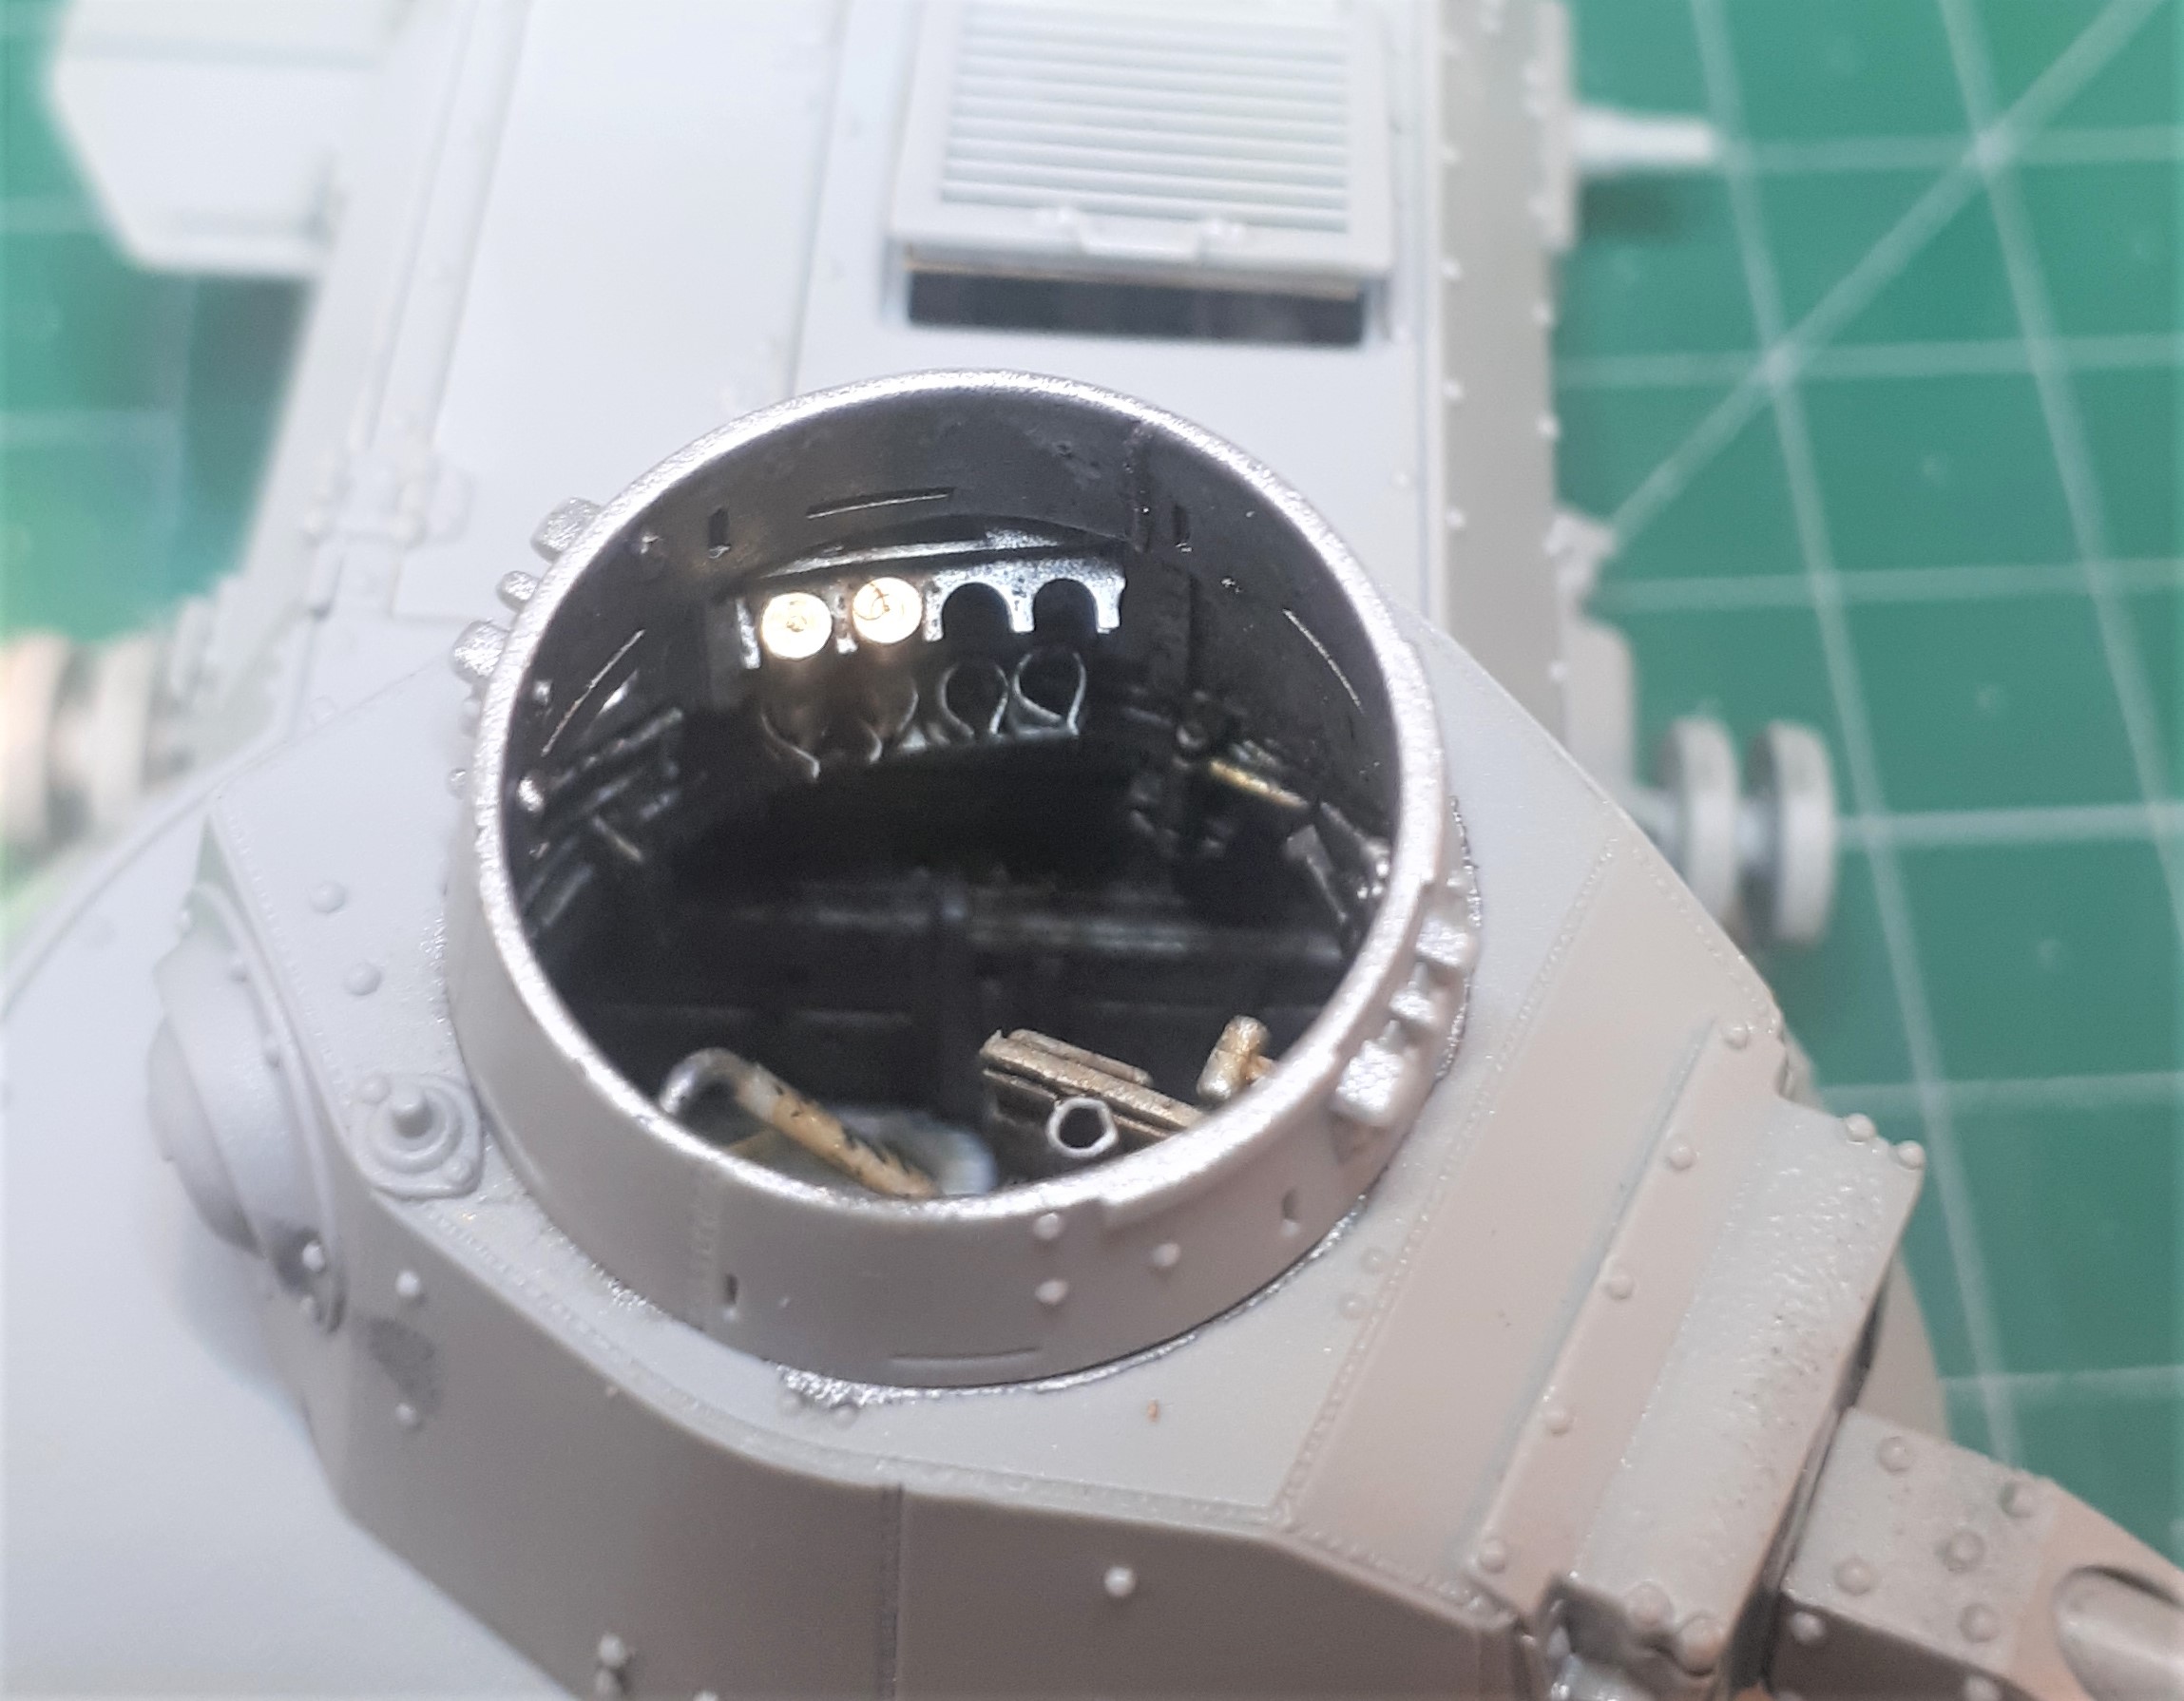
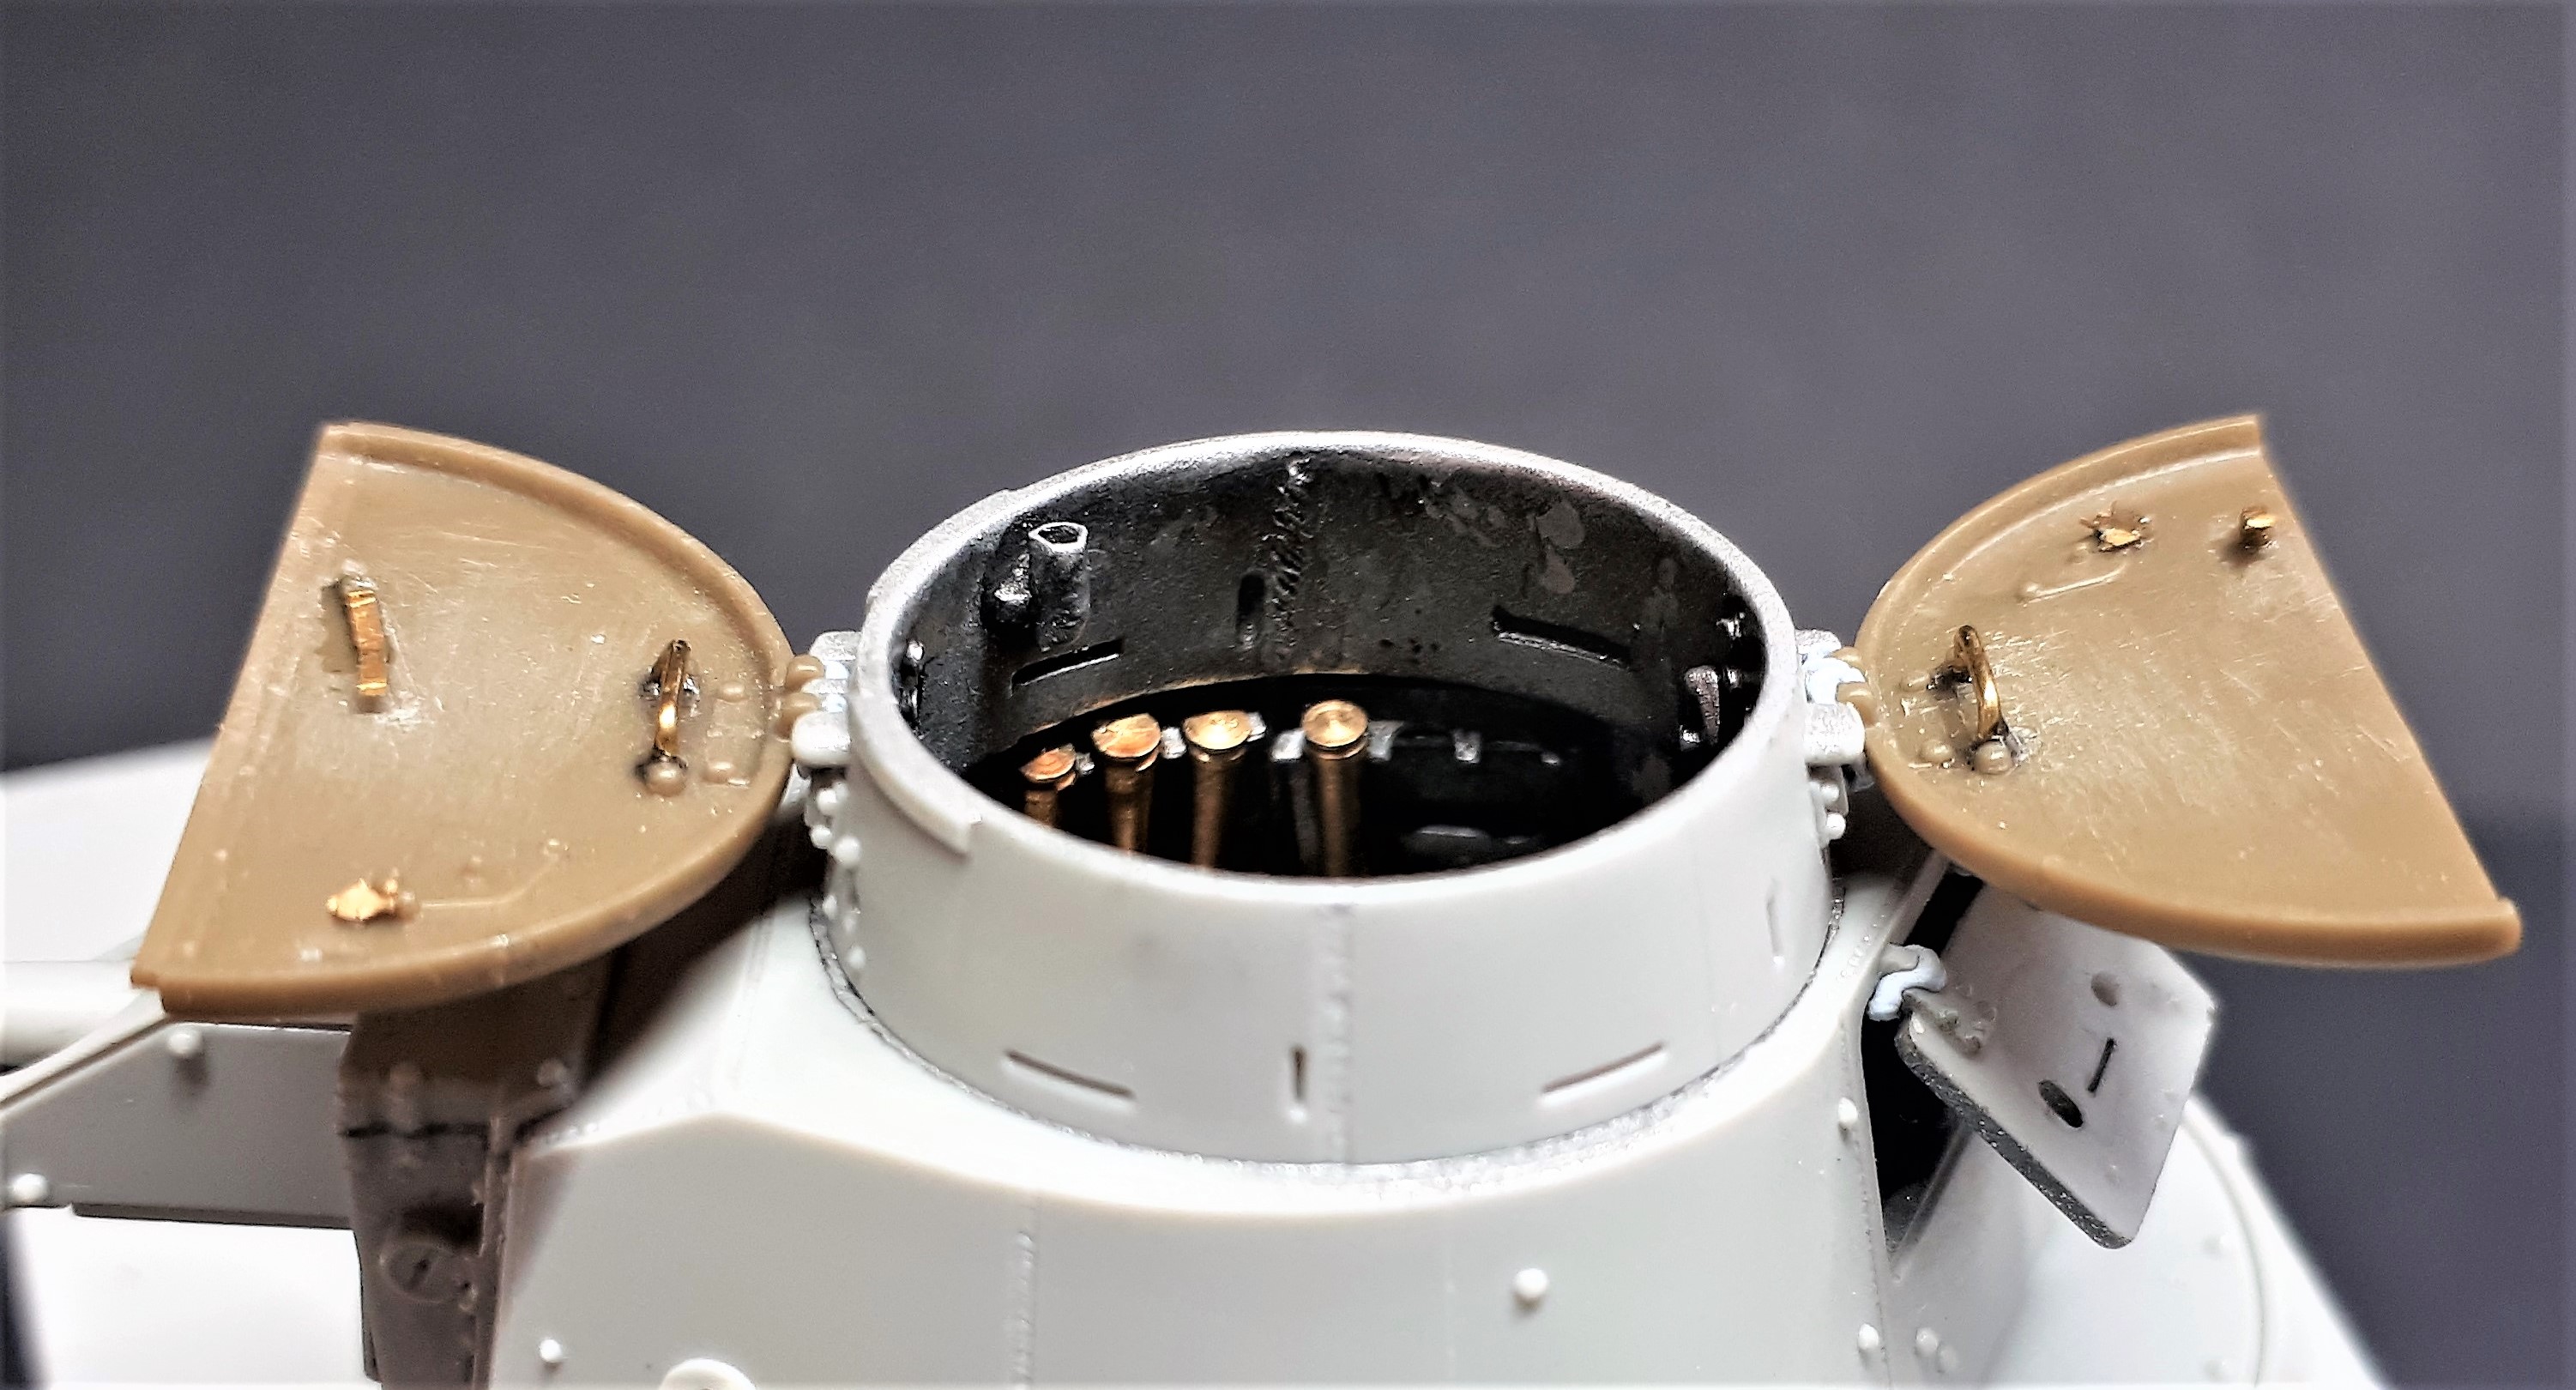
Another part of the interior that required a lot of work was the interior of the commander’s cupola.
The hatch is very large - taking up about two-thirds of the turret roof area. With the hatches open the inside is visible even without peering down into the turret interior.
Now this is one aspect of the kits where the Fine Molds version is actually better than the Dragon equivalent. The Dragon cupola has no interior detail whatsoever, whilst the Fine Molds version does at least have the inside fittings for the hatch hinges and also the small circular vision / pistol ports. However, what neither kit offers are the impressions of the six horizontal and two vertical vision slits which surround the cupola itself. There are also two prominent vertical weld beads inside because the cupola ring itself was made from two semi-circular pieces.
You can see the inside of the vision slits and one of the weld beads in this image of a restored vehicle.
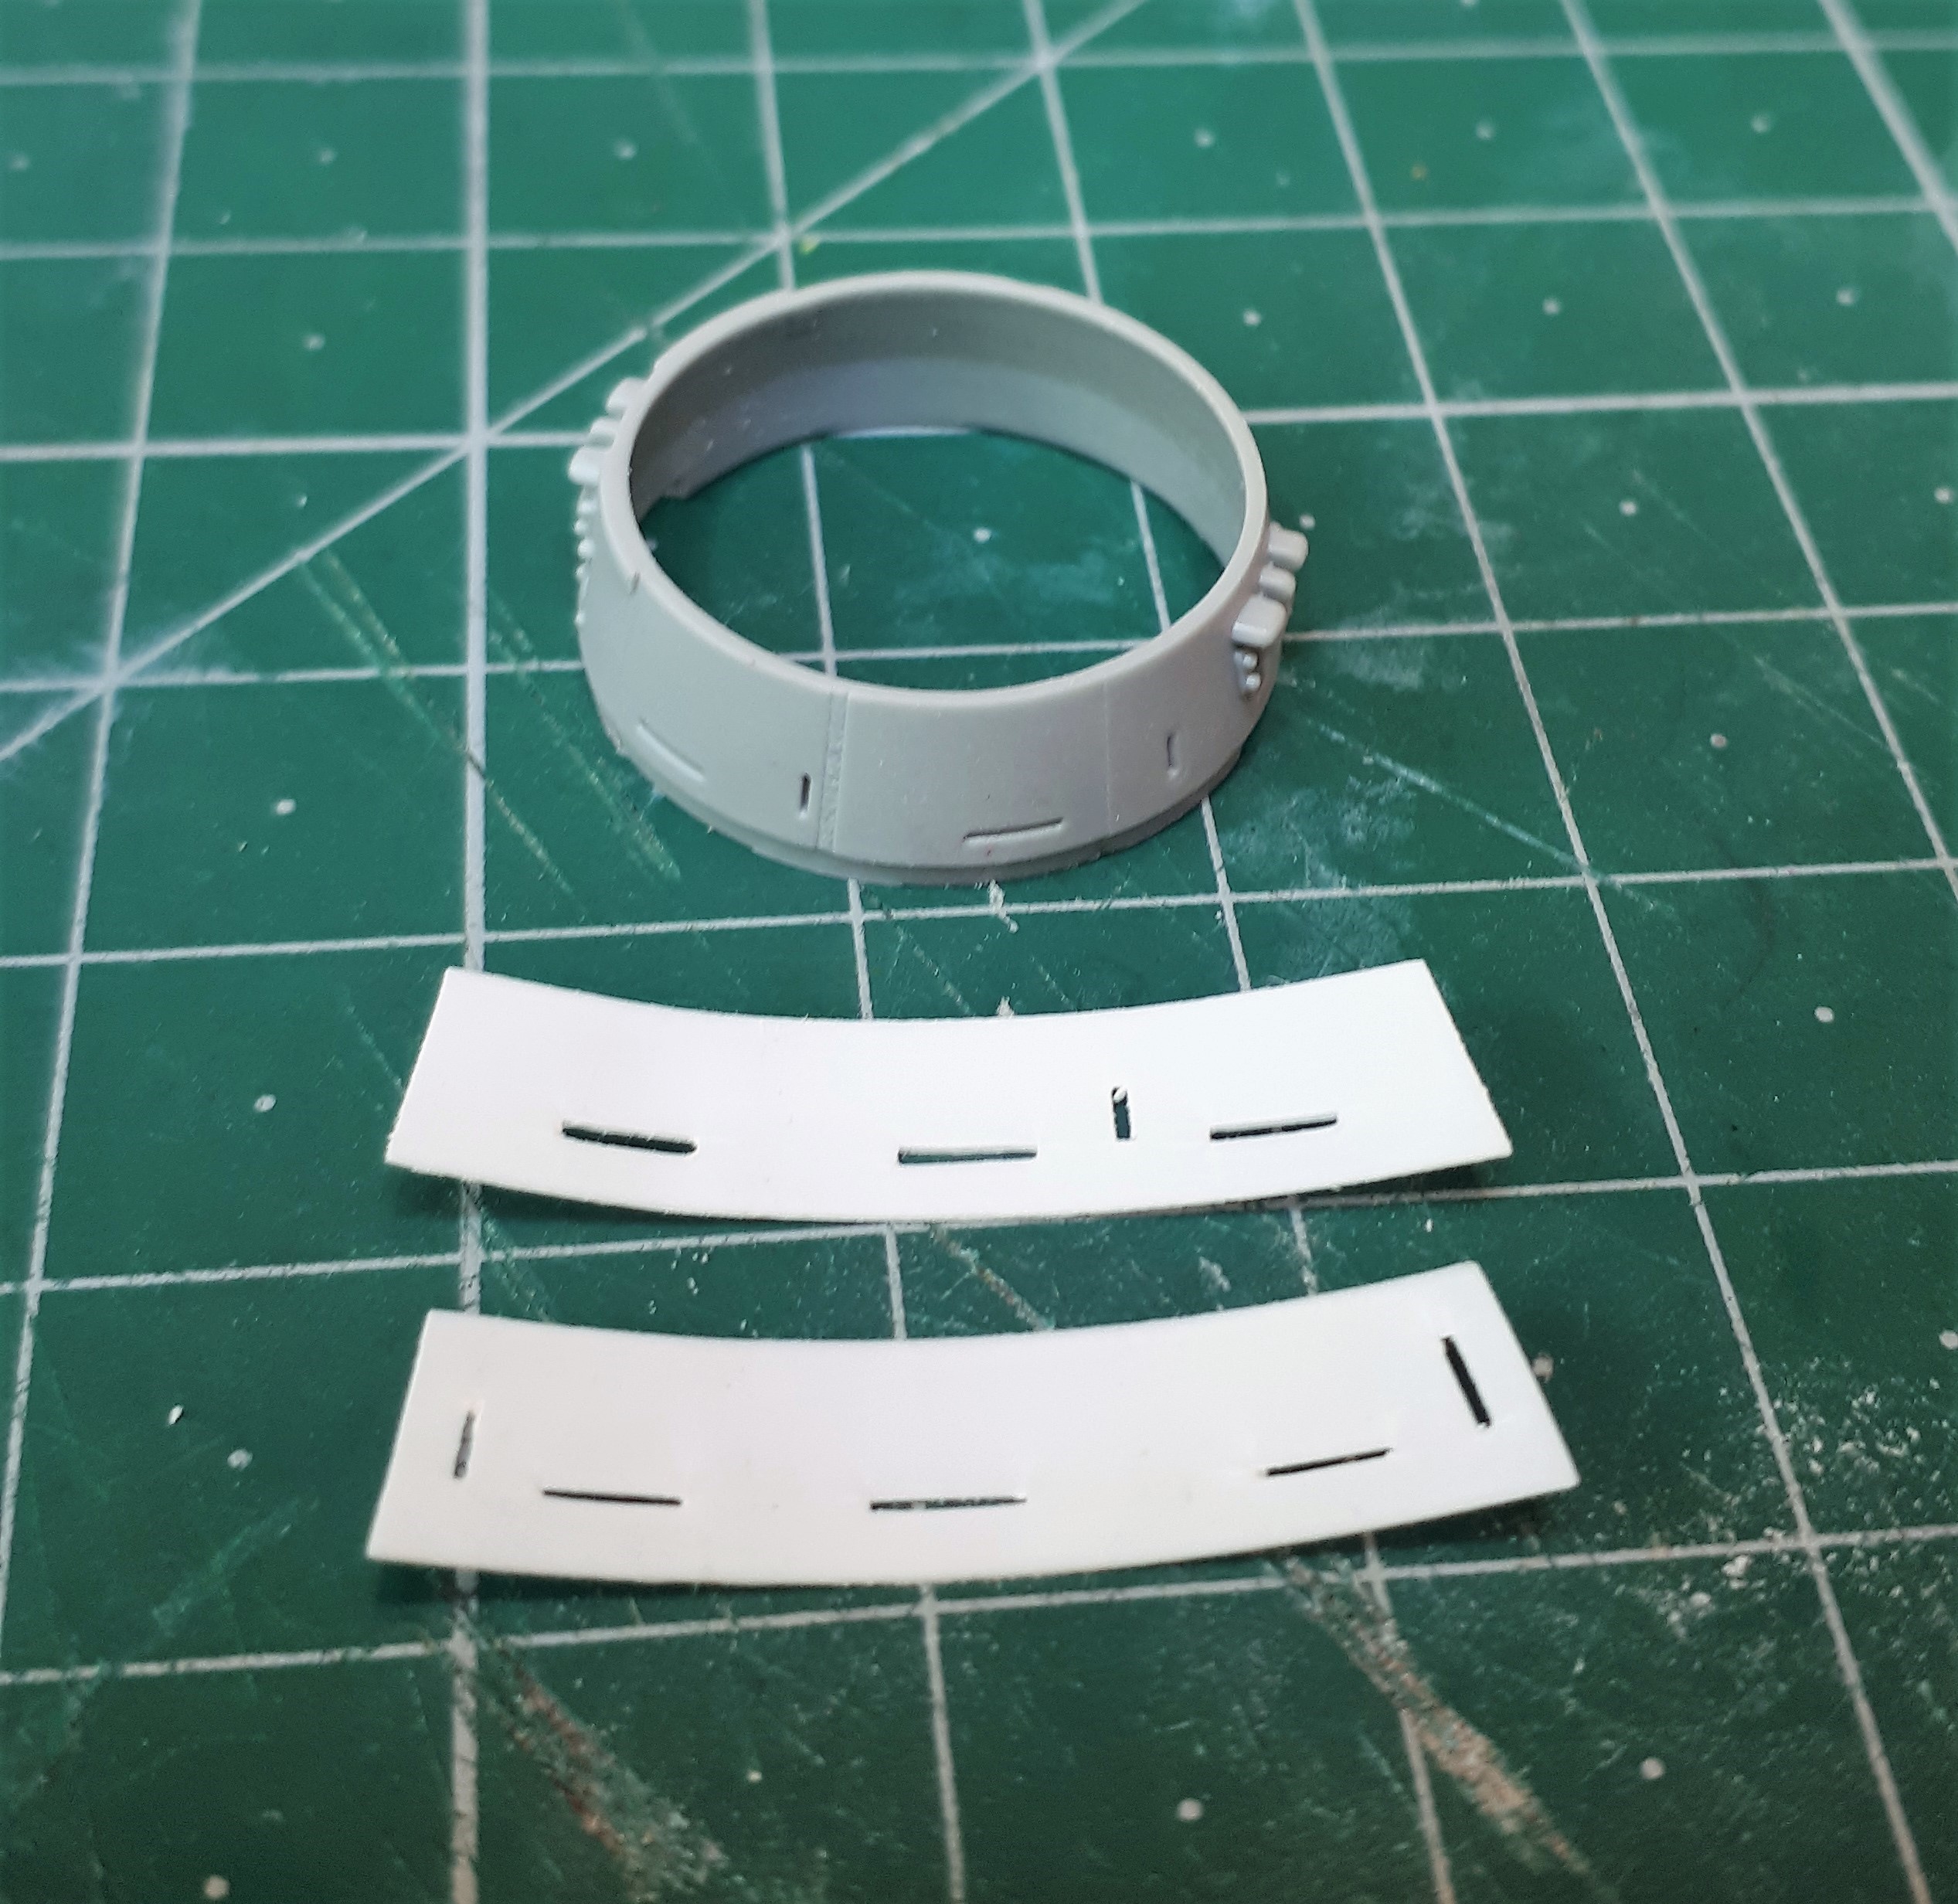
When I was sill intent on fiishing the Fine Molds kit, I tried to drill out the vision slits all the way through from the outside using a very fine drill. This was only partially successful - partly because the Fine Molds cupola is also way too thick. Once I had the Dragon cupola (which is at least thinnner) I decided a different approach.
Here you can see the two cupolas side by side with the Dragon part on the left and the FM one on the right (the reason that the FM one is grey and not dark green is because I had sprayed it with primer to see how well my work had gone - I was not impressed!).
Next I cut out two strips of thin plastic sheet which were the right size to wrap insde the Dragon cupola and cut the vision slits into them.
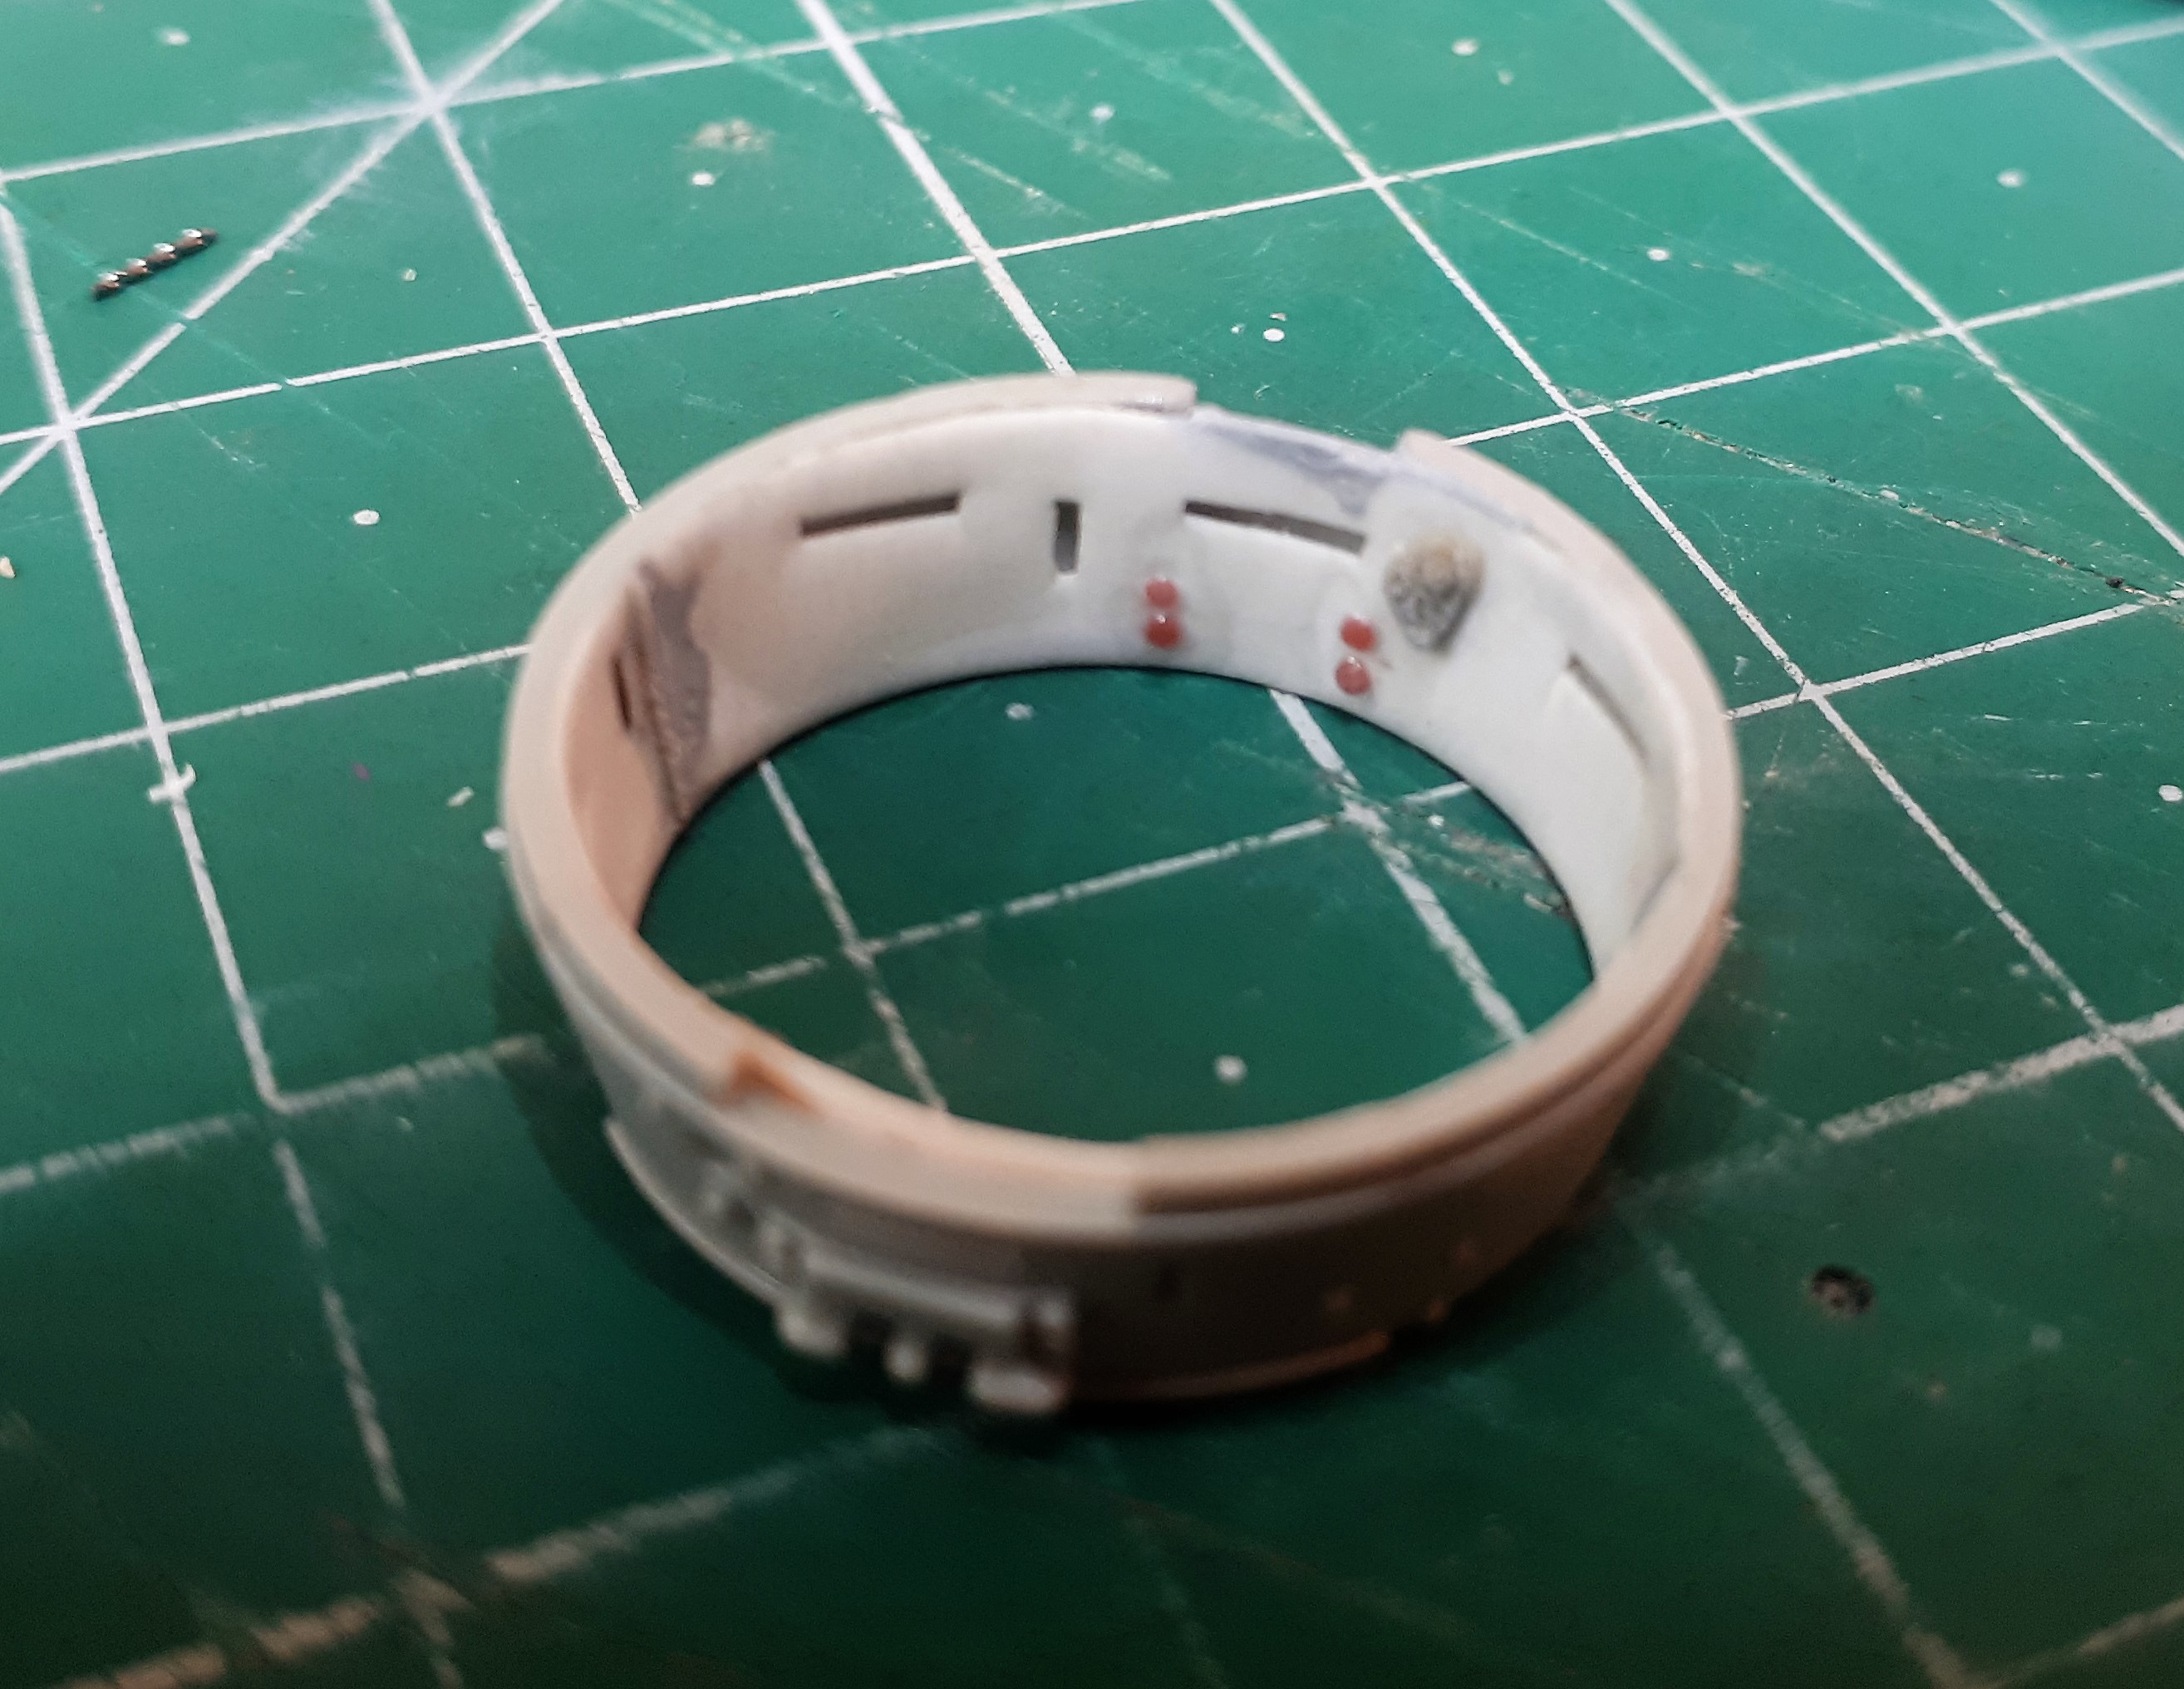
These were then glued inside and, once dry, sanded to make them as thin as possible. Next I transplanted all of the hinges, etc from the FM part into the Dragon cupola. I also added some bolt heads from slices of stretched sprue and the weld beads from the stretched sprue also, softened with liquid cement and then pressed gently with a knife the make the weld beads.
It looks a bit messy here, but once everything was painted I was quite pleased with my efforts.
In this last shot you can also see the replacement grab handles and hatch latches which I added to the Fine Molds hatches using brass wire and spare photo-etch strips. These were moulded solid on both the FM and Dragon kits, so you have to make them which ever kit you buy. It’s an odd feature of many of these kits that they give you 3D handles for use on the outside, but seem to think it is acceptable to mould them as simple raised details on the inside of hatches - even when you want them positioned open.
The final detail I added to the inside of the cupola was an AA mount for the MG (from a small piece of brass tube). I believe that not all Ha-Gos were equipped with these, but if you look carefully at the shot of the second tank at Bakri (with the dead crewmen alongside) you can just make this out. The FM kit also had the mounting brackets in the correct position, but not the tube.
Nice work #2 , sorry , I knew the other Tim first …
Glad you finally made it over to the new digs , we’all been here for some time now .
Fantastic work on the HaGo .
Hey Tim re the 2-pounder ammunition, the photos of damage you posted earlier look like AP piercing (neat holes) so is there any obvious HE damage too? Beautiful work on the turret, you’ve every right to feel pleased with the results, I’d be ecstatic! 
Hi Tim,
Beautiful detail work, very impressive, .
Cheers, ,
G
Thanks Cheyenne. And don’t worry, I’m quite happy to be the other Tim’s no.2!
Hi Tim. Yes, if you look at the two stills from the cine film I posted above, you will see neat holes in the upper image (at least two mid-turret and possibly two more in the turret ring behind the time strip) and then two ragged holes in the lower image. The latter are in the lead tank - the one I am recreating - and they look like HE impacts to me…
Thanks G man…
A few more details before I get on to painting…
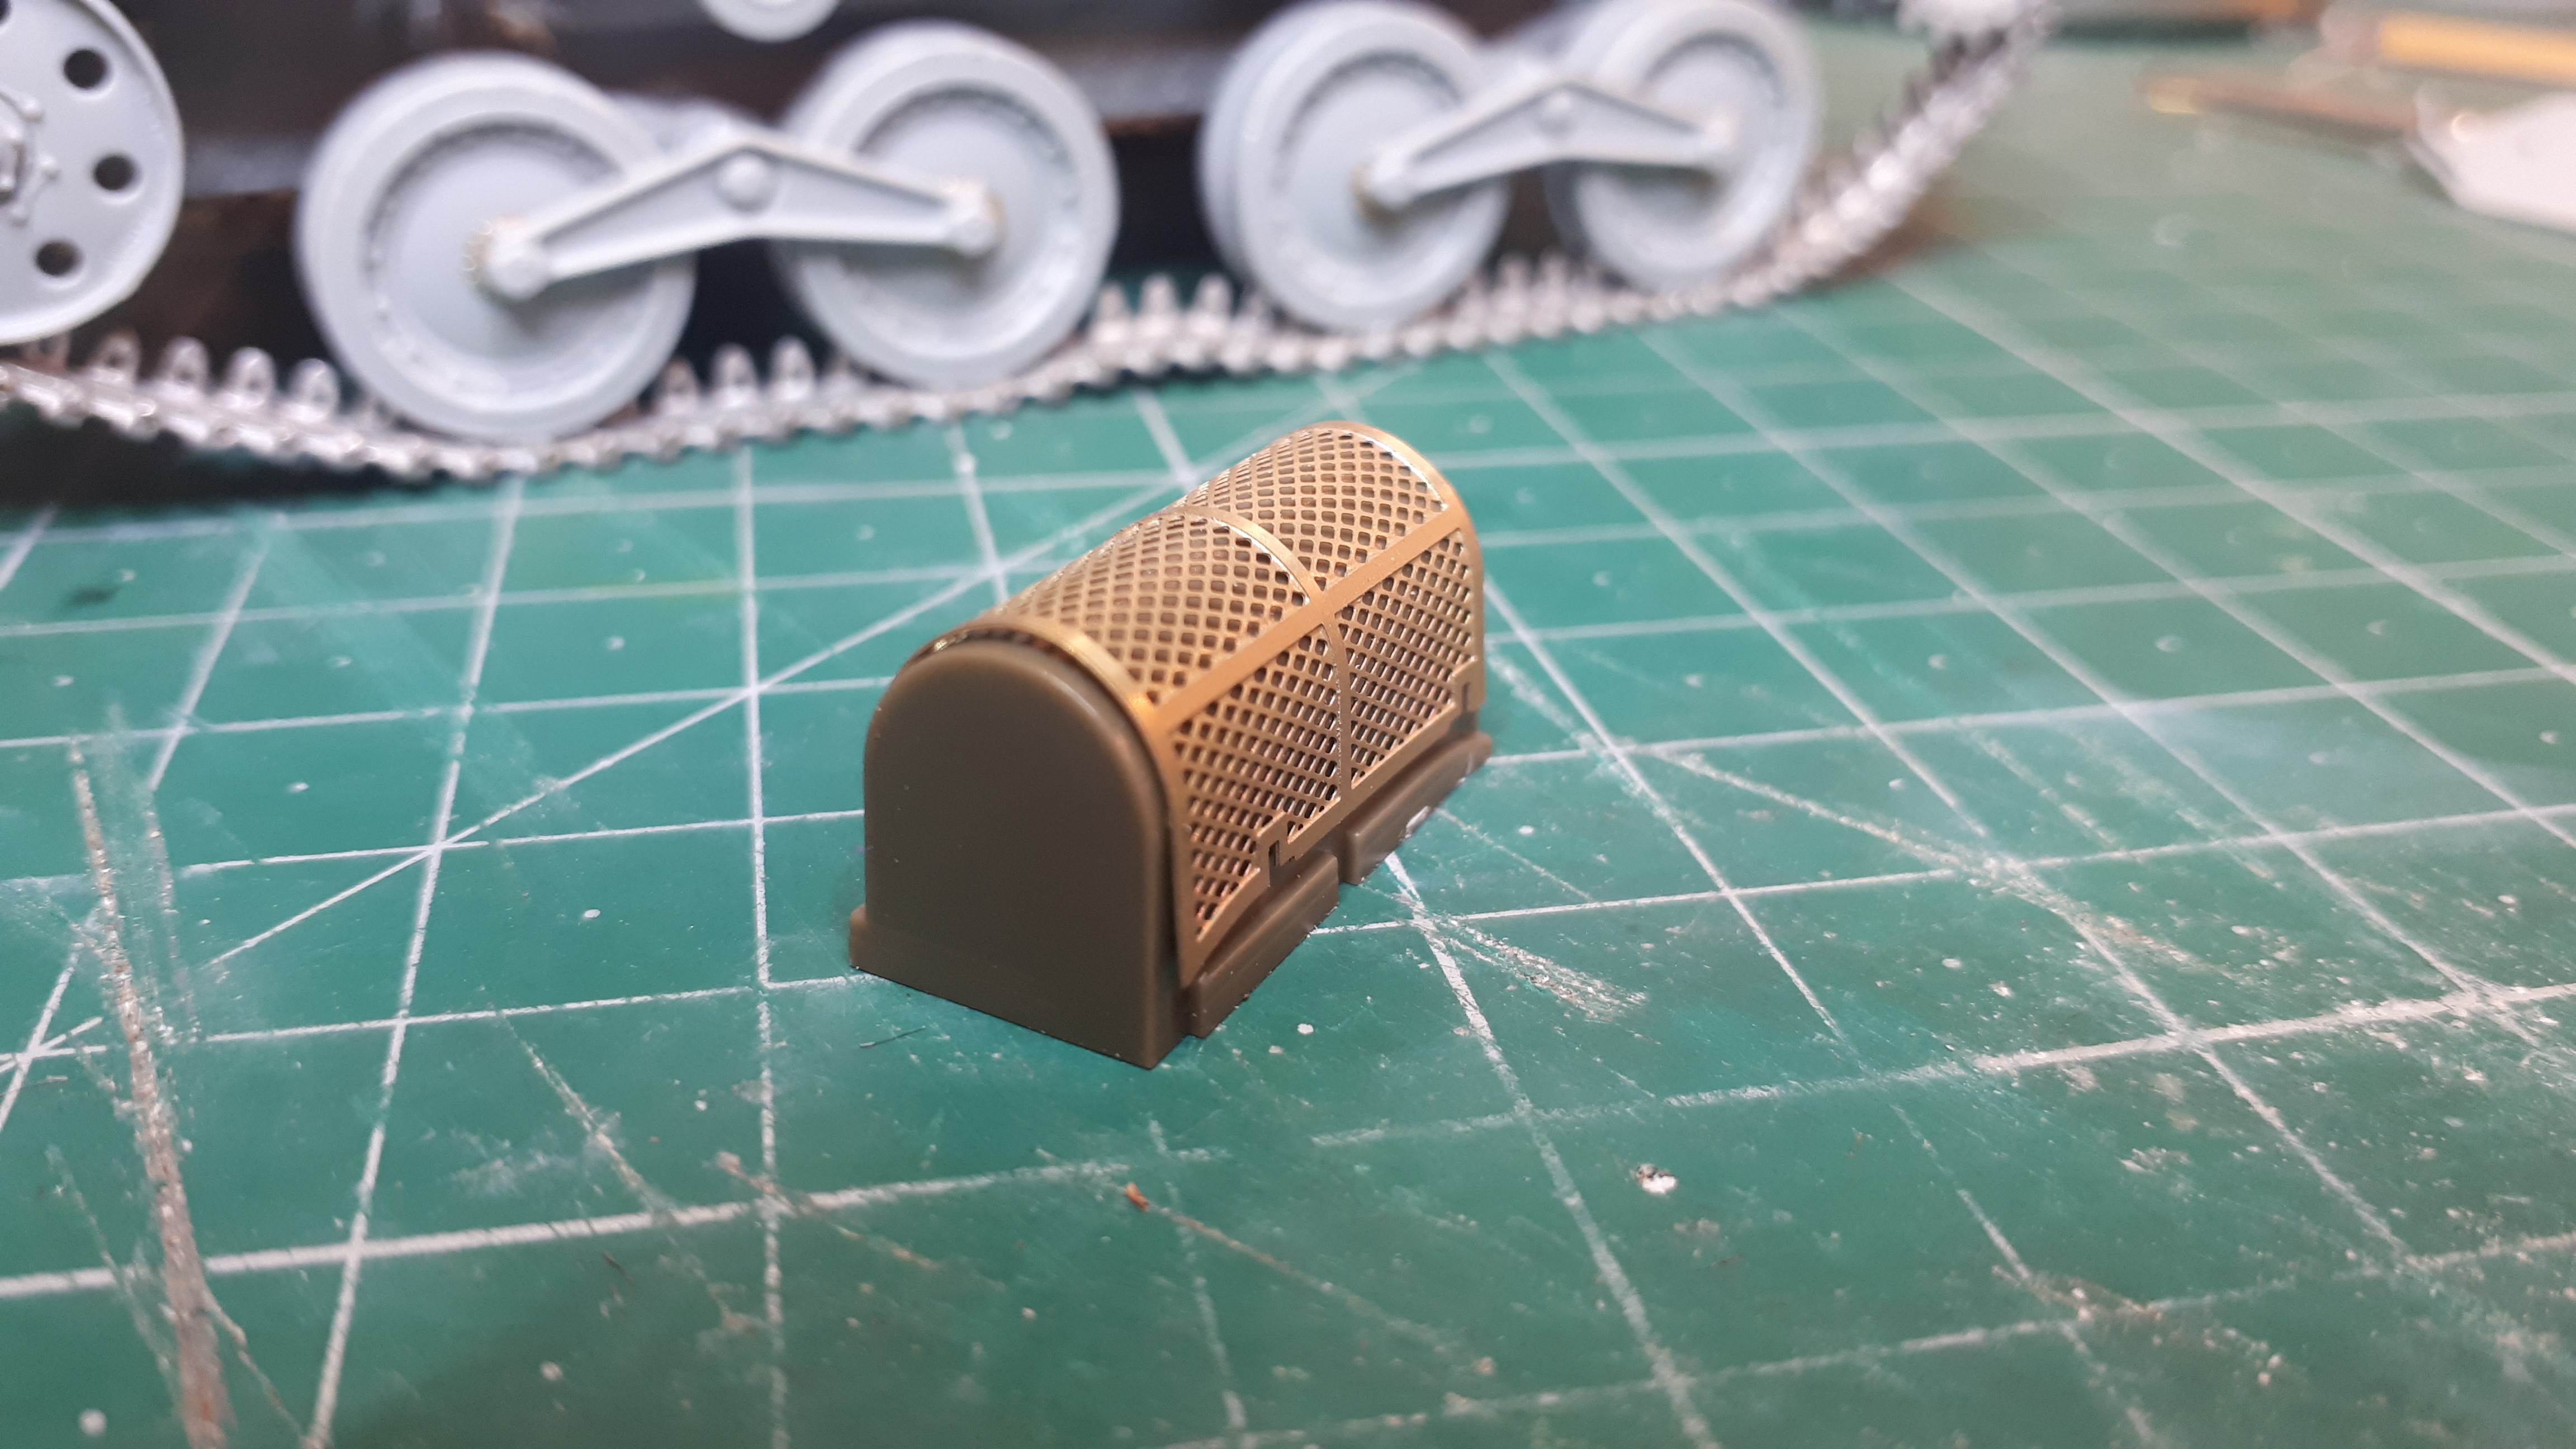
One useful part of the Fine Molds kit which did not come with the Dragon equivalent was the mould for the photo-etched muffler guard. Here is the Dragon PE wrapped around it…
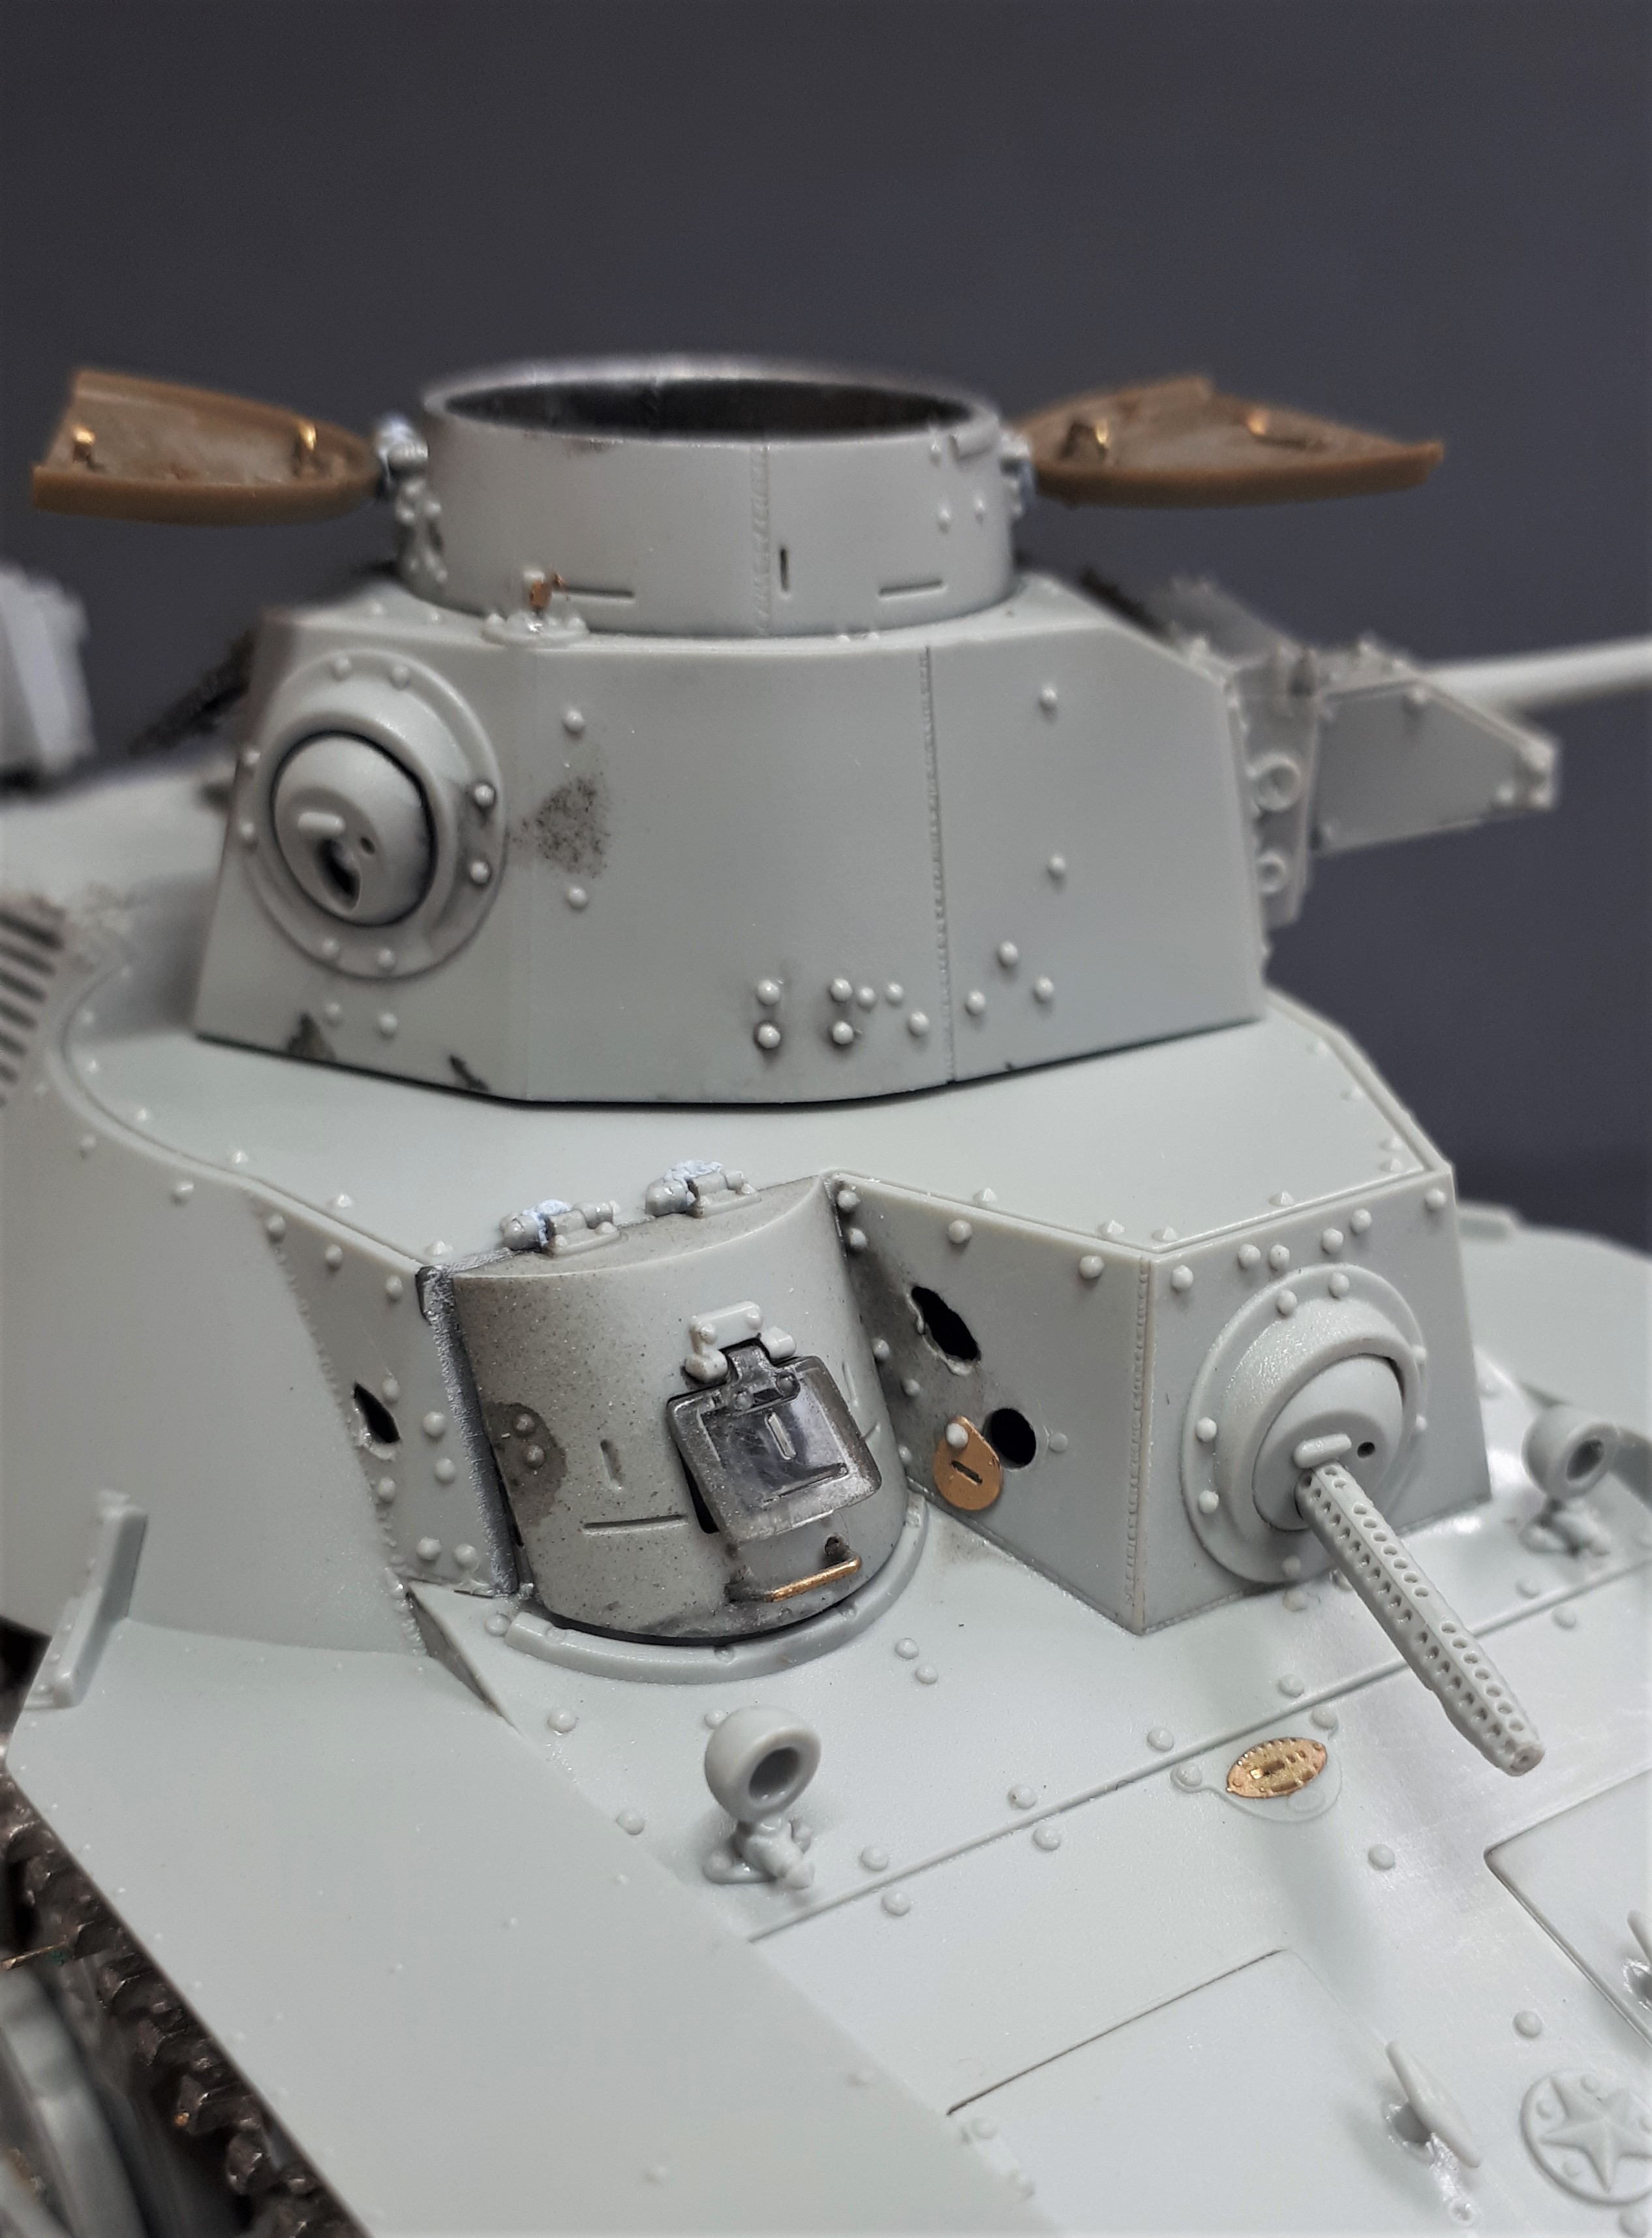
The Fine Molds kits also wins the prize for the most detailed maker’s plate on the front glacis. However, you can also see other details, such as the armoured MG sleeves, which are far superior to the FM offerings.
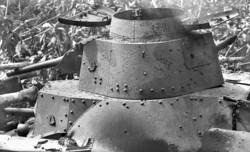
Here you can also see the two ragged holes caused by the 2-pounder HE rounds. These were made in the usual way by thinning out the plastic from behind and then punching the holes with a craft knife. I have tried to replicate the real impacts as closely as possible…
It just keeps getting better and better. Overall, Dragon or FM? I really need to add one of these onto the top of the build pile!
Cheers,
Rick
Hi Tim,
Amazing detail, I really like the ‘clunky’ look of Japanese vehicles, they’re reminiscent of mid-war, early WW2 British light tanks, and you capture the look brilliantly, .
Cheers, ,
G
Hi Tim, I’m really enjoying this thread. Keep up the great work!
—mike
Thanks Tim, as an American, I tend to forget that the Pacific War wasn’t fought and won single handedly by John Wayne. Even my visits to Malaysia tended to overlook the war there. This is a great story about a heroic stand. You’ve inspired me to track down a 2 pounder to add to my collection.