I wasnt sure how well you’d fill such a huge area with foliage. Youve nailed it!
That looks amazing. Well done.
Your attention to detail is astounding. Very nice work! 

—mike
Lovely scene!! You can ask the actors to take their places…
Now Sir…THAT is impressive.
J
What a good detail in the step by step, it really makes you want to make a similar piece of land, it looks great, congratulations for the work and for sharing it.
Greetings, Omar
You just have to put a snake or two in there. Nice work.
bruce
Thanks so much guys.
It’s certainly going to be a while before I plan any more jungle dios - too much greenery. Italy was a doddle by comparison. In fact, my next stop is probably going to be the Ardennes Offensive - so at least it will be Europe in the winter!
And Bruce, it’s funny you should mention a snake. I have plans for one sneaking up on my Madras Sapper.
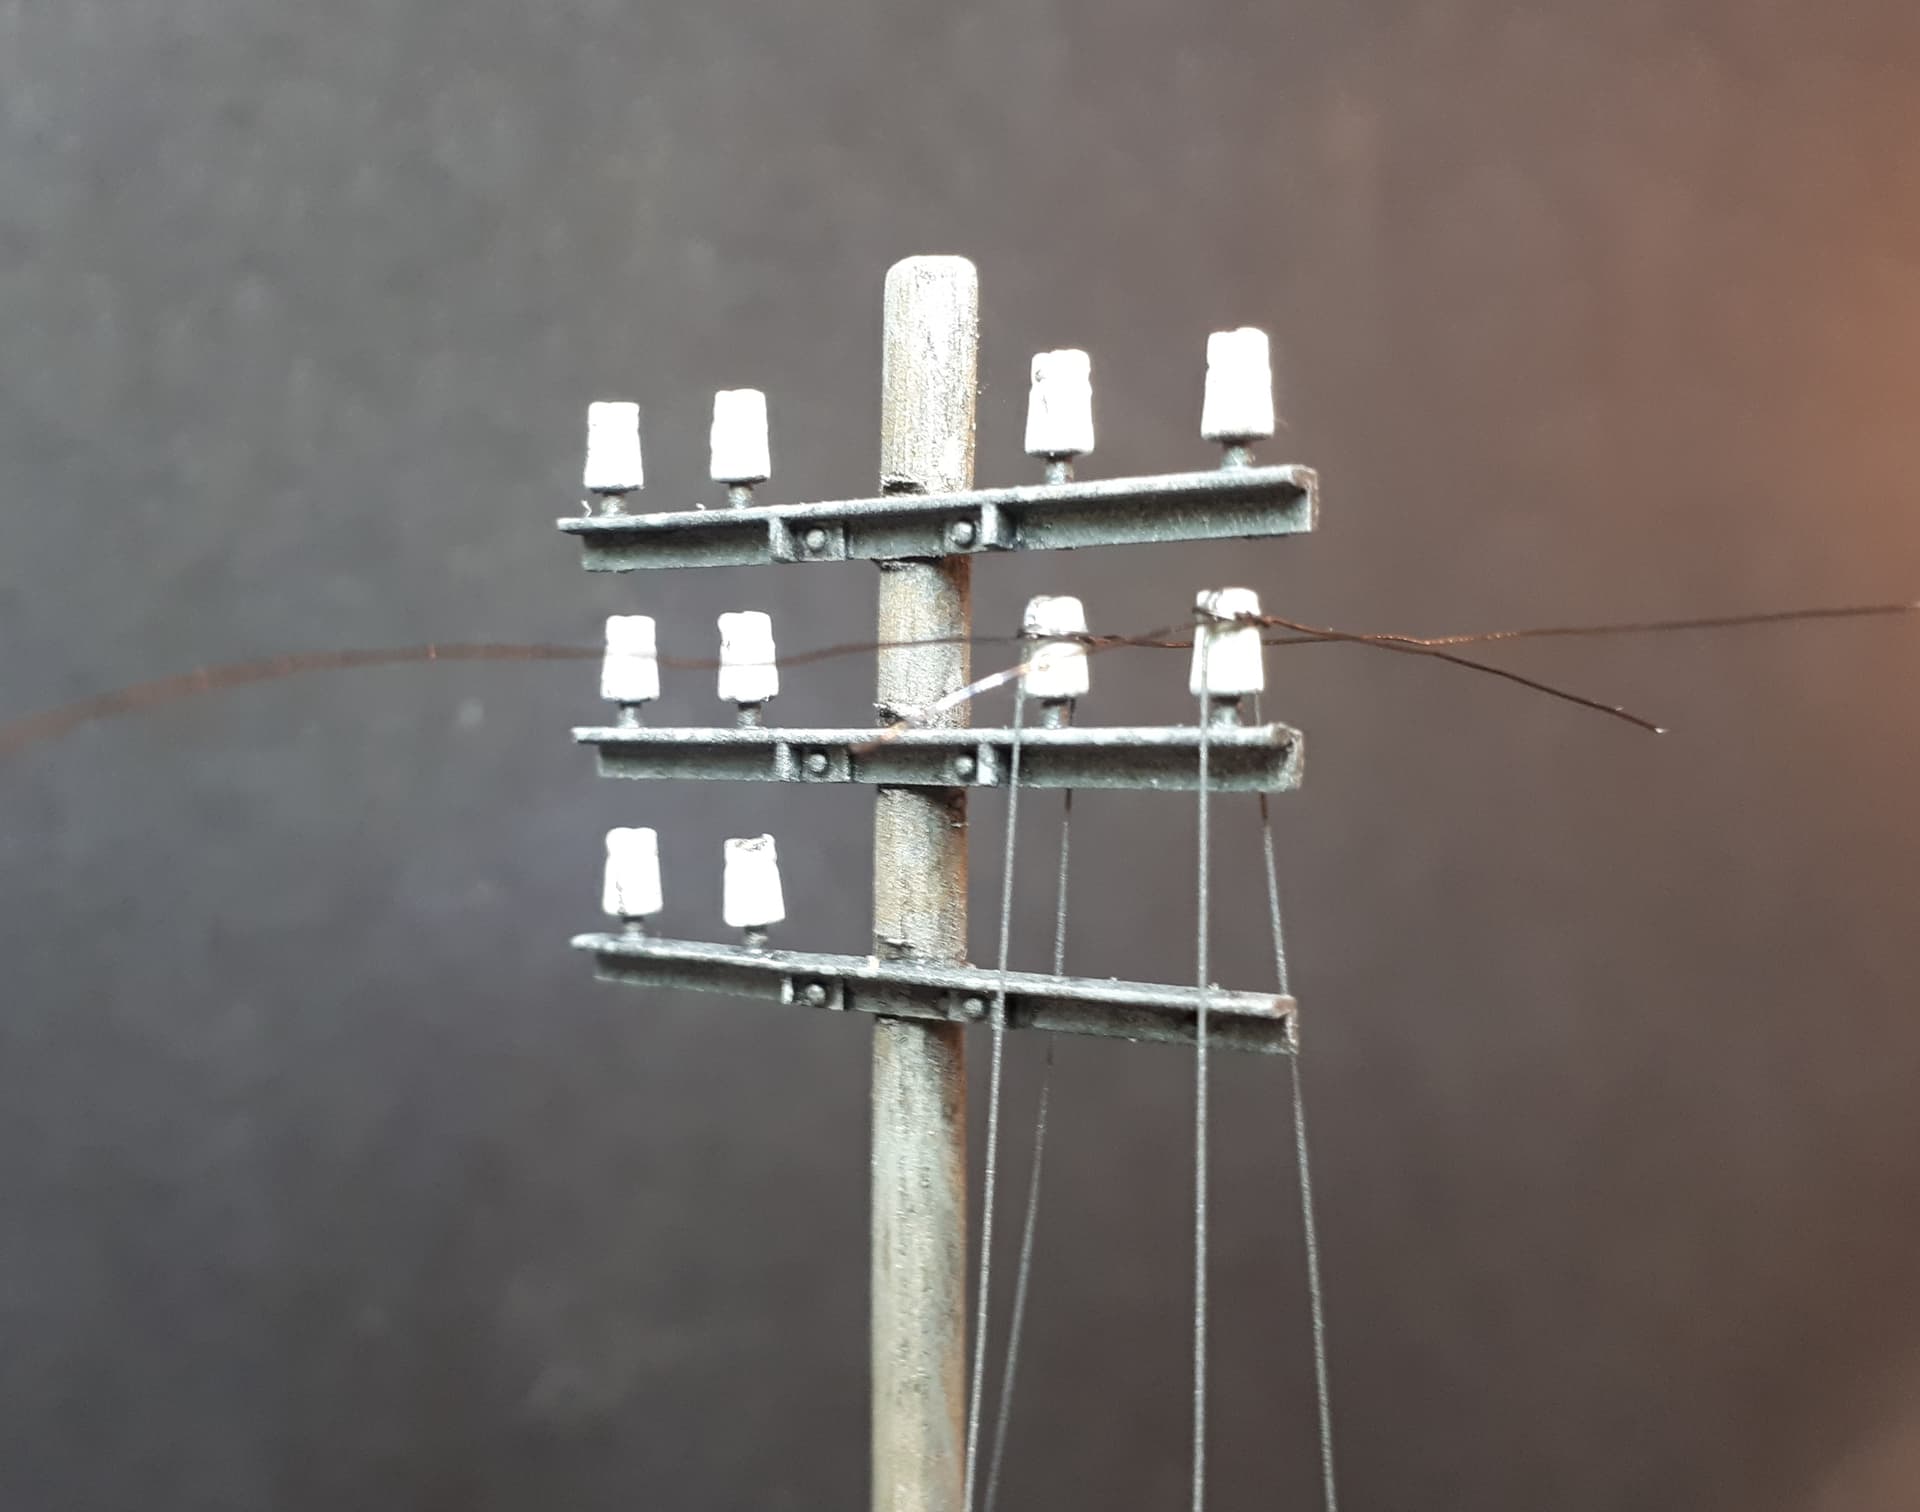
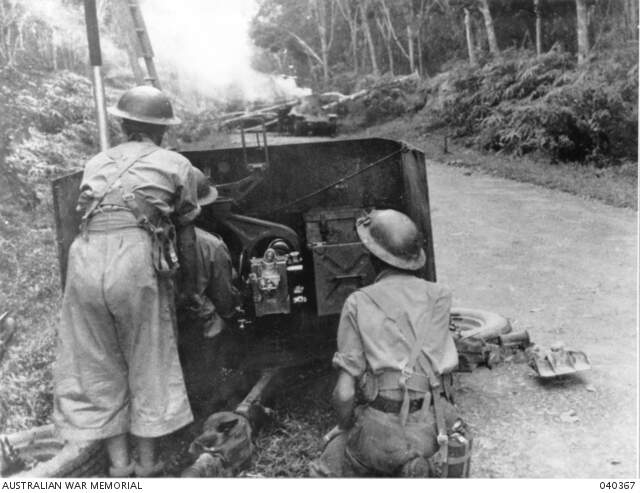
As a little aside, here is how I went about the telegraph pole. This is an important part of the scene, because it features prominently in the photographs of Parsons’ 2 pounder.
The poles along the Bakri road were quite distinctive. As well as being very tall, they had a thicker base with a high band of white paint to mark the sides of the road (where there appears to have been a slight ditch). They also had an uneven number of insulators - six on the road side, four on other.
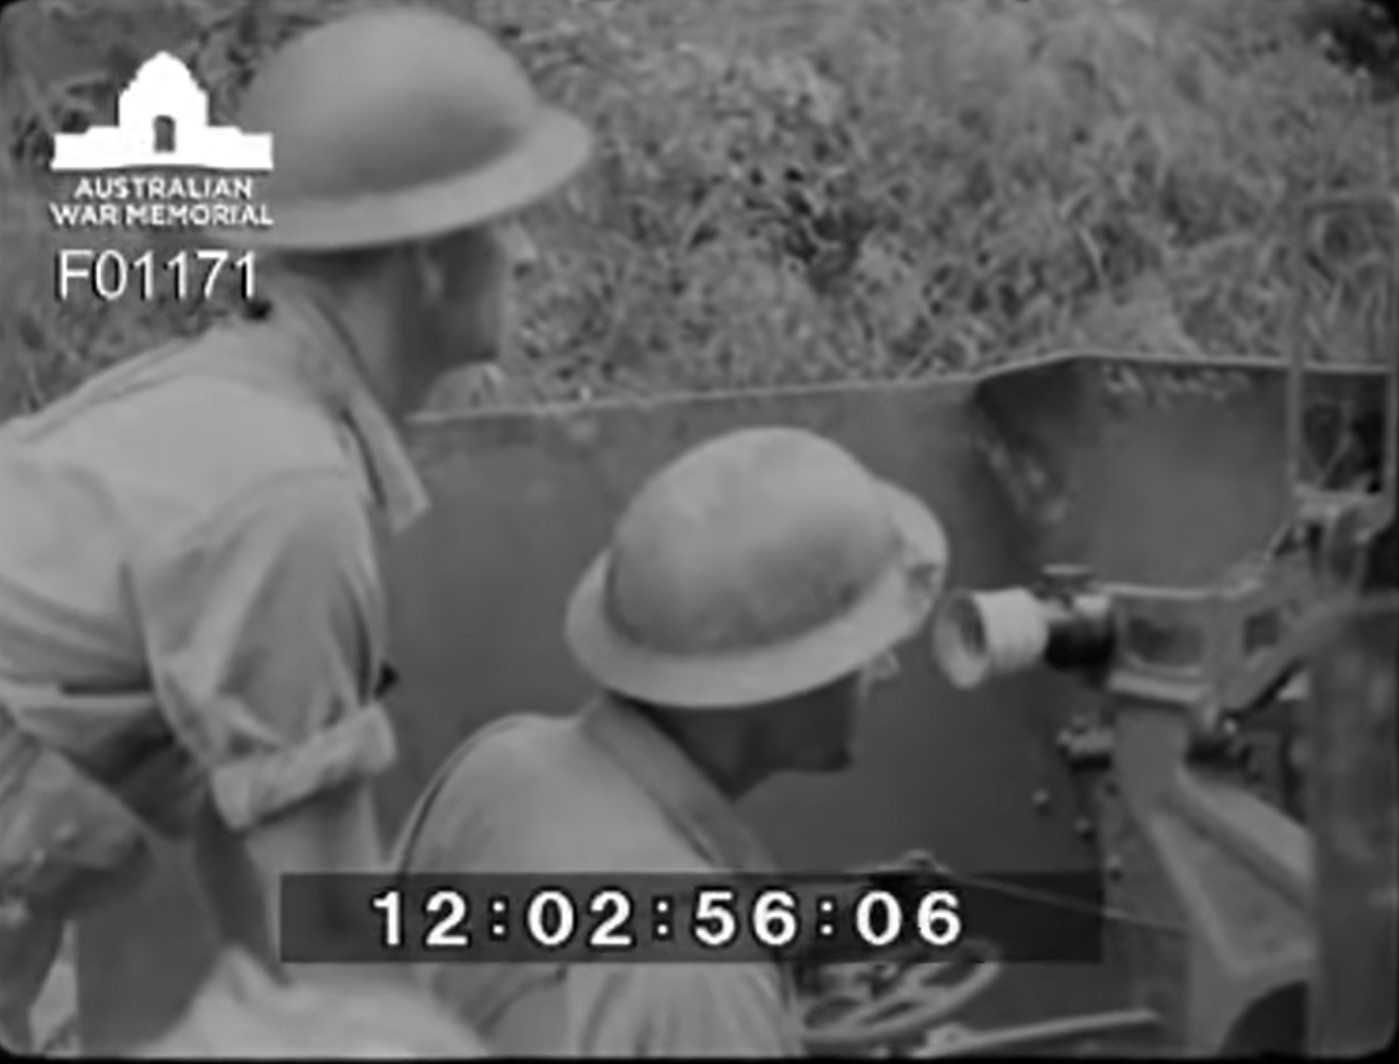
The best view comes from the shots of the burning Ha-Gos further up the road:
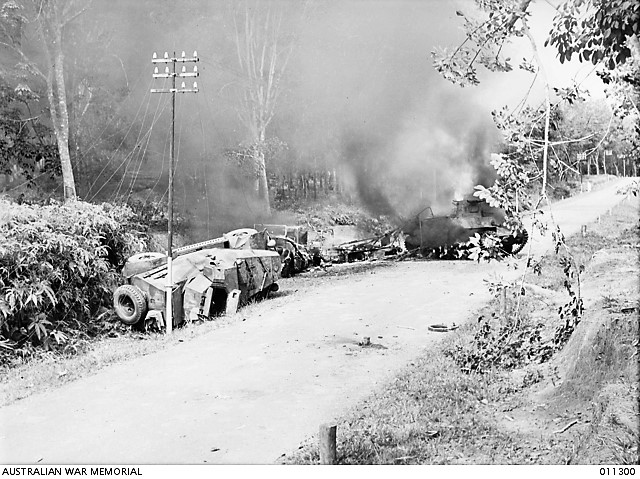
I am assuming that the wires were brought down when the trees were cut down just after the battle, although it’s impossible to be sure. I suppose it might just as easily have been part of a desperate ‘scorched earth’ policy by the retreating Commonwealth troops who would have wanted to ensure that the advancing Japanese had no means of intercepting the telephone network behind the rapidly diminishing lines.
Anyway, the basis for my telegraph pole was the venerable Miniart set, although I used a wooden dowel for the pole and made the thicker base from a sleeve of plastic tube. I then added the cross pieces and insulators from the Miniart set and added some brackets from plastic strip, plus some suitable bolt heads.
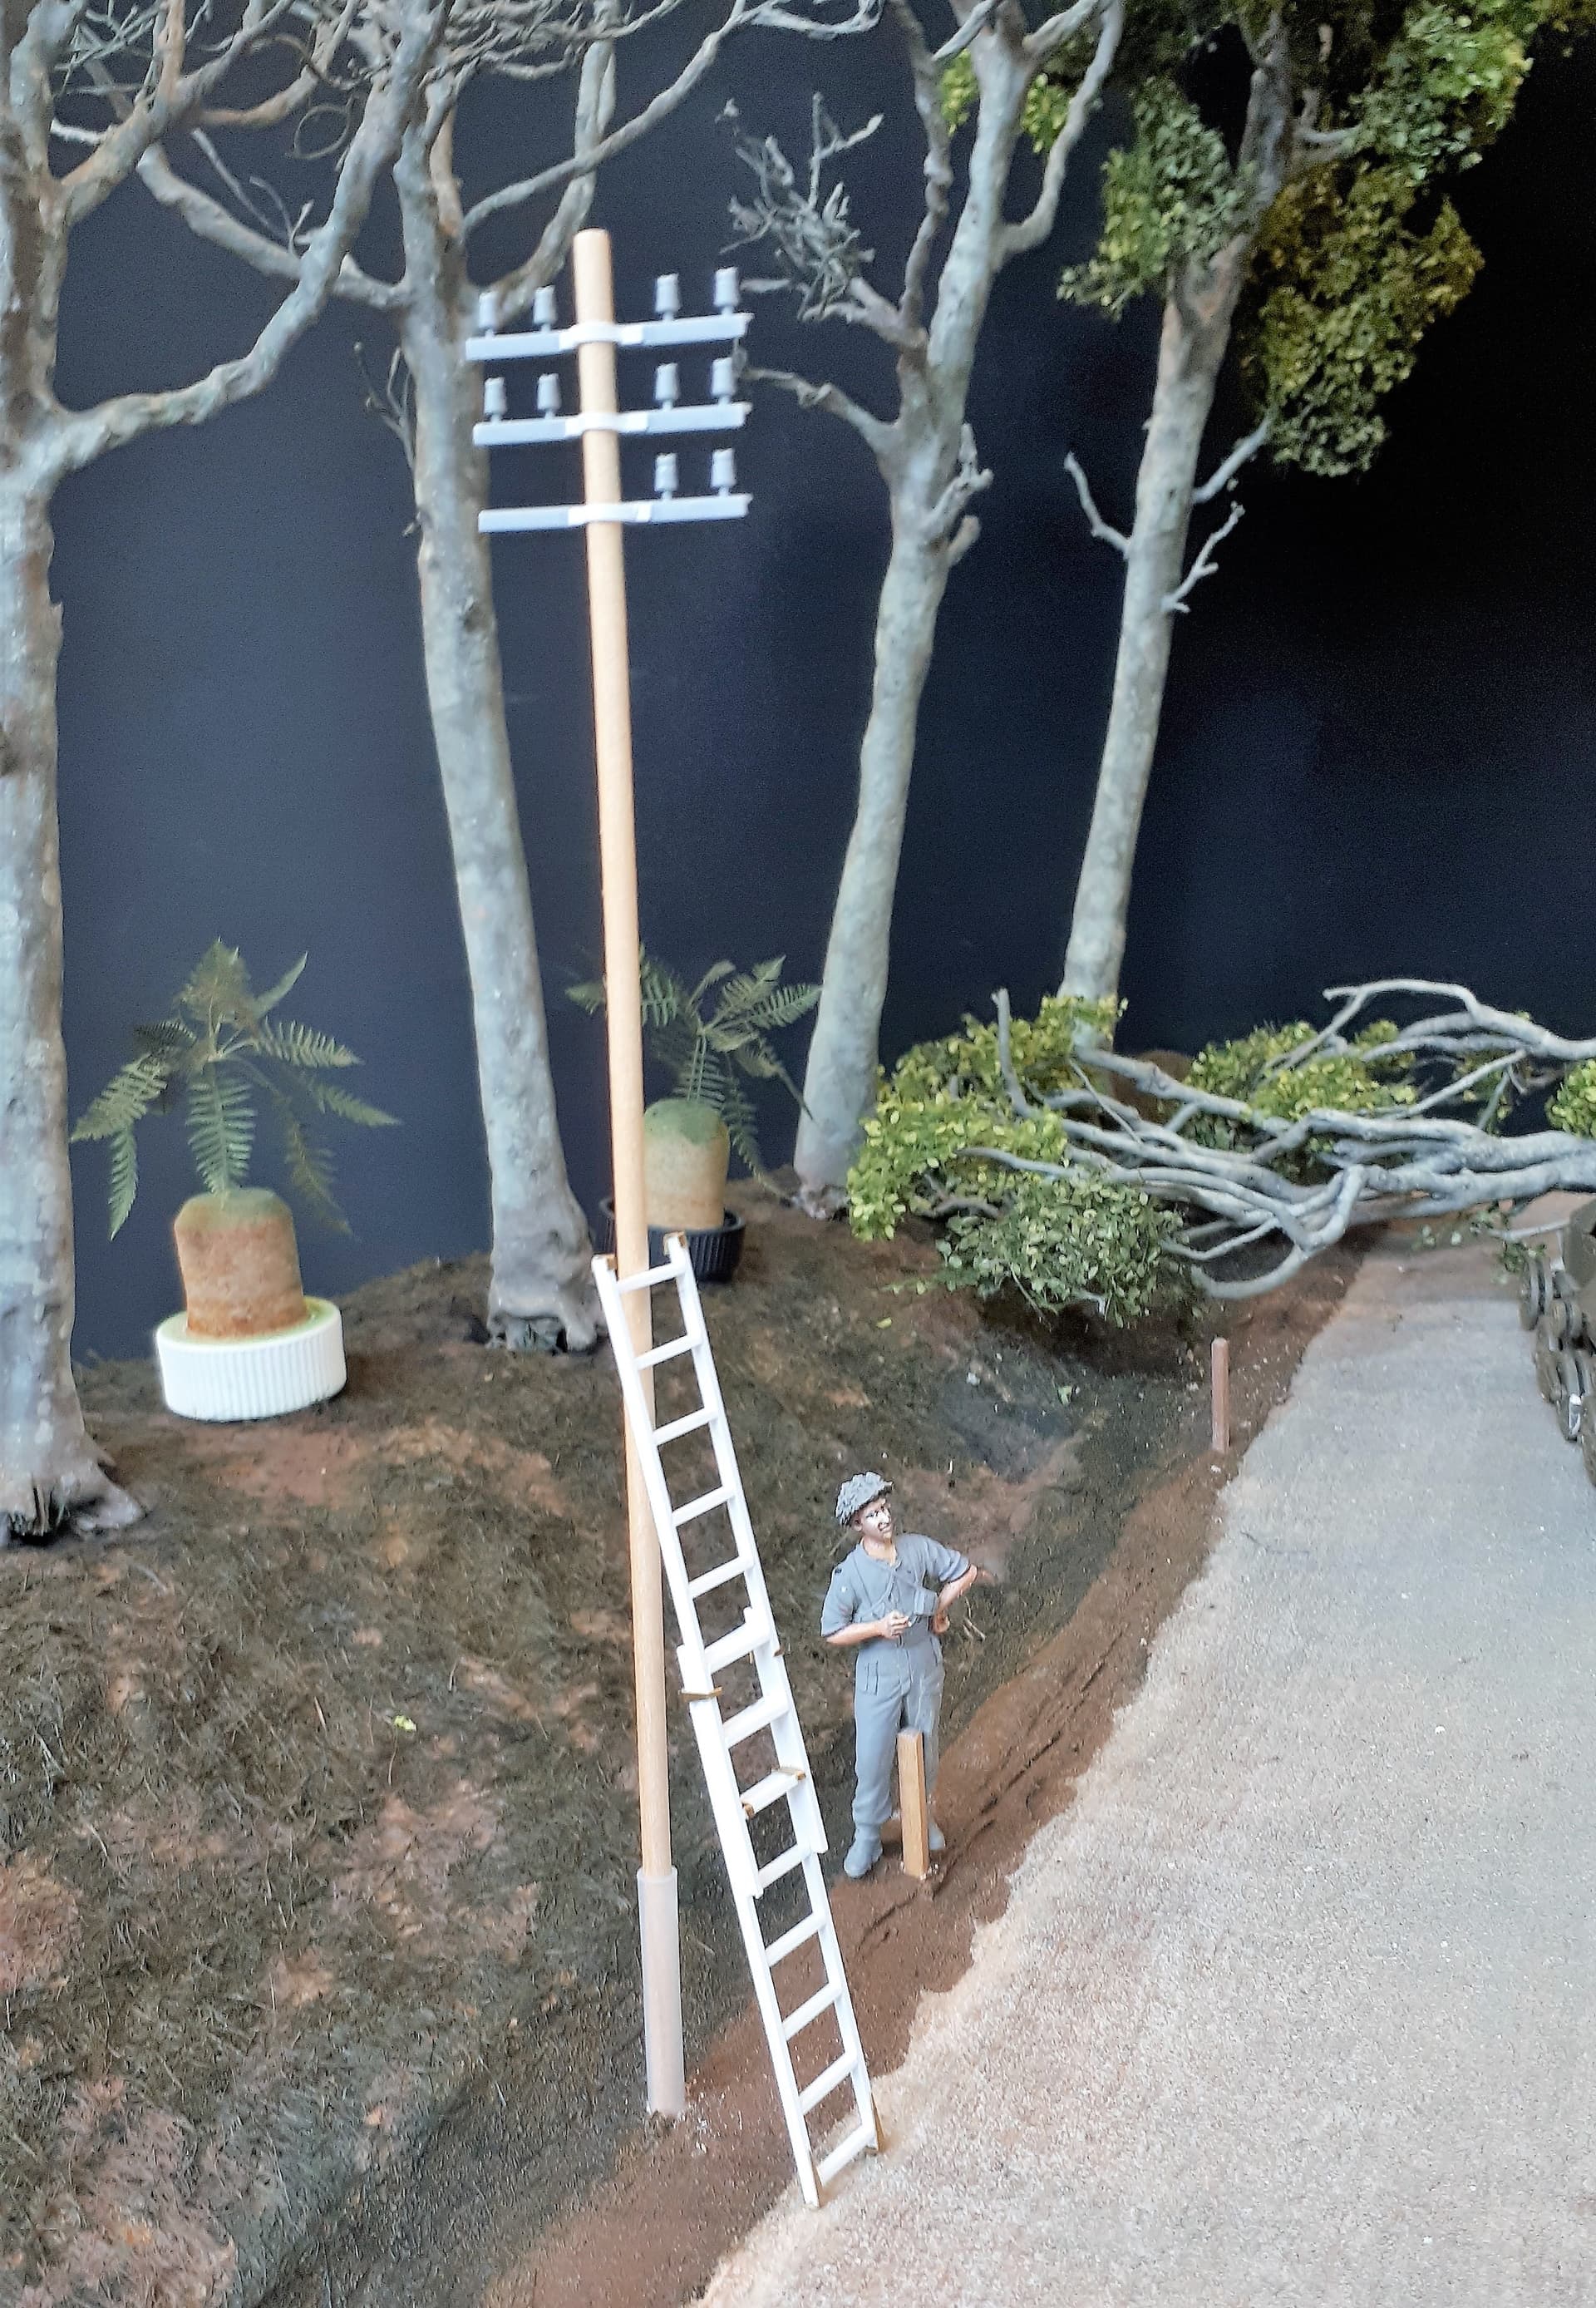
The ladder, which also features prominently in the most famous photo, was scratch built from lengths of square U-shaped plastic rod with added brass.
The pole assembly was then painted with Vallejo acrylics…
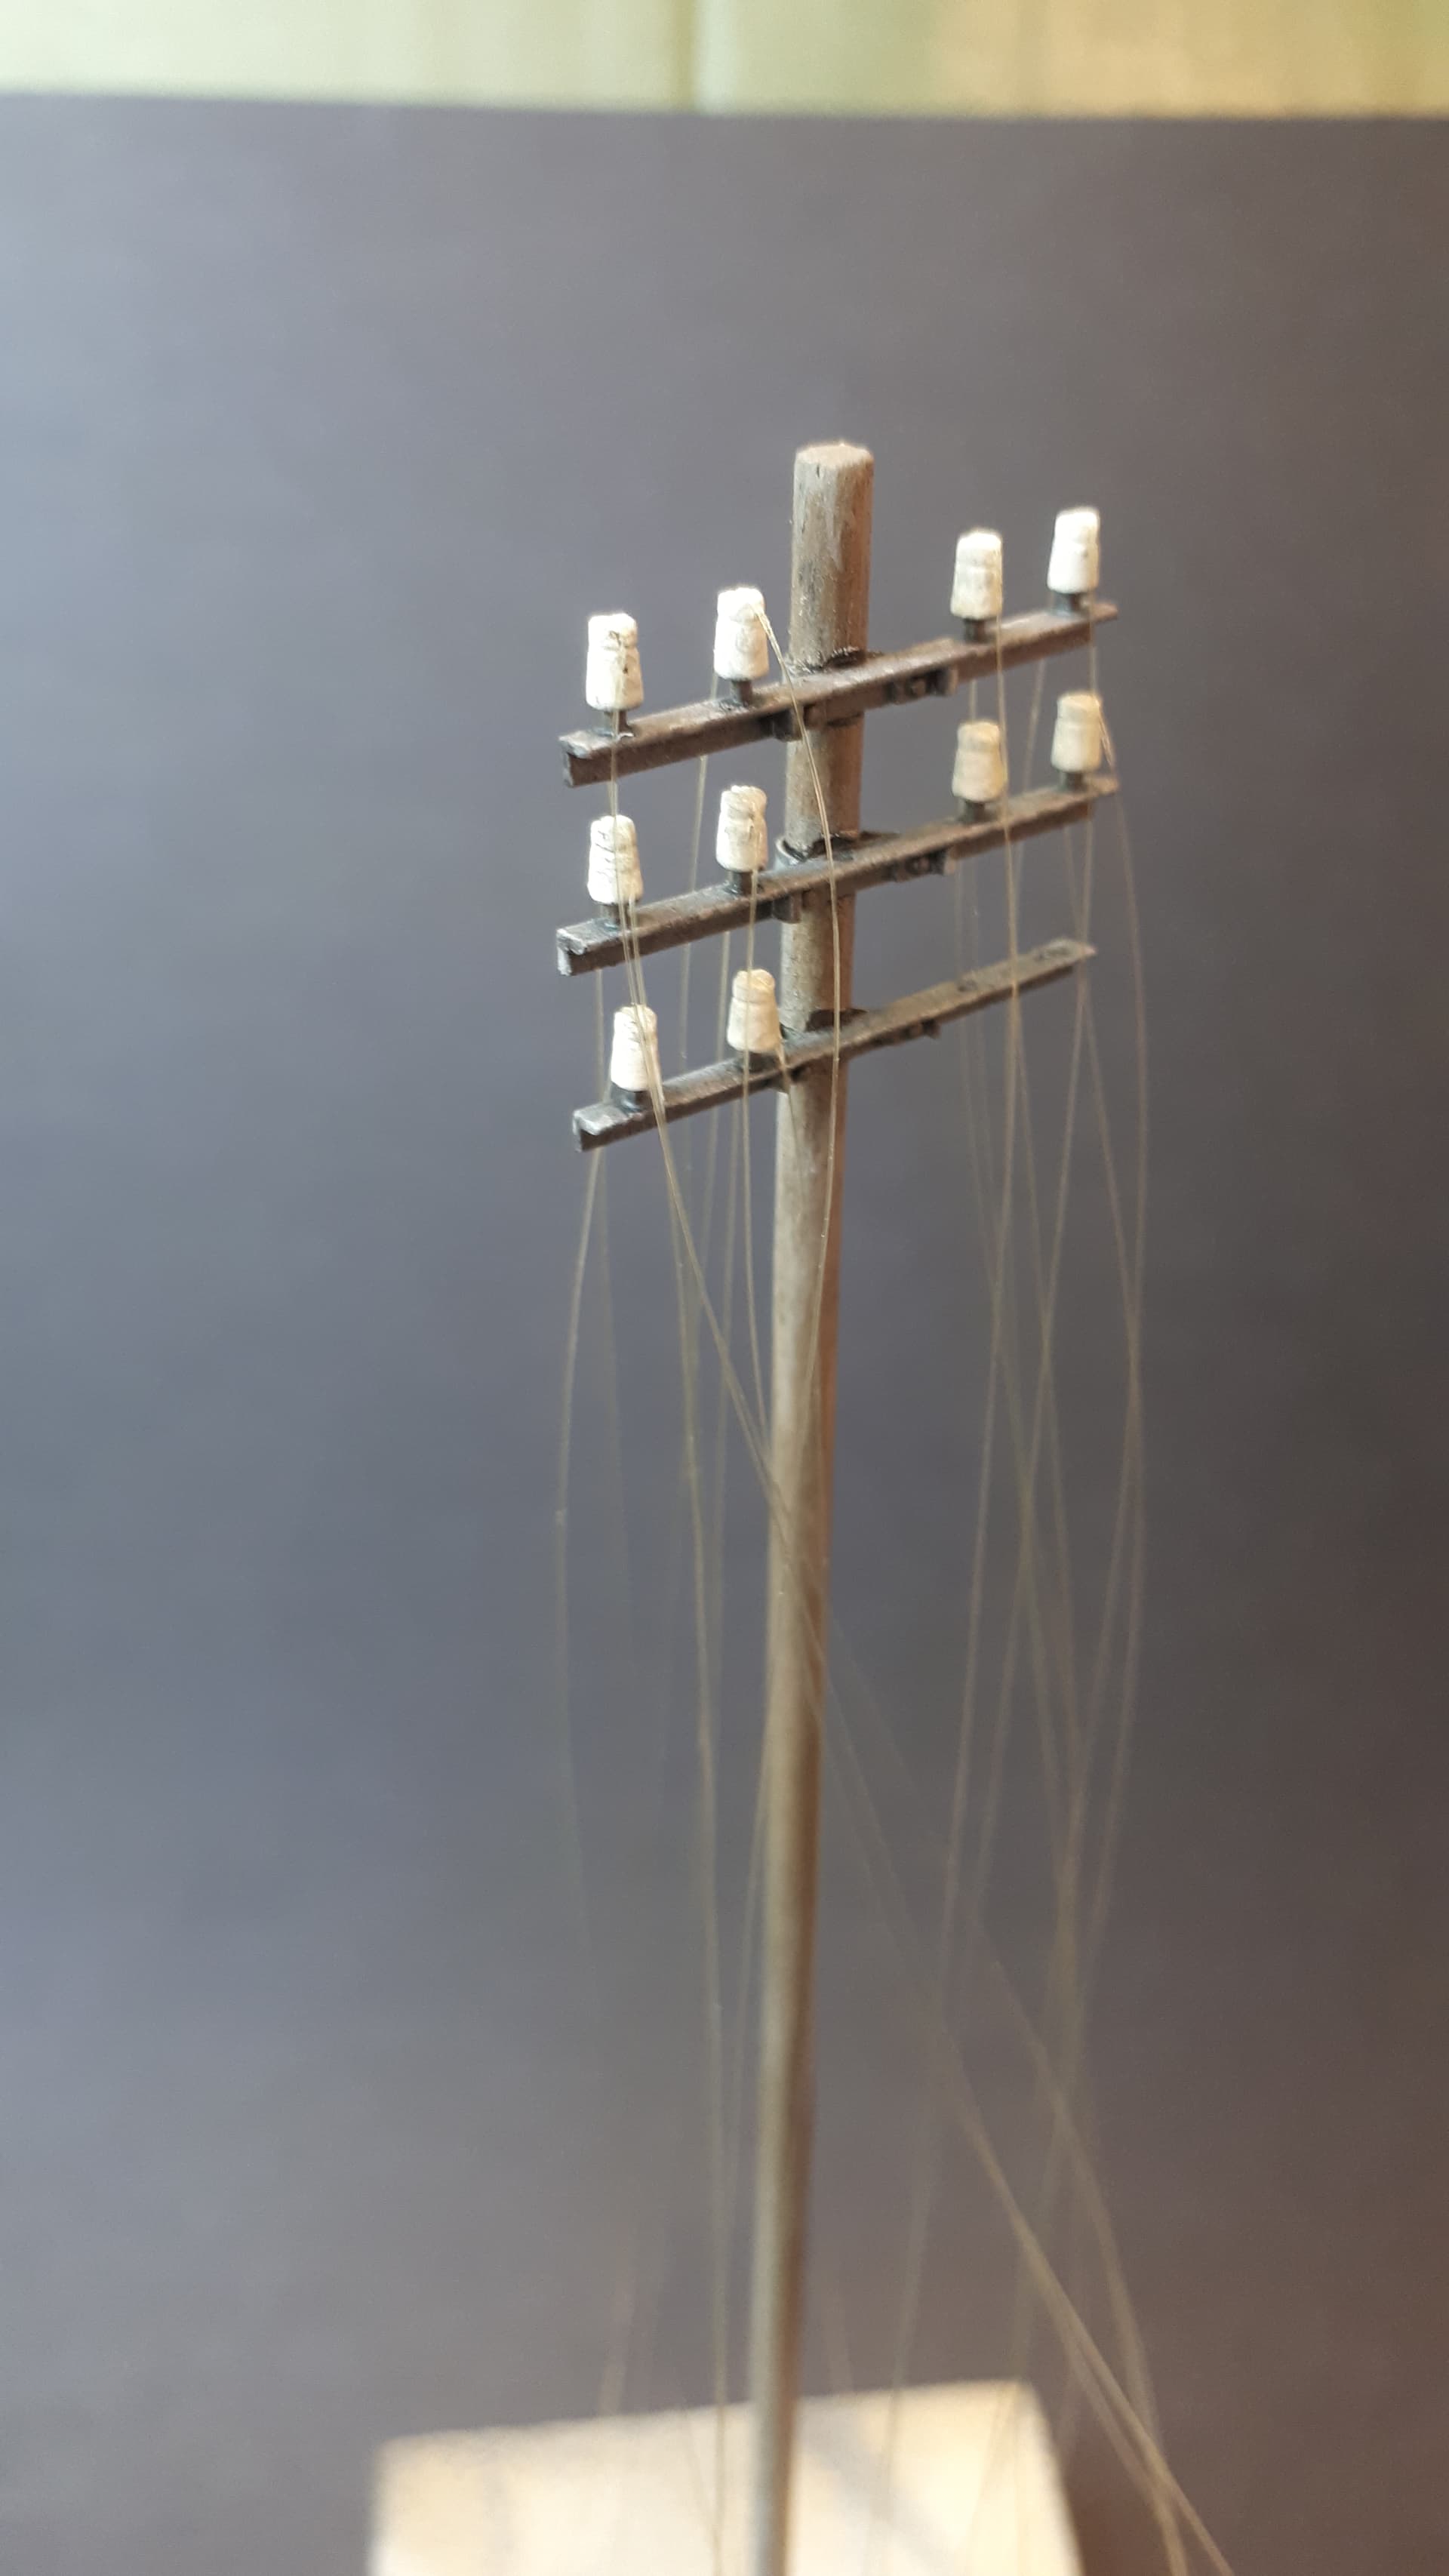
So far so good. But then I had to work out how to make the sagging wires and attach them to the insulators. After a bit of online research I came across two options: fishing line (0.14mm) and fine gauge wire (0.15mm / 34 gauge).
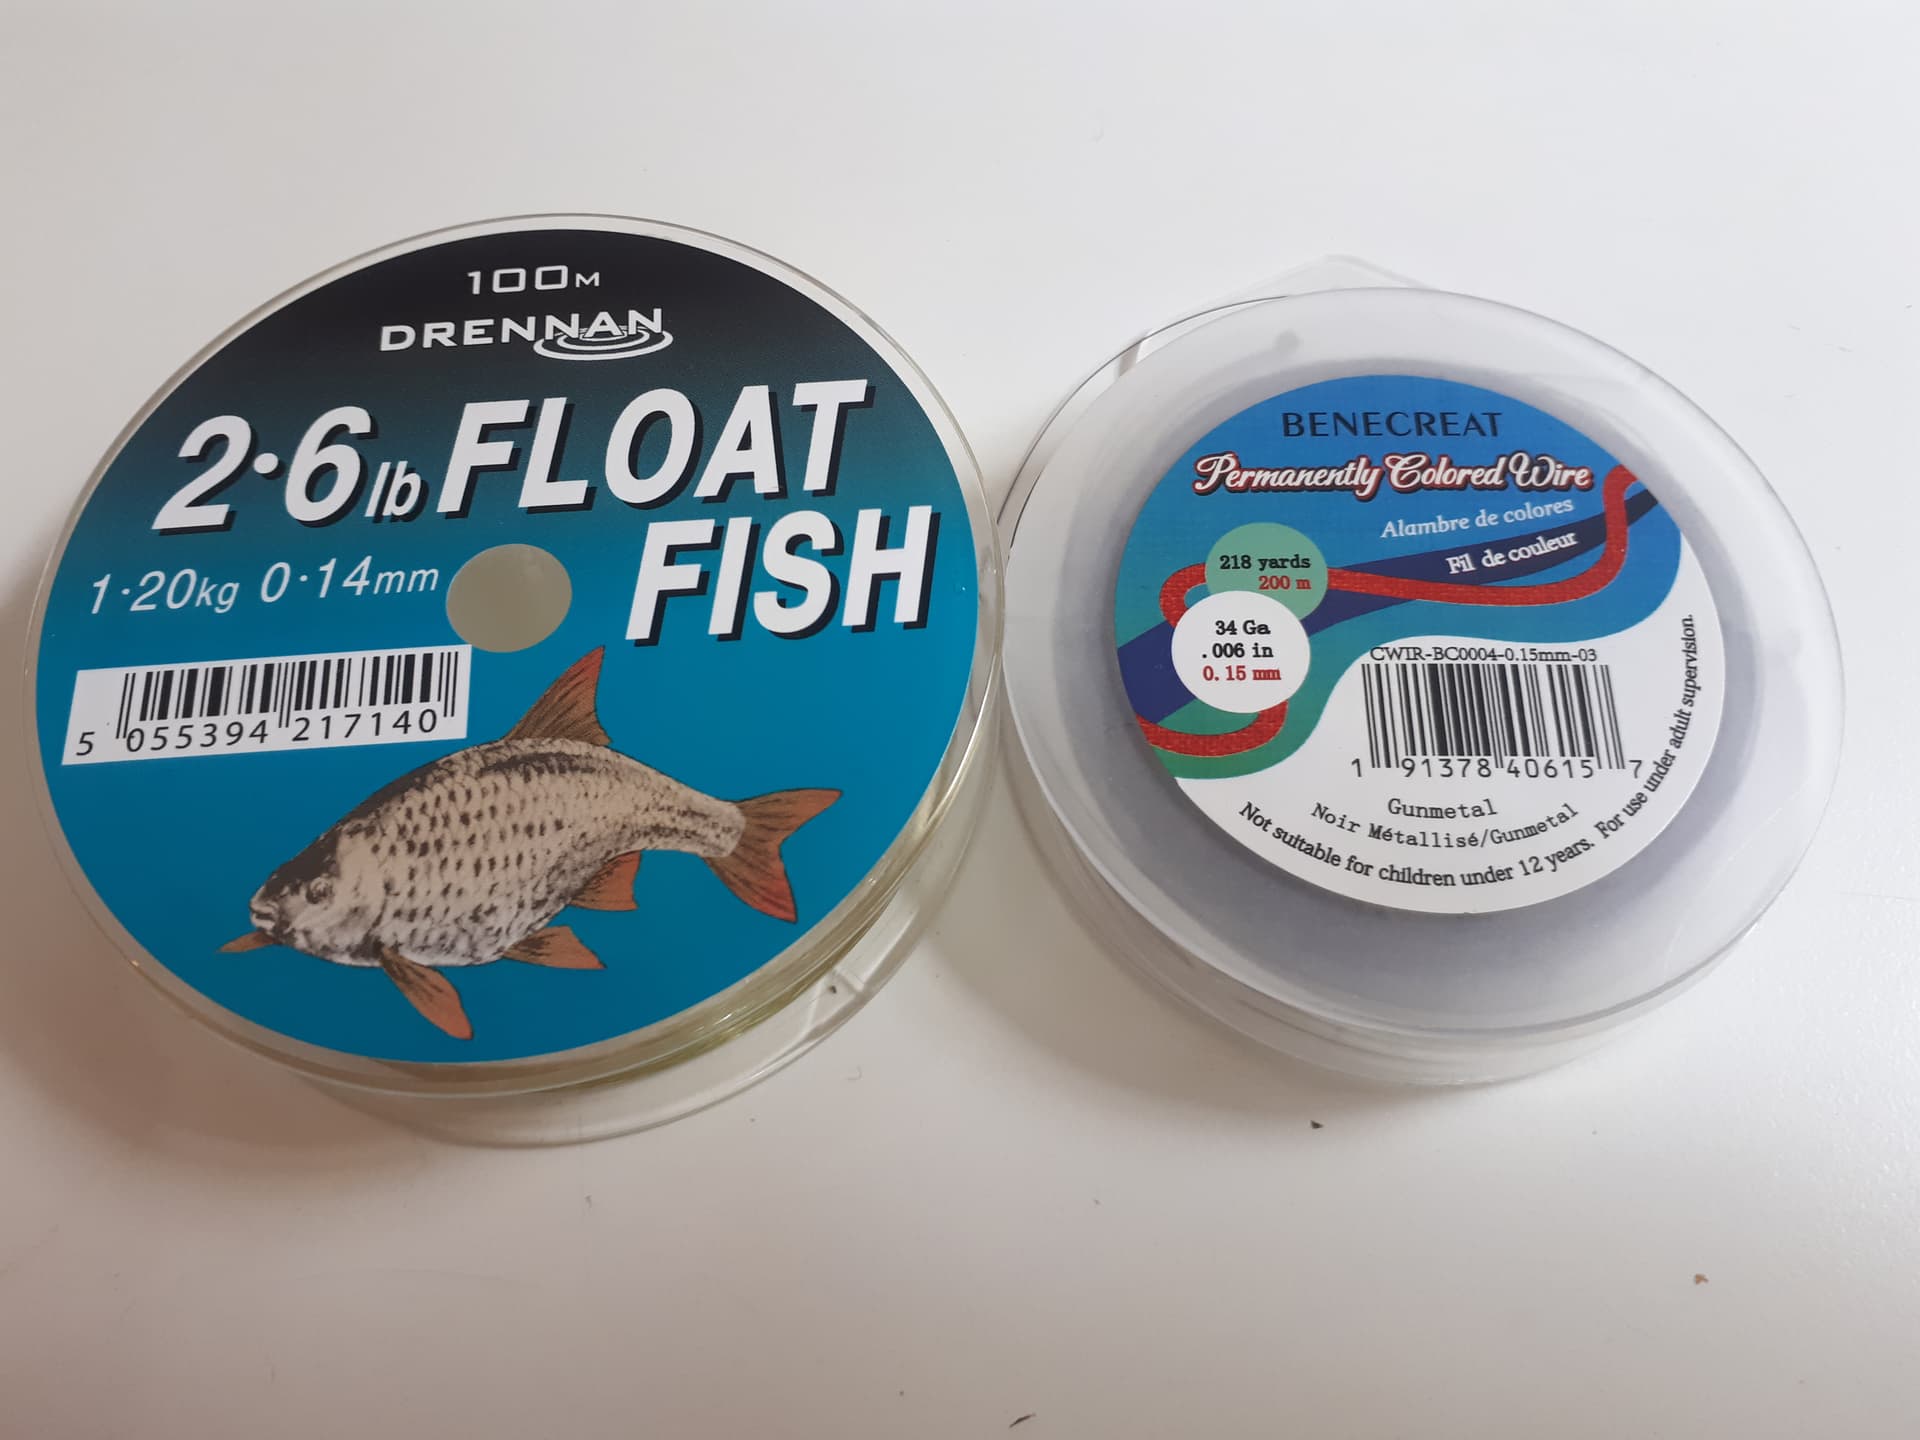
These are not only very cheap, but also come in very long reels - so enough for the rest of my life time I suspect!
The image two steps above shows the first attempt with fishing line. As you can see, it sags quite nicely, but it’s the wrong colour. It’s also not prone to sharp bends, so it had a tendency to stick out either side of the insulators before it sagged.
Then I tried the wire, which has a realistic gun metal finish and will take sharp bends - but I found it too stiff to achieve a realistic sag.
So in the end I compromised by using the fishing line, which I sprayed with a gun metal colour, for the actual telephone lines and the wire to tie the fishing line to the insulators. This was tricky, because I had to create a loop of the wire to ‘lasso’ the fishing line in place (temporarily fixed with fast drying super glue). I then used slow-drying black super glue to flood the metal wire and, when it was dry, I snipped the excess away.
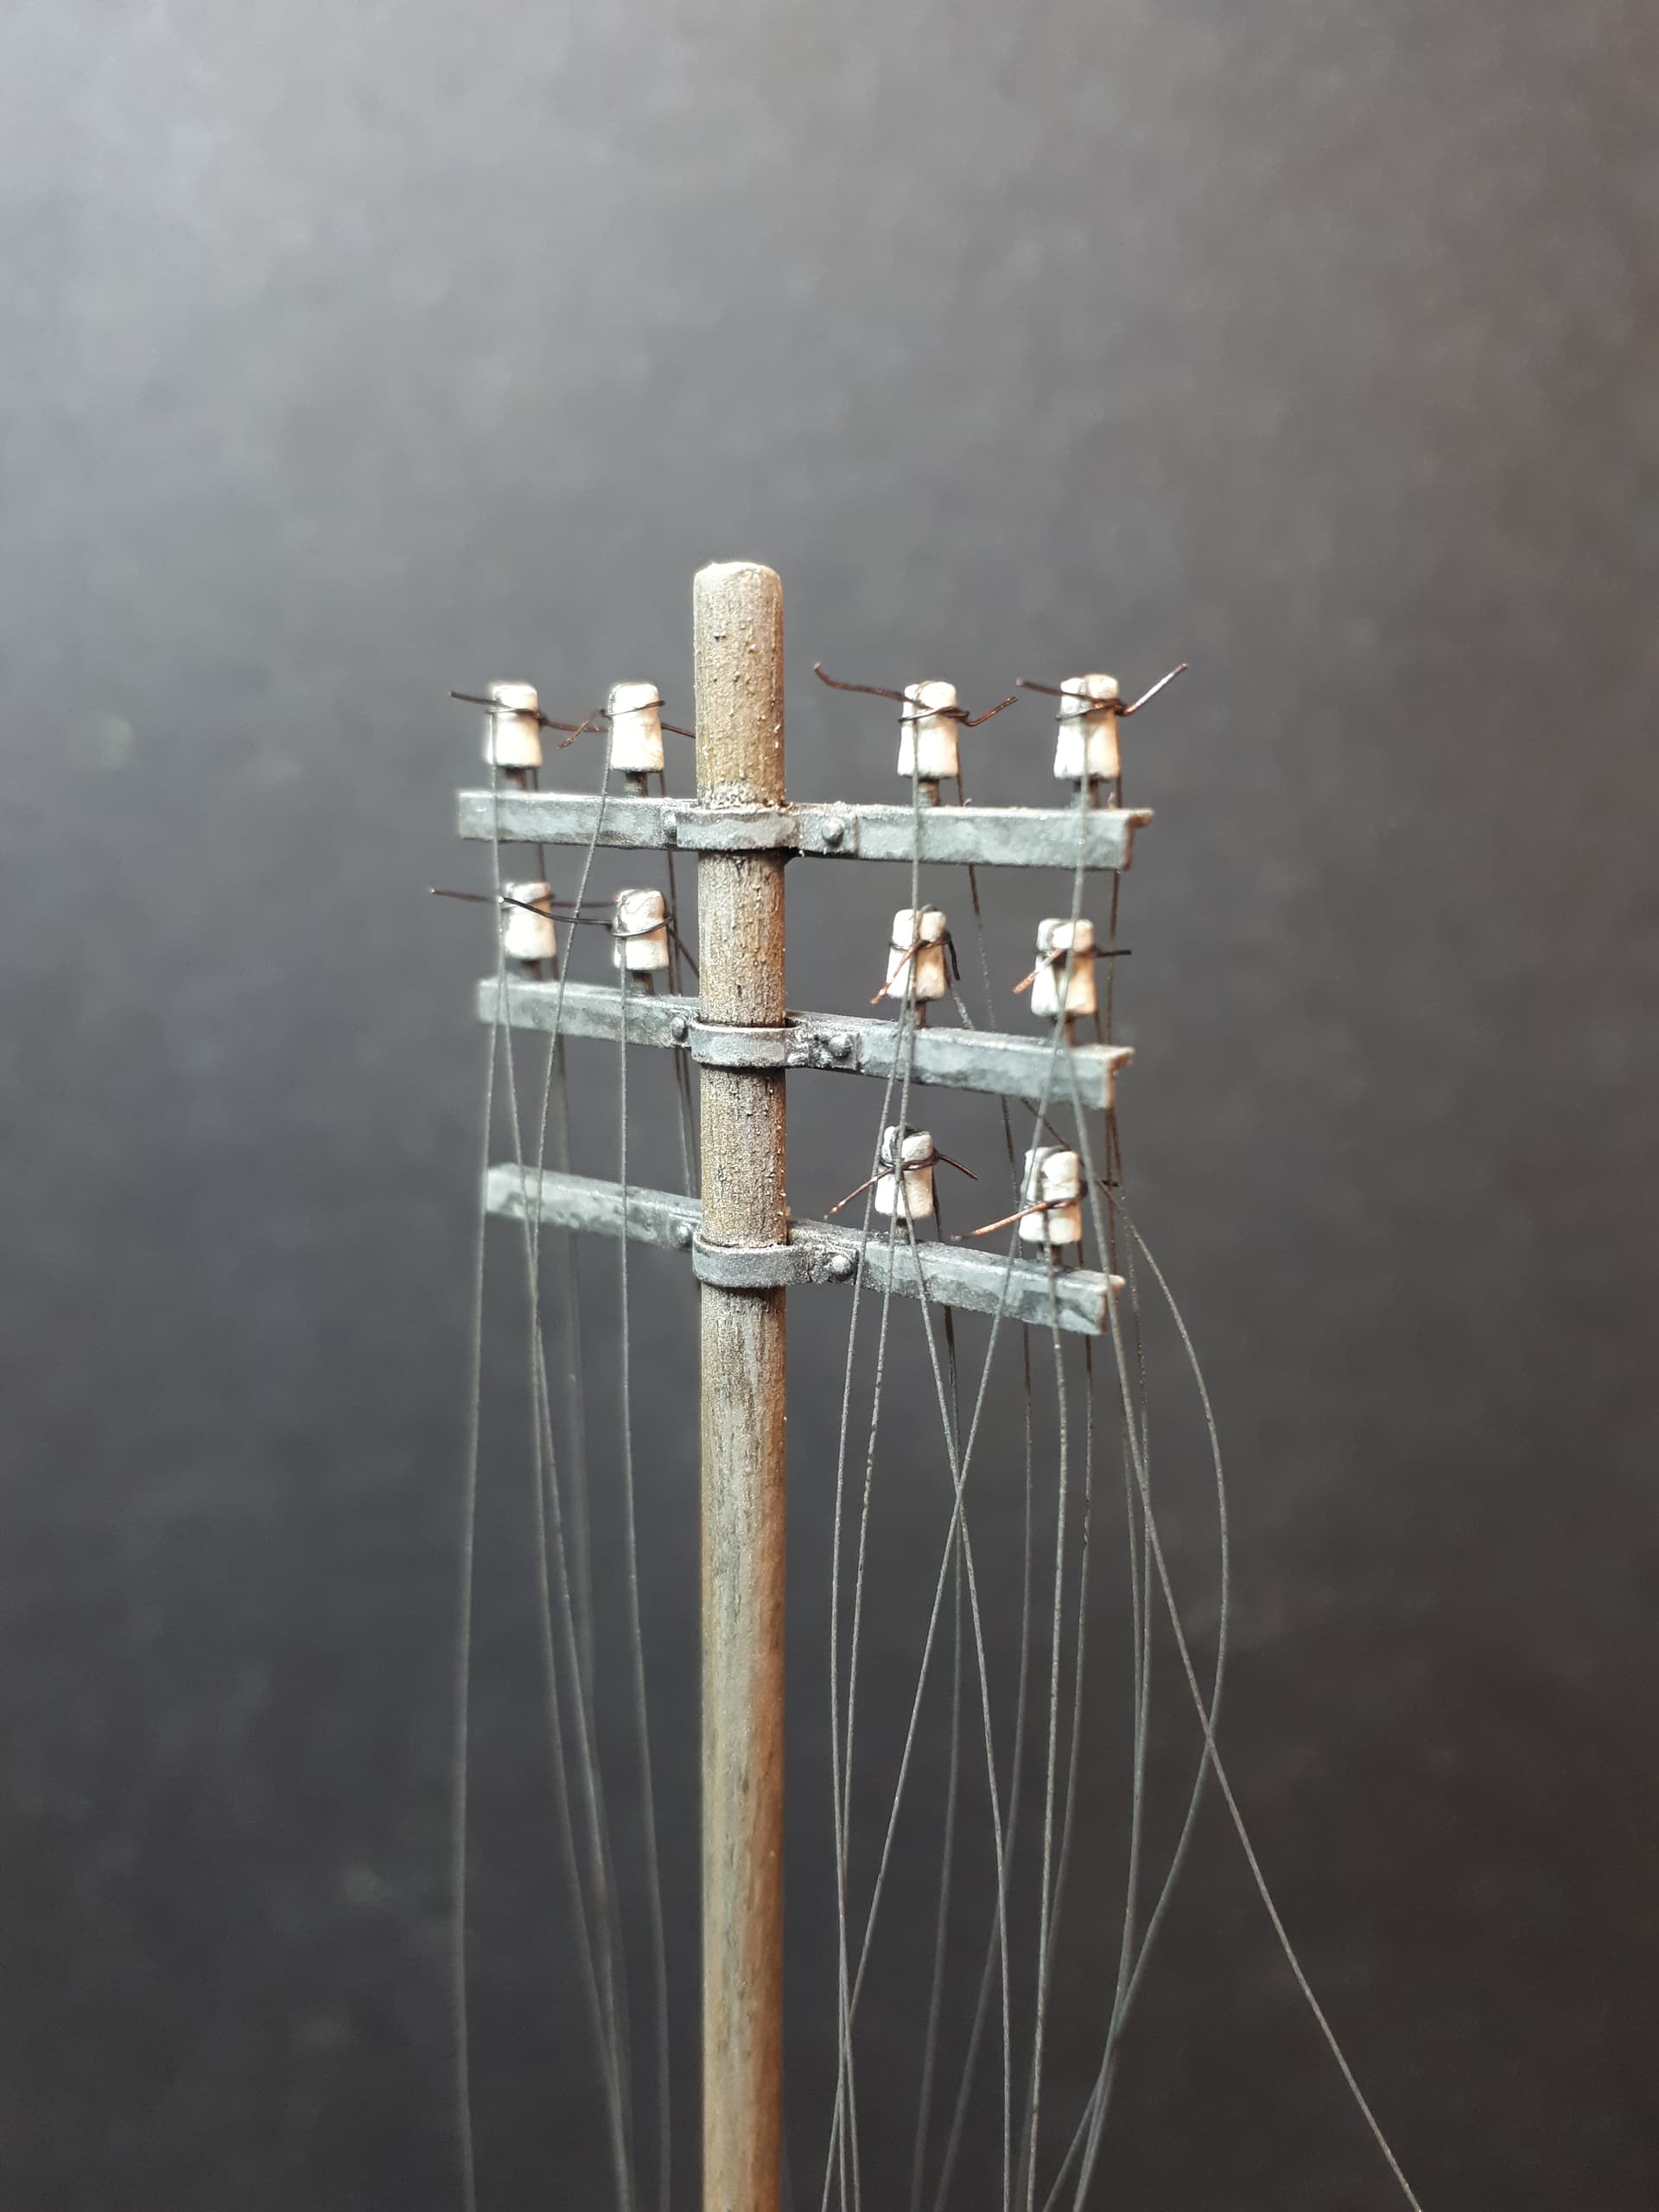
This did, however, have the desired effect - and was also more realistic, since the real wires are often tied to the ceramic pots in a very similar way.
The fact that the wires are now painted in a dark metal colour means that they are almost invisible to the naked eye unless they catch the light or stand out in silhouette - just like the real thing… Job done!
10 Likes
Tim, this has been outstanding in every sense - certainly along the way, whereby techniques and problems have all been tackled. Well done you.
Now, let’s see the final piece!
Yeah man,those wires and poles look the biz! Nice solution.
J
Thanks Boots, Jerry. No need to crack the whip Boots, I’m on it!
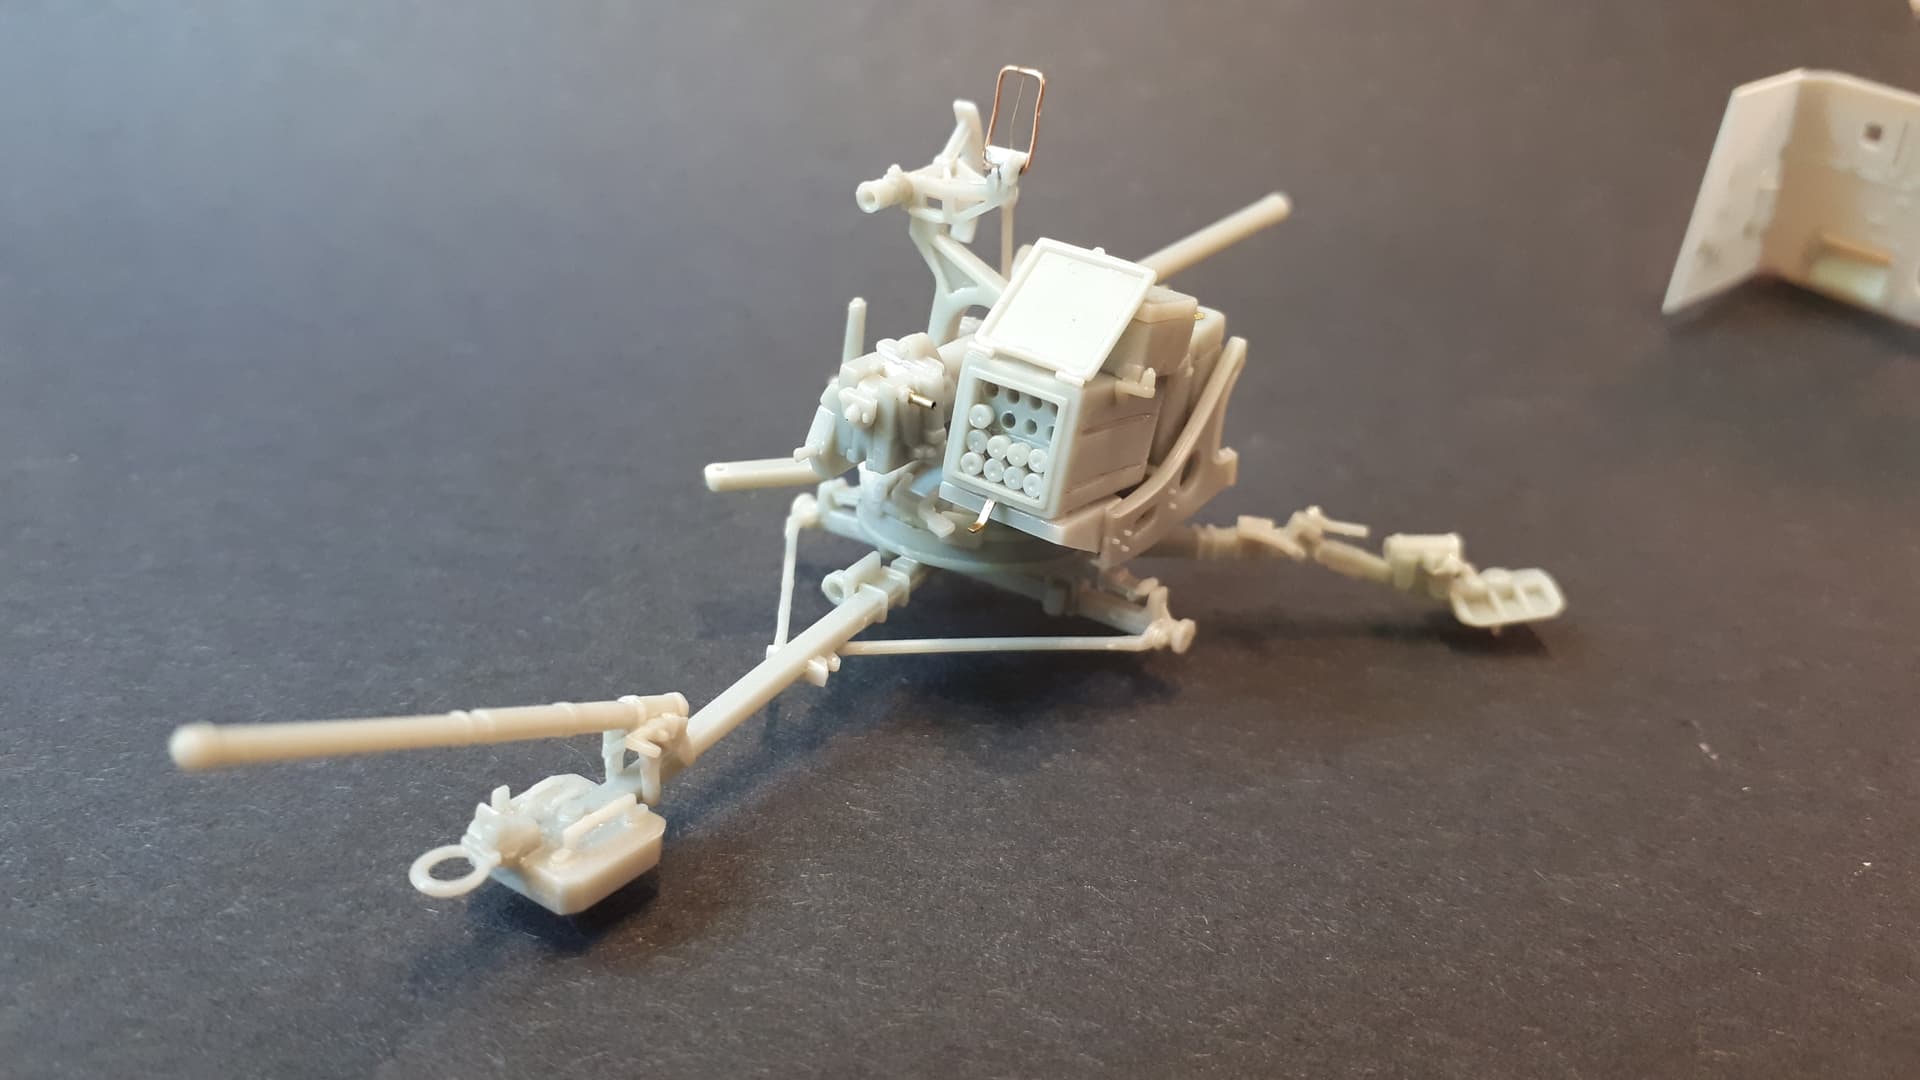
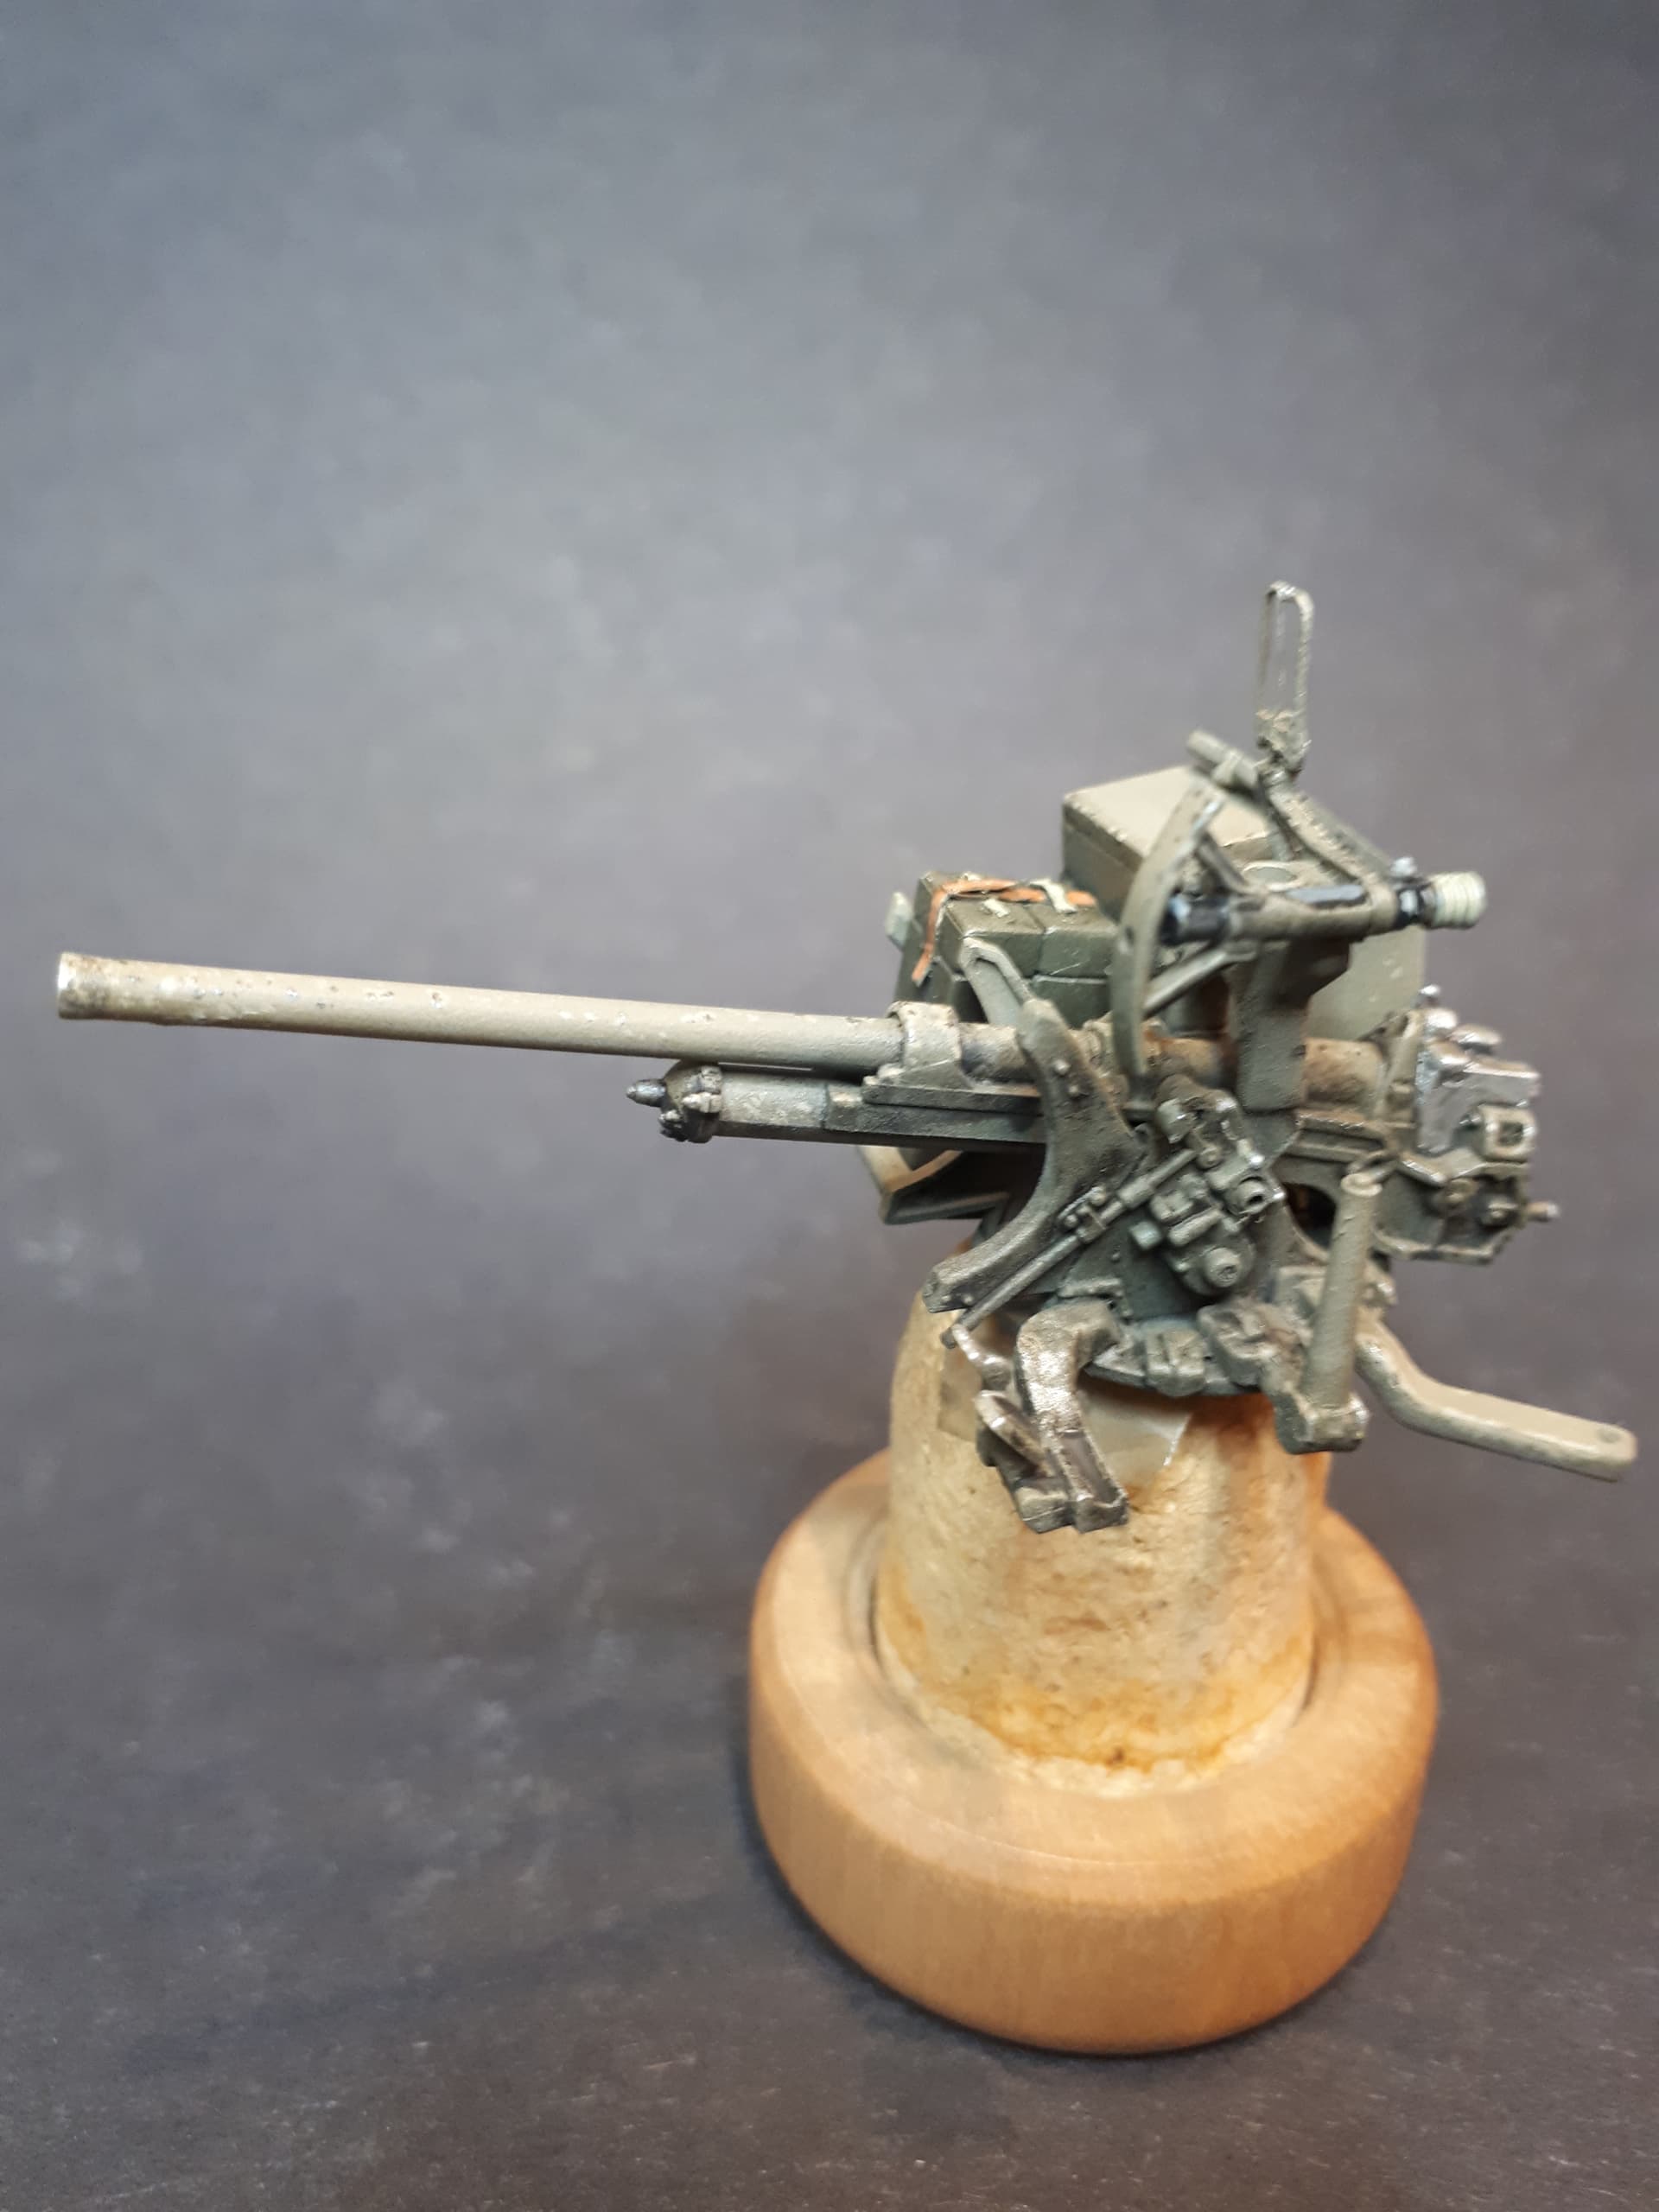
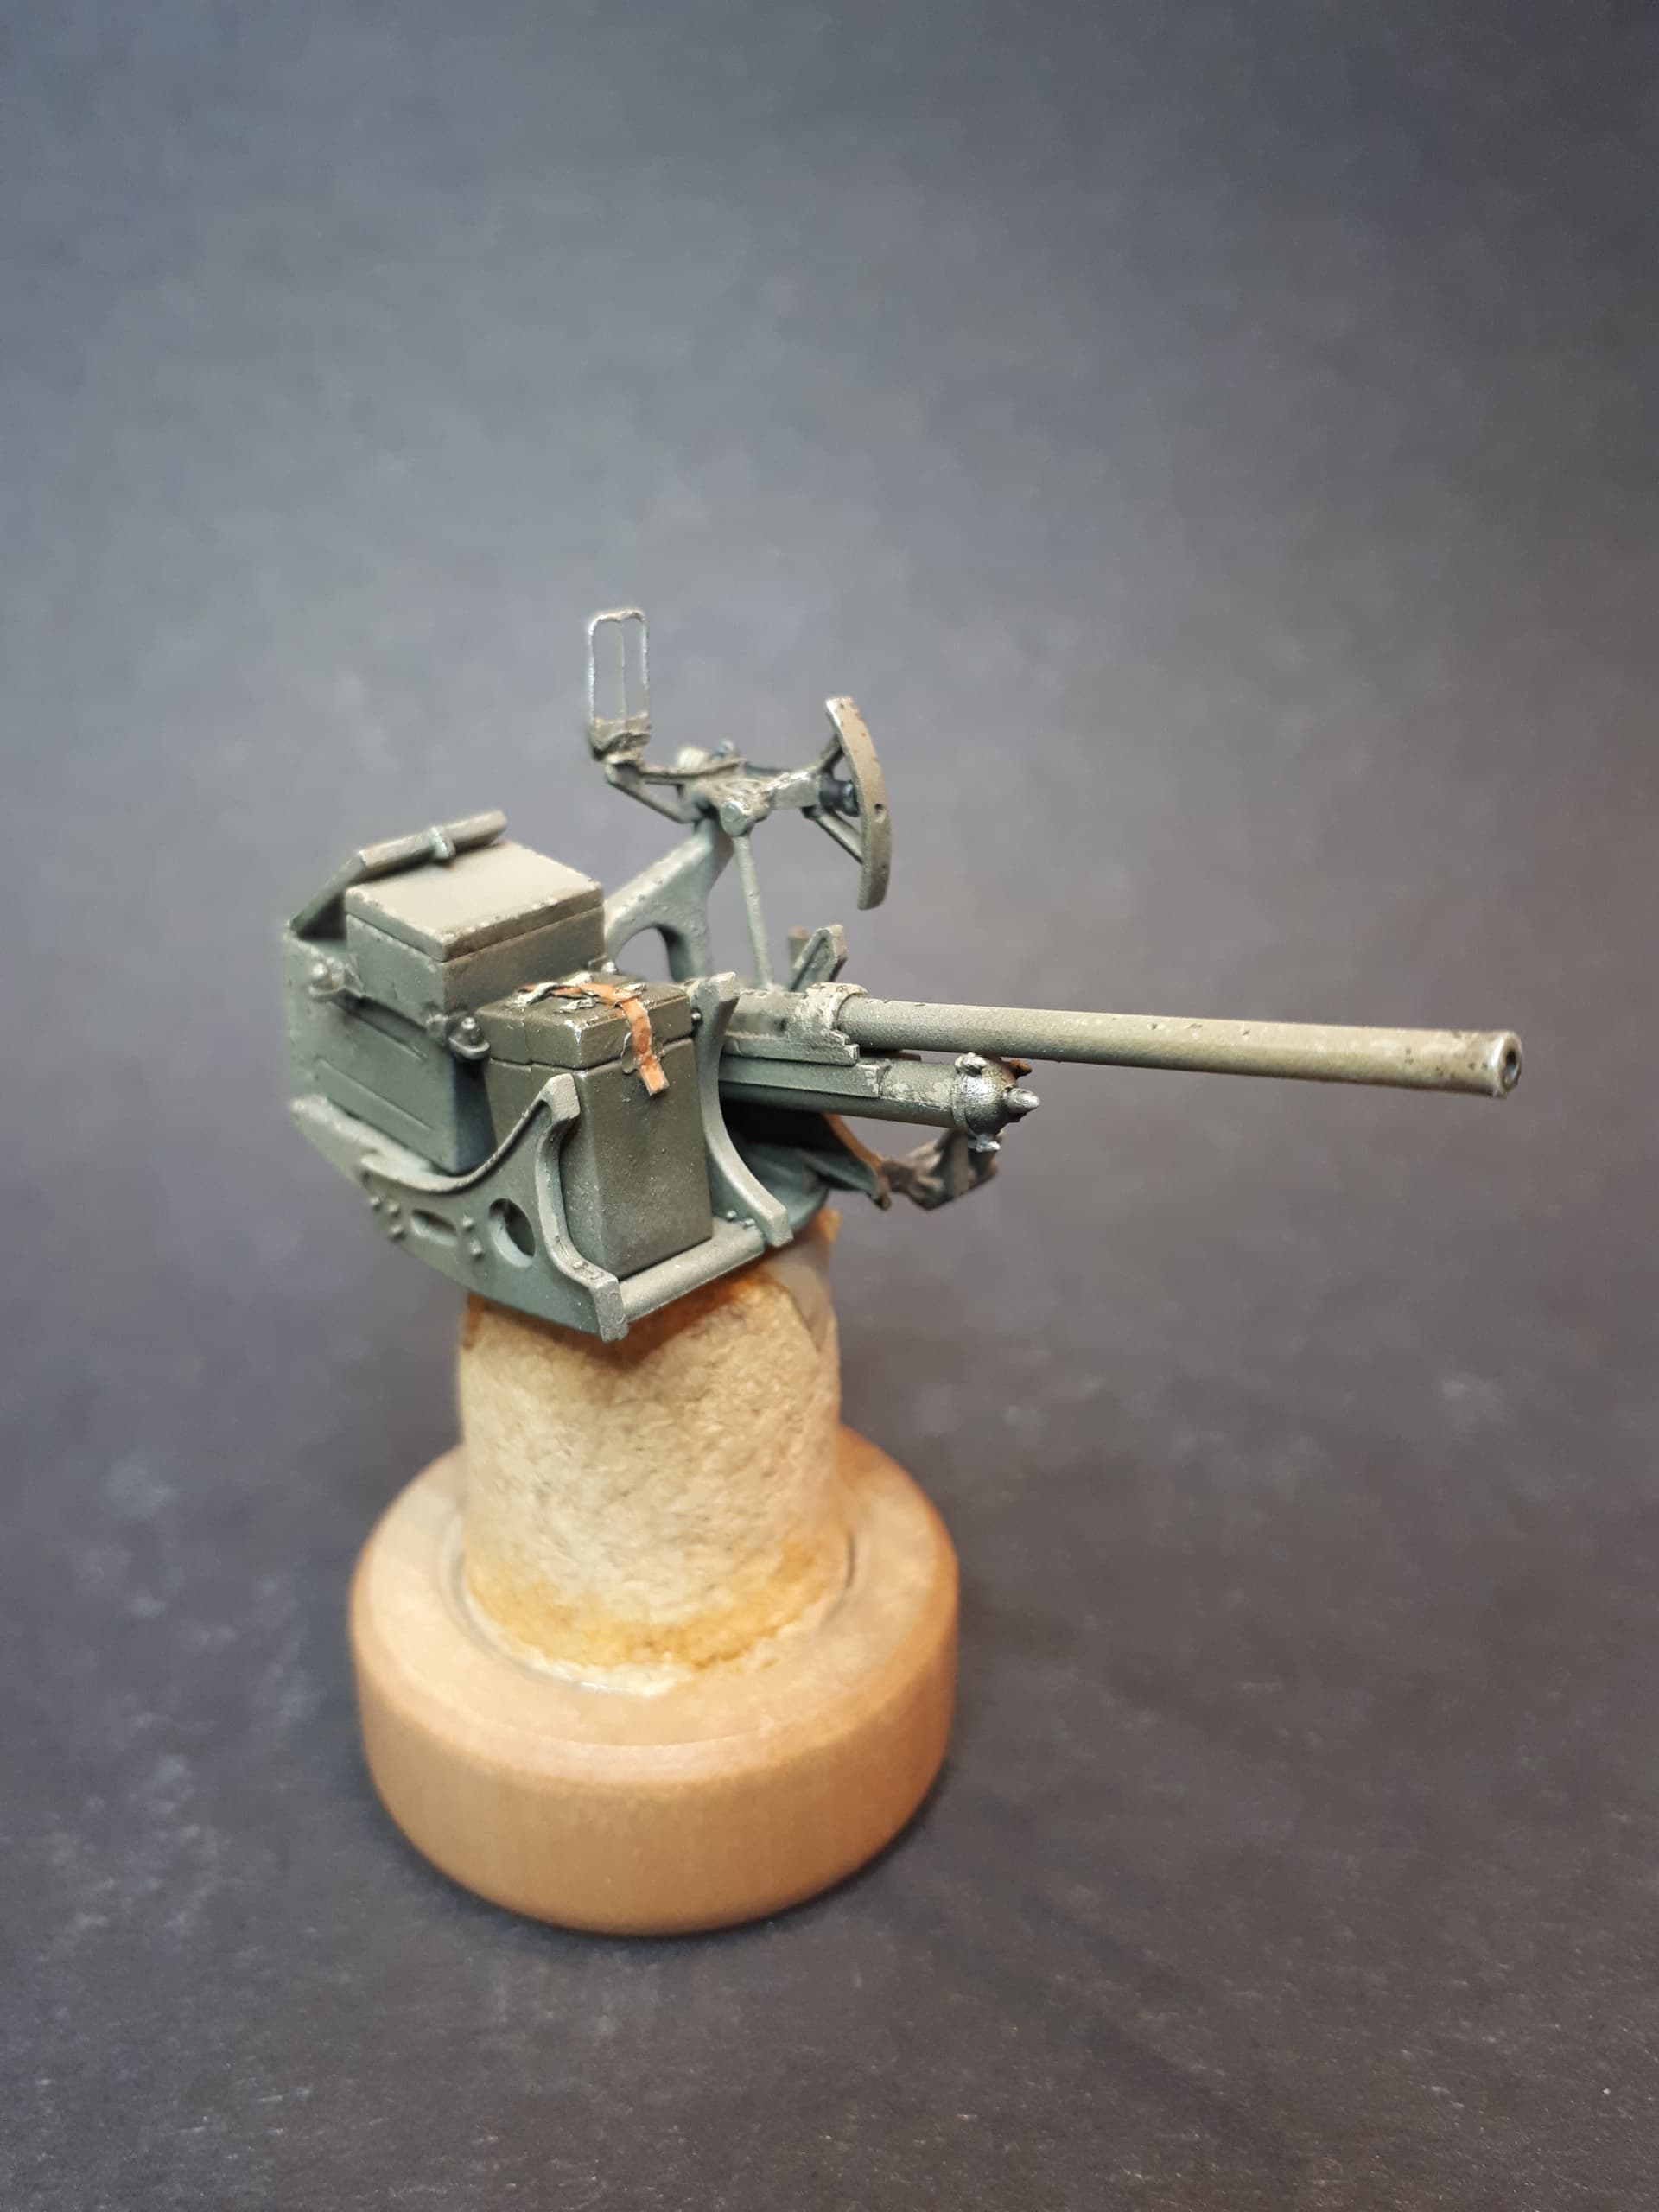
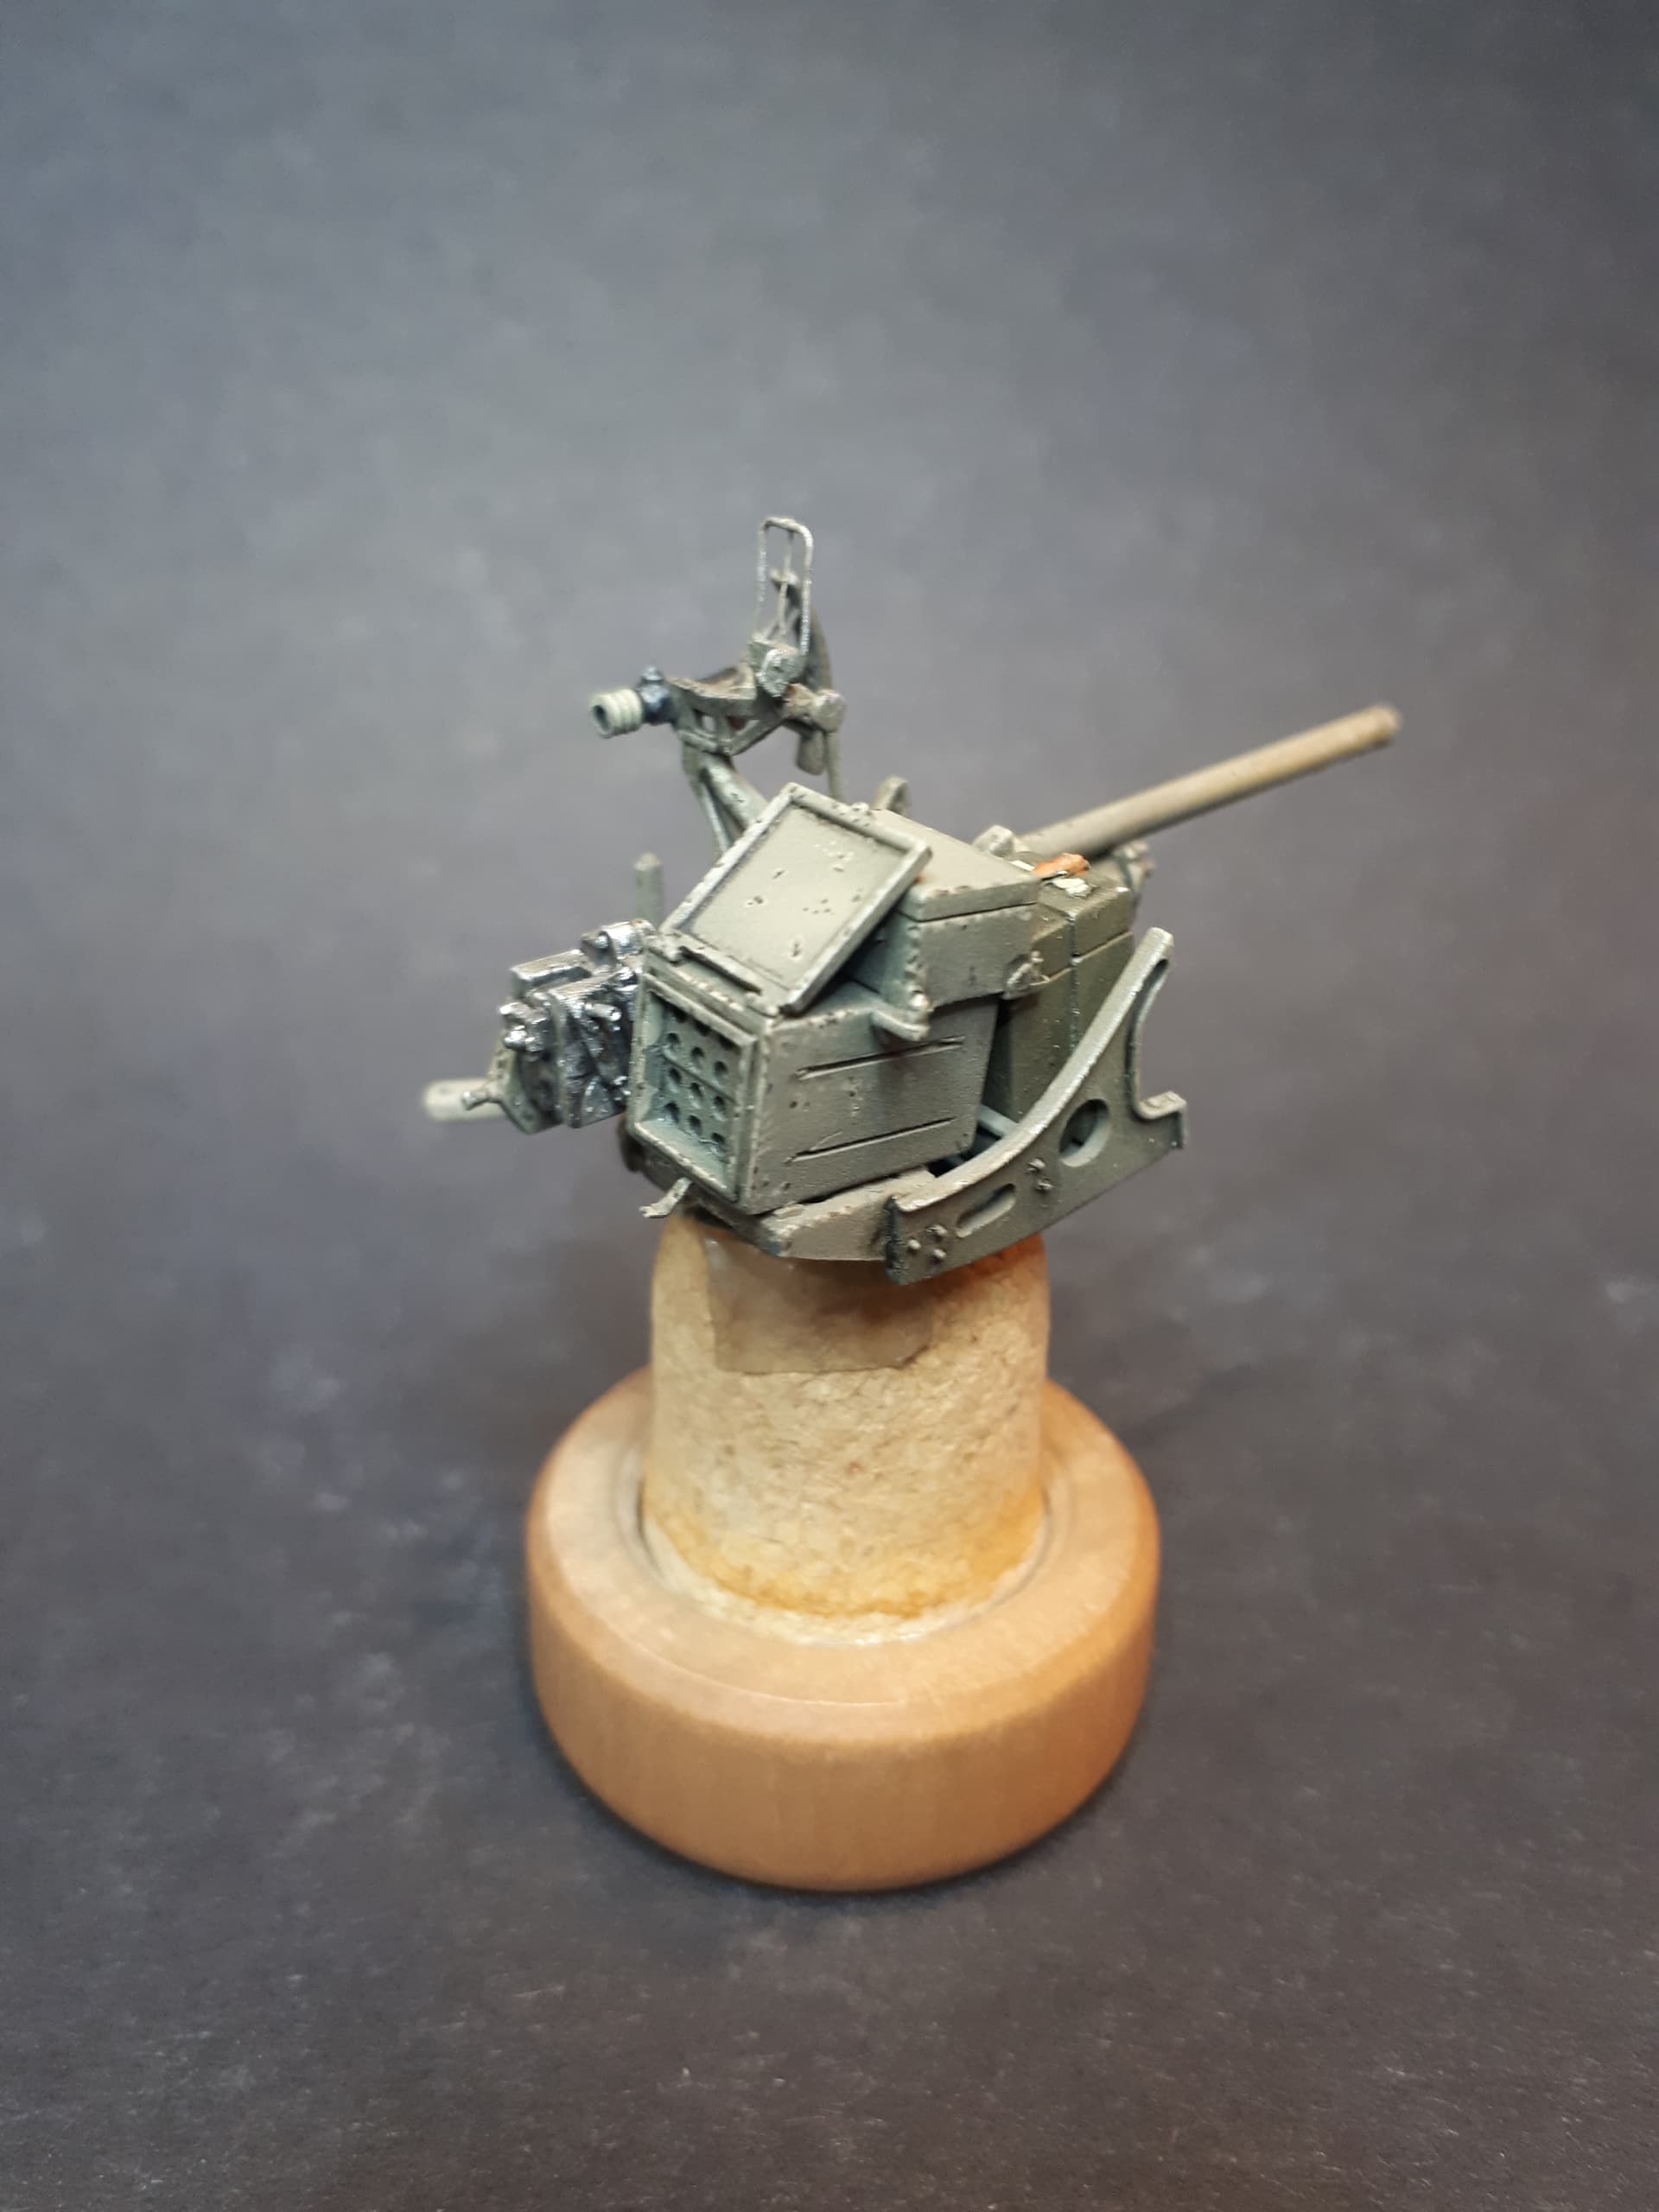
OK, so here is where I am with one of the most important elements of the diorama: the 2 Pounder gun.
I have started a standalone thread for this build, which I must update, but the long and the short of it is that I ended up going with the Vulcan plastic kit after I found that the Sovereign 2000 resin version was over-scale and inaccurate.
The Vulcan kit actually builds into a really nice piece with only a few parts (e.g. the open sight) needing refinement.
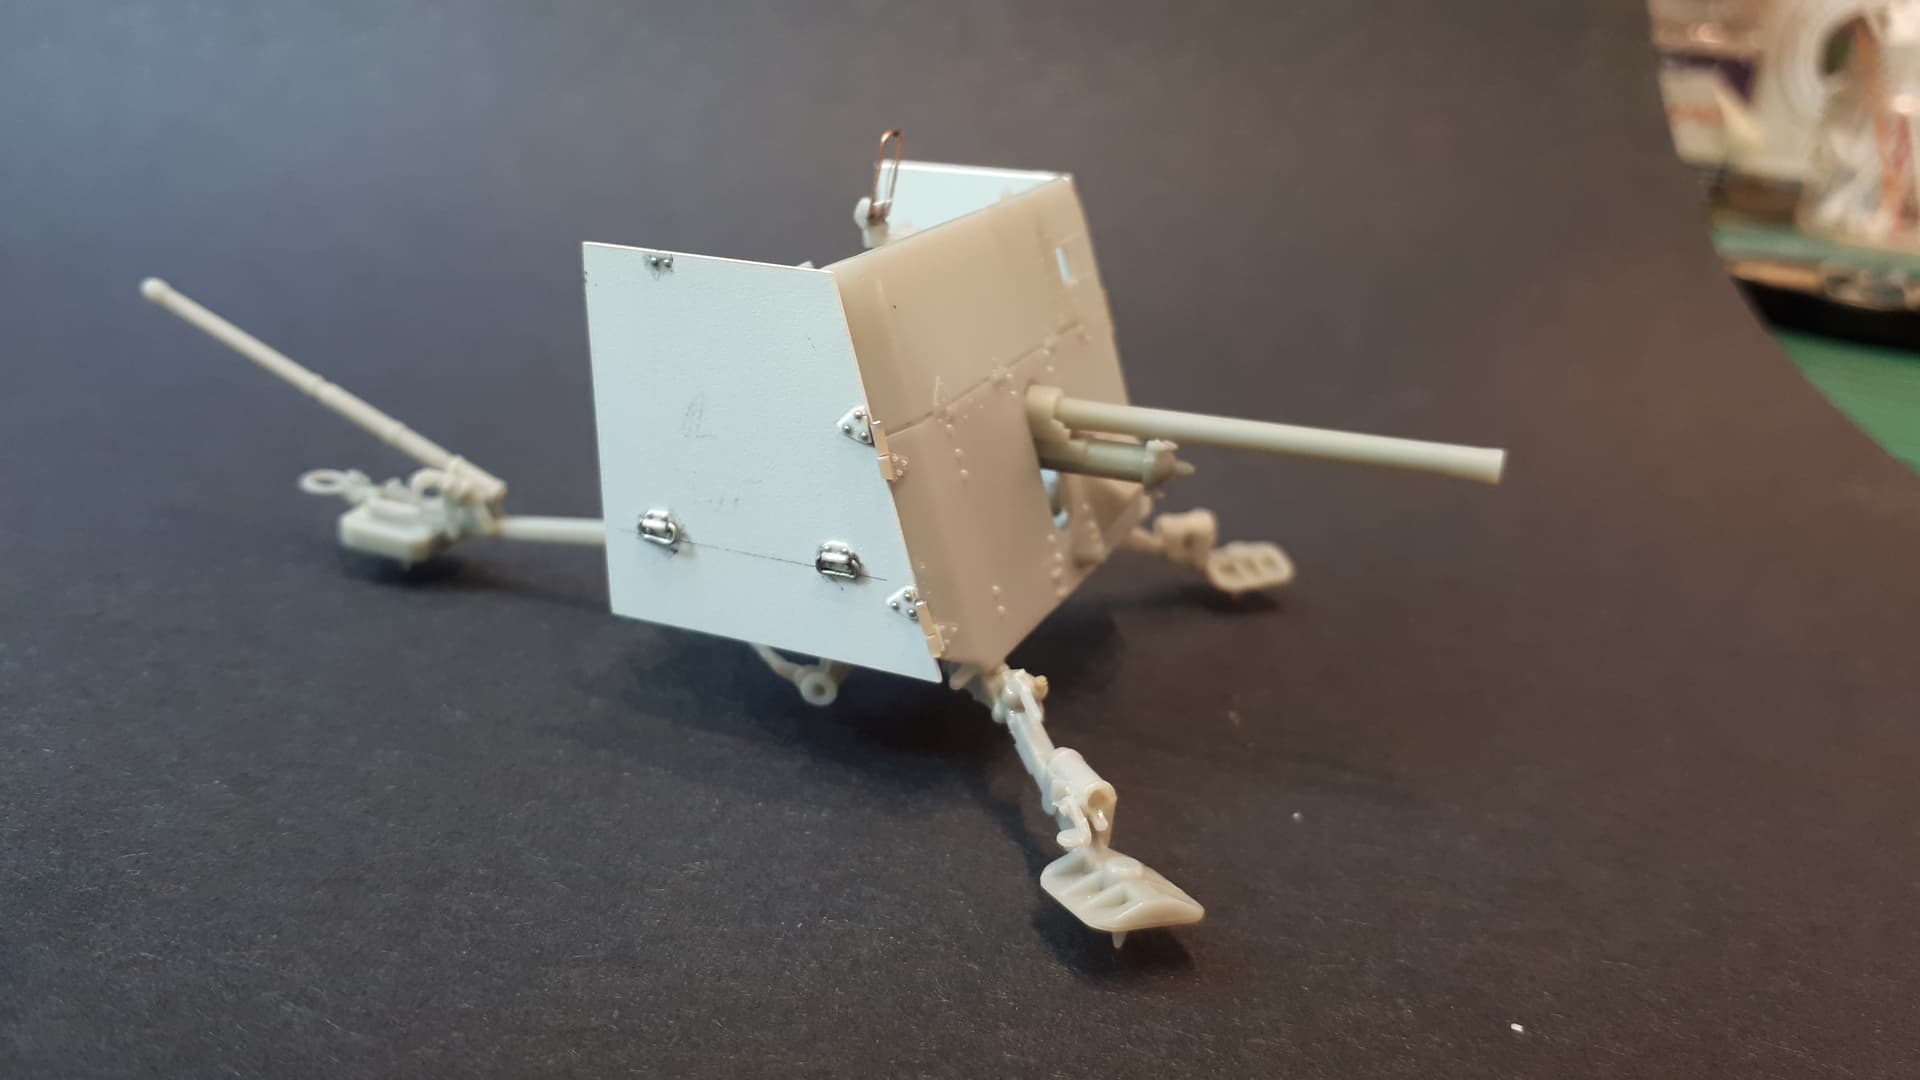
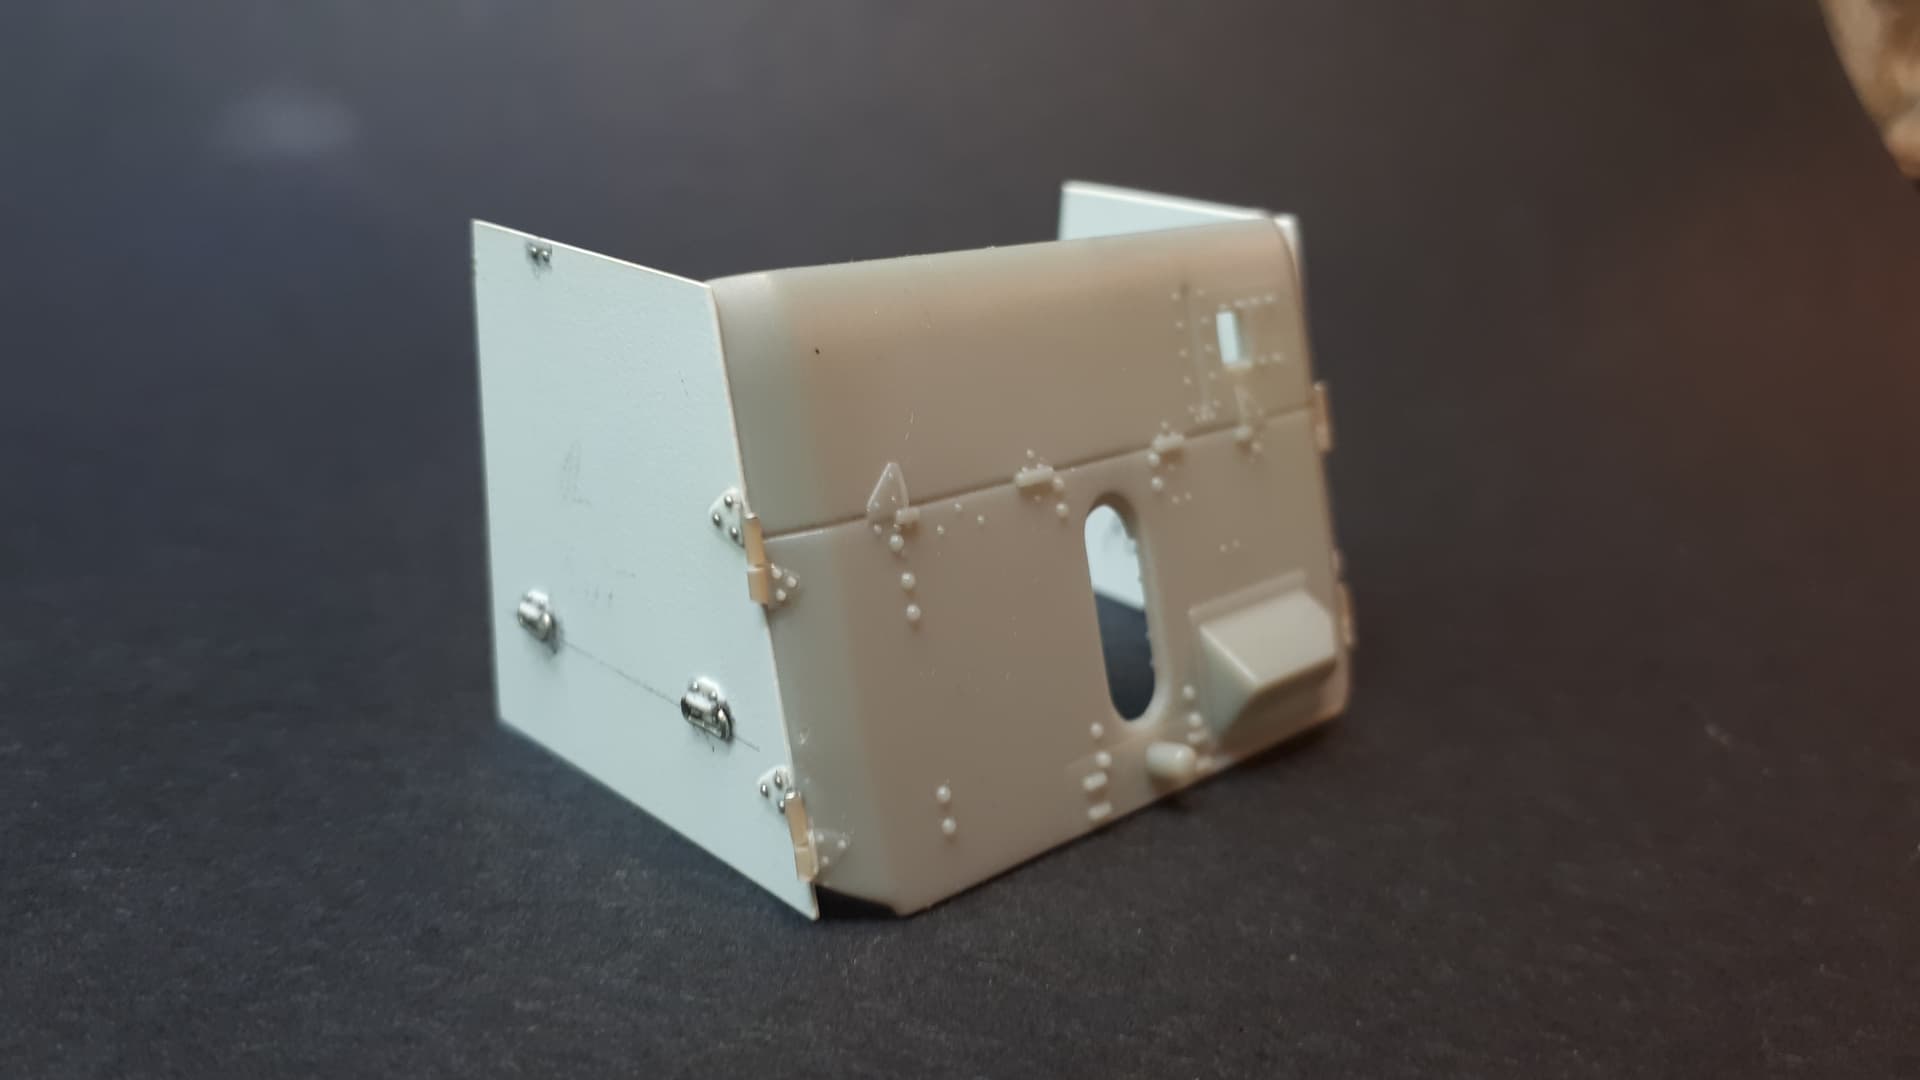
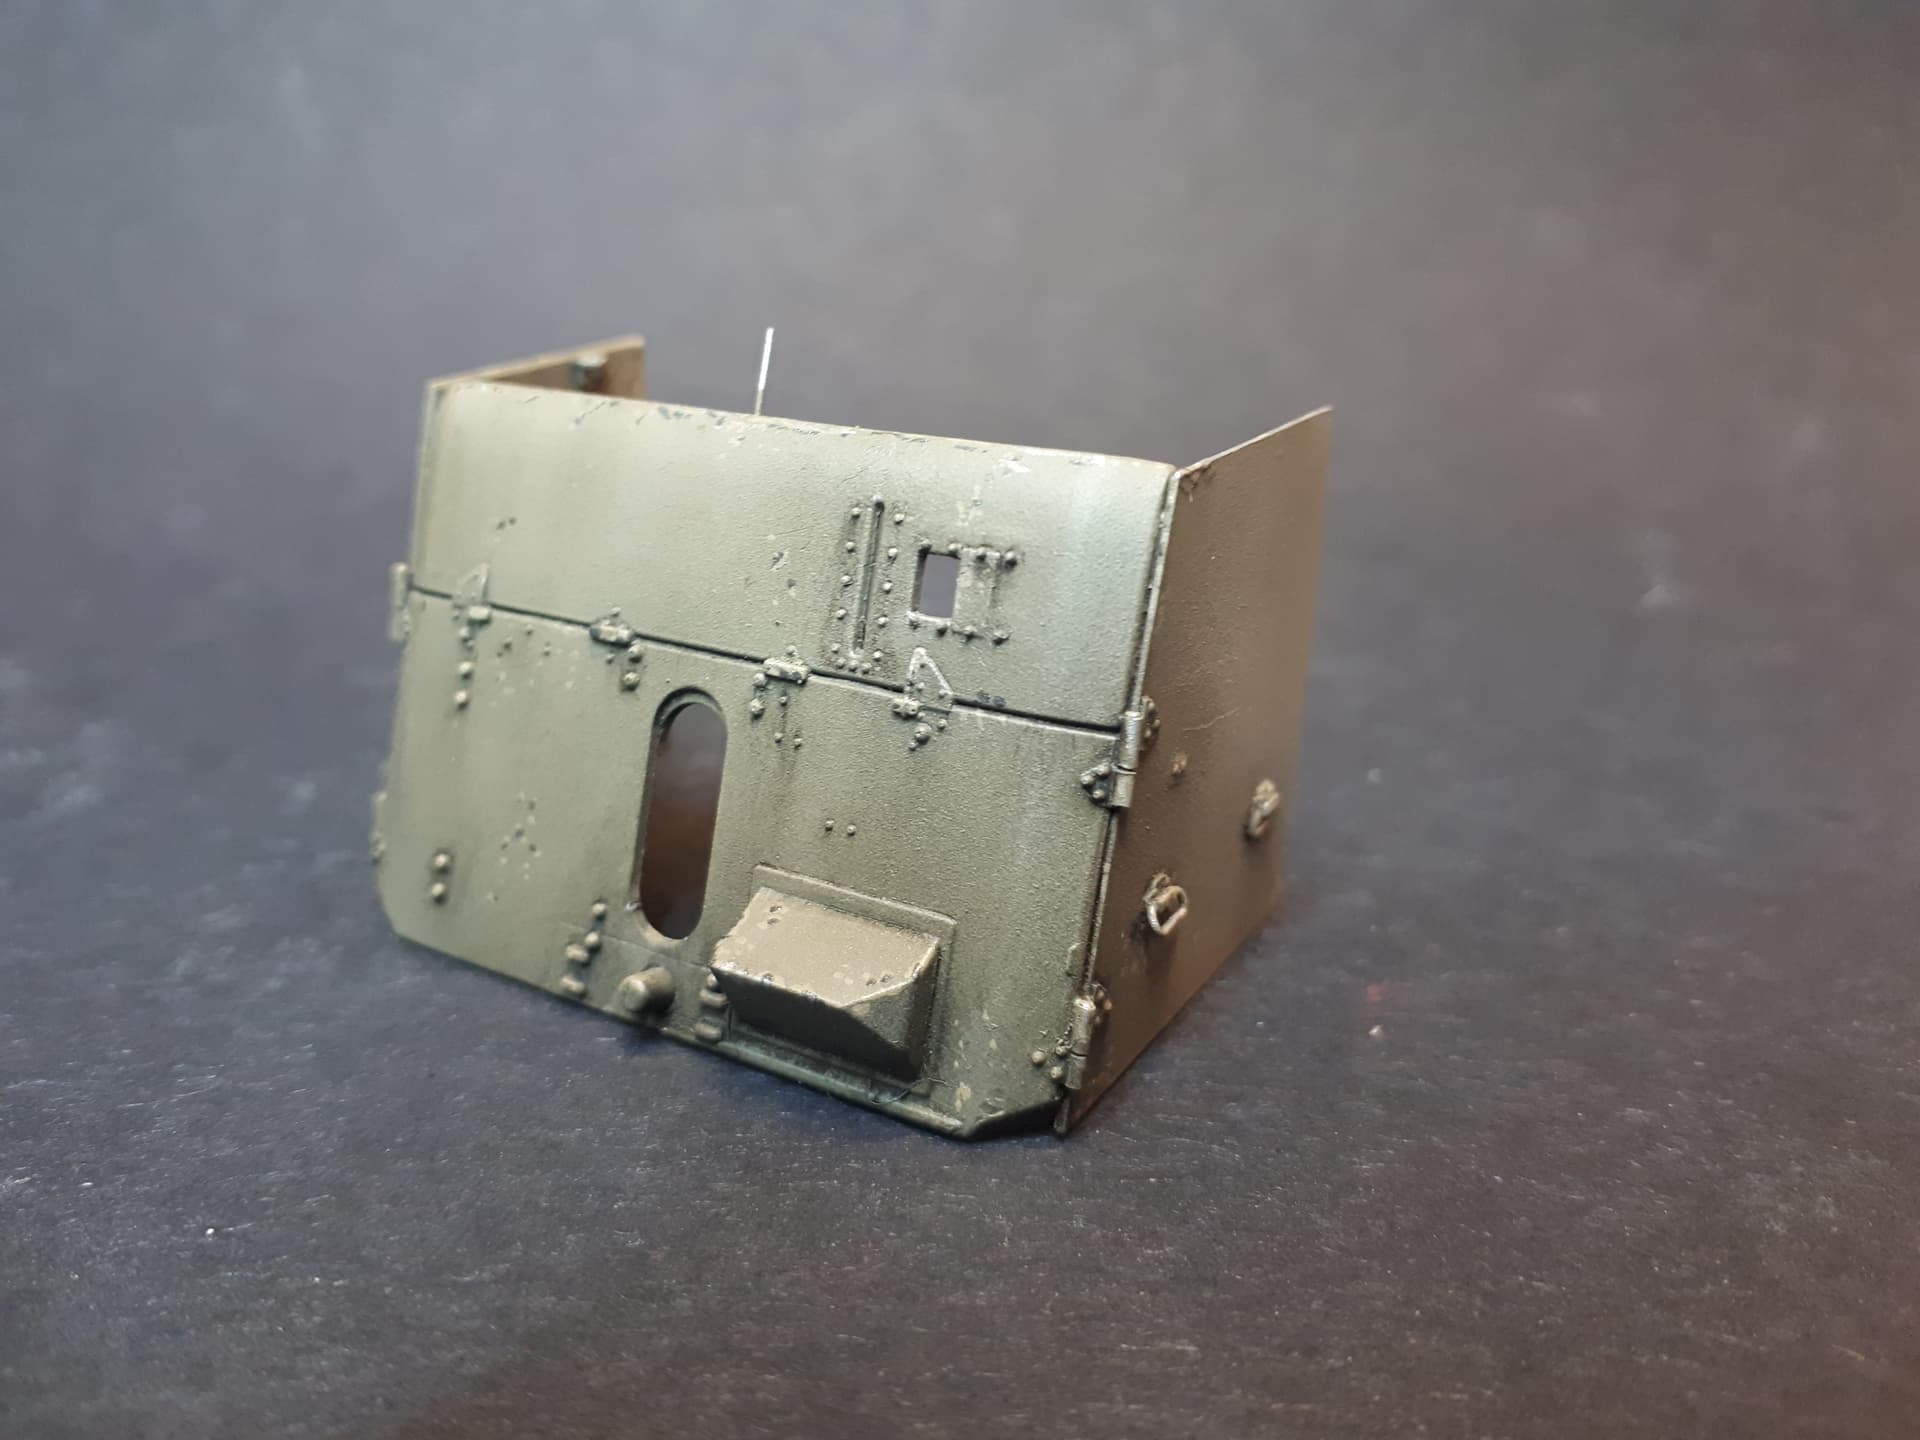
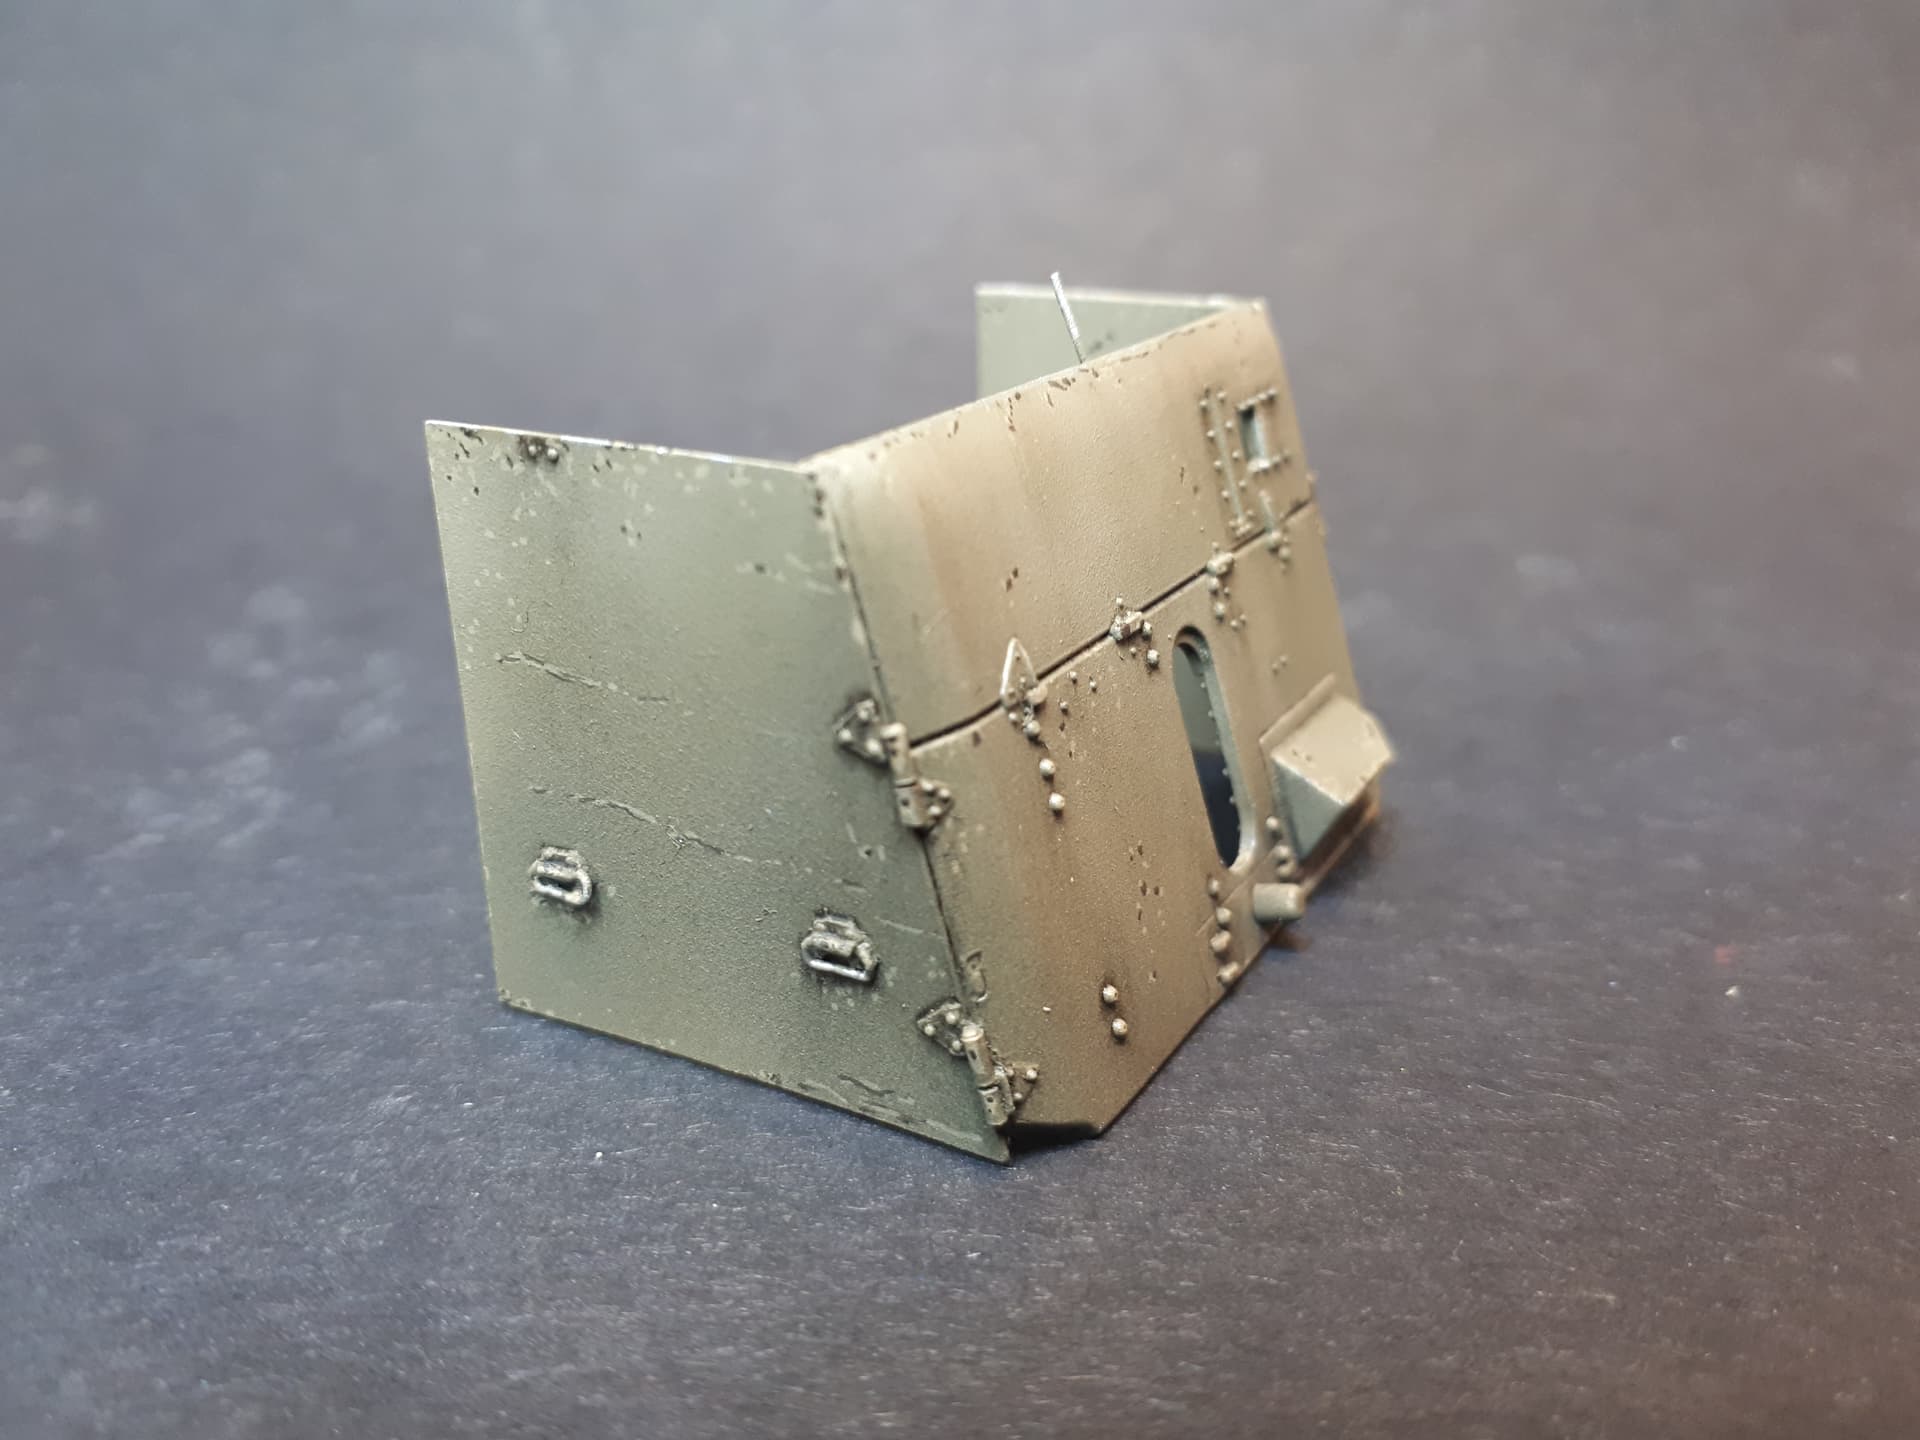
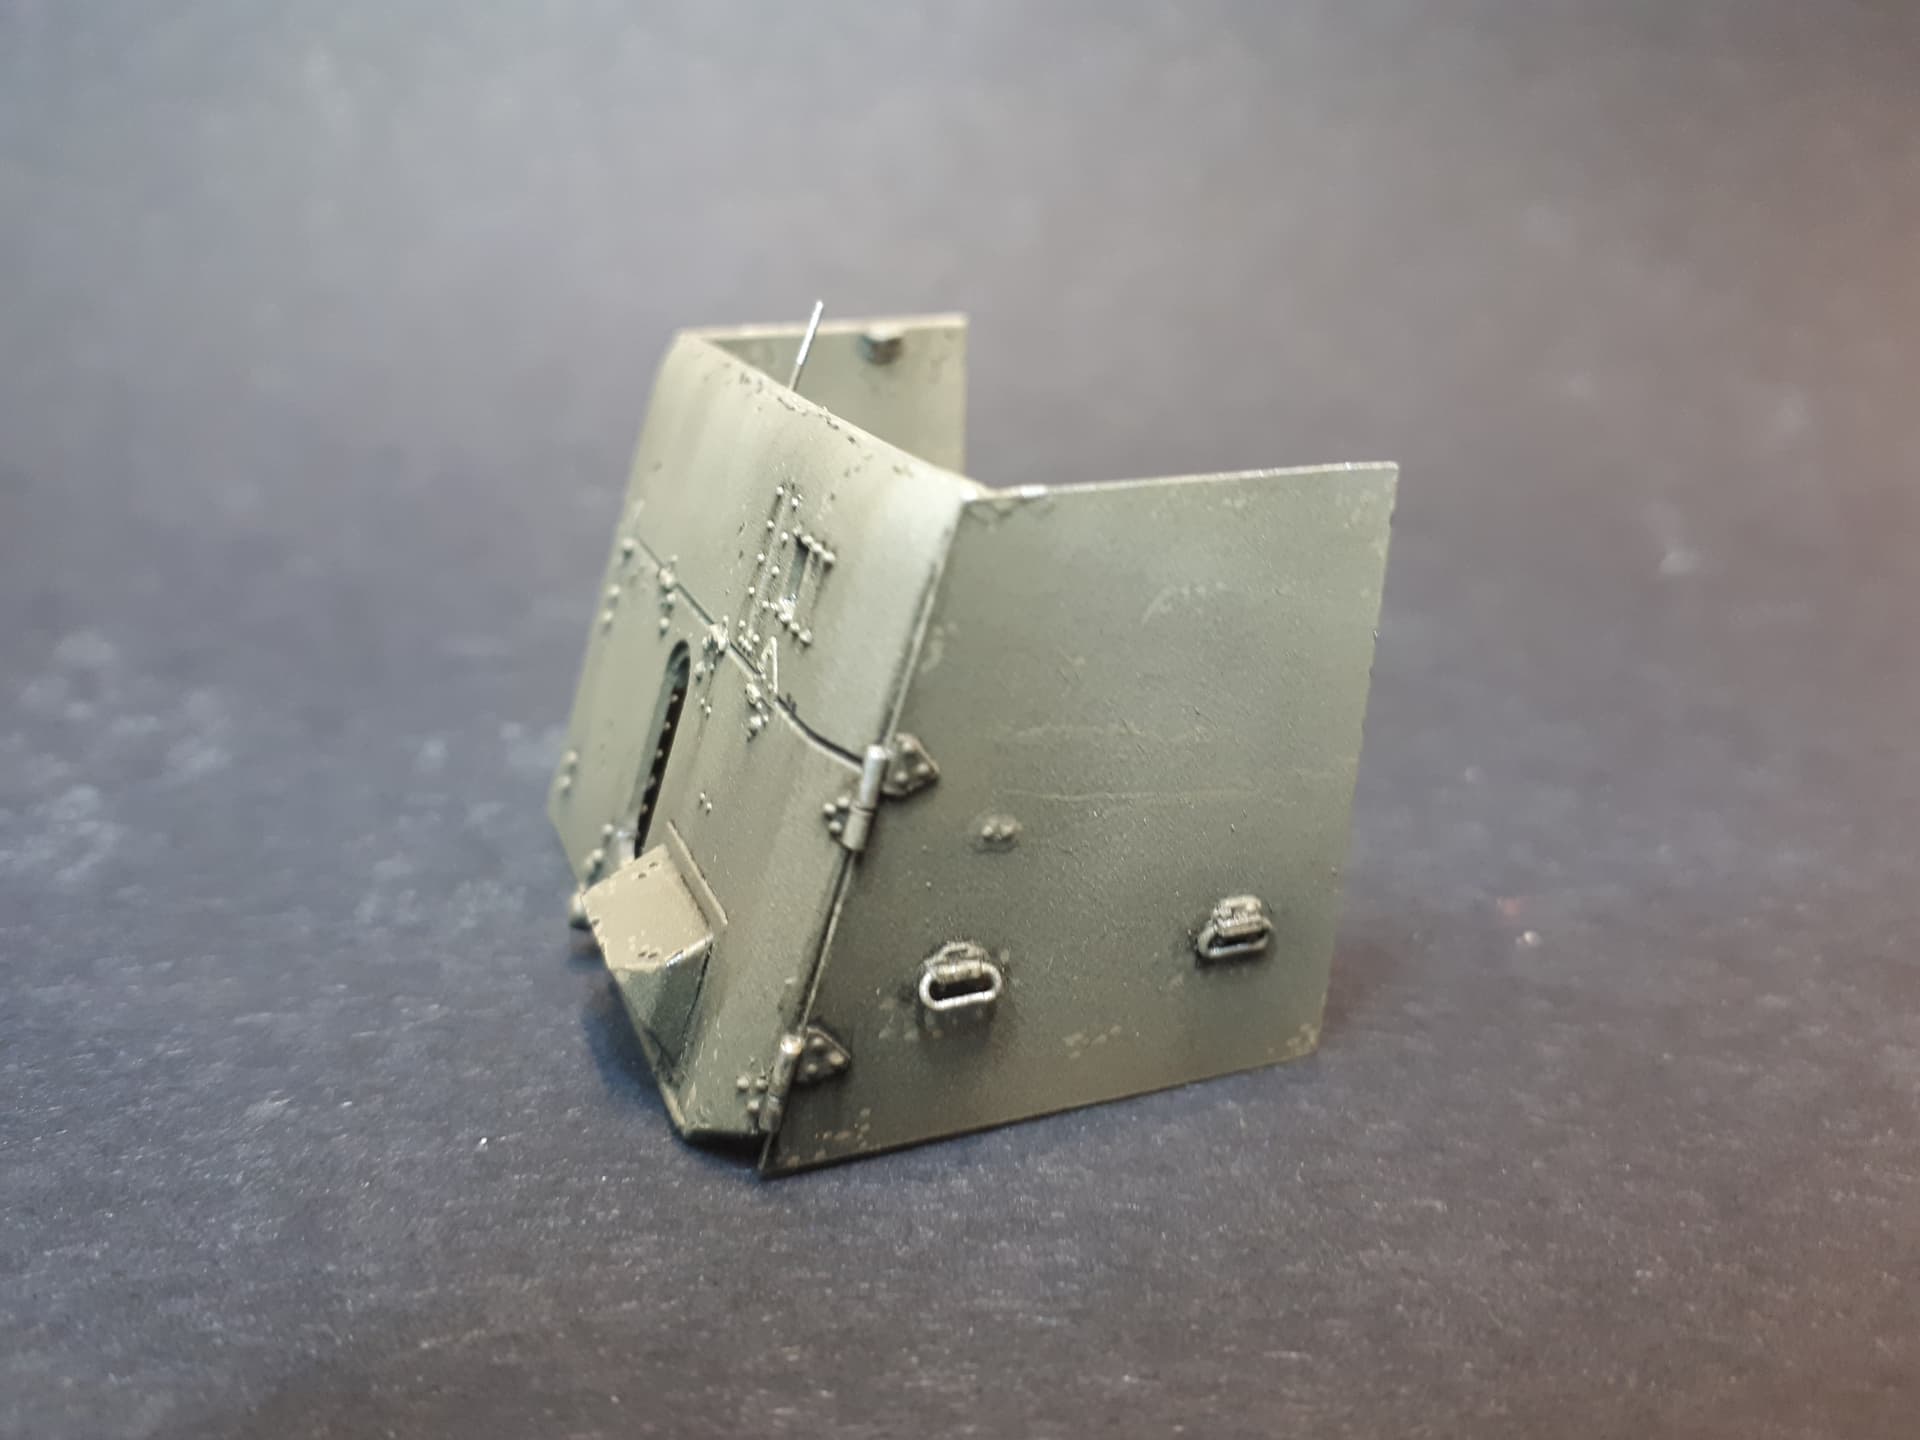
The biggest challenge, however, was to scratch build the side shields which were used on the 2 pounders in Malaya - and, it seems, almost nowhere else. If anyone has any images of them being deployed in combat elsewhere (e.g. France in 1940, North Africa) then I for one would love to see them!
Luckily I was alerted to some images of one of these guns preserved in Russia with the shields fitted - which does suggest that they were used on the Eastern front.
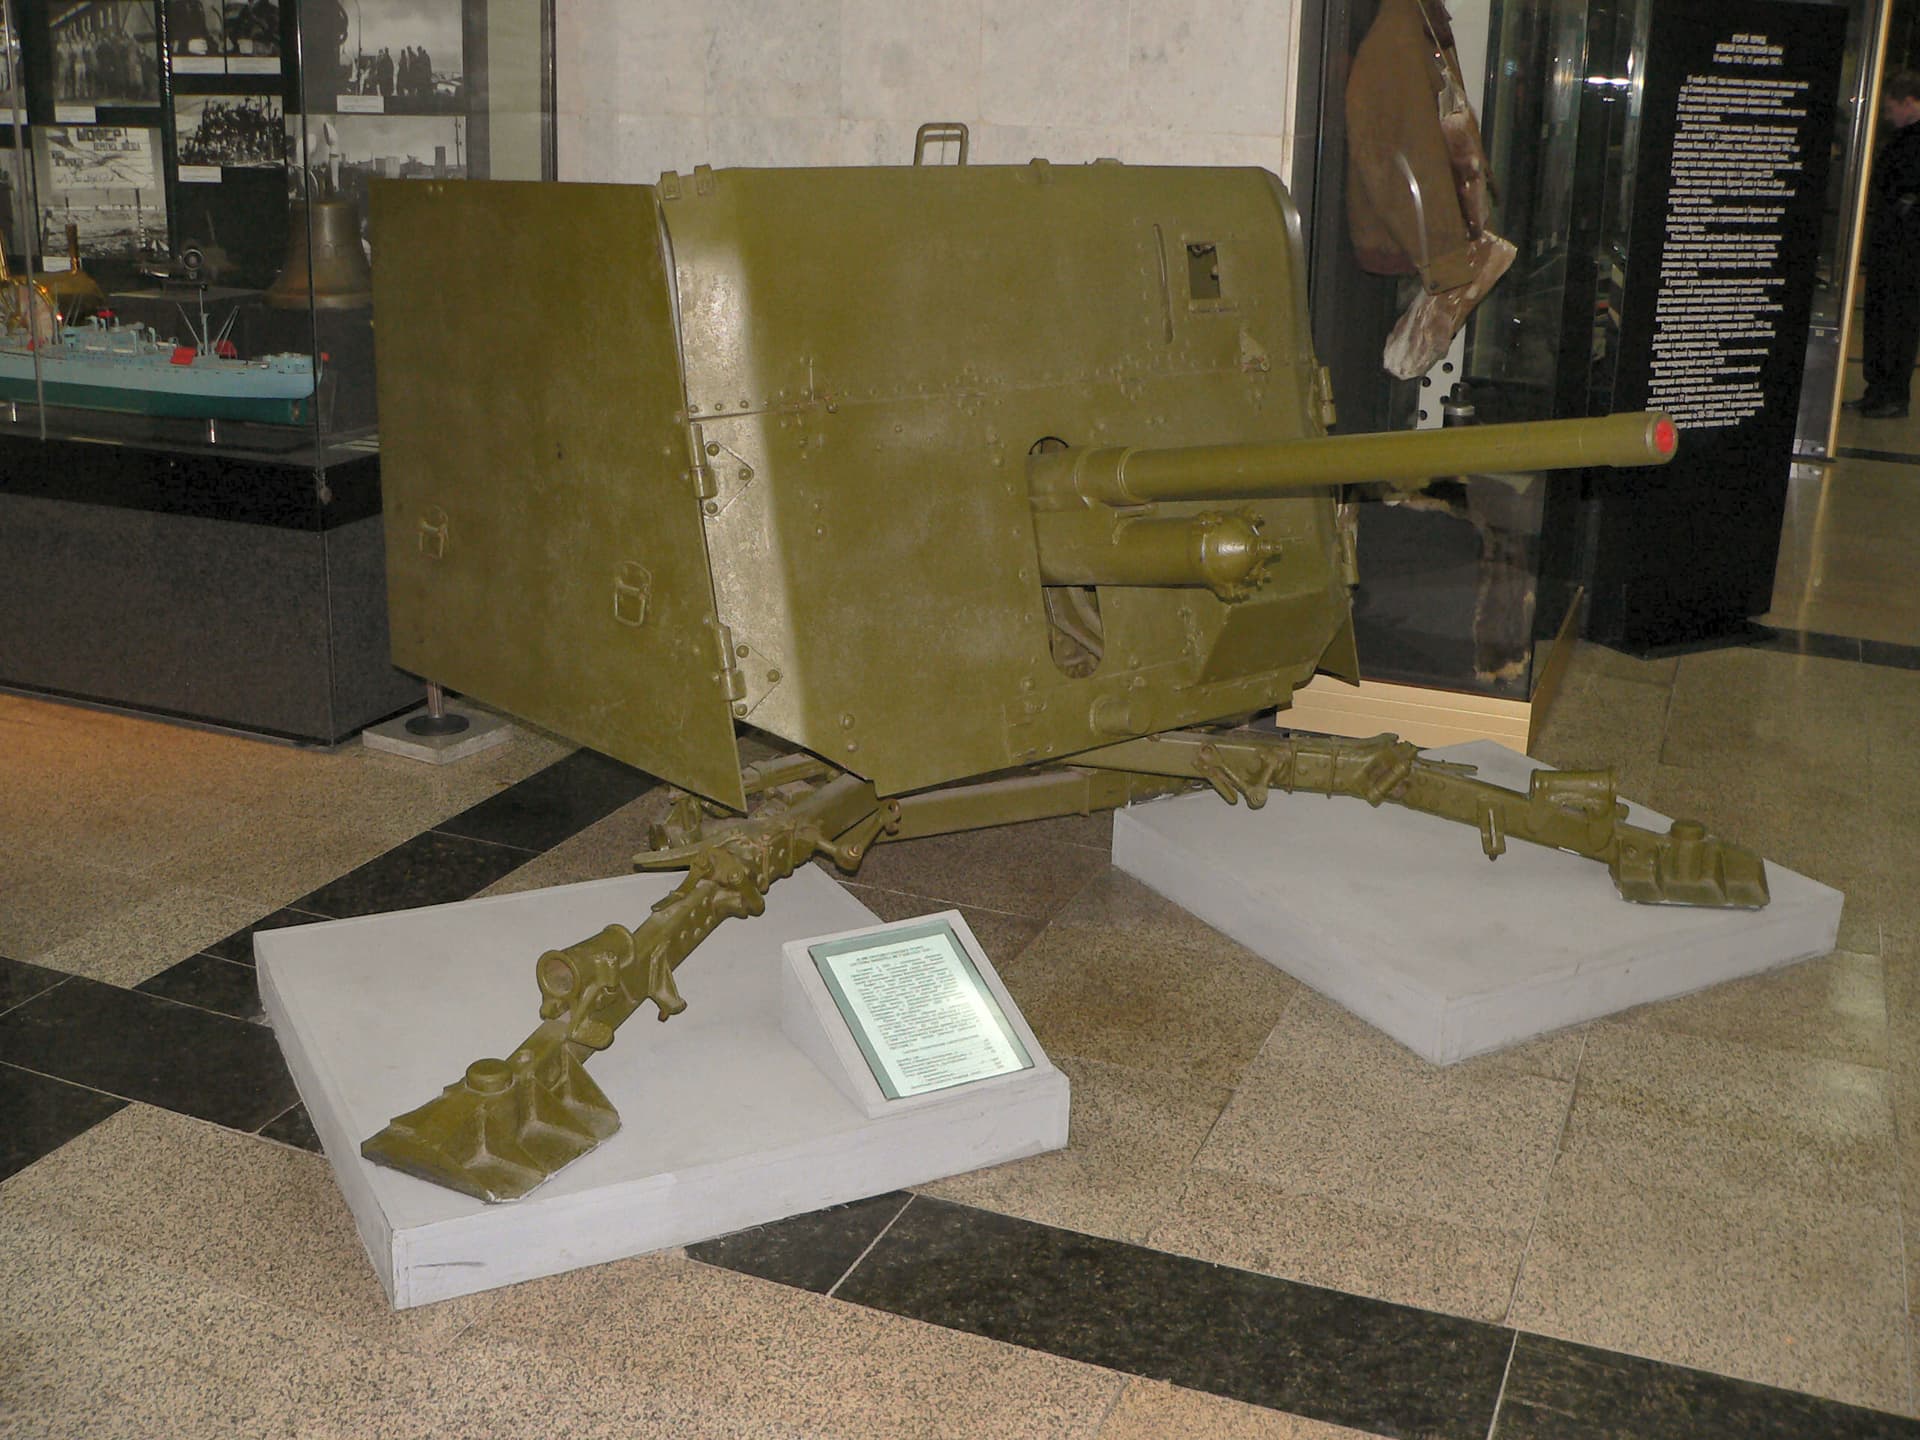
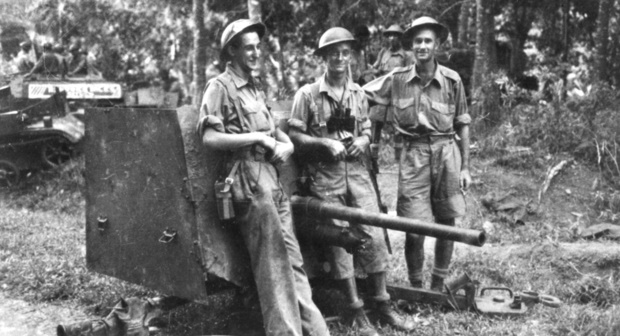
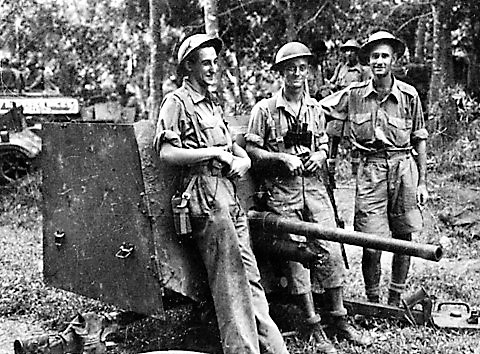
These images helped me with some of the details, although I am glad to say that I had already managed to work out most of these from the Bakri shots of Parsons’ gun. As a reminder here he is with the crew in front of the gun with its distinctive shields…
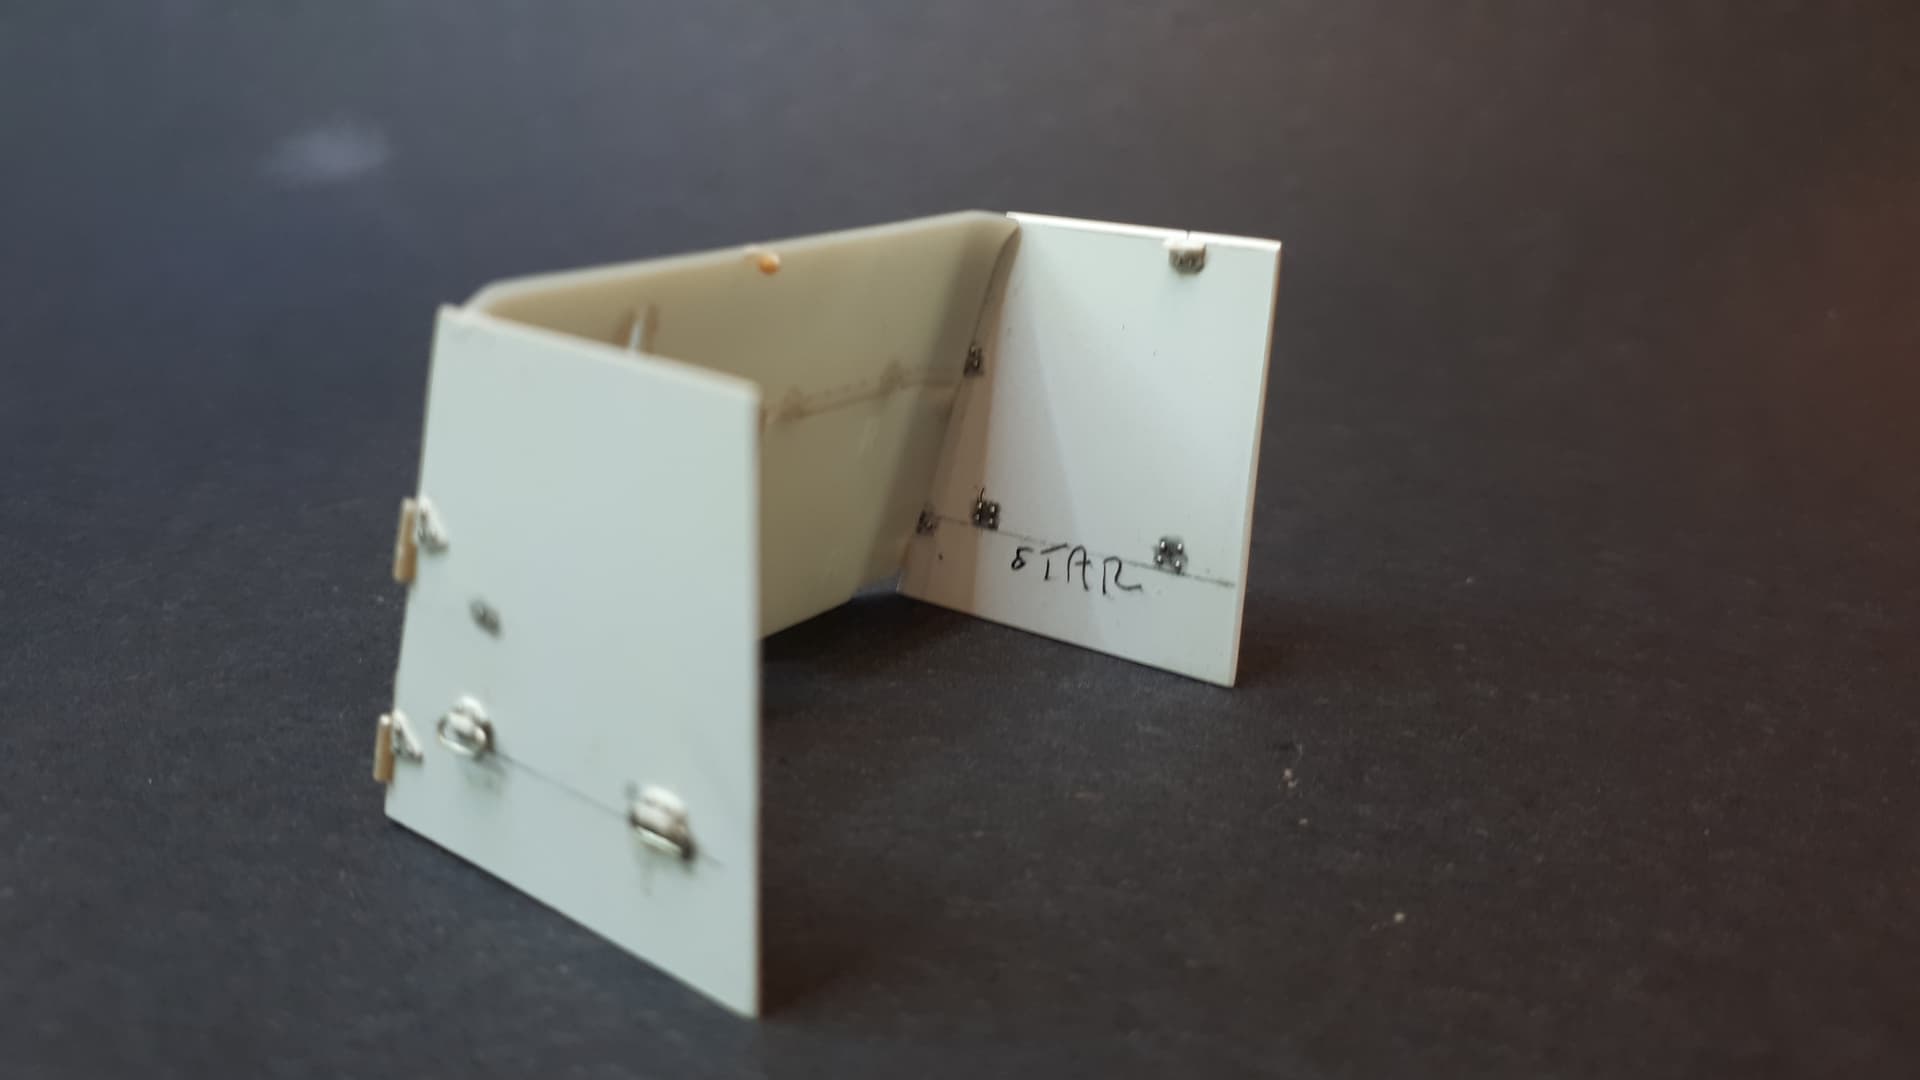
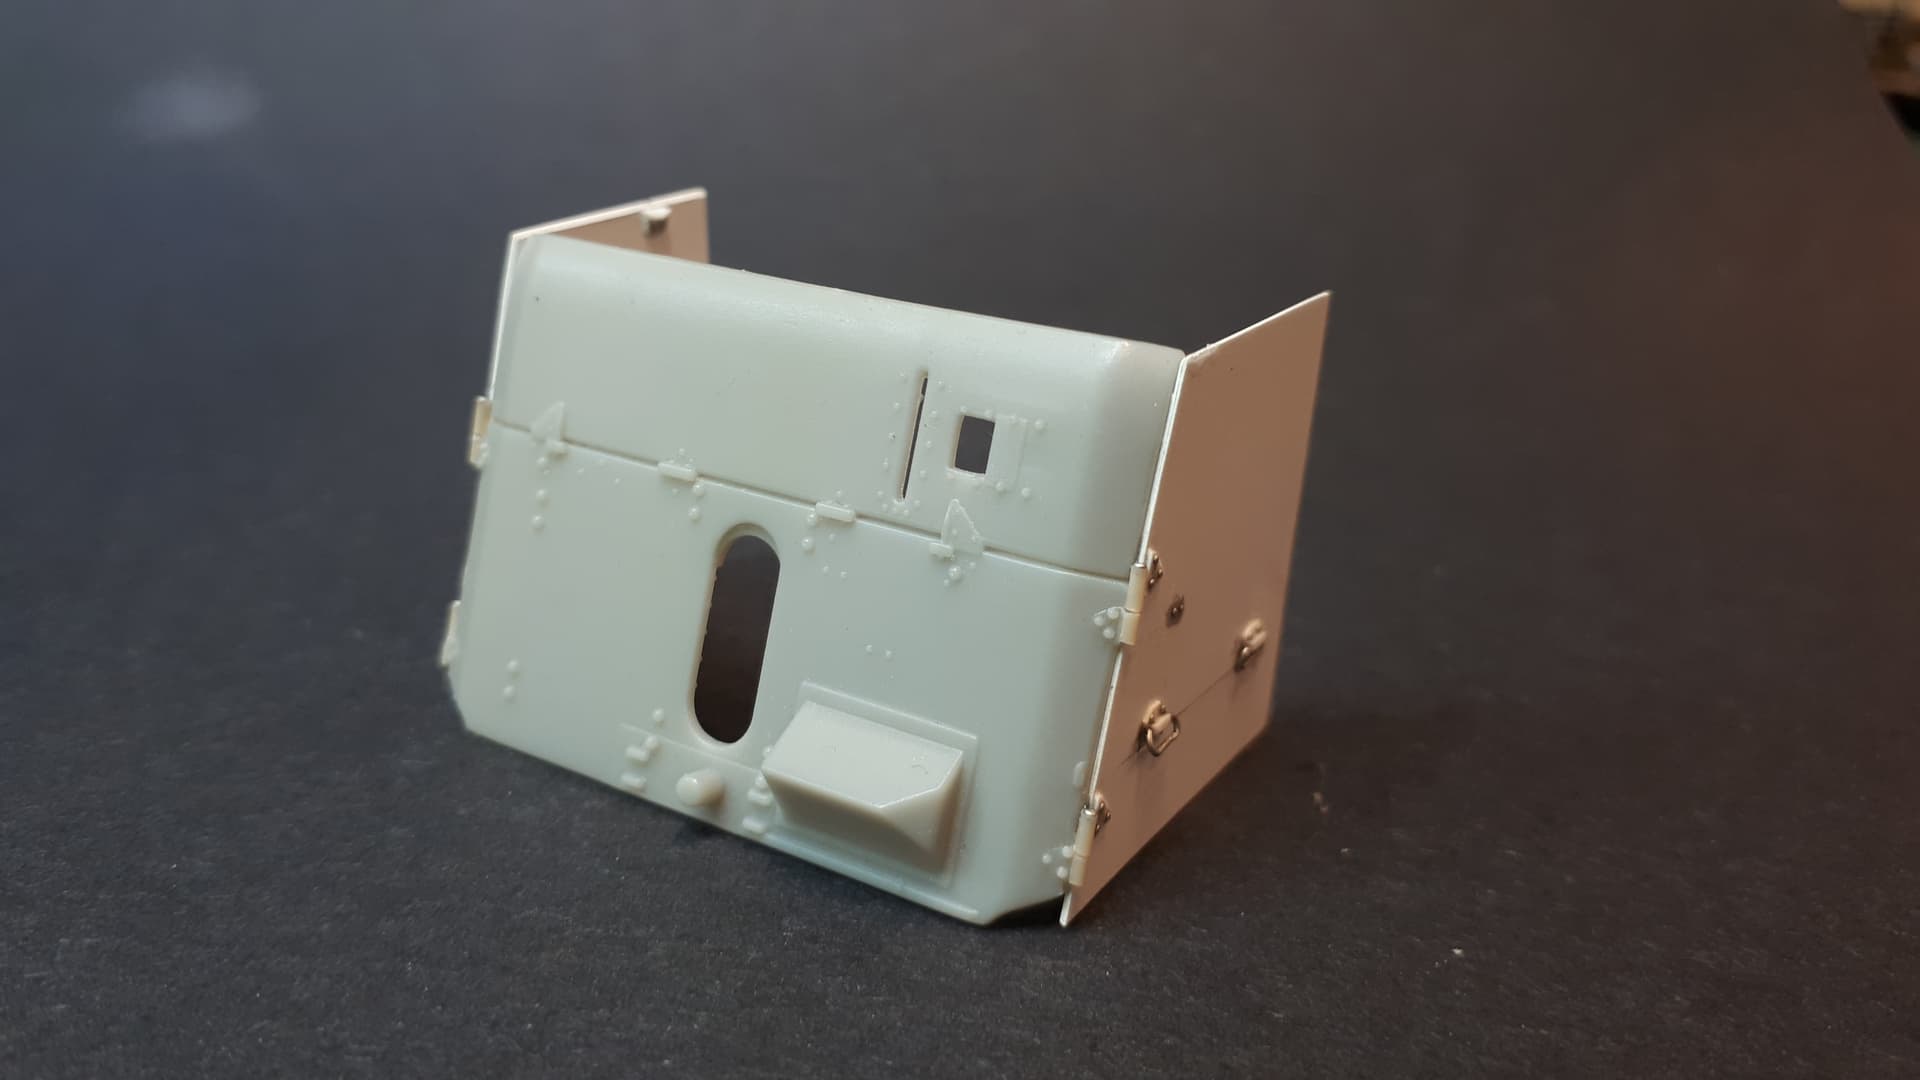
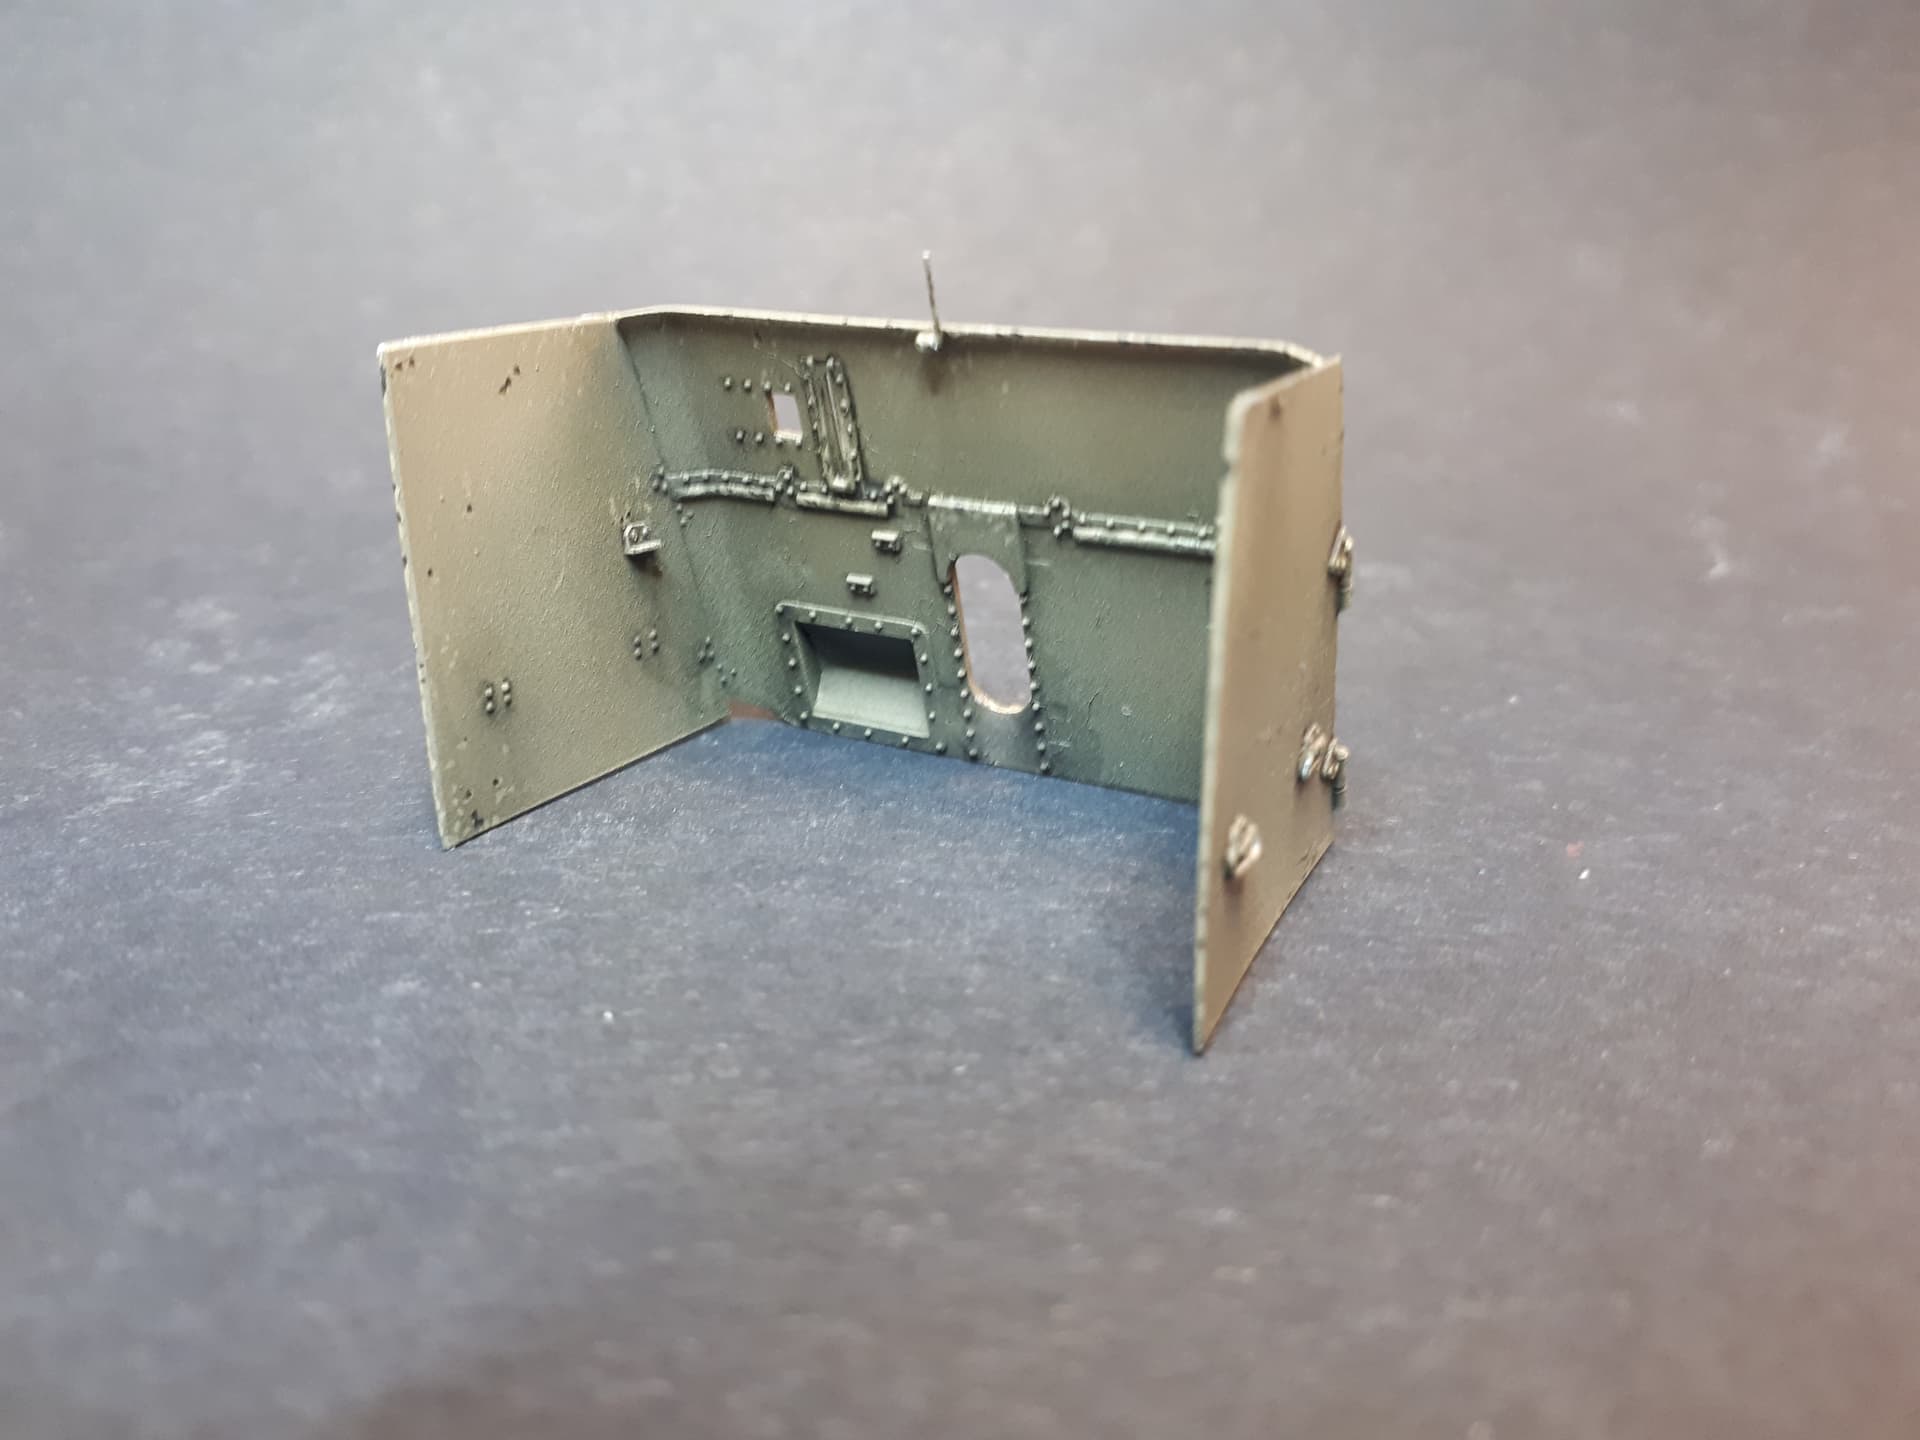
Here are the unpainted sub assemblies and other views of the completed but unpainted model. You will note that I Ieft off the gunner’s seat and the handwheels at this stage because I was still working out how to fit the figure in place.

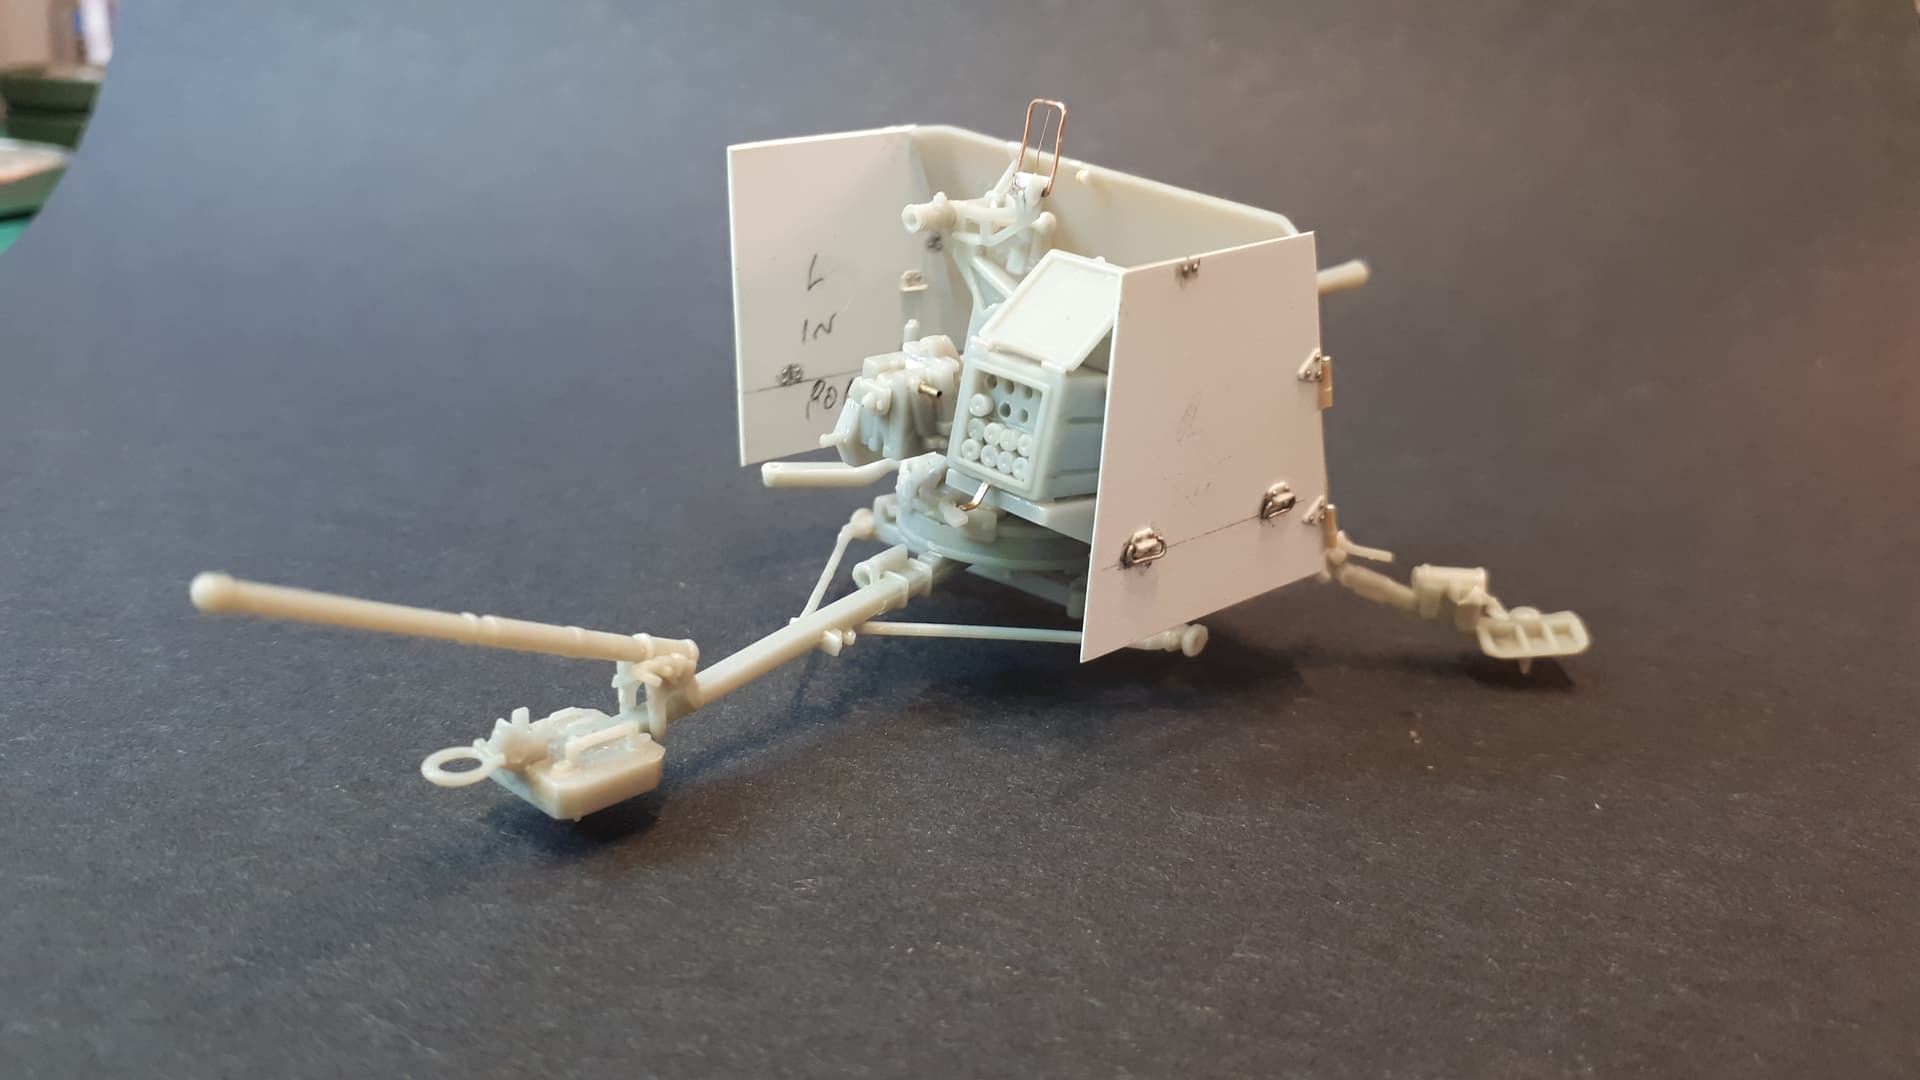

One other modification was to leave the onboard ammo locker lid open. I used the tops of the ammo boxes which came with the kit (with the holes drilled out more) to make the racks inside, although I have yet to find any images of the inside of this locker to know whether this is accurate.
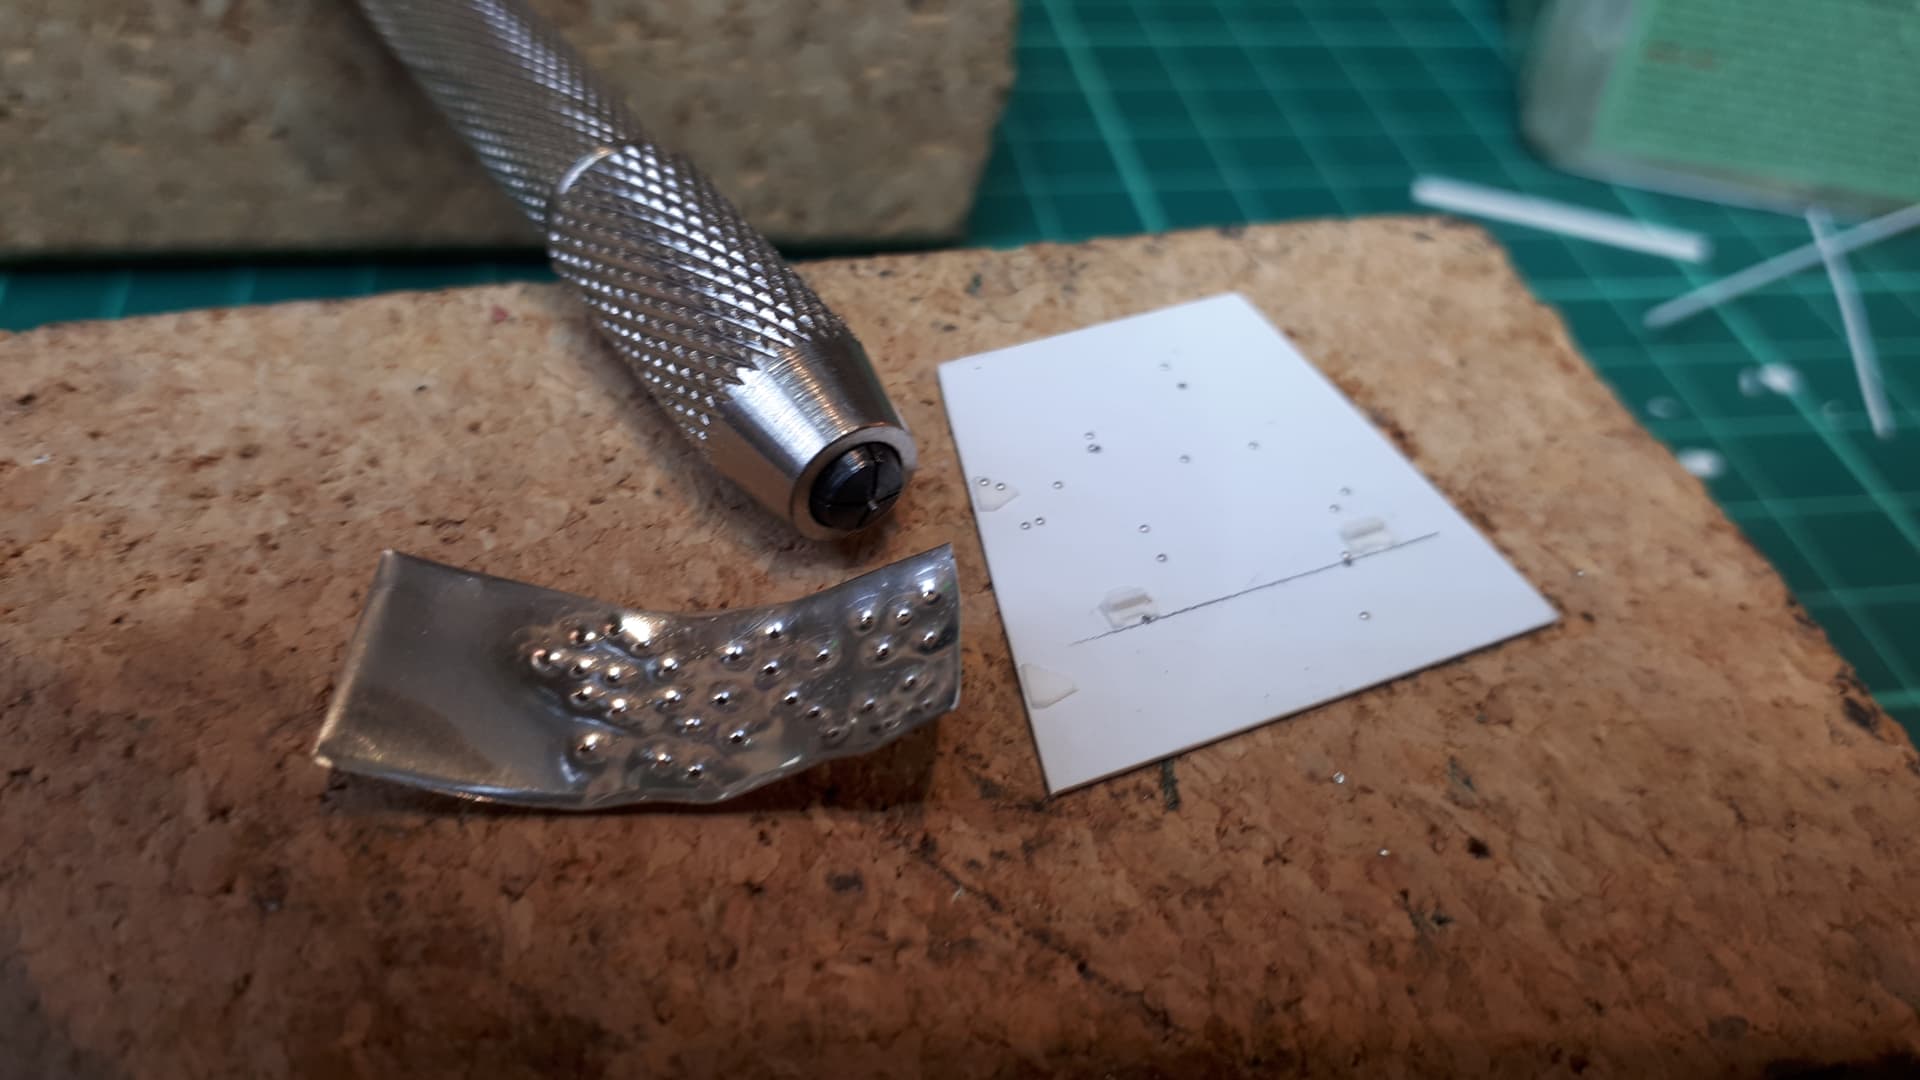
To make the various rivets on the shields I used a technique that was new to me, but which is absolutely brilliant. You put a small drill bit back to front in a pin vice and then use it to punch into a thin pewter sheet sitting on top of a pencil eraser. As you push through the sheet, this makes perfectly shaped domed rivets which you can then pick out of the surface of the eraser with a sharp knife and glue in place with black (slow-drying) super glue. Any excess can then be cleaned up with debonder and a brush.
You can see the results here…
10 Likes
Very nice work on the shield details. And of course, I admire your achievements on the entire scene. Brilliant!
—mike
That gun is lookin very detailed man! WoW!!
J
Brilliant work Tim !!
The pics really need to be vieuwed on a big screen to be appreciated… My phone simply doesn’t do them justice…
1 Like
Absolutely stunning work Tim in every respect.
It’s like watching a masterclass “how to turn a gun shield in a work of art” …
Thanks guys. I really appreciate all of your comments. Sorry I can’t reply individually, but time is pressing if I am to get this show on the road for Scale Model World in Telford…
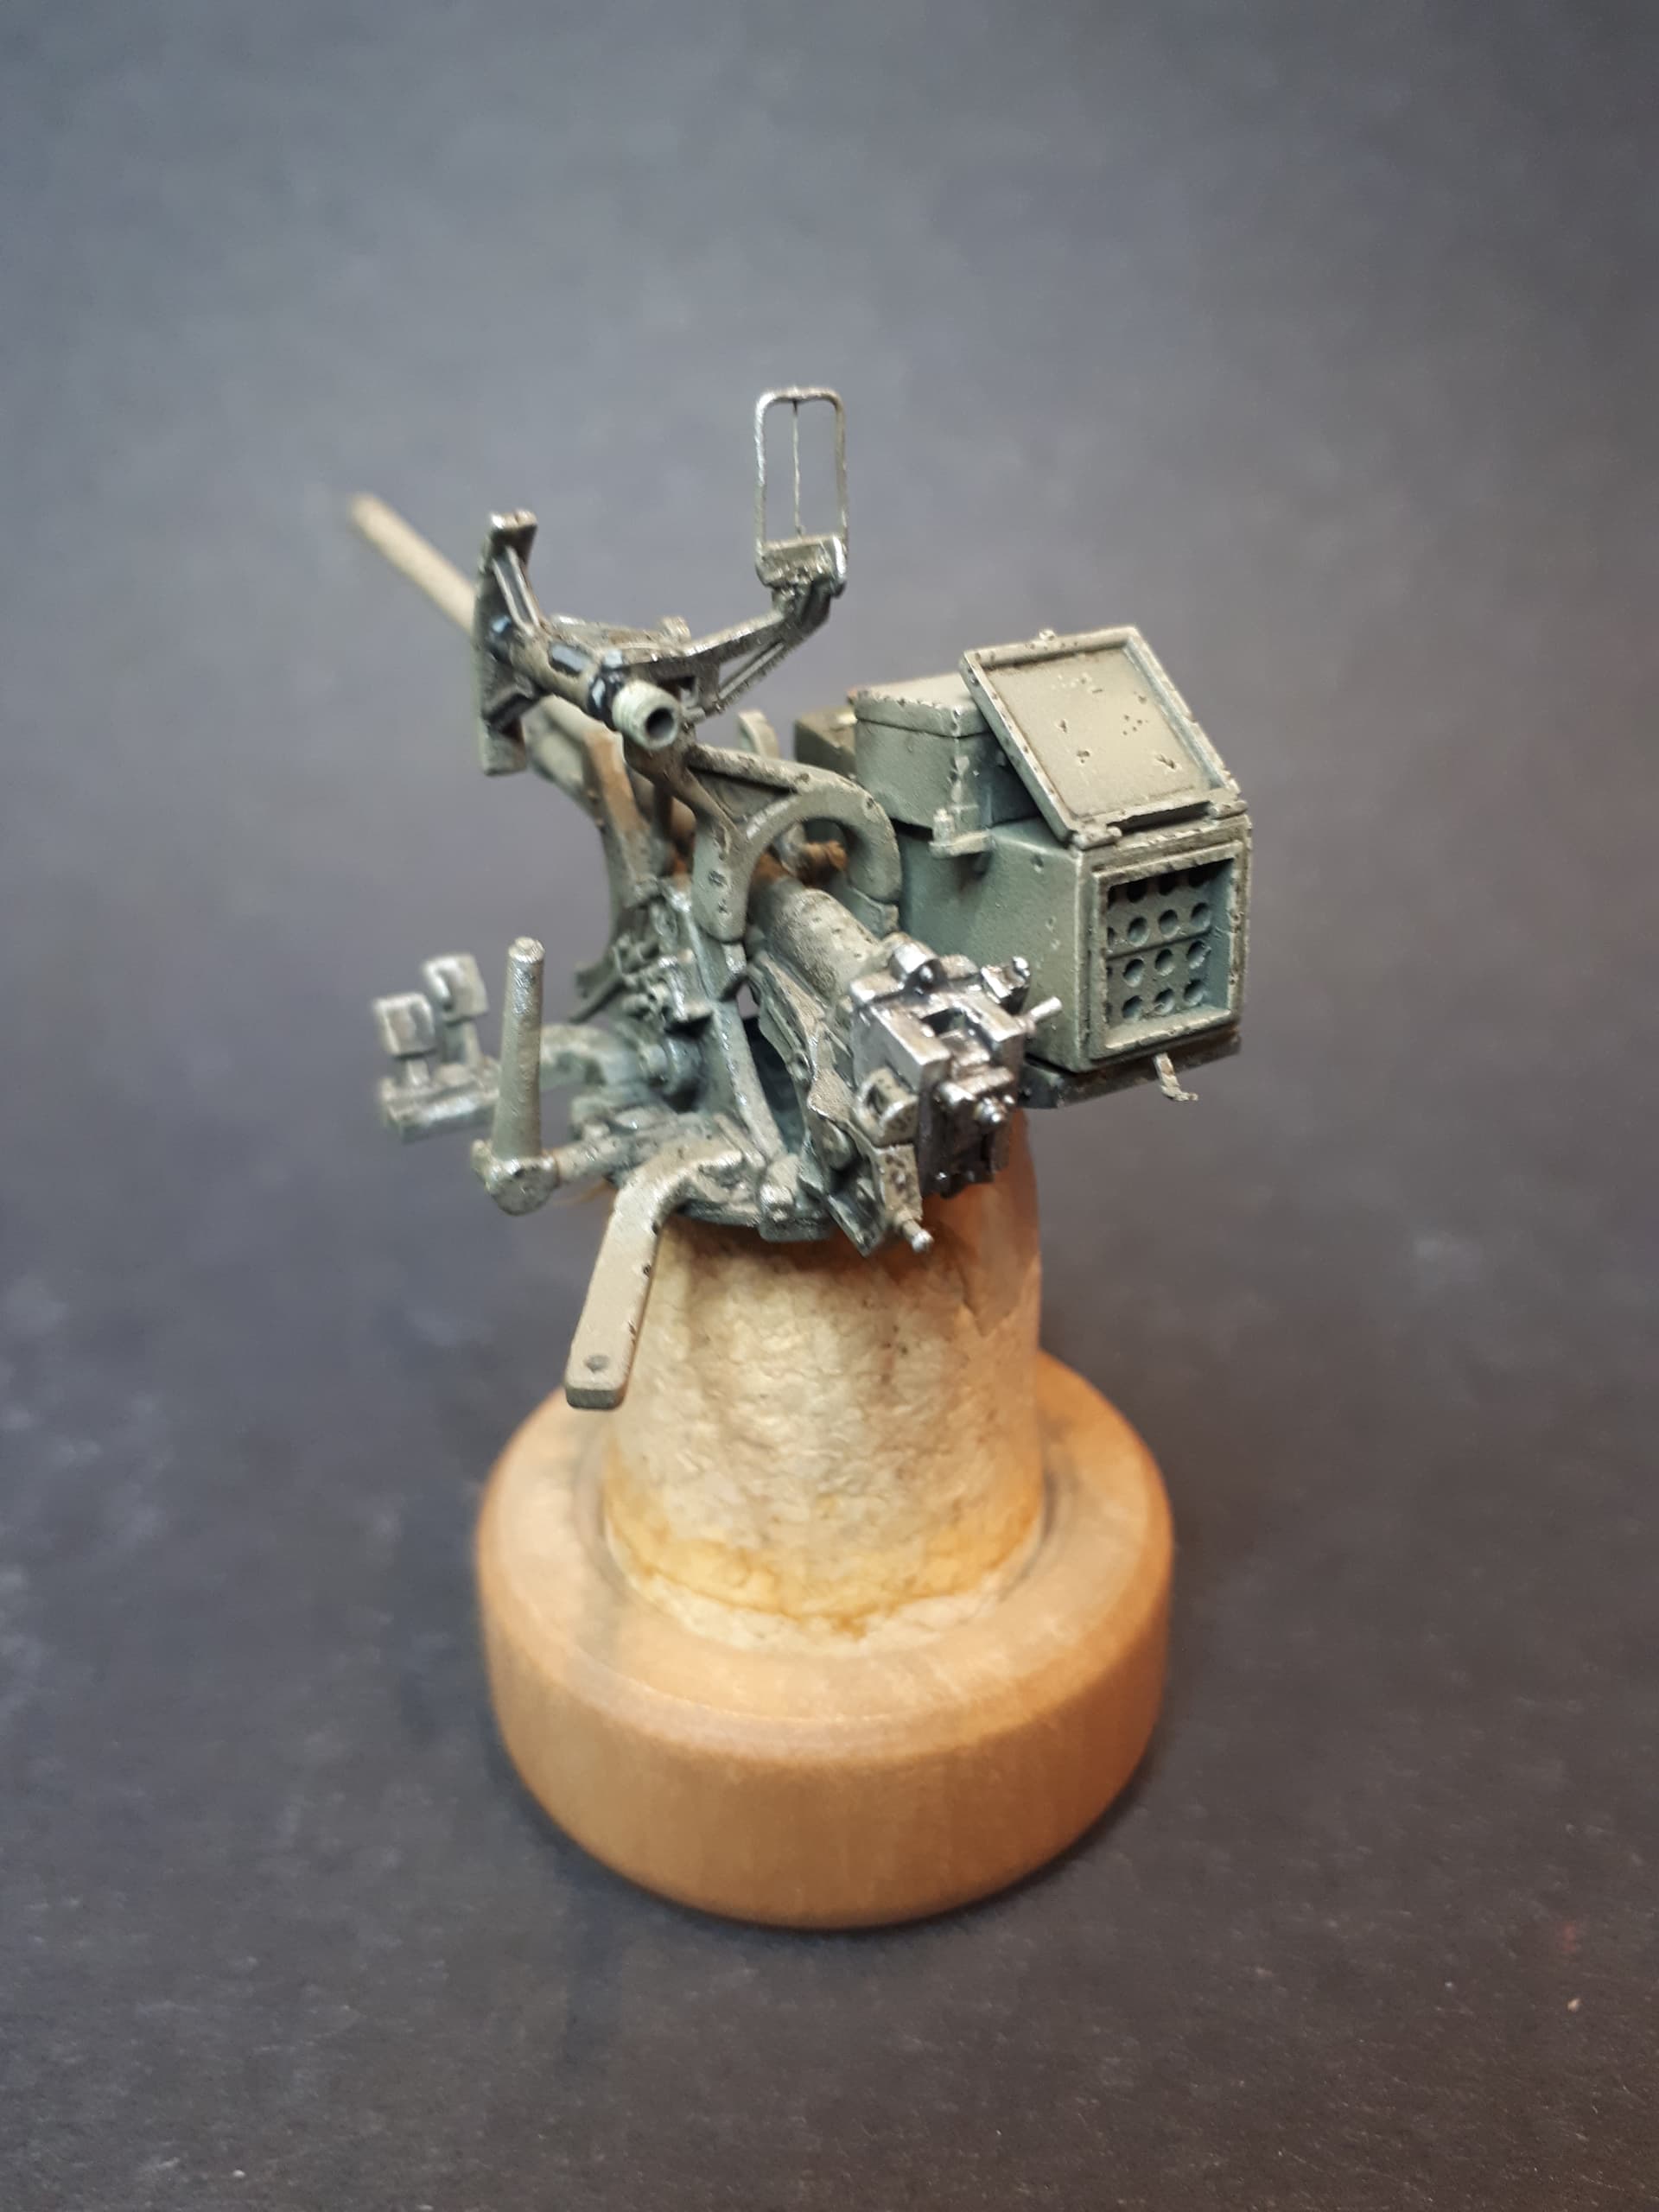
The Vulcan kit really is a little gem… apart from the shields and opening up the storage bin, the only things which really require extra attention are the open sights.
The rear sight is provided in the kit, but its just too clunky. So I replaced it with one made with fine wire shaped on a simple jig… and an even finer wire for the vertical cross-hair. The foresight and it’s hinged mount are missing completely - you can see it folded down in the image below - but this was easily added from wire and plastic card.
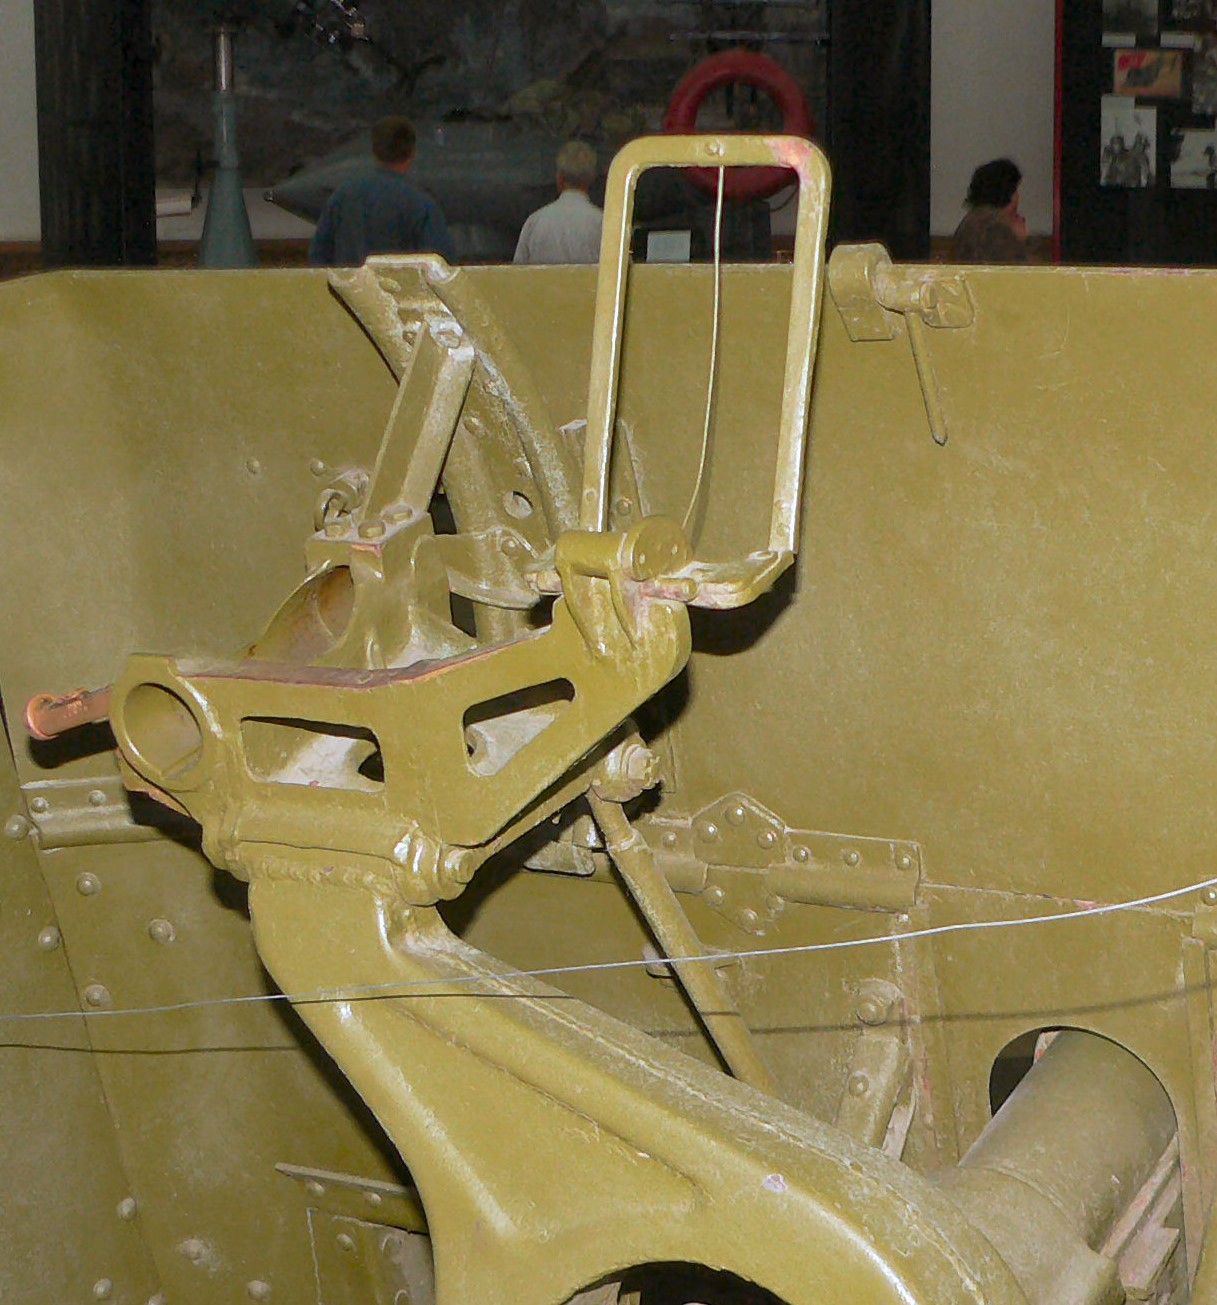
There is also a tensioning bar for the side shields which fits into brackets at the top of the starboard side (roughly midway from front to back) and half way down the port shield (nearer the front). It’s missing in the image above (although there is a wire in place), but easily spotted in the Bakri Road photos. It’s the rod which can be seen above the loader’s head…
The other end can be seen running into the timing strip just above the traverse handwheel in this photo…
Because it actually runs at an angle between the shield and the main gun sight, it can’t be fitted until the shield is glued in place.
So here are some images of the gun nearing completion after base coat and initial weathering. The main shade is Mr Paint MRP-333 Khaki Green No.3/G3.
Now someone is probably going to tell me that this is the wrong colour, but I have done some research and, as far as I can tell, there is no firm evidence as to what you would expect for a gun manufactured in Australia and sent to Far East in 1941. The shade of the gun in the photos above certainly looks darker than the khaki drill uniforms of the crew and, after all, this was destined for the jungle, not the desert.
The MRP acrylic sprays beautifully from the airbrush without any need for thinner, but be warned (I learned the hard way) that this is a lacquer based paint and lacquer thinner - NOT WATER - needs to be used for cleaning! Eventually (after having to strip the first coat from the model) I used Mr Color 400 Levelling Thinner.
For highlights I added a little Tamiya Buff XF-57 (Tamiya paints mix fine), then added chips, scuffs and scratches with an even lighter mix of the above, infilled with the original base coat + dark grey and, where appropriate, steel. Details were picked out in various places with different shades - the breach block, for example, should be quite shiny, the leather strap for the spare ammo boxes, etc.
Please note that this is not the final weathering because I am waiting to have everything almost finished - tank, gun, figures and base - before going in for the final unifying dust coat.

14 Likes
Just stunning work Tim - impressive at every level .
Choice of subject , research , layout and composition , ground work and flora , vehicles , paint … I could blather on for days . Thanks for sharing this wonderful effort.
A fan - Richard
The gun and its shield came out beautifully. Top-notch work! 
—mike