Trucks around the yard

Hello model builders,

I’ve been wondering about what to build for the last few months. One plan was to build a 1/24 C-500 tri-axle, Texas bed truck. Another was to try a C-500 tandem/tandem bed truck. Either would be a fun challenge, but both would require the collection of lots of parts and materials, which could get pretty expensive and time consumptive.

So, here we are, not doing either. Instead, I’m going to make a diorama of an old lumber/construction yard, but set generally today. This idea stems from a kit I purchased a couple years ago, which is a Dnepro 1/35 Marmom Harrington, 1 ton, 4x4 pickup - which happens to be very similar to a truck I saw as a kid, with my dad at our local lumber yard.

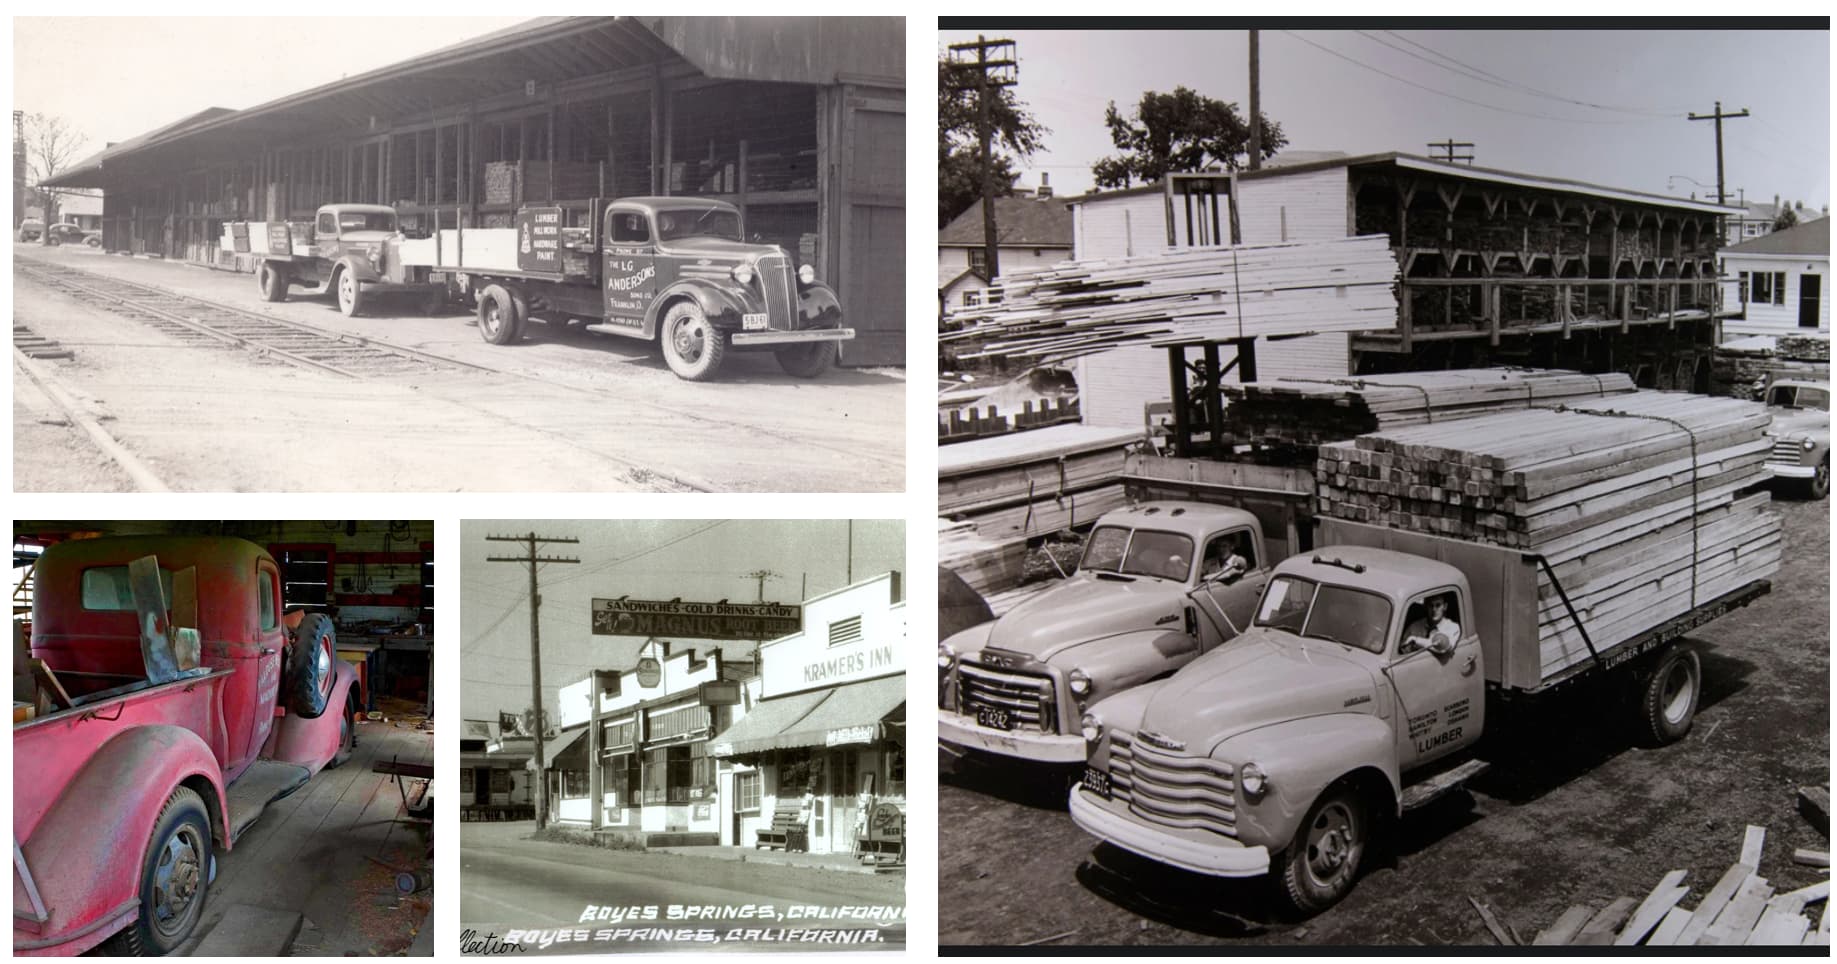
So the plan is to build a group of old and new vehicles you’d see in a lumber yard, and build a small collection of era specific buildings. I collected some images of old yards:

Above, some old buildings for inspiration and prototypes - which aught to be fun to make - and below, the vehicles I’d like to make:

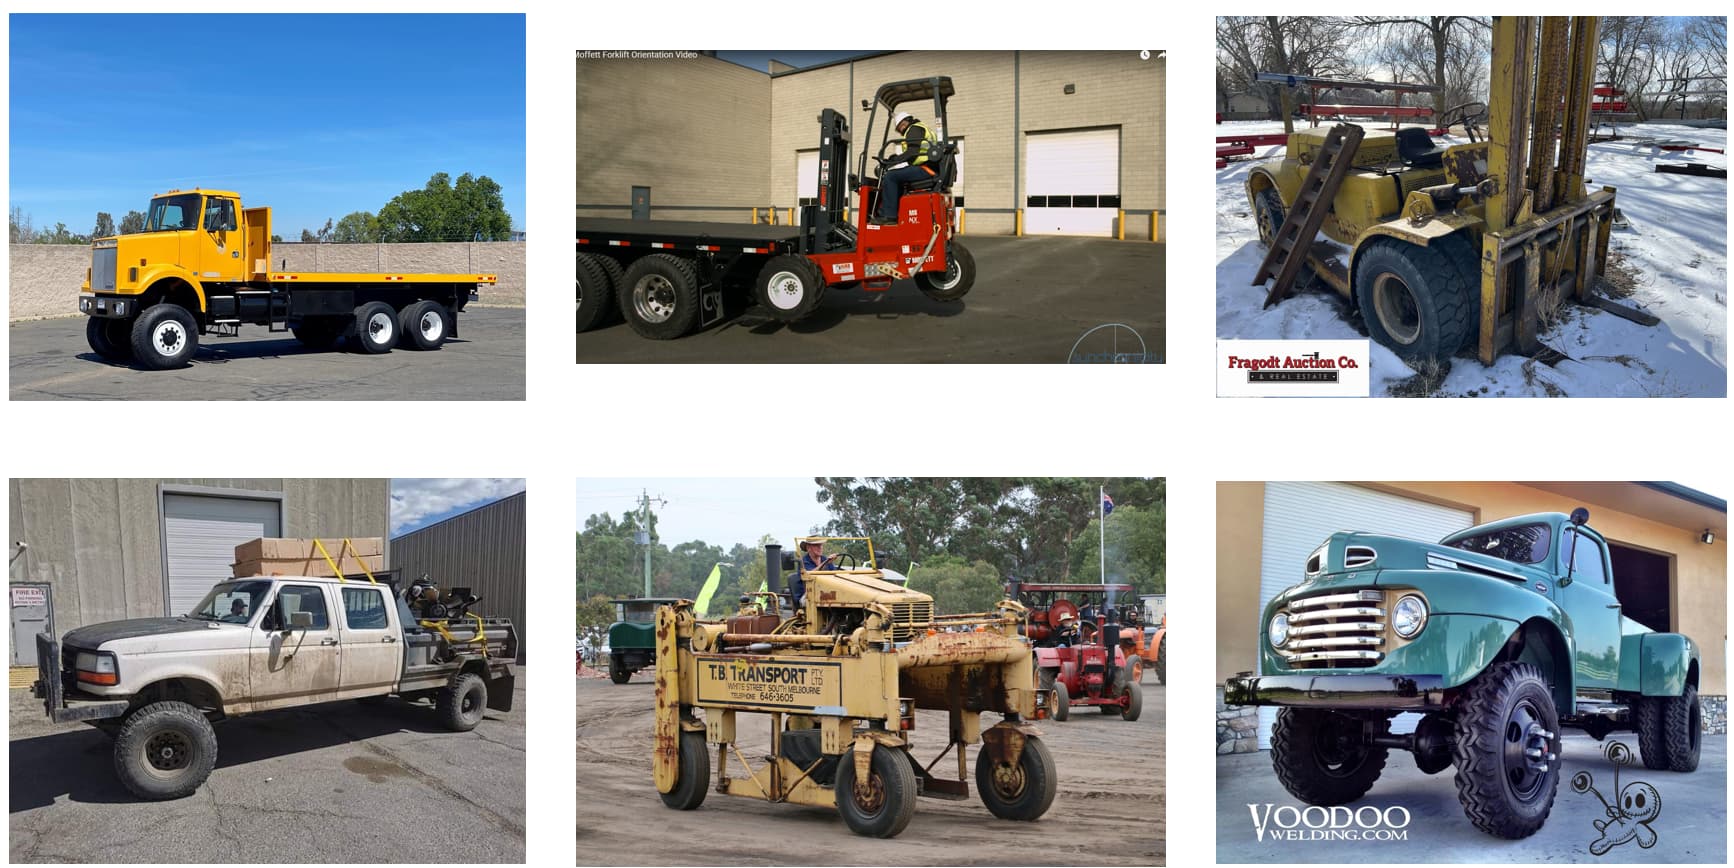
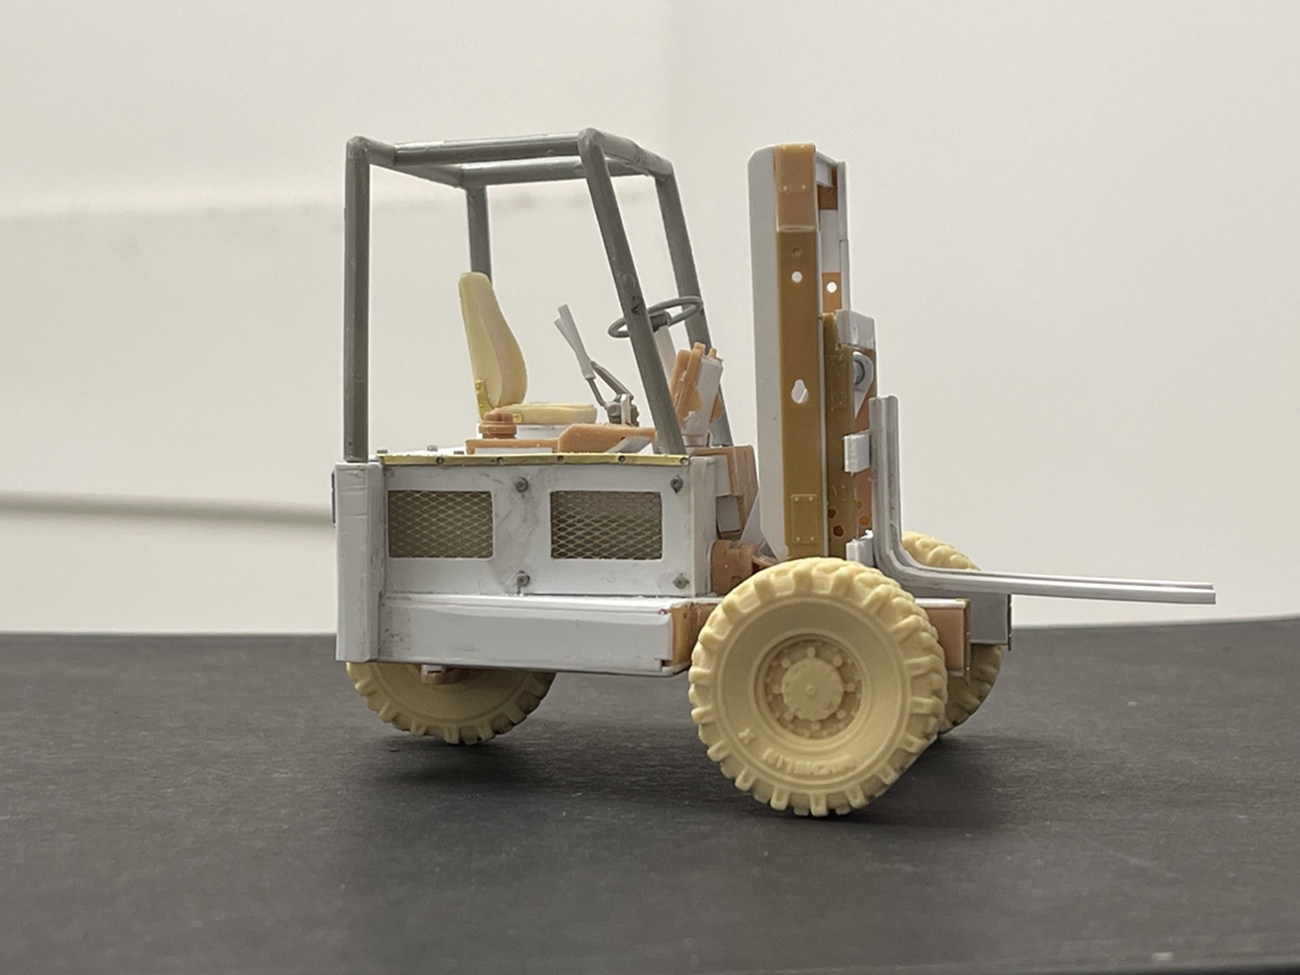
Starting in the upper left, a 6x6 flat bed; a bed mounted lift truck; and, old Hyster forklift. On the next row, an F-350 with a loggers box bed; an old straddle carrier, and finally, the old Marmon Harrington 1 ton 4x4 Ford.

This will include a few base kits and scratch building. Happily I have parts for most of these languishing in the junk box or stash, except for the forklift. For the fork lift, I’ve ordered a kit but it could take a long time to arrive, while the straddle and bed mounted lift will be mostly scratch built.

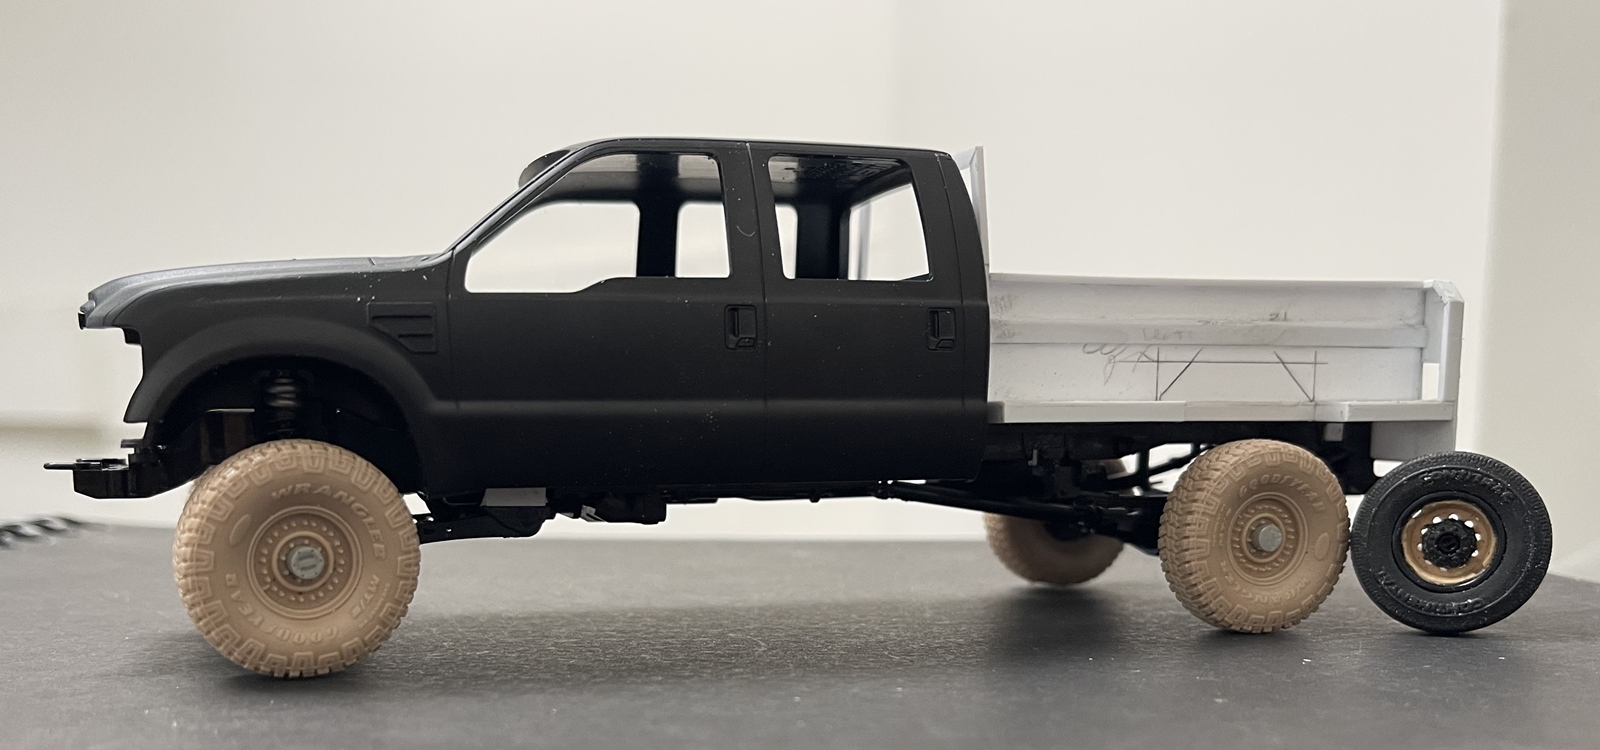
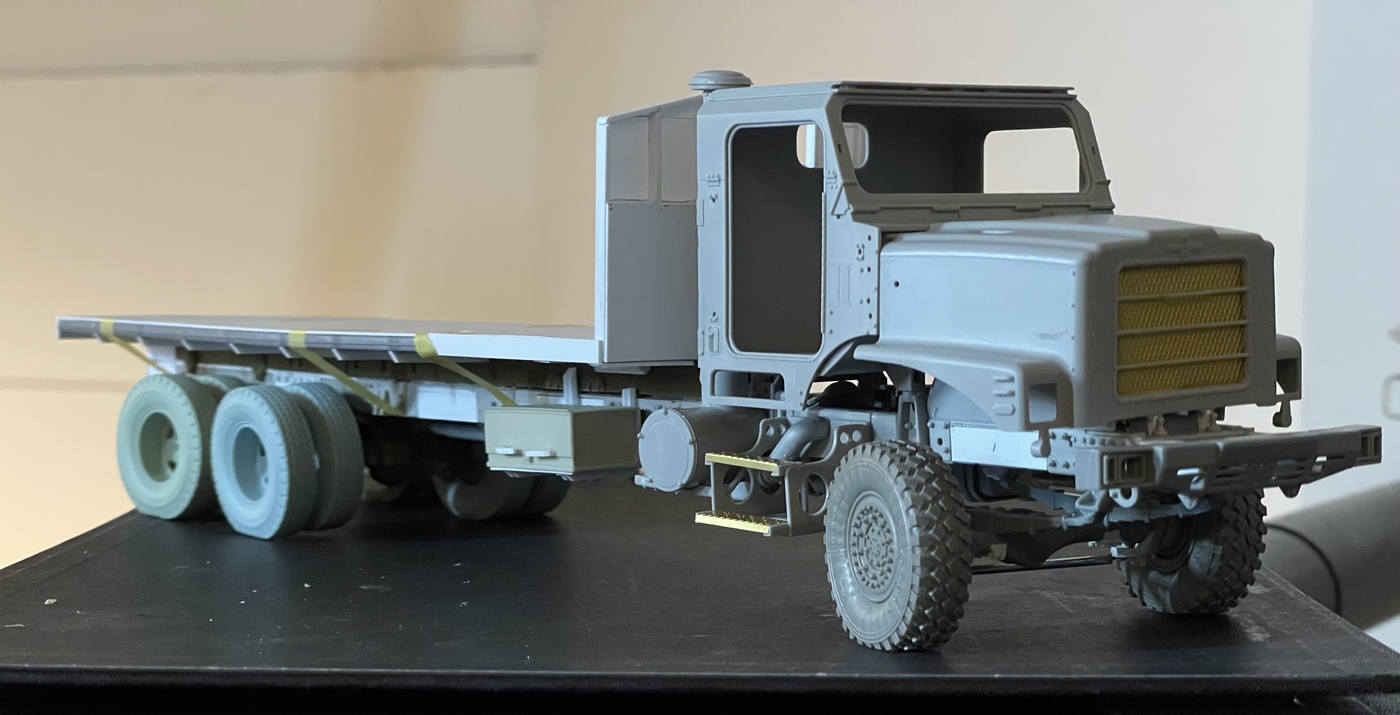
I’ve started with the lumber truck, per below, but, of course, mine will be a 6x6:

And to do something like this, easy - mix together parts from a MK.23, M1083, an old Italeri M923, and other remnant parts:

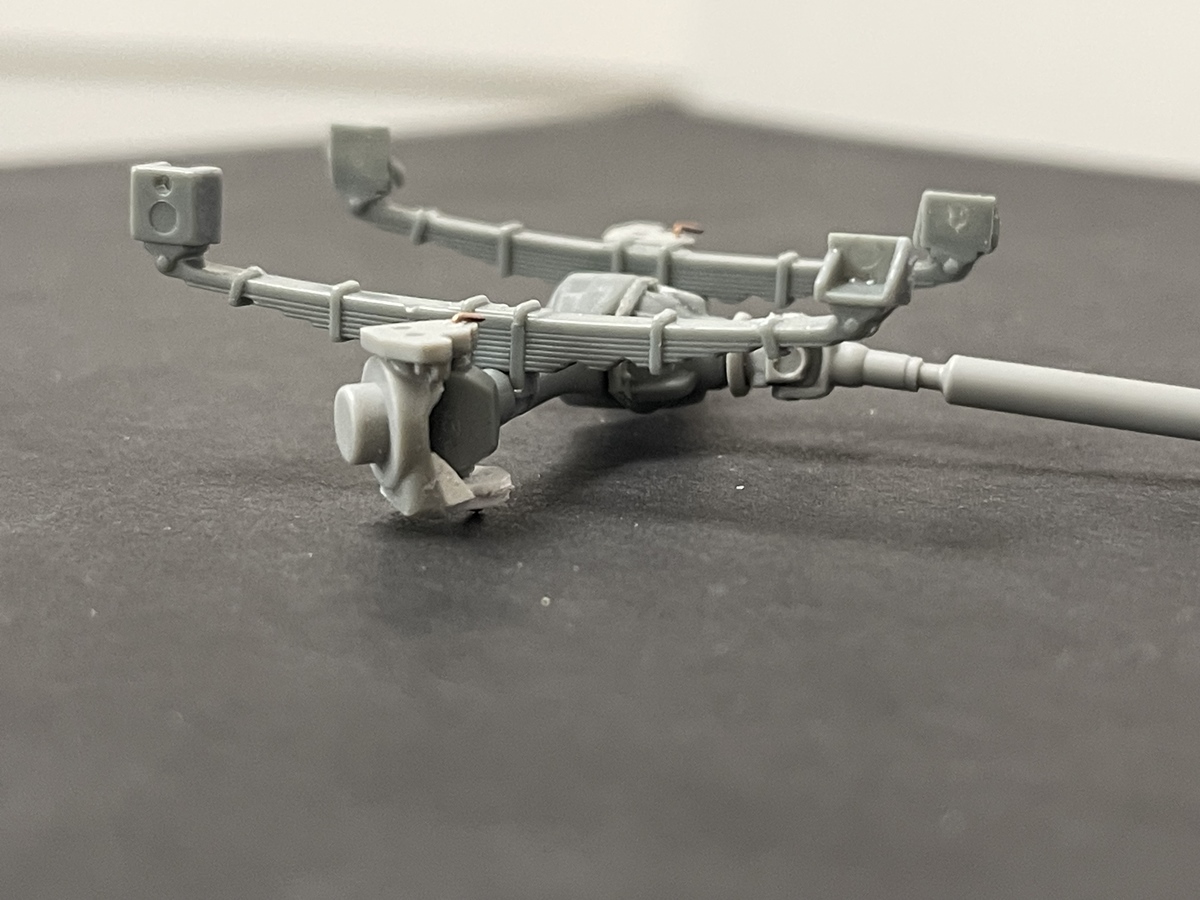
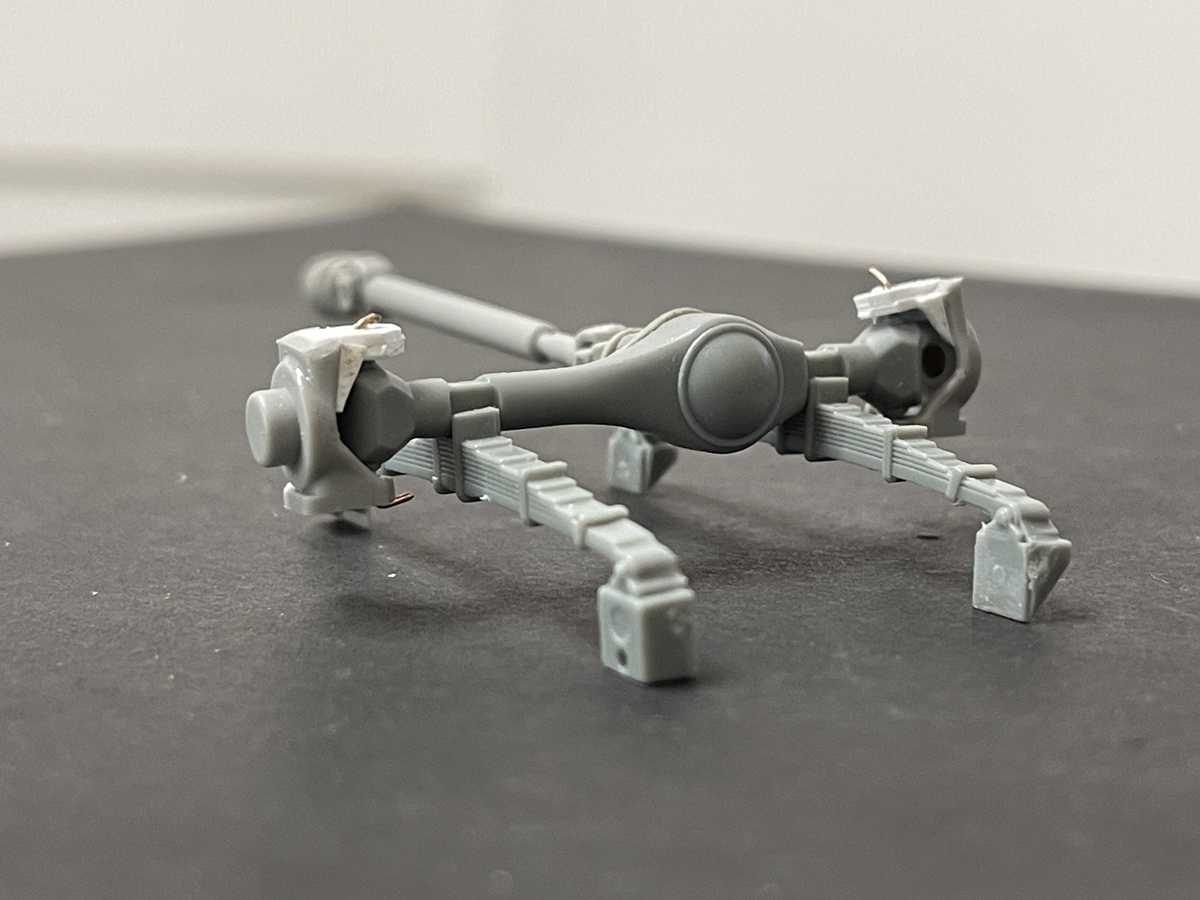
The MK 23 MTVR is a short bed, with independent 6x6 suspension, which is not what I want for a lumber truck. So, I 've made it into a long bed, added the M923 suspension in the rear - which is not ideal for this, as it uses the old Rockwell axles. I’d rather use something more modern with a walking beam or air ride suspension, but that’s the way it is. I haven’t decided on tires and wheels just yet,. Hopefully the stash will provide - I still need to dig a bit more.

I’ve got several sets of resin single wheels, which would be fine for the front, but I’d rather use doubles on the tandem. so the search is on. The Italeri tires wheels are fine, but the diameter is a bit small for my liking, and they’re singles too.

The front leafs and axle are from something else and looks more modern than the Rockwell axles. I used the newer axle on the front because it will be more visible than the rear. I fabbed up some front steering knuckles, so the steering will be posable.

OK gents, thanks for having a look -

Cheers
Nick

12 Likes

Will definitely be following this build - 6 vehicles plus buildings - it’s going to be fascinating!

cheers
Michael

1 Like

Now here’s something epic to look forward to in 2025! Bravo Nick it looks like all that cycling has invigorated your mojo - would I be right in thinking you’ll be ordering a 1:1 scale truck-load of balsa?

3 Likes

If the results are anywhere near your previous builds, they will again be flabbergasting…

2 Likes

Most people when they discover a challenging build, don’t double down and select an even bigger project to replace it. I am down for it and all. Given your normal pace, what are you going to build in 2025. :upside_down_face:

3 Likes

Excellent … following along eagerly !!

2 Likes

Hi gents,

Thanks for dropping by :grinning: Yes, this will be a bit of a design/build project - the plan is to keep going until I’ve had enough of it!

@cosimodo Hi Michael, well, let’s hope it all works. I’m trying to mostly rely on the stash and scratch building. As for the dio, I really enjoy building them, and mixing vehicles and building as you go keeps things interesting.

@Dioramartin Hi Tim, not sure about epic! but hopefully interesting enough to keep me going! Yes, I’ll need a lot of lumber to do this :smile: which is good. I like weathering scale lumber and then making scale buildings!

As for the bicycle, who’d have guessed? Something I really liked doing years ago is still fun! and, dare I say…good for me…you mean some exercise beyond the rigor of using tweezers, pin vice, and files…is…“healthy”??? :smile:

@golikell Hi Erwin, for now, well, I’m staying optimistic - hopefully all goes according to the idea

@Tank_1812 Hi Ryan, reading and rereading what you said… :man_facepalming: yes, common sense might suggest not doing this - but, one of the big hurdles, in addition to figuring out how to make what I had in mind, was the price for the whole project - wow…a 3d printed truck cab, about $120! plus a donor kit for an engine, resin: tires, wheels, and axles = way too much money for me! In desperation, I reached out to the guy who makes the 3d prints, and asked if he could downsize to 1/35 - and no, he said as small as 1/32 which while close, would look ridiculous matched with detailed 1/35 parts.

So, back to 1/35! As for pace, haha! I’ll try and keep this moving! The longer I keep going on a project, the less likely I’ll finish it! :smile:

@Johnnych01 Hi John, thanks for stopping by! Good, if you stick around you can keep me honest!

And, I have been at it - Starting with the bed mounted fork lift:

These are interesting little rigs - as you can see above a mix of scratch, extra sprues, and unused resin tires/wheels, so some decent progress. This took a fair amount of head scratching to figure out.as I’m not directly familiar with them. I’ve seen them on beds of trucks and running around job sites, but never thought that much about how they actually work - and now, well, I still don’t know much about them, but do have a basic sense of their fundamentals!

And, the big truck - I realize the pictures above are small, so a an update:

It’s coming along. I am still working on tires and wheels, but, have made decent progress on the truck - the MK 23 base kit is the Trumpeter kit, which is pretty nice - I would have used the whole kit, but the independent suspension would look a bit weird under a lumber load. The white squares you see along the frame rails are patches over notches provided for mounting hardware for the unused independent units ( 6 of them) while 2 of them in the rear are covering recesses from segments of M1083 frame rails. The scale bed is 26’ long, like a fairly typical lumber truck.

Speaking of axles:

This assembly is the front axle and is all mix and match, so some work was needed to get the parts to work. I think the axle is from an RG 33 or 35, driveshaft from a bigger MRAP (not sure which?), not sure about leaf springs. The steering knuckles are from an Oshkosh independent suspension, which were cut down to fit the sold axle, and as you can see, bases added for the lower ball joints and steering. I haven’t glued any of this, as I want to be sure that the finished assembly works with whatever I settle on for tire/wheels :man_shrugging:

OK, thanks for having a look -

Cheers
Nick

8 Likes

Looking forward to the Straddle Carrier most of all. Excellent progress on the other cool stuff as well.

1 Like

Hello model builders,

I’ve made some good headway on the little piggyback lift. With the basic shape in place, on to adding some details - first though, what it will basically look like behind the flatbed:

This is dryfit. The goal when it’s done is to have the lift tower being closer to vertical.

And on to the lift:

This has been a fun little project, complicated enough to be a challenge, but not so much so that it became a huge hurdle. In case any of you were wondering, on the real version, the forks scissor out from the tower, which allows them to drop loads below the front tires, so it can load things to the ground. You can barely notice, but the scissors are there on this little version too. There are a few parts I’d like to add, but not sure how to make them for now - something to wonder about. The roll bar is…old pieces of sprue cut up and glued together!

@KoSprueone, hi KSO, thanks. I’m looking forward to the straddle carrier too. They’re such an unusual machine - again, something I remember seeing as a kid, but man, just a little kid! I’ve got a small tractor model, I think it’s the Thunder Case, that I’ll use for the basic engine/hood/driver seat and the rest, cobbled together like this one!

Cheers
Nick

12 Likes

To my surprise, my Meng F350 kit arrive via EBay yesterday - according to the site, this wasn’t supposed to arrive for another two weeks - well, my early Christmas surprise!

Unlike many kits, this doesn’t have too many parts, so I had to jump right in (and, I managed to finish the small forklift, but still pondering tires/wheels for the flatbed. The plan here is make this a fairly rugged looking trcuk with a logger’s box bed. What is a logger’s box you ask?:

A super cool, heavy duty bed! As the name indicates, these were/are built for loggers - and they are tough - as I understand, they are seen more often in Canada’s logging regions, but - beyond that I don’t know :man_shrugging:. If I had an F-350, I’d want one!

So, I’m making one for the F-350 in 1/35:

The Meng kit is pretty nice, but it’s low parts count makes the assembly a bit simplistic, but that’s ok for what I’m doing. First step was to give it a modest lift kit - and the kit tires…they are very nice, but seem to reflect the cheapest base model option - they are small! Maybe 29" or 30" at best to scale. I tried to make them look bigger - going so far as to cut up and remake the wheels to look like steelies - but, not great. Hence, back to the stash tor something else. The tires and lift give it the overall look I’m after.

While these boxes look somewhat simple, there is a cleat patter with some nuance, so still working on it -

Above, you can see the tires, from an HMMWV (a DEF model part) which I added locking hubs to in the front and carriers for floating axles in the back (it’s an F 350 after all!). You can also just see in this picture how I raised the front coils. I used a piece of 3/32 tube, wrapped with some solder, so it looks right and is fairly strong.

OK guys, thanks for having a look and hope you all have a great holiday season -

Cheers
Nick

10 Likes

Always a pleasure to see your work, Nick. I actually had a hand in that kit. I’ll PM it to you.
Looking forward to seeing more.

1 Like

Once again, my flabber has been gasted…
My model making is throwing stuff together out of a box, with occasionally some AM bits for good measure.
Yours Nick is real modelling skill, and precision skill at that… How you meld plastic rod and sheet or even scrap left overs in with random kit parts hurts my head…
I know the 350 is a kit, or at least parts from it, but that flat bed and the fork lift. WOW. And then some… It’s only the beginning of the ride but we all know this is going to be a jaw dropper … Stunning !!

5 Likes

Yep what John said with bells on. While 2025 holds deep concerns for so many reasons, there’s one constant – Stickframe’s builds will be Total Quality with a capital K. Compliments of the Season Nick, keep on rockin’ our modelling world :guitar:

6 Likes

Like those NFL players who say THE Ohio State - Nick Haskell, THE truck builder. :slight_smile:

4 Likes

Thanks very much guys, I really appreciate it! and, that you like seeing all of this coming together -tho, with your kind comments, the pressure is on to not screw it all up! :sweat: :sweat: :smile:

A small update of some more progress on the F350, which is now about done. This went together quickly because it’s a pretty nice kit with a fairly low parts count, leaving me to spend time on my various add ons:

I really like how this is coming together - in fact, I wish I had one like this in real life! Perfect for me driving around urban streets! :smile:

Thanks for having a look,

Cheers
Nick

10 Likes

As you should, the truck looks great and no Carolina squat to be found. :+1:

2 Likes

@Tank_1812 Yeah Ryan, I don’t get the idea behind those trucks :man_shrugging: I could see somebody slamming the rear end of a two wheel drive, but a four wheel drive? and worse, the colors used for the suspension parts! :man_facepalming: Oh well, to each their own.

And along the lines of, “to each their own”, no I did not do some distinctive modifications to my car, no, instead I did truly important and meaningful work, specifically, thinking about the dio to go along with these model trucks. I enjoy doing research on my builds, and wind up collecting lots of images, then make up a PowerPoint show that I can use as a guide as I go, for models and dios.

Here’s a brief overview of what I want to do for this project:

First find lots of pictures to use as content and character studies. I usually don’t use any one of these exactly, but they are good for the overall direction of the project. Then, for this project I went really nuts and made up a couple of images of what I think this should basically look like:

The image above is what I have in mind for the street view, and below from the right side:

I imagine four buildings - a main shop/office, a work shop, lumber shed, and a shack.

These will be board on board construction using basswood. The main building will start with a heavy cardstock base, with wood over it, and the other buildings will be complete board on board, all similar to craftsman model railroad buildings.

OK gents, have a happy weekend -

Cheers
Nick

5 Likes

Not a fan myself of squat, it’s been made illegal for safety reasons. Though I did see a playa rolling yesterday. :man_shrugging: I think Rob posted a photo of a MRAP with a failed rear end that I want to model one day for fun.

The layout is coming together and looking good. I don’t have changes but I am sure you have some as it progresses and I am interested to see where you take it from here.

1 Like

Thats going to be a pretty extensive layout … and visually very impressive … :+1: :+1:

3 Likes

No fun and games with graphics today - back to actual model building :smiley:

Two sets of M54 front tires/wheels arrived today. It turns out each set comes with four tires and wheels, so the plan was to buy two sets, and have enough parts to make a set of tandems for the rear of the flatbed, and hope I guessed correctly and a set of spare MRAP tires would match the diameter, and I could use them up front as super singles.

Here we go:

The MRAP tire is in the upper right, and happily, they are all the same diameter. The little blue dots in the lower left are cut off and carefully collected bolt heads, to be reused.

And in many simple if not tedious steps, a set of wheels for one of four on the rear tandem. None of this was all that hard to do, but patience was required. Also, along the way I noticed that the two tired intended for use on the M54 front axle were sagged, and the two spares (obviously) not. This becomes relevant as the centerline of the two are different, meaning, you need to set them up based on the ground plane, not the apparent center - you’ll see what I mean in a few pictures, as three out of four worked, and one, well, back under the knife it will go. A test fit:

Pretty good. With this done, I went back to work on the front axle, and cobbled lots of stuff together to make it work:

While a bit messy, all worked out just fine. I still need to add steering gears, pitman arms, and drag links, but hey - that’s pretty fussy task, so next on the list! :smile:

And a big dryfit - all of it!

Note the aforementioned floater - on the inside of the front, right rear tandem…perfect… :smile:

You can see it better in this view. Happily, this is a fairly easy fix. As for the rest of the truck it’s coming along just fine.

OK, on we go -

Cheers
Nick

10 Likes