I really like the look of the blue truck just how it is, body fill and rough paint job. It just has the look of well worked truck with lots of mileage. Being in the rust belt I see lots of trucks/ cars with wheel well body fill.
@Barney You know, that’s a pretty good idea. I was planning to paint it blue, the same shade as the lift truck, and weather it - but, the primer shining through along the fenders and some rusty cab corners might look pretty cool - some ideas to ponder -
In the mean time I went about making the cab interior. Like the chassis, the junkbox and evergreen provide:
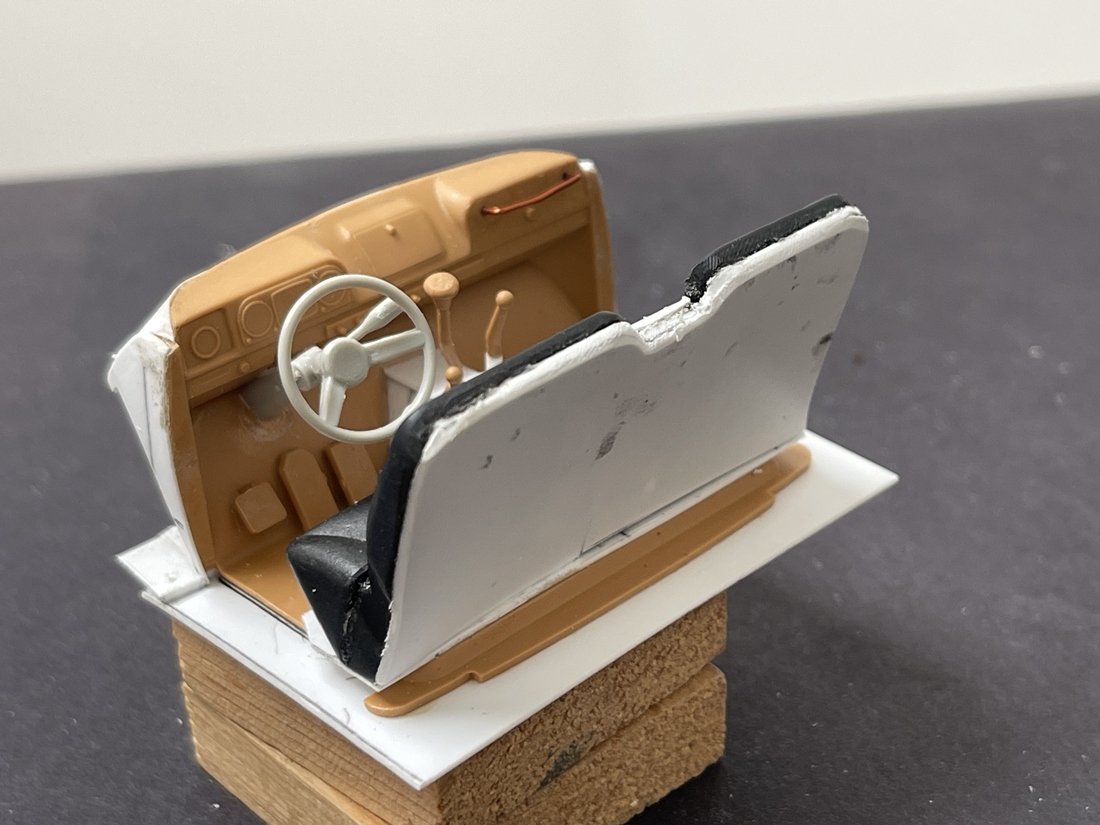
I used a steering column and wheel from an M1083, dash and part of the floor from a Zil 131, and the seat, from a 1/25 kit, which required a lot more cutting and carving than I would have hoped - I probably should have scratch built it - but it’s now done. Next, I had to widen it up to fill the gaps between the body and dash:
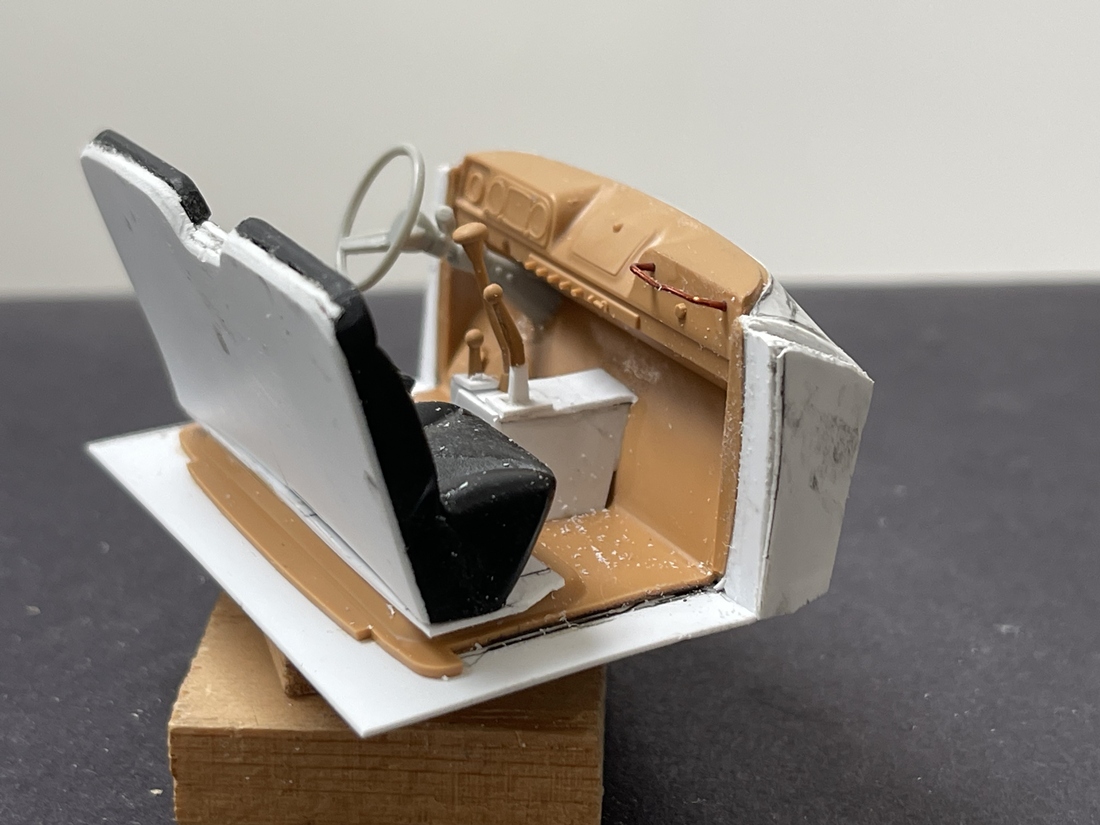
None of this is that hard to do, but it takes time. For grins, decided I needed something of a transmission tunnel, which of course will never be seen, so I’m not too concerned about the sloppy fit. Added gear, transfer case, and PTO shifters. I’ll know they are there  And finally, to get it flush with the hood and underside of the windshield, added a shroud:

As subtle as this may seem, it now prevents light coming in from the underside/firewall, and has a better overall fit - and, in the cab:
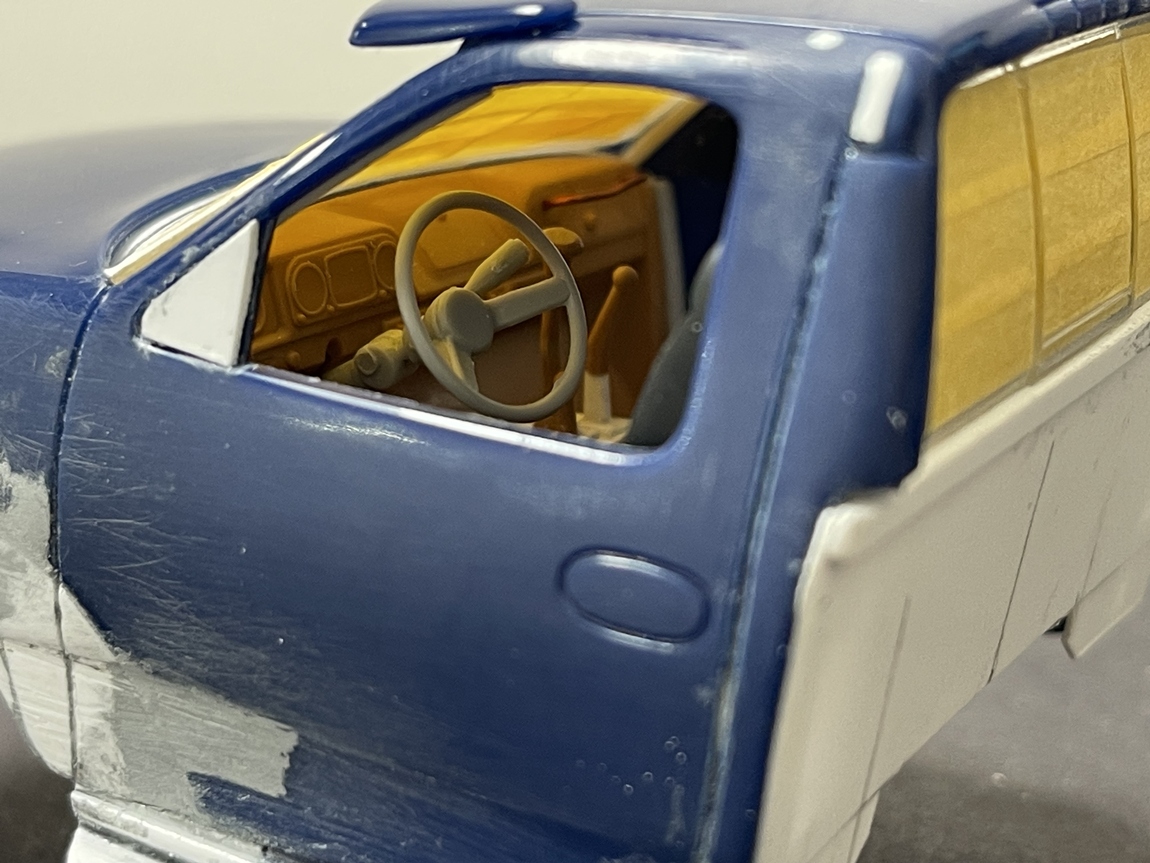
While not a perfect fit, it’s pretty close. I’ll add some door cards and be done with the cab -
Thanks for having a look -
Cheers
Nick
9 Likes
A more interesting update on the truck today, I added a bed:

Not to worry, all just dryfit, and the cab will sit level.


I think this worked out OK - mostly evergreen, but some nice remnant PE cut up to be repurposed. I mentioned before that it looks like a Ford F 450, but now that it’s together, I think a bit more like an F 550 - which is also fine!
And in the realm of rarely to be seen, added some details to the engine and thereabouts:


My compulsive side is demanding that I add more bolts and so on the frame rails, so…almost next on the list. First, I want to make up a rear rack for the bed. I’ve got an idea for this, but I don’t think it will be as easy as it seems.
Thanks for having a look -
Cheers
Nick
13 Likes
Good looking truck. 
2 Likes
The bed looks great with the various brass bits from the re-purpose stash. My only question, coming someone who hasn’t seen a Ford F-XXX of any type since they don’t sell them down here, are the the tires too small (picture 1 esp.) for a truck that size - maybe I have watched to many American car resto shows to know what a workday truck should have.
cheers
Michael
1 Like
Great stuff going on in this topic!!
1 Like
I am NOT a car mechanic
but should there be an angle (yellow arrow) between the steering shaft and the “gear”?

1 Like
Looking really sharp, looking super heavy duty. It has the look of a well used yard truck. Will you dent up the truck bed from 2”x4”’? I can so visualize trucks like this, anywhere from construction to asphalt companies.
2 Likes
Great looking truck and wonderful detailing as always … I am with Barney … the beat up, used hard look with body primer showing will look the perfect daily yard user …
2 Likes
Not really all that unusual, there are typically u-joints near where the steering shaft meets the steering box.
1 Like
Would those u-joints be visible?
1 Like
Could be when it is outboard of the frame rails, but I think Nick’s will be in the shadows when painted. Plus, this is still at his mockup stage anyway.
2 Likes
Hello model builders,
thanks for having a look and leaving some comments.
@cosimodo, Hi Michael, fair questions, so I’ll try and address. First, regarding the Ford F series trucks, the F-150, F-250 and F-350s are generally, light duty trucks, with the numbers respectively meaning 1/2, 3/4 and 1 ton load rating, while the F-450, F-550 and so on getting into medium duty trucks ,of 1 1/4 and 1 1/2 ton ratings. The latter series being used for tow trucks, service body trucks, flatbeds and so on.
As to the front tires and the fender openings, the real trucks that are stock 4x4s tend to have bigger (taller) wheel openings as shown below:

As a result you can generally tell these trucks are 4x4 from a quick glance, though some of these that are 2 wheel drive use a straight/solid/beam front axle that also sit pretty high on leaf springs. As for my wonderful model, well please see below:

We have two things to consider, first, as you can see above, the picture on the right is from the series I used above, which was dryfit, and the cab was tilting backward, making the big gap look even bigger. The picture on the left is with the cab sitting correctly, so the weird geometry looks less dramatic.
Another thing to consider is that this cab came from a kit that was intended to look like a monster truck with giant tires with equally giant wheel openings, so all of the white material is added fill, which was attempting to make the cab look more normal. I think the wheel opening should be more of a uniform circle shape, but I haven’t yet figured out how to tie the less dramatic curve into the front bumper provided by the kit - or, if I will try and do so -  Who knows? I’ve wondered about this and might just give it a go
@Uncle-Heavy and @Dixon66, well guys, yes, the steering gear and column. As @Dixon66 correctly observed, there is almost always a flex joint, or u-joint between the steering gear and the steering column to cope with the inevitable angle which occurs because of the location of the steering gear and the steering column and wheel which tend to not be on a level plane. So to address this I faked in a linkage and U-joint:

The funny thing about this is that we are in some ways adding detail to parts that usually wouldn’t be applied like this, as most light trucks have a pitman arm located below, and not next to the gearbox (which I built), whereas heavy trucks seem to have them on the side as I built it, though the ujoint or flex joint are used in both cases.
The image below is of a typical steering gear on a light duty 4x4:

You can see a pitman arm located beneath the gearbox. You’ll also see there is a flex joint linking the gearbox to the column, versus this:

which is what my model generally represents. I think the model looks better with the Ujoint in any case!
On to some more progress:


I added more to the bed, specifically the rear part of the rack. This was slow going - as it’s made of sheet brass, folded and bent, with evergreen inserts to give it some strength and keep it rigid.
@Barney and @Johnnych01 I really like the idea of denting the bed up, so I’ll give that a go. The oblivious challenge here will come from denting up, but not pulling the PE off the model, as it is only glued in place, but at this point, I really don’t want to knock it off the project!
Thanks for having a look and leaving some comments -
Cheers
Nick
6 Likes
Not the bed, but maybe ding the brass sides a little with some irregular bit of metal held against them with a pair of pliers & gently squeeze? In such a way it doesn’t risk glue-failure…no I’ve no idea really, but I’m sure you can do it. (Oh did I say “Wow!” to this latest post? Wow!)
2 Likes
Thanks!
Almost everything on a model is fake 
1 Like

Excellent representations of a damaged and somewhat “repaired” rear bumper.
Maybe add some weld beads?
1 Like
Nick, it is looking wicked!
1 Like
Thanks Nick, great explanation.
1 Like
Well guys, making progress on the trucks. Real work is on the verge of cranking up, so I’m trying to hustle through these. And for today, some painted vehicles, the Marmon Harrington, and the straddle carrier.
I didn’t post this picture here, but I tried again to ruin the Marmon Harrington:

Ahh, a dream come true - more damage. While on my way to priming this, well, disaster struck again. Not to worry, the concrete floor was undamaged as a result of this… 
The bummer is that I lost one of the front leaf springs, so had to make one up, which was fine, except I couldn’t match the arch of the resin one, so it took a few tries to level it out. But, now it’s painted up, and sorry for the bad lighting! It’s cold and windy outside, so I opted for indoor pics:


And there you have it - I need to do some touch up paint, but it’s mostly done I debated about how bad the paint should be, and decided on mild decrepitude, and let the poor body fit and sagging and bent chassis tell the story
And the straddle carrier:


The paint went relatively smoothly for this, except I broke one of the chain drives - so, it received a fairly clunky repair, but not a disaster.
As a whole I’m pleased with both of these. For such a straight forward build, the truck was a real handful to pull together - seems I did each step along the way at least twice. The challenge with the carrier came from not really having any idea how the mechanics worked - that is, I understands the concept, but not much of a clue on the how of them I think that made it more fun!
Thanks for having a look -
Cheers
Nick
12 Likes
 Well you always were the Master of Mild Decrepitude & these are exceptional examples of why.
2 Likes