Trucks around the yard

@KoSprueone, well, I just couldn’t contain myself - more of my wood, this time, erected! :smile: :smile: As for the building, I agree - if I can pull it off, I’ll bet it looks pretty cool - so fingers crossed.

In the mean time, the woodshed. It has about 60% of the framing done, as it still needs a lot of work on the front deck and the rafters, but progress is being made:

I think the amount of weathering worked out fine. There’s enough there to make it look old as hoped, but not so much as to make it look decrepit.

Despite the appearance that like a Tamiya kit this practically put itself together, it didn’t. So, for some variety and relief to my sanity, I’m going to add wood siding to three of the four sides. For this thrilling task:

Yes - this is about 75% of the material to be used on the back wall. I did the same for each of the three sides. Next, “painting” it, which will actually involves the joyous process of scraping various colors of pastel over each board (scraping the back of the hobby knife on the pastel stick, letting the pastel fall onto the boards), then blending them into the weathered wood by brushing/scrubbing on with isopropyl alcohol. Thankfully baseball season has started! I’m afraid that each wall will take a full nine innings to “paint”! :smile: :smile:

Before I took these pictures today, I went out for a bike ride - all good - nice day, and a good ride. Until that is, about two miles from home. Well, the rear derailleur and chain that I knew needed good cleaning, well, as they say - left the chat. Jumped the chain while attempting to change gears, but happily I was able to jam the chain out of the front derailleur, bending the retaining bracket too…ok then - the walk of shame from there directly to the bike shop. It needed a spring tune up anyway - so now, all the time I could want to paint siding!

Cheers
Nick

10 Likes

The woodshed looks great. The weathering on it is awesome.

2 Likes

Haha, the wood jokes!

@Stickframe That wood frame is looking badas* realism can get.


Nick on his way out the door to take pictures of cool sh… stuff

6 Likes

Taking it to the ultimate level – 100% realistic DURING construction??!! Outrageous! Looking forward to seeing The Pastels come out to play…and not just for backing tracks. I’ve never used iso alcohol to apply them (just scrubbed on dry with a small medium brush), what’s the advantage - better blending?

Alas the bike malfunction – reminds me of once wedging the chain between top gear & the rear fork at speed downhill. Those little screw-limiters to prevent that phenomenon do work loose, with little or no warning before disaster strikes. Requires regular preventative Zen.

4 Likes

@HeavyArty, thanks Gino, I appreciate that. I think I enjoy building wood frame structures as much as scratch building trucks, it’s nice to hear you like the results so far.

@KoSprueone, as I’m from the Bay - Hella realism! and your cyclist! Nice :grinning: :bike: :man_biking: But, I travel light - just the Iphone :smile: I found this picture doing some research for a client a while ago - check out the tires - look a lot like my fat Maxxis! but, the cyclists are in better shape than me - lol - I’m working on it!

@Dioramartin, hi Tim, yes, the pastel technique yields very nice results, but, the pace is absolutely glacial - as you asked, I looked up some old photos:

Once you’ve weathered your base material, you scrape shavings from pastel sticks. In order to keep it interesting, I like to use a few colors in addition to the base color - greys, some yellow, and sometimes terra cotta - then, go about the initially horrifying step of blending:


I say horrifying because like adding pigment to armor, the initial step is pretty ugly. Using the ISO allows the pastel colors to bond and make a wash, unlike dry pastel that looks a bit more like a dusting. And when it dries:

I like the results - and clearly you can see the color variants, but, they are not over powering, and in the context of the final build:

I like the result - but, again, this process is very slow and requires discipline when you’re doing it. I think it looks better than say, air or hand brushing on a uniform color, particularly if you are trying to make an old building.

As it turns out, I got lazy - and tried a new approach for the wood shed. While staring at the face of pastel-izing hundreds of boards, I decided to use a product called Hunterline, a stain, which is some sort of secret blend of pigment and an unknown, but water or alcohol soluble (or so I thought) carrier. I have a few of their colors but have never tried them before.

So, I boldly poured some of their product into a cup (“Cottage White”) and promptly added a few shots of Sepia India Ink and an ample amount of ISO 91% - and well - :flushed: it looked like a mix of household latex and fine oatmeal…perfect - undeterred, I applied it anyway. It’s drying now, so will know tomorrow if it worked :thinking: :sweat: It looks OK now, but without daylight, it’s hard to tell exactly what it looks like? Better or worse I’ll post the results -

And back to the bike, indeed - preventative Zen matters. About two weeks ago I applied an ample amount of brake or carb cleaner to the chain and derailleur, then applied what I thought was plenty of penetrating oil - alas, what I likely did was dry out the little sprockets in the derailleur, and gunked up the parts that were supposed to move freely - the chain and cassette is now a greasy, gunky, stiff mess…and whose fault?? mine… :man_facepalming: My local bike shop must love me and my “vintage” mountain bike :smile: :man_biking:

OK gents, on we go and thanks for having a look -

Cheers
Nick

8 Likes

I think we are all suckers for new products!

2 Likes

Are you familiar with those racing bike shoes?
The type that is like a glove with a cleat under the front part
with very little in the way of sturdy walking soles?
A classmate at university was a cycling fan and he started turning
up a uni with a bicycle tire hanging around his neck.
When we asked: WTF man?
The answer was that he had been out on a nice Saturday with his
racing style bike, many miles away from home and bike shops.
He had a flat tire. Didn’t carry a spare tire or any tools.
He had to carry that bike about 8 miles, walking on tiptoes with those
cleated shoes.
Now he carried a spare and since there was no luggage rack on his
racing bike he carried the spare as a necklace …
He ought to have used a backpack …

2 Likes

In the late 60’ies they sold bikes with combination locks.


The red button is moved left - right the correct number of times and then up
to unlock. Locking is by pushing the lever on the right side down.
I inherited my brothers bike which had this stupid lock (the only advantage
was that you could not lose the key).
Bag with schoolbooks on the luggage rack, strap from bag wrapped around the
saddle post. Glorius downhill on my way home.
Stupid bag falls off, pushes the lever down, locking bar tries to enter the wheel.
A sudden very loud rattle with me almost tipping over the handlebar.
Locking bar bent at 45 degree angle, every single spoke on the rear wheel has a
distinct knick in it. Had to walk 750 meters home (yeah, small town and I lived
near the school, call me privileged).

2 Likes

Double wow … the initial wood craft was pretty amazing in how the colours are applied to give such a realistic look, but then adding in the frame work on the timber shed, that has taken it all up by about 4 levels in brilliance …

2 Likes

The framing very much reminds me of when I took “cottage construction” in shop class. Albeit my project did not turn out as great looking as yours. Truly impressive, I admire your talents.

1 Like

Jeez Nick you’re pushing this thread title’s relevance, it’s turning into Trucks & the Art of Bicycle Maintenance. Maybe Robin needs to start a new one called Bikes vs. Newton’s Laws, I can contribute.

Many thanks for the pastels tutorial, a coup for my team engaging in high-end hobby espionage to augment my databanks, and they didn’t even have to sleep with you! A shame really, seeing as they’re all lingerie models :grin: anyhoo, and in no way innuendo related (we’ve had enough wood jokes), looking forward to seeing how your “Cottage White” looks in the harsh light of day.

2 Likes

The thought has occured to me …

1 Like

Well guys, I have worked steadily on this over the last few days, and today, real work - nope, I’m waiting for info from other team members.

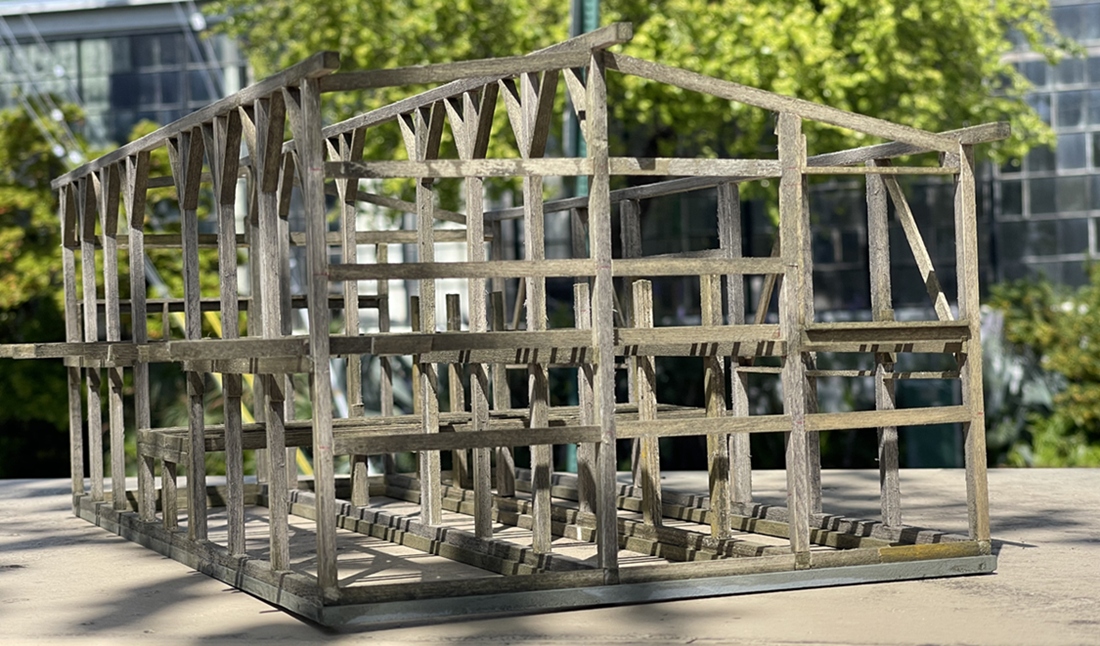
The wood weathering process has been interesting - first, a shot of the stain I used on the building siding:

Oh what a treat… :open_mouth: hmmm, this doesn’t look right to me? This is what I mentioned above, the Hunterline Cottage White - but, in fairness to the product, well, I added a few shots of Sepia India ink, because I didn’t want this to be bright white - and well, it isn’t. I also poured in an ample amount ISO. This in real life looked a lot like highly diluted pancake batter…perfect.
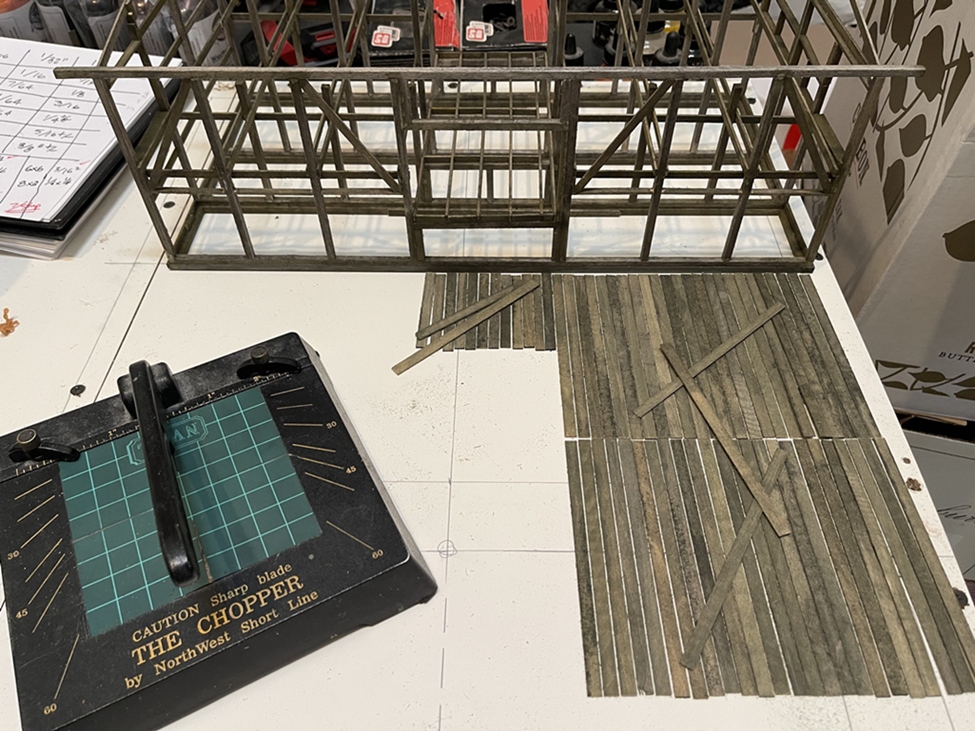
But, when applied:

It looked pretty good, as a staining product that is. I shouldn’t have added the Sepia because it became darker than I wanted. Happily, I refrained from doing anything more that day, and instead slept on it.

Next day though, I mixed together some white India Ink and ISO to use as a wash to bring in some more white. This seems to speak to the value in using stains and not paint for a task like this, as you can add layers, without completely blocking out the base color. It took me a while to get to this - I contemplated a variety of other choices - glad I didn’t use them.

And what this looks like with the white wash:

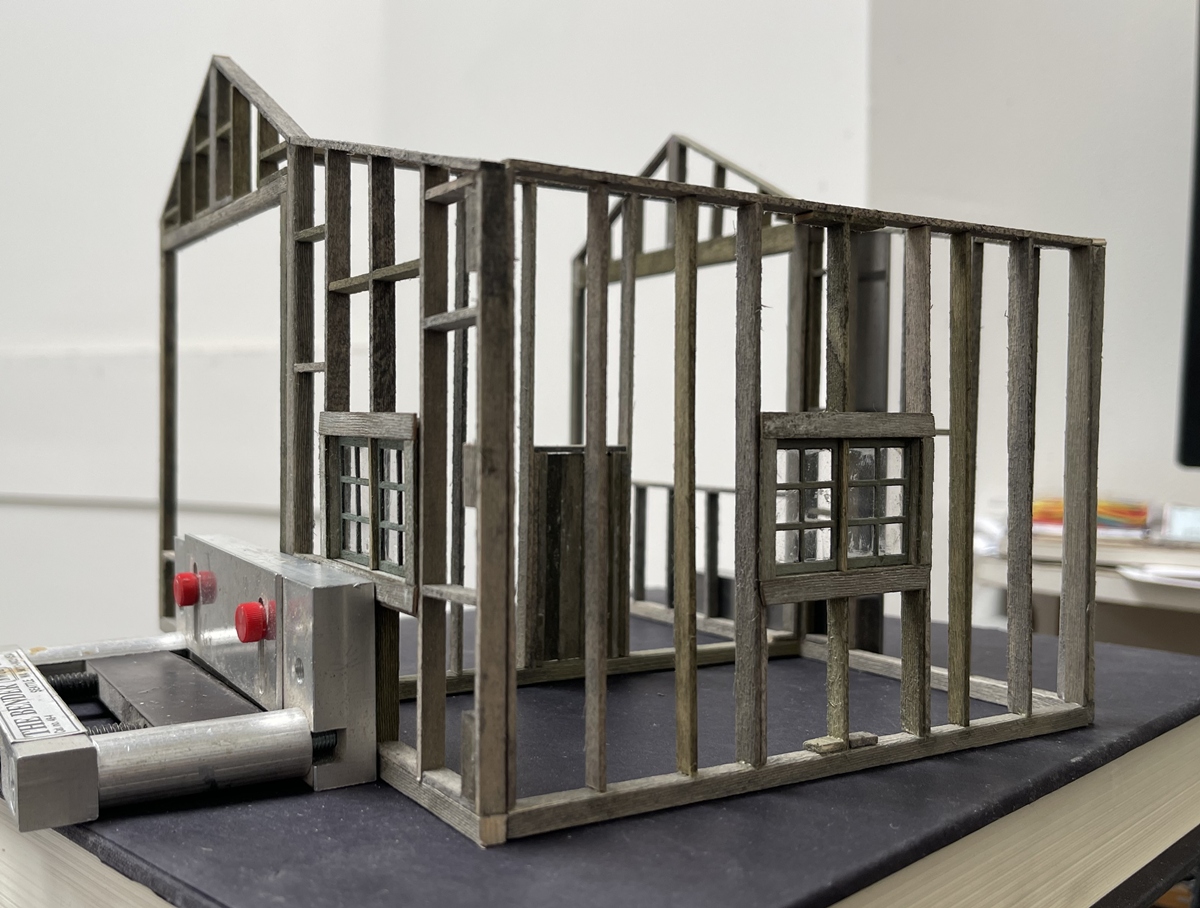
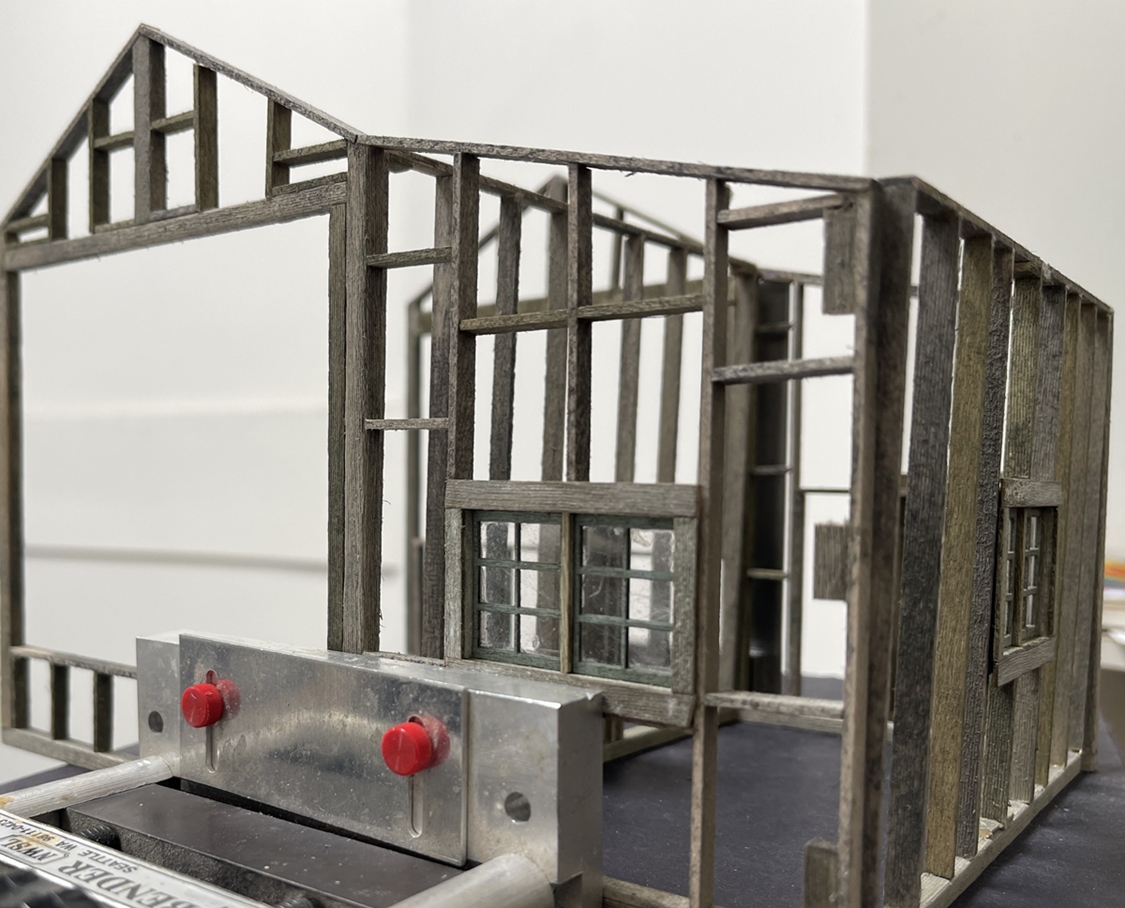
While maybe subtle, you can see that the material now looks a bit more white, which is what I wanted to begin with . As this was done, I naturally had to get after installing it all - yet another model building treat:

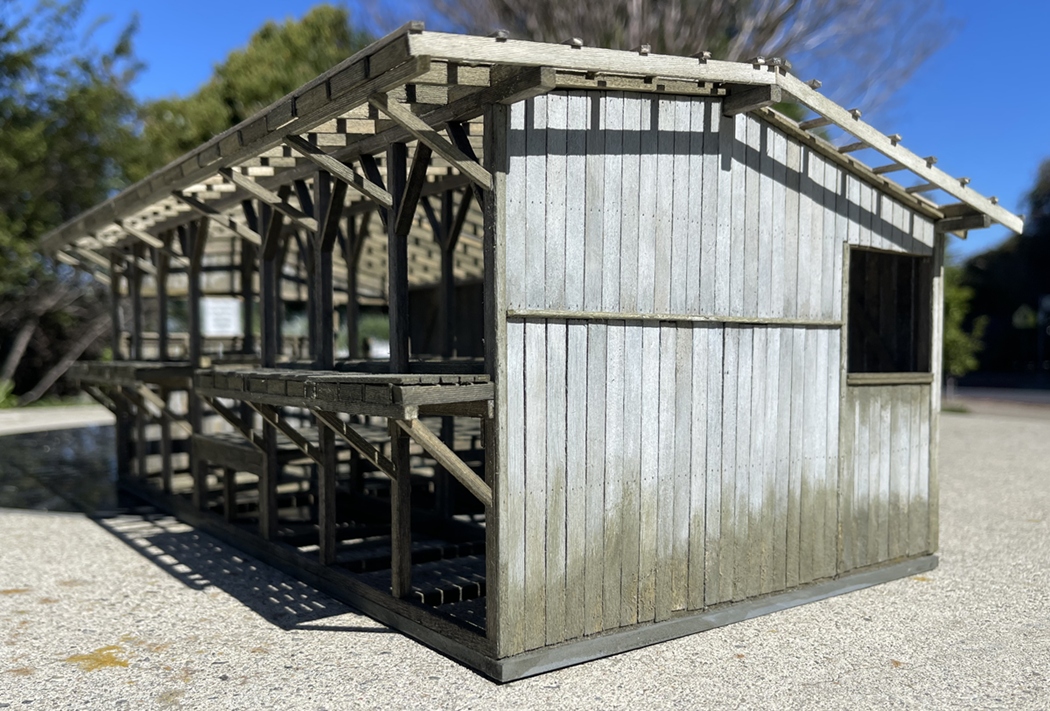
Unhappily, today is not bright and sunny, and with cloudy skies, this is what we get - but, the point is obvious enough, this seemed to work out fine. The staining on the lower edge of the siding will make more sense as the dio moves ahead. It’s hard to see, but nail holes are there. A few close ups:

I installed the decking in the portal, which looks pretty good, and I like the inside of the siding - it looks really good.

In these, you can see the decking and where the front deck will be built.

I included the picture above to highlight the water table/horizontal board about 2/3 of the way up this wall. It turns out that the scale building is just tall enough to make it seem unlikely/impossible to use 20 - 25’ scale feet long siding boards, so I picked a mid point I liked, and separated lower and upper boards - if nothing else, it adds some interest to the wall and will cast a nice shadow.

And, as to bikes…very sensitive subject indeed, particularly because mine is still in the recovery room - the bike shop that is! They said it will be done on Thursday.

Thinking about gravity and bikes…well, when I decided it was time to start riding again after a long time, I decided I needed to find out if I could still do some of the old classic tricks - first, riding down a short flight of stairs! then boldly dropping off of a concrete wall! Yes! I’ve still got it!

Then a few weeks later, well indecision got the better of me - closing in on some pedestrians, I vacillated :man_facepalming: left - no right, no left - oh sh*t! there’s a ledge! quick right! crash!!!…not to worry, I broke the fall with my jaw and left hand - very nice…all while blazing along at well below 10 mph…very nice… :rofl:

A couple years ago I saw three spandex clad guys on very high end road bikes really moving along - they were trying to beat the street light. The third guy, while cranking up had his composite fiber front wheel explode! I mean even with a loud bang! followed by him dumping it straight over the bars and onto the street. And, I suppose, just like each of us, he jumped right up, trying to shake it off - “no, I’m fine…it’s cool, it’s cool”. He didn’t have any obvious injuries, but man, I’m sure he felt that for a while - he went down really hard.

So, not sure about making thread about this sort of thing, maybe bad karma :smile:

Cheers
Nick

8 Likes

I’ve kept busy working on the woodshed - adding more details to the front, and framing the roof:

This is beginning to shape up - and a couple of the interior:

I really like the shadows inside and outside, and with a sunny day they really pop.

I’m liking the effect so much, I’m wondering about not installing the previously planned corrugated roof, and instead not putting a roof on the building. As this will be part of a diorama, maybe setting it up to look like a crew is replacing the old roof, allowing me to logically justify leaving the roof framing exposed - and keep the interesting shadows. Not sure just yet, but I am leaning in that direction.

Thanks for having a look -
Cheers

Nick

11 Likes

Excellent idea.
Could they be working in sections? Removing maybe a third at the time?

1 Like

As if this project couldn’t get any better. As if! Great idea…how’s the market for 1:35 roofing contractors? :upside_down_face:

3 Likes

Gotta agree with the concept of a roof replacement! That means you will possibly have to have to build a scissor lift or zoom boom!

1 Like

Yeap, those shadows are to cool to be hidden away, if not the full roof, even 2/3s removed and the rest in a sorry state of repair with new sheeting piled up ready … its an amazing building.

1 Like

Hello gents, @Uncle-Heavy, @Dioramartin, @Barney and @Johnnych01, OK guys, we seem to have consensus! good, so time to think about how to do this. The idea of having some but not all the material on the roof sounds good - maybe I can paint some material to look old, and some new - in a couple of uses for each. Old on the roof and old in a heap, and new on the roof and stacked on or near the truck!

@Barney you know - those are both good ideas, a load handler would be cool to make, and would be fun to try! I might just go with scaffolds and ladders for now, as I’m running out of room! but, who knows? Nobody says you need to glue vehicles onto dioramas - right? as such - maybe some final photos have a telehandler, and others don’t - something to consider, as I’m always up for a scratch build.

But, for today a new building. I’m, or was, waiting for corrugated material for the roof for the woodshed. I say “was”, because now it doesn’t seem I’ll need as much as ordered. Anyway, I have started and made some good headway on another smaller shed:

Sorry about the dark pictures. I’m thinking this building will be across the drive aisle from the wood shed. This will get horizontal wood board siding. I am going to try some alt approaches to paint - specifically mixing white India Ink with crackle paint medium, to try and get a checkered finish. I will apply this mix over weathered material so the apparent “old wood” will be seen beneath the cracked paint layer - who knows? maybe great, maybe a mess - if a mess, I can always flip the material over and stain the other side - :man_shrugging:

OK gents, have a good weekend

NIck

6 Likes

NIce. You should apply for your General Contractors license. The building looks square and true.

4 Likes