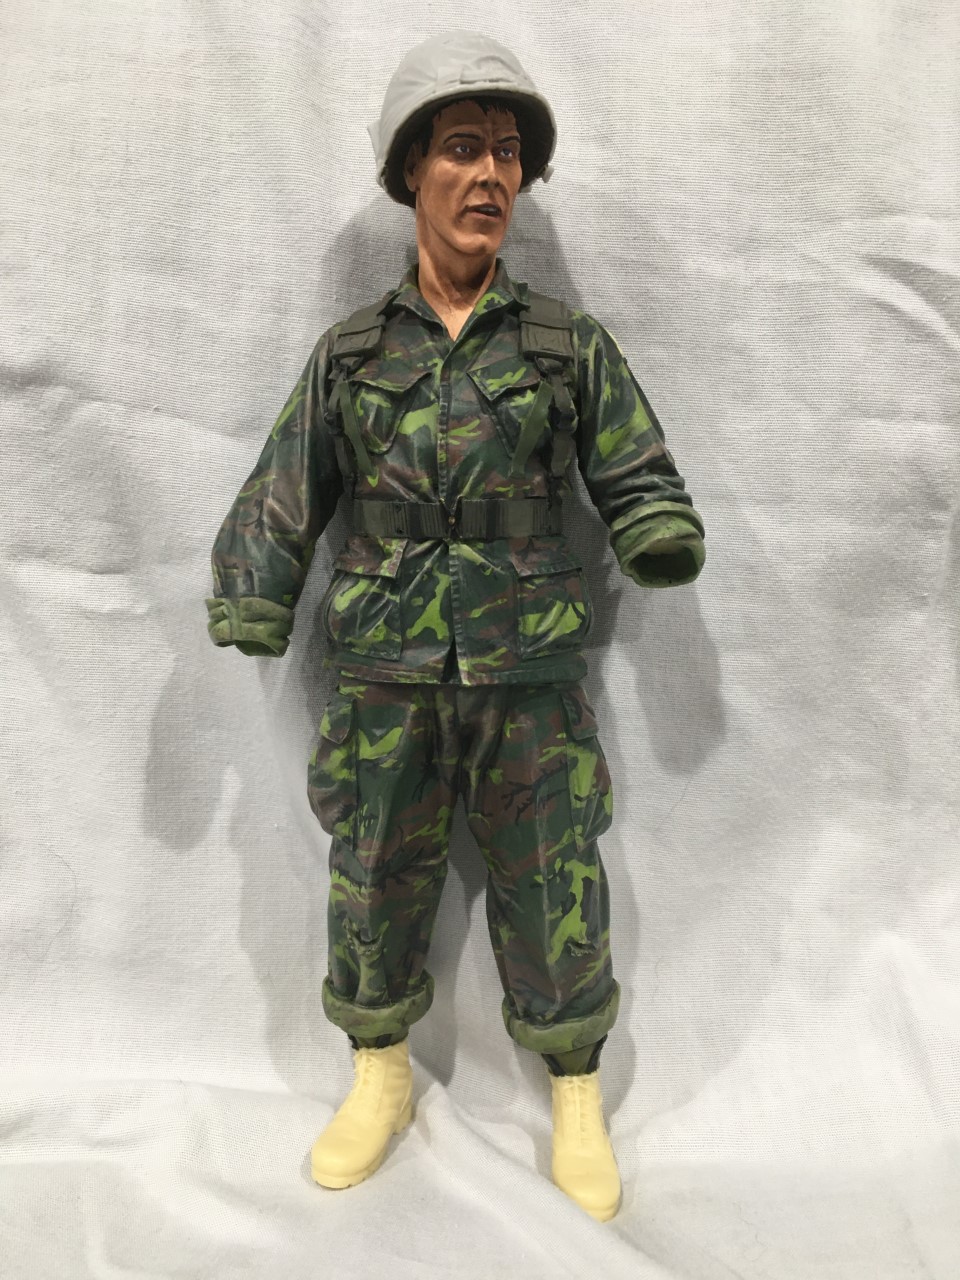
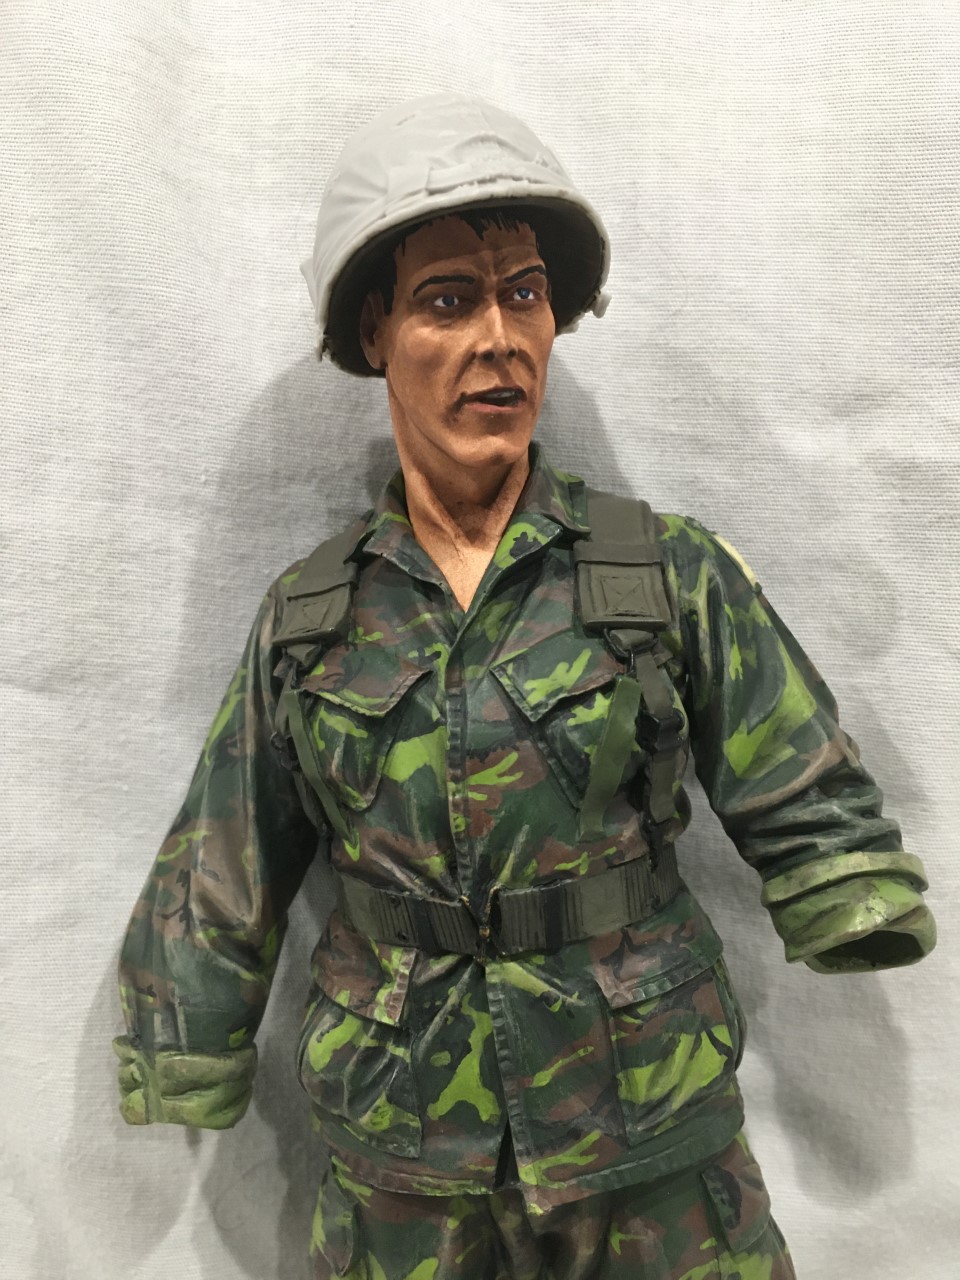
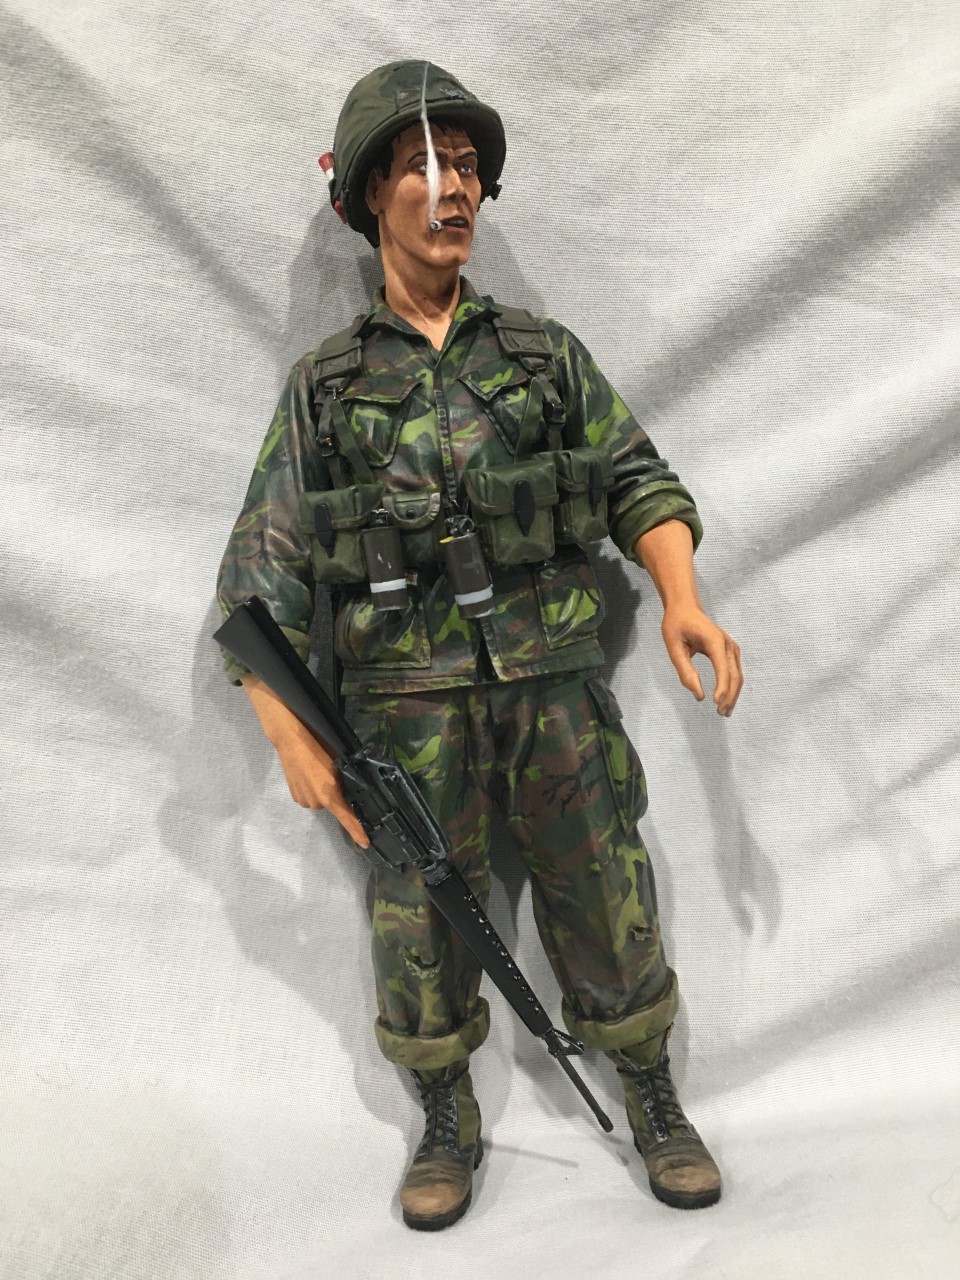
I have always wanted to tackle the ERDL camouflage scheme. It took some time to figure out which figure I wanted to use. I tend to favor large scale figures, and I wanted my foray into ERDL to be big and bold! Furthermore, the figure had to be reasonably within the timeframe that ERDL was more or less commonplace. I decided to go very big and use my 200 mm Verlinden Vietnam 82nd ABN grunt.
Contrary to popular belief, the ERDL was not exclusively used by LRRPS/Rangers, SF, SOG, SEALS and the USMC. By 1969 it was not uncommon to see random grunts in line units who acquired a set. Admittedly, it is hard to find photos of line troopers in the 82nd wearing them, but there is evidence that men in the 3/82nd ABN had ERDL uniforms during the brigade’s nearly two years in the war.
The ERDL pattern is phenomenally difficult to reproduce, either in scale models or in real clothing (reproductions of the uniform). From my perspective, this comes down to scale, shape and color. I find it much more difficult to paint than the tiger stripe patterns, even though tiger stripes are visually much more complicated.
I did my best to copy an unissued ERDL uniform in my collection. Again, the scale is troublesome as eyeballing the pattern and its location on the garment does not lead to precision, particularly as the pattern starts to repeat itself. Verlinden’s sculpting does not assist this process. I still hold a special place in my heart for Verlinden due to childhood nostalgia, but I recognize some of the brand’s frequent and glaring errors. Verlinden’s tendency to sculpt Vietnam jungle fatigues as WWII jump uniforms remains baffling. When the scale of the pockets and the length of the tunic is way off, it frustrates said attempts to precisely eyeball the placement of the pattern based on an original. The lack of sculpted seams in some places also necessitates guesswork.
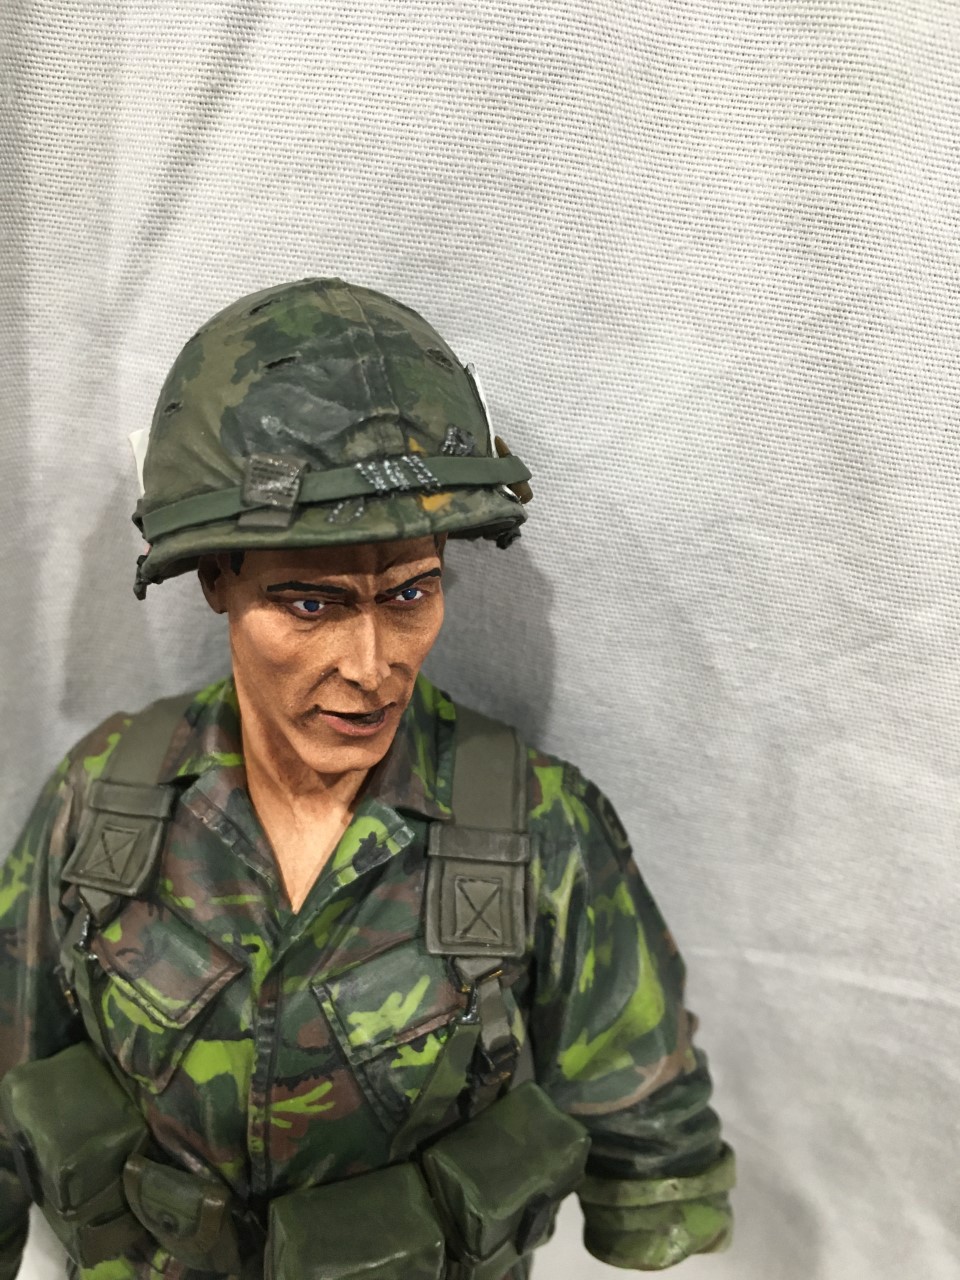
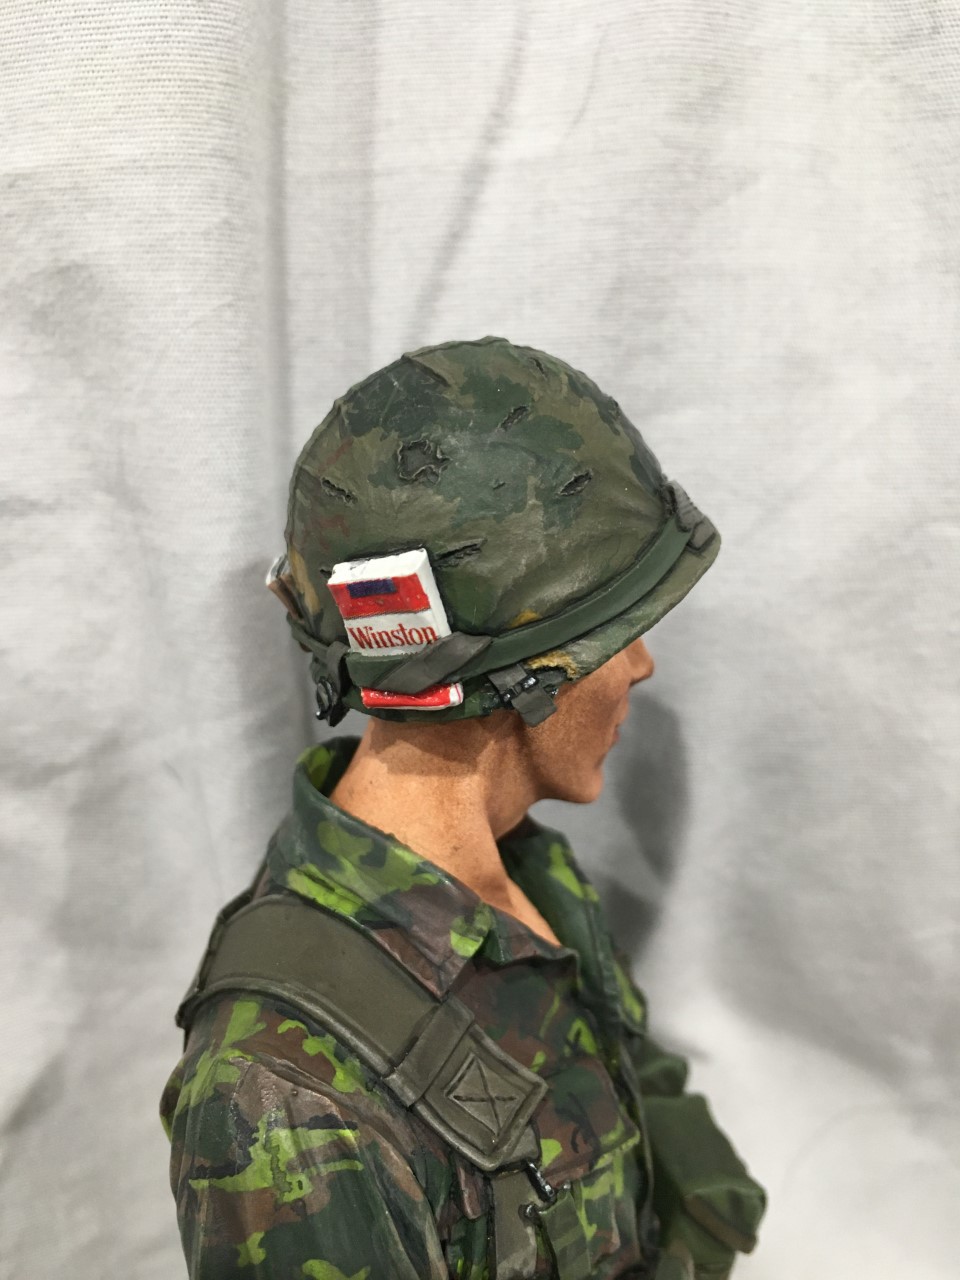
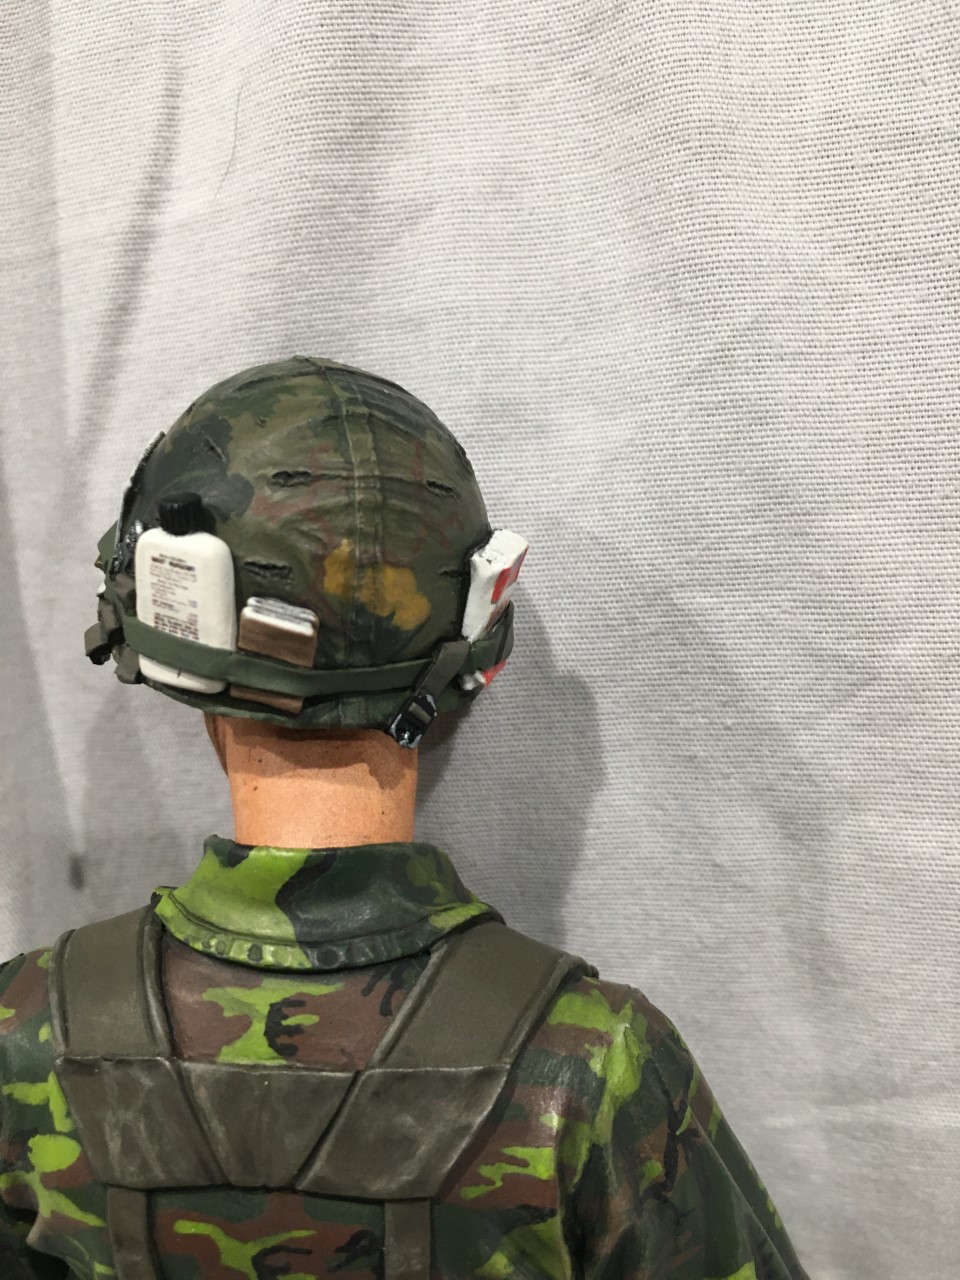
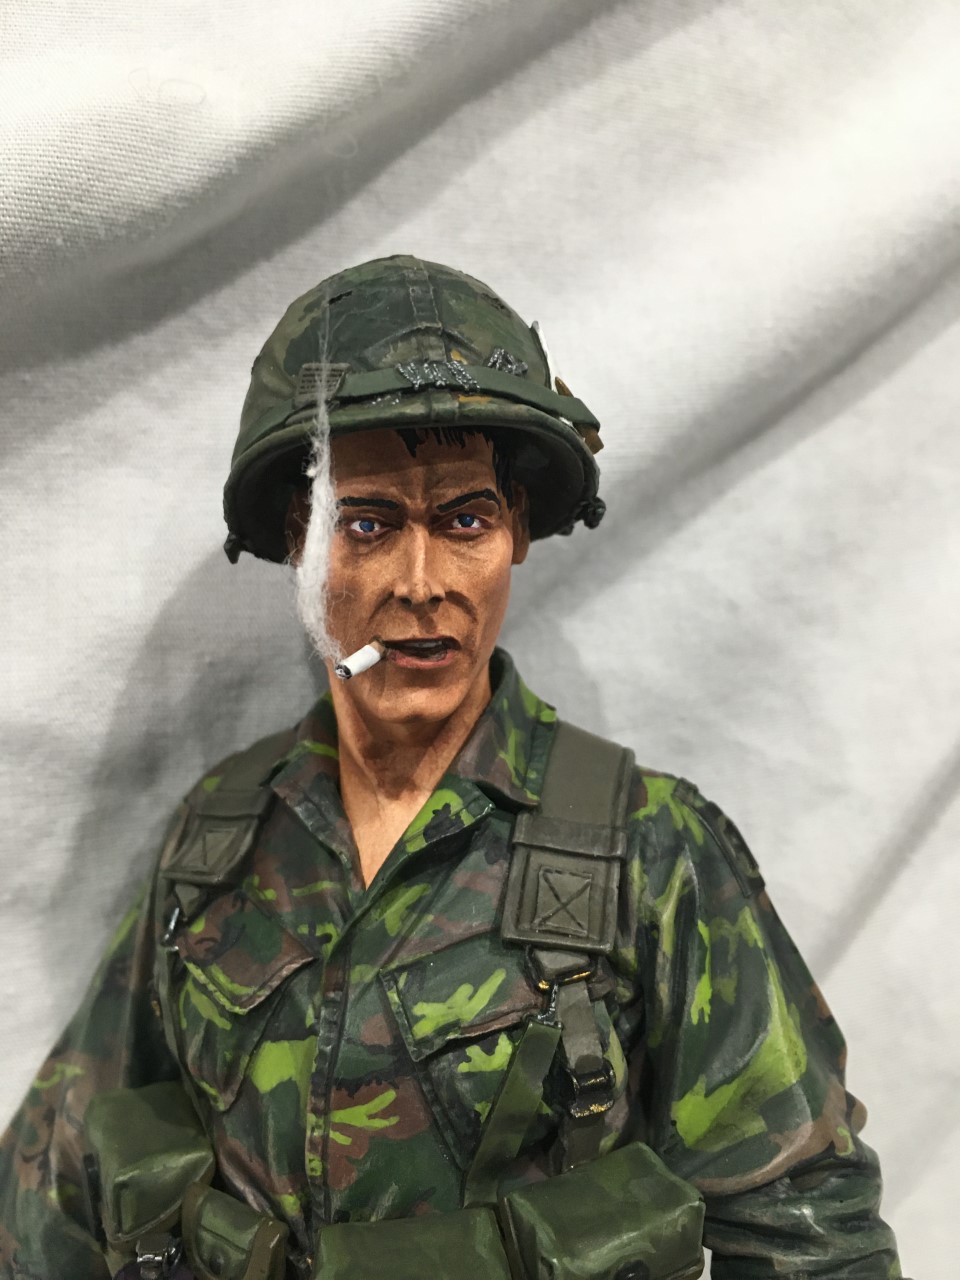
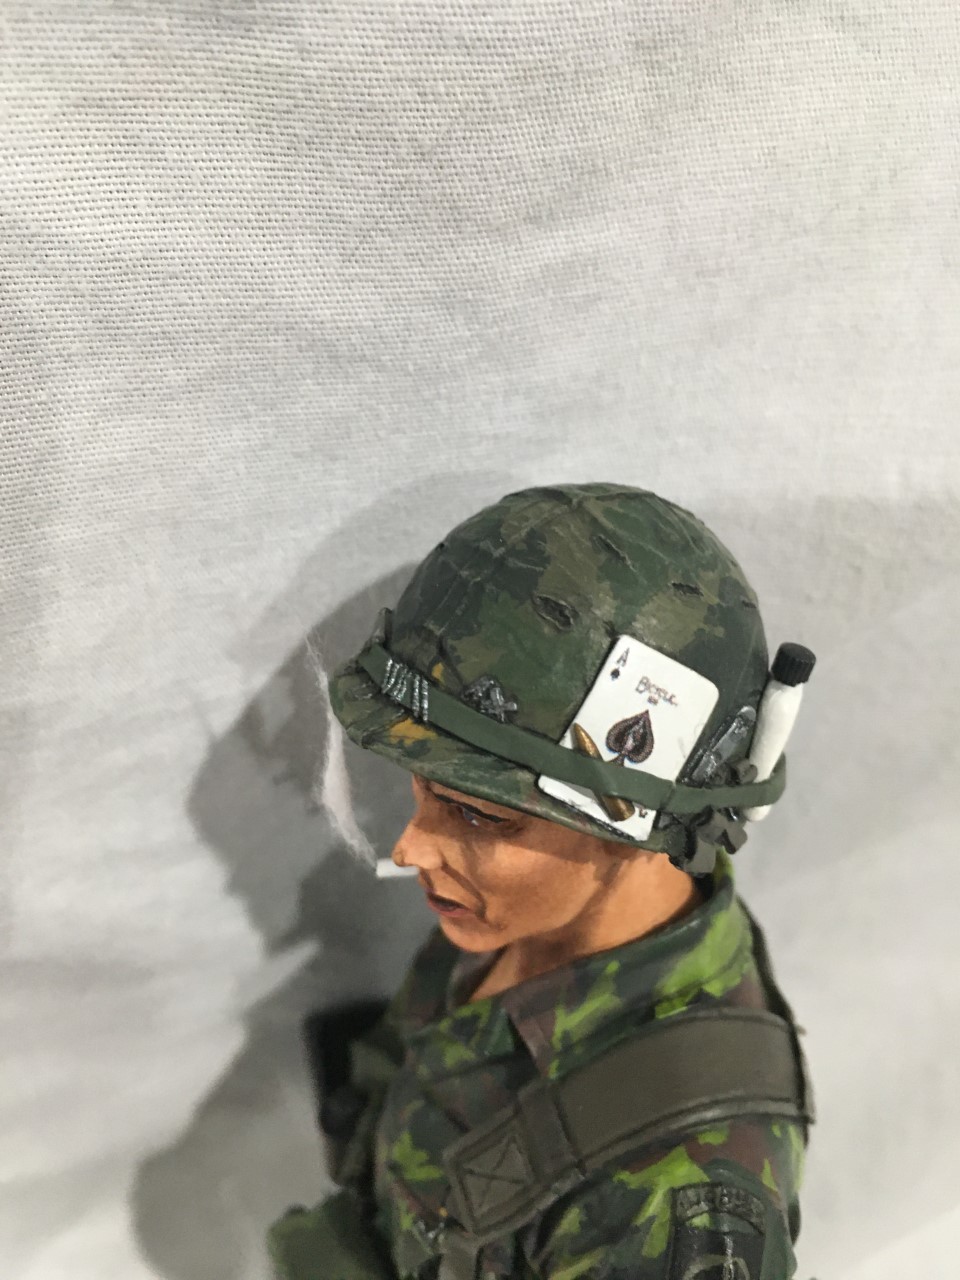
Some final notes on the progress: I painted the head in pastels. I am a true convert to pastels for large scale figure head sculpts. The helmet is a “Nuts Planet” 1/10 scale steel pot for the Charlie Sheen “Platoon” bust. The original Verlinden helmet more closely resembles a WWII Soviet helmet. It’s so ridiculously bad it’s funny. While the helmet itself is beautifully rendered, I’m not a huge fan of the “Nuts Planet” helmet. The grunt with a ton of junk in his helmet band is a cliche. In reality, most grunts only carried a couple of items in their helmet band - if anything at all. The visual of a helmet loaded with playing cards, toilet paper, Rosary beads, bore cleaner, bug juice and matchbooks is aesthetically cool, but it’s a Hollywood affectation that is largely balony.
Very nice work on the ERDL camo. I found the shapes similar to woodland pattern, but the colors are very much different and I think you nailed them, especially the light greenish one.
I also thought ERDL was exclusive to Rangers and LRRPs… learn something new every day.
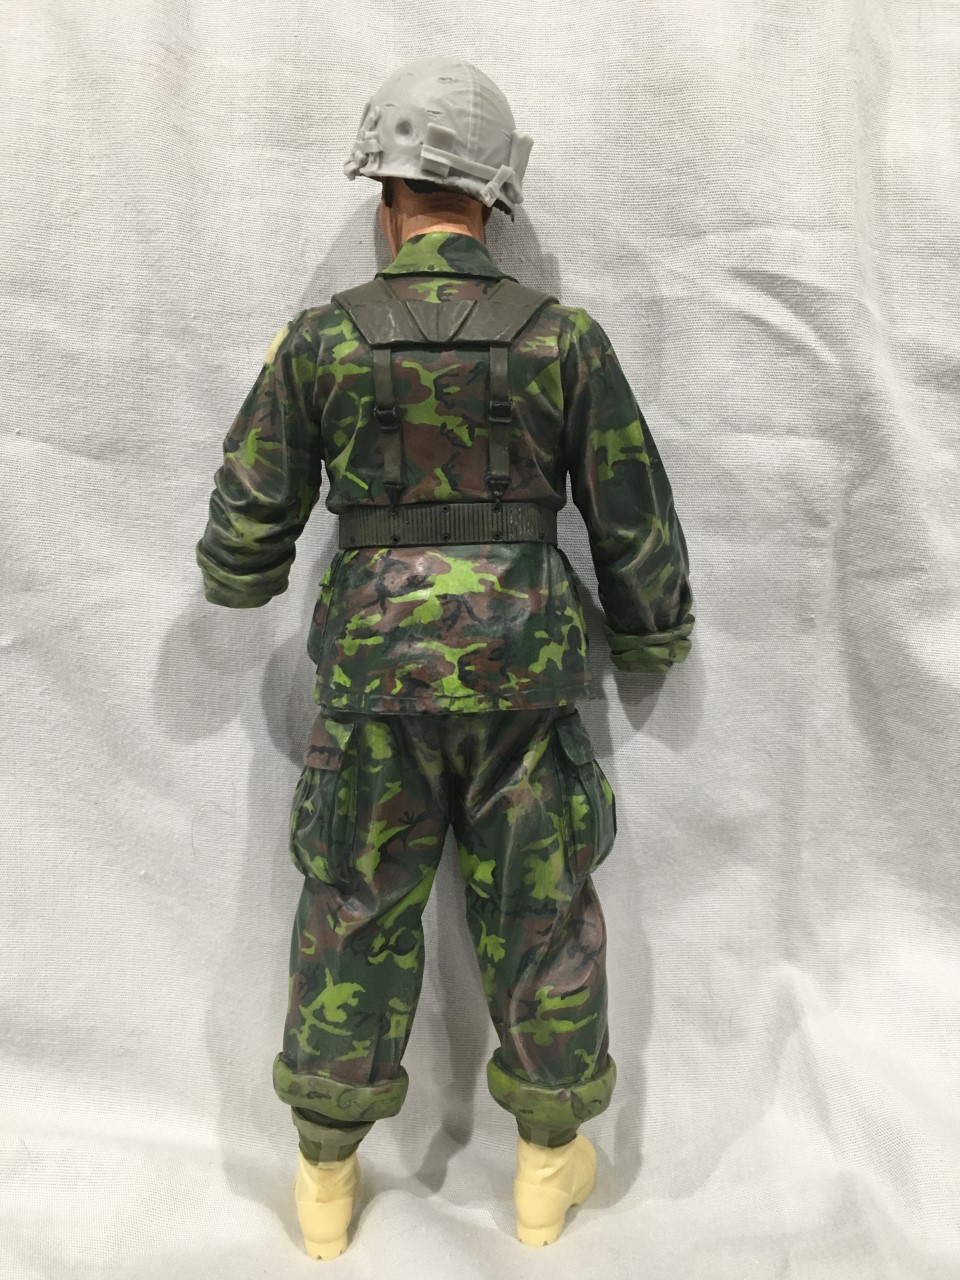
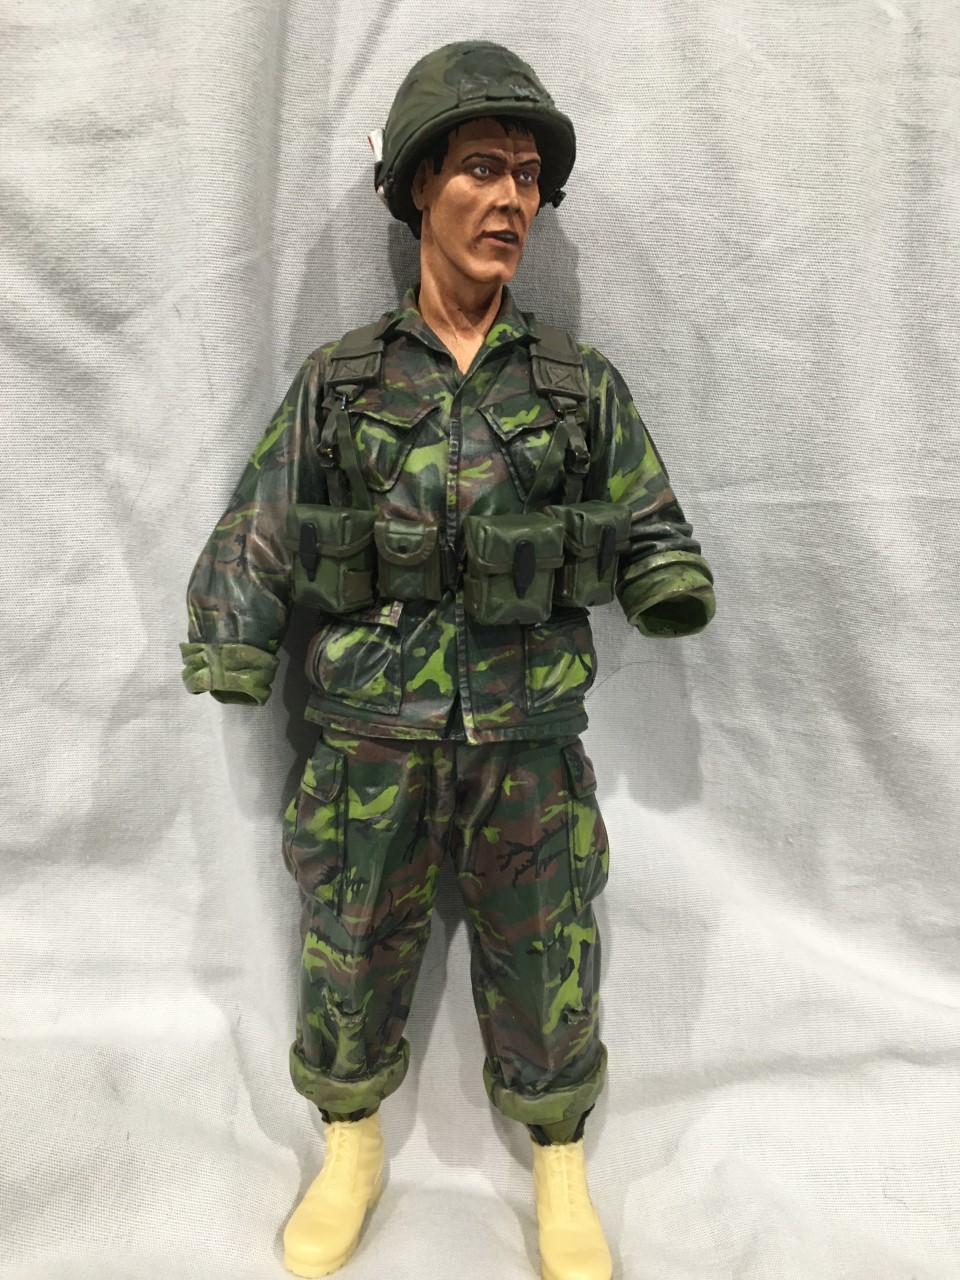
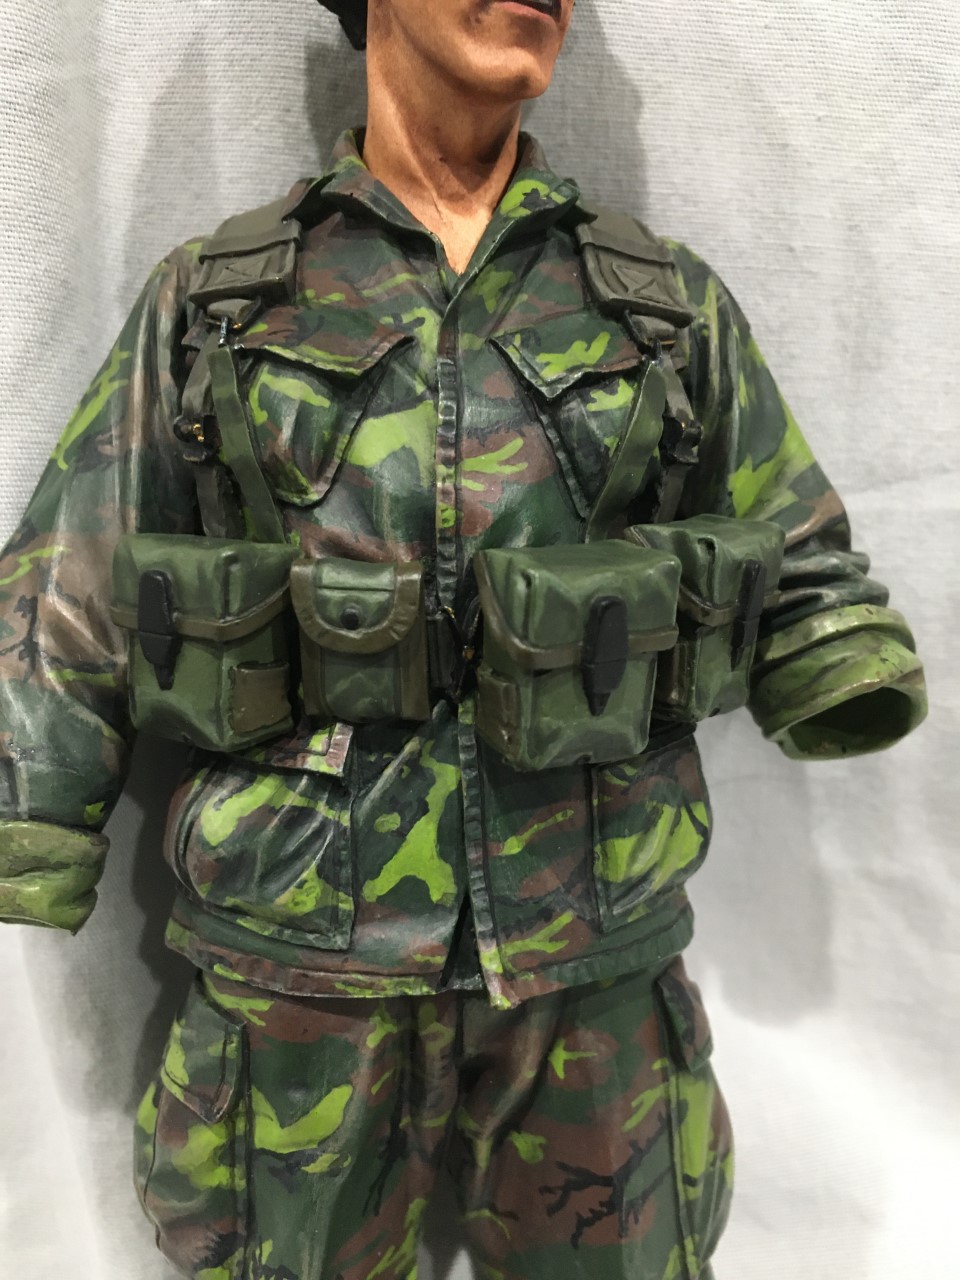
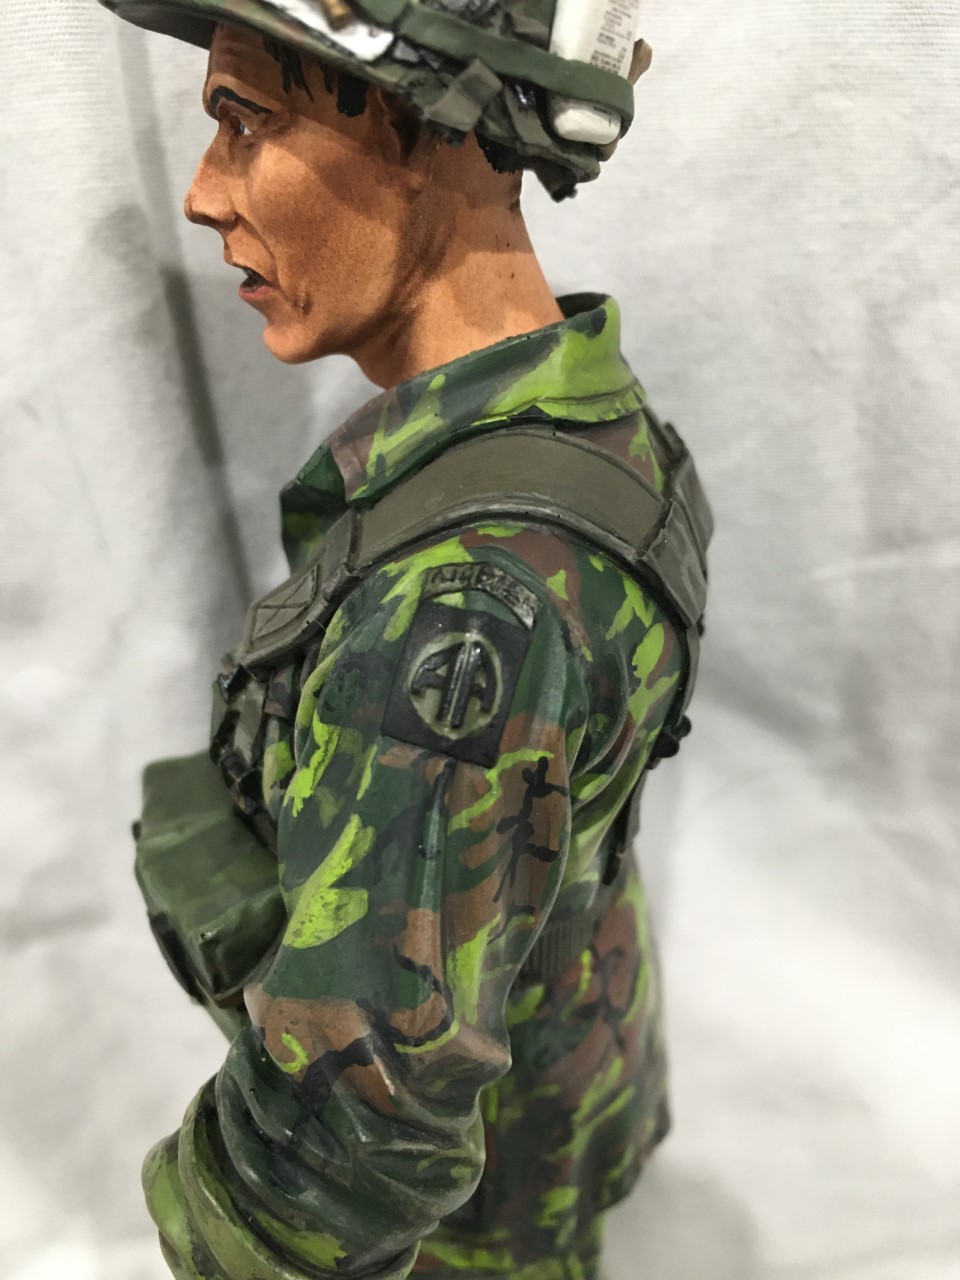
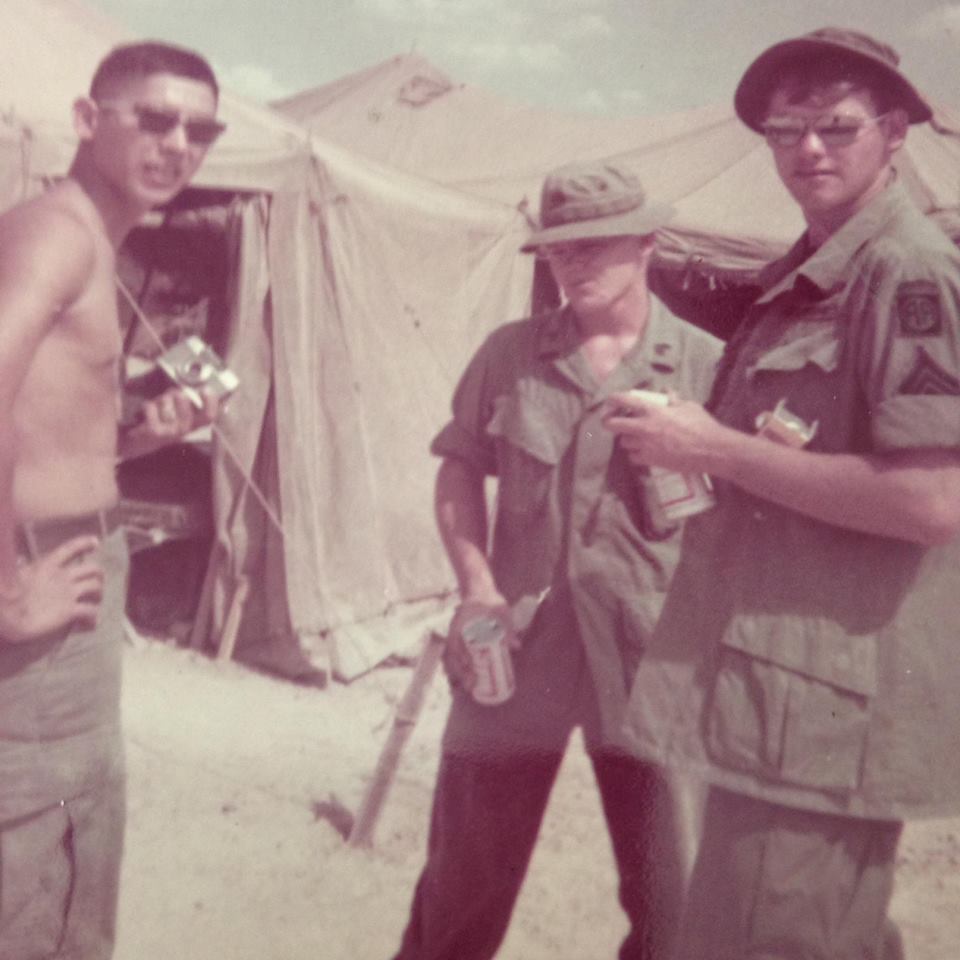
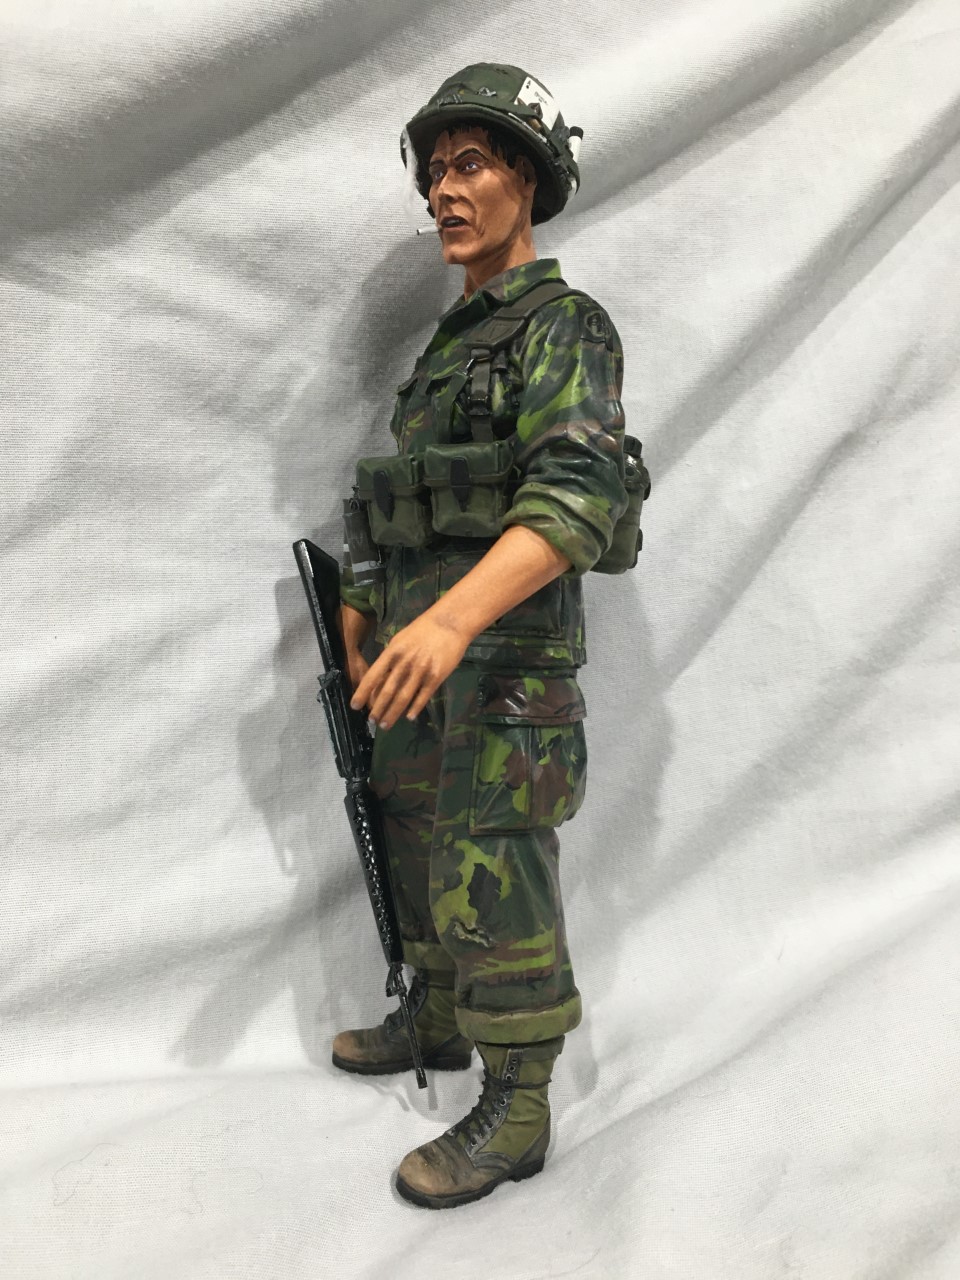
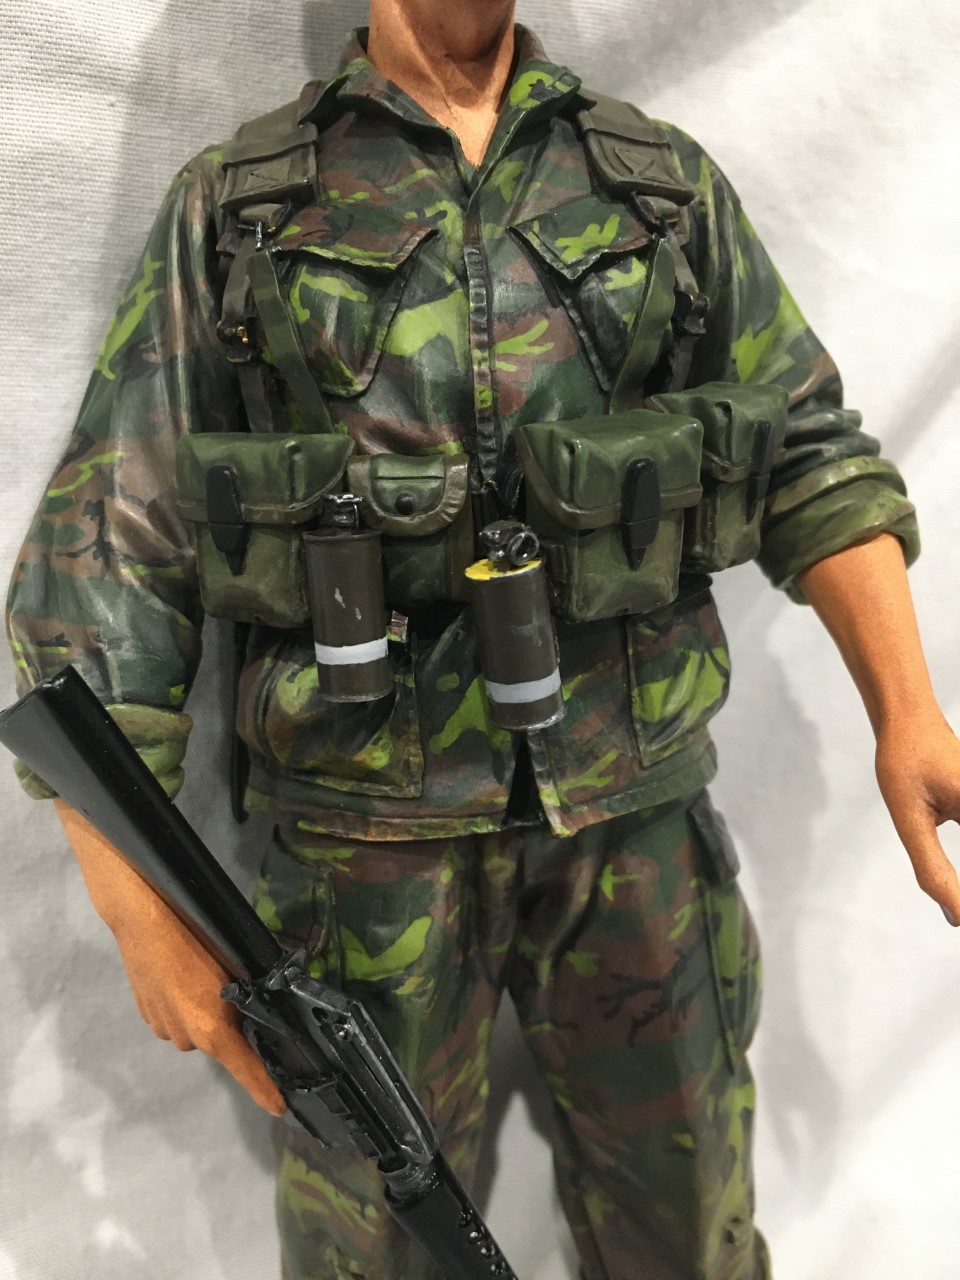
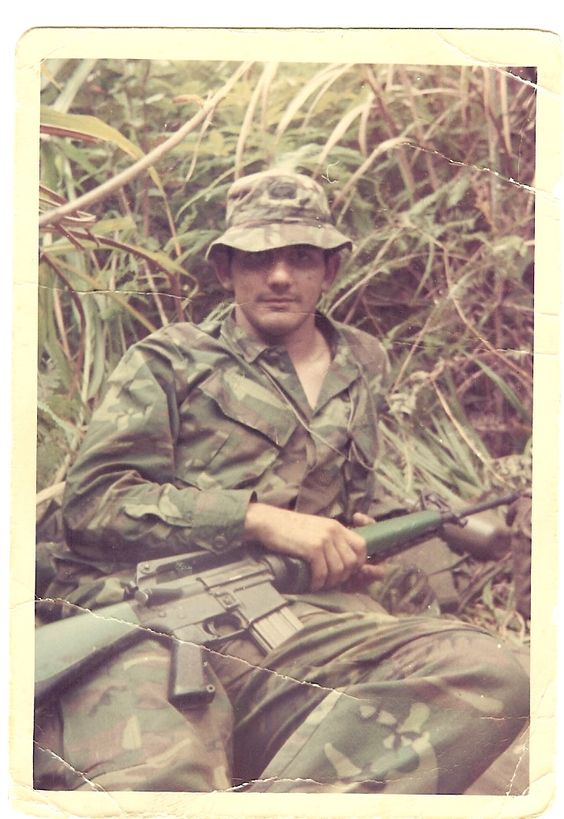
Hello and thank you for the comments and compliments. Here are some update photos. The helmet is 99% done. I need to finish painting the cigarette pack. The printed details on the junk in the helmet band were made possible by the decals provided with the Nuts Planet bust for that purpose. If you are familiar with patches, the 82nd ABN SSI may look off. When researching photos of the 3/82nd’s brief time in Vietnam, I saw the enclosed photo of an NCO with a locally made patch and I thought, “That’s cool!” and more unique than the standard black “AA” on an OD square. In all likelihood, the patch in the period photo was probably made with a square of OD twill and black felt superimposed over that. The ammo pouches are somewhat customized. The figure comes with two M-1967 style ammo pouches, but they are way too long. In reality, the M-1967 20 round magazine pouches are the same length as the magazines. The figure also came with only two pouches. After 1965 no self-respecting grunt went into the bush with only eight magazines (unless it was a very brief firebase perimeter patrol). I didn’t want to scratch build a bandoleer and fit that between the arms and body. So I cast copies of the ammo pouches and cut them down to size. In comparison to the magazine in the figure’s rifle, they are still a tad long but I’m happy with the result. I was going to use four, but the available space on the front of the pistol belt made that infeasible, so I settled on three.
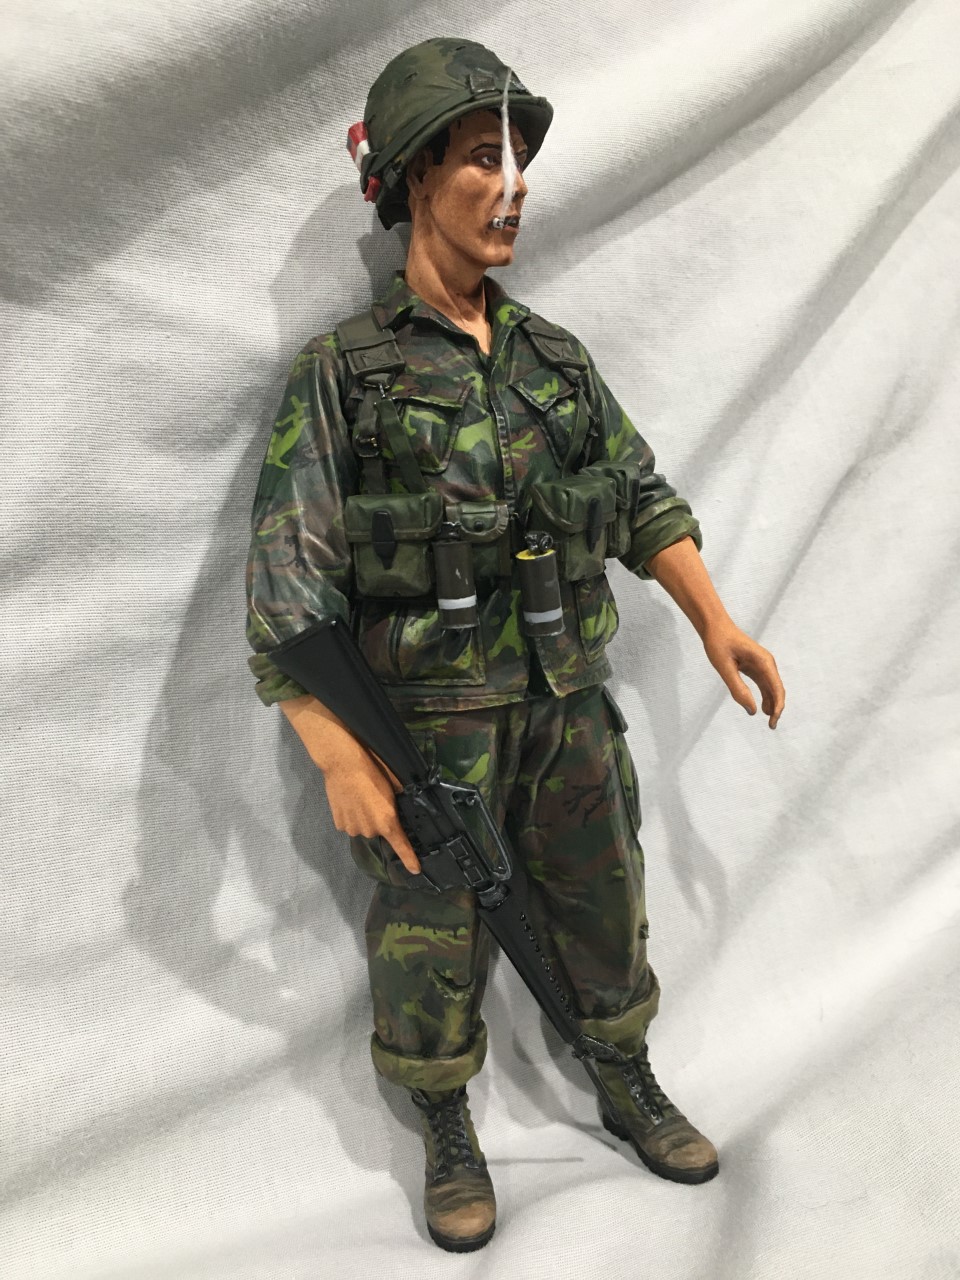
Karl: To answer your question, I used Tamiya Acrylics “Deep Green” for the base coat, Tamiya “NATO Brown” and “Flat Black” and Vallejo “Lime Green”. I’m happy with the result, but upon further reflection, I think next time I do ERDL I’ll tone down the lime color a bit, or find a different brand of lime green. I’m probably one of the few figure painters on here who really dislikes Vallejo acrylics in general. I wanted the uniform’s colors to remain relatively crisp and new looking on this first go around (rather than trying to mimic a heavily faded pattern in which the colors start to look much different), so that’s why I stuck with the straight colors.
Thanks for the info on the color. I understand what you mean about a ‘fresh’ look versus a ‘weathered’ one and I think you have done a great job in terms of making the uniform look relatively new. The gear, insignia and the equipment on the helmet add a nice bit of detail to the figure.
you’ve done a fantastic job on that figure and I see you have opted for the dark version of the ERDL camo rather than the light version, was there a reason for this? also have seen Shelby Stanton book: “uniforms of the Vietnam War” that is an excellent resource.
having recently read a few MACV-SOG books, the ERDL camo uniforms were not popular as they took longer to dry.
I own several items of Vietnam and post Vietnam uniforms in a personal collection. The ERDL stuff is printed on the same ripstop poplin material as the basic green jungle fatigues. That stuff is thin and dries very quickly. I also own several original Tiger stripe items.I bought them before all the reproduction stuff came along. Most of those are made from a heavier cotton twill material that does not dry as quickly as the ripstop poplin material. Although one Tiger Stripe shirt is on a thinner non ripstop poplin material.
Thanks for the comments! I haven’t made enough progress to post new photos yet, but I felt I ought to be courteous and reply.
I haven’t heard that about the ERDL uniforms. Stik is correct, they are the same as the R/S OG-107 jungle fatigues. Most of what I have read regarded the popularity of the camouflage. ERDL is a phenomenal pattern, and special units liked them because they were in the supply system. Tigers had to be purchased privately through local tailors, and even then they had to be found in U.S. (not Asian) sizes. In one of his books, Gary Linderer talked about getting evacuated after being wounded. He pleaded with the hospital staff not to cut his tigers off because he couldn’t just go out and get a new set issued. Most special units (LRRP/Rangers, Force Recon) who had depended on tigers early-mid war switched to ERDL simply because they were an issue item. A ripped set of trousers could be DX’d. There is some debate on the camouflage effectiveness of tigers. But there can be no debate on their cool factor. The only organization that seemed to stick with tigers to the end of the war were Army Special Forces, probably because they are so damned cool and the look defined SF in Vietnam since the advisory period.
An interesting note on the durability of the ERDL’s is that the original prototypes were made in the very light non-R/S poplin that some of the OG-107 uniforms were made. While the camouflage was popular, the units testing the prototypes wanted the uniforms to be heavier and more durable - much like the heavy twill tigers that they were using.
SOG didn’t usually go for camo patterns in general. The nature of their missions dictated the use of uniforms that could lend plausible deniability by the U.S. government. OG-107 jungles, and even twill fatigues or HBT’s were ubiquitous and “sterile” enough to permit them to play that game.
Stik - I have a set of those thin tigers. Those were U.S. contract made on Okinawa late in the war and were available as an “issue” (no NSN) item to Special Forces. They were referred to as “Okinawa paper mache” tigers because they were so thin they would only last a week in the jungle.
Graywolf - Thanks! Without the Nuts Planet decals, that would not have been possible.
Gee wiz, I thought the Dennison Smock Para pattern was tough, you’re a gluten for punishment. I’m not even done with my 2nd figure, still two after that, very time consuming. Great camo work!
Now, you mentioned pastels for the facial work, haven’t looked into that. Isn’t that just another form of acrylic, constantly drying on you , work-ability time is very short? Or am I wrong about all that?
Good to see another Verlinden classic get some paint. Ruck Over bby! Cheers, Ski.
Thank you! Yeah, camo sure has a way of making one appreciate single color uniforms.
I’m glad you asked about pastels. It’s really more like “painting with dust” (as far as this technique goes). I grew up on the Kesslar and Winar “How to Paint Realistic Military Figures” techniques. For me, large scale faces were always a very frustrating hit or miss with their methods of base coats, washes and highlights. It works great for 1/35 and smaller, but with larger scales I always seemed to get five ruined head sculpts for every one that worked out properly. When I got back into scale models, I tried my hand at other techniques, which were more successful but still not getting me what I wanted. Years ago, I was introduced to pastels when I dabbled in 1/6 figures. For a time that was the prevailing method of re-painting such large scale head sculpts. I really enjoyed the painting aspect, but I had very mixed results and put the technique away until relatively recently.
Without going into too much detail, the process involves applying a base coat of acrylic flesh color. You then get artist’s grade pastel sticks (quality matters here) and you grind a fine powder out of them. Using a standard brush, you brush on the powder applying shadows and highlights. The “painting” and blending is a much faster process. But of course, you are left with a head sculpt painted in fine dust. This requires successive applications of a flatte matte pastel fixative to secure the pastels in place. What I love about the pastels is that they provide a very soft, natural, flesh like tone and texture. They are much easier to blend for fine points of transition between shadows and highlights without worrying whether your wash or tint is too watery or too thick. It’s very easy to apply something like a five 'o clock shadow as well. Of course, eyes, eyebrows and hair are all still done with standard acrylic techniques. The most complicated part is applying the fixative. This is what ruined many of my 1/6 head sculpts years ago. I lacked experience applying matte sealants and varnishes. I didn’t know there was a specific sealant for pastels and I was prone to using too much at the wrong temperature and humidity. After testing and practice, I learned how to apply the fixative after successive layers of pastel painting. From here on out, I will probably only use pastels for large scale head sculpts and other areas of exposed flesh.
Thanks again for the comments! I hope to post more updates this weekend.
Thanks for that explanation, sounds like you got it dialed in, and I had no clue, lol. I’m an oiler and old habits die hard, but I can appreciate your passion for the process, using pastels. That’s why this hobby is so much fun, there’s just too many variables to ever get bored!
Here I am, many months after I said I would post an update, and I am finally done. Whenever I made some progress I didn’t have the time to post, and a couple of life events transpired between the last post and now.
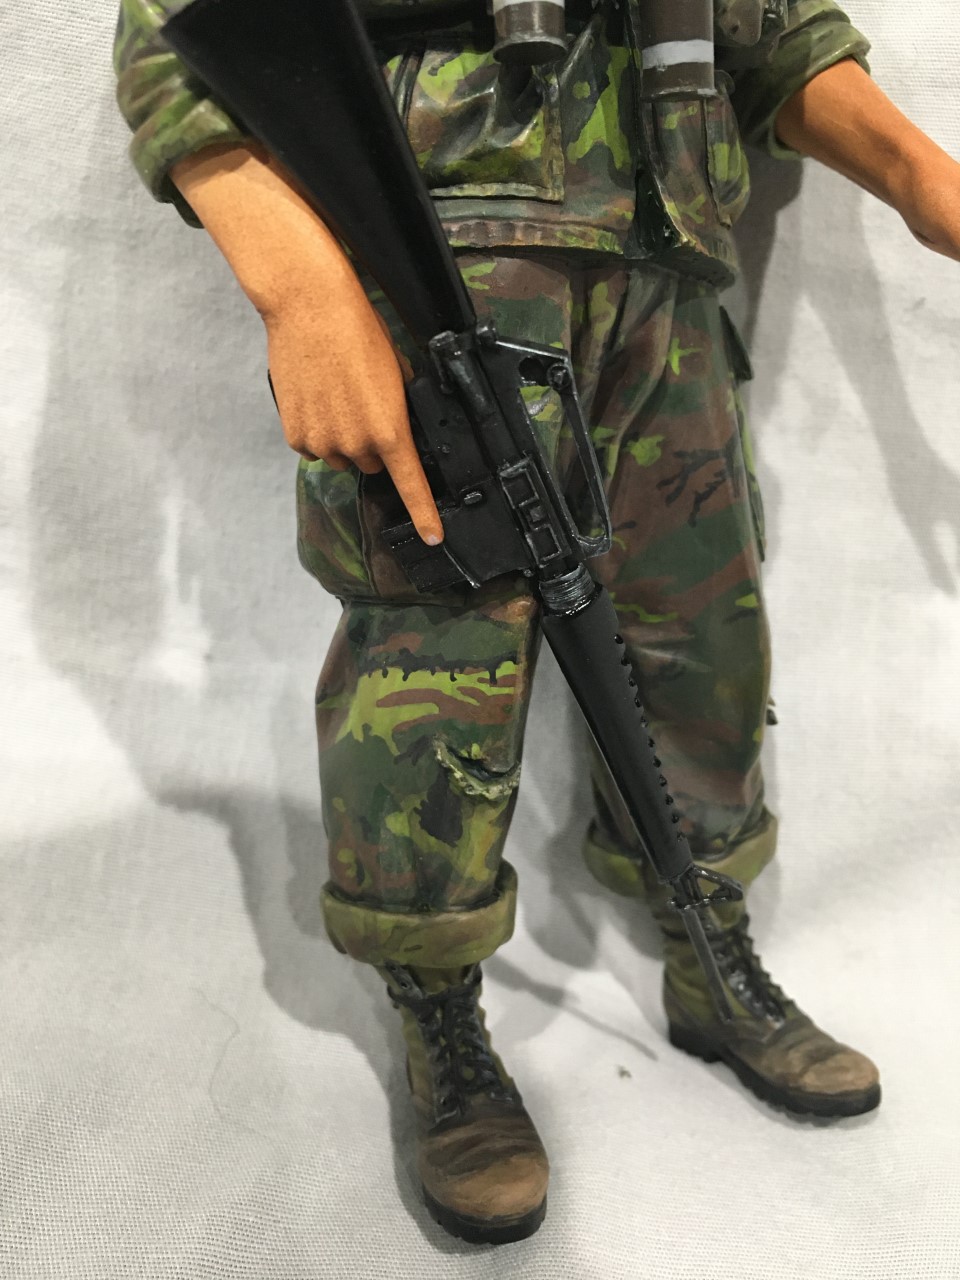
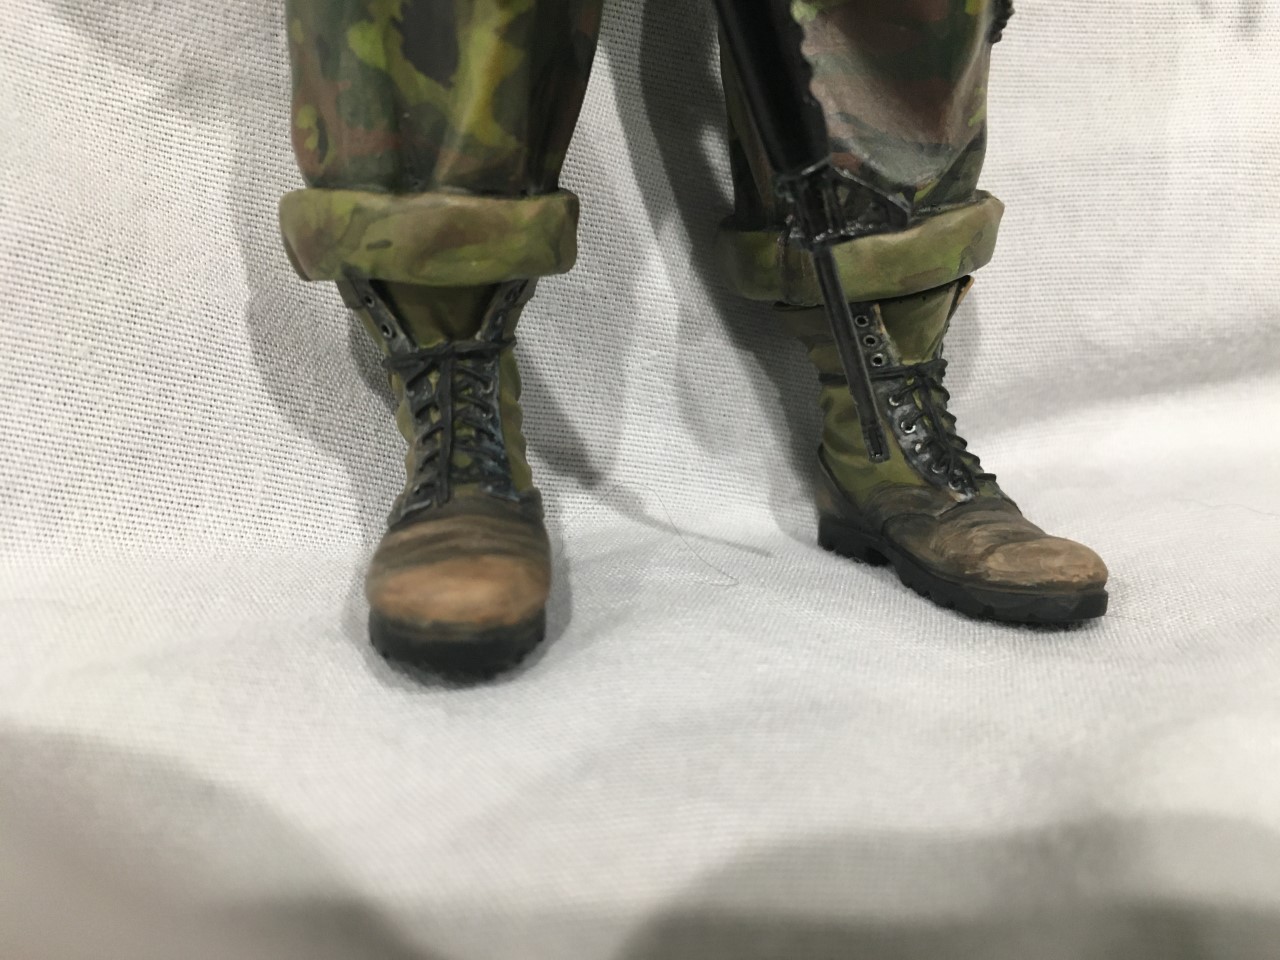
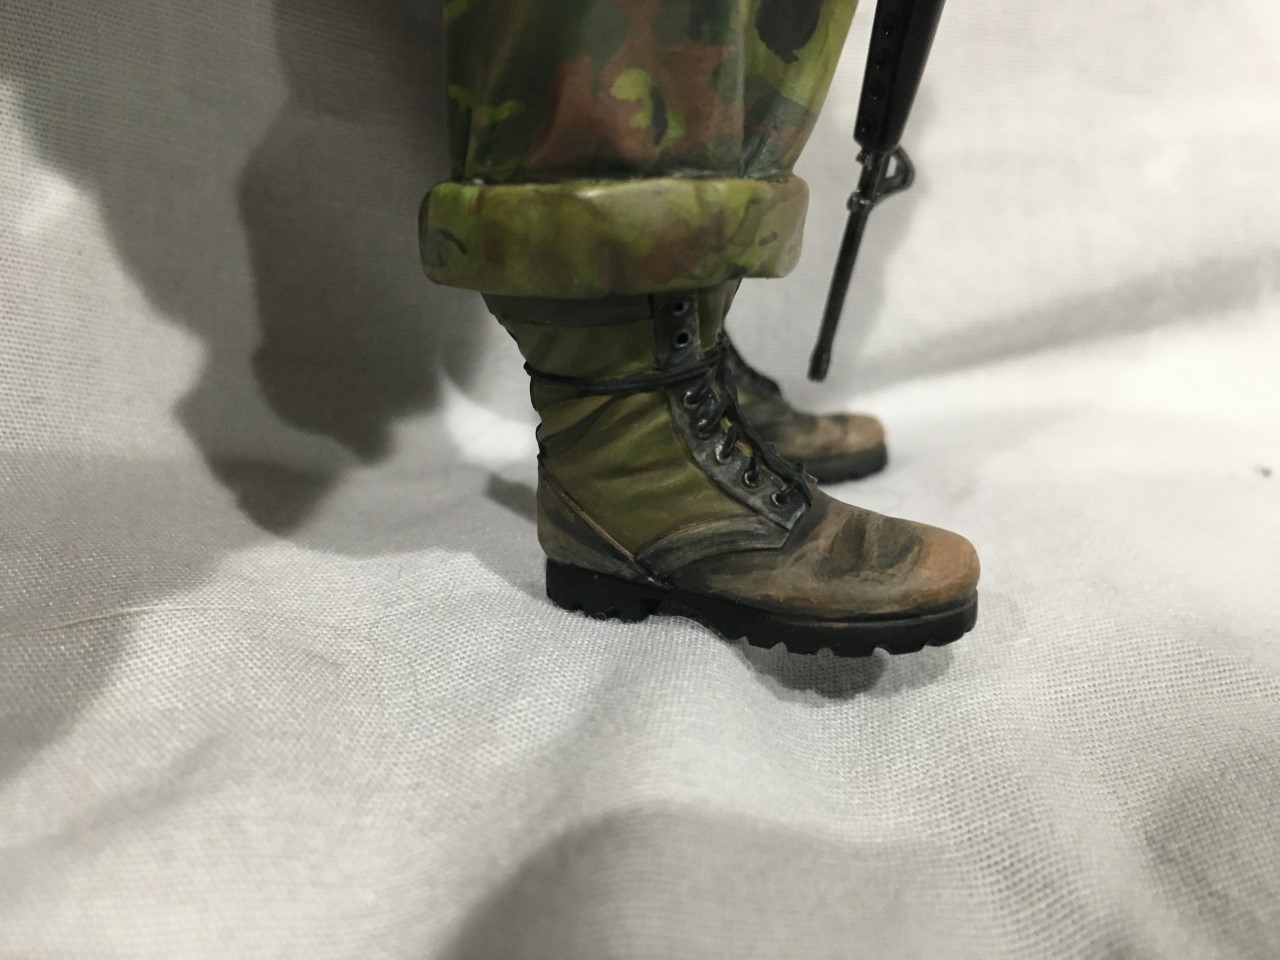
Most unfortunately, in typical Verlinden fashion, there are inexplicable inaccuracies that I was unwilling to fix, or only partially able to fix. I boggles me that Verlinden persisted with producing M-16 series rifles with slab side lowers, as though their only reference point were early civilian Colt SP-1 AR-15’s. I was unwilling to try and create a fence for the lower and no one makes a more accurate version in this scale. The M-1967 canteen pouches that are modeled are inaccurate. The model’s pouches feature the horizontal stitching, which wasn’t added until the early 1970’s when the LC-1 pouches were reinforced to prevent wear by the canteen cup. I figured that this was an obscure enough bit of gear history that few would know to call it out, and I didn’t think of a way to feasible fill in the horizontal lines without ruining the vertical lines. Finally, the model’s boots were produced without the nylon ankle reinforcements or even the horizontal nylon band at the top. The lack of both was inexcusable, so I used lead foil to create the horizontal band at the top in order to make them 2nd model boots. While technically not common by 1969, the 82nd ABN troopers would have had access to surplus jungle boots at Ft. Bragg prior to deployment.
I was right outside of Chu Lai when the 82nd came in on a constant stream of C141’s. They all wore standard green jungle fatigues. Rifles were brand new forward assist M16’s. The literally looked just like every other FNG in I-Corp. They brought all sorts of equipment that would wind up in a pile somewhere (even washing machines and dryers!). We all just smiled and went on about our business as we hadn’t been there all that much longer too. They had several little mules to haul stuff on and promptly took them out on Highway One (during the tail end of Tet). They told them not to go out there, and they told them to mind their own business. A day or so later they had their first KIA’s when a mule hit a mine. Why they came in thru Chu Lai is strange, they should have gone in thru Pleiku as it was much closer to where the ended up. Still it was the single biggest dog & pony show I’ve ever saw.
the bug juice bottle is huge. Real ones were about 30mm wide by 50mm tall and maybe 12mm thick. Bugs got fat off the stuff, but was good for leeches and fighting ring worm during the monsoon.
After the 82nd get going down south, they started a LRRP company, and they wore a lot of Tiger Stripes and standard green. But were never outfitted like SF and SOG. The card in the guy’s hat band should have the 82nd logo on it and be a standard playing card size. I honestly only saw one unit ever use the cards, but also makes a great story later.
gary
I think your work on the figure is excellent- brining it to a much more accurate standard. I also have to commend your extremely fine detail painting- from the various helmet items down to the grenades and boots it all looks superb. There is one thing that is strange and maybe its just the lighting but several areas seem to have a slight sheen to them- now perhaps you are going for a rain drenched look in which case it works but if not then I would suggest going over the figure with some matt varnish to knock the sheen off a bit. Just my two cents.
I believe I hinted earlier that my driving motivation behind this build wasn’t necessarily to portray the typical 3/82nd ABN grunt, but it was to try my hand at the ERDL pattern. I wanted to go “big”. When digging through my cupboard of boxed figures, I settled on this guy because I always wanted to go “really big”. Unfortunately, outside of Verlinden 200mm Giant Scale figures and the handful of busts available, there isn’t much material to customize or even fix a Vietnam War character in this scale. To compound the error, three separate model manufacturers essentially created this same figure with minor variations in either 120mm or 200mm (Kirin, SOL and Verlinden - of which Verlinden essentially produced this figure in three separate forms). They are all of a standing 82nd ABN grunt with either a helmet on or off. Both SOL and Verlinden made them in 200mm and they all have M-1967 pouches. There seems to have been an affinity for tying the 82nd to the M-1967 gear. Another SOL offering of a 200mm topless “girl grunt” in Vietnam had M-1956 web gear, but that web gear was so bad as to be unusable and the helmet was way out of scale.
I figured an 82nd paratrooper late in the 3 BDE’s tenure in Vietnam wearing ERDL wasn’t too far outside the realm of possibility.
Gary - I appreciate the story. Thank you for telling it and “Welcome Home”. The playing card print was a decal that came with the “Nuts Planet” bust. As much as I may like a challenge when it comes to painting, I definitely couldn’t hand paint an ace of spades at that level of fidelity - nor an 82nd death card. Likewise, the Winston cigarette pack, the bug juice label and the writing on the matches were all decals.
Karl - The sheen you mentioned has been a consistent problem for me. A friend made the same comment on figures I completed a few years ago when I sent the photos to him privately. It is, partially, the lighting. This setup is an ad-hoc way for me to get decent photos out quickly. The colors aren’t so bright in person, but they are, sadly, still a bit shiny. When I started modeling in the 90’s, I used Polly-S paints and never had a problem with excess gloss. Now that those are gone, I’m stuck with Vallejo, Tamiya and Testors acrylics. I don’t like any of those as much as I liked Polly-S, both for the quality and consistency of the paint and the color range. Out of the three, I prefer Tamiya and as I stated in an earlier post, I’m probably one of the few figure painters who generally dislikes Vallejo. Testors acrylics do have a noticeable gloss in all their colors and I minimize my use of their paints. Regardless, your point is taken. I’ve grown more comfortable with matte sprays after getting more experience with using them to finish wargaming miniatures, but I’m still a bit leery of the results from spraying an entire large scale figure. If you have any tips on reducing the glossy sheen from the paint, or on using matte sprays I’d love to hear them.
I hear what you are saying about different paint brands- some will produce a satin finish, others matt and sometimes some brands end up somewhere in between! I recently got a tip from a modeller here about a paint brand I am using that is a little too matt for skin tones so its something I’ve been looking at recently.
As you mentioned spraying on matt varnish I can say I agree with you here, I too feel wary about spraying a large figure with varnish. I have found that AK Ultra Matt varnish is very easy to paint on- it flows very nicely off the brush and can cover 1/10 bust torsos very quickly and efficiently. Spraying it needs a bit of restraint with the paint flow but it works well here too. Vallejo make a very nice Satin Varnish which needs diluting for both brush and airbrush- and they have a nice Gloss too.
I have recently been using Scale 75 Artist Acrylics- these are in a tube and very nice to use- they dry very matt too which helps for military colors. I hope one or two of these recommendations helps you out a bit.
Just realised I forgot to ask about the cigarette smoke- did you do that with cotton wool and how did you get it to stand up on the cigarette like that?