Wheels of the Union Jack and Tricolore - Oct '21 to March '22

@md72 , great to see you making a start here Mark! I had pretty much exactly the same seams all around the shell on my build as well, even across the rear end!

The panels on the rear pillars are fuel filler doors, one on each side.


They are not present on either side of my kit shell, so maybe I got the new electric version :thinking:

Looks like there’s not much detail on the plate that sits in the vent on the front guard. My kit has the outer chrome strip moulded to the body, but nothing behind it.

Cheers, D

Some more progress on the Lotus -
Underside of monocoque dressed off and shot with rattle can high build primer - a little more work to do on some seams but that can be done later…


The kit gear lever and it’s well looked nothing like the original so scratch building of lever , well and linkage was needed . Lever is straight pin with knob of epoxy putty.
Linkage made of brass shim , rod and epoxy putty.
Well is sheet styrene.


Lenses for instruments made of .010” clear styrene by scribing with needle and circle template then cutting out with scissors.

Interior almost ready for paint.
Thanks for looking !

1 Like

Interior largely done - sidewalls painted grey .
Box at bottom of tub under dash done with aluminum foil .
Seat and gear lever well Tamiya semi gloss black .
Dash flat black and bezels/switches picked out with silver permanent marker . Instrument lenses of clear styrene set with Future . Knob on gear lever base color sand yellow - woodgrained with burnt umber oil paint . Lotus emblem on top painted with yellow and green - Future clear coat over all.
I purchased another set of Tamiya rivets as used on my RC 166 motorcycle build and used them on dash , gear lever well , sidewalls and seat .


Now on to stripping chrome and starting suspension.

2 Likes

Beginning to sort out the issues of the ill fitting coaming .
In addition to the poor fit there is next to no contact area down each side between the monocoque and the coaming , making it difficult to get a strong joint .
Gaps filled with sheet styrene. Going to need Archer resin rivet decals to replace rivet detail after filling and sanding.


@Joel_W
This is the high build primer I am using …

Stripping chrome with stuff I use in my parts washer - it removes some paint finishes as well …

Very nice progress Richard, the interior has come up really nicely! Great tip using the silver marker for the bezels. I have used red and yellow markers for the needles in the gauges.
Looks like you’ve got the body fit issues well under control also.

Cheers, D

1 Like

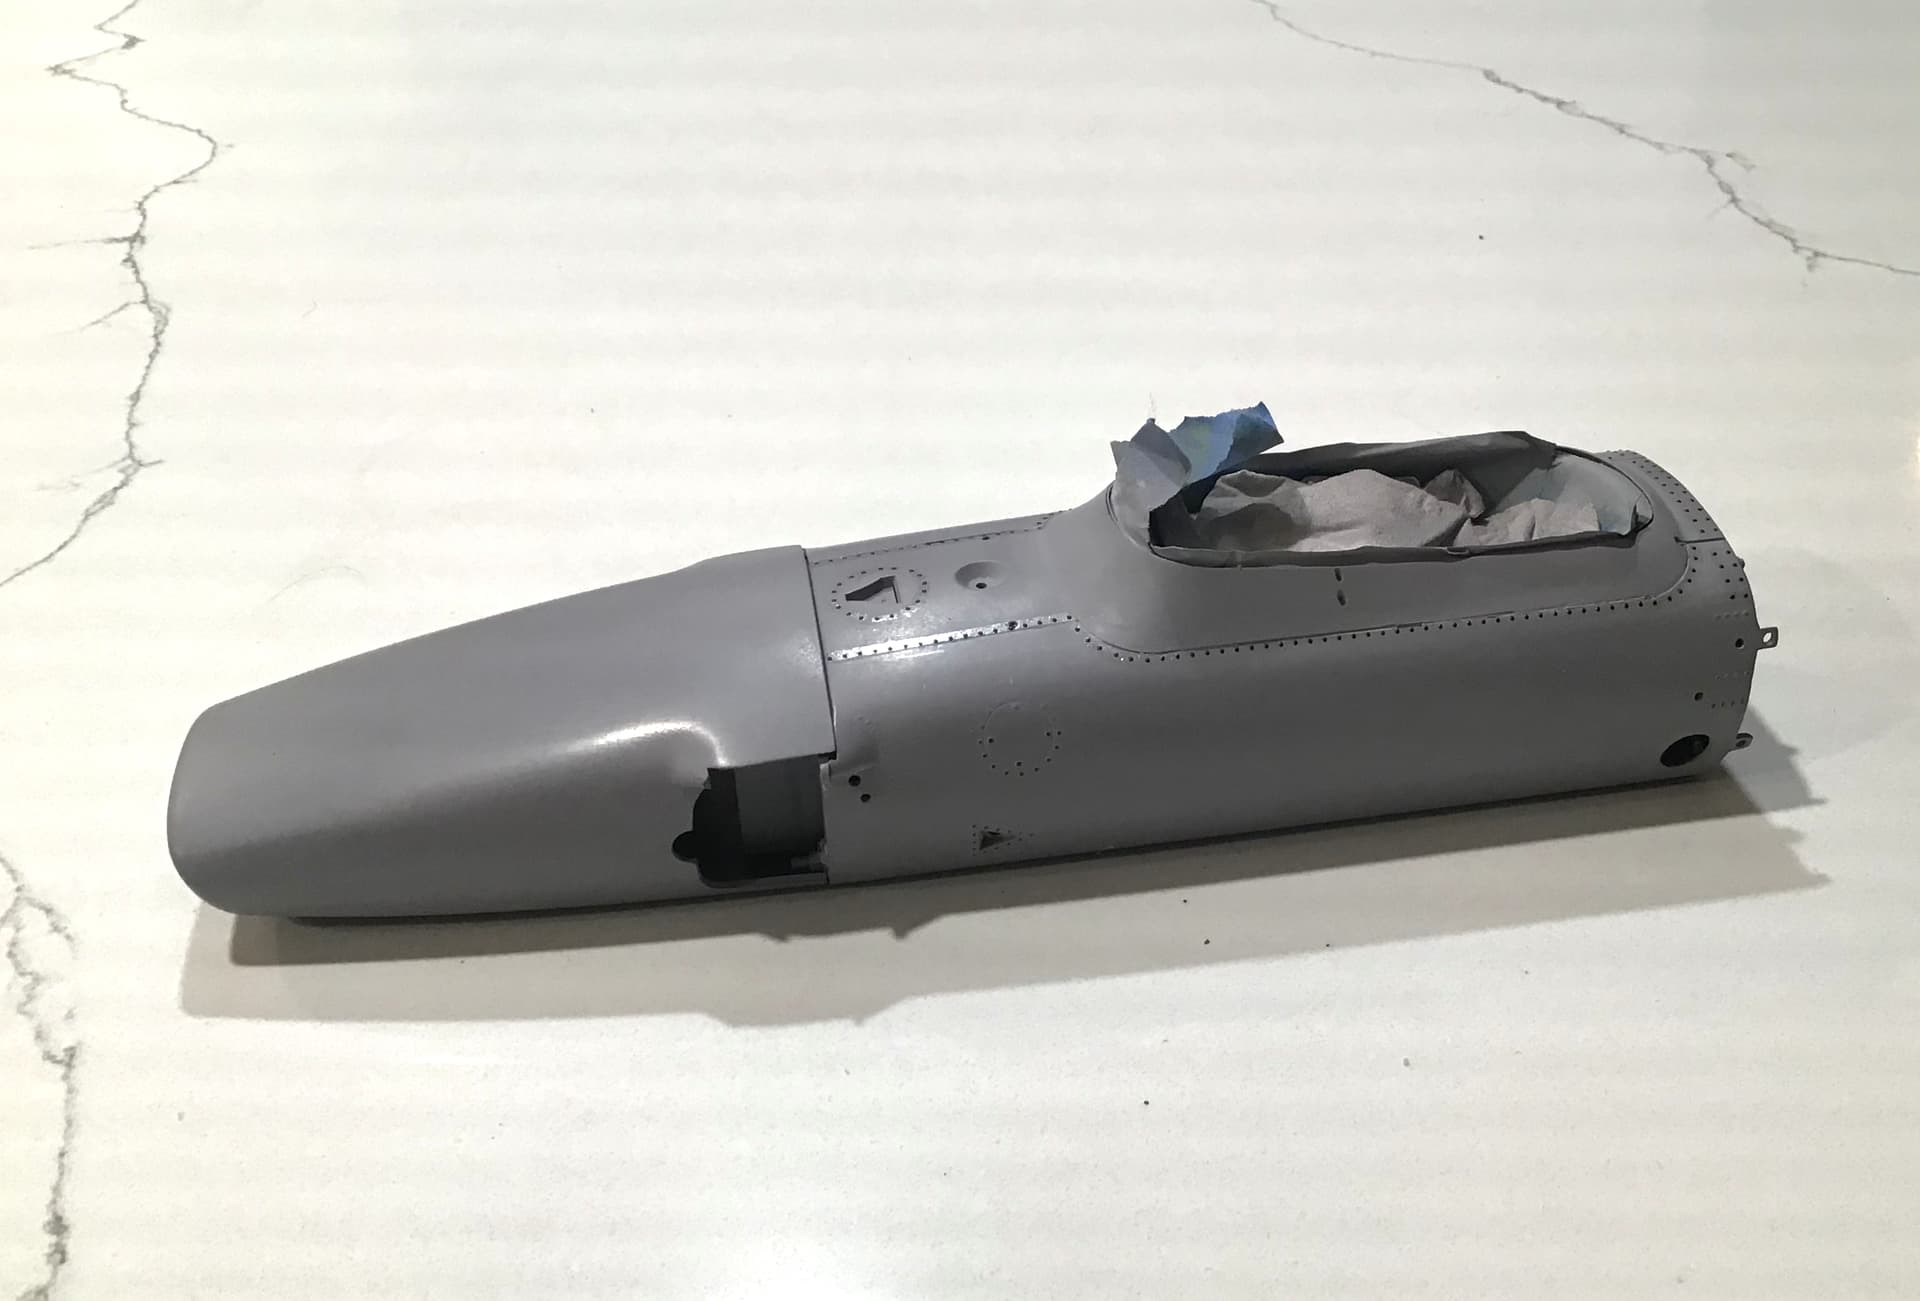
Body work largely done . Cockpit coaming tuned up as best I can - total PITA . Primed and blocked out and rivet detail lost to sanding replaced with Archer resin rivet decals. If anyone needs to do the same I used their O scale (1/48) set # AR88032. Rivet size and spacing matched the kit molded on rivets nearly perfectly.
Nose cone primed and blocked out as well .


Engine nearly complete - I will need to find some clear tube for the fuel lines to replace the ancient stuff that came with the kit as it went hard and brittle . I may try monofilament if I can source the right diameter.

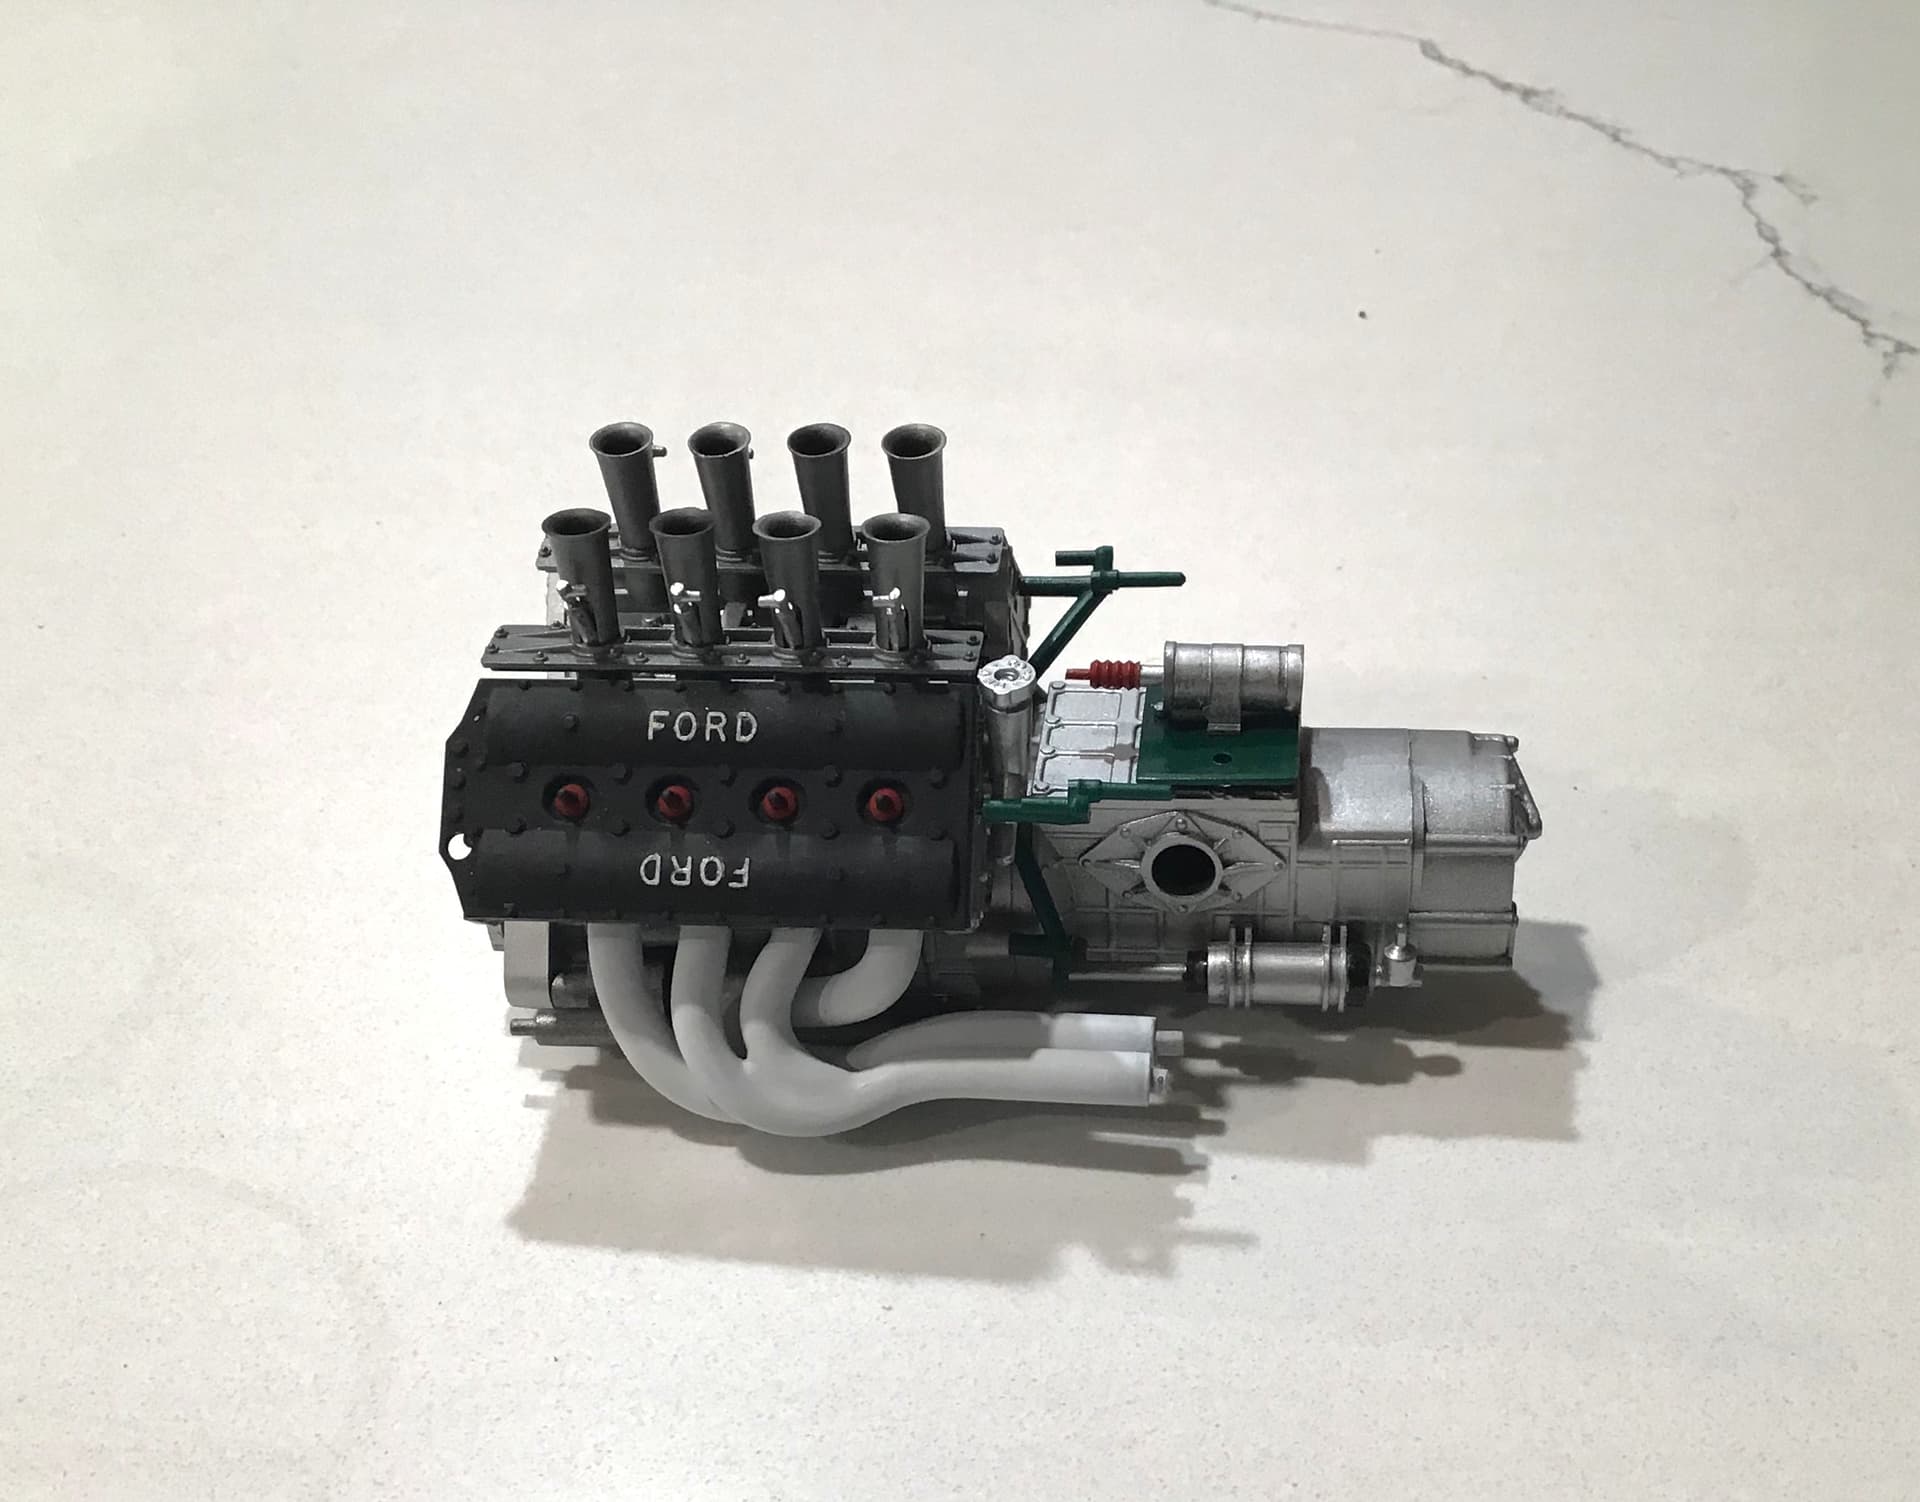
For the benefit of Damian I tried to make the Ford lettering on the cam covers ( of the longest lived and most successful F1 engine in history ) look like the Chevrolet Bow tie but the paint brush would not obey … :grinning_face_with_smiling_eyes:
tee - hee
Cheers - Richard

2 Likes

British Racing Green paint on. SMS lacquer is pitched as being ready to spray from the bottle but I couldn’t make it behave and had to thin it nearly 50/50 to get it to lay on nicely.
The Indycal decals also did not fit . Perhaps it was my mistake in assuming they were engineered for the Tamiya kit . The only other 1/12 Lotus 49 kit that I am aware of is the MFH kit and at nearly $800. I can’t imagine there are many people buying aftermarket decals for it , especially since it comes with these markings and it is also apparently sold out . I suspect that the decals are generic and since they are offered in multiple scales they are simply enlarged or reduced as needed and not specific to any kit . If this is the case it is a shame because it would have been far better to have them too long and cut back as needed rather than have unsightly patches which is what I had to do . I will compliment them however in that they are thin , tough and settle down beautifully with Microsol.


Cosworth Ford DFV plumbed and wired. I wound up using Monofilament for the fuel lines to the injectors and leftover black tubing from the RC 166 build for the ignition wires as the 50 year old material in the kit was unusable .
If a 1/12 scale Colin Chapman should appear I may be in for one of his tirades as I don’t know the firing order and consequently the fuel and spark may not be happening in the right place and at the right time .
The tubing from the motorcycle kit was also smaller and more in scale. Tamiya supplies black tubing for the coolant hoses but the line from the rear of the right cylinder bank to the expansion tank was hard pipe on the real car so that was scratch built using a piece of sprue.

2 Likes


RDT1953

16h

And here is the state of mine - paint largely done - 2 coats SMS BRG - decals - 3 coats SMS gloss clear .
Only rubbing out done was primer and first coat green - afraid of losing rivet detail . Decal edges showing a bit and in the interest of full disclosure I got the Team Lotus decals on the wrong sides - the short line should be at rear by number roundel .
As the nose cone will be permanently attached I did not bother with paint / details that won’t be seen. Rear bulkhead and front bulkhead done with foil .
Wheel centers Tamiya semi gloss black. Wheel nuts and all suspension components except uprights are Alclad Hi Shine Aluminum over Tamiya gloss black . Wheels Alclad Aluminum over Stynylrez Black Primer .

Thanks for looking !

1 Reply

1

Reply

3 Likes

That’s a great outcome given the hurdles you’ve faced Richard. And potentially good practice for your Alfetta.

cheers
Michael

Thanks Michael- PM sent re: Alfetta availability

Hi Richard, your review swayed me to pull the trigger and I think it was the last, a 159M since I did see they had gone out of stock. So glad I did.

cheers
Michael

1 Like

Good on you - glad I got mine when I did .
I see they are working on a Ferrari Barchetta - that is appealing.

The Barchetta does look nice but I wonder about the detail they shown so far. Are pistons and valves necessary in something that would almost certainly be closed. I think I would just assemble the engine block w/o the interior.
cheers
Michael

1 Like

I thought the same . I think their Ford Cosworth DFV has operating crank , pistons and cams but not the valves.
I would not bother with any of that except as an exercise to see how well you could make it work . I don’t think kit would be very durable either, white metal being a bit on the soft side.
I actually am eyeing up their 1/12 Ferrari TR curbside kit .

Here’s a TR kit you maybe interested in, may be more than you want to spend!
https://autorestorations.co.nz/project/ferrari-testa-rossa-representation/
The slide show is worth perusing

cheers
Michael

1 Like

Wow ! Thanks for sharing that . Very impressive work .
I was glad to see a hand beaten aluminum body rathe4 than fiberglass. I wonder what it cost .

Finish line in sight - coolant pipe down left side needs prime and paint. Tamiya would have rubber hoses at both ends bot the real car had hard pipe elbow at front that led inside nose cone until it got close to radiator. Elbow fabricated out of brass tube .
Tamiya also omitted the two lines from the fuel pump at the bottom rear. Left side of the tub . Brass pins set in pump inlet/outlet and hoses added.
remaining are Talbot mirrors , windscreen, final exhaust.


Thanks for looking! RT

3 Likes

OK, I’m off and crawling, whipped the DB 5 out tonight and highlighted the flash.
It’s gonna take me a lot of effort to get close to RDT’s finish on that Lotus. :sweat:


Just for comparison here’s D’s DB 5.

This could take awhile. :wave:

1 Like

Calling this one done. A struggle all the way.
I could have carried it a bit further - rear brake lines missing - another Tamiya oddity as they included the front lines. The windscreen had a sprue gate smack in the middle of the top edge - I polished it out and then broke it in half - sigh …
All in all I learned some things - mostly painting in big scale and working with SMS & Alclad lacquers so a worthwhile effort in that respect. I guess the biggest obstacle was between my ears - with all it’s faults I just didn’t think the kit was worth all the effort. Some things suffer by comparison and I had just finished Tamiya’s RC 166 kit which was excellent in every way. Perhaps my attitude would have been better if I had done the Lotus first - who knows ? Anyway , here it is .


I tried Indycals, Spotmodel and Hiroboy looking for a set of Joel Wilstein handprint decals for the coaming but everyone was sold out - a hot item it seems :wink:
So thanks everyone for the interest and help - now on to the MFH Alfetta!
Cheers- RT

3 Likes

Humble apologies for the delay in replying to your completion post here Richard @RDT1953 , real life has knocked me around for several months now but hopefully I’m back on track to get things moving again.

Great result on your build for all of the pitfalls you have described, it turned out really nicely indeed! Thanks for joining the Group Build, and congratulations on crossing the finish line well in front of the rest of the pack!

Good to hear that you gave the SMS paints a shot as well (the owner of the company is a friend of mine), and I totally agree with you that they perform better with a bit of thinner rather than straight from the bottle. I usually add a few drops of MLT to the airbrush cup before and after adding the paint, so probably about 15-20% thinner in the end. Not particularly scientific about it. Hope it’s ok with you, I will post a couple of your completed images on the SMS User FB page.

Cheers, D

1 Like