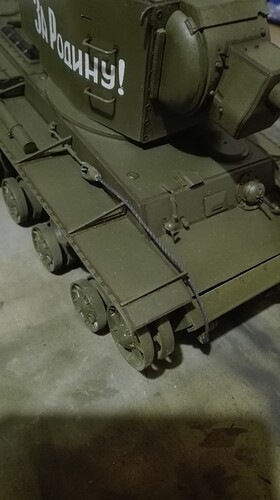
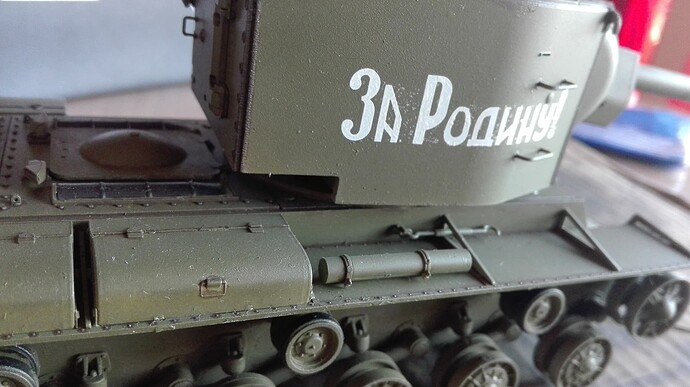
Nicely done! 

I was thinking, do those tracks need to get a flat varnish coat?
I was thinking of doing a light smear of rust pigment so it could be of use but I fear that it will mess up the base color.
I got time to carefully watch the video.
I got almost the same pigments, but I’d prefer to use the Vallejo pigment fixer instead of the Wash.
However, I wonder if it would be worth to drybrush the higher points of the tracks with gunmetal.
Basically, my idea was:
-
Drybrush the higher points of the tracks bottom with a steel color to simulate wear
-
Spray a flat varnish coat
-
Smear a very light Old Rust pigment without fixers, just some grains smeared with a cotton bud.
-
Apply some mud pigments mixed with the Vallejo fixer
What do you guys think about this plan?
Wouldn’t bother with the rust, tracks on the running gear don’t rust, simple as that.
Follow the direction of the video, but adapt the technique to the medium you’re using, and that’s that.
Today I did the towing cables.
Oh boy that was not simple, it was a single very thin cable made of multiple threads, I had to split in half and one of the sides spread open… I had to use some glue to make it back in a single thread, and still ended up a little botched.
Do you think the color is fine? I made it dark iron like the treads.
I think it looks good! I often use dark iron for tow. Some also use it for tools, but I make a mix from Vallejo for tools that is close to dark iron but a tad more blue
I need some very clear and shining steel color for the track’s wearing and to paint the headlight internal part.
What is the best choice for this? I intended to use my italeri gunmetal, but that ended up way too dark despite my previous uses.
Also, I noticed lots of dust particles that really stick to the model, even if I stored it under a shoebox after the gloss coat. I already tried gently with a brush and even moisted it with distilled water, but the stuff just sticks.
I suppose that the flat coat will make it look better, but I would like to know if there’s some easy trick to get rid of it.
No you don’t. Use something like Hannant’s ‘Oily Steel’, or a steel coloured pigment powder.
As for the inside of the headlight, Tamiya’s ‘Chrome Silver’ is pretty good for this - but then any paint manufacturer that does a ‘chrome-like’ colour would fit the bill.
As for the dust issue, just put it somewhere you know it won’t get dusty whilst it is drying - like a bathroom or something like that.
I am having trouble finding this Chrome silver (or to be precise, any metal color) at a decent price, so I passed some flat coat today.
Unfortunately the dust on the side containers was unremovable, so I just flat coated over them and will mask it with weathering.
What worries me is this decal. As you can see, application was sloppy and there were plenty of bubbles I had to pop.
I had hoped that the flat coat would have masked it, but there it is.
Do you think that it will get decently masked with some pigment smearing?
No, not really, and it will most likely then end up looking over weathered.
You could overspray the decal with a satin-cote or matte varnish and, when its bone dry, carefully and lightly mask over the decal where you don’t want the green colour to be, then re-spray the green colour. Then re-spray the varnish of your choice.
Or hand paint around the decal.
Or just leave it, it really isn’t that bad.
Sounds complicated and risky for me, I might make the mess worse.
Maybe with some light dry pigment smeared with cotton bud it might look like a mud splatter. I’ll experiment.
Have you used microsol or microset on it? That can soften the decal set in and not above the pockets.
Next time you can also trim the film to be closer to the letters and have less of an issue or use the decal to cut out a mask and paint the letters (hairy stick or airbrush). You could also use a dry transfer.
Next time: You could also lay the decal in wet clear coat / acrylic varnish instead of on a dry and matte or satin matt surface.
I use a paintbrush to place a puddle of clear varnish on the spot where the decal will go, place the decal in the puddle, move it to the correct position, press it down, brush in the remains of the puddle in over the decal to make sure the edges are covered and then let it dry
I did set on gloss varnish, but since it was my first “big” decal I had some trouble. The other side went much smoother.
@Tank_1812 Tank_1812, I just applied the decal on the gloss varnish, after moistening the area with water. Had no luck finding these micro-products, but will certainly look for them the next big decal I have to set.
Trimming it would have been a smart move, I thought it would have been wrong to cut the decal itself but now I realize it was silly not doing it.
Anyway, the other side went close to perfect, now the matter is to fix this one. I still think the pigment would be a good choice, it would still look a bit “rougher”, but that could simply pass as a thicker mud splash I think.
Hobby shop can have them in the store or online.
You can also get them direct.
I understand if depending on the part of the world, shipping can be difficult or out of price range.
HTH
I’m with Tank_1812. It’s well worth having these on your workbench:
- MicroSet (blue label). Use during decal application to aid with settling them into position.
- MicroSol (red label). Use after decal application for conforming decals over relief (rivets) or into recesses (follow directions carefully).
That being said — and unless you’ve already coated the area with product — a light application of MicroSol (red label) could potentially solve your bubble issue at its current state. IMHO.
—mike
Too late, plenty of matte varnish on that, really not worth messing with, especially for a newbie like me.
I’ll try the pigments and see what happens.
Hannants oily steel is an excellent color. I ran out and should try to find more , great stuff.


