The track I used came directly from asuka’s JGSDF kit (35-024). I considered the AFV club track, but the injection molding problems and the cumbersome assembly made me give up on it.
1 Like
The metal track is too heavy to the sherman and looks not reality. another reason the detail is not good than plastic one. the thrid is metal is not easy to make wear effect that real things was rubber.
1 Like
Continue polishing the turret, wanting the turret surface to have a smooth and rich detailed feel. So far, the goal has almost been achieved.


4 Likes
Next, the parts of turret must be glued one by one according to the instructions, many parts are still not detailed enough, if there is time and conditions, it is better to replace with PE parts. The turret 's pistol hatches and vent shields not only lacked the detail they should have, but also shrunk. I have to modify it myself. A round bulge should be added to the pistol hatch, which is directly made of instant glue and then polished and shaped. The vent shield is melted a little surface with glue for the casting texture is added manually.


3 Likes
Then glue it to the turret with the DEF resin mantlet tarpaulin I prepared. It was then loaded with a metal barrel also produced by DEF. However, it did not provide artillery brakes, and according to DEF’s instructions, it was recommended to use ASUKA’s original plastic brakes. However, the original brake is a half-divided two-piece design, and there are many details missing. I’m worried that it doesn’t work well enough.


6 Likes
looks great so far
1 Like
I started thinking about 3D printed brakes, and I bought the print set with high precision of Sherman M1 muzzle brake from ROCHM. A set of three separate brakes, disassembled the support to see that the quality is good, the overall shape is very accurate, and the details are also in place. It’s worth putting it on and using it. But the problem is that its connection to the barrel is directly bonded, which is different from the design of the DEF’s metal barrel.


3 Likes
The DEF is designed to be the same as the real thing, the brake is misaligned with the barrel, so the metal barrel port of the DEF contains a fastening nut and has a step to insert into the brake inside. But the ROCHM brakes already contained a fastening nut and a part of the barrel, so there was a conflict between them that could not be installed. DEF’s recommendation is to use ASUKA original brakes, but ASUKA original brakes have the following problems: (1) Two-piece design, need to be glued together, the gap in the middle can not be ignored. (2) Four screws for fixing are missing on the front side of the brake. (3) The side chamber exhaust hole of the brake was originally designed to be slightly angled to the back side, but ASUKA did not make an inclined design, just a simple vertical angle. Looking at the picture below, it can be understood: orange is ROCHM, green is ASUKA. From the side, you can see that ASUKA is a straight plate, while ROCHM is a curved concave.


3 Likes
As an aside, I also compared the ZVEZDA’s latest M4A2/76(W) muzzle brakes (gray). Although he is also a two-piece design, he surprisingly opened four fixing screws on the mold, and the exhaust side chamber is also an accurate inclined design, and the overall shape is also very accurate. Although the two-piece design is not easy to polish, at least ZVEZDA’s research attitude is very in place, but unfortunately the poor mold making level dragged him down.
For ASUKA’s brakes, both 1 and 2 can be solved relatively easily, and the fixing screws can be glued directly with glue sticks to four times. But if this sloping side chamber were nit easy to be modified, I’m not sure I can do it well by myself. But anyway, so I’ll try to modify the ASUKA brake first. If it fails, there is also a backup solution (ROCHM’s brake), but this solution needs to cut the metal pipe.


3 Likes
I tried to carefully grind the inside of the brake with an electric grinder and a very thin pointed mill, and finally succeeded in sharpening the ideal inclined arc. The result is no less than that of other brakes. In the end, I decided to directly use my modified ASUKA original brake, because it best matched the metal barrel of DEF, and the details and research were good after my modification.


3 Likes
too bad that kit is no longer available.
1 Like
Which kit? These two kits I used are available now.
1 Like
Nice mill work on that muzzle brake. It’s going to look spectacular.
1 Like
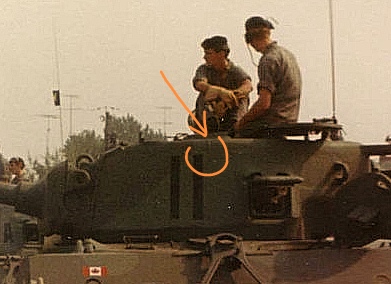
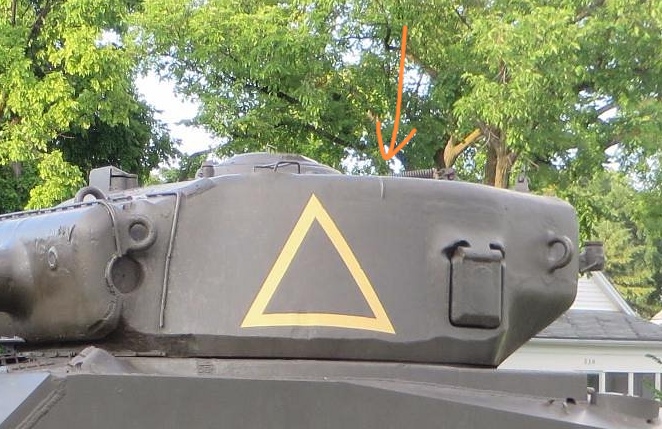
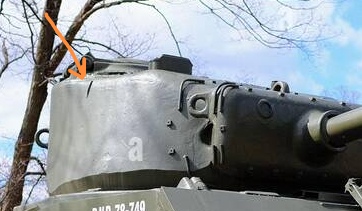
Recently, I found a detailed feature of the Canadian Sherman Turret. That is, most of Canadian turrets have three short raised lines on the top and side edges. There are two on the left and right sides, and one on the back side. I can not find any information on what these three lines do, if any friends who know can tell me is really appreciate!

3 Likes
I added this feature. It is also very simple, first three grooves are made in the turret, then ues thin plastic line is buried and glued with glue.


3 Likes
Asuka’s JSDF. the one with the T84 track.
1 Like
Yes, it is. But it’s easy to buy in China or Japan.
1 Like
sorry didn’t know that. I checked the Asuka/Tasca website and it was not there.
1 Like
At this phase, the overall modification is nearly over, and now the next stage of detailed modification and improvement begins. The first thing to do is the lamp guard. I considered using a 3D printed guards, and the printed guards looks great, but it was a bit soft. In the end, I used the original PE part of the kit, because its thickness and hardness can perfectly reproduce the details of the lamp guard. It’s just that bending and bonding are more troublesome, but I’m not afraid of trouble. So I used the original PE to make the lamp guards. The result looks pretty good in the end.


4 Likes


