i did chain and rigging certification for years but sod lugging around big anchor chain like that and it looks like they have added spikes in places. on some of them. good idea having swivels at the ends of the chain before it goes to the anchor point or the chain can twist itself up with then loads the links more and loads closer to breaking force gets applied
3 Likes
I guess that’s how they cut down the rain forest in Brazil - but climate change isn’t man-made, right?
2 Likes
It depends on which trees are cut down and most importantly where they are cut down.
The Amazon rain forests is a bad choice for the climate.
Letting trees collect carbondioxide in Sweden, turning them into buildings that will stand for maybe 100 years and let new trees grow on that patch of land could be a better choice.
After a while most forests get into a steady state, the carbondioxide still being collected by the growing trees is balanced out by the carbondioxide released by the decaying trees.
Turning the trees into paper is a bad idea since the recycling percentage will not reach 100%. We can replace the plastic in many products with derivatives of cellulose (i.e. trees). If this is used for disposable items like food trays it doesn’t really do much good but if we turn it into furniture or building materials we will take that carbondioxide out of circulation for a longer time.
The “mathematics” or “economics” of it all gets horribly complicated after a while …
Replacing concrete and steel in buildings saves a lot of carbondioxide …
2 Likes
Hello!
Looking at the footage where the trees fall so fast, I’m thinking “Ain’t it a damn shame…”
Carbon circulation is sure complicated… If I was to simplify it, I’d say leave it alone and carbon will be deposited (might take thousands of years, but it will). Disturb it, and it will be released. And we’re disturbing it.
Back to my model - I tried to make some changes @namengr Wayne suggested, then I mounted the engine in the frame together with the radiator. The shaft from the engine to the transmission needed shortening about 1mm to fit. I also made the hose from the radiator to the water manifold. And here’s what it looks like now:


Now I’ll try to cover the engine a little and then mount the tracks permanently. Thanks for looking and have a nice day
Paweł
9 Likes
Looking good, engine looks more like I remember now. Keep up the fine work. Wayne
2 Likes
Here are files for a 3D anchor style chain. You would have to resize it with slicer program to get the size you need.
3 Likes
The detailing looks great.
1 Like
The pictures of the Rome plow look fantastic.
2 Likes
Hello everybody!
Thanks a lot for your comments!
@HDSC2D - I like 3D printed parts a lot, but for a chain like this I’d probably look for some cheap jewellery…
@namengr - will do! Thanks a lot!
@mech - Thanks a lot!
I hope to have another update for you soon, with the chassis built up. thanks for reading and have a nice day!
Paweł
2 Likes
Hello everybody!
The construction goes on - I installed the belly pans and the “nose” - here the part also had those funny distortions, so instead of filling and sanding I decided to cut the affected parts off and scratchbuild them out of styrene sheet:

Then I put on some more “Vietnam red” and installed the suspension permanently:

As you can see the fuel tank needed some filling (and still needs sanding), also because of the distortions/sinkholes:

There is a very interesting part with all those lines - unpainted in the photos:

I have also found a place where the kit is inconsistent with the instructions:

The throttle pedal is different then in the instructions which has you install three pedals in the three slots in the floor. From what I’ve seen it should be installed diffrently. @namengr - maybe you can tell me more exactly how… I tried to research this detail on the net, but got no real results - the closest was a video of a D8 being started after 15 years…
Now I’m trying to put the tractor together and paint it, but in parallel I start working on the blade.
Thanks for looking and have a nice day
Paweł
8 Likes
Coming along nicely. The weathering is looking great.
The more Hobby Link kits I see, the more I like them.
1 Like
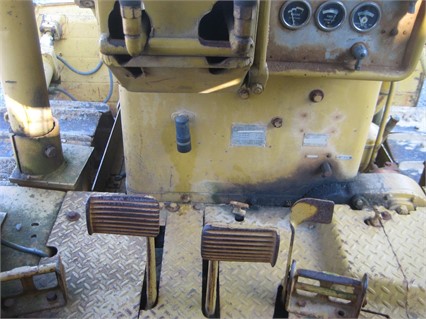
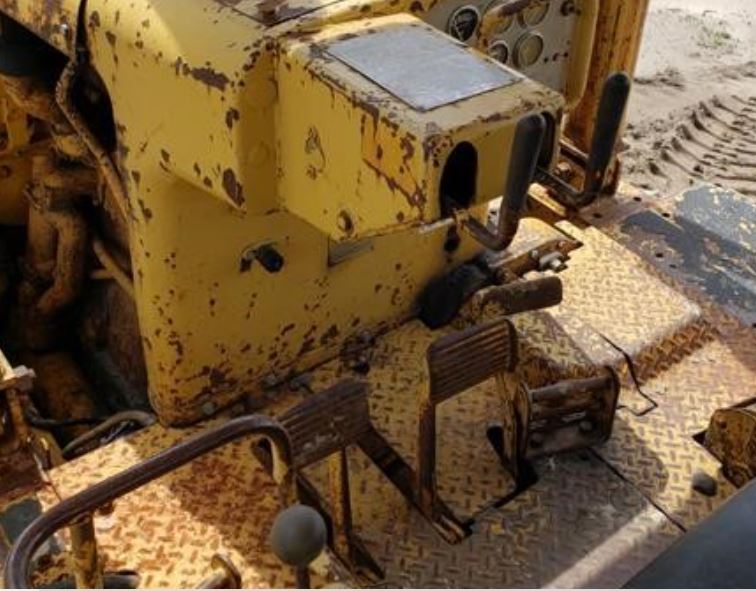
Coming along well. The hydraulic lines are so you could connect a pull scraper or for the ripper attachment. Also, the pedal is actually a decelerator. The throttle is the tall handle on the dash controls along with your steering clutches.You have a left and right brake pedal and decelerator pedal, as you always operate with the throttle lever wide open. Here is what the pedals look like. Also I would ease up on the red dust a little more, and the tracks would be mostly shiny steel unless it’s been setting idle for a while. Refer back up to Frenchy’s pics. Wayne
3 Likes
Total noob asking:
Which foot is doing what?
One for the decelerator and the other switching between the brakes?
I assume the steering clutches engage/disengage the drive to the tracks and the
pedals are used to brake a track. Would braking both tracks at the same time be
a relevant operation?
1 Like

@namengr , @Frenchy Wayne, Frenchy - thanks a lot for your input! Wayne the red dust wil partially go away when I start spraying OD. What you can see on the photos it’s just a first layer of the preshading.
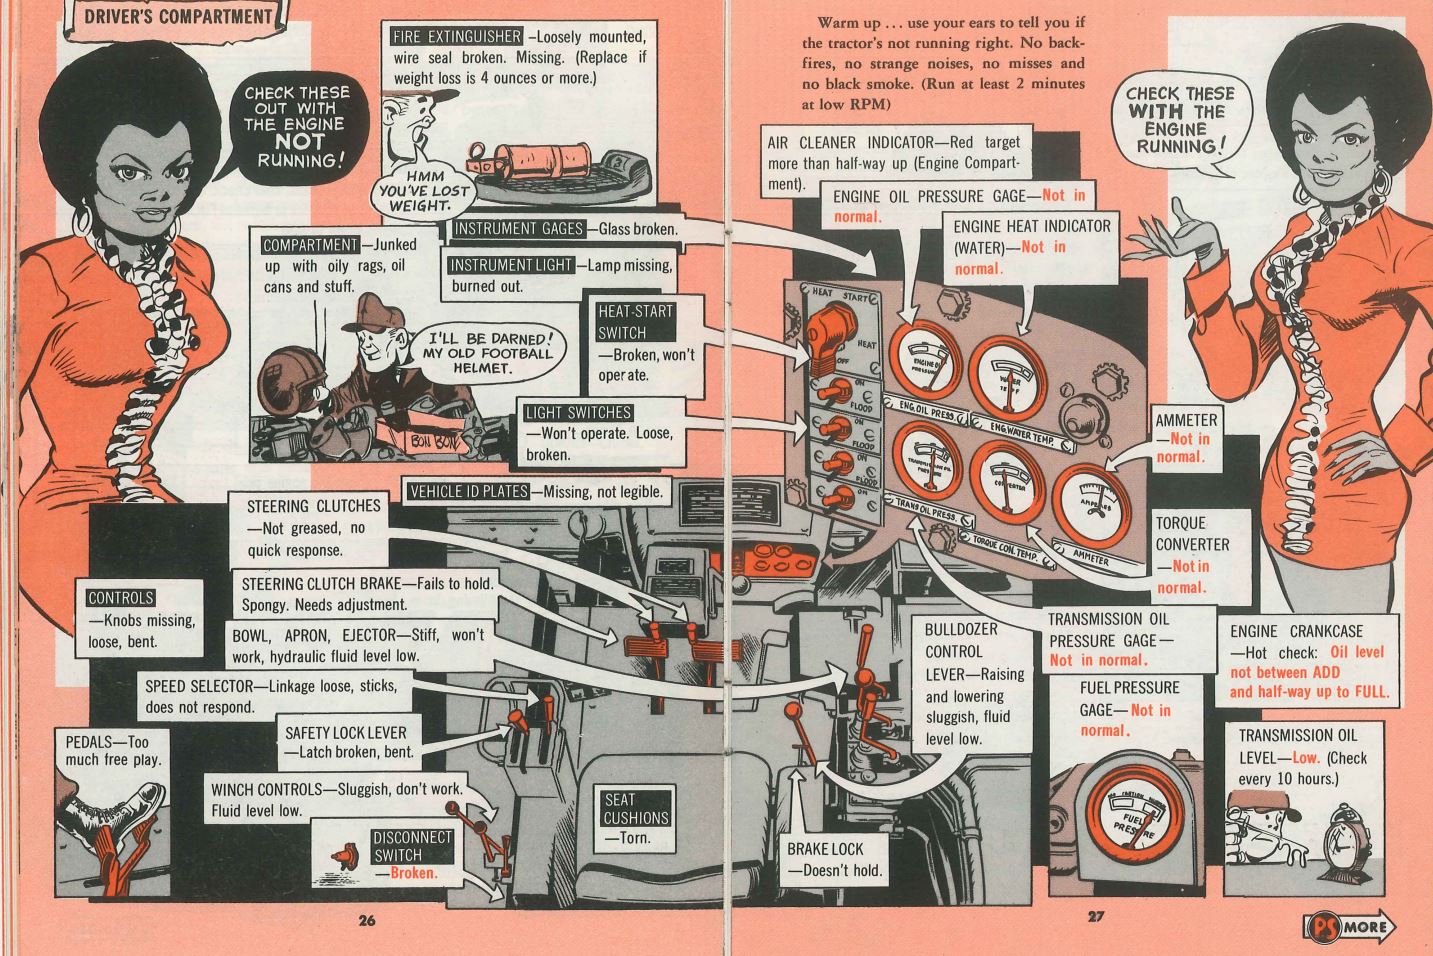
Frenchy - cool pictures again! I like the one from PS Magazine a lot - explains most of the controls! do you know which issue it is? I have a feeling the whole issue might be very interesting to me!
@Uncle-Heavy - interesting question, I’d like to know it too!
Thanks again for your help and have a nice day
Paweł
2 Likes
Here’s the link to the whole article : https://psmag.radionerds.com/images/9/9a/BYOI_PS_Magazine_Issue_230-The_D7E_Tractor.pdf
It’s from PS Magazine #230…
H.P.
2 Likes
Your right foot works the decelerator while your left works the brakes. For gradual moves you pull the clutch lever to cause a pull to the opposite side and if it is more severe you push the brake to lock the track. When working you can adjust the blade’s digging action from side to side. Normally you just shift to neutral to stop. Most of the time only one of the 3 levers would be in use for the winch or ripper. The 3 were for a scraper with one to raise/lower, one to open or close the front gate and one to work the ejector that pushed the dirt out. Wayne
4 Likes
Thanks!
![]()
1 Like
Hello everybody!
Thanks again for all your comments and for the explanations!
The knowledge you shared let me do the controls (hopefully) right. I added the missing throttle lever and made the clutch levers out of wire instead of using the kit supplied levers because I was afraid they would accidentally break on me. Handles are made of white glue:

Here also levers are made out of wire - thanks to you I know know what they do!

And finally the pedals - the kit supplies spare pedals, so I took a second decelerator, cut it down and got the second footrest this way:

I also started to work on the blade - as you see the parts need some filling and sanding:

The references you got me didn’t let me rest:


And in the kit it looked like this:

I couldn’t let it this way and I broke out my saw. It was a little gory but now it’s more correct:

Now I’m starting to paint the tractor, thanks for looking and have a nice day
Paweł
8 Likes
Your controls are looking really good and also the belly pan work. They were always a pain because trash would build up in them and could catch fire, so they had to be cleaned out regularly. Later plow cabs had a water tank in the roof in case of fires. Wayne
2 Likes