It looks field grey or at least some king of mid green to me.
Ken
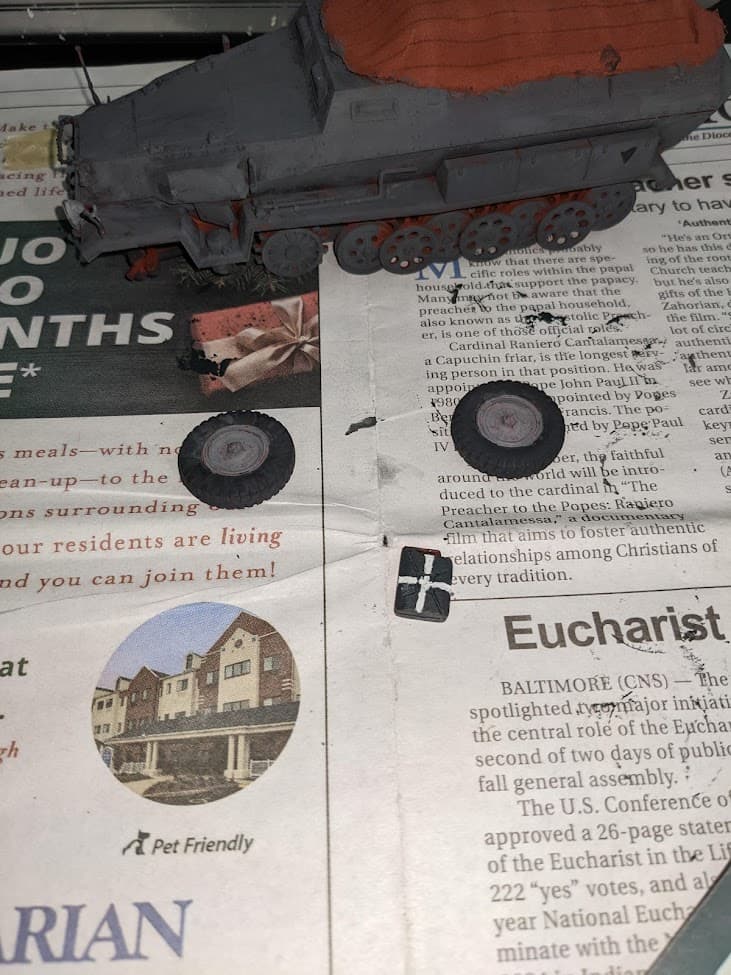
I touched up the vehicle, marked one jerrycan as containing water, and Painted the wheels. The jerrycan took some practice, but the wheels were great to paint! The rims allowed easy separation of the hub and tire. Taking a look at the vehicle a few days later allowed me to catch some spots I’d looked over or not seen during the original painting.
Also, after looking at some other photos, such as the one mentioned frequently by me with the hatched whitewash, and the one below, I have decided to add some shovels to the side. They are from an old Tamiya T-34-76 kit and should do just fine with some simple alterations.
This and the other image show that the 251/8 had some tools, such as shovels, attached to the side.
Just caught up with this, excellent work. I don’t think you got a direct response to your earlier question about interior washes – I’m not sure how much will be visible with the roof on, but if still relevant & not too late I suggest the following. It looks too dark as is, I’d cover the entire interior including seats with a flat dirty (browns/khakis/greys) pale wash to lighten it. Next a liberal dirty dark (not black) pin wash. Then dry-brush the seats as Tim/sluff suggested, and finally if necessary a lightish grey dry-brush to raise interior details.
I think the jerrycans are held on with rope interwoven through their handles & wound round the hooks on the hull front. The canvas roof looks like maybe a mid-grey base with daubed dry-brushed light dirty-grey patches over it, with an overall dilute dark slate-grey/khaki wash to settle in folds?
I’m not sure what exterior scheme you have in mind - like the photo in post # 38? If so, forgive the photo-bomb but if you’re sans airbrush like I was, the following images might help. I got reasonably close to an actual scheme from Kursk with brush alone & you could use the same technique. I know the winter camo looks like it was roughly brushed on but the aim is still to avoid overly-hard edges that can look unrealistic in scale. Artists’ acrylics used here but same effect could probably also be done with oil-base.
Sparingly dampen the surface (without any pooling) in small sections, taking care to keep the surface horizontal to avoid runs…

Quickly apply single-cream-consistency paint on the wet…
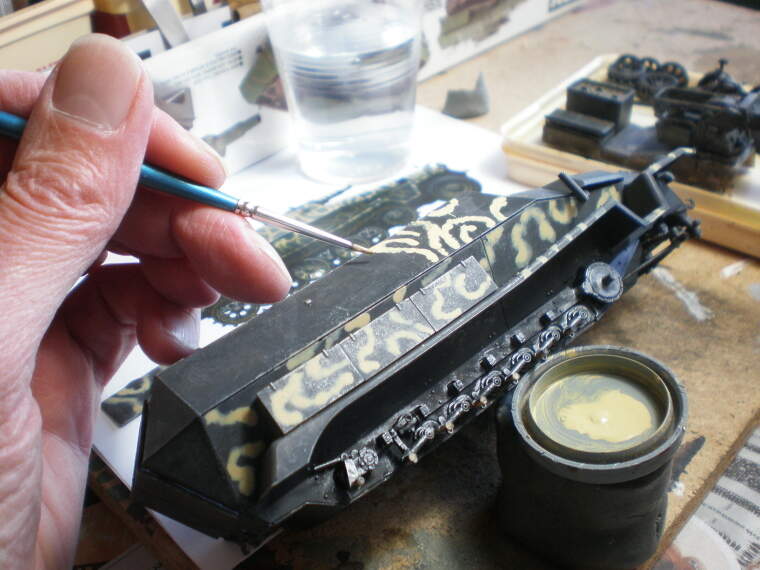
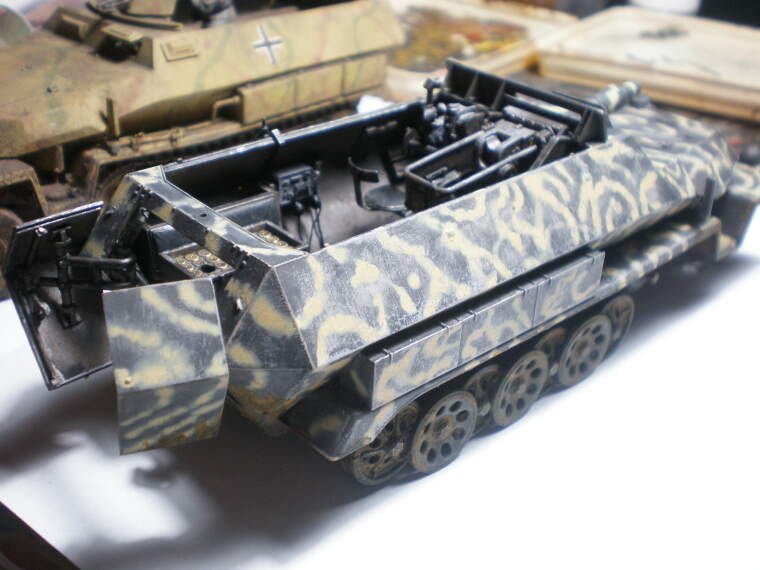
Paint goes variably fuzzy at edges as though sprayed. After a gentle but severe sanding to fade it all (and another dilute dirty wash) here’s the overall result…
P.S. Happy to remove the photos if you prefer, I’m only trying to illustrate the technique not my own stuff ![]()
5 Likes
Yeah, I’m going for a hatched whitewash like in post #38 and the first reply to this topic. It just looks neat. On that note, would they have re-painted markings over the whitewash or whitewashed around markings? Also, do you know what markings apart from the red cross and license plate? (I saw one Balkenkreuz in the image on post #38, but am wondering about others)
No, you’re good. I appreciate the photos to accompany your advice. And I am “sans airbrush” just as you are. Thank you for this, it will help a lot.
Barely any, really only the edge of the back benches and a bit of the floor.
Do you just mix lighter colors into the wash?
I found a pack of a bunch of colors of oil paints for $16 (I assume the paints are cheap quality too). Would using those produce a similar result to more quality brands (such as W&N)?
Is this done with water?
What do you mean by “singe-cream consistency”? Does this mean that the paint is only slightly thinned?
As I said, you’re good. I appreciate the photos to help me understand, and other people may also find them useful.
Please forgive my heavy use of quotes, I simply wanted to make sure to differentiate between your long post. And thanks again for the help!
1 Like
OK the most important advice I have is wait for others’ opinions before any final decisions. There’s no right or wrong if the result looks good & you always have the final word.
Markings - I imagine there’s archival evidence for all possibilities: camo painted around original markings, markings repainted over camo, camo blotting out markings completely. The “38” photo seems to show the middle option, on the rear panels anyway but I see no marking on the side…are we sure that’s an authentic colour pic or has it been colourised? I ask because the red cross symbol ain’t red…possibly a lo-viz modification but I really don’t know. I’d probably put licence plates on but virtually obliterated by mud/slush. So the shorter answer is paint what you see & extrapolate logically from that. If nobody knows what’s round the front or other side from a photo, nobody can tell you you’re guesses are wrong.
Airbrushes are great & I actually do use mine occasionally, but for military vehicles hardly ever. I have 5 best-quality brushes covering the usual range & I care for them like newborns, they never let me down.
Washes can be tricky…to avoid disappointment I usually paint several spare panels of plastic (e.g. Evergreen) the same base scheme as the model area to be treated, and then test the wash mix or mix-options on them before risking it on the model. Yes I mix the intended wash colours slightly diluted from the tubes into a runny-toothpaste kinda consistency & then progressively dilute to a watery stage. Test. Adjust shade if required. Apply really fast with a super-soft sable brush, then dry the brush with a tissue and use it (the brush) to suck up surplus paint from corners etc. for lightening washes. For darkening & pin washes it’s the opposite, corners etc. is where it should collect.
I ought to stress the point about keeping the area being washed horizontal, whether interior or exterior, otherwise it just obeys gravity before it can dry. So it’s a particular pain for 251’s with their geometry, I used a vice/vise to swivel from one set of panels to the next after it was dry…
Yes my exterior scheme was all water & acrylics. Perhaps the problem with using white spirit for that kind of scheme would be its tendency to evaporate too quickly so the paint doesn’t have a chance to bleed. Unless you add some kind of inhibitor, but then you might get the opposite problem that the paint bleeds all over the wet area. I just prefer the predictability & total control of water over solvents.
Paint consistency – well ordinary milk is too watery, full cream too thick…single cream’s somewhere in between. I had to experiment as will you, as above if it’s too thin the paint bleeds all over the dampened area, too thick and it just sits there with no bleeding at all. Go for the Goldilocks effect.
Paint quality - I’ve always used super-cheap artists’ acrylics because I feel low quality is exactly what’s required for a realistic finish! I would think the same goes for oils.
Thanks for accepting the photos, I know it can tick guys off understandably so I’ve taken to offering removal just in case. Hope something here helps & good luck ![]()
![]()
2 Likes
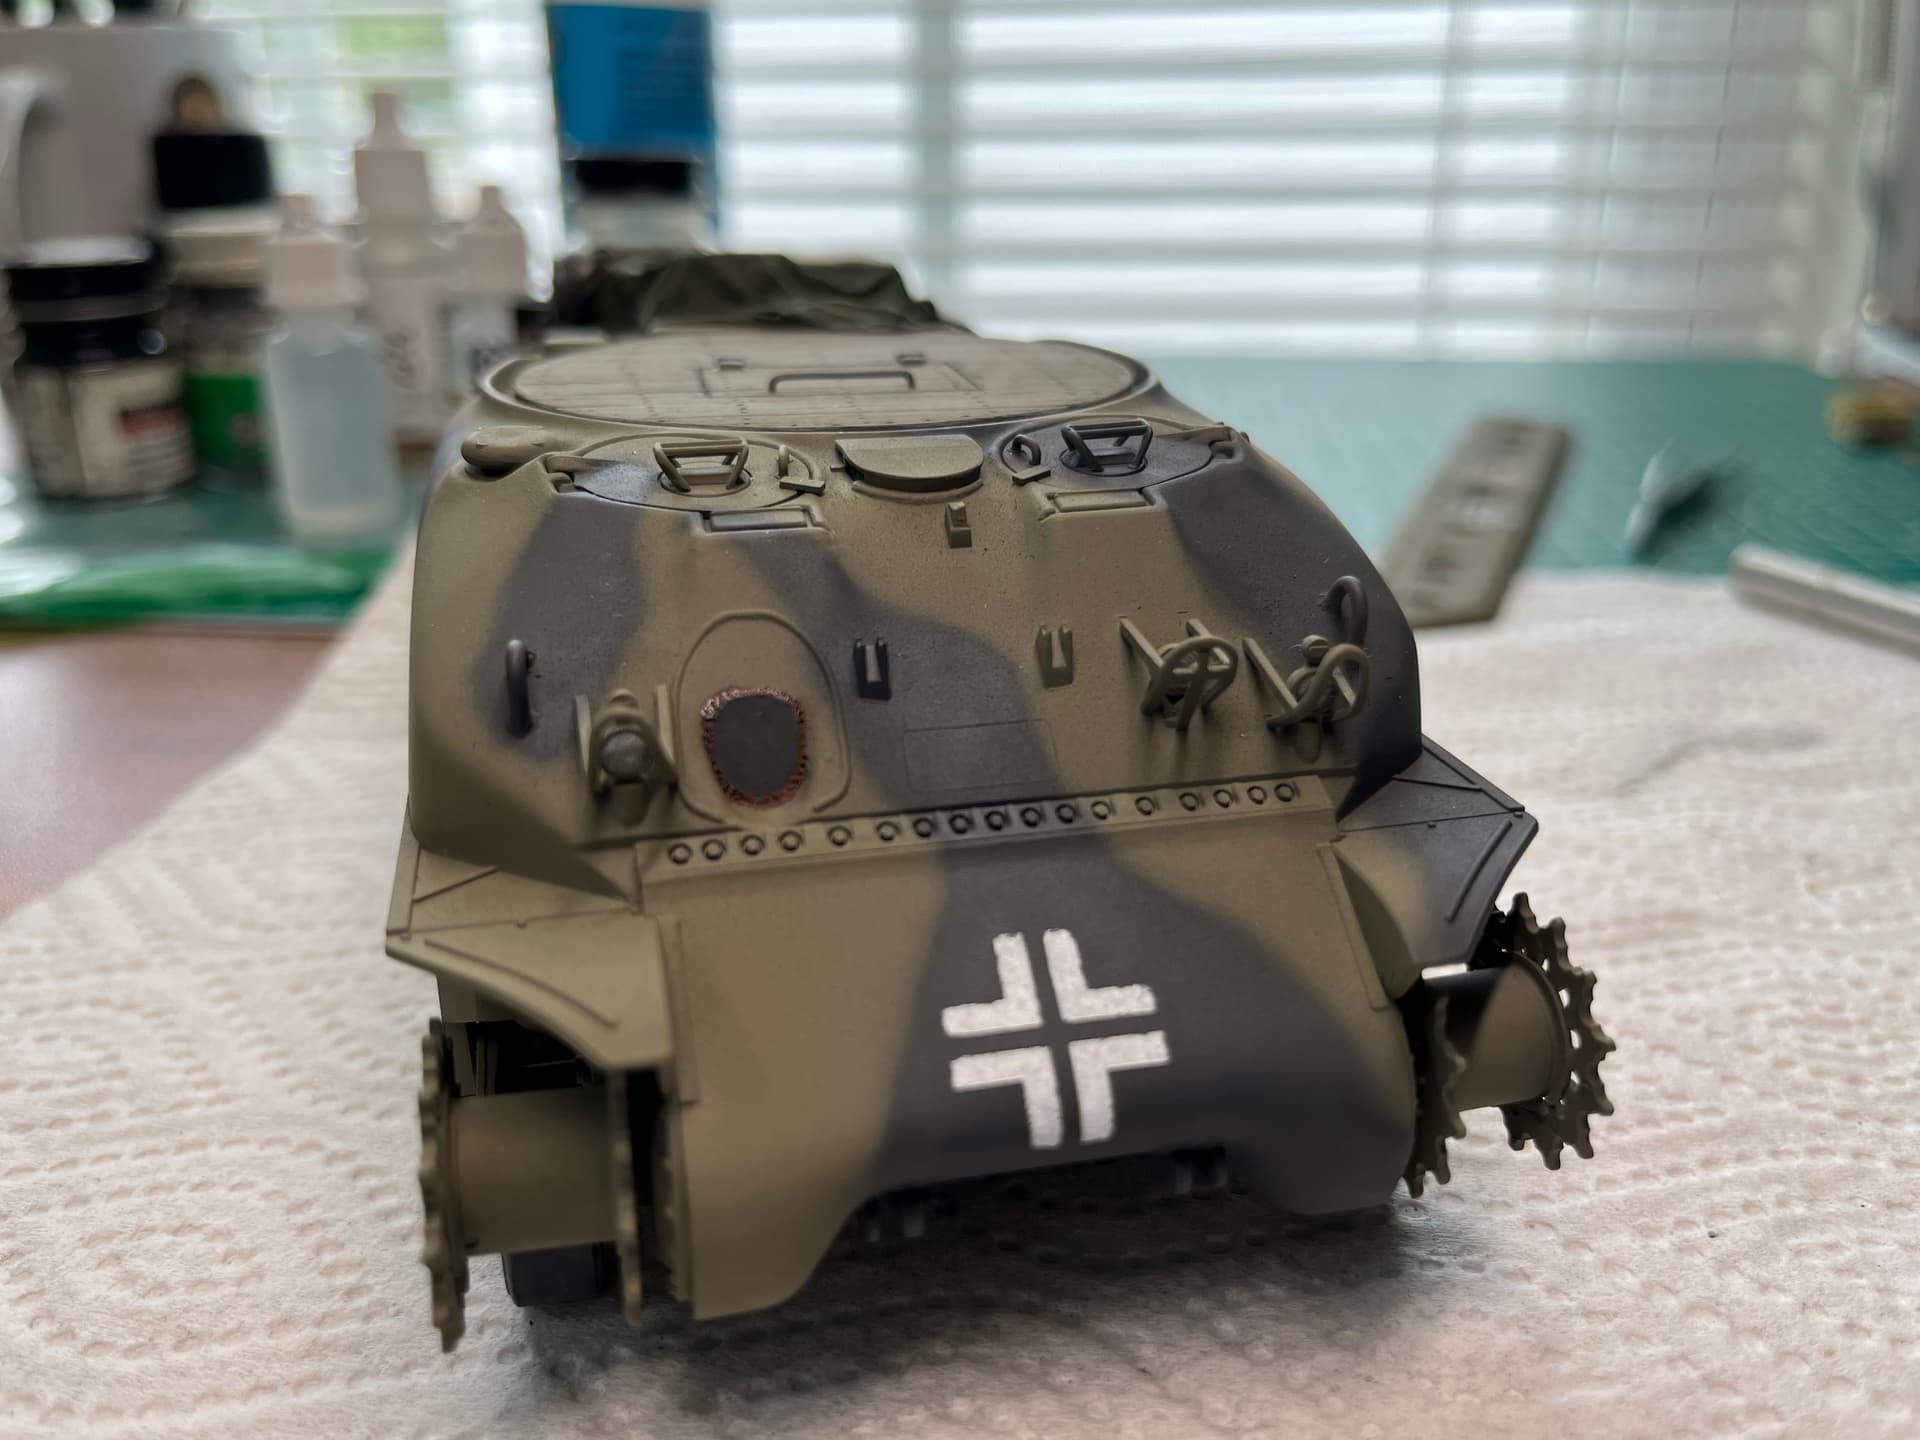
I colorized it with an AI to get a feel for the colors/patterns. They (I used two, both with same results on the cross) may have interpreted the different colors on the cross to be the camo, or it could have been some kind of non-filled cross or low-vis type of thing.
My search for the markings has not been very fruitful, but it seems that they didn’t have the Balkenkreuz much on the 241/8 sides. I might just put it in the lower corner of the back doors. Perhaps just as a convoy ID marker or something.
I will also need to use masks for the circles and the crosses on the red cross symbols. Do you have any suggestions on making/using them when they are in specific shapes?
1 Like
I’m also without an airbrush but I’ll definitely be giving this a try!
2 Likes
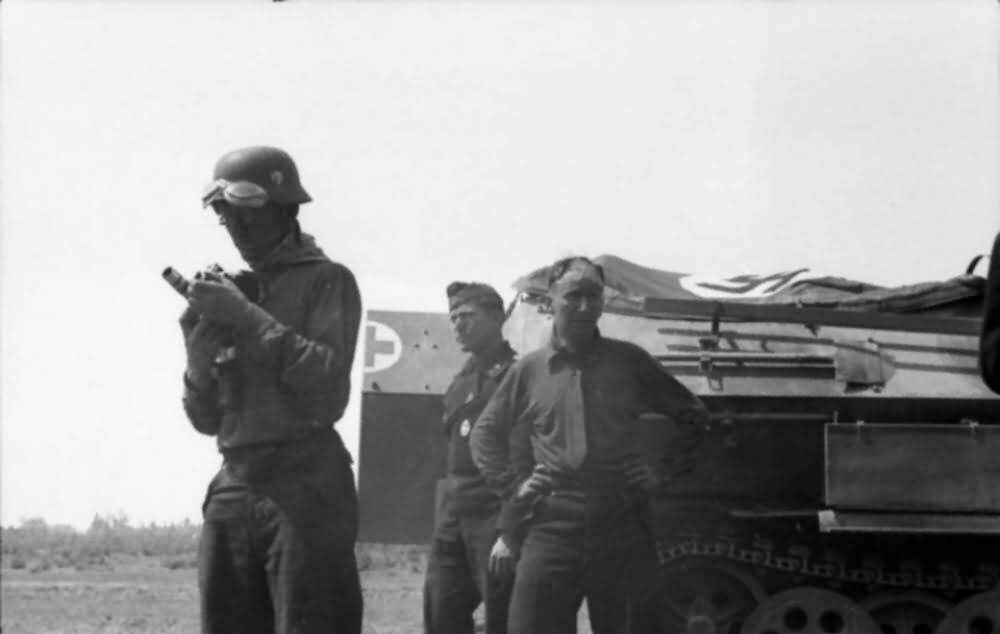
The pics you are looking at are of an Ausf A vehicle, not and Ausf C. On the C like the kit you have, the side bins are all the way to the rear of the fender and the tools were relocated onto fenders. The two earlier versions had the bins centrally located but only the Ausf A had tools on the hull sides.

The colour of German vehicle tarps is a long debated matter. Most go for a mid grey or Field Grey for early war and a Khaki for mid to late war, but my opinion is that is just to suit Grey or gelb vehicles. With so much debate, whatever you choose won’t be ‘wrong’.
To make your interior details show up in the covered, therefore darkened interior, use a much more diverse lightened dry brush colour closer to the front of the vehicle. Just don’t make the colour too light in the rear 1/3 or it will look overdone.
As you are doing a C not an A, you do not have to follow the pic exactly. You can add your markings then whitewash over or around, or add them after as you please. Usual praqctice was to scrub off the whitewash after winter snows, so I’d add them first, then the wash.
Taking photos of ambulance vehicles was actually banned by the German Military as they saw that as defeatist, hence so few photos exist compared to the number of ambulance vehicles used (of course not all rules are ever followed).
Coming along nicely.
2 Likes
Thanks a lot! I never knew that the Germans banned the photographing of medical vehicles. I also appreciate the help you gave about the tools. Guess those shovels will find another home one day.
So would this mean that they would just whitewash over existing markings and scrub off around them, or just go around the markings?
I appreciate all the help and the encouragement. This is my longest-running model (due to procrastination and not having much time) as well as the first serious modification with non kit-included parts/scratch building.
It depended on the crew and the method of application. Some crew felt the need for at least the cross to be visible so their own comrades did not shoot at them. Others did not care.
The white wash was applied with whatever they had available. Paint Brush, Broom, Brooms made of twigs, leaves and branches of trees or bushes, Hand brush (small straw brush used for sweeping small areas), rags, etc. The larger the applying tool, the less control they had, so run off onto markings was likely.
1 Like
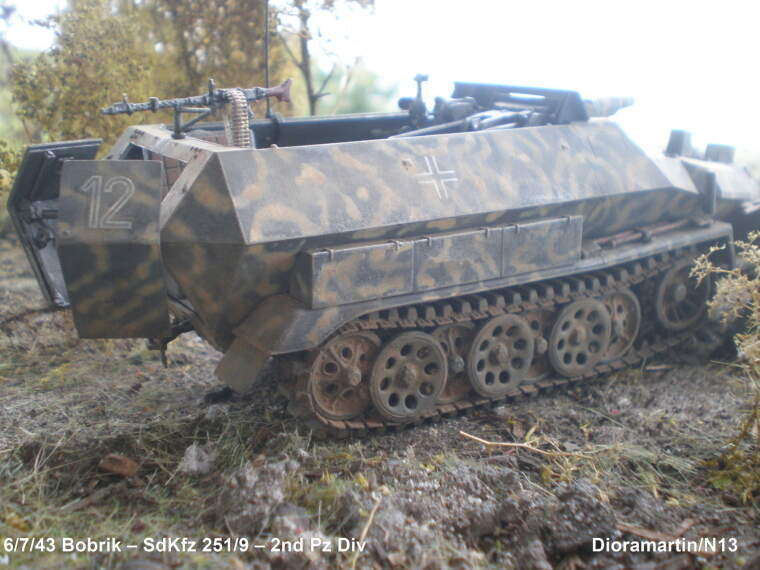
Although this is a museum model and not a 251/8, this photo from Stikpusher shows how they went around the markings. I’ll go with putting the markings on before the camo.
1 Like
Glad to help, I forgot to explain the important first step - a gentle sanding with fine sand paper of the base coat. That helps the paint to bleed at the edges just enough & tends to inhibit a wider spread. But as always experiment on spare panels, it took me a while to find the right balances. ![]()
1 Like
I don’t have any separate spare panels, what could I use? My first thought is some plastic they give as a base for figures, but those are small and I have few of them.
Ah! Wasn’t expecting that…well, improvisation is a handy weapon to have in the model-making armory. Sooner or later you’ll probably need to check out the wide range of Evergreen styrene panels/strips, they’re invaluable for modifying & scratchbuilding. But meanwhile I guess anything that will accept a standard primer will do, the purpose is only to test what paint & washes will look like, so it doesn’t even have to be plastic but it’s preferable - do you have any redundant toys lying around which have some flat surfaces? ![]()
1 Like
I guess I could use some plastic spoons, as I’ve seen many modelers do.
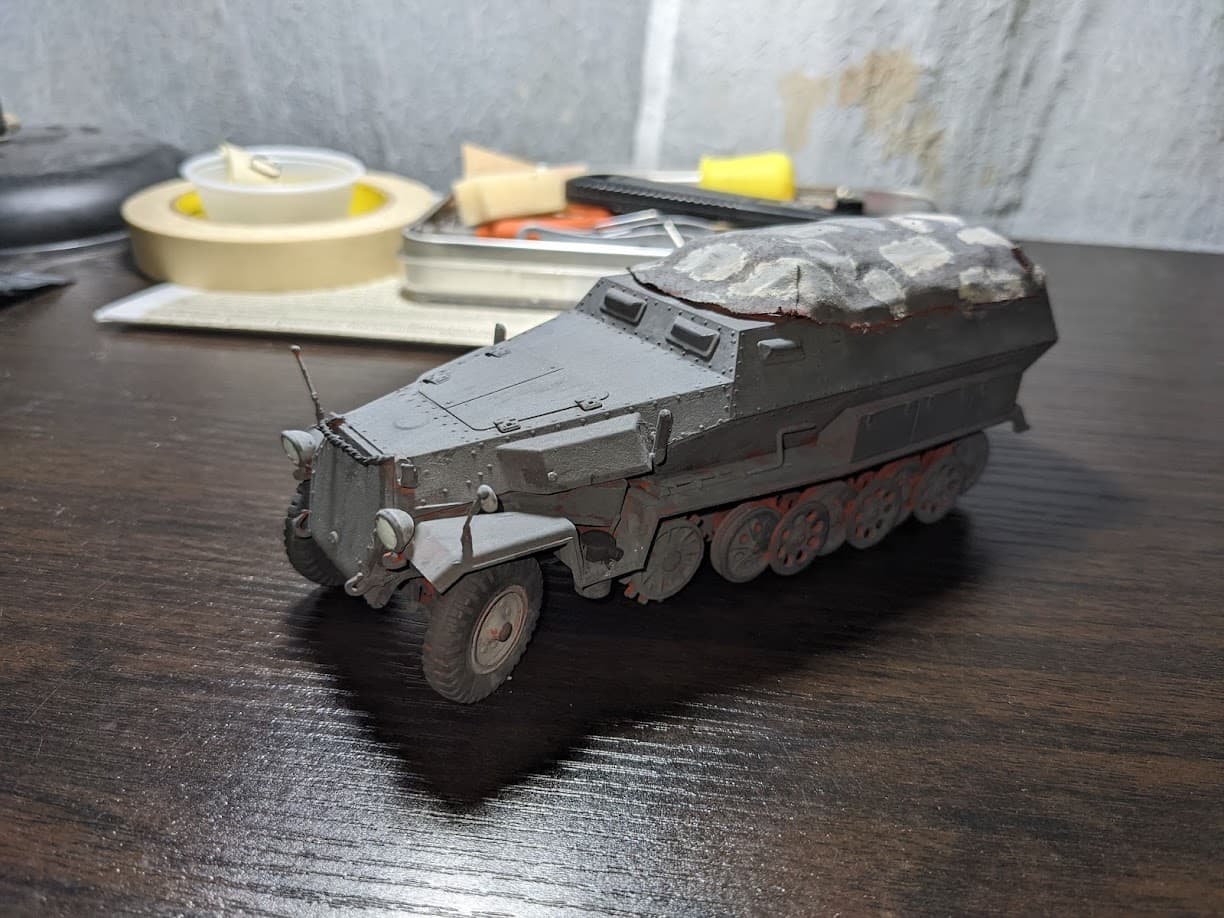
Anyway, last night I did the roof, made out some details such as the headlights and mirror as well as attaching the wheels. Apparently, the wheels can move freely in this kit, but I don’t know how they did that in a cheap, older Tamiya kit. I might glue the wheel in place so that it doesn’t mess with weathering.
1 Like
I’m having trouble with circle masks for the “Geneva Convention Markings” (aka, the red cross on white background). Could anyone provide help or suggestions? rn, I’m drawing a circle with a compass and cutting it out with an xacto knife, but the paint is bleeding under the tape.
I’m glad you spelled out Red Cross markings, I didn’t know those were called Geneva convention markings. No airbrush, right? You can use a small piece of sponge and dab the paint on. Just blot the sponge on a paper towel to remove the bulk of the paint first and build it up slowly. I recently used this technique on my captured Sherman markings.
I didn’t know their “official” name until I tried looking for more photos of 251/8’s (but it turns out, they were prohibited from being photographed). I have ended up just painting on white, then I’ll cover it with Dunkelgrau to form a circle. I’ll keep in mind your technique, though.
On a side note, is that a German Sherman?
lol
Yes I’m modeling a captured Sherman with the turret removed, used by Germans as a tow vehicle. Loosely based on a single photo I saw 15 years ago.
1 Like
Nice, fantasy tanks are always interesting. “Fantasy” meaning kinda plausible but inspired by something you saw. Also, how did you get the good cross shape?