Great detail work Olivier.
I am loving this thread.
Great detail work Olivier.
I am loving this thread.
Thank you all for the kind comments. Yesterday I managed to complete a full set of headlights protections and install the headlights on the tank. The result is quite good. At least this first set will help build a second one without too much difficulties. I’ve already changed the sequence of assembly of some parts. I hope having the second complete today.
I also finished the travel lock and its missing details on the 13/90. The mudguard is in place too. I’ll try to post pictures today.
Olivier
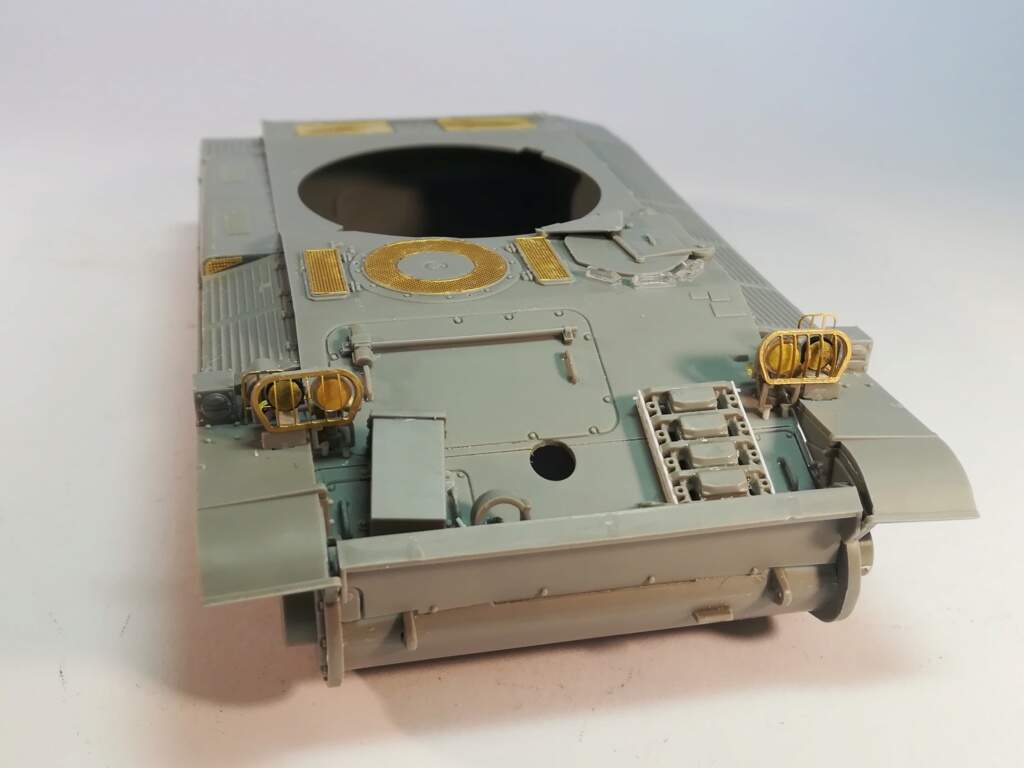
The front ends of the 13/90 and the 13/105 are complete. I’ll add the spare roadwheels after the painting. I’ve added some details like the new spare track links brackets for the thicker rubber padded links and the securing screws for the travel lock. The headlights are in the right place.
On the 13/75 IDF I just need to shape the headlights protections and glue the headlights, on the 13/90 I need to finish the empty infantry telephone box and the rear light and on the 13/105 I need to add a missing light on the front right fender (omitted by Takom).
Olivier
Detailing phase is over. Still need to add the IDF headlights protections though.
For the Argentinian 13/105 I didn’t find any clear picture showing where the light power cable enters the hull. So I prefer not adding the cable till I find a good picture. This will be an easy fix.
The 13/90
The 13/105
I have a couple of PE and plastic parts to glue and the painting stage can begin.
Olivier
Some really nice detailing happening here. 
Beautiful job Olivier!
Superb detailing! Very nice
Thank you guys.
I thought the detailing was over. I was wrong. In fact I had a last look at my reference pictures. Never do this if you think your build is complete 
First I needed to shape and glue the single headlights protections. They come on the PE plate in the 13/105 box. They are tricky to assemble. The best way is to first bend and glue the lower lengths and then only you can bend and glue the upper lengths inside.
I noticed Takom omitted the protection over the left rear lights (13 IDF and 13/105 only). I also noticed the infantry telephones were wrong. The call light over the box is the wrong shape and the wrong size for the IDF version (the same as the French army one). On the Argentinian tanks the light was simply removed.
The modified rear left lights on the 13/90. The largest light is reversed with the oval part on top. The black-out light is made of styrene rod and strip.
The protection of the rear left lights (13 IDF and 13/105).
The Argentinian infantry telephone without the call light.
The trio
The build is officially over. Of course after painting I’ll add the running gears and the MGs for the IDF and Argentinian tanks.
Olivier
It ain’t over til the fat lady sings…

So let her sing ASAP
I’m waiting for FC Modeltrend to tell me if they would sell the 105 mm gun from the Sherman repotenciado set separately. This would be great to replace the wrong Takom gun. The plan B is to hide the gun muzzle with a muzzle cover which would be a shame as the muzzle brake is something intresting in this model.
Olivier
I finally shot the base paint over the three tanks.
Recently I purposedly bought some AK French Army Green for the 13/90. Some wasted euros! The color has nothing to do with French Army Green.
So I decided to go my usual way by mixing some grey green with XF-13. I’ll post pictures of the three base color tomorrow when the paint is dry.
Olivier
Looking great Olivier!
I missed this thread, Olivier you’re doing great work and great research. Since i prefers detailling over painting i really likes the 3 models.
I will follow the rest.
About french 60/80’s colour i must says that i have a lack.
Lot of vehicles looked browny olive Drab but some looked dark green.
About the IDF one, from my research the 67 vehicles were Sinai gray not sand as often see.
The sand colour on photos is just dust. Forget the 73 IDF sinay gray from real colour. The 82 one is better even for 67 or 73.
Maybe he means it is for a different era and not a tank colour - French Army Green Hard Tack Biscuits? Month Old Bread rations? The colour of the water ration in the Bastille ![]()
At least you have the tried and true method.
Thanks for the comments Stéphane.
Concerning the IDF color, an Israeli site displays pictures of a parade in 1967 where you can see the sand color. However it is not a yellow sand more of a greyish one.
Here is the link to the site I used as reference.
IDF armor blog
Olivier
This is the great thing about the site and threads like this. I will probably never own or build an AMX 13, but having the ability to see and watch not one, but three get a custom build, intricate ( and superb) scratch building and detailing is a real joy. You have and are doing a fantastic job Olivier and the completed 3 viewed side by side will be a real testament to your skill. C’est magnifique
Olivier
The Humbrol 72 is nearly perfect for 67/73/82’s sinai gray that looks more grey than the 90/2000’s one.
Real Colour 95 is accurate too i thinks. I have in mind a pics that show a M51 Sherman in 73 on the Egyptian front and if the tank looks sandy overall, it’s quite visible that the real base paint is graywish. So HU 72, RC95 or a grey sand mix will be nice (in early 90’s i used Tamiya XF20+25% XF49).
Give it a try my friend.
Now i’m waiting the rest of your steps.
Stephane
Here are the first pics of the base coats.
The 13 IDF got a mix of Sandbraun and Sandbeige (Vallejo), the 13/90 got a mix of XF-13 and AK French Army Green. The 13/105 got a base coat of Sandbraun with XF-65 Field Grey patches. The camo scheme is not fully accurate as Takom top view does not match the other views. So I had to guess what to do in some areas. I’ll probably have to fix some spots.
Stéphane, thank you for the color references. Here is one of the pictures I used as a reference.
Olivier
The tracks are installed. It was quite a pain as they were all too tight to close.
The painting of the details has started.
The IDF 13/75
The French 13/90
The Argentinian 13/105 (waiting for a replacement barrel to arrive)
Olivier
Very nicely done. You have inspired me to build one of these little guys. Especially like the camo one.