OMG! They were such a bear to get on in the first place, AND NOW I TO GET THEM OFF AND DO IT AGAIN!!! UGH!! But it must be done. I’m 3D printing the mating half of the blade knuckle since I’m anticipating having to maybe break something in getting them reversed and I want to replace the damage end with the hole broken out. Wish me luck. I’ll report back when surgery is underway.
2 Likes
Lucky for me and Gino, having spent the time to pin those blades instead of gluing them, I was able to remove the blades reasonably easy without causing much damage or taking too much time.
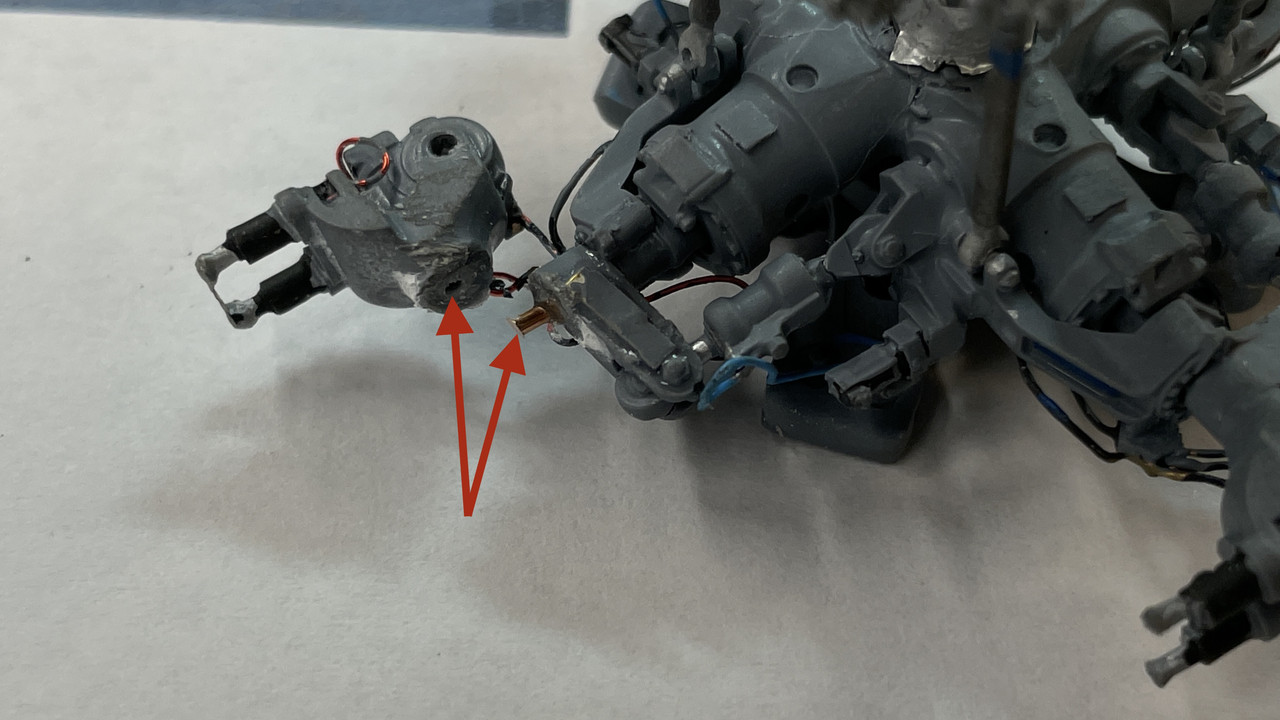
While trying to get the blades back on I re-torqued the knuckle that I broke yesterday and rebroke it. This time, knowing that more CA wasn’t going to do the trick, I drilled and inserted a 1/32" diameter phos-bronze pin. It was much more secure after regluing.
I got three of the four blades in again. The last one is the one with the 3D printed end. I just printed the mating half which I’ve also pre-prepared with hole positions to pin the parts together and to the end of the blade since I’m also cutting of the battered plastic end. This will give me two good eyes into which I will put the mounting pin.
Tomorrow, the blades will be on I promise. I’m still having trouble positioning them fully folded. The resin knuckles and the plastic blade ends do not conform well to each other. I’ve had to grind away little bits of the blade end to let it swing further towards the hub’s center.
Meawhile, I’m continuing to draw like mad on the Iowa Turret Project. I got the gun loading apparatus finished. This was a very challegning SketchUp task. Here is the cradle in the loading position. The gun is held at 5° during the loading procedure. This gun can be reloaded in 30 seconds.
And here it is in the firing position. There’s still more detail to add around this equipment which I will eventually get to.
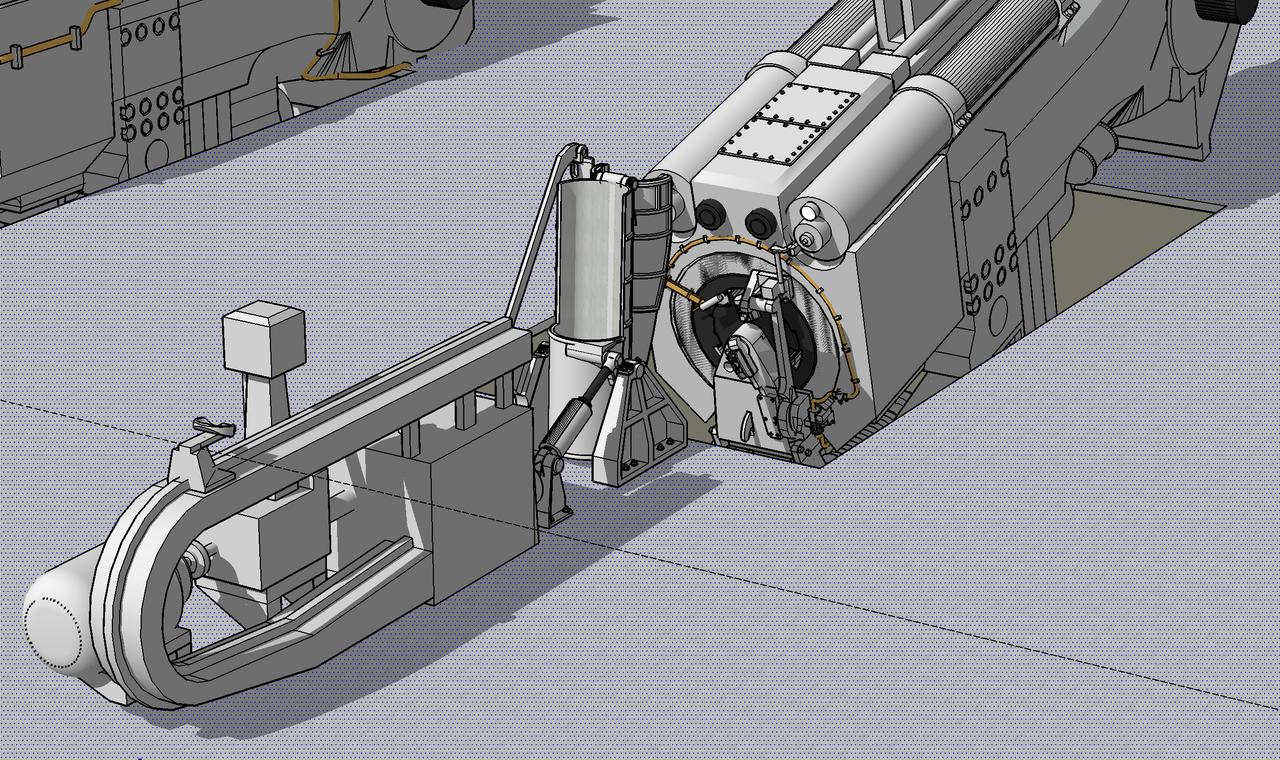
Again, I’m fully describing this project elsewhere in the forum.
6 Likes
Good deal. I’m glad the blades weren’t too hard to redo. Looking forward to seeing it all together.
First of all I’m getting this error when trying to enter yesterday’s post in the FSM Forum.

And I can’t seem to enter a new post in the troubleshooting forum. Any ideas?
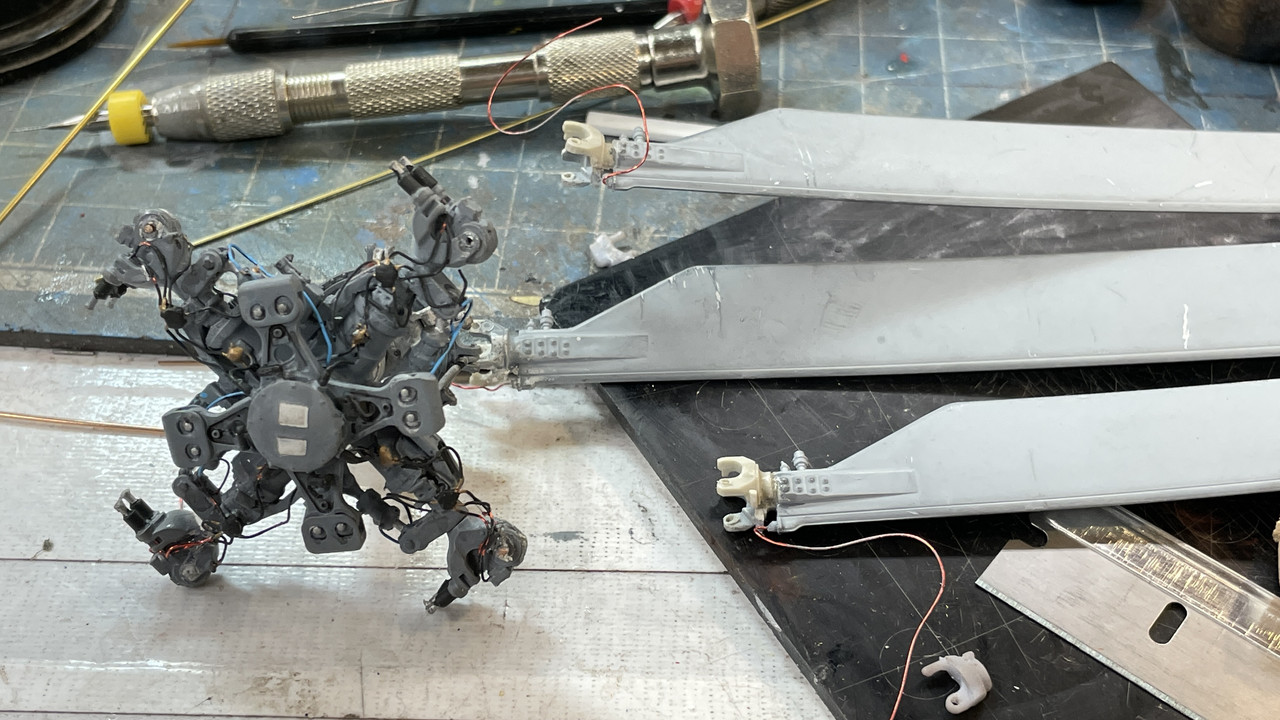
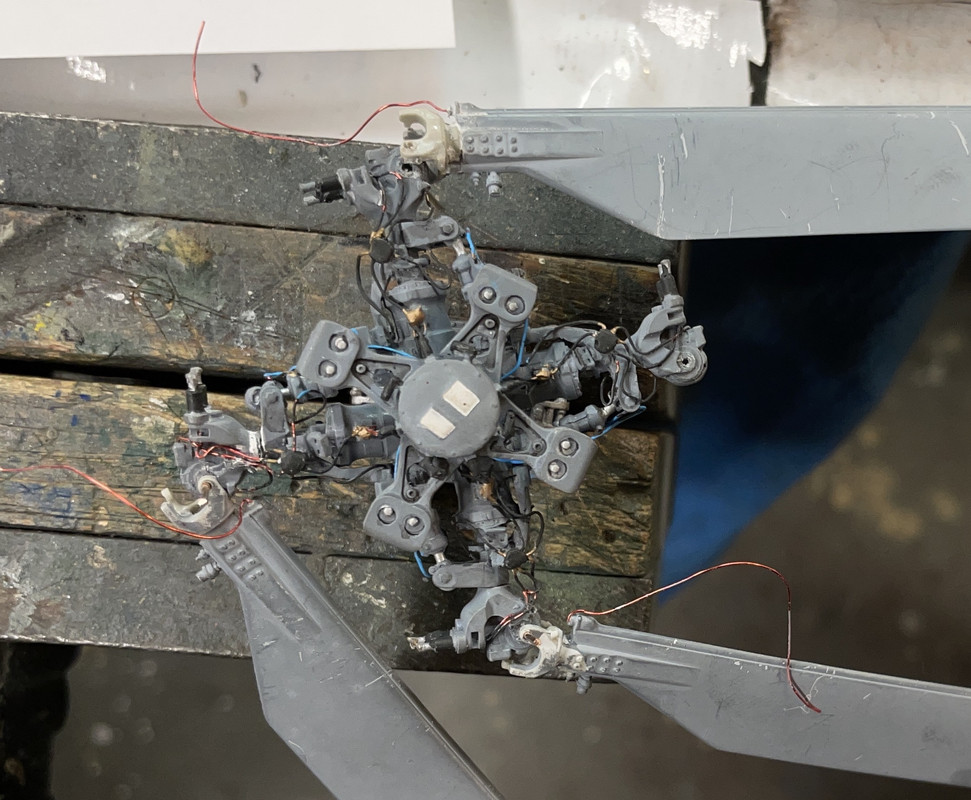
Secondly, I did (FINALLY) get the four blades attached to the hub. My new parts worked although they still required a styrene spacer and then do some creative carving of both the claw and the rotation motor head on the hub to get the new parts to sit correctly on the hub. Again, the pinning idea was the reason I could do this at all. The hub’s taken quite a beating and will need some TLC to bring it back to it’s prior self.
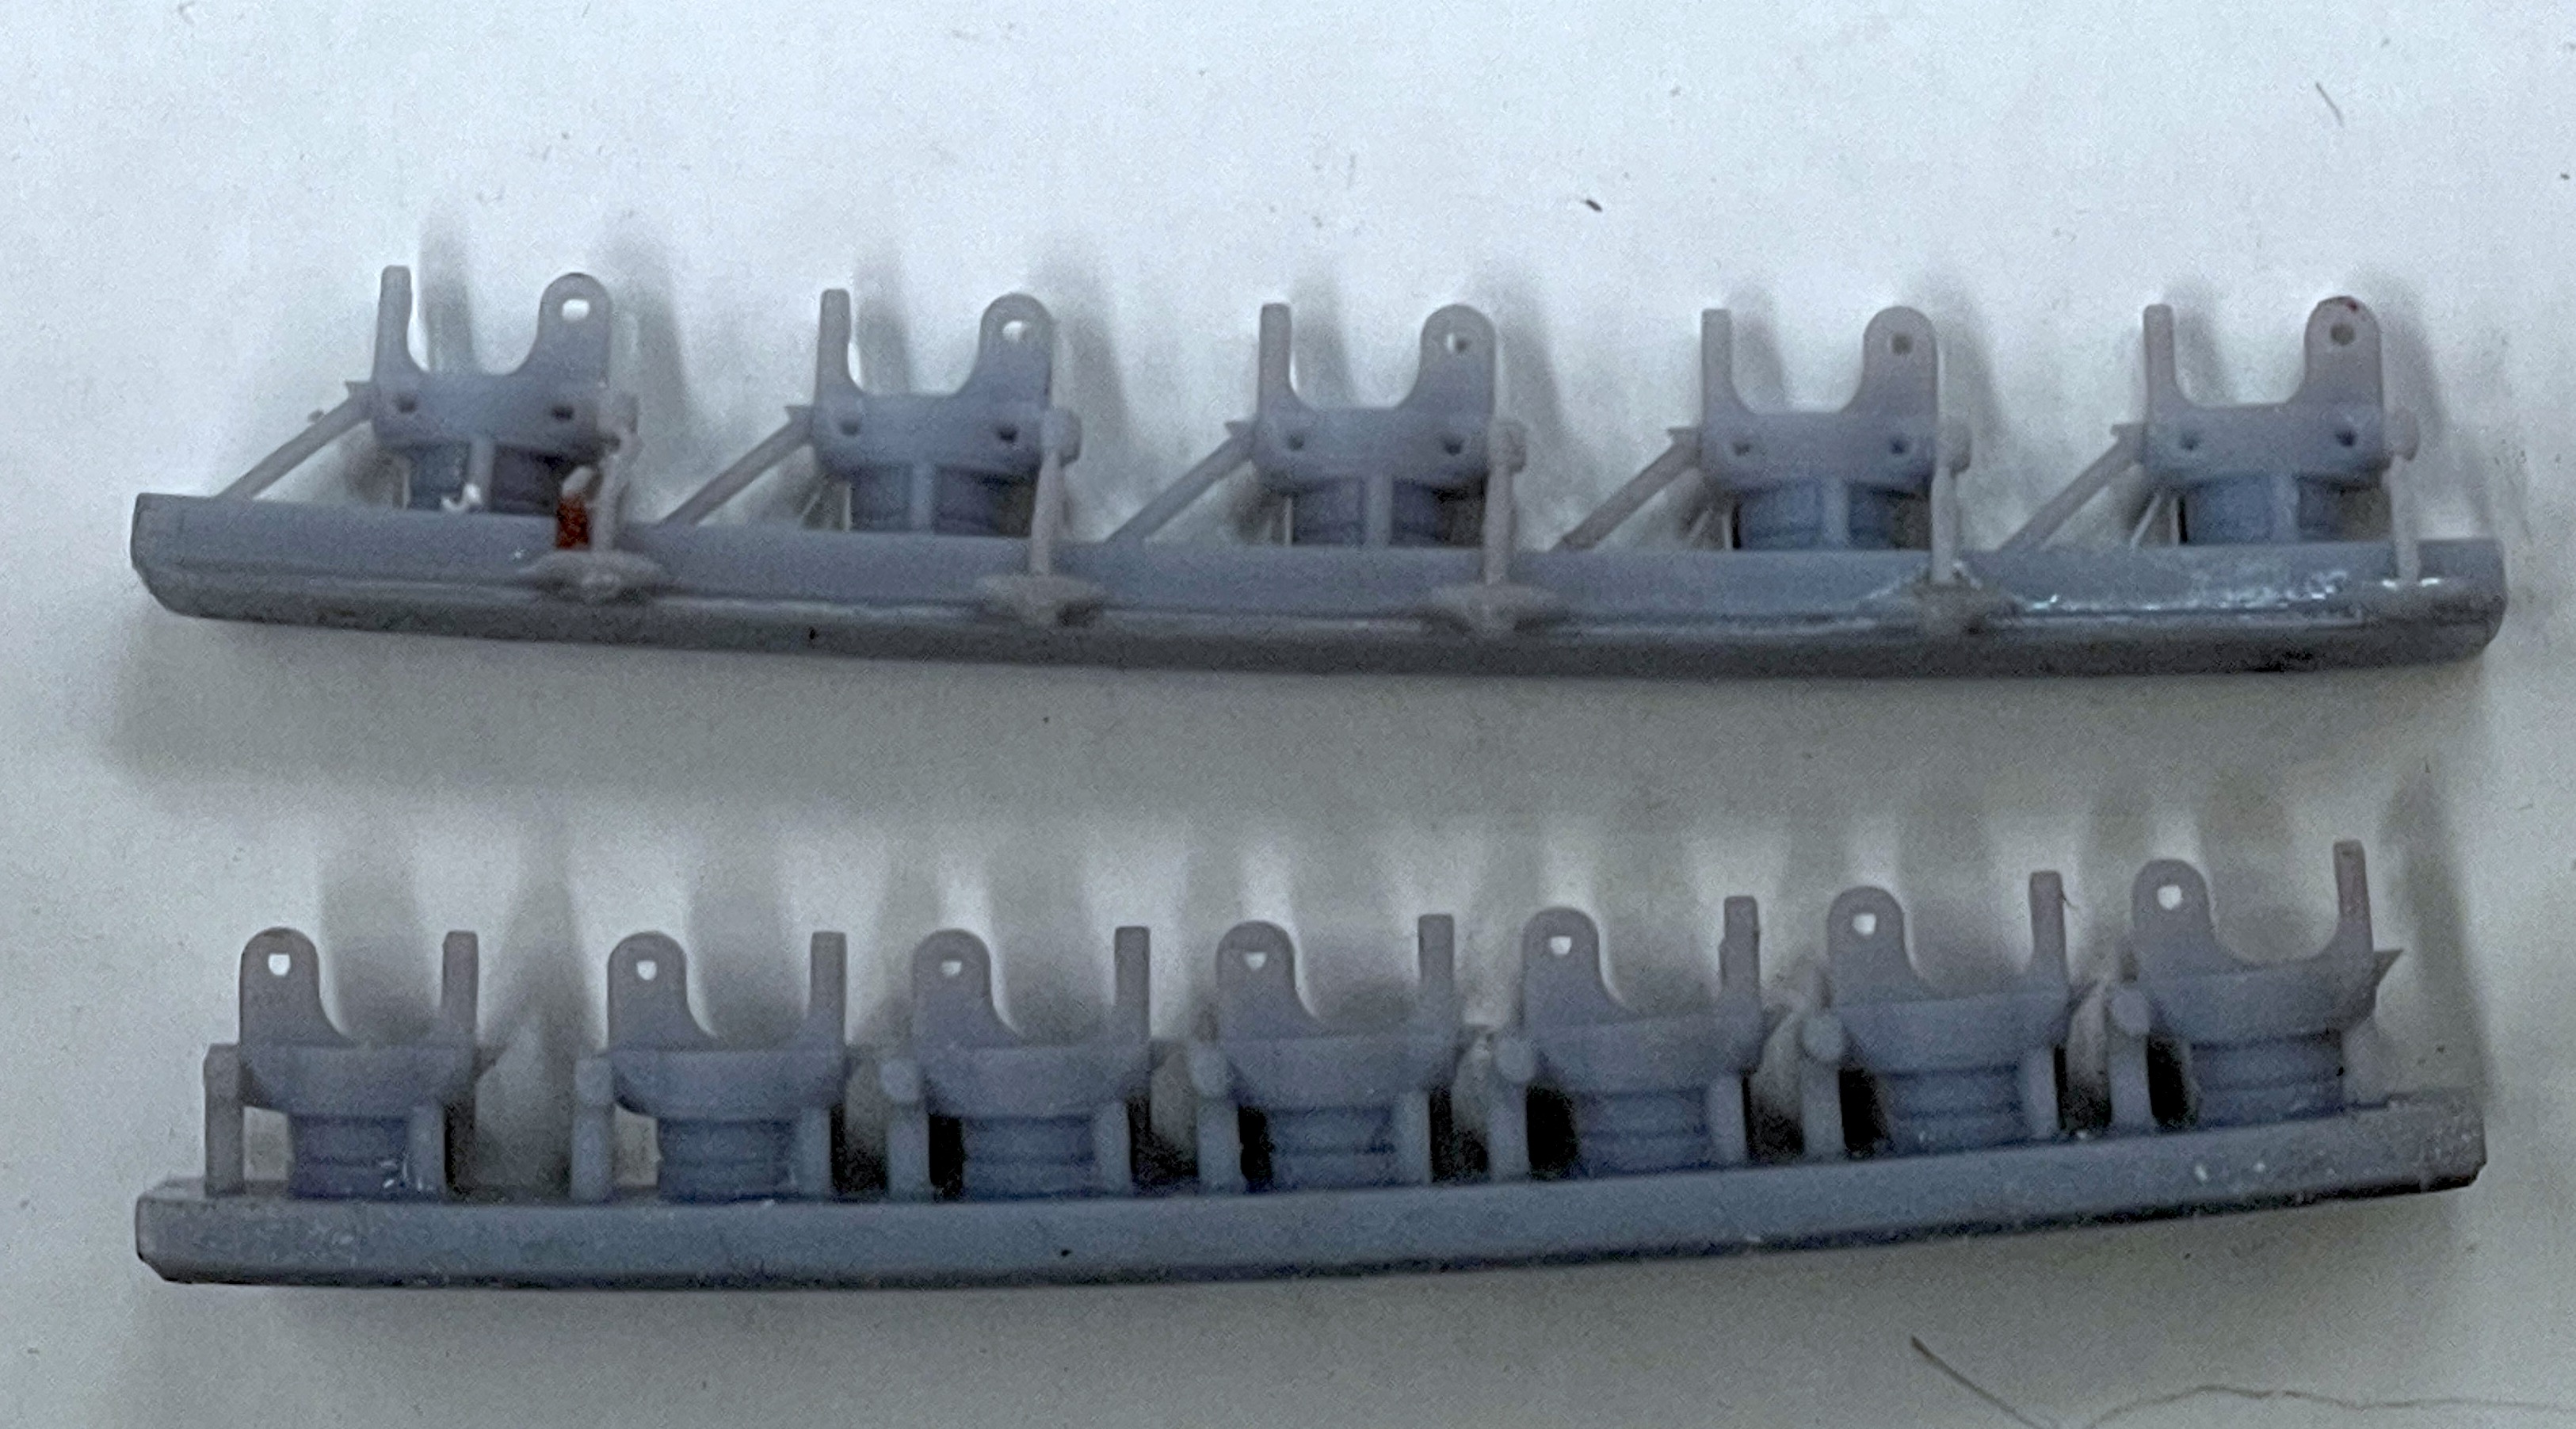
Here are the two sets of claws. I’m glad I made a bunch since I did use a few before I got it right.
And here are the four blade facing in the correct direction. The broken hub came loose again, but the pin I inserted kept it in position. I’m letting it float until I put the blades into their racks and then I’ll hit it with some CA. I have to hook up the blade deicer lines and repaint the rest that show their underlying copper. Actually, considering the abuse it took and the number of times I dropped it on the floor, the fact that it looks this good is a minor miracle. I have to put back most of those PE straps on the ends of the blade lock indicators. I have to touch up the blade paint, detail the sensors on the hub end and do some slight weathering on the bolt heads.

2 Likes
No idea on the Finescale Modeler issues.
The rotors are looking good though.
I finished the rotor head, did the repaint, connected the deice lines, and refinished the blades including painting the pop-out nitrogen leak indicator. I also did the anti-collision belly light and finish painted the rear landing gear. I fixed all the blade lock indicators putting on fresh little slivers of PE fret to complete them. They do need some touch up paint. And I notice that I didn’t trim the phos-bronze rotating pins.
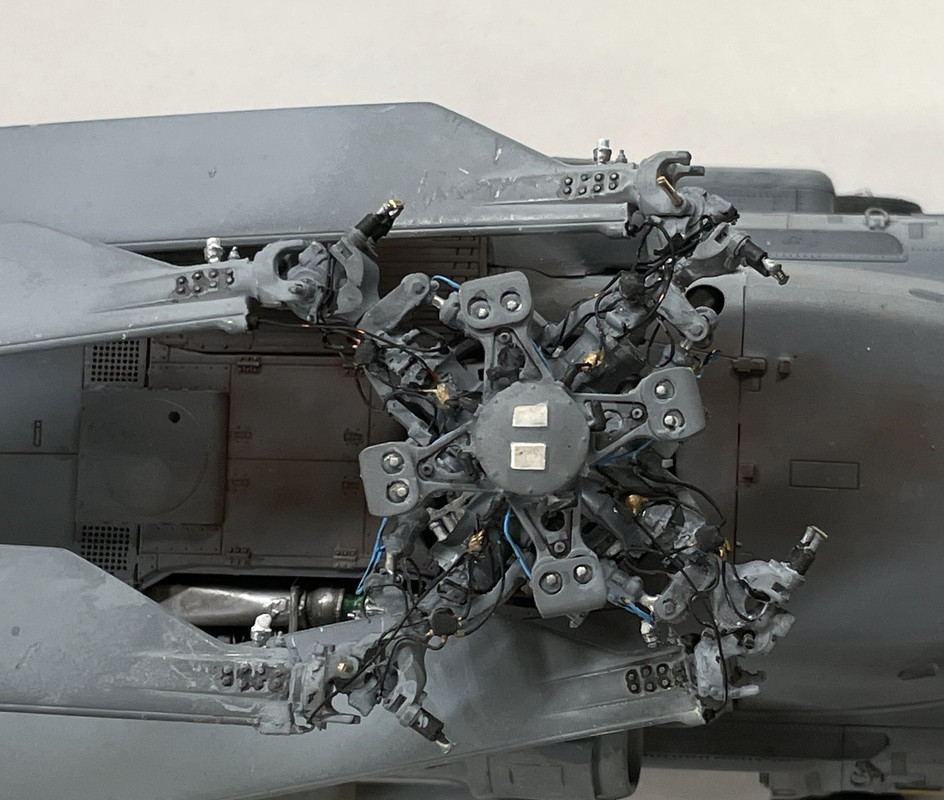
There may be a few more areas needing attention such as cleaning up the accent around the blade bolts.
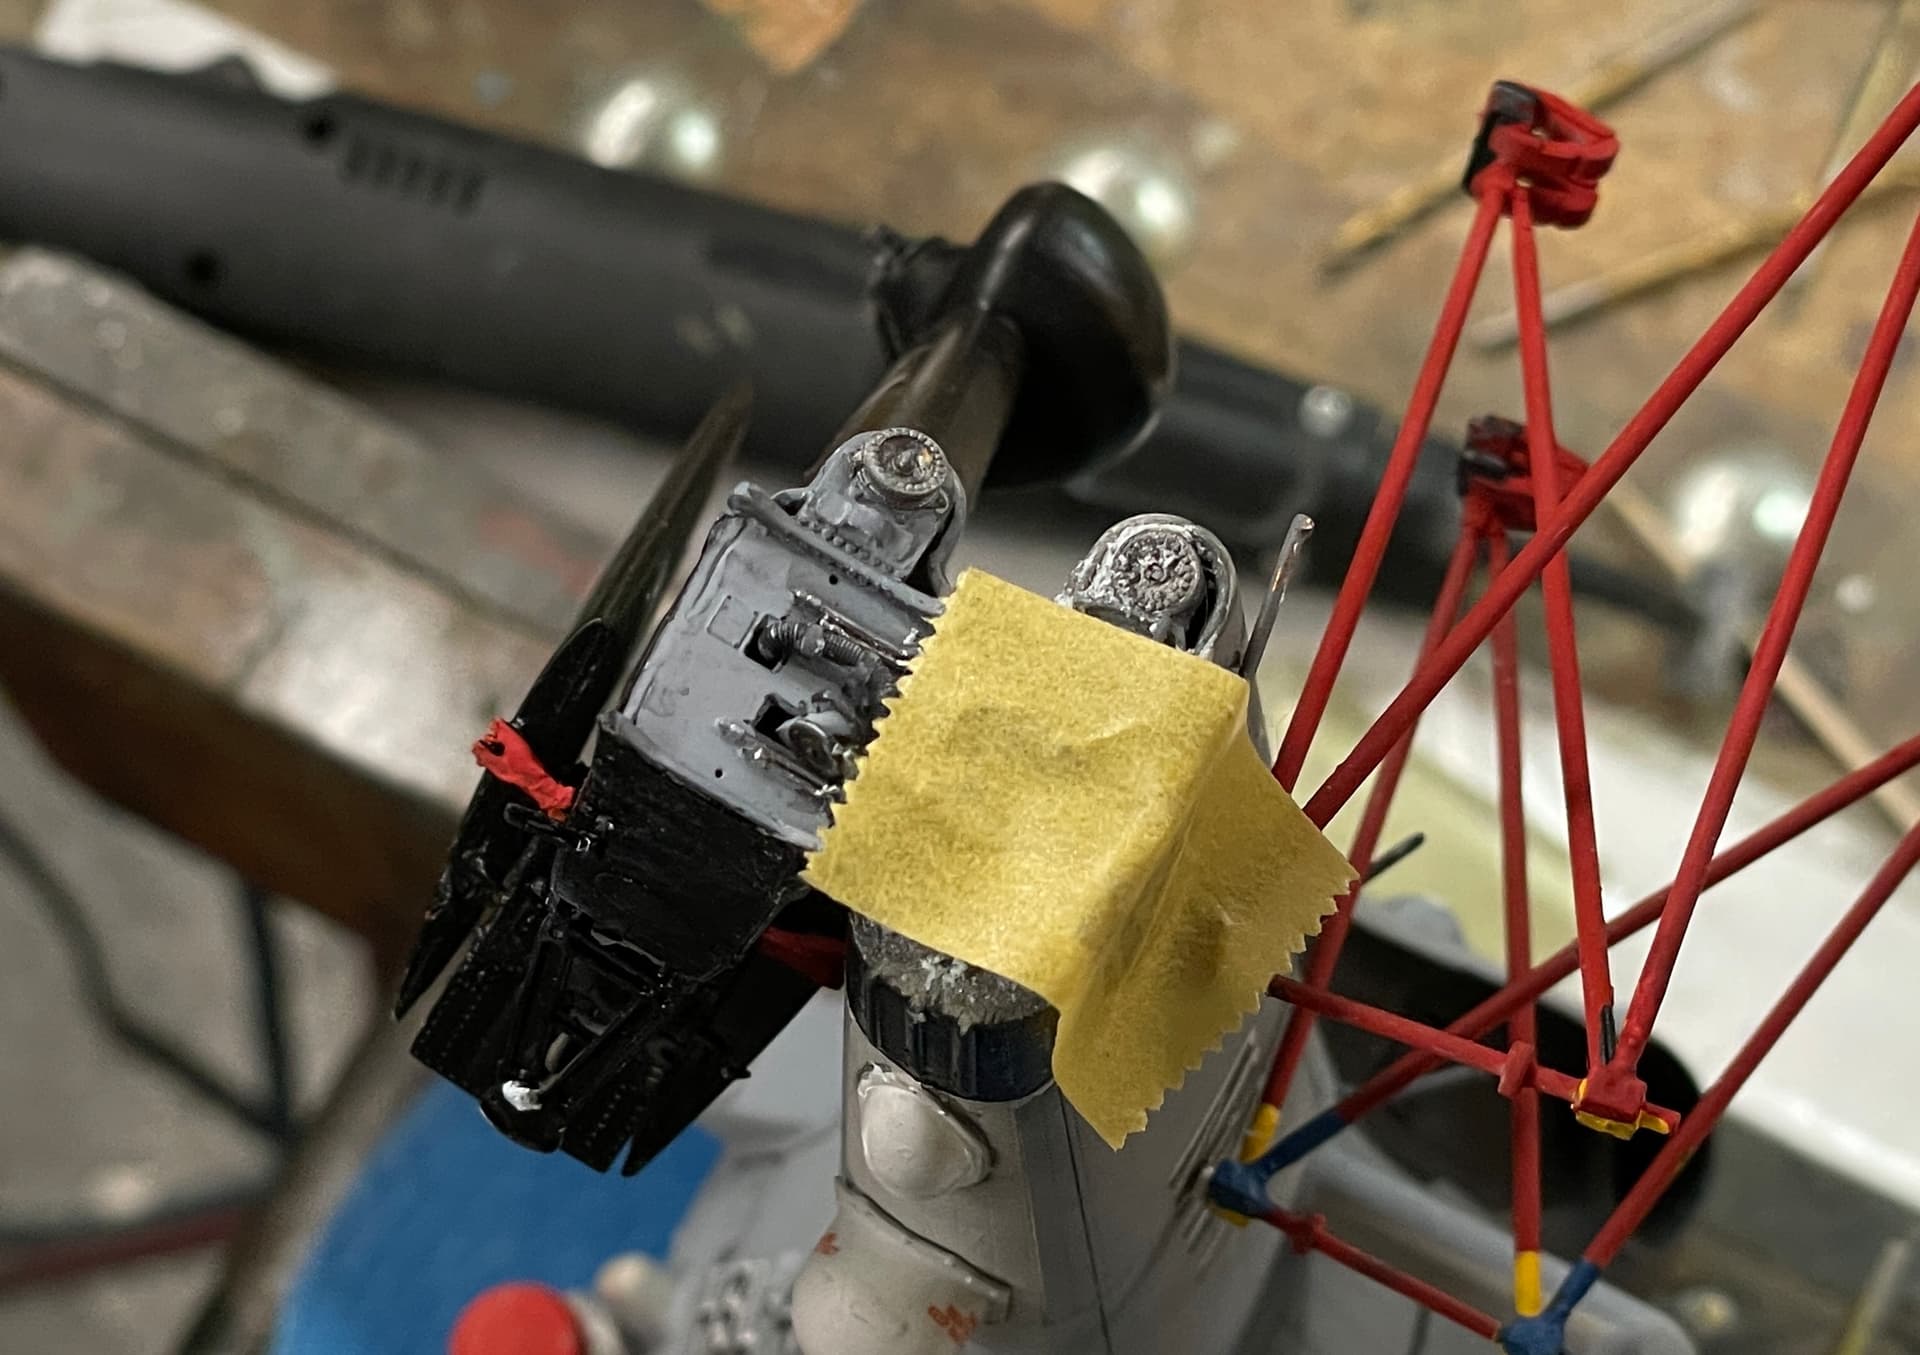
While mounting the rotor and attempting to position the blades into the holders, I broke one of the holders. I also knocked off one of the blade clamps. I drilled both and pinned them.
Ran out of time today to put it all back together. I also broke off the engine hatch by grabbing the model in the wrong spot. It’s a very delicate beast. It will be finished on Monday.
So everyone have a happy Super Bowl Sunday! I’d like Cincy to win, but really don’t care who does as long as it’s a good game that doesn’t embarrass anyone.
6 Likes
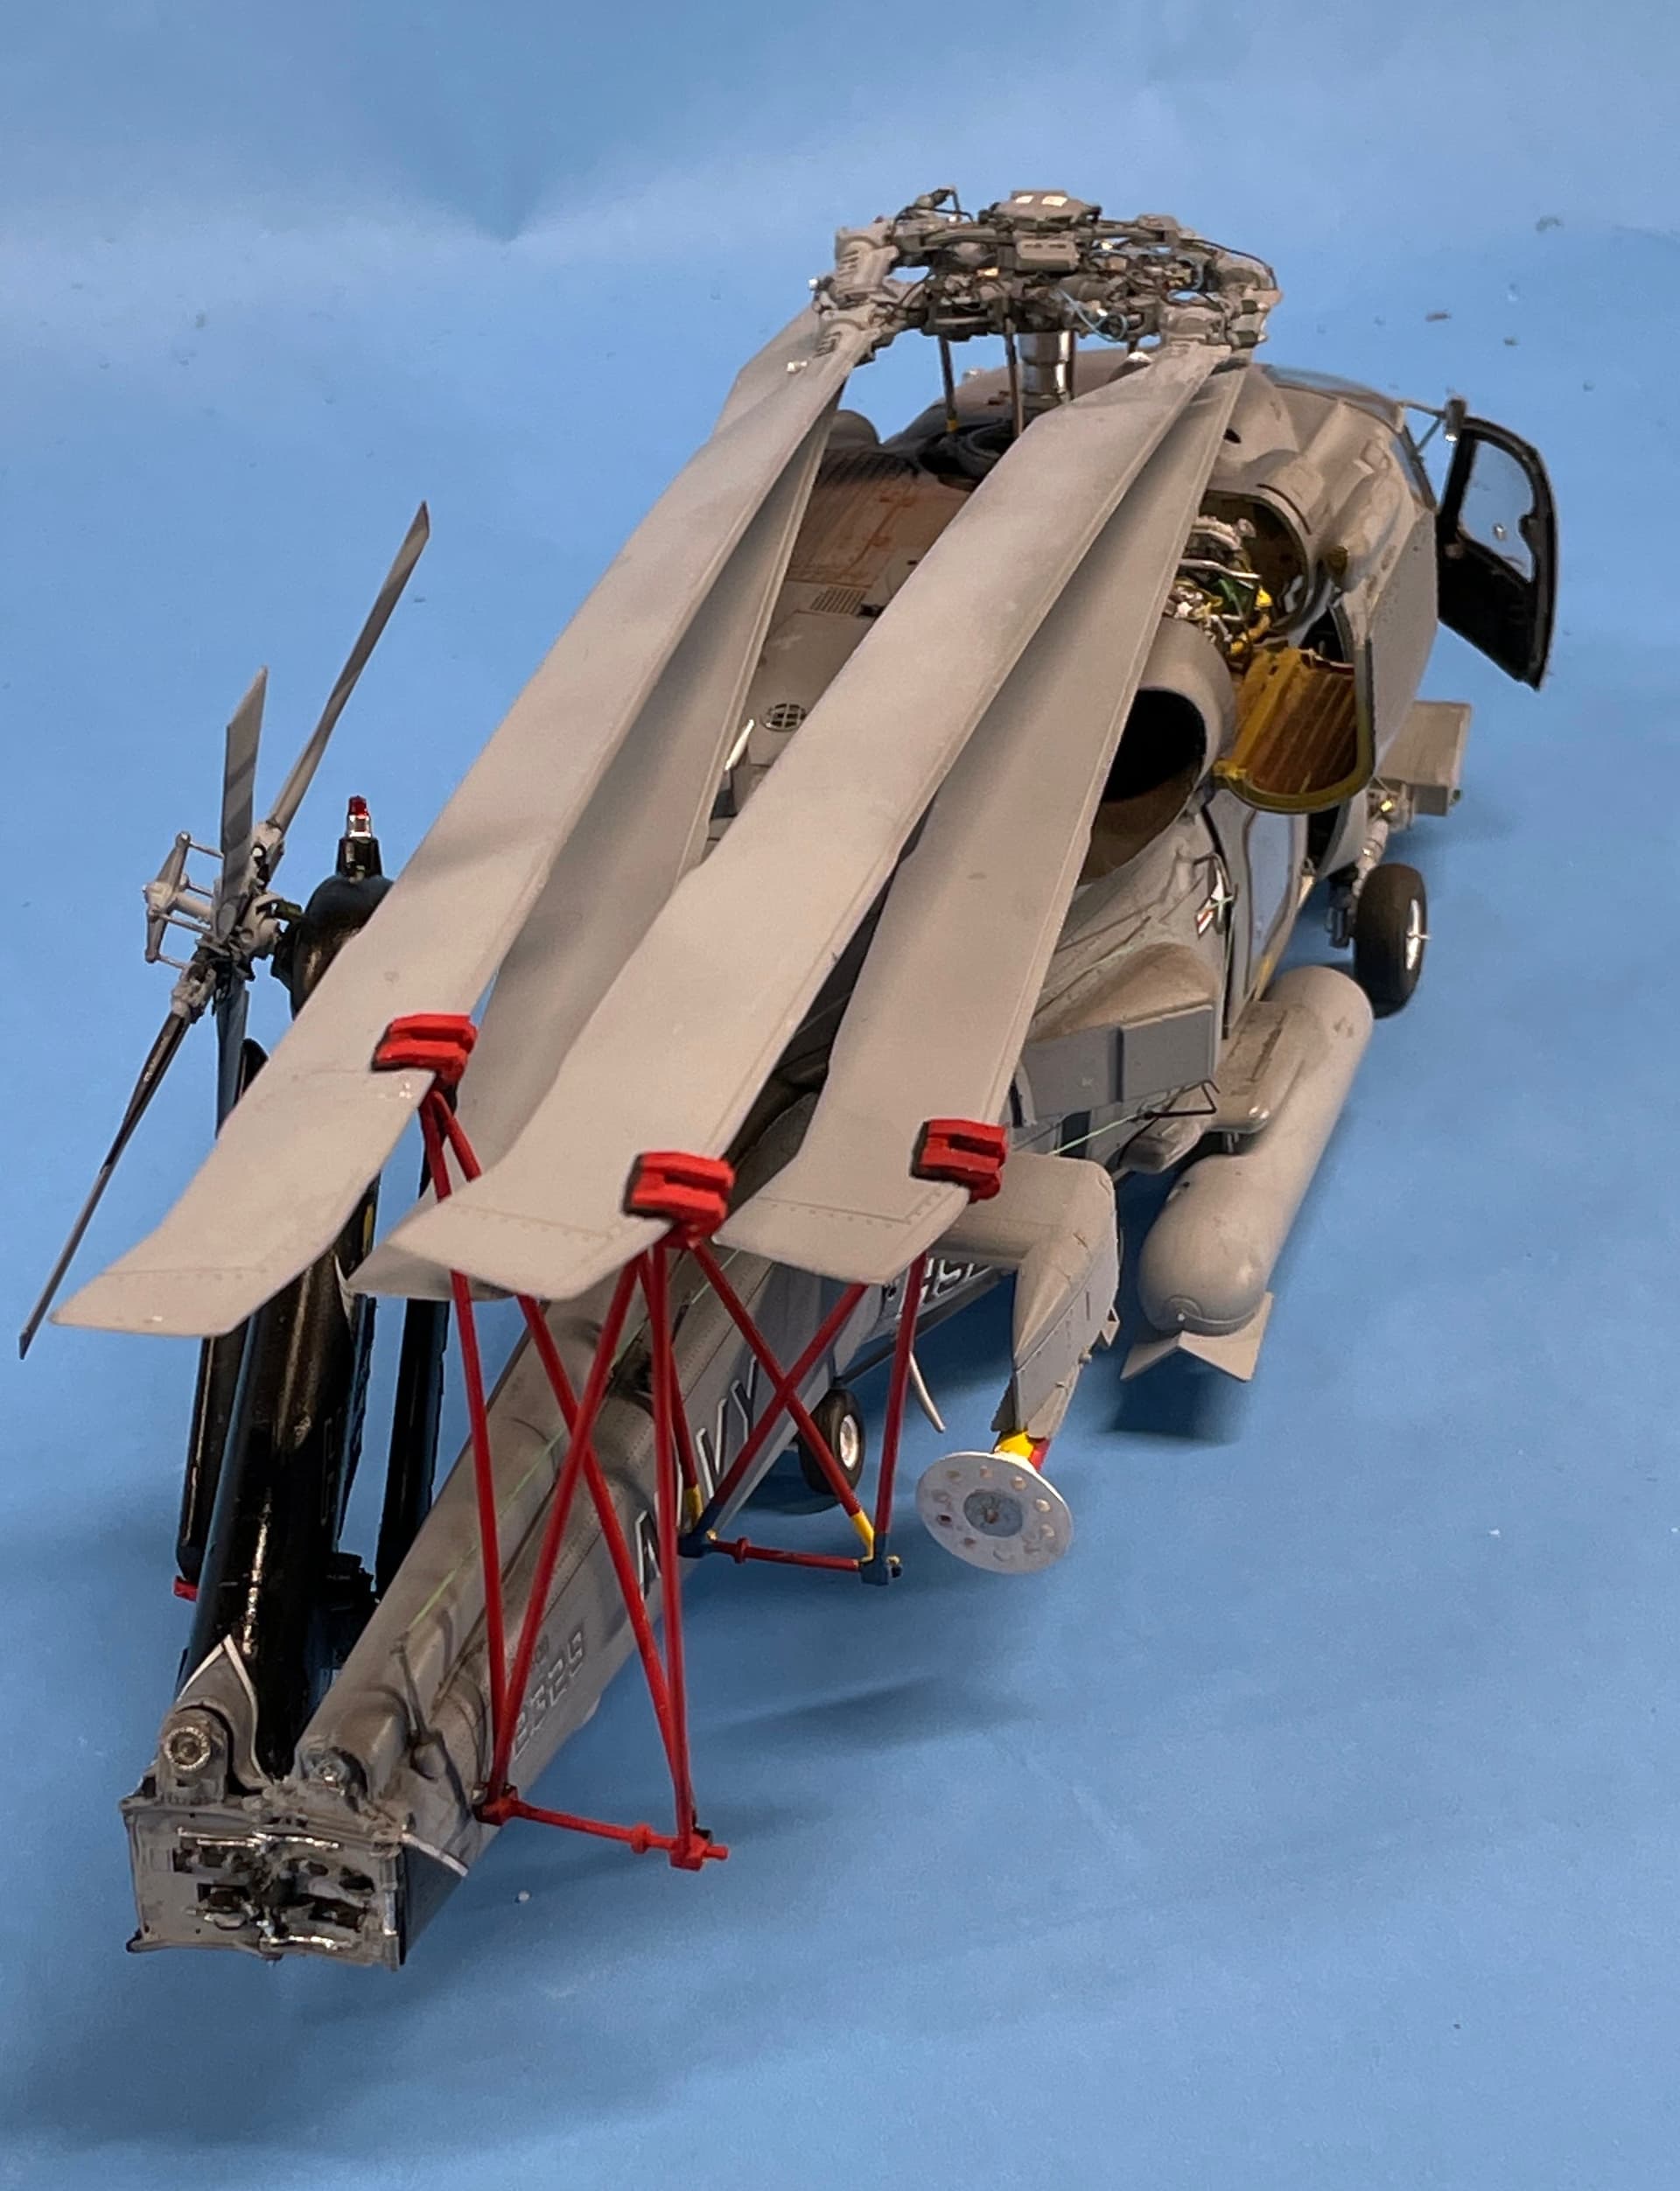
Big day! Had a gall bladder imaging session this morning to see if it’s working right and finished the Seahawk this afternoon. Won’t know about the gall bladder for a couple of days, but you’ll learn about the finished Seahawk tonight.
Before putting the rotor on I had to get the tail boom on. I chose to use epoxy putty since there wasn’t much gluing surface for conventional adhesive AND the surfaces themselves were not very secure. I put a wad of putty on the back of the fuze side of the ResKit hinge component and pushed the parts together. Had to hold it for a while by hand and then used some tape. The putty cures pretty fast, and while this was going on I removed a lot of the stuff that had oozed out of the joint all over the place.
After it cured I did more fine cleaning using various dental tools. BTW: you may want to ask you dentist if he has any tools that are no longer usable in the practice, but could be very useful for us modelers. I got a bunch from my dentist. After cleaning I had to go back and touchup paint any areas that degraded during all this fussing.
I did final touchup on the main rotor, trimmed all the extra-long pins that are now holding the blade hubs, and did final finish on all the wires and bits.
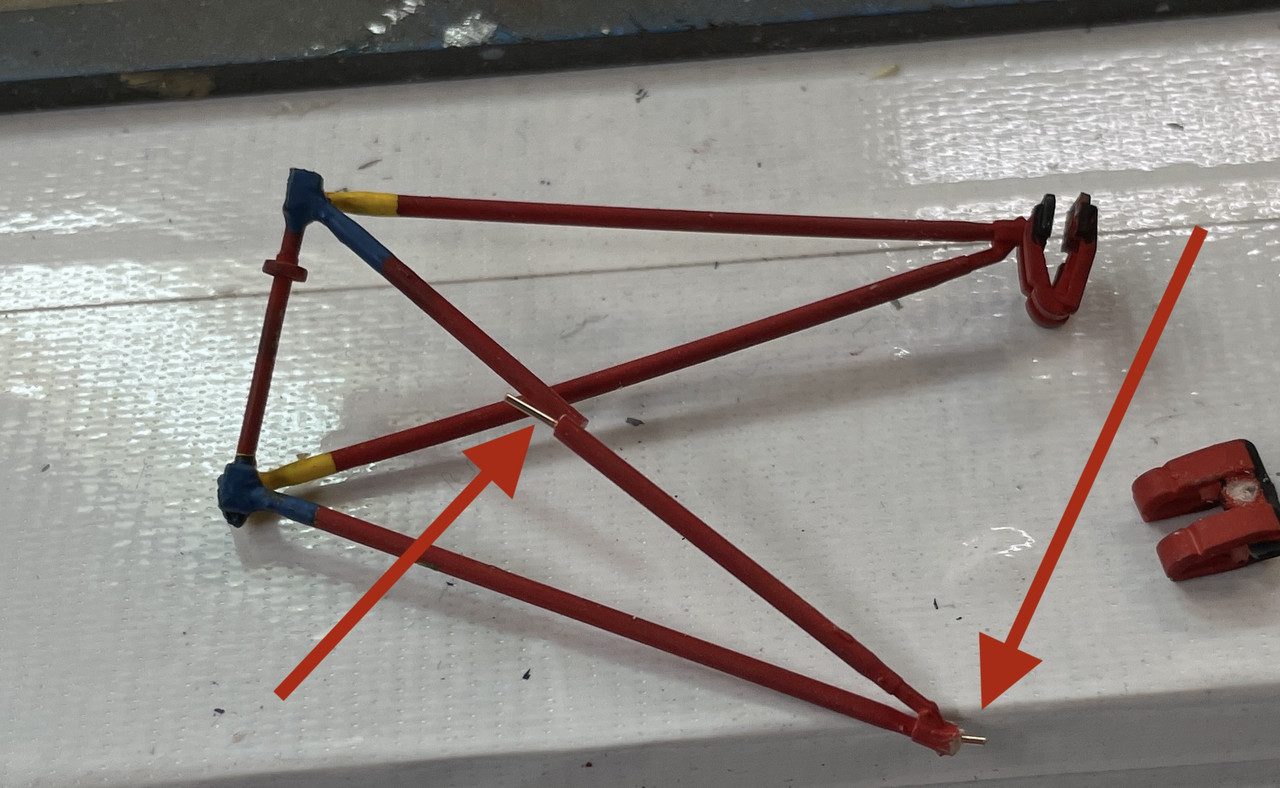
I had to repair the rear blade brace since it fractured right near the fuze joint. Don’t know when it happened. I drilled and pinned it. Not easy with the model so far completely and the brace glued to it. Kitty Hawk styrene was a bit brittle and broke way too often way too easily. The rotor went on easily and all the blades aligned perfectly with the braces. Miracle!
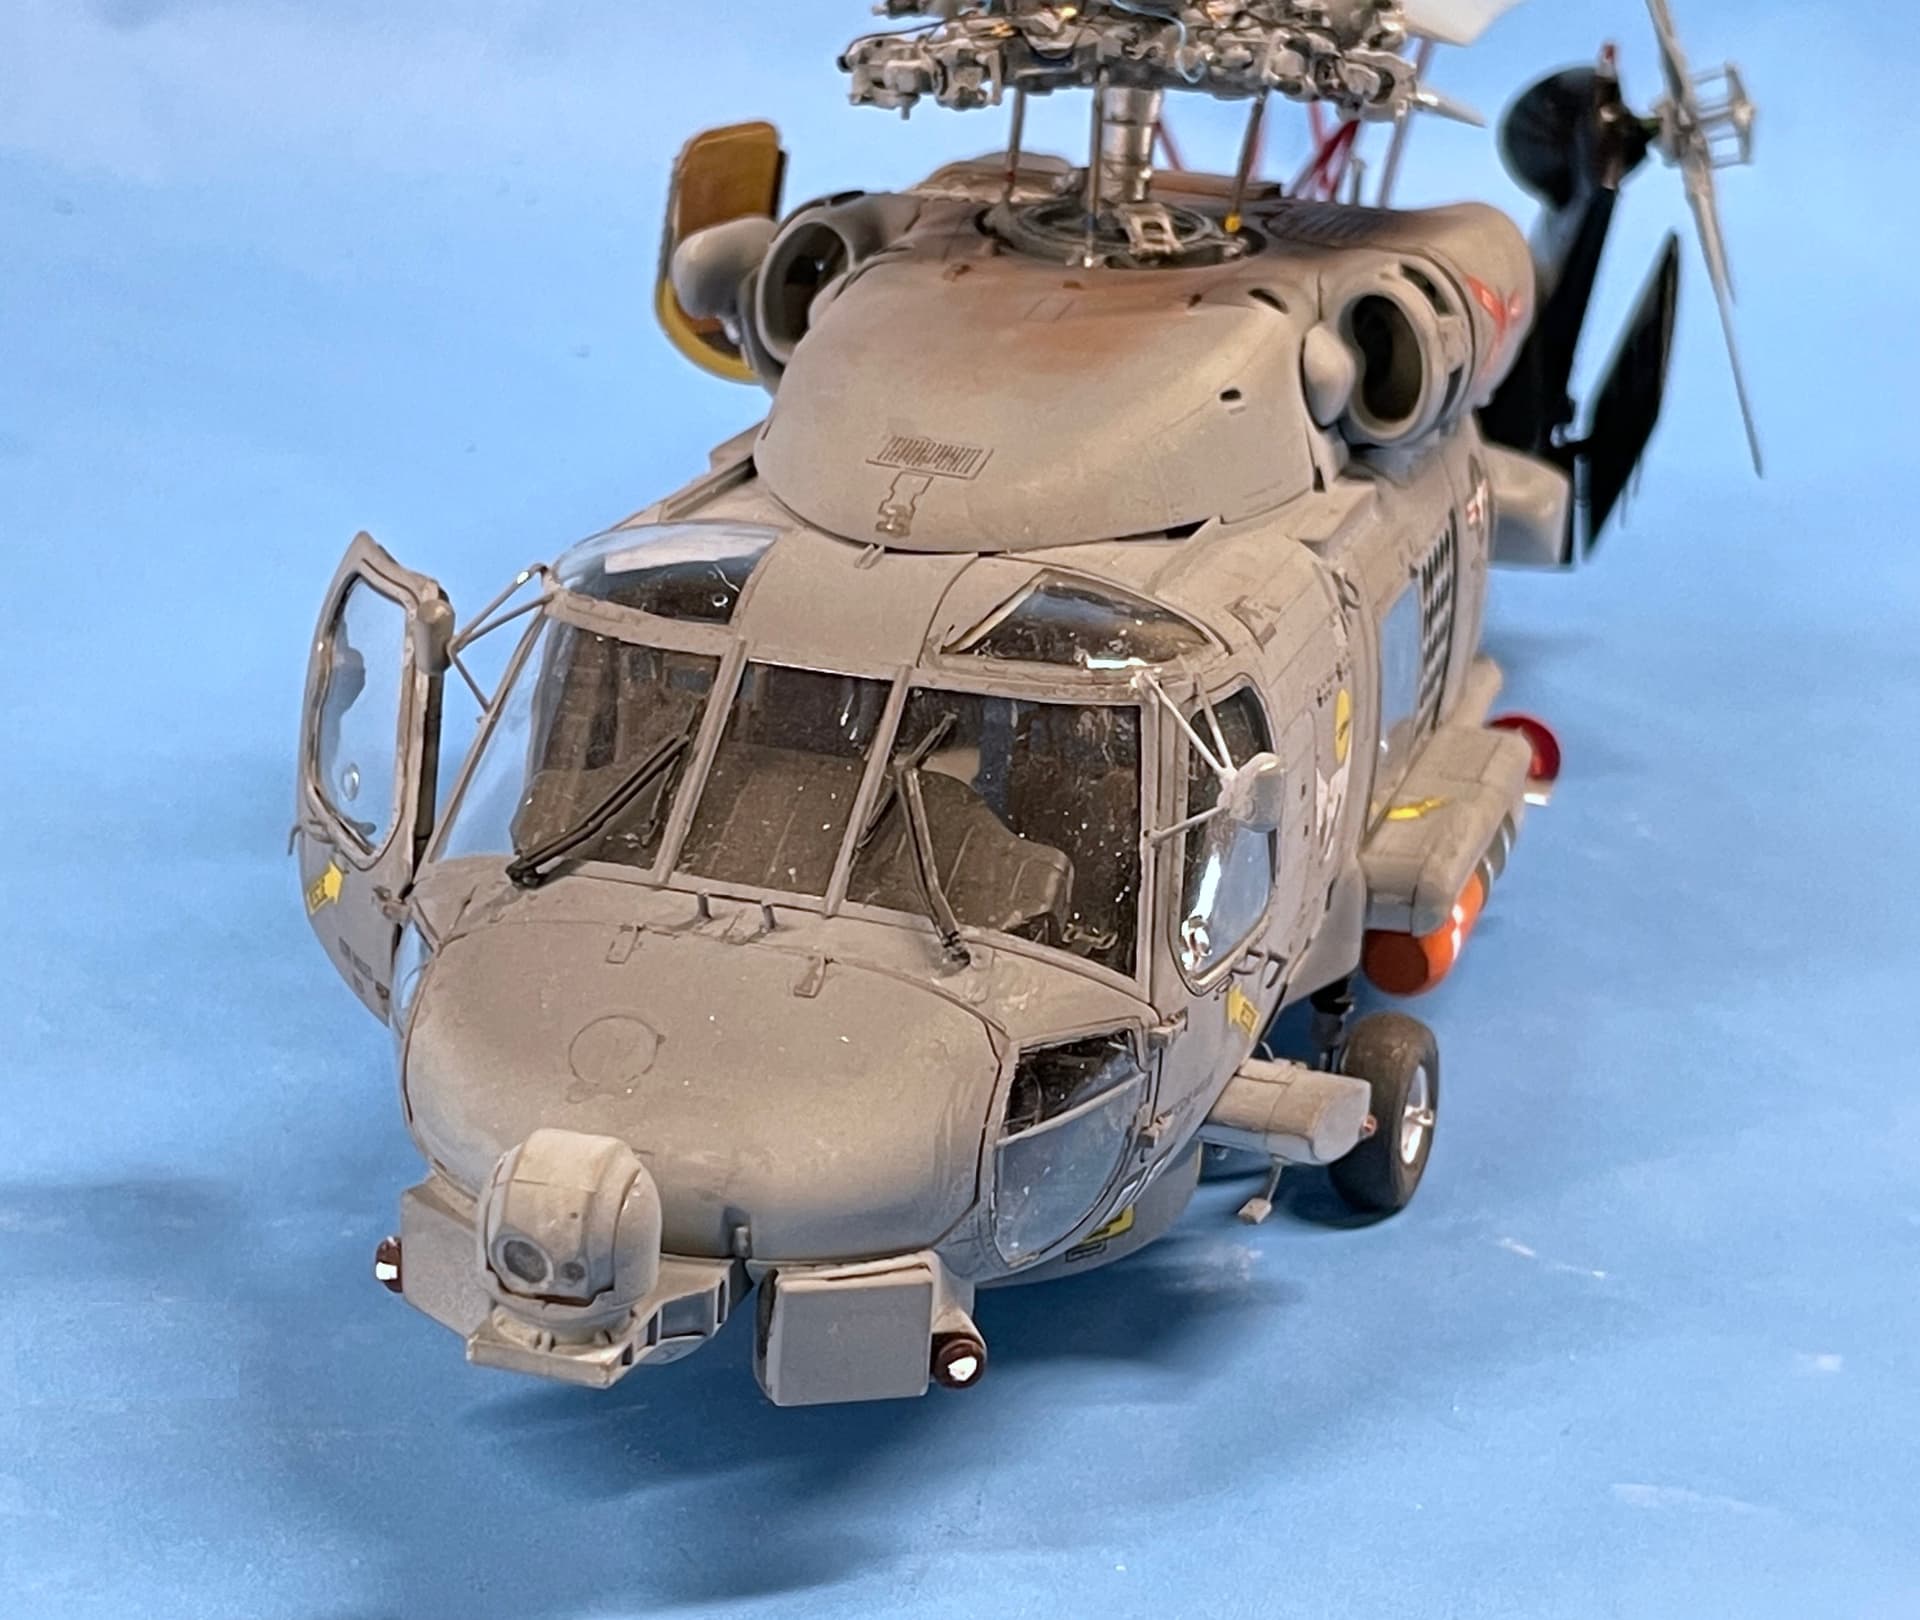
I then remembered that I had to add paint and add the missile warning sensors that go onto the port and strbrd EMS pods in front, and the HF antenna wire. I also had to reattach the open engine cover this time with wire. It’s now a bit flexible so you can bump it without it fracturing off. CA is too darn brittle!
For the antenna, I used E-Z Line Lycra inserted into a 0.030" Albion micro tube held with some thin CA. For those that haven’t use E-Z Line, it’s great for rigging antenna and small naval ship rigging. It is hugely elastic and when slightly stretched stays taut. It also glues almost instantly with thin CA. I think it has to do with the huge surface area within the fiber itself. The stands making up the yarn are very fine. The tube was inserted into a hole I drill in the fuze at the antenna entry point. Also a pain in the butt since the model (including the rotor) was already there and in the way.
With that it was done. I still plan on doing the base, but the model stands on its own nicely. Here’s the album.
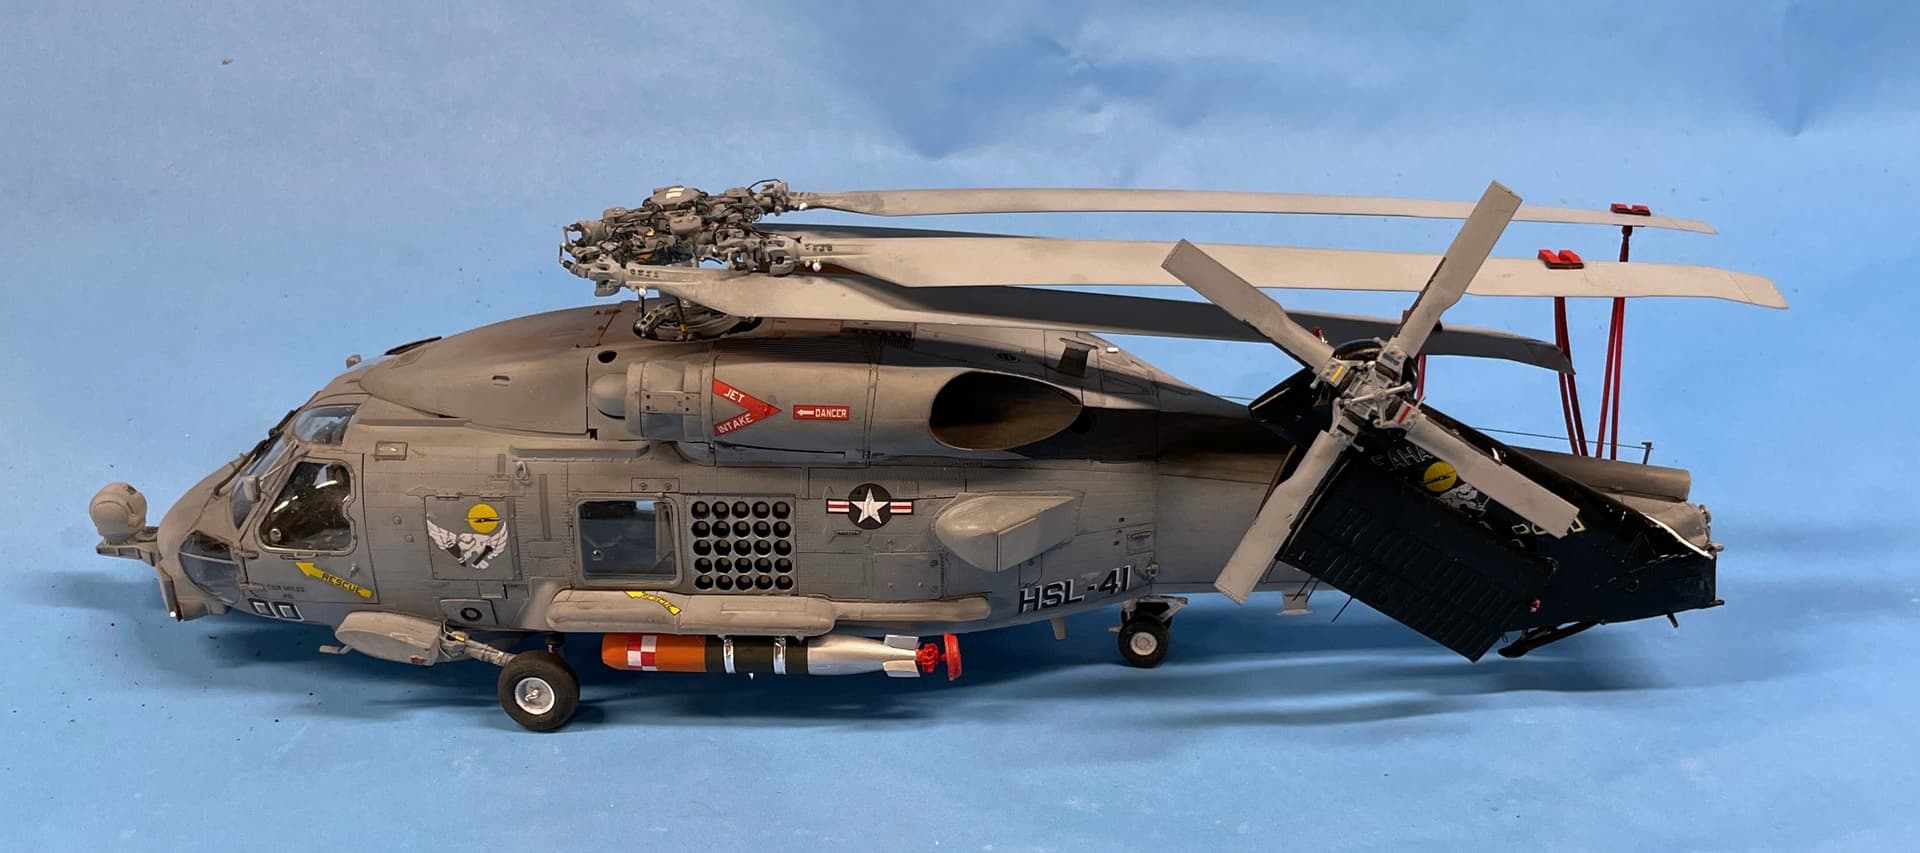
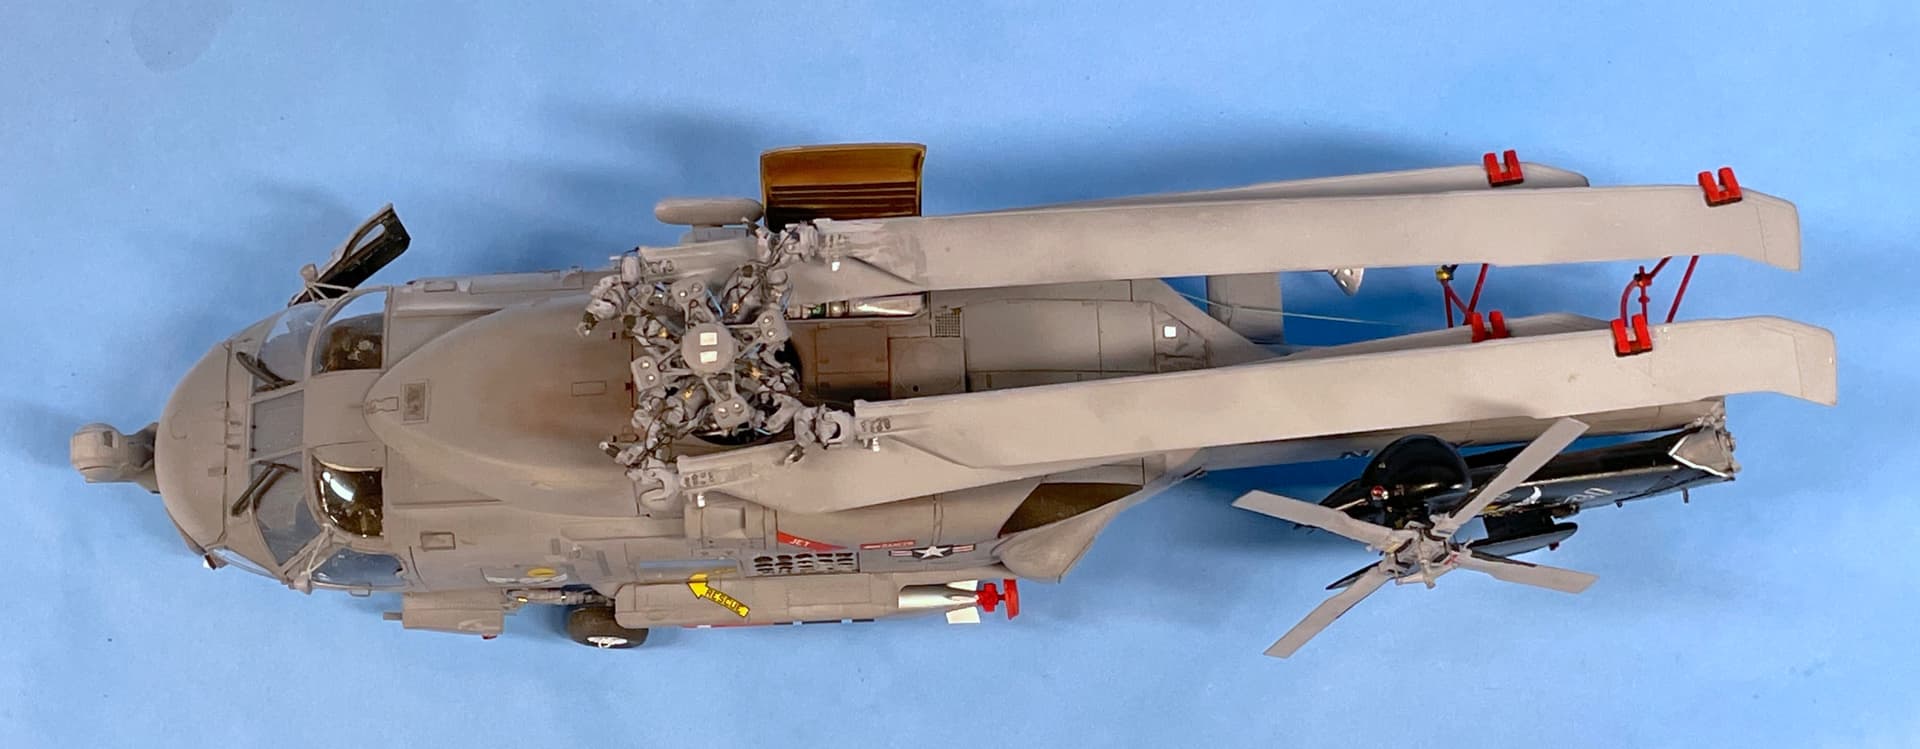
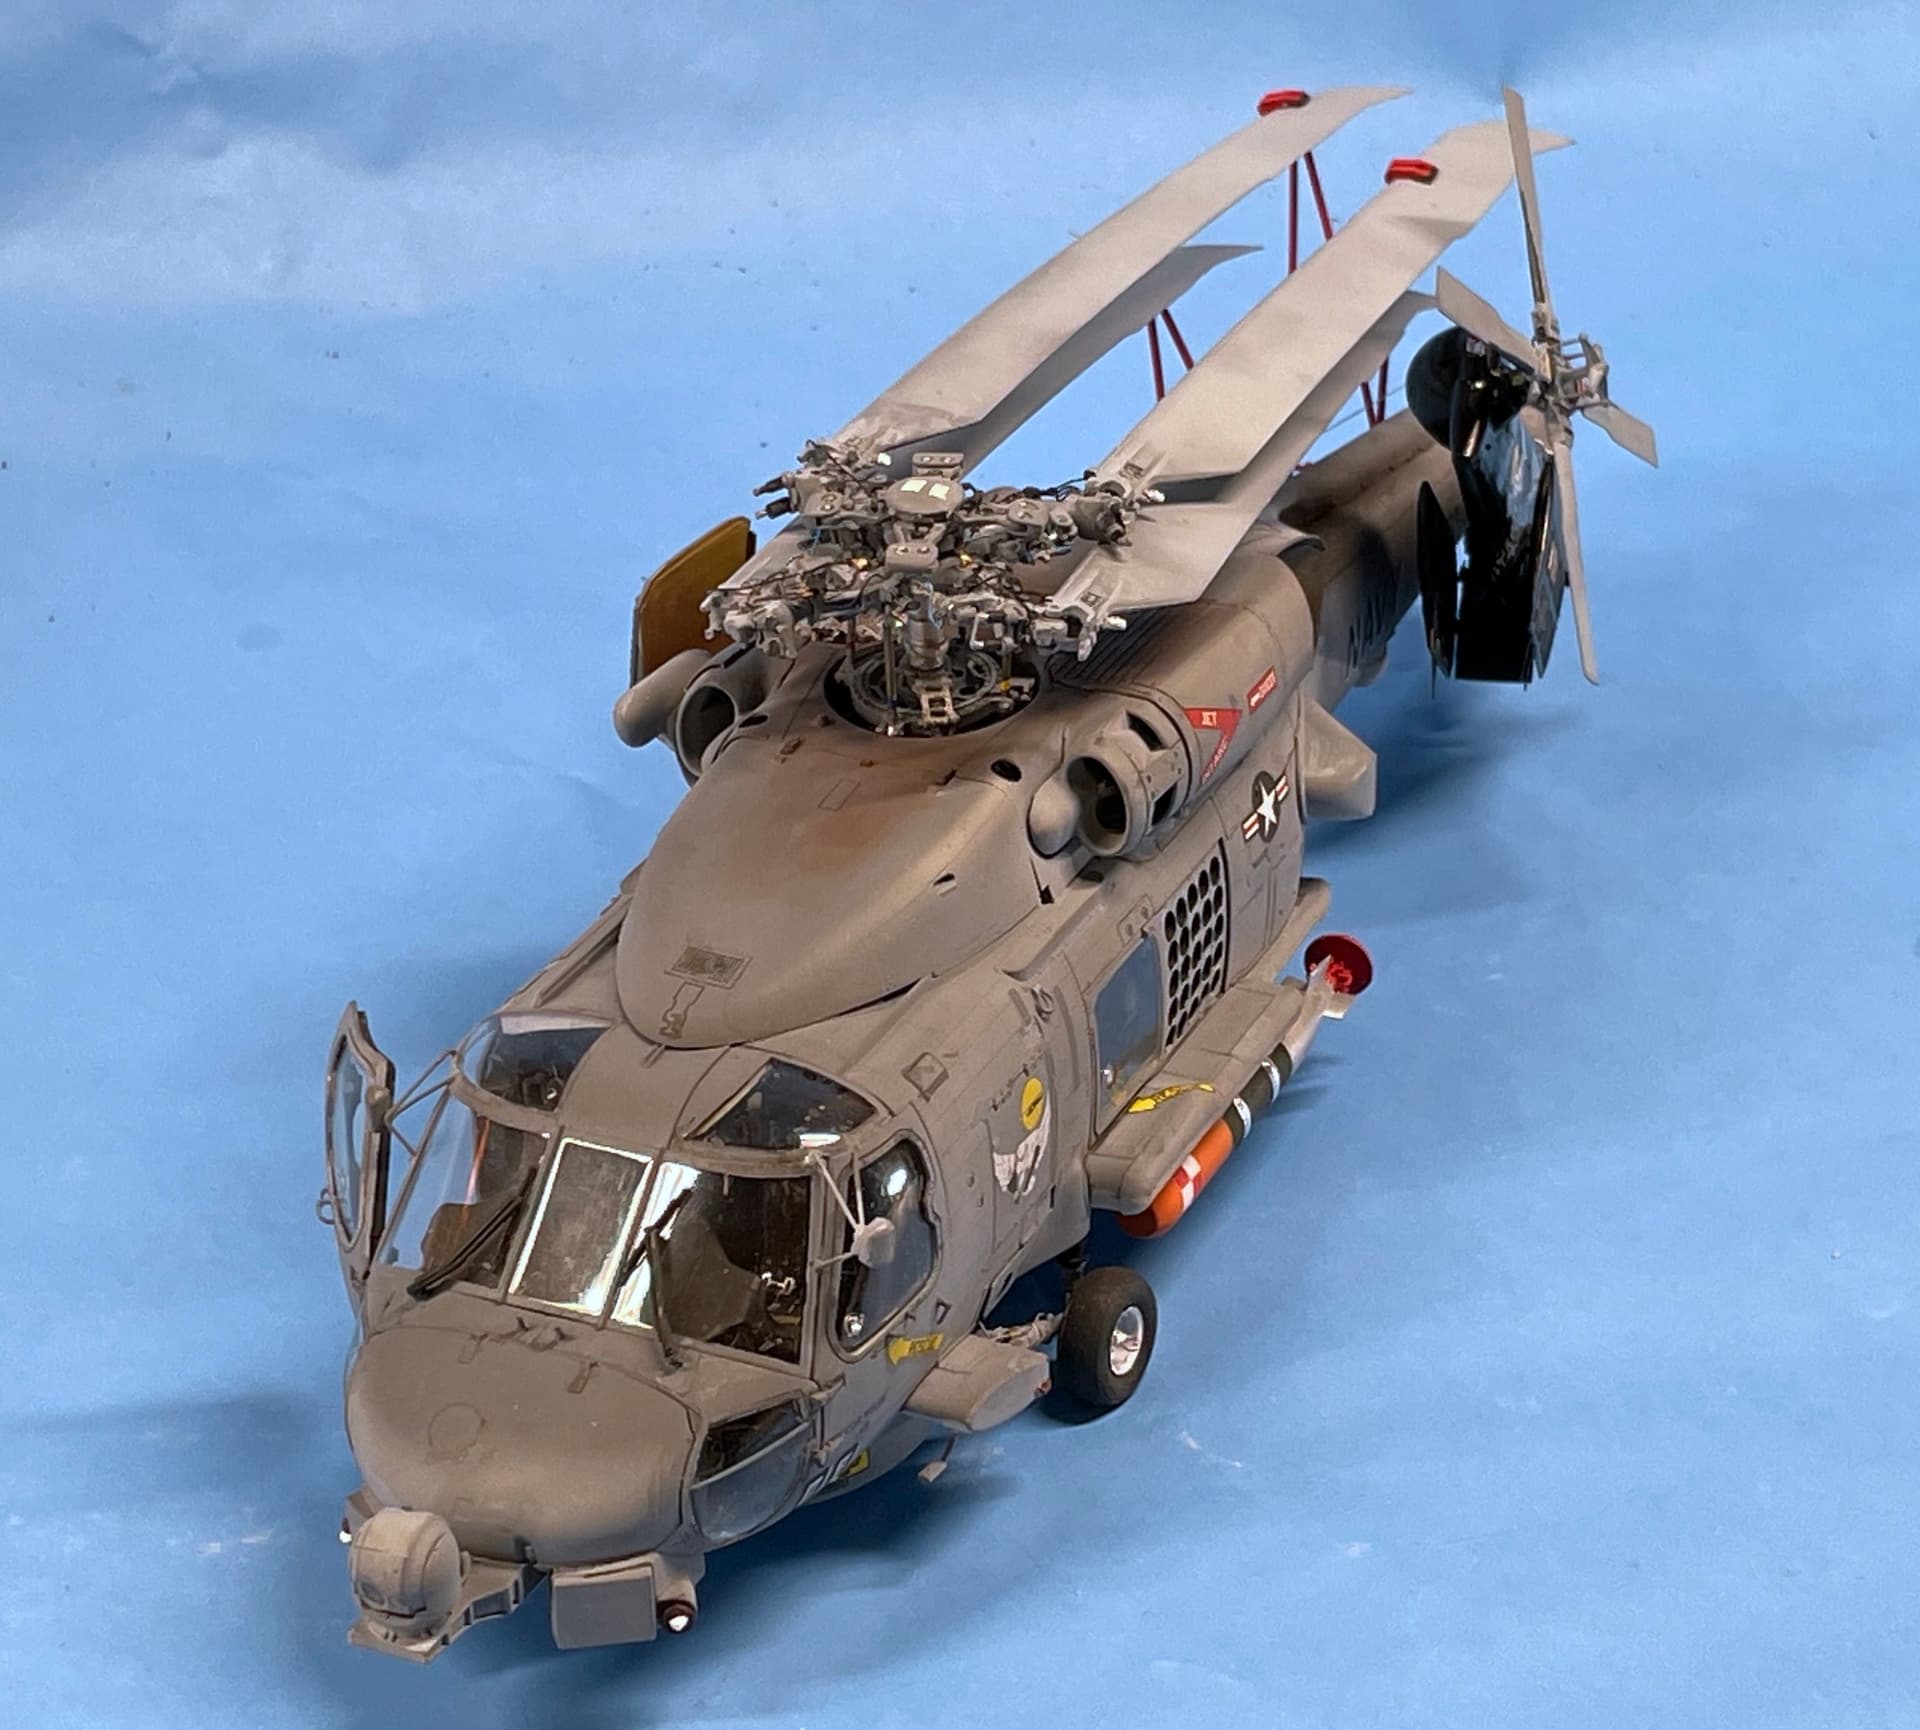
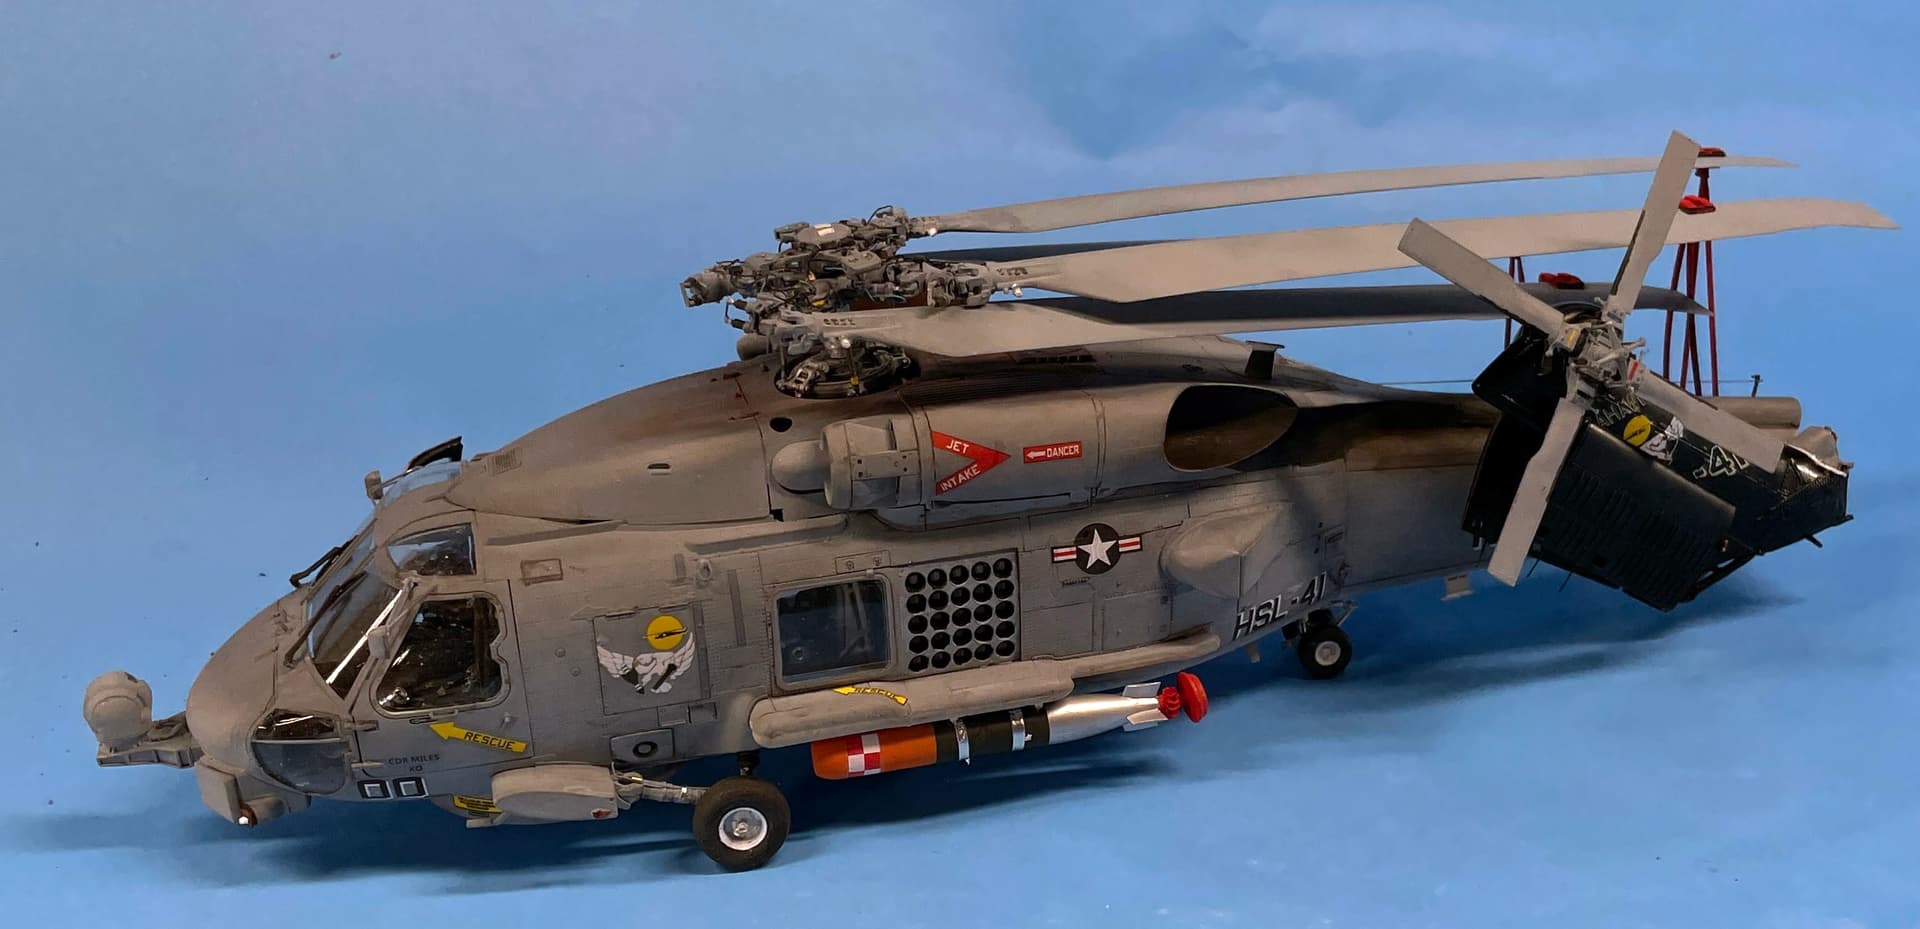
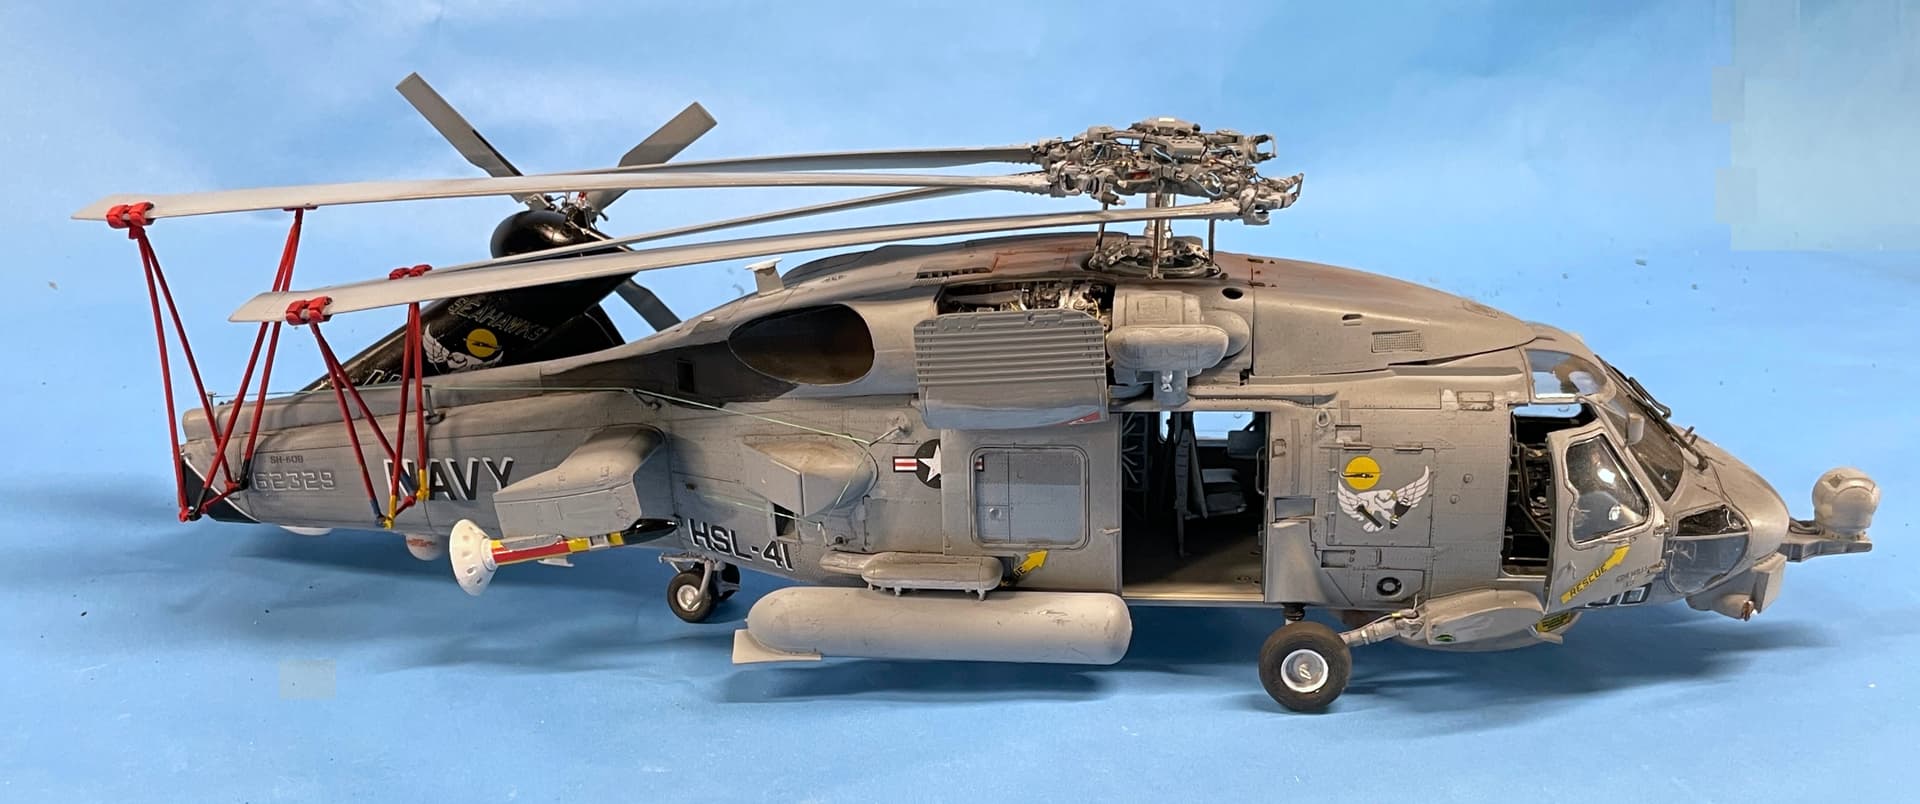
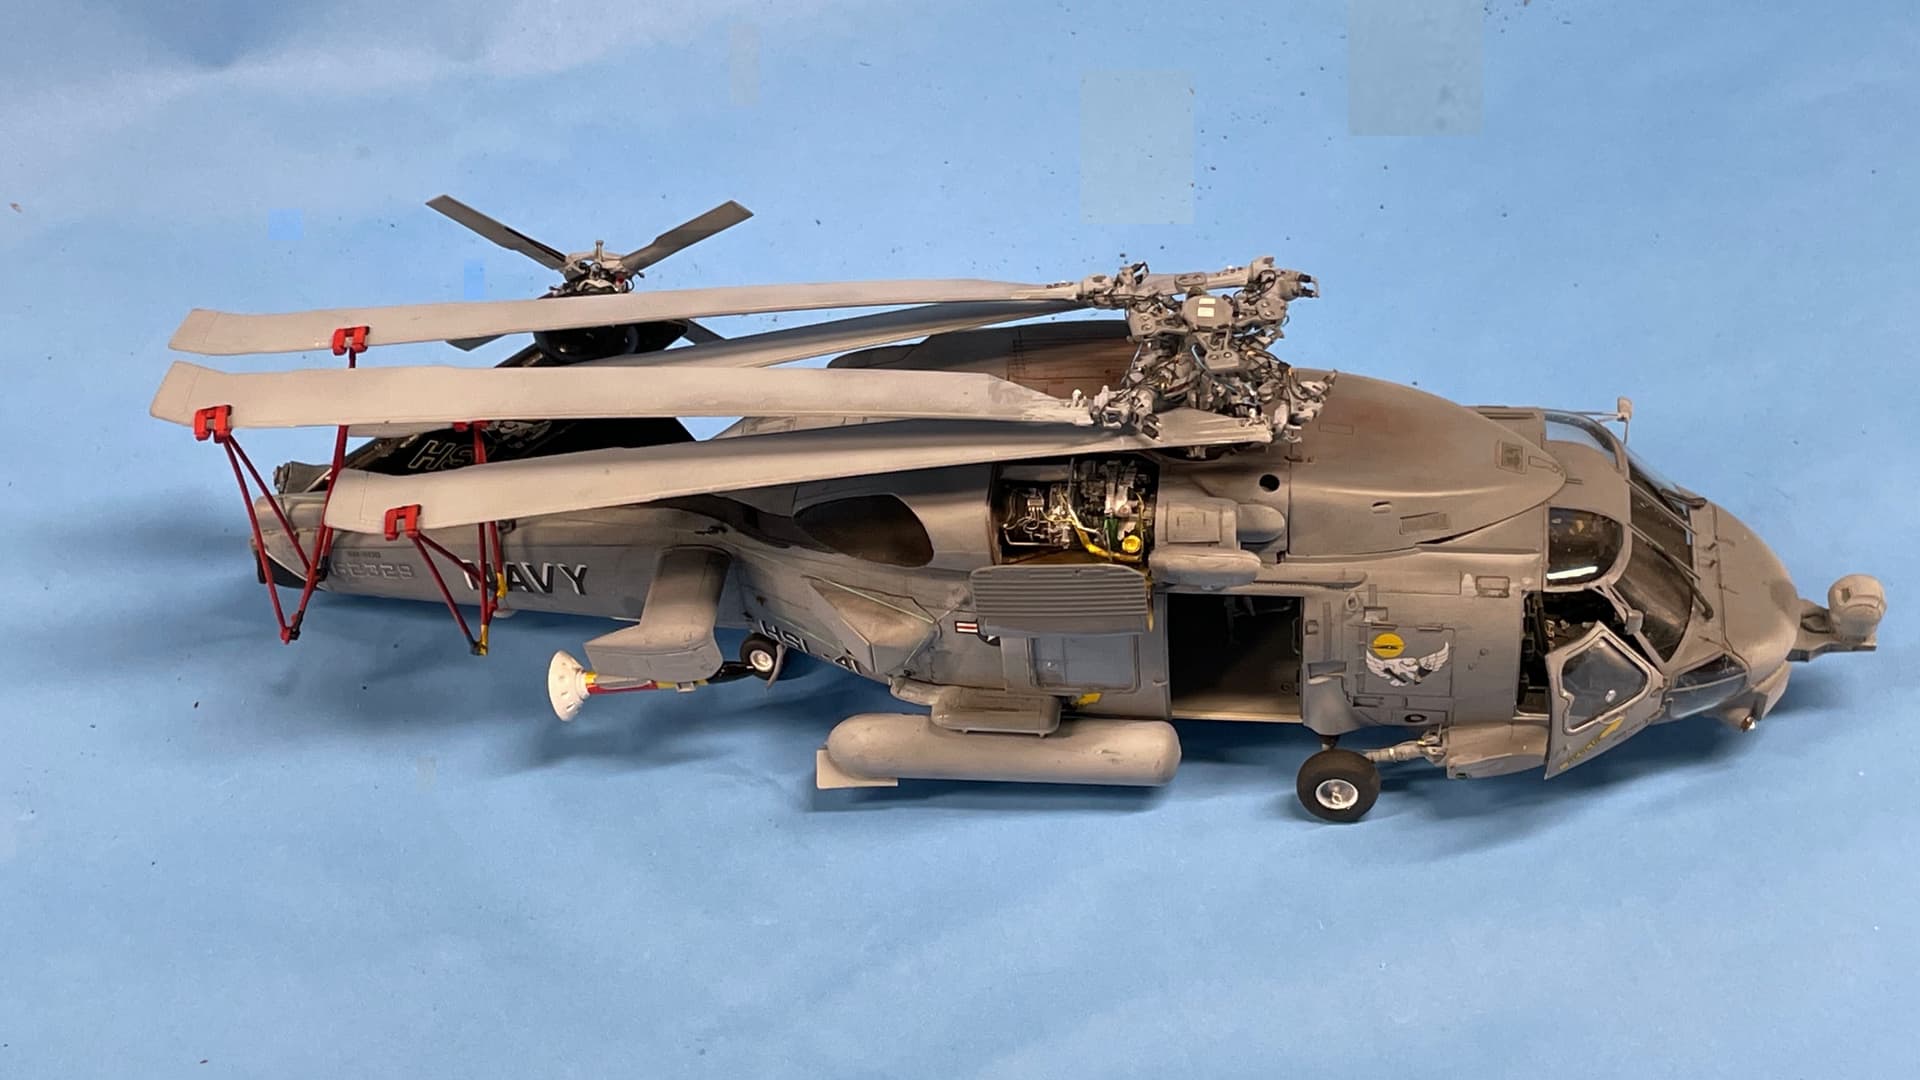
So there you have it. Work started in mid-Oct and ended in mid-Feb about 4 months of pretty intensive work. My opinion of the model:
Pros:
- Beautiful surface detail especially with the addition of the ResKit parts.
- Lots of choices on build and configuration. (Huge amount of parts still left on many sprues.)
- It’s a great model in a great scale. You can really go to town on super-detailing.
Cons: - Instructions leave something to be desired. Terrible instructions on creating the stowed version
- That reversed part HD33 that i had to redraw and 3D print.
- Styrene was fragile and broke at the worst possible times. You better be a good problem solver.
- The ResKit parts did not mate 100% accurate with the kit’s requiring further problem solving.
- Fits - While having the interior as a separate box seemed like a good idea at the time, in reality it made getting a good main joint nearly impossible requiring a lot of filling.
It was singularly the most complex aircraft build I ever did and I’ve been building models almost non-stop since 1954 at my 9th birthday. I’ve made a practice recently to have each project I attempt to push my skills. This project did not disappoint. That said, I love how the rotor head and engine came out. They met the image I had in my mind’s eye and for that all the work was worth it.
8 Likes
Wow! What a wonderful wild and whirly ride you’ve taken us on! — loved every minute — well, excluding drills snapping, parts breaking, and rotors reversing. All said… some really amazing recoveries which lead to Kitty to looking absolutely gorgeous. 
Thank’s for that ride! 
—mike
I’m a little sad. You have finished that beautiful work.
All the process has been amazing and perfectly solved. TBH, the 60 is my fav chopper in any of its versions, and yours is very very nice. Superb finish. Infact, my wife asked me what to buy for me at Valentine’s day and I asked for a MH-60S like yours, but no luck, I got an A-10 instead.
Congratulations.
Fantastic build! Looks great!
A real beauty of a build and its great to see it all together now and looking awesome.
I’ve been following along for a bit now . Very nice job and kudos for your perseverance.
Excellent job. She came out great.
Thank you all very much for following along.
As an epilog… Here’s what my work space looks like when I’m done.
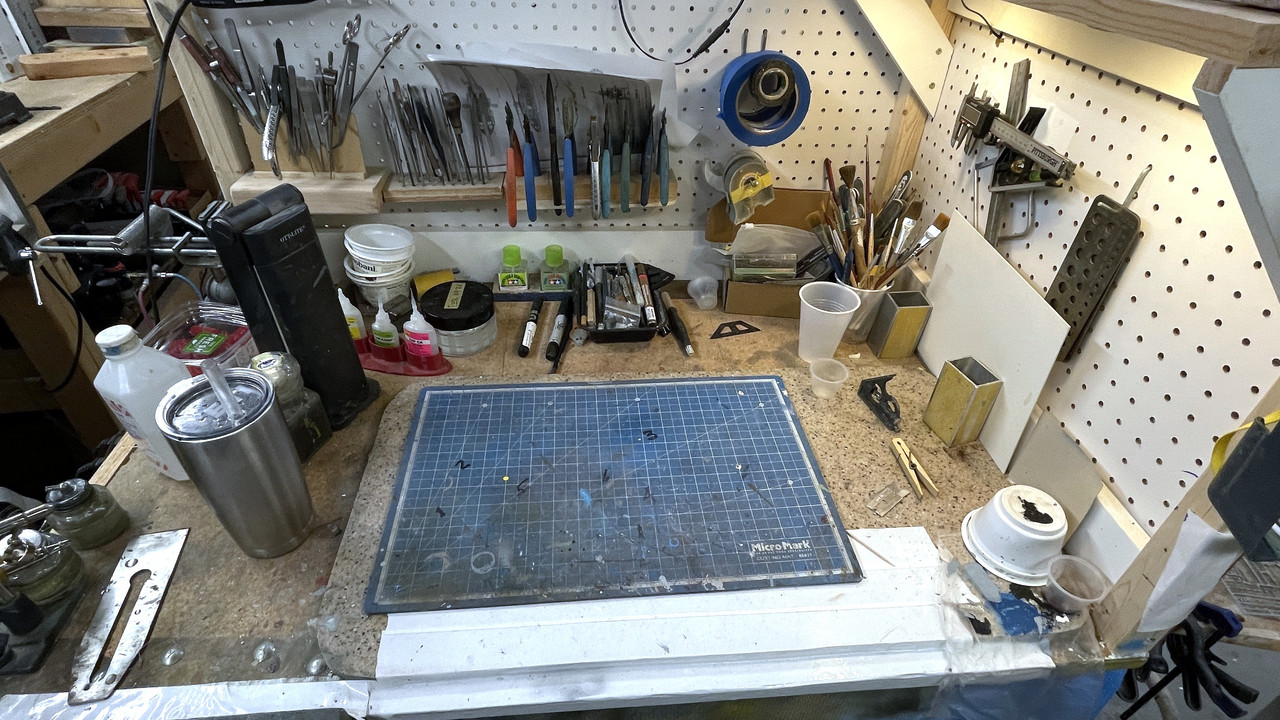
This phenomenon only occurs every so often when work is done. Sadly, it doesn’t last very long.
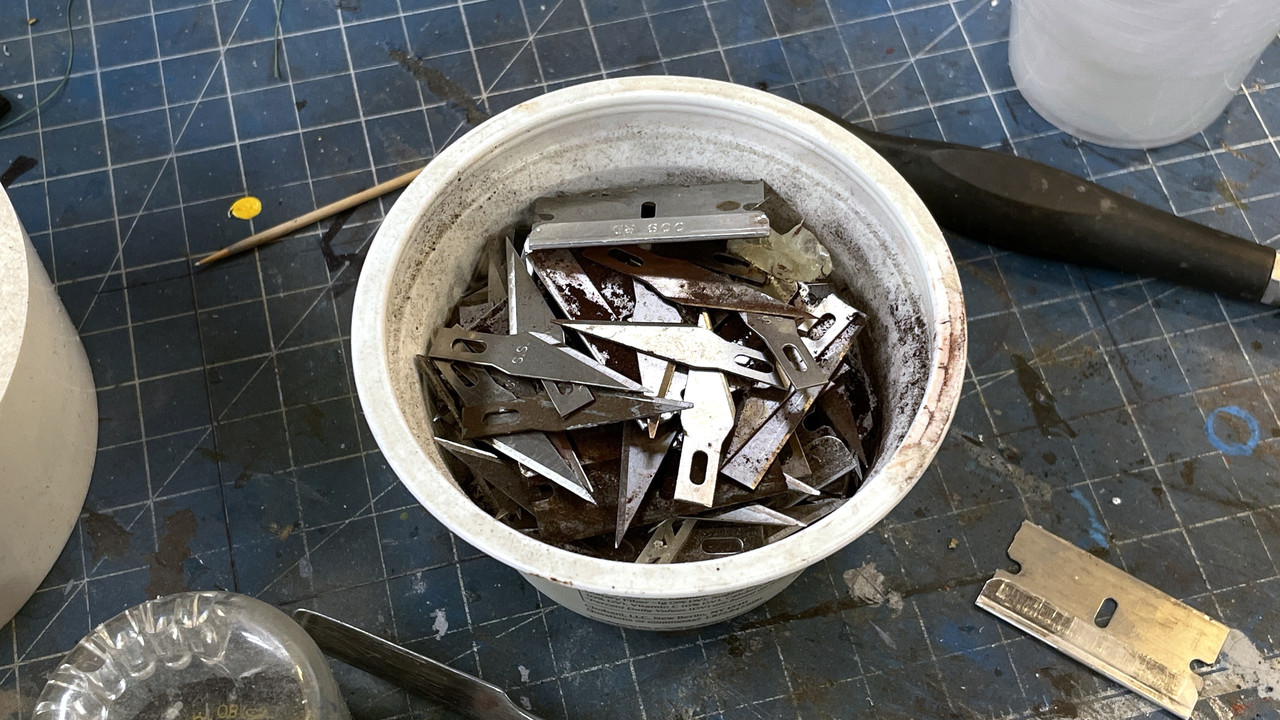
And here’s my high-tech method of dealing with the sharps that are created constantly. I buy my #11s in the 100 piece packs and change then very often, especially when using it to cut decals, masking, bare metal foil, etc. I toss them all in a yogurt container and when full, tape the darn thing shut and toss it in the trash. I don’t handle them any more than I have to. Being an AFid person and on a blood thinner, I try and not cut myself.
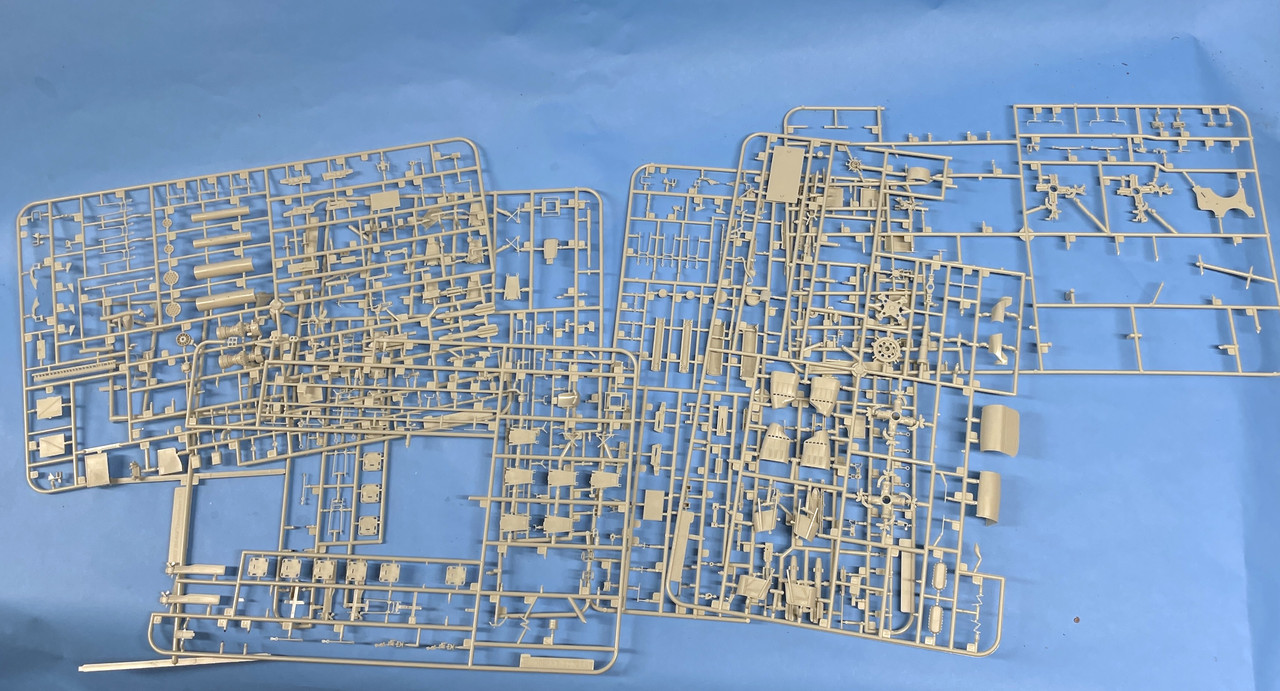
Lastly, when I said there were a lot of unused parts, I wasn’t kidding. These are not all of them. I threw out a bunch of sprues that had parts on them besides these. It seems like a lot of waste.
Well… that’s that. Next up will be the massive Missouri Turret project. I’m still waiting for the kit and guns to come to my local hobby shop. I’m finding more and more reference images and am busy drawing all the parts. I’m posting the whole deal on the ships part of this forum.
5 Likes