BLOG: Kitty Hawk 1/35 SH-60B Seahawk

Thanks and you’re welcome.

Short session today. Paint masking is well underway. I decided, because of the way the side and bottom colors interact, especially around the sponsons and radome, that I would have to mask them carefully. There’s a nice seam line running down the fuselage length to demarcate the bottom and side colors.

To mask the dome I measured it’s diameter, cut it in half, set the calipers and cut the circle. I’ve described this before when masking the wheel hubs. This was easier since it’s easier to use the dividers as a circle cutter on bigger diameters. I have one point sharpened to a cutting chisel in the direction of the cut.

To mask the lower edge, again, measured its diameter, cut it in half and used that setting. I got a really accurate mask this way.

As seen in this image, the nose has a very specific curve also a circular shape so that too would get the dividers treatment.

And here’s how I did it. In the above it also seems to show that the gear legs are bottom color. Is that correct?

And then I got going on the rest using a combination of 3M Blue Tape and three thicknesses of Tamiya. I absolutely love Tamiya tape, but it’s more expensive than the 3M so I use them selectively with the 3M covering bigger areas. The curves had to be 3M due to the width I had.

I still have to mask the sponsons on the opposite side and then I’ll be ready to shoot some gray base color. I don’t think the bottom of the personnel hoist is bottom color. None of my diagrams show that.

2 Likes

I’m still trying to figure out what configuration I’m going to use. In some of the wild schemes I have to do more work on the exhaust black areas. And it would require more masking… ugh!

I did paint today! I laid on all the FS36320 Dark Ghost Grey using the Mission Models paint (which I like a lot) thinned a bit with some A-K interactive thinner. They seem to be compatible.

Started with the tail after finishing the masking of the bottom color areas.

I believe that the fold machinery is body color and not zine chromate. If it’s zine, I can do that too.

Did the tail rotor. After I took the pic I used some Dullcoat on selected areas that are going to be painted black. The black ares are the elastomer boot at the blade base and the de-ice book that goes partially out on the leading edge from the root.

And then I painted the main part. I had to go back and shoot some minor light spots, but all in all it painted really well. Dries quickly too, but I’m giving it overnight to make it better for further masking. Right now my edges are going to be pretty hard. If I wanted soft edges I would have stood the tape off the surface a bit. Because of all the stuff sticking out, doing a freehand job wouldn’t have worked. The overspray would have hit parts that were supposed to remain the other color. The same goes for the darker top color getting all over the tops of the sponsons, hoists, etc.

I like it alredy now that it’s monochromatic. I’m really not all that excited about doing all the additional color work and masking required for the flashy decal schemes. I’m almost ready to just make it a ultilitarian bird. Having readers that have actually FLOWN THE REAL THING adds to my challenge.

Stay tuned.

5 Likes

I bit the bullet and painted the top darker color (Tamiya XF-53) freehand and was satisfied with it. I held the gun at angles that would let the edges drift around the curves without fouling any protrusions getting oversprayed.

While this was drying I drilled (my new supply of 0.0125 arrived) the rotor blades to accept the lead wire from the nitrogen leak sensor. I thought they were from the nitrogen leak sensor, but was showed the error of my ways. The leak detector is the plunger that sticking out from the trailing edge. It doesn’t report remotely, but shows a white indicator that’s easily seen. The real blades are hollow filled with nitrogen. If there’s a crack, the nitrogen leaks out, the sensor notes this and alerts the crew that the blades is no longer flyable. This lead is the last wire to tie into the hub along with all the other wires and pipes. It was easy doing this when they weren’t on the model.

I also painted the exterior dark parts of the engine hatch and then, after it was dry, put textured black graphic arts tape to simulate the anti-slip tape on the prototype. This door will be open.

I decided on the paint scheme. It requires the entire tail, top and bottom and boom to be gloss black. It also angles onto the fuselage in front of the hinge. At this time I got a nasty shock. The Mission paint has lousy adhesion compared to Tamiya. I tried to mask the de-ice boots on the tail rotor blades and promptly pulled the gray paint off the resin. I touched it up and then had to paint them by hand…ugh!

I thought the paint lifting was limited to resin parts, but then it did the same thing on the boom which was styrene. In other words, Mission paint pulls off. In the future I will have to spray Tamiya primer first and that’s aerosol so I’d have to do it outside, which I can’t do in winter temperaturs.

Here’s the version I’m going with. I like that it doesn’t have the lo-viz insignia. Since you have to overcoat the whole deal with gloss so the decals work, the gloss black tail works. There’s more flat black over the exhaust on the roof, but that would mean masking. And masking right now could be a problem. I’m going to leave that bit of black off.

I sprayed the tail boom completely with gloss black and then that little bit of the main fuselage. I freehand painted it. It’s not great and I back-painted with body color to get it better, but as you’ll notice if you look closely at the color sheet, there’s a white line decal that demarcates the black and that will hide any unsteadyness.

And here’s that tail bit.

I then took the gun in hand and attempted to fuzzy up the bottom color edges. I was taking a helluva risk doing this, but it didn’t ruin anything. I’m not sure I like the result, but it did soften the edges a bit.

Here’s the tail rotor with the detail painting, but not totally done. I still have to back paint the de-ice boots to get the line a little cleaner. My freehand painting hands are NOT steady! I wish I could have masked, but it would have made a bigger mess.

That brings us up to date… happy weekend.

6 Likes

Happy Monday!

I’m at the stage where waiting for paint to dry is the number one activity. I sprayed Allclad Aqua Gloss as the gloss coat. It’s water-based and has no odor. It takes a number of hours to be safe do decaling. I’m champing at the bit to start doing decals, but have to hold off until the finish is all fixed.

I finished touching up the tail rotor, fixed a blemish on the tail boom and went back and touched up damages to the body color. That touch up necessitated doing a deep clean of my airbrush in the ultrasonic.

While all this was drying I built the load outs. I’m adding one towed sonar and two torpedoes. The torpedoes had ridiculous propellers; a series of tiny, bent PE that had to be glued on is a radial array. It was a bit of struggle and, while necessary, i’m not a big PE fan for PE’s sake.

Here are both of them complete ready for paint.

The torpedoes have a three-color paint scheme: props and tail = red, back = silver, middle = O.D, and nose Yellow-orange. I shot the tail with Tamiya rattle can silver.

I also shot the main rotor blades with Tamiya White Primer to maine the Misison Paint adhesion problem. I then sprayed more clear on the areas when I re-shot the body color to fix some discolored areas.

When this is fully cured tomorrow, I believe that I can actually start decaling next session. I have to add the mirrors in the rear-view mirrors, paint the outer ends of the sonobuoys in the array. I did remove the masking in the exhaust duct and it came out okay. I can’t remove any masking on the glazing until all the decals and any panel accent work is done, and the flat coat is applied. The end is near. I also have to mount the blades and those fold clamps… can’t forget that.

4 Likes

Looking really good. Almost there.

Surre is. The light is at the end of the tunnel and hopefully it’s not a headlight.

Short session made even shorter, which I’ll explain later.

Painted the fold joint details and masked and painted the two torpedoes.

The torps came out nicely and still need the prop areas to be painted red and a decal to be put on. The plans call for the warhead to be yellow-orange.

I was all set to start adding decals to the tail boom now that the fold area was finished and then I noticed that I had OVERSPRAYED YELLOW-ORANGE ALL OVER THE GLOSS BLACK. it seems that I was holding the torpedoes in proximity to the work area and made a slight mess. I then had to go back and re-shoot the black and that killed the decal session.

I did get the first coat of body color on the tops of the main rotors. Tomorrow I’ll do the bottom and that will get them ready for assembly.

Tomorrow, decaling will officially commence. I glued back on that fussy antenna that kept getting knocked off. This time with very stout piece guitar B string.

5 Likes

Almost everything that can be painted is. The decaling began in earnest and is basically finished. The aircraft didn’t have as many stencils as other models I’ve built. I use MicroSet first, put down the decal and the MicroSol. I may add more MircroSol if more shriveling is needed.

I started on the starboard side, did the same side of the tail boom, did the port side and then port side boom. I’ve complained about the instructions, but the decals are excellent. They’re thin, have nice narrow margins, didn’t tear, laid down well with solvent, have good color registration and opacity.

Because of the folded tail, I had to slide the HSL decal under the folded wing and get it into position. It goes down parallel to the little vertical stab that sticks out the back and that’s completely behind the folded horizontal stab.

I did the same routine on the ports side, then I decaled the torpedo and towed sonar. There’s only enough decals for one torpedo which makes no sense to me.

And the I added the missing radome under the nose. I thought the FLIR was an option for this part misreading the instructions. It was pointed out to me that it is essential. I traced the part and scraped off the many layers of paint so the solvent cement could do its job. I now have to go back and airbrush the blend of body and bottom color. There’s one decal that goes on the front of the dome. And then all the painting will be done! Well actually, I still have to prepare the blade stowage racks and paint them, and put on all the marker lights and missile warning sensors. Can’t forget those. The tail sensors are buried deep in the space protected by the folded wings.

The main rotor blades are fully painted also.

I’m going to do some very conservative weathering including some panel accenting. Then I’ll give it an overall flat finish (except the glossy tail, which remains so.) And do final assembly. I still have to order the figures from Reedoak and do the base work. We’re almost done.

9 Likes

Looking very nice. That is a plus of the KH kits. The decals are nice.

Thanks, and the decals dried perfectly and all the rivets are visible through the film.

I started today with the best of intentions to finish up more of the model and get the blades mounted on the hub. I decided to reinforce the flimsy pins that hold the plastic blade knuckle to the hub swivel by drilling and pinning with 0.032" phos-bronze. After drilling I attempted to hold the two parts of the blade knuckle with a clamping tweezers. Before I could get the glue near the joint the small mating part snapped out the tweezers with the wire attached. The wire hit the floor and the part… well… the part went into the atlernate universe. I swept the entire freaking shop and examined every flat surface, but it was gone, gone, gone. (BTW: Great old Everyly Brothers song from the mid 60s).

So there’s three parts when I need four. And I really need that part!

So I photographed the part from four directions, measured the critical dimensions with the digital calipers and drew a diagram, and then drew it in SketchUp. I put it into the slicer and will print it tomorrow. It will print in a little over an hour.

Here’s the drawing.

Here’s the array of many parts on the slicer.

Why make one when I can make a bunch. Since they’re all the same height, the print time does not change and the total resin use is $0.29. It’s really great to know that in some cases, even in desparation, I can still create parts when I need them. This really is only reasonable with small, east-to-visualize parts. If I screwed up one half of the fuselage, that would be a different matter.

I did get one other thing done and that was painting the ends of the sonobuoy dispenser. This view is after painting the NATO black, but BEFORE, back painting to fix all the parts that shouldn’t be black. A little touch up with body color and it will be perfect!

4 Likes

The paint is going on nicely. Looking great. You could always go w/a torpedo and an aux fuel tank (there are two in the kit) if you want a full load, or try to make the missing second torpedo decals.

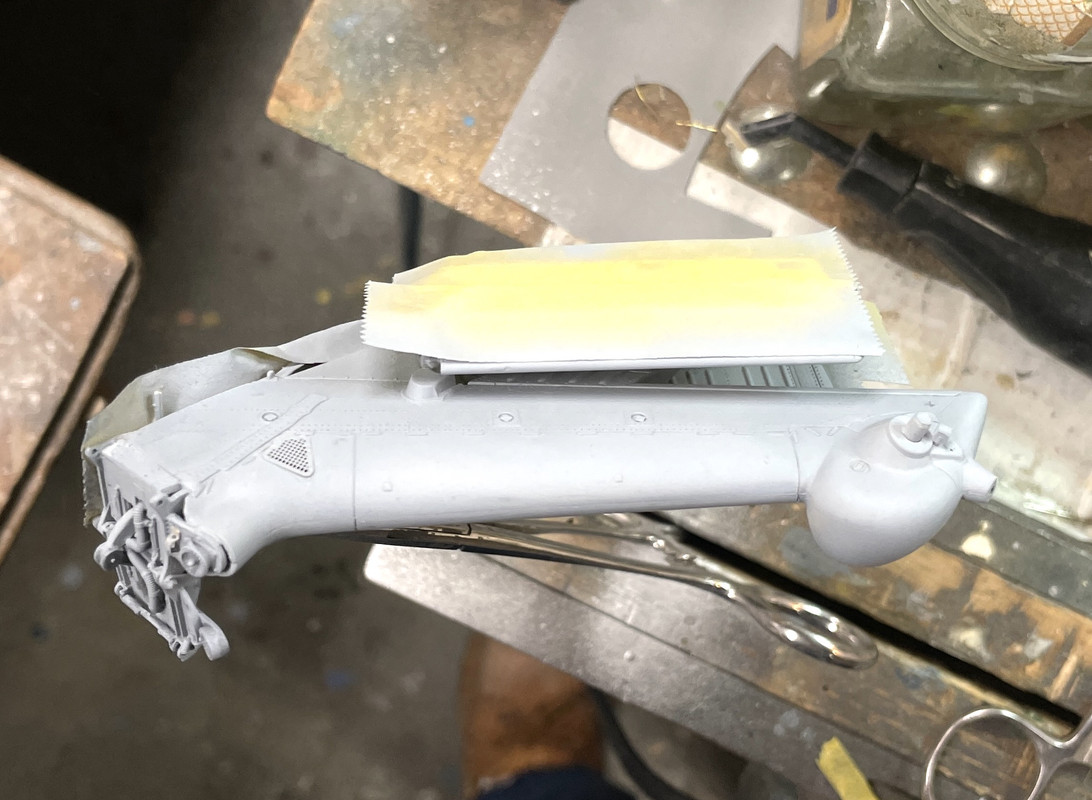
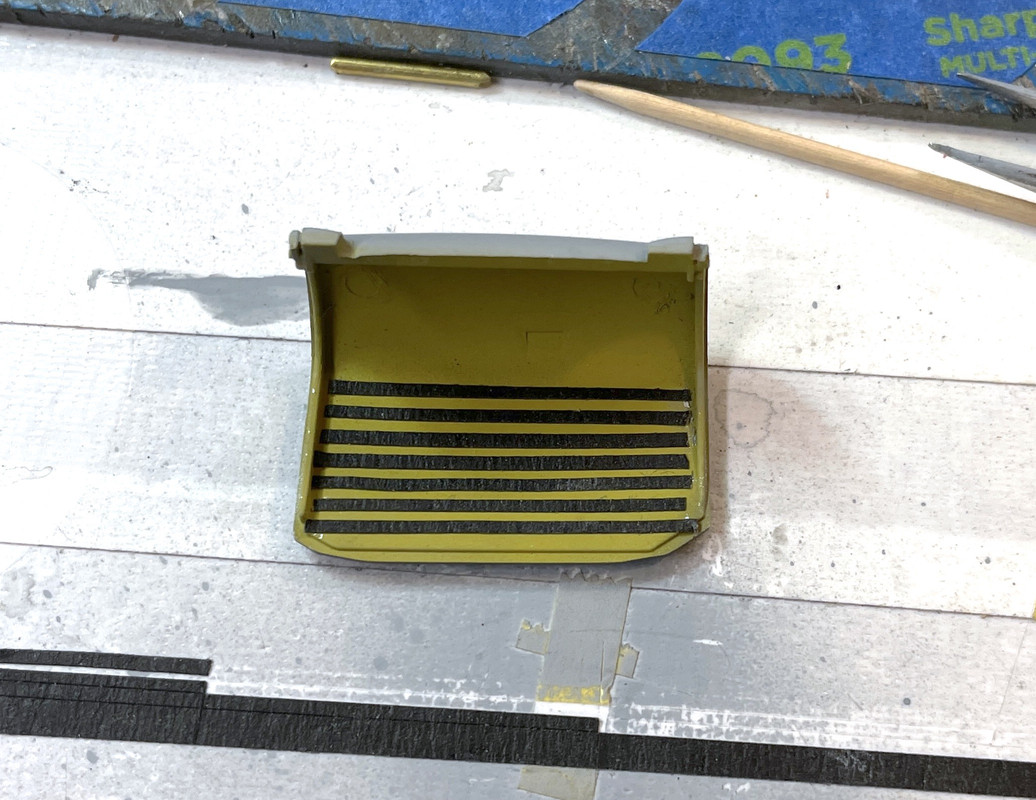
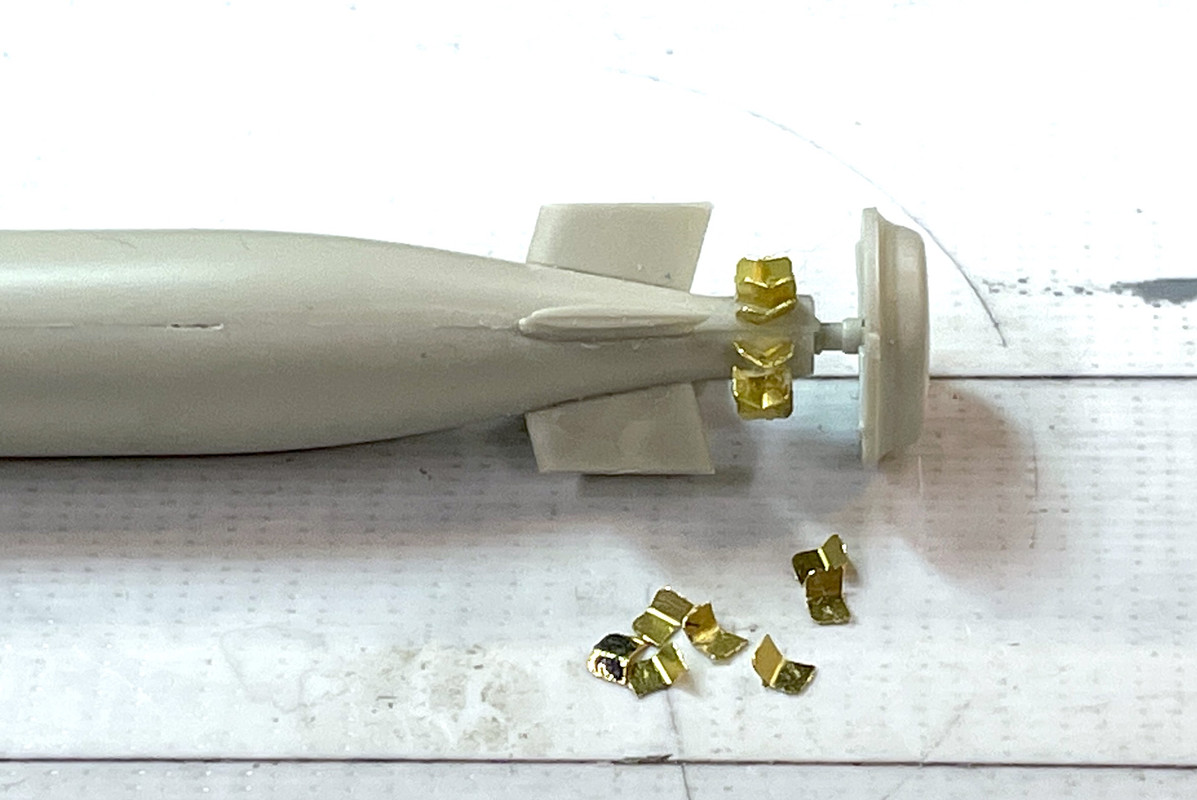
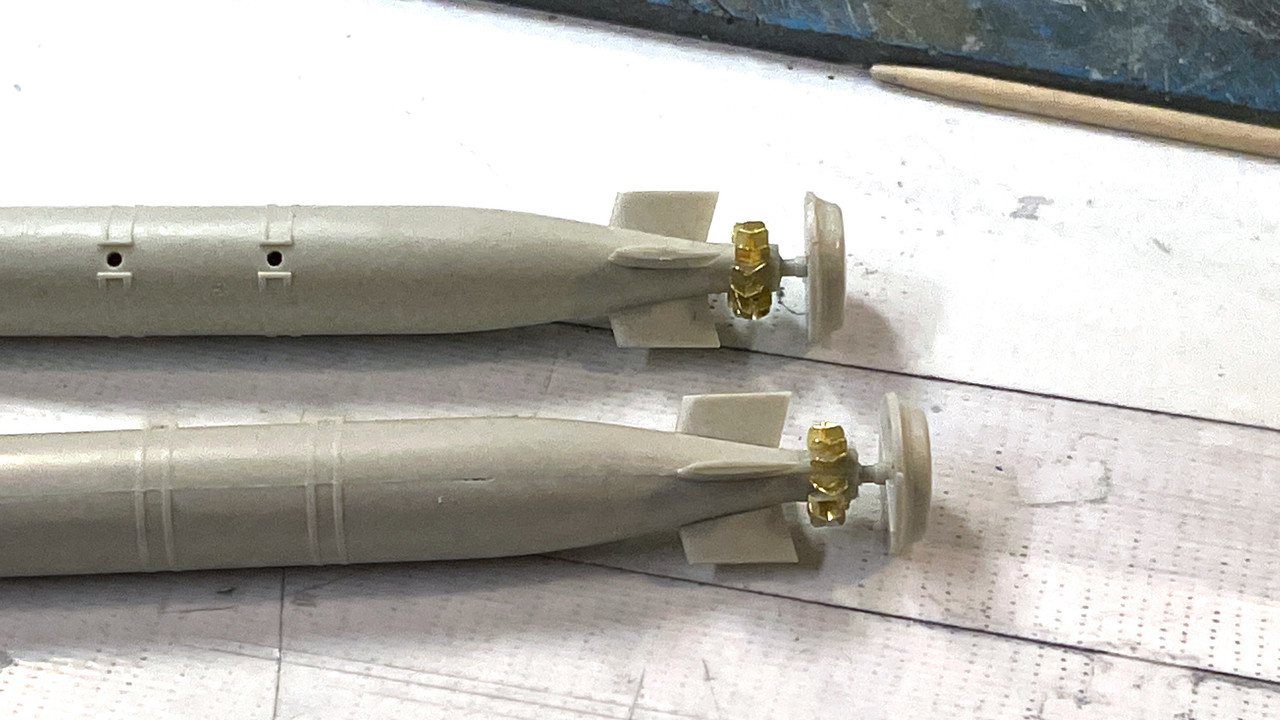
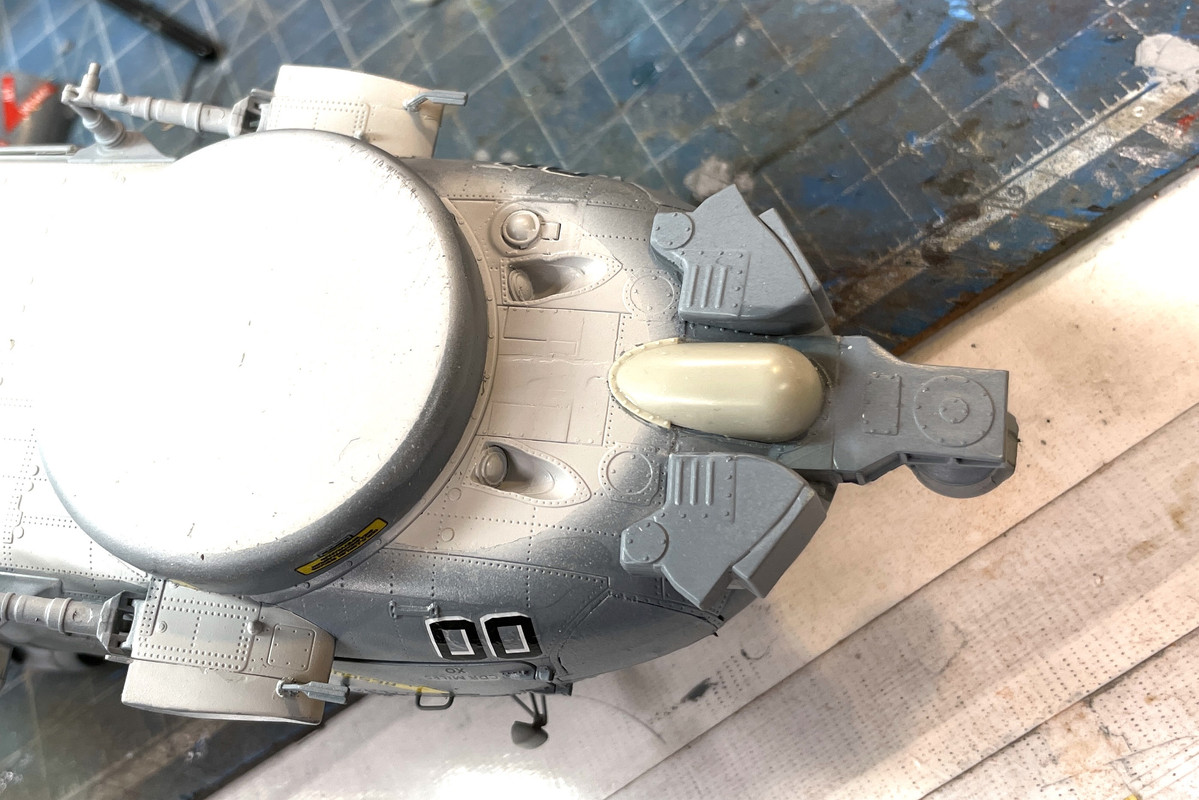
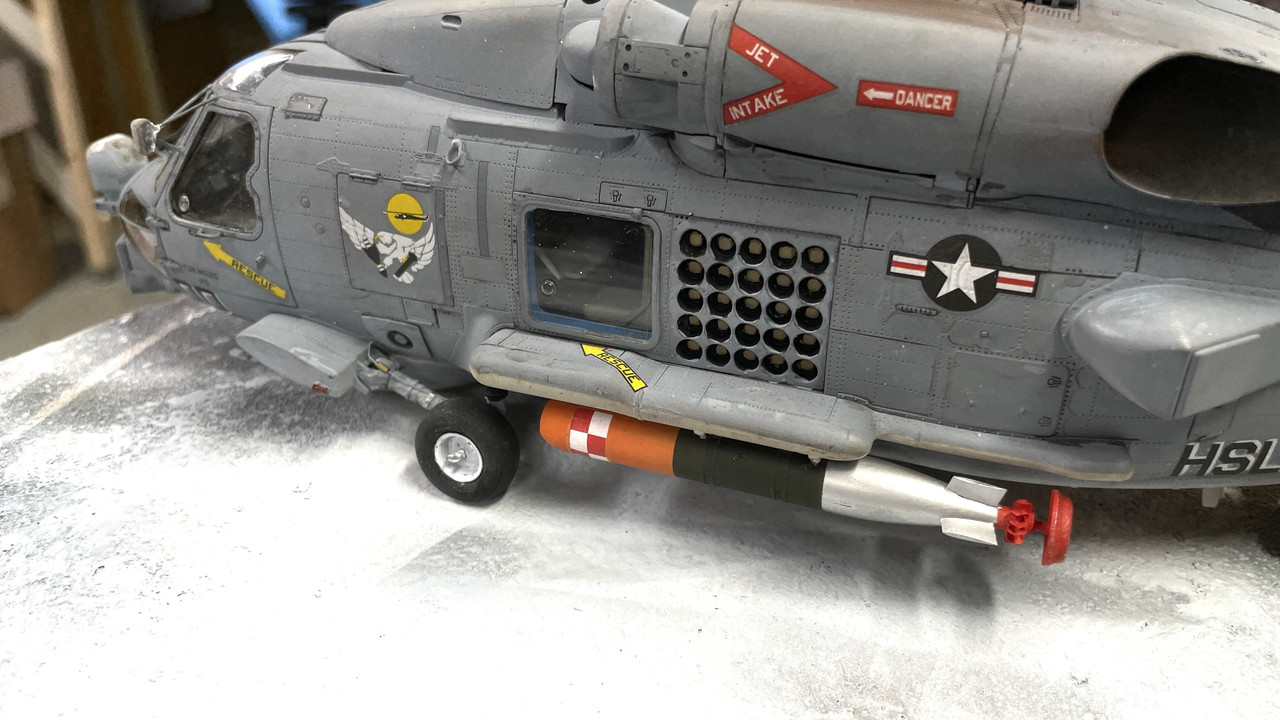
I took your advice and built the fuel tank. It will go on one side and the torpedo on the other.

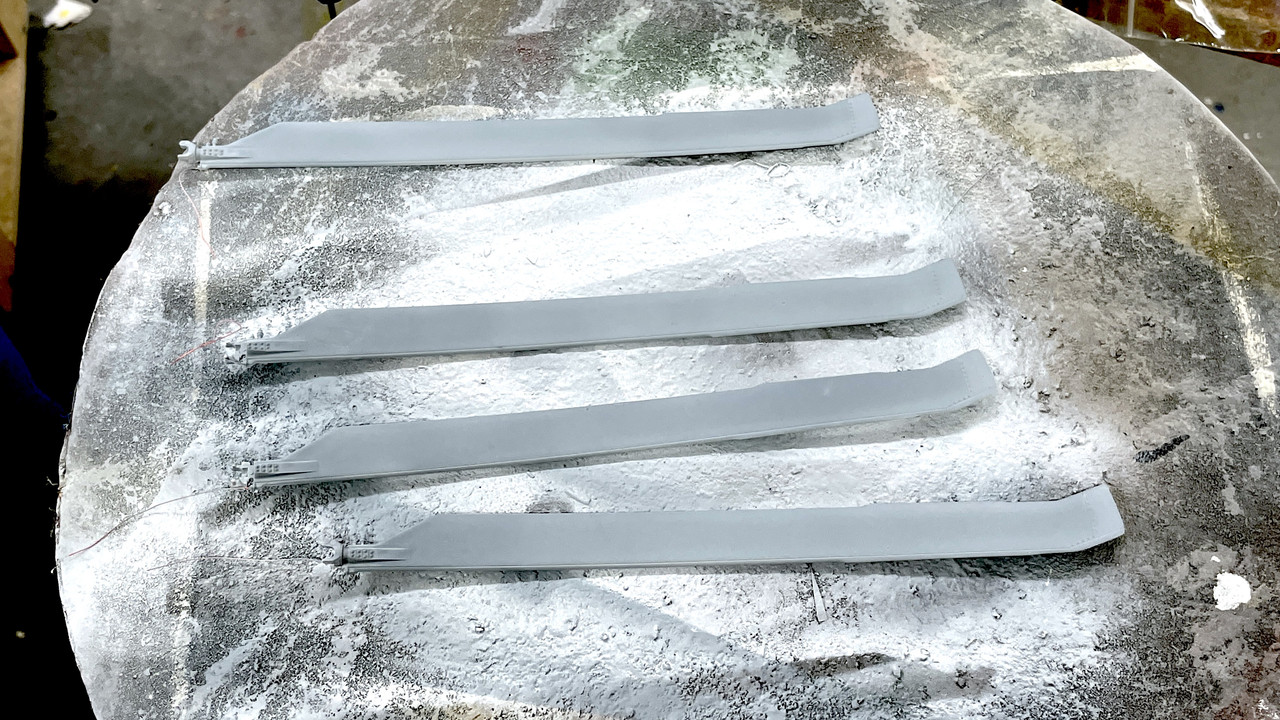
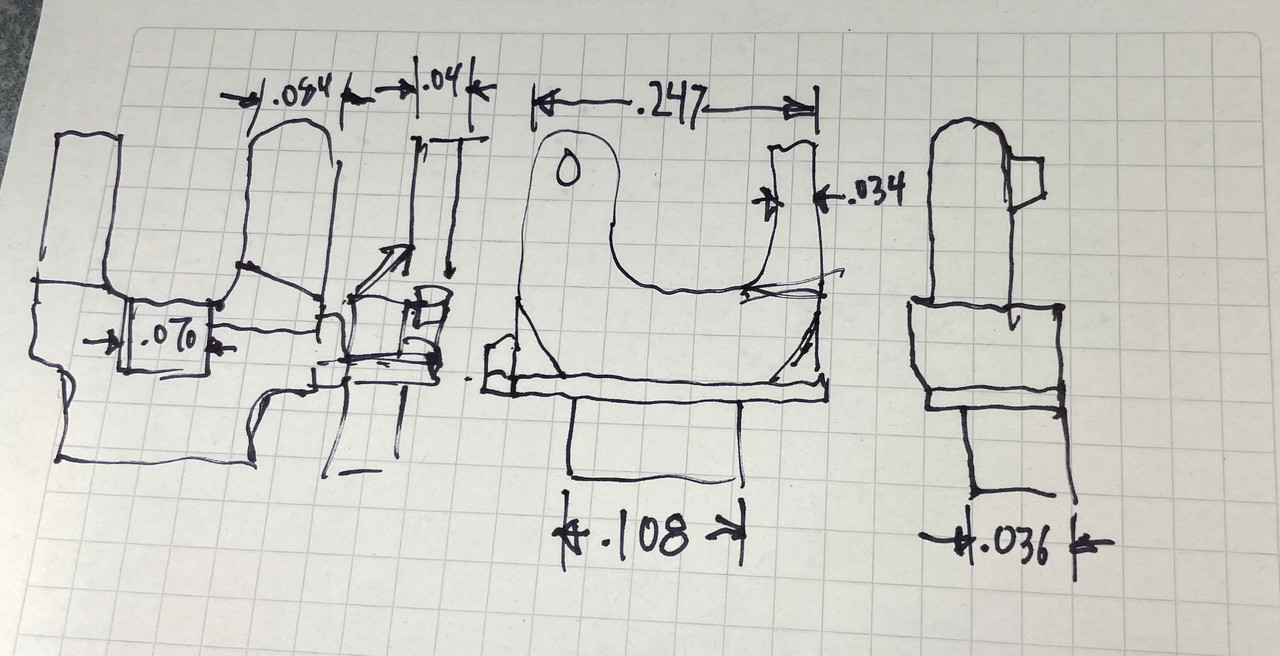
Today was a milestone day with the panel accenting, flat coat and unveiling of the glazing. I got a got set of prints, but they’re too thin. I got the profile dead on, but the depth needed some shimming.

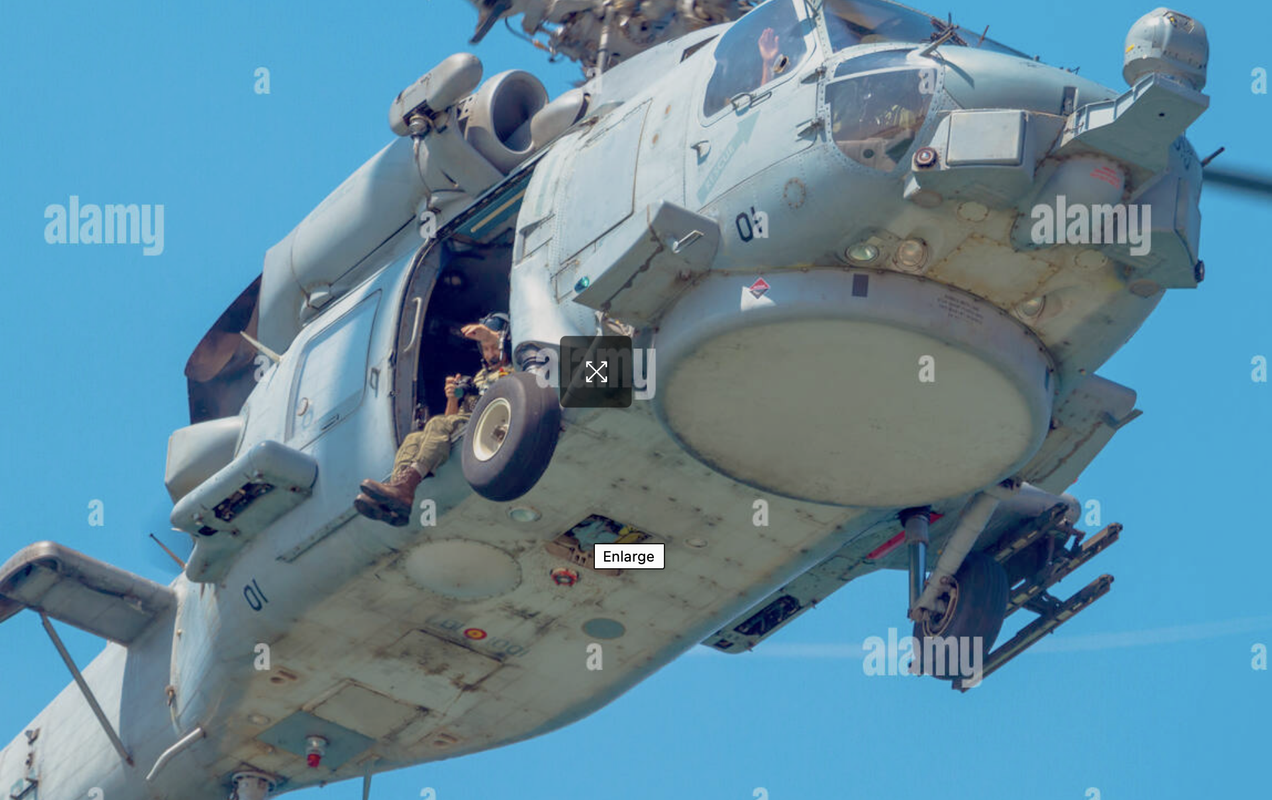
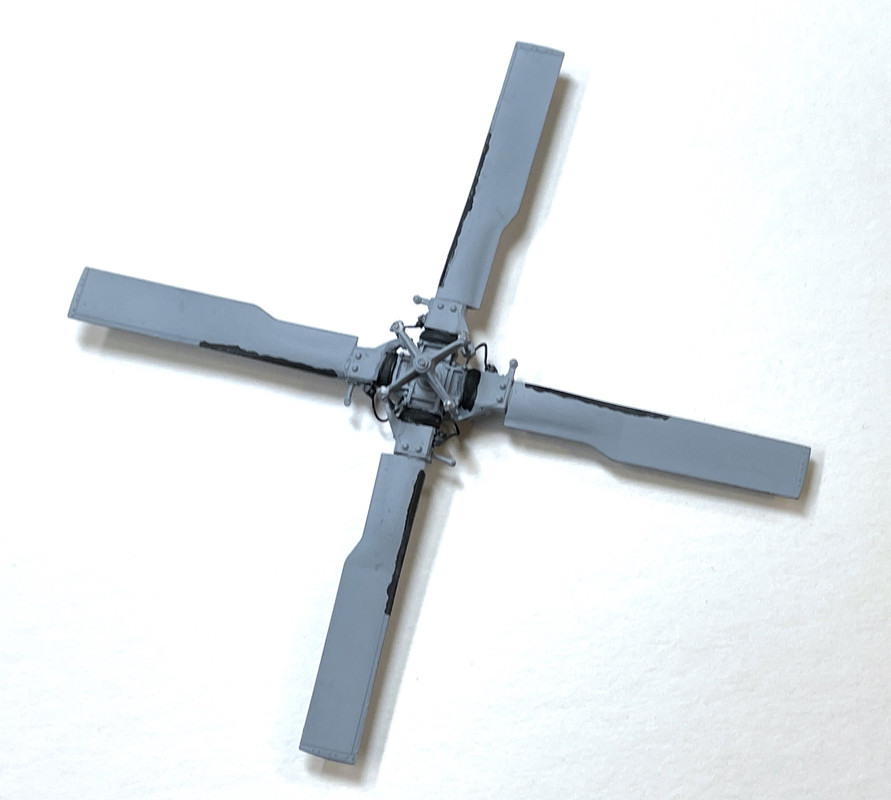
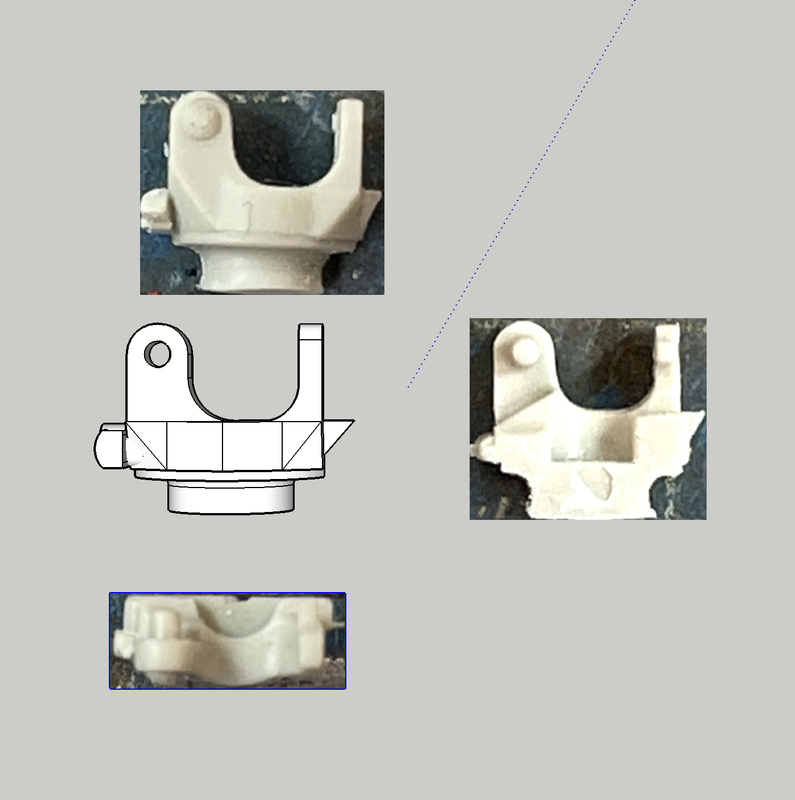
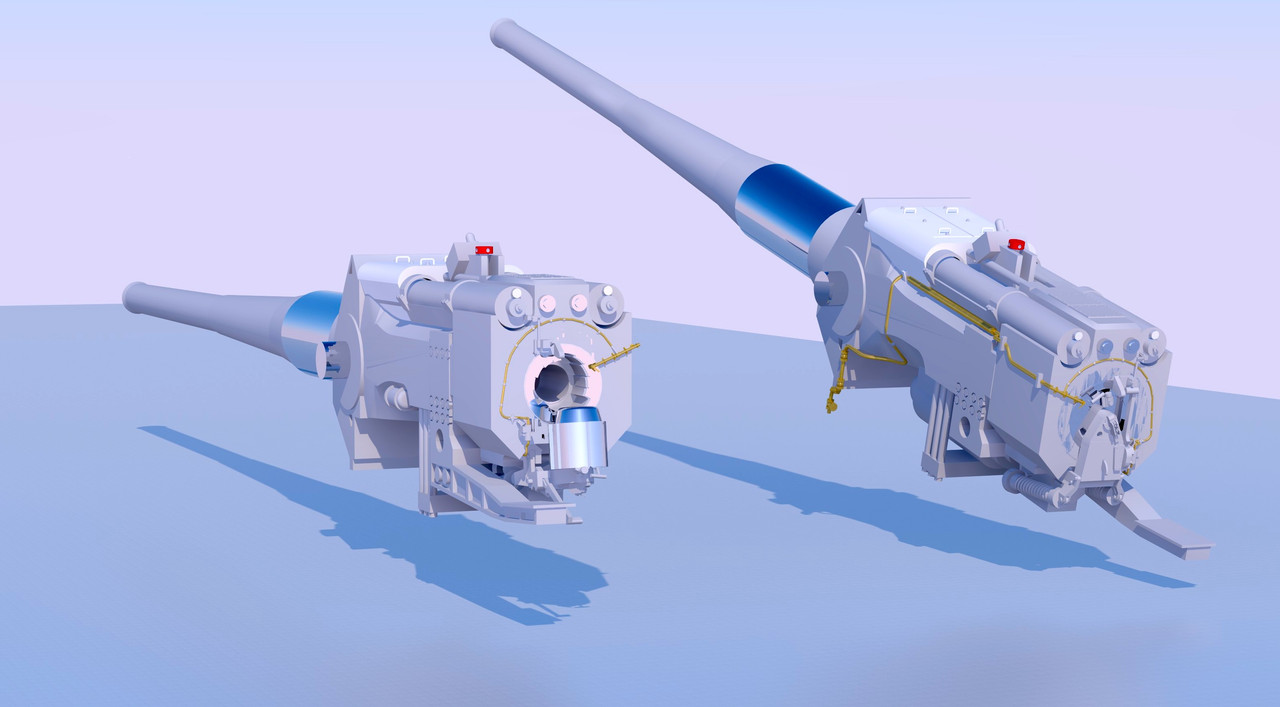
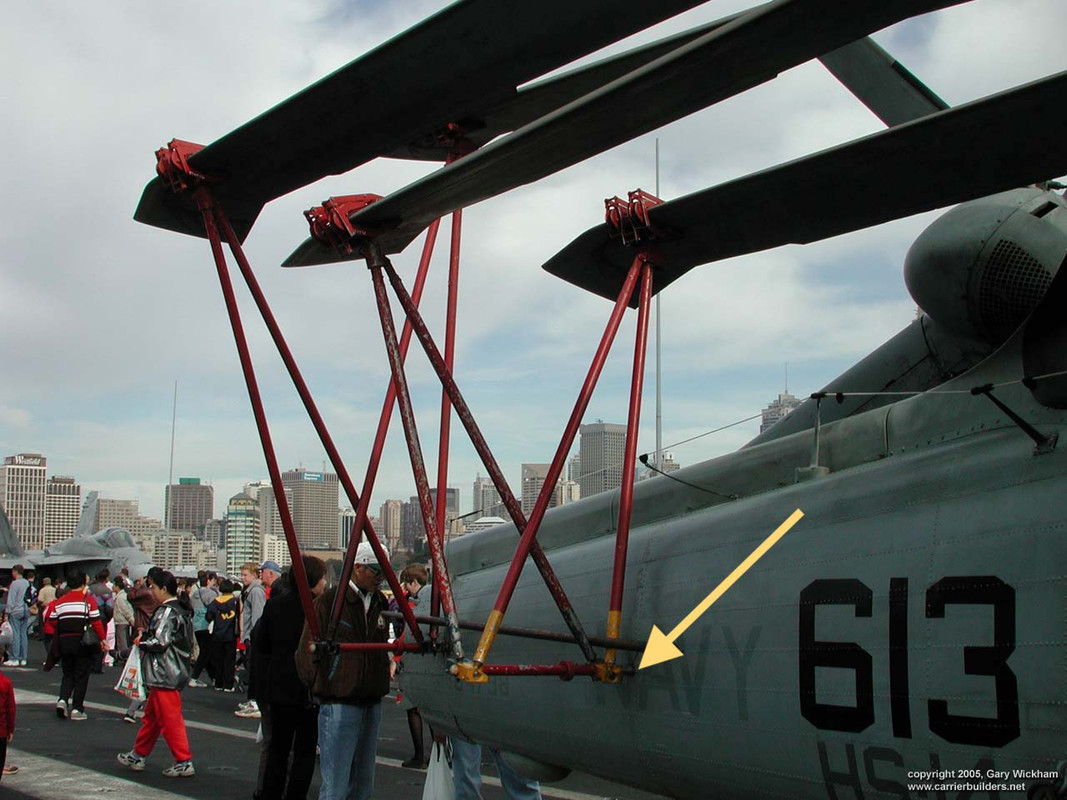
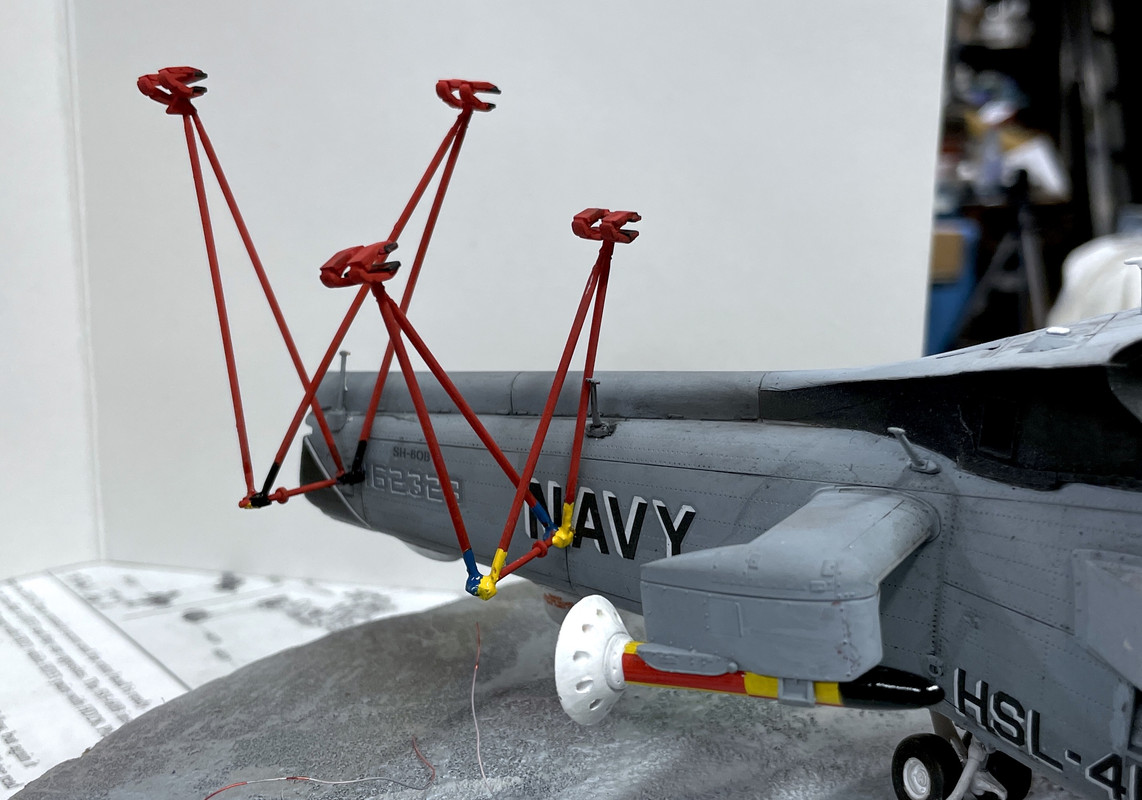
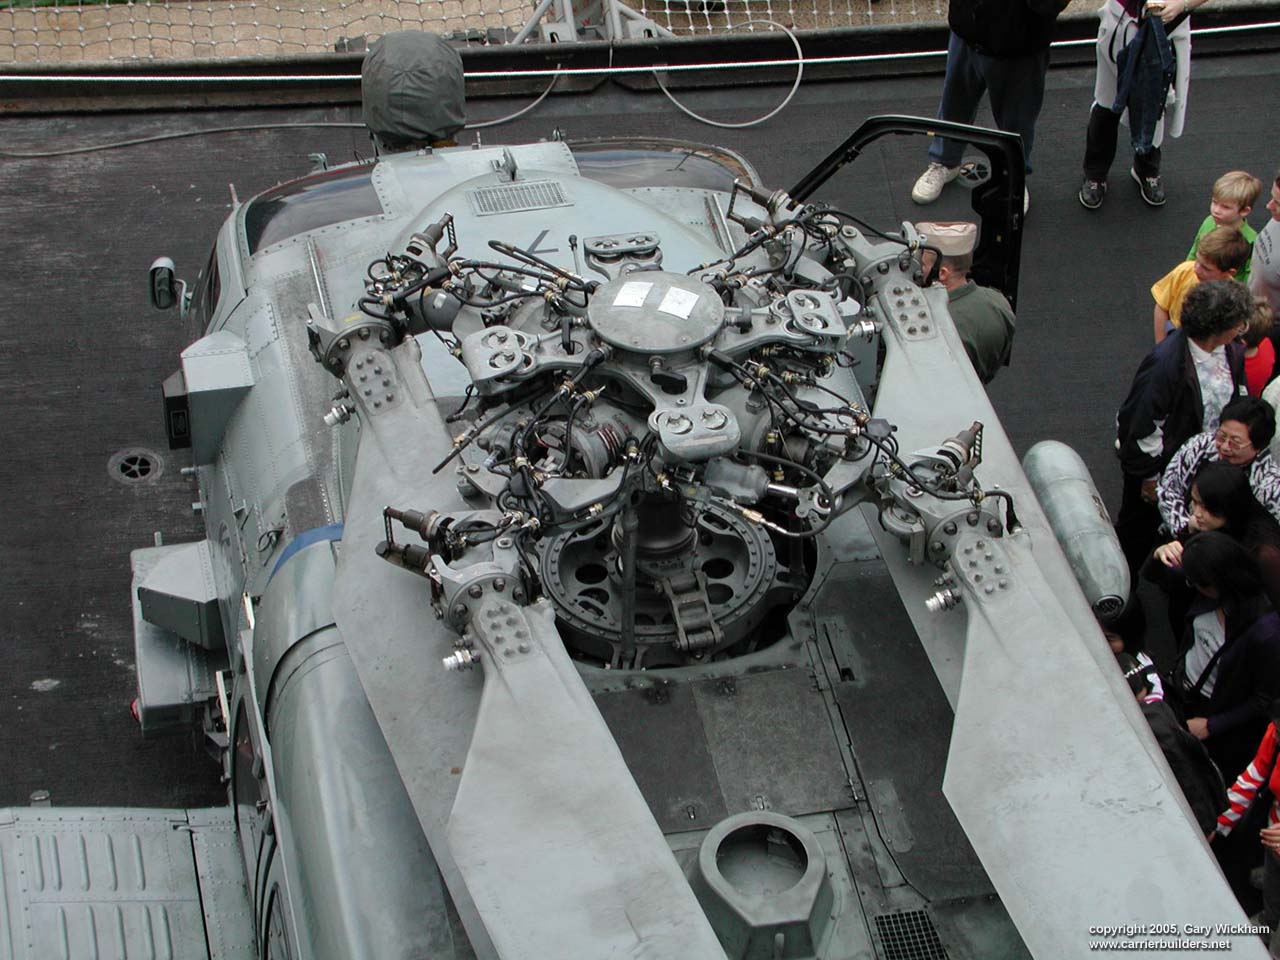
Here’s the comparison to the original

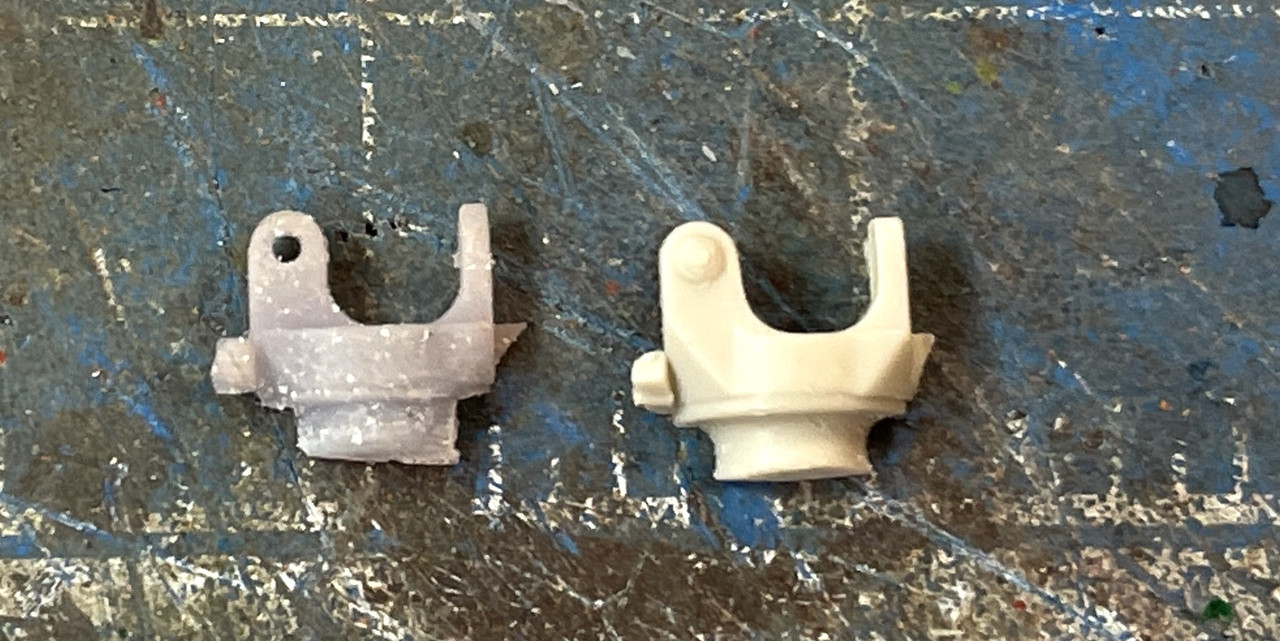
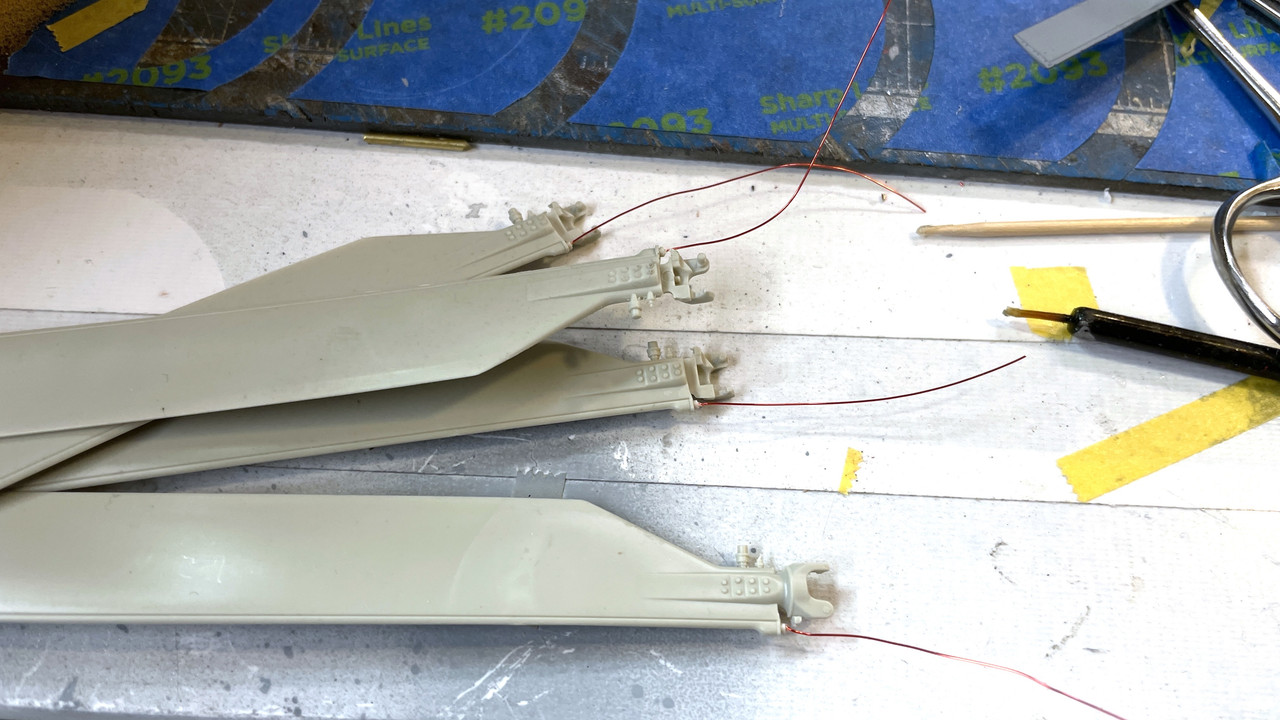
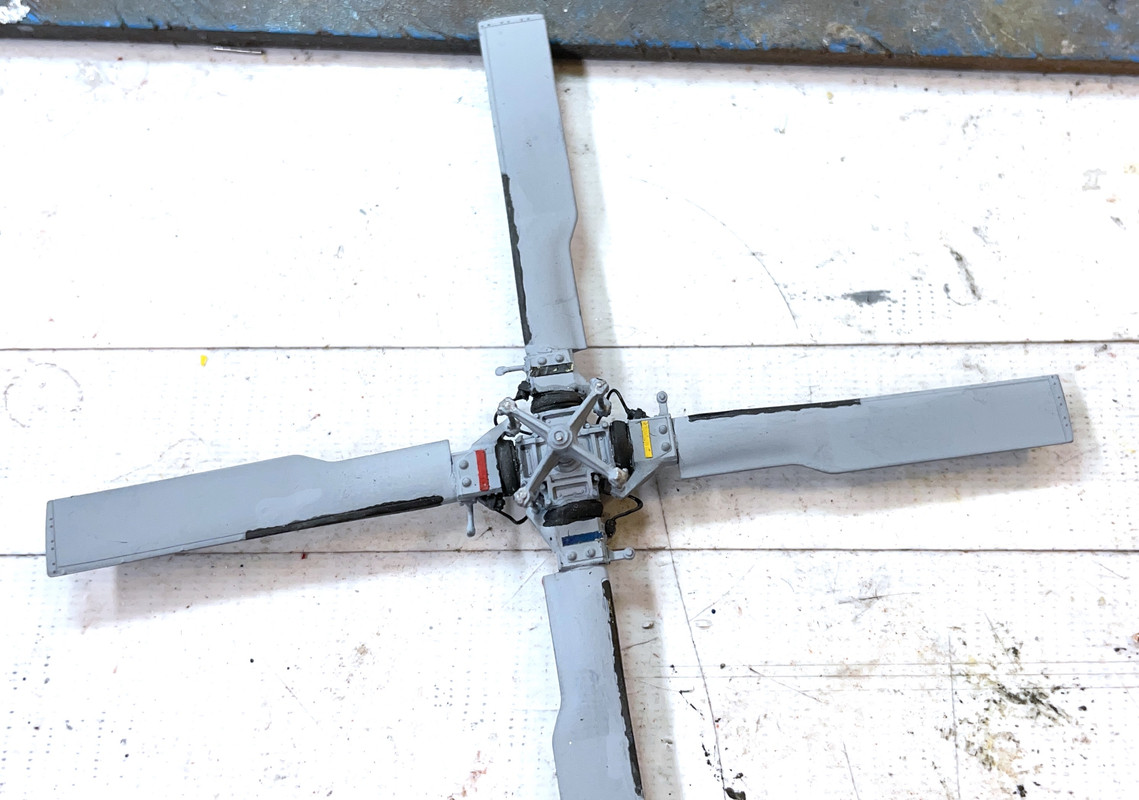
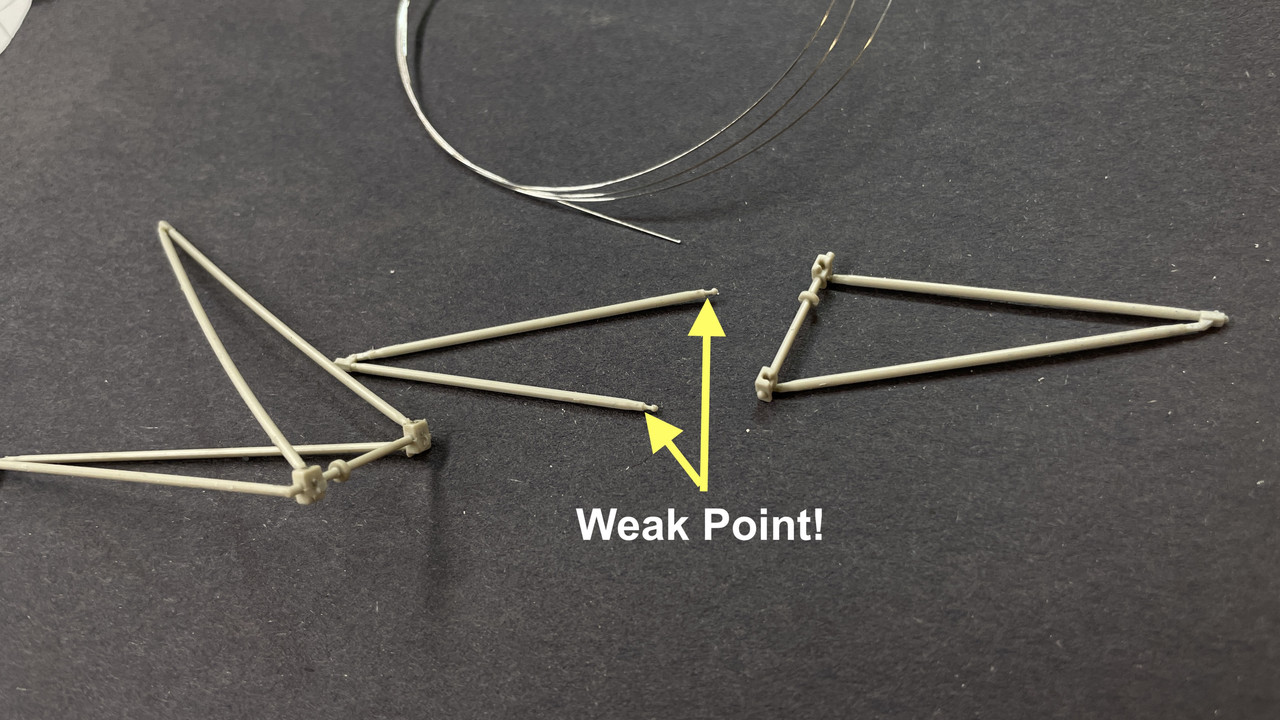
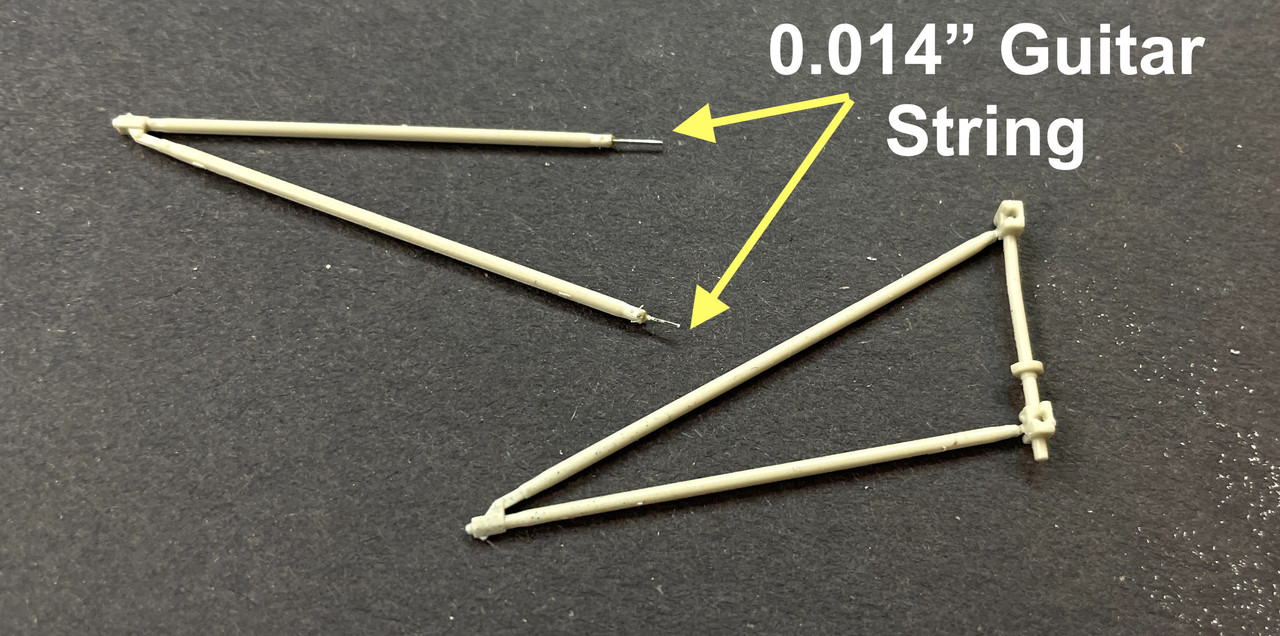
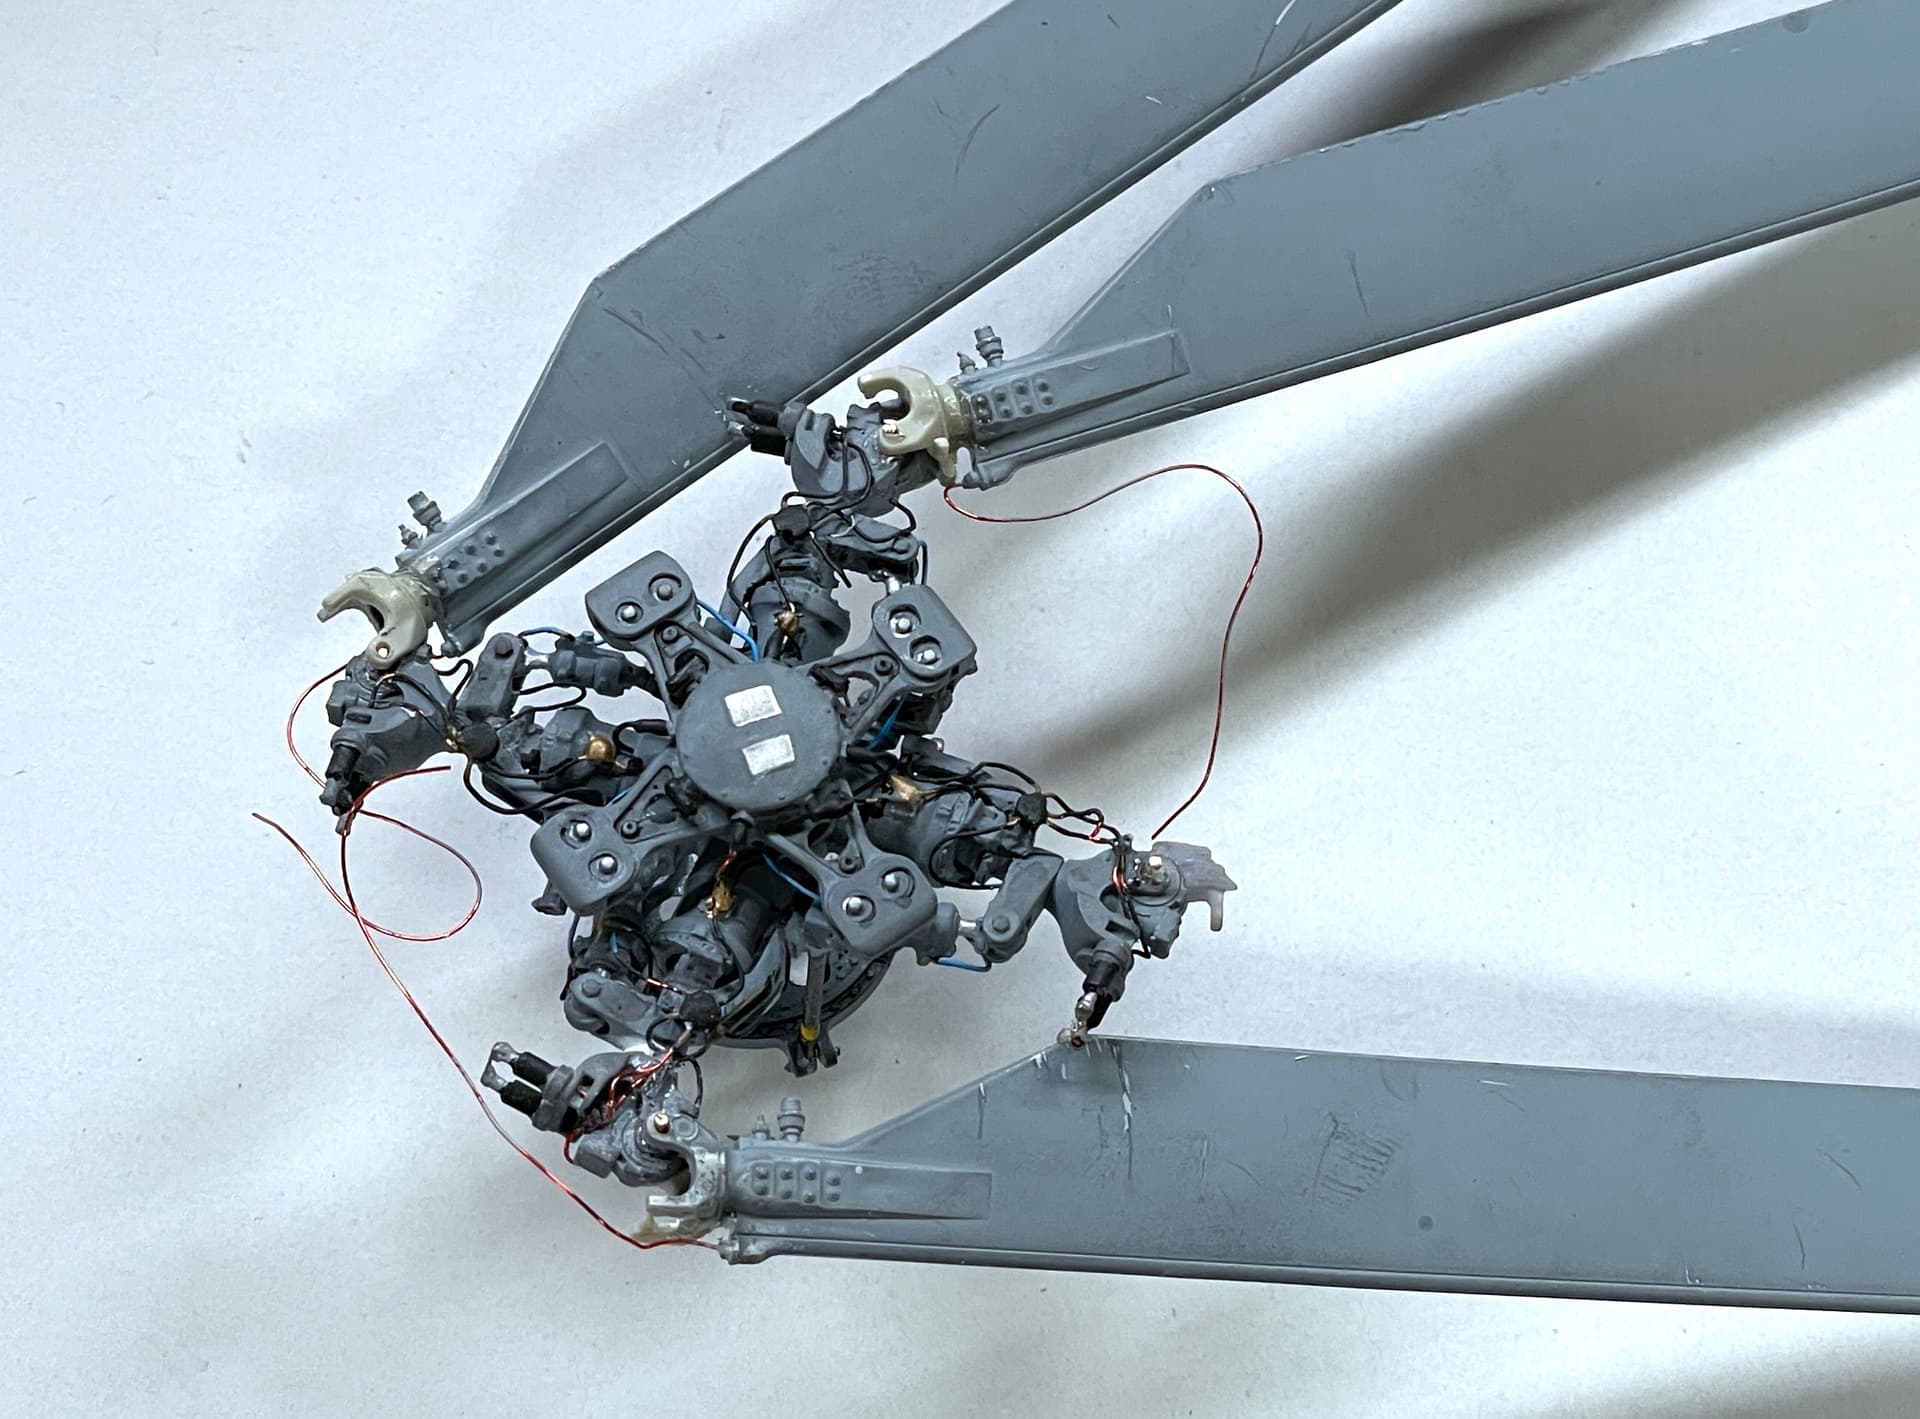
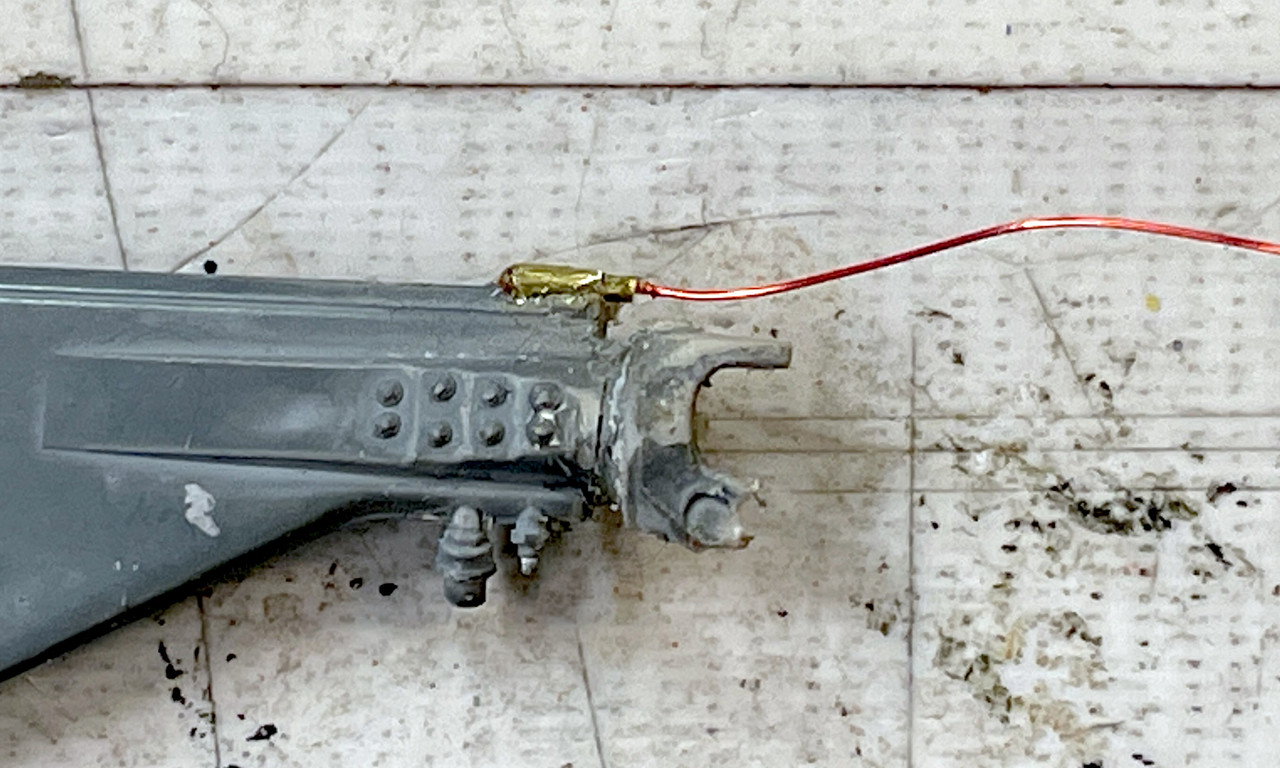
After fitting it on the hub and blade I found that it was about 0.040" too thin and used some styrene CA’d in place to do the job. It all fit nicely.

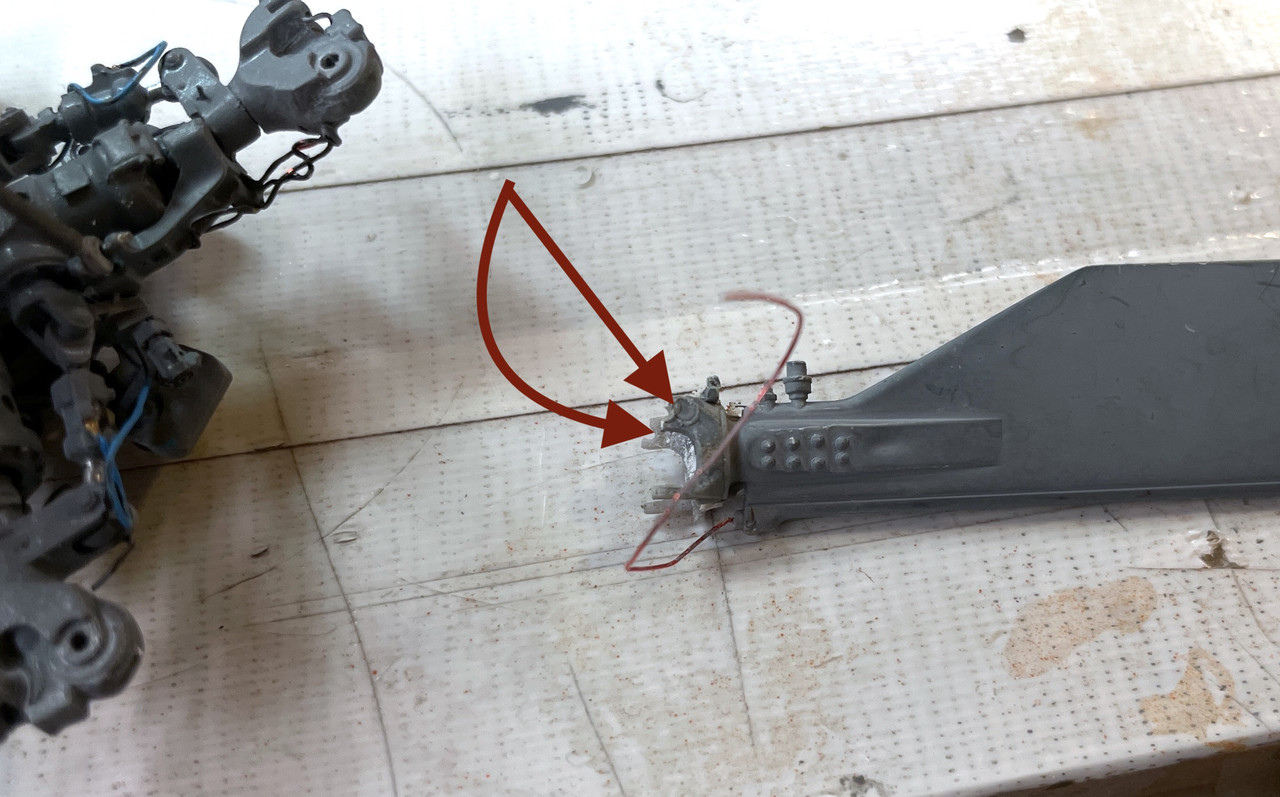
It all fit nicely until, both eyes fractured when I put a little bit too much downward pressure when fitting the hub on the craft and trying to determine how much droop the back two blades will have to have. I will epoxy the blade without the full eyes and then use some Bondic to reconfigure the contours.

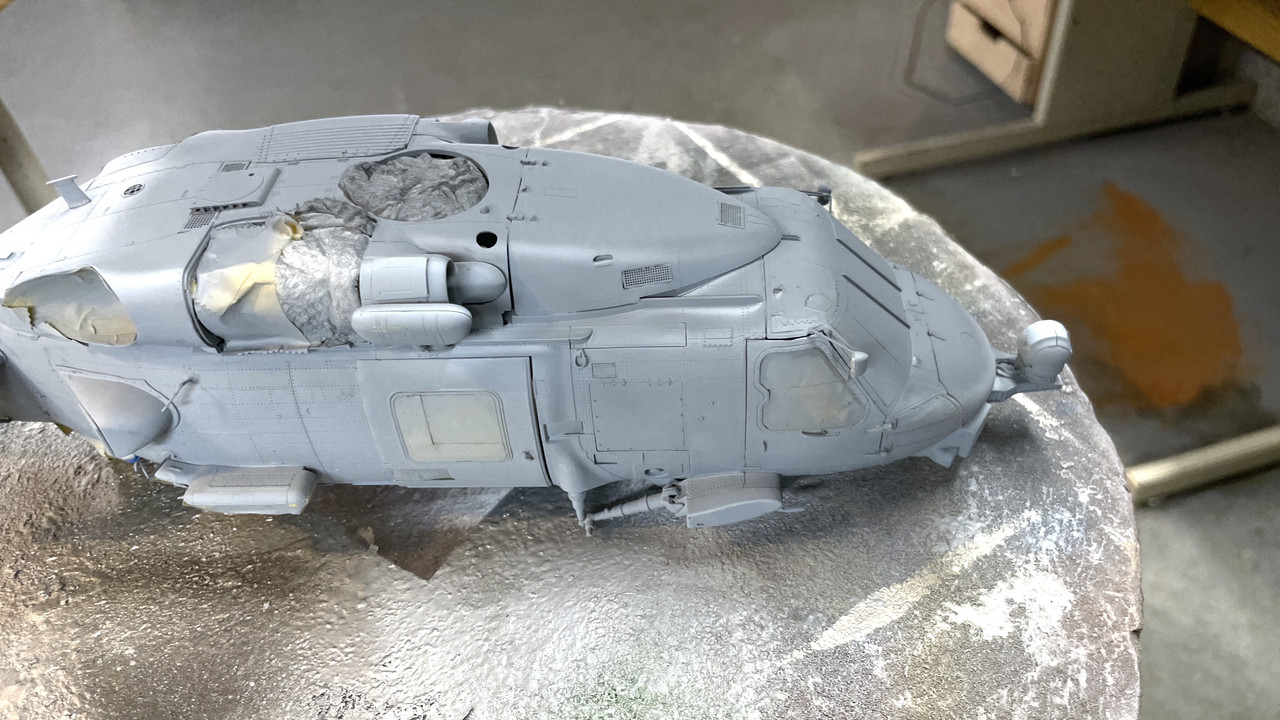
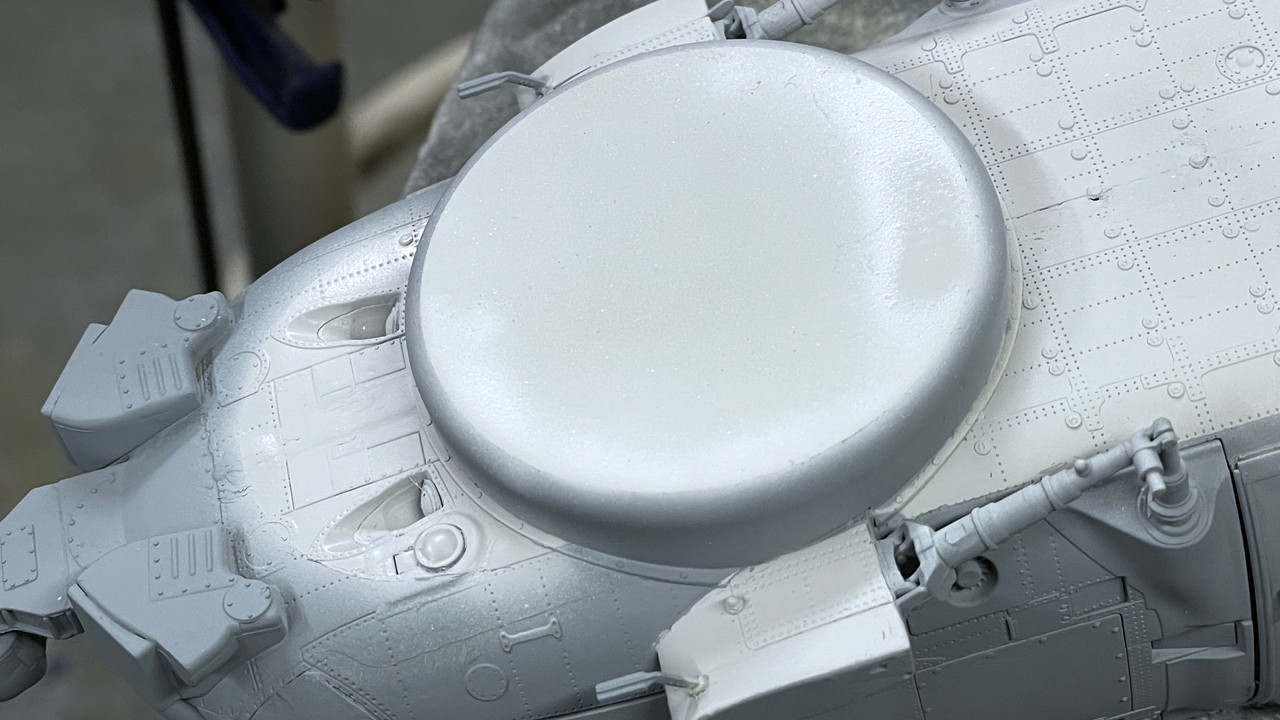
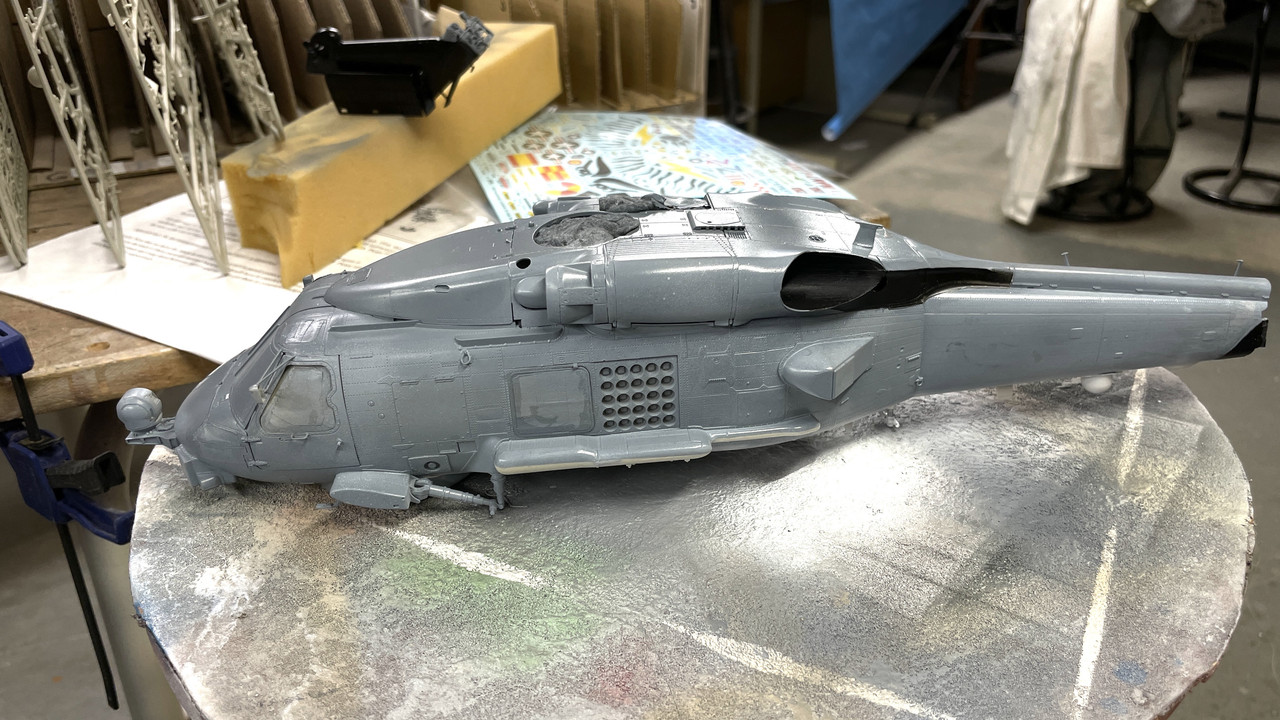
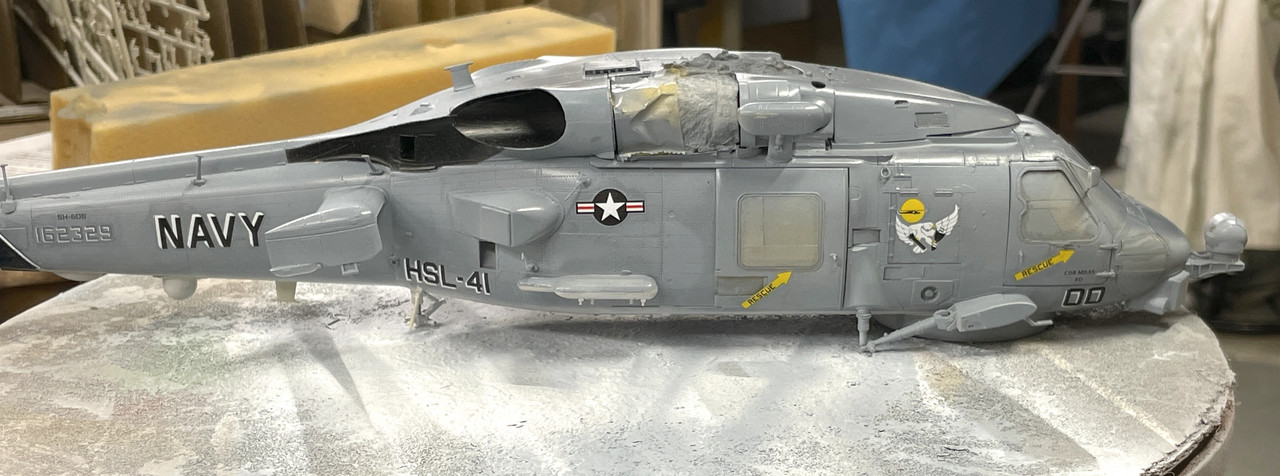
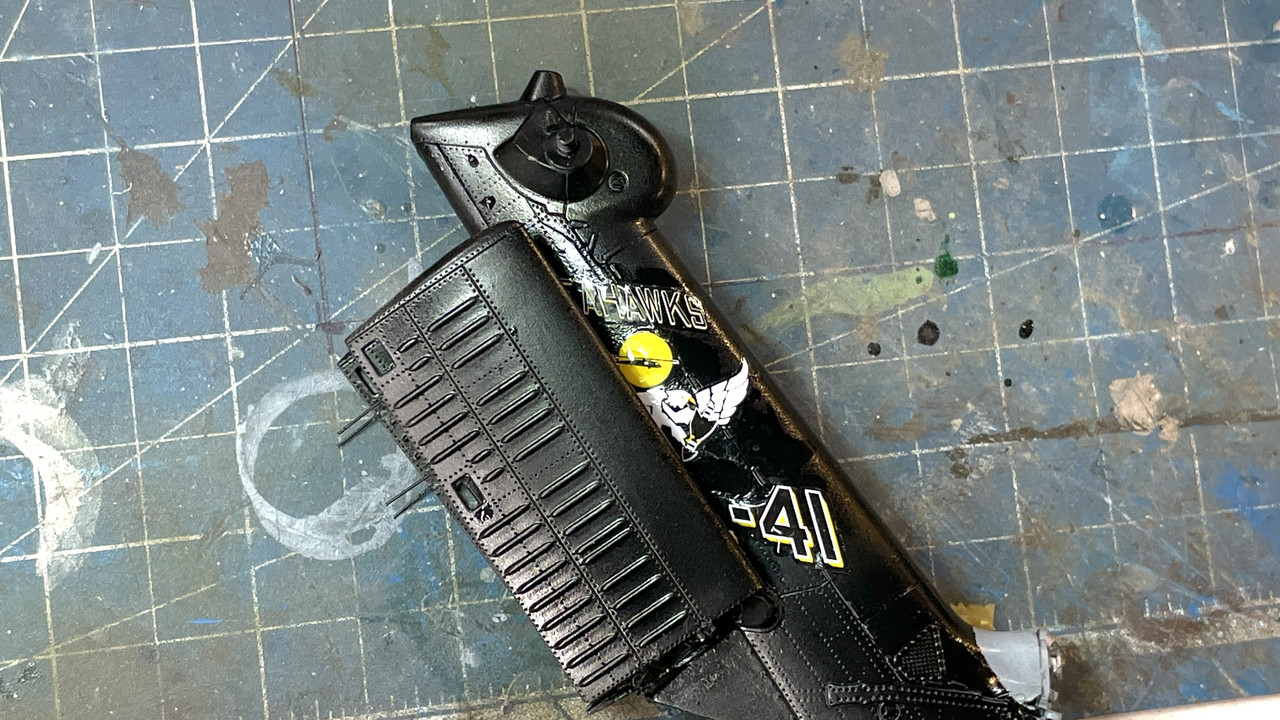
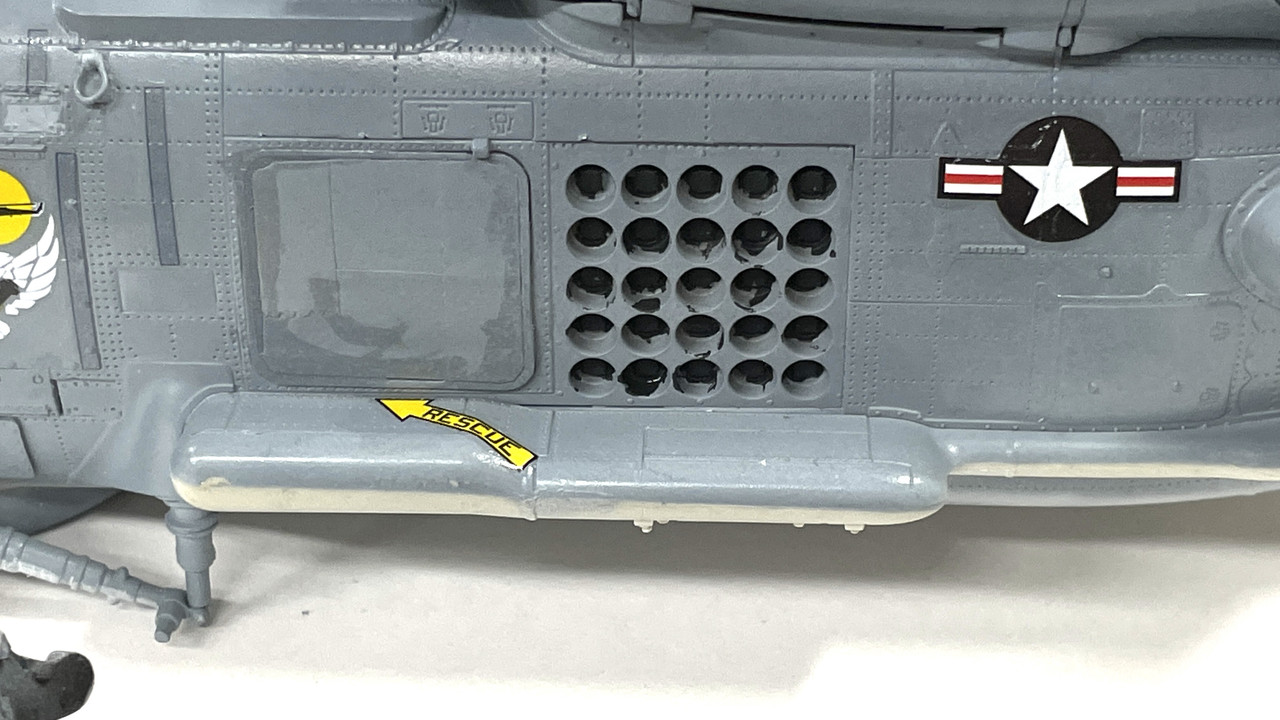
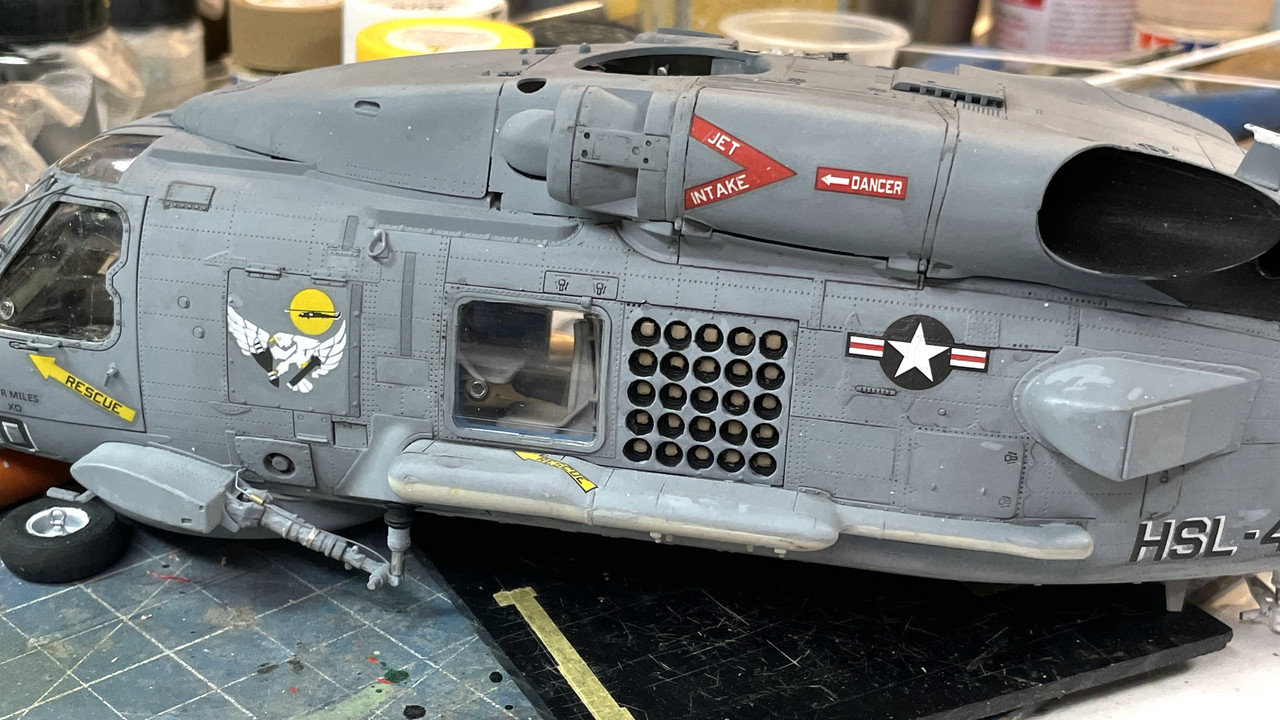
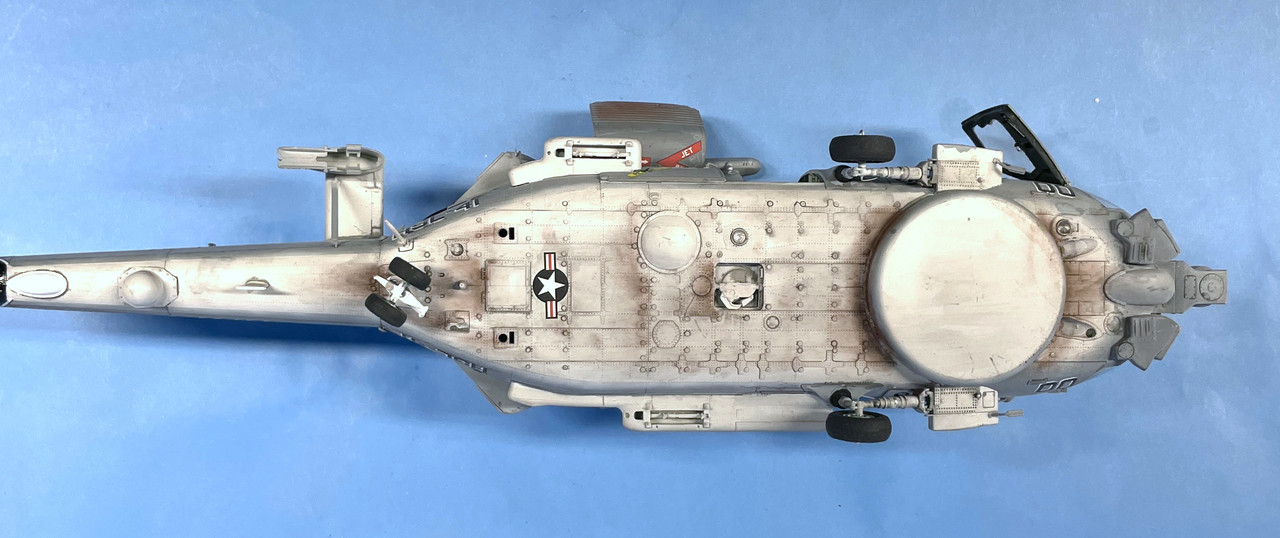
I used the Tamiya Black Panel Accent to highlight all the doors, seams and compartments this machine has. It looks pretty awful when you first put this stuff on. You have to let it dry before removing the excess.

The bottom had a lot of places.

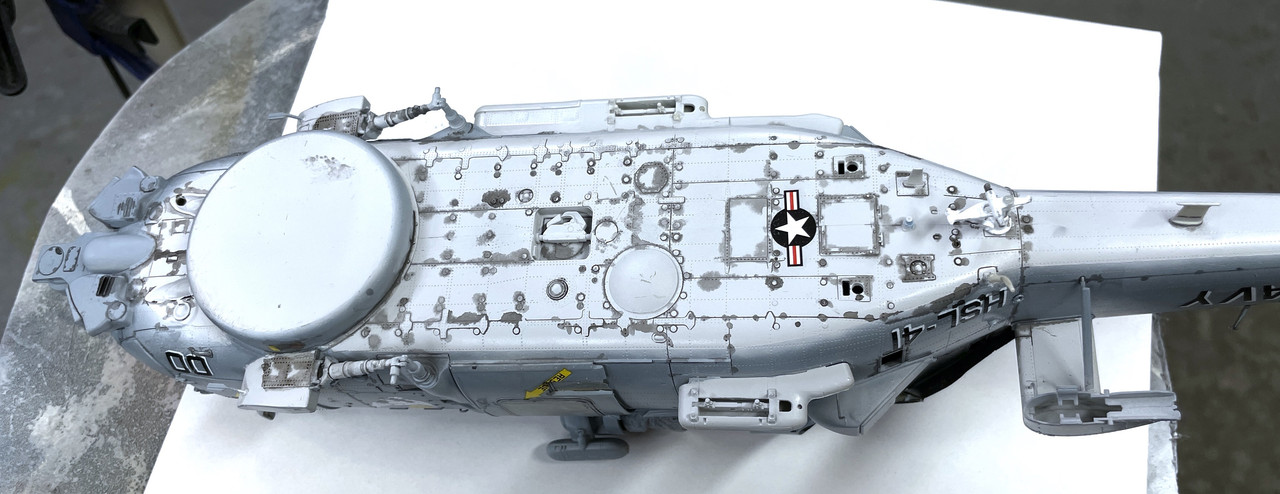
I use the traditional Q-tip lightly dampened with low odor mineral spirits. I was annoyed that the mission paint dissolved in the mineral spirits. That’s not supposed to happen. Tamiya paint DOES NOT. Also on the bottom, some of gloss coat was not sturdy enough and the accent leaked into the flat paint underneath making clean removal of the excess difficult.

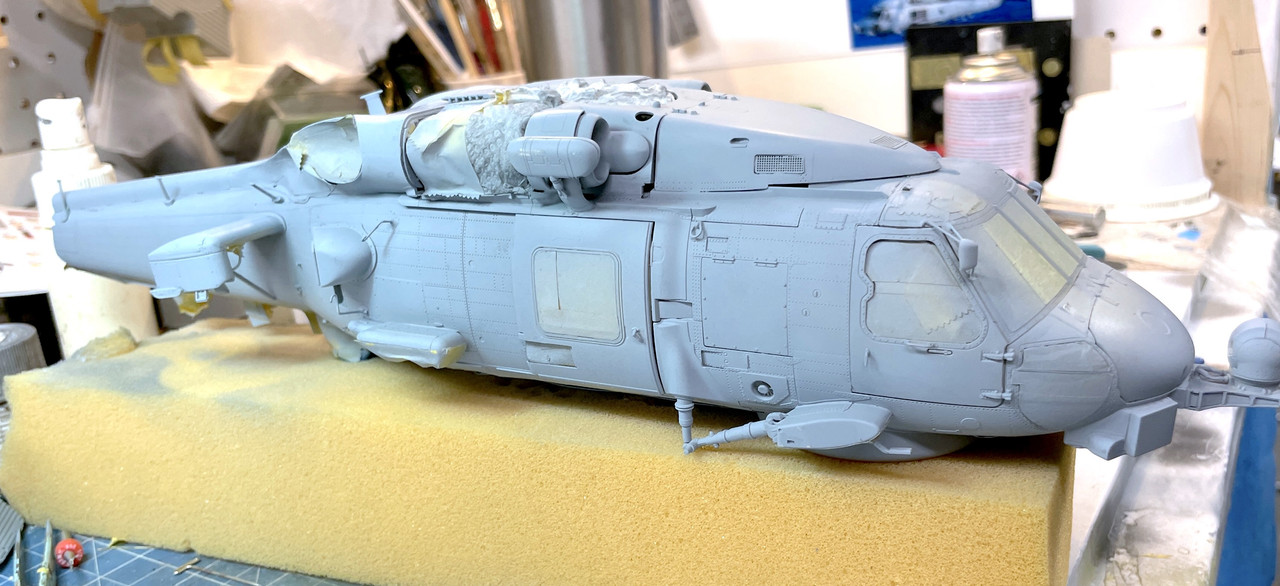
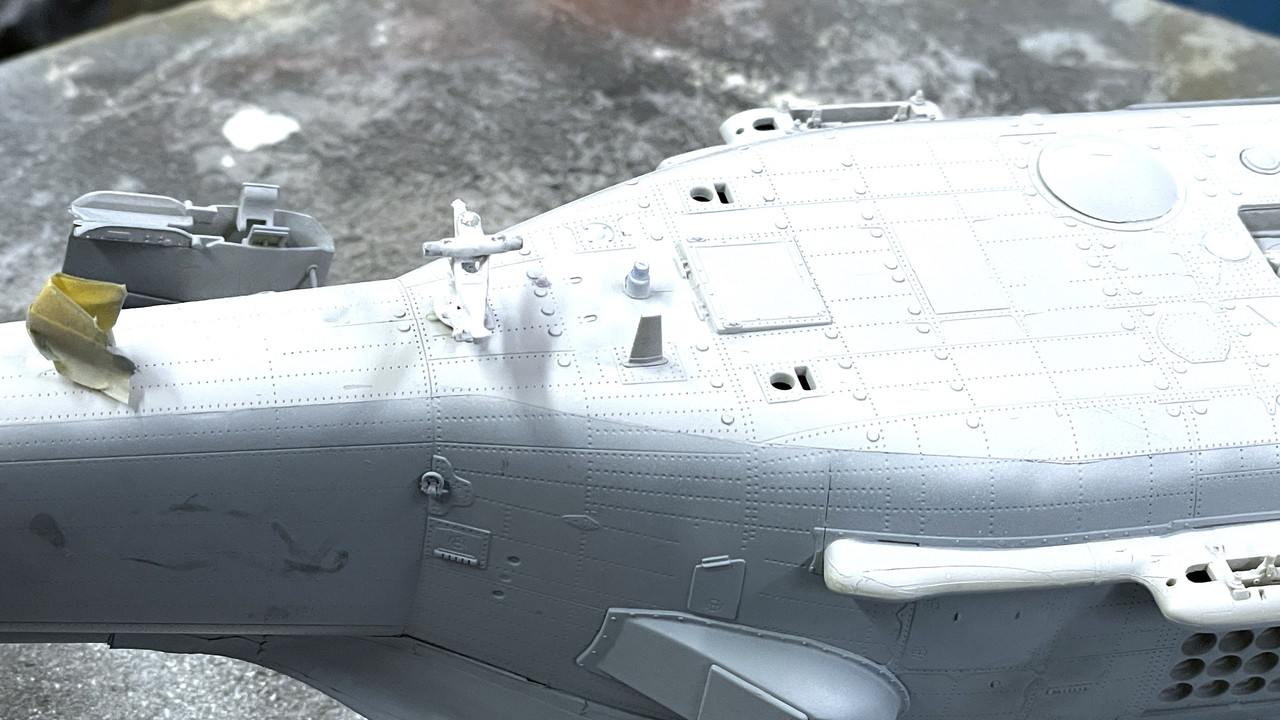
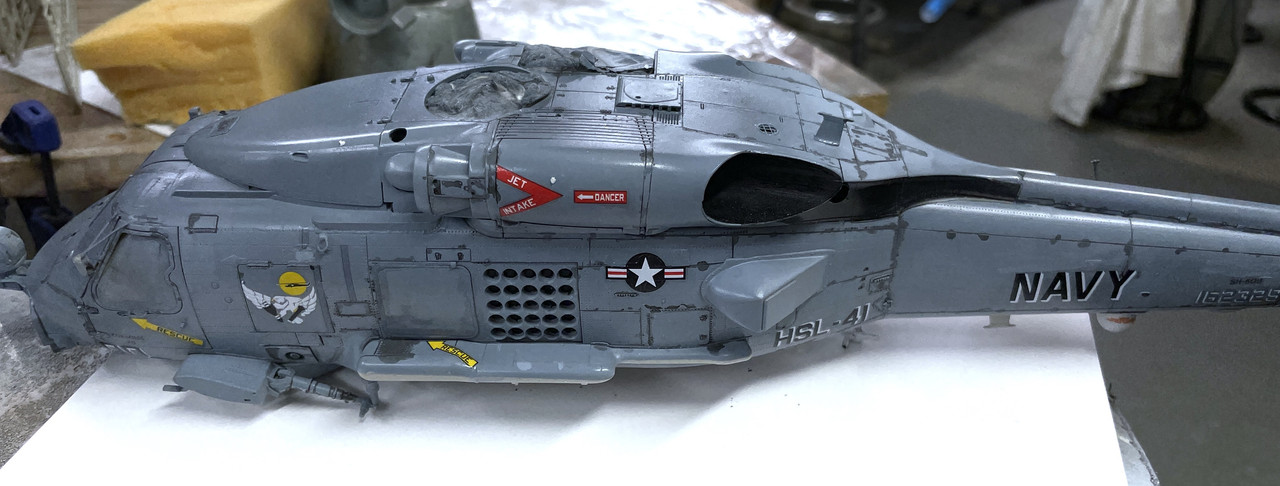
But, with all of that, the final results after shooting with Tamiya clear flat boosted with a bit more flat base, came out pretty nicel

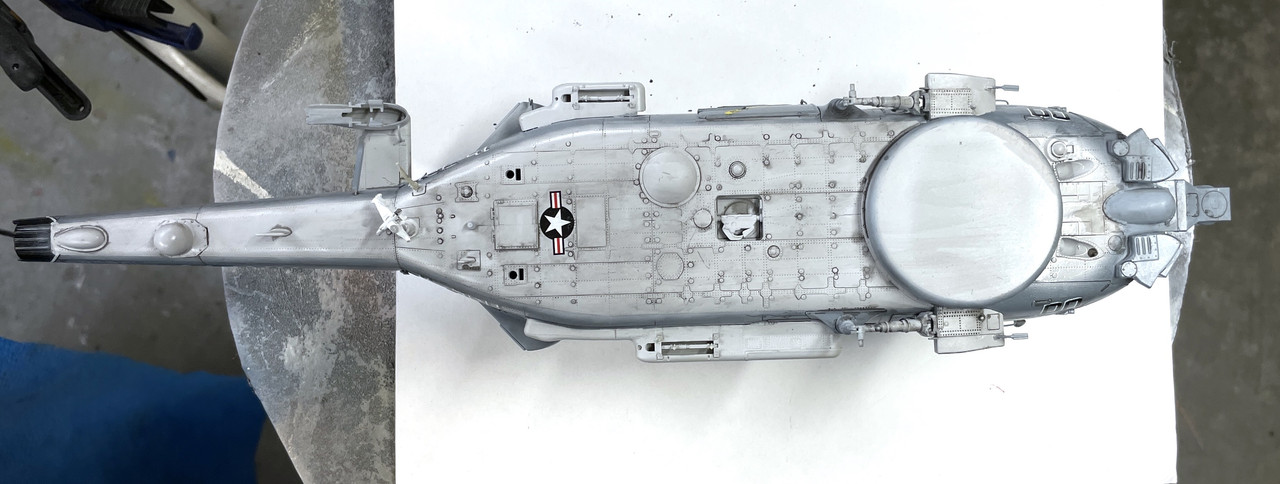
There will be more dirtying the bottom with pastels since even on clean Seahawks there enough stuff being discharged from various vents to make things interesting.

I actually almost blew by getting all set up to spray the flat only to realize I didn’t do any of the panel acccenting. You can’t do that on a flat finish. It makes a mess.

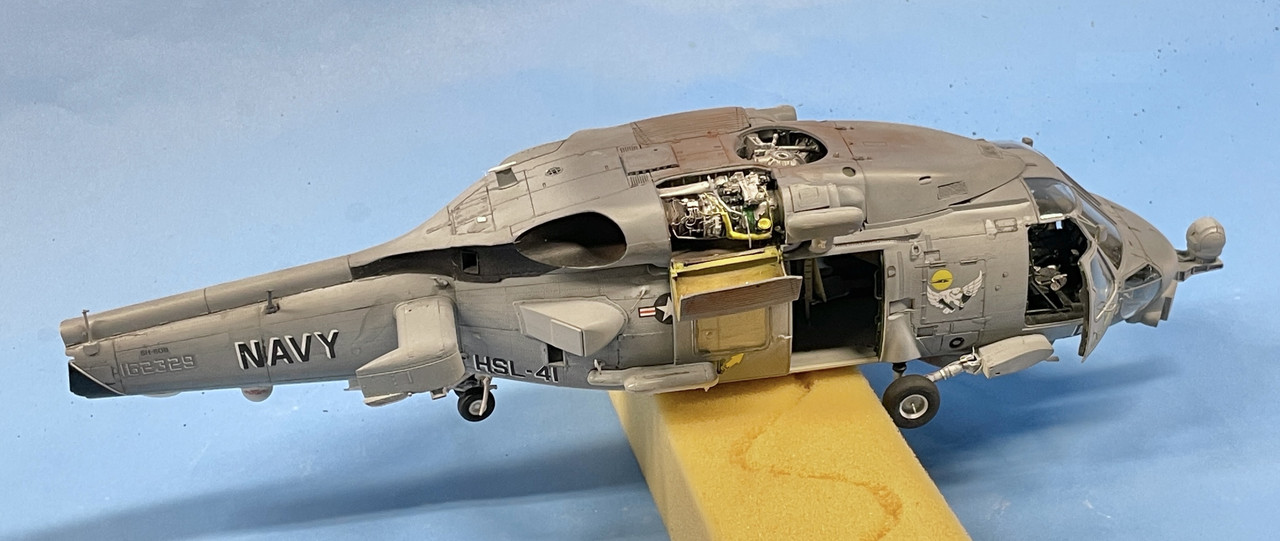
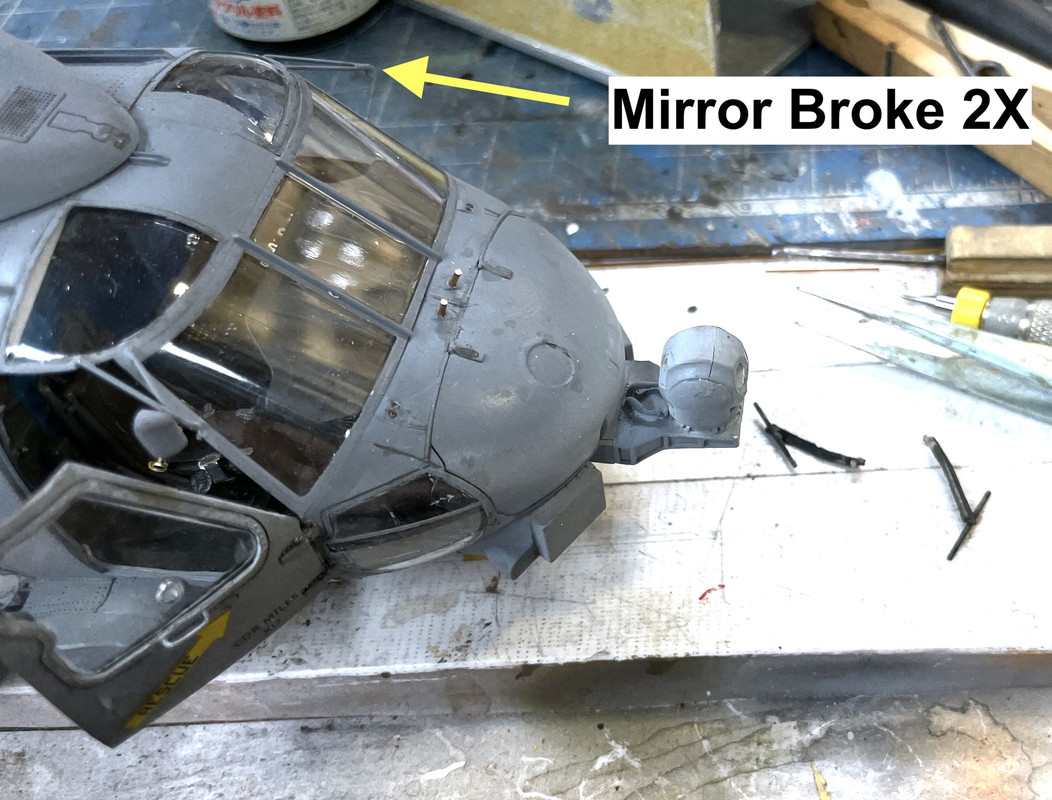
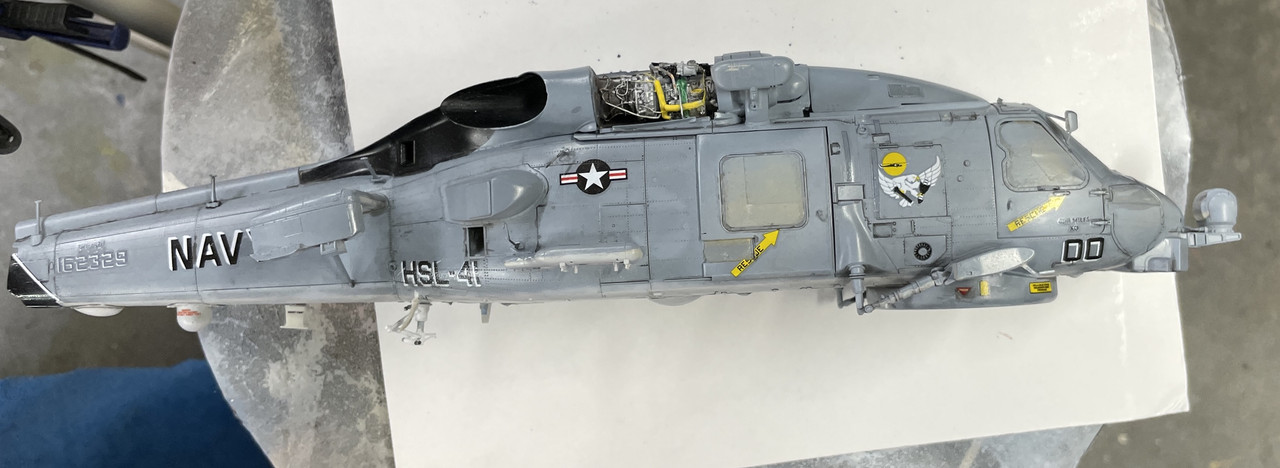
After the flat dried it was time for the “great unveiling”. I took the tape off all the glazing. I was worried that the canopy cement might not have enough grip to resist the pull of the masking tape and I hate when my worries come true. The first window I de-masked popped out. it was the window in the sliding cabin door so I was able to put it back carefully using solvent cement. All the other windows de-masked without problem except for the co-pilots door. The tape was too tight, especially where I sealed the edges with clear gloss.

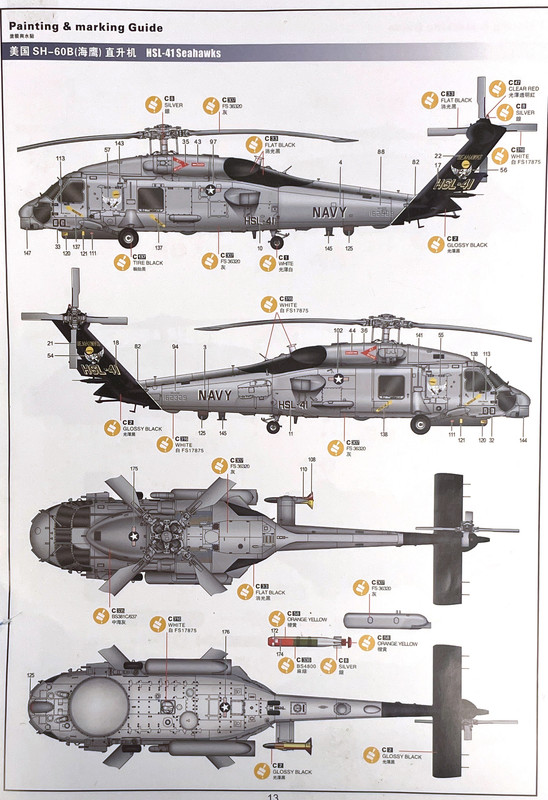
That window got damaged. All the others are perfect. I put on several coats of Pledge with Future floor wax and hope it will be okay. There are two other sets of cockpit doors, but they are not for the SH-60B. The “B’s” window has a curved notch taken out of it, while the others are straight. If this window is too damaged, I’ll make one of those work.

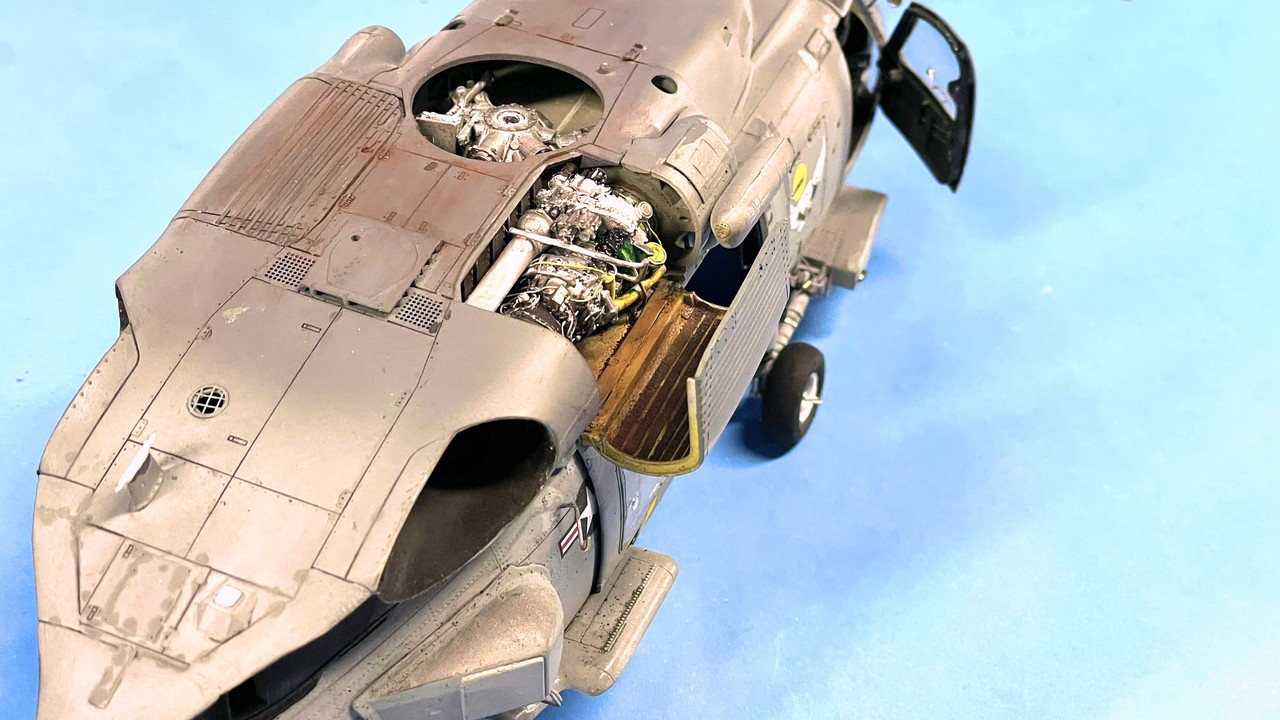
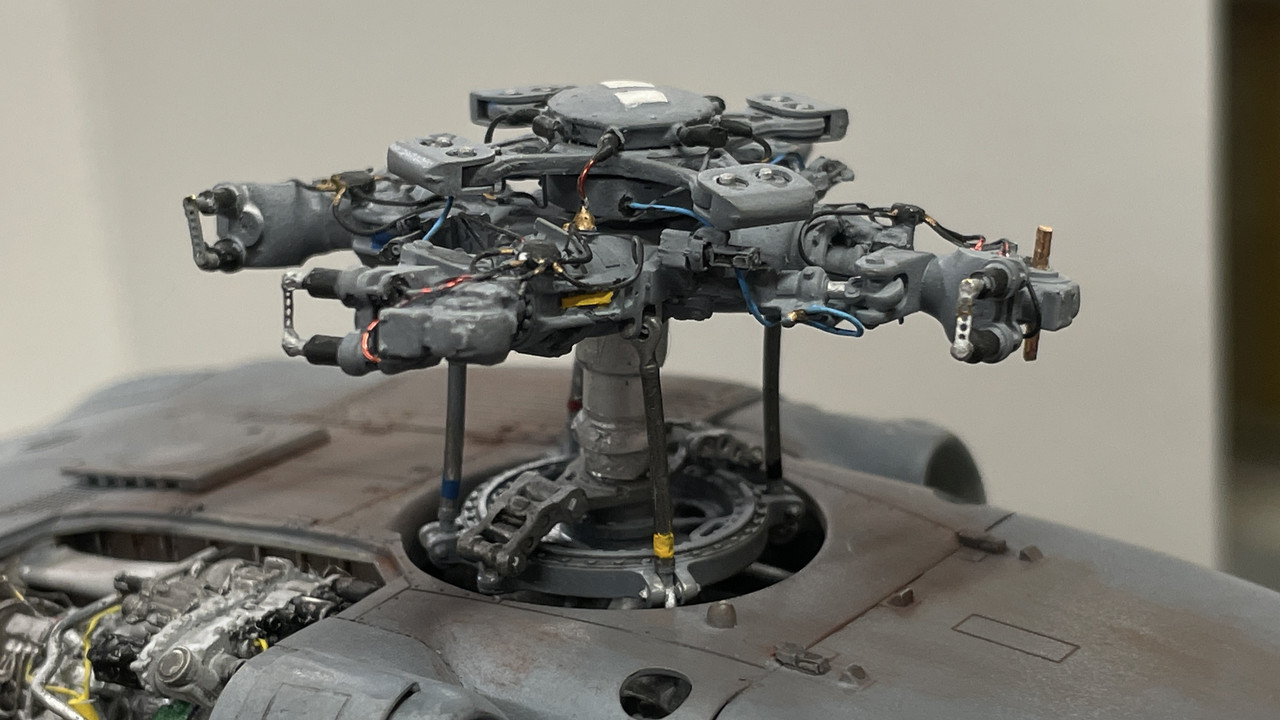
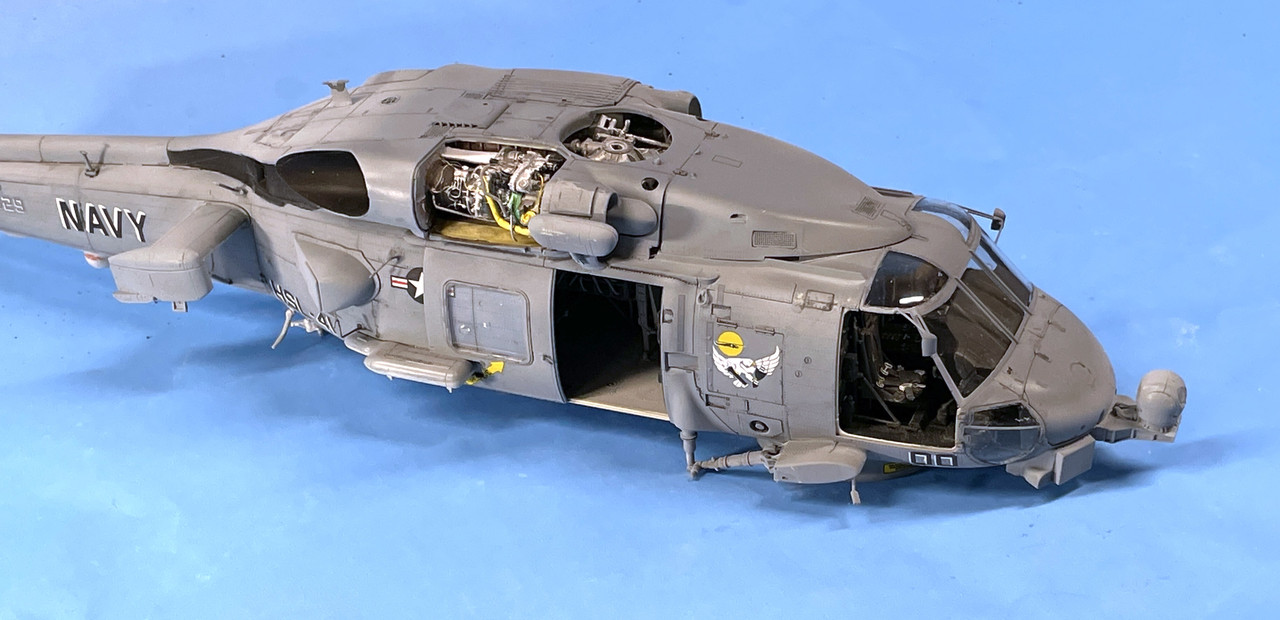
Here’s the glazing exposed. It’s nice to see the engine again. I missed seeing it.

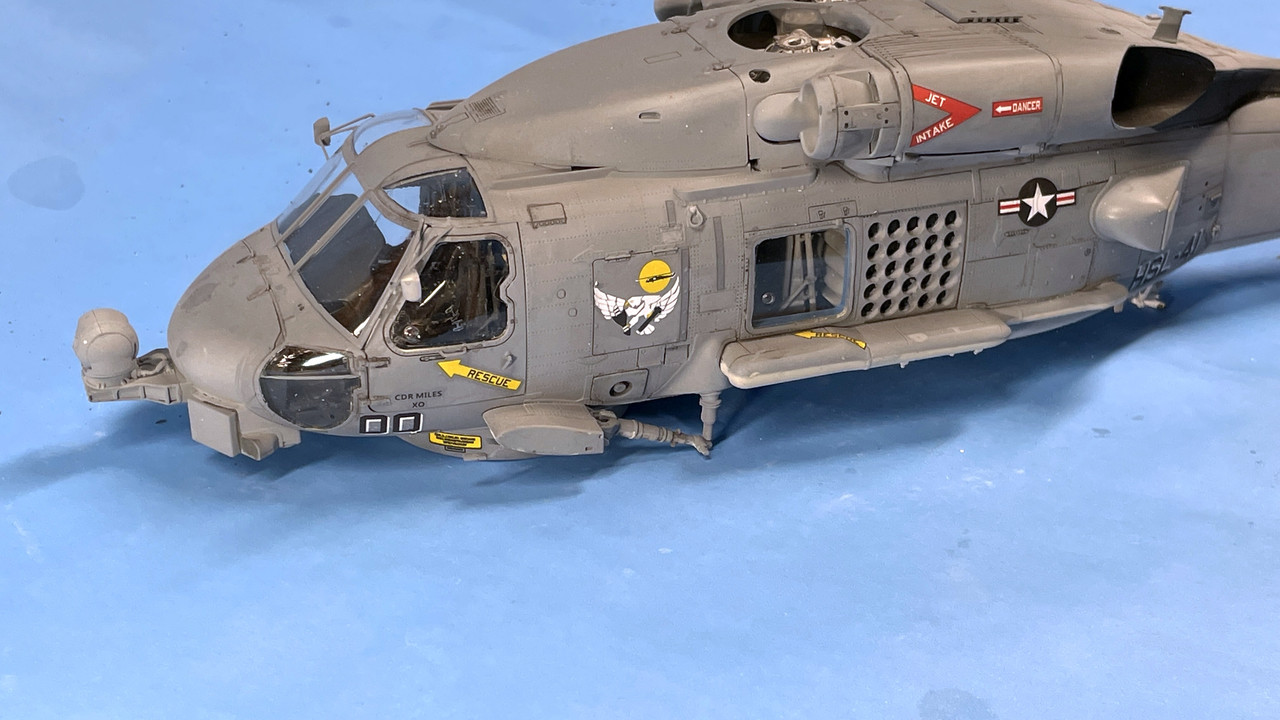
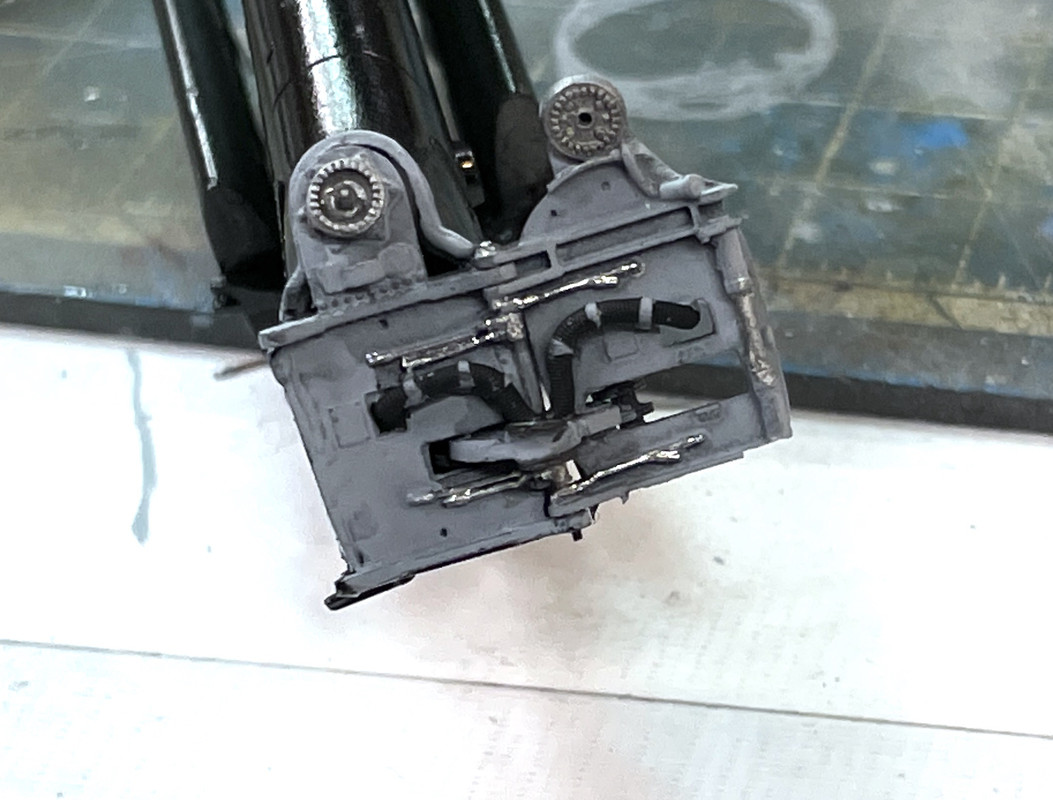
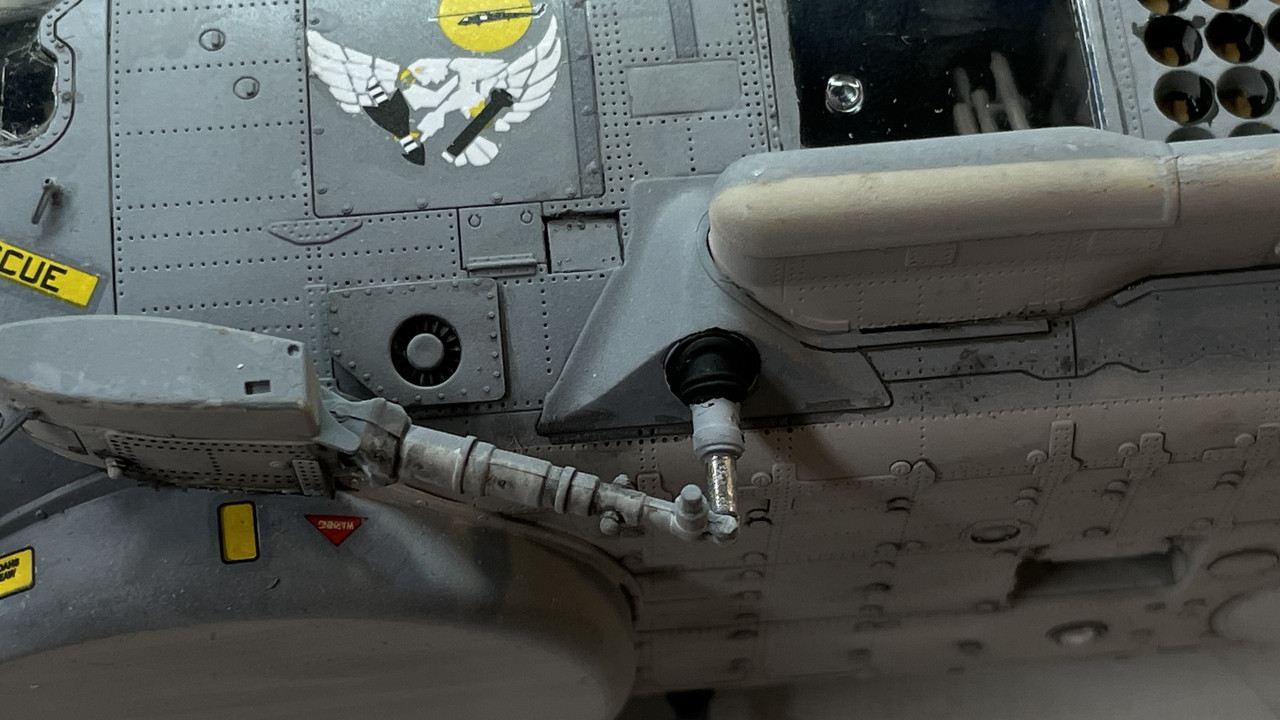
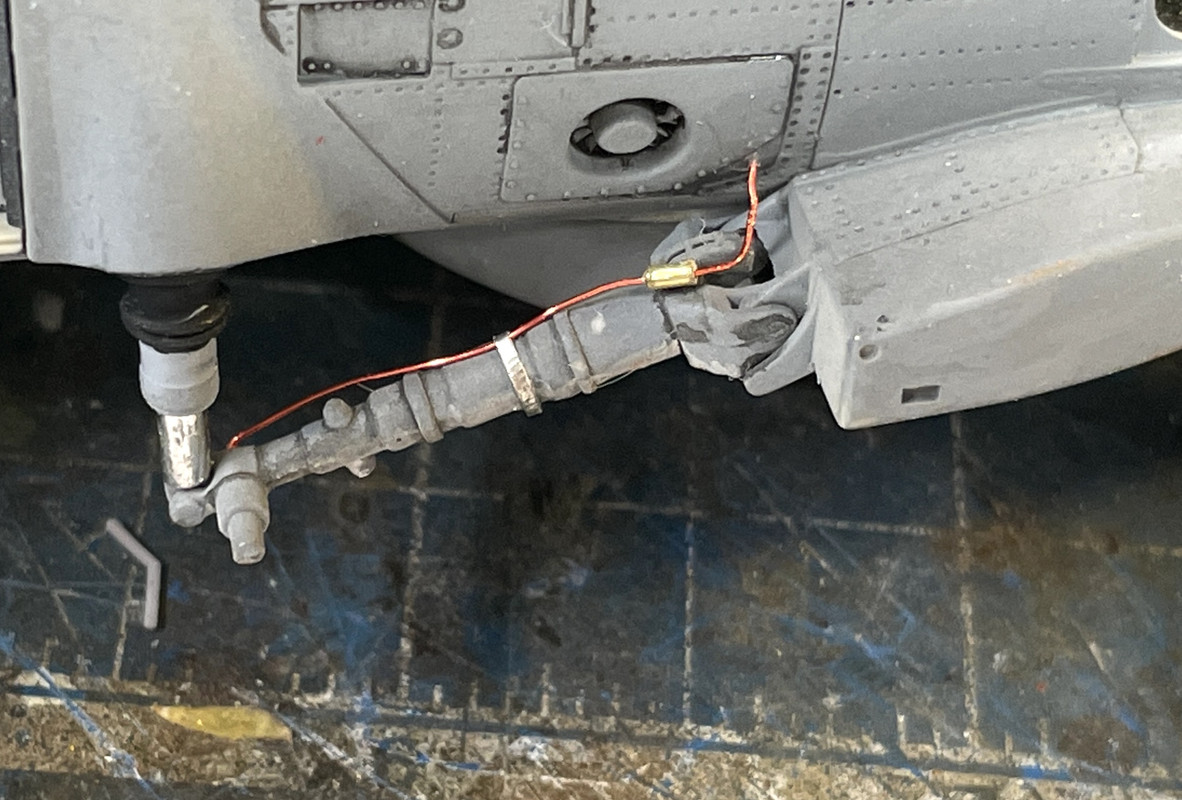
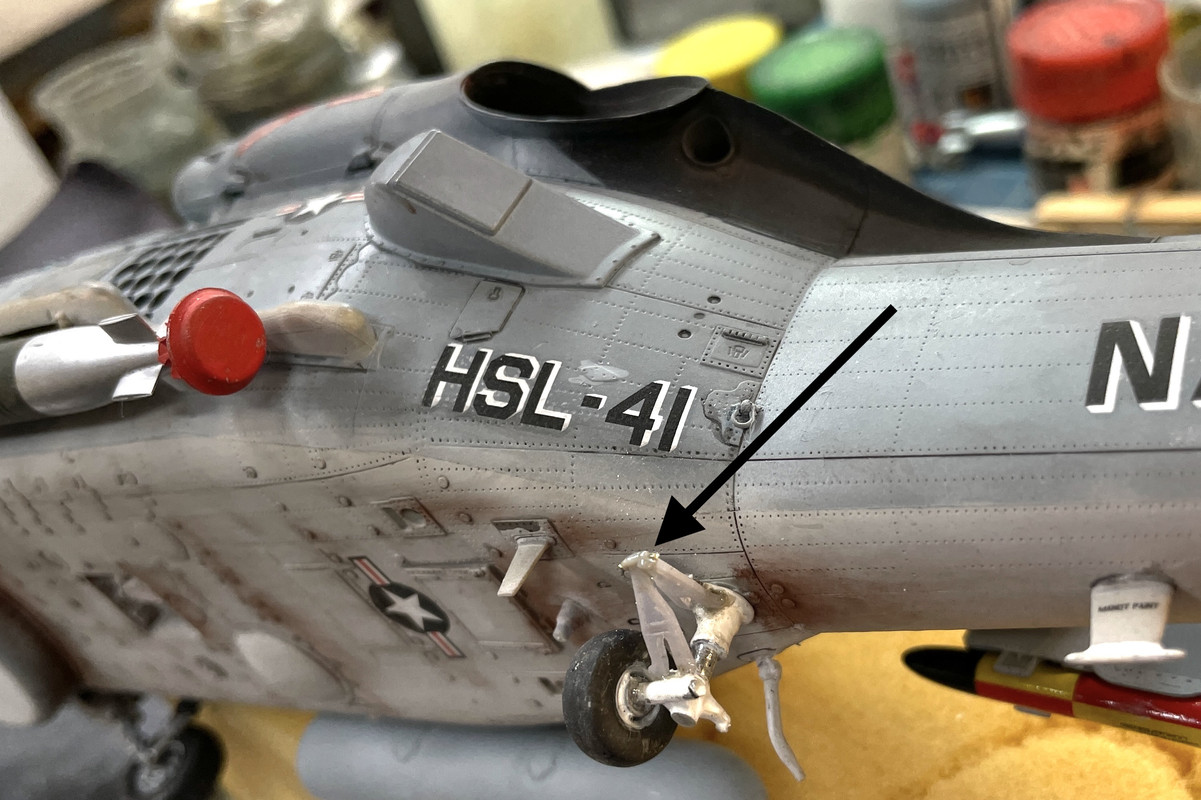
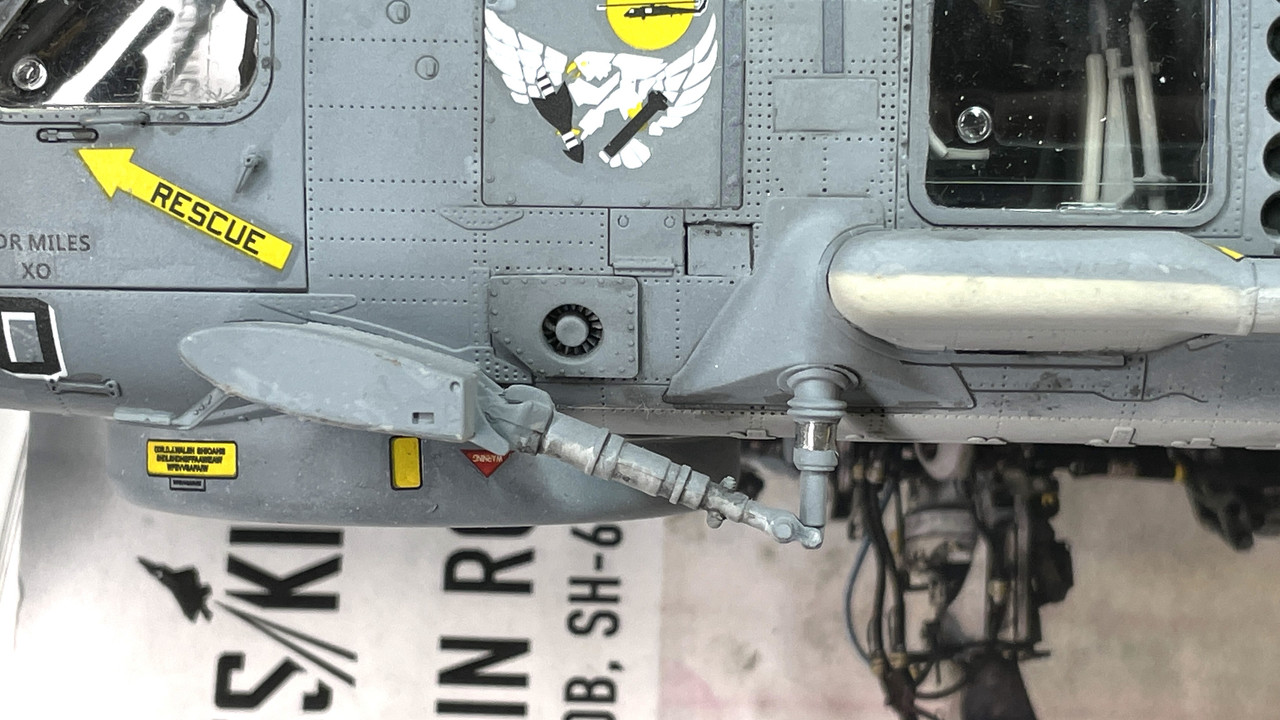
I did a few more punchlist items. I filled the hollow rear-view mirror housings with Bondic and then painted them with Molotow Chrome. Decanting the marker was one of the smartest things I’ve done in a while. It’s really slick to be able to brush the paint where you want it. The felt tips work good for the first application, but make a mess if you have to go back and add more. I also used the same to paint the oleo strut on the main gear. There’s still some more tiny paint jobs that need doing and that will wait until Monday.

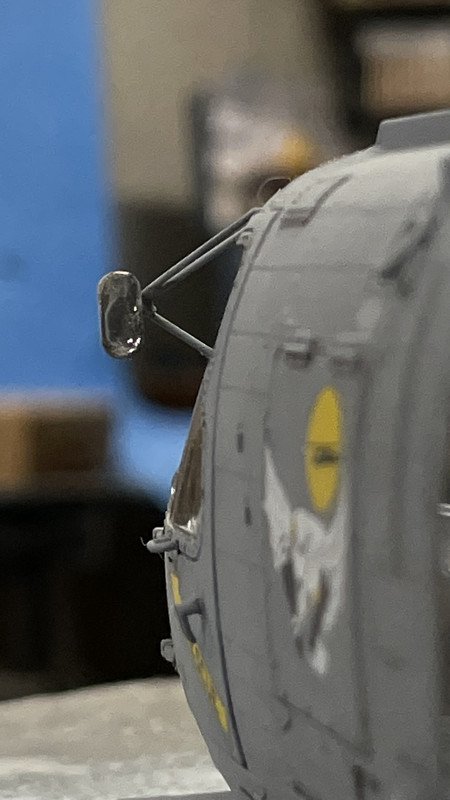
Above the oleo strut is an elastomer bellows. That will be painted rubber black.

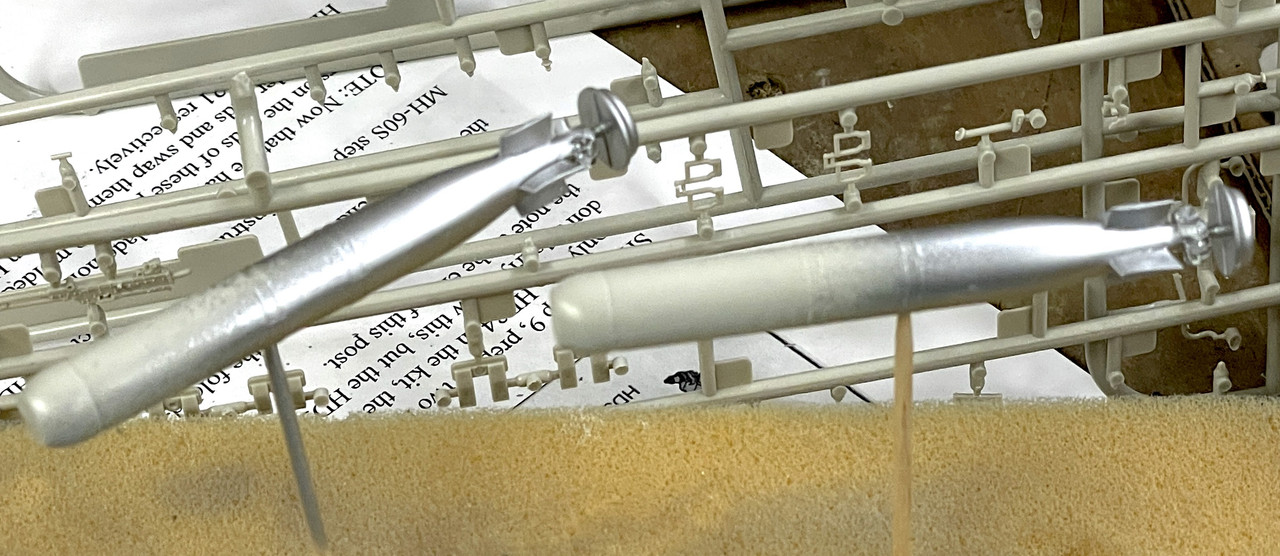
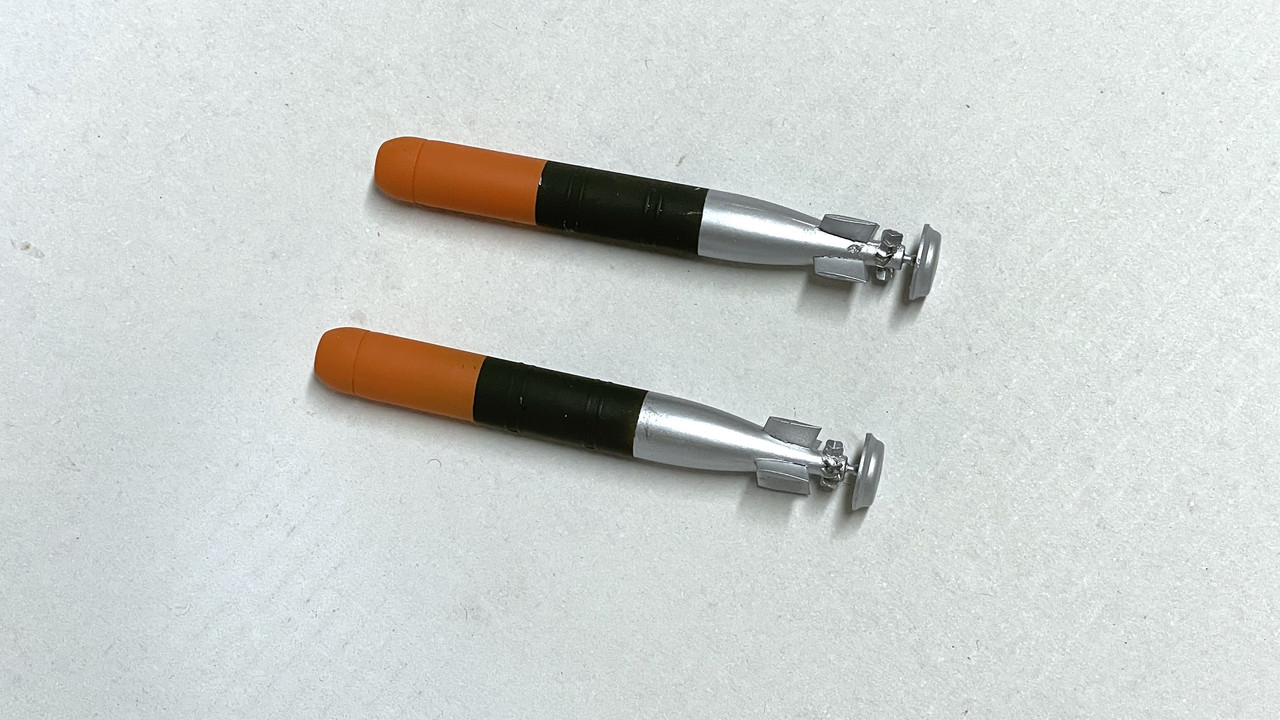
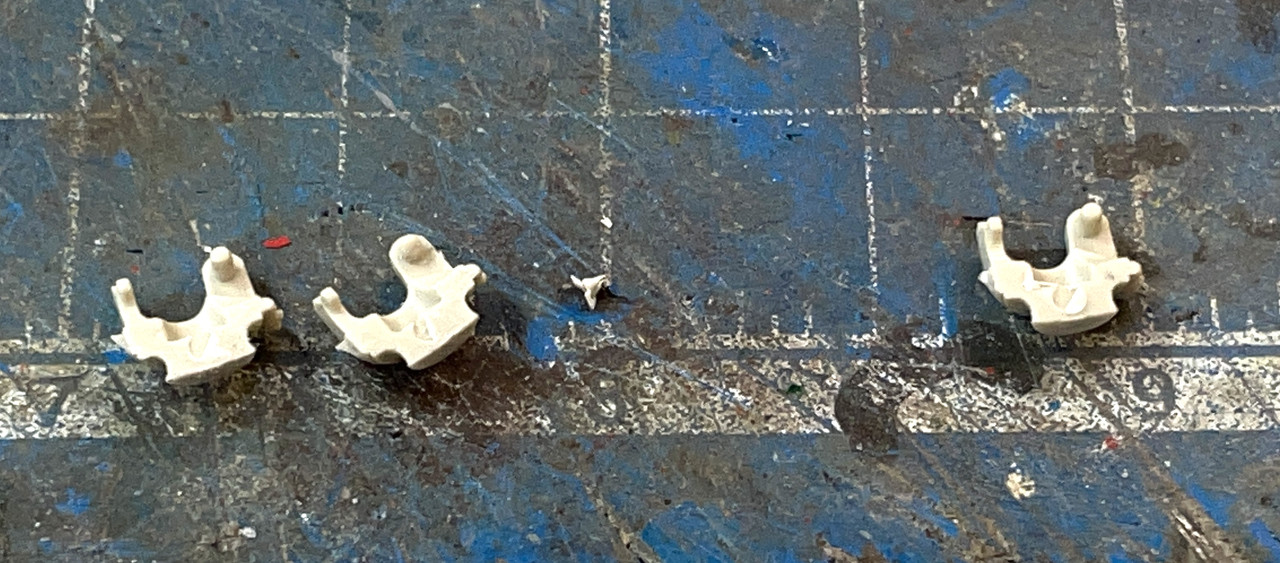
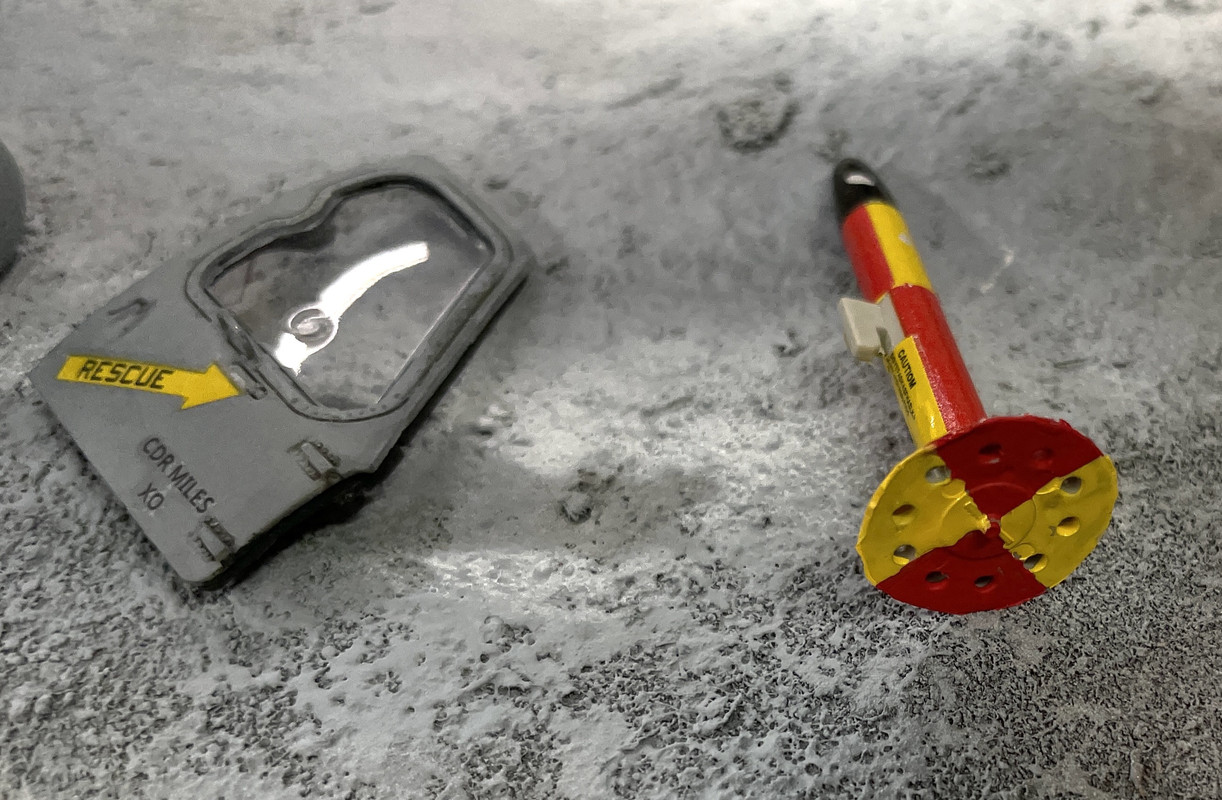
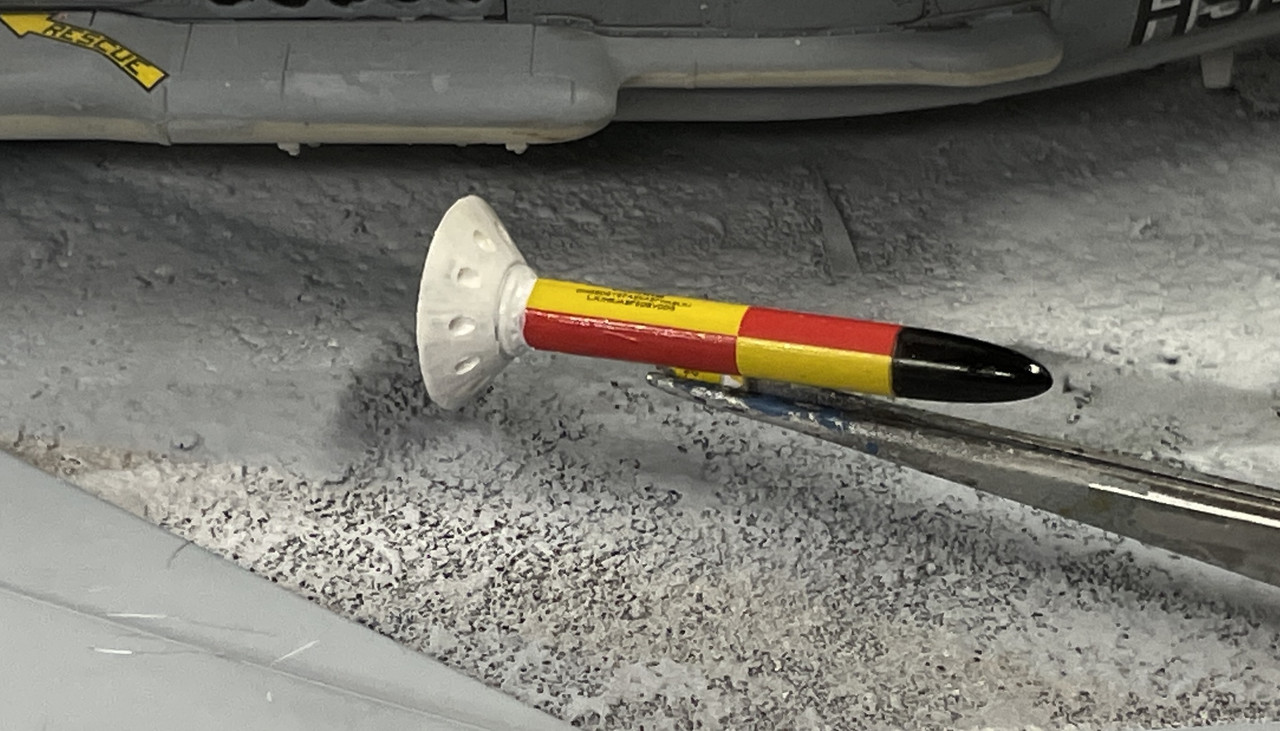
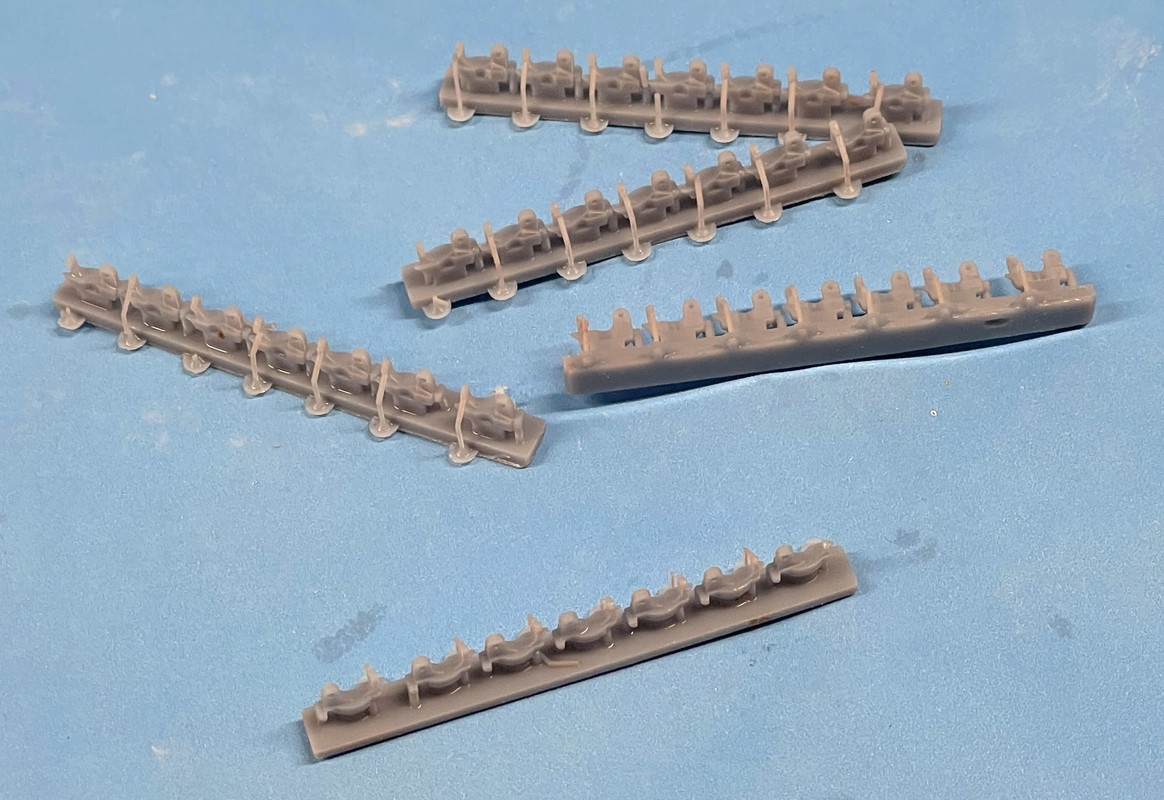
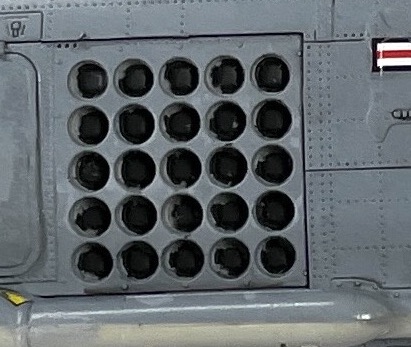
I also did the back painting on the sonabuoy noses and they look good now.

The model proper will be done some time next week. The base and figures are still out there.

8 Likes

Again, input from my readers caused me more work. It was one of those two-steps back and one forward.

I tried to save the damaged door window, but it was a mess. The other two door windows in the kit were for other version of the Sikorsky bird inlcuding the Blackhawk and their cockpit door windows varied slightly in configuration. I woke up thinking about this and decided to go for it. The model’s coming out too good to let that crappy window detract from it.

I filed and sanded the replacement and got it to fit reasonably well.

I installed it without mess up, repainted the door’s interior and did some trim painting around the outside. This took quite a while.

I then repainted the landing gear shock strut to do it like it’s supposed to be. Still needs just bit of tending loving care.

Here’s the fixed door and the towed sonar rear portion freehand. No decals for that. I had to blend Tamiya yellow and white to get to the lighter yellow.

And I’m repainting the sonobuoy bays. The inside is tan, and the holes are completely black as I could see looking more closely to some photos. I didn’t finish this job today. I got the tan done and most of the black. I will have to back paint the body color next session.

The main struts need some brake lines. I should add them since I added all those tubes on the rotor head.

Till next time…

8 Likes

A reader on one of the other forums piloted the Seahawk and has continued to provide me with invaluable prototype information about the real bird and I’ve incorporated everything he’s told me. Yesterday he told be about the real colors of the antenna and the sonobuoy dispenser. And he showed me the brake lines on the main gear.

I put in the brake lines. I used magnet wire and diameters of Albion tubing to make a faux fitting. I made a strap clamp out of wine bottle foil. This stuff works great, but you first must remove any printing or coating on it with acetone. The coating prevents good gluing.

I realize that is not the kind of clamp they actually use, but the kind they use is really hard to model.

i then finished all the painting on the sonobuoy rack and it looks much better. I also painted the break line leaving the brass natural metal since the actual junction is natural metal also.

Lastly, I stripped the decal off the airbrake on the MAD (magnetic anolmaly detector) which I have been erroneaously calling a towed sonar device, and painted it flat white to simulate the styrofoam that they are now made of. I will paint the aluminum pad that holds it on tomorrow.

That brings us up to date. I need details of the engine bay cover latch. I’m going to mount both the bay door and the cockpit door with bent wires. We’re getting closer to the end each day. I still have the running lights to install, do the powder weathering, and then mount the blades and the tail boom. I have to paint and install the main rotor folding in clamps. And it will be done.

Meanwhile, if y’all are interested in ship stuff, I’ve started another thread on this site in the building of the missing interior for the new Takom 1:72 USS Missouri 16" main turret. The model’s cool, but has nothing but the exterior shell. I’m drawing and will 3D print all of the interior apparatus down to the first projectile deck. I’ve finished the main guns yesterday, and starting working on the below turret decks.

Here’s the guns…

Here’s the link to the thread.

Bis Morgan… (see you tomorrow.)

7 Likes

My Seahawk pilot has given me more suggestions including how each blade (main and tail) are color coded and used in managing the main rotor folding process. The blade clamps are also color coded to their respective blades. The colors are also on the main rotor hub. I’m going to color some tiny strips of Tamiya tap and add this micro-details. The scheme is Forward starboard blade is Blue , Aft Starboard blade is Red , Forward Port Blade is Yellow and Aft Port Blade is black .

I finished all the weathering I’m going to do. I dirtied the bottom up and added dirt on the walking arees on the roof. I got the engine door installed, broke it off in handling the model improperly and glued it back on again. I got the front door mounted with wire. And I spent WAYYYYY to much time screwing around with the tiny marker lights on the wheel sponsons and the windshield wipers. Didn’t finish them, but will do so today.

Here’s the bottom: Notice the wheels are now on.

And here’s the model showing its newly attached doors. I’m very happy I was able to fix that door window. Dodged a bullet on that one.

Lastly, the wipers. I find that some of the smallest details drive me the most crazy. It’s the Pareto principle at work, except it’s 3% of the parts take 90% of the work (and aggravation). It’s a small gluing area and they weren’t drying correctly. I ended up using gel CA. I’m wiring them on since the mount points weren’t holes, just tiny flat spots. I want the model to be able to put for the long haul.

When laying the model on its side while putting on the cockpit door I broke off the port side mirror. Glued it on with gel CA and then broke it off again. This time I’m going to J-B Weld it and then not touch it again.

6 Likes

Will you be blogging the turret exclusively over at FSM rather than here ? Those guns look great !

It’s looking great. I can’t wait to see it completed w/the folded rotors.

Find the turret build right here… Takom Iowa Class Mark 7, 16"50Cal Turret with Full Interior Start-to-Finish - #19 by Builder2010

In the middle of an ice/sleet/rain/snow storm today and into tomorrow. Good day to spend some time in the basement building cool things.

It was pointed out to me that I mounted the engine hatch at the wrong angle, but couldn’t get the work platfom part flat. Well… after carefully looking at a guy kneeling on the hatch and working on the engine, I realized that I put the wear strips on the wrong wing of the hatch. The strips go to the hinge side, not the outside. With that understanding, I removed the strips, fixed the paint, made new strips, applied them and redid the weathering. I also had to repair where I had glued the door in the wrong position to the helicopeter’s body. All’s well that ends well.

I then got the wipers on using the wire. Touchy, but not too difficult.

Lastly, based on Svt40’s additional info, I’m adding the color-coding strips to the various places identifying all the blades, their holders and other parts. I painted some Tamiya tape and attempting to use that. It’s not sticking as I wish it should. I think I’ll give it a little patch of clear gloss since things stick to gloss better than flat.

Onward and upward!

It looks like they had to destroy one of these Seahawks in that successful ISIS raid last night. Mechanical troubles. In look how complex these beasts are it’s amazing they work at all.

5 Likes

It was one of those days where I spent 30% of my time doing new stuff and 70% of my time fixing crap that I broke off.

For the new stuff, I built the blade support racks and their associated blade clamps. The kit parts have a very narrow, scale-ish, connection between the forward half of the two-part assemblies and the main part. There are two sets that vary in size. I was seiriously concerned that this narrow part wasn’t going to make it especially after it got softened by the solvent cement in its proximity.

I fixed this by drilling and applying a piece of 0.014 guitar string and a corresponding hole at the correct angle in the main part. I put on accelerator and then pooled some thin CA in the joint. Much, much stonger.

You can’t use sprue cutters to cut guitar string (or any music wire for that matter). It’s so hard it will put nice half-moon dents in the cutters and ruin them. You need a good hardened cutter. I have a Xuron Hard Wire Cutter. But surprisingly, my 30 year-old Channellock long-nose pliers have a cutter near the hinge and cut hard wire with no damage. It’s all abou the metallurgy. Chinese tools generally don’t hold up.

The Xuron cutters can’t cut a tiny piece due to the thickness of the jaws, so a bit was sticking out the bottom of the assembly. This will imapale you so it needed to be removed. I used the Dremel with a diamond-coated burr. Took my time and didn’t grind away the much softer plastic surrounding the wire.

The blade clamps were another small assembly that too much too much time due to the poor engineerig. They needed to be glued together OFF the blade since I’m going to airbrush the entire blade clamp, but I needed it to be spaced as it would be on the blade. I measured the blade’s thickness at the point where the clamps go and then used a piece of cardboard of that width to glue the clamps. When they were reasonably set, I placed them on the blades to finally cure.

Here is the gluing set up.

And here’s all the parts waiting for paint (on Monday).

I glued the rearview mirror back on. First I tried 30 minute epoxy, but it wasn’t viscous enough to stay put and there was no way to clamp it. I wiped off the epoxy and then used some epoxy putty. This worked! It help the part still and cured hard. The mirror is firmly attached. It needs a little cleanup which I’ll do next week.

While fussing with the mirror, I had the model supported on a foam block. It fell off and a main wheel came off, a tailwheel came of and the scissors link broke again. That’s the seond time it broke off since I replaced the original with my 3D printed one. It had become a mess. I still had some printed ones left over, so I made a new one. This one I actually got the hinge wired too. Needs painting.

I painted the main rotor color coding. The tape idea wasn’t working so well. Besides the hub there’s also coding on the swash plate connection links.

Lastly, I got all the loadout items installed. Had to reglue the torpedo. Very small contact area for these parts… i.e., really fragile. This is NOT A TOY! IT IS NOT FOR CHILDREN TO PLAY WITH!

So, that was a pretty big week! Got a lot done and it’s almost finished. What’s left is putting on the main rotor blades with their stowage clamps, and put on the tail boom in the folded position. I may use epopxy putty on this application due to the small gluing area and the weight of the part.

The blade mounts when you look at a prototype image show a connection into the fuselage to locke them into position. The model does not have this, but I’m going to add it. Otherwise, all those blades are just hanging out there.

All y’all have a nice, safe weekend.

6 Likes

Spent a lot of time today fussing with getting the blades mounted and didn’t finish. I did get the blade racks installed. i found that there was a pin on one end of the bottom member that could go into the holes in the fuselage if there were holes there. There were keyslot-shaped engravings at the correct locations on the strbrd-side. I measured the pin and drilled out those areas. Then I realized that I had put the mounting pins on the wrong end of this member and had all the paint schemes backwards.

I had to make new pin on the rear set using Evergreen round styrene of a very similar diameter. The front one’s pin was intact and I was able to use this. I repainted all their bottoms to conform to the scheme on the rotor head. I also added all the blade clamps before painting. The red was air brushed. The rest was hand painted.

Then came the real fun. Getting the kit’s plastic blades into the scale-like attachment points. I was able to use metal pins on all of them without further wrecking the plastic components. Getting these things in was approaching a horror show. At one point I over-torqued one of the hubs and broke it off. I reglued it.

The remaining blade was an hour’s worth of work. Besides using another 3D printed knuckle after I wrecked the first one, I also had to fix where I destroyed the connection journel for the de-icing wiring. I broke the copper wire off from manhandling the knuckles to stay glued. So I re-drilled the tiny hole to reapply the copper. Then it happened again. This time I broke off the carbide tiny drill in the hole and couldn’t get it out meaning I couldn’t redrill it. It’s impossible to re-drill a hole with a chunk of tungsten-carbide buried in it.

I ended up cutting the whole journel off and replacing it with some Albion micro-tubing. That too took wayyyyy to long because I kept losing pieces as I was cutting them off using the razor blade. It was getting late. I was getting tired and hungry and the basement was getting cold.

I finally got that done and next session I’ll get this blade finally mounted.

As you all know by following my work, I generally do not give up. I will keep trying until I get it. Meanwhile, the blades will need repainting due to all the messing around with them.

4 Likes

It’s coming along. Unfortunately, your rotor blades are on backwards.
http://upload.wikimedia.org/wikipedia/commons/8/88/US_Navy_050525-N-0167B-011_An_Aviation_Electronics_Technician_performs_corrosion_control_on_an_HH-60H_Seahawk_helicopter.jpg

3 Likes