Continuation of Build blog of Heller's HMS Victory

Thanks, Russell. Yeah, I sometimes botch a repair job like this, because in my mind I conceptualize the repair as an easy thing, but in practice, it’s more effort than I thought, and then I get in a hurry to finish the repair, only to find it looks worse than before!

But doing this repair was a nice change of pace from all the rigging I’ve been doing - almost makes me want to shelve this kit, and go work on something else!

Thanks again. BTW, you’re not in Melbourne, are you? I guess they’re starting day 3 of their 5-day lockdown.

2 Likes

This looks very impressive! I remember doing a Billing Boars Wasa back in the '90’s and remember what a dread it was… respect for your build!

@bwilt, I just looked up the Boars Wasa…holy cow, just the painting alone would drive me bonkers!

Hi Tim,

very nice fix and recovery! And don’t let your motivation get down with the rigging - you’re doing a fantastic job, I couldn’t do this, and hey, she looks really impressive already!

Cheers
Jan

Indeed I am Tim… Once again the hotel quarantine system has failed putting us back in this situation :man_facepalming:

Thanks, Jan. You know, I could actually just stop work on Victory right now, and no one would be the wiser!

Today, I started work on the foretop deadeyes. Once I got the lower deadeye glued in place, I realized, how am I going to get the string from just under the top, down to the lower shrouds? Doh! Then I figured out that the hole in the foretop, where each deadeye goes, is for the string that leads down and secures the foretop shrouds to the fore shrouds. (That made sense, right?) Well, at least I have the port side to get it right. Plus, the little jig I built to keep the spacing between the upper and lower deadeye came apart, so Plan B is to cut a strip of plastic (approximately 4.5 mm in width), tack glue it into place on the lower deadeyes, then use the plastic as a spacer between the deadeyes, and then get the shrouds secured to the upper deadeyes. And I just had the thought, instead of gluing the strip, try to use my small clothespins to keep it in place, and then there’s no worry about the glue making too strong a bond, and causing any further damage when I remove it. If nothing else, this model keeps your brain cells churning!

Russell, sorry to hear you’re caught up in the lockdown. I hope you have enough provisions to keep yourself going. Myself, I registered with my local health department to get vaccinated; right now, they’re about 2-1/2 weeks behind from date or registration to getting an appointment to get vaccinated.

Thanks for checking in. I guess I’ll take some photos of the port side foretop to try and explain the thing about the holes.

“We now return to our regularly scheduled programming”.

1 Like

Hi Tim, whereabouts are you located?

I want aware there was a vaccine approved yet? :astonished:

No stress on supplies-still allowed to shop for essentials :slightly_smiling_face: but there’s no way I’m going to home school the kids this time round!!!

I’m in Virginia, about 30 miles west of Washington DC. Yeah, there’s been 2 vaccinations approved (one from Moderna, I forget the other manufacturer). Both of these vaccines require the initial shot, and then a follow-up shot about 4 weeks later. Johnson & Johnson has also developed a vaccine, and it’s a single shot, but I don’t think it’s been approved yet.

Glad to hear you’re allowed to go out for essentials. As for home schooling, “Kids, today, we’re going to learn about airbrushing”. See? Easy!! :grinning:

1 Like

Agreed! :slightly_smiling_face: Was hoping to get a couple of the Airfix starter kits for the kids, but seems the dreaded virus has delayed them as well… :mask:

Hadn’t heard you guys were so far advanced on a vaccine, they’re still talking months away here :thinking:

Hmmm, I thought the vaccines were pretty much world-wide. I heard that the J&J vaccine is only about 71% effective; the first vaccine that made headlines here, one of the drawbacks, was it had to be shipped & stored at about -90 degrees Farenheit. The Moderna vaccine isn’t like that, I think it can be shipped & stored at room temperature, or close to it.

Quick remark on the vaccine stuff, if I may - Tim you’re about right, the first one is Pfizer/Biontech, US - German cooperation, needs to be stored at around the temperature you mentioned (- 60°C, I’d think that’s close to what you said in F), the second, Moderna, needs to be cooled as well, below 0°C, but not anywhere near the Biontech/Pfizer stuff. Both very good and effective, well up in their 90%. They are based on a fairly new mRNA technology. Israel is reporting really good results, they are way up front in vaccinating their people. UK are doing a good job, as well. Astra Seneca is approved in the EU as well, and I think it is approved in the US - or about to be approved? Effectiveness is comparably poor, though. But better than nothing. J&J is coming up in Europe, effectiveness said to be similar to Astra Seneca. I’d really hope to get vaccinated, but EU sucked badly in their procurement of vaccines. So it’s hope and wait here (well, we started, but slow and low numbers).

Break.

Tim, some pictures really would be helpful to follow your deadeye business! However, it’s good to hear you did not set aside your HMS Victory, looking forward to see progress!!

Cheers
Jan

Hi Jan!! Your wish is my command: a couple of quick pictures of the deadeye stuff. The first picture is of the port side of the foretop - a long time ago, I realized the lower deadeyes would be getting glued into the foretop, so I didn’t paint the places the deadeyes would be going (hence, the light sand colored plastic). The rest of the top, it seems to have a “speckled” appearance - that’s just dust that’s collected over the years. I think, because I used a flash for this picture, it enhances all the dust.

So this second picture is on the starboard side, showing the lower deadeyes glued into place, and the white plastic, is my scratch-built jig to get the distances between the upper and lower deadeyes correct.


So the plan is, take one of the upper deadeyes, put a dab of thick superglue on a portion of its circumference, then get the shroud to adhere to the deadeye, while keeping the deadeye oriented correctly. I figure I’ll have to repeat the process two or three times, to get the shroud all the way around the deadeye.

And this is the shrouds, hanging over the deadeyes. I’m not sure why the ratlines are at such an angle; must be the way I got the whole shroud assembly attached to the mast.

So, in a previous post, I made mention about how, in Longridge’s book, he makes mention about belaying the main yardarm jeers, the main sail clew line (he calls it the clew garnet), and another line. In particular, I found in various parts of the book, that those lines are supposed to actually go down through the grates around the main mast, and belay to what Longridge calls “bitts”, located on what is called the upper deck. So in this picture, the red object on the upper deck (it looks like a big “H”) is the bitts, and on the deck above (the quarterdeck), the grates where those lines are supposed to pass through to the deck below.

A close-up of the grates:

Now Heller, in their belaying diagram, shows (as a broken line, meaning it’s hidden behind something) this set of bitts, but you’d never know any lines are belayed there. For me, it doesn’t matter that much, because I doubt if I could get any tools down into the narrow space to tie some knots.

So some Covid stuff: When I went out for a walk today, I got to thinking who the other vaccine manufacturer is, and I thought maybe it was Pfizer, so Jan, it looks like I thought right! Over here, the last I heard, we had about 11% of the population vaccinated (equating to 30 million+), so that’s a good thing. However, we still have problems: a vaccination site in my neighboring state sort of got overwhelmed, because a rumor was started that they would accept walk-in people for vaccinating, as well as people who had an appointment. And a week or two ago, up in New York, workers found a large amount (15,000 doses or more) of vaccine that had been improperly stored, and thus, went to waste. Vaccinations got off to a slow start here, also, but that was because of confusion as to who would get the initial doses, and no clear-cut rules for prioritizing other people, once the supply of vaccine got ramped up.

Back to the deadeyes:

I read the instructions (finally!) about installing the deadeyes, or more particularly, how to install the “lanyard” between the deadeyes. Heller suggests putting in the lanyard while the deadeyes are still on their runners. That’s ok, but the problem is how to secure the lanyard after it comes out of the last hole on the deadeye - Heller just says to tie a knot. So I was thinking, string the lanyard into the deadeyes per Heller, and the secure it in place with a dab of superglue. We’ll see how that works out.

5 Likes

Tim,

great work - and those pictures are really helpful. Yep, got the idea what you’re doing! - This is really some complex work you are doing there, and a lot of different lines, shrouds and sails…just seeing what all you’ve installed already!
Keep your motivation high, I’m always looking forward to see some progress on your find build!

Cheers
Jan

Hi Tim, yep, what Jan said: the pics really help and keep that motivation high 🤸🙂

For those pesky dust bunnies are you planning a display case to protect this amazing work?

On the vaccine front, we’re quite a ways behind. I think there’s about 180 thousand doses in the country and they’re allocated to (logically) frontline healthcare workers :cowboy_hat_face:

Hey Russ,

Yes, definitely, a display case is planned!

Glad the pictures helped to explain things.

Yeah, health care workers were in the first group to get vaccinated.

Yesterday, I tried to get the first deadeye and shroud stuck together, but it all fell apart. I guess I have to come up with plan C. (In my head, I’m up to about plan F). I should try to do some work today on Victory, but after the deadeye failure, I’m not in any hurry to get to it.

Today’s ray of sunshine: the income tax forms I requested from the government arrived in today’s mail! However, the main form for doing the taxes didn’t arrive, so I still need to order it (I think this was a problem with the way the Internal Revenue Service (IRS) website works when ordering forms & such). Not that there’s a rush - I owe quite a bit to the gov’t this year.

2 Likes

More sunshine (at 10 o’clock at night!): looking through all the stuff the IRS sent me, the main tax form was included, so now, I’m pretty much set. However, considering the amount I owe, there isn’t too much of a rush to complete the forms.

1 Like

Well, the struggle with the deadeyes continues. I haven’t been wanting to work on them, as they are difficult to complete, and the results aren’t very satisfying. I’ll start with how things turned out on the starboard side:

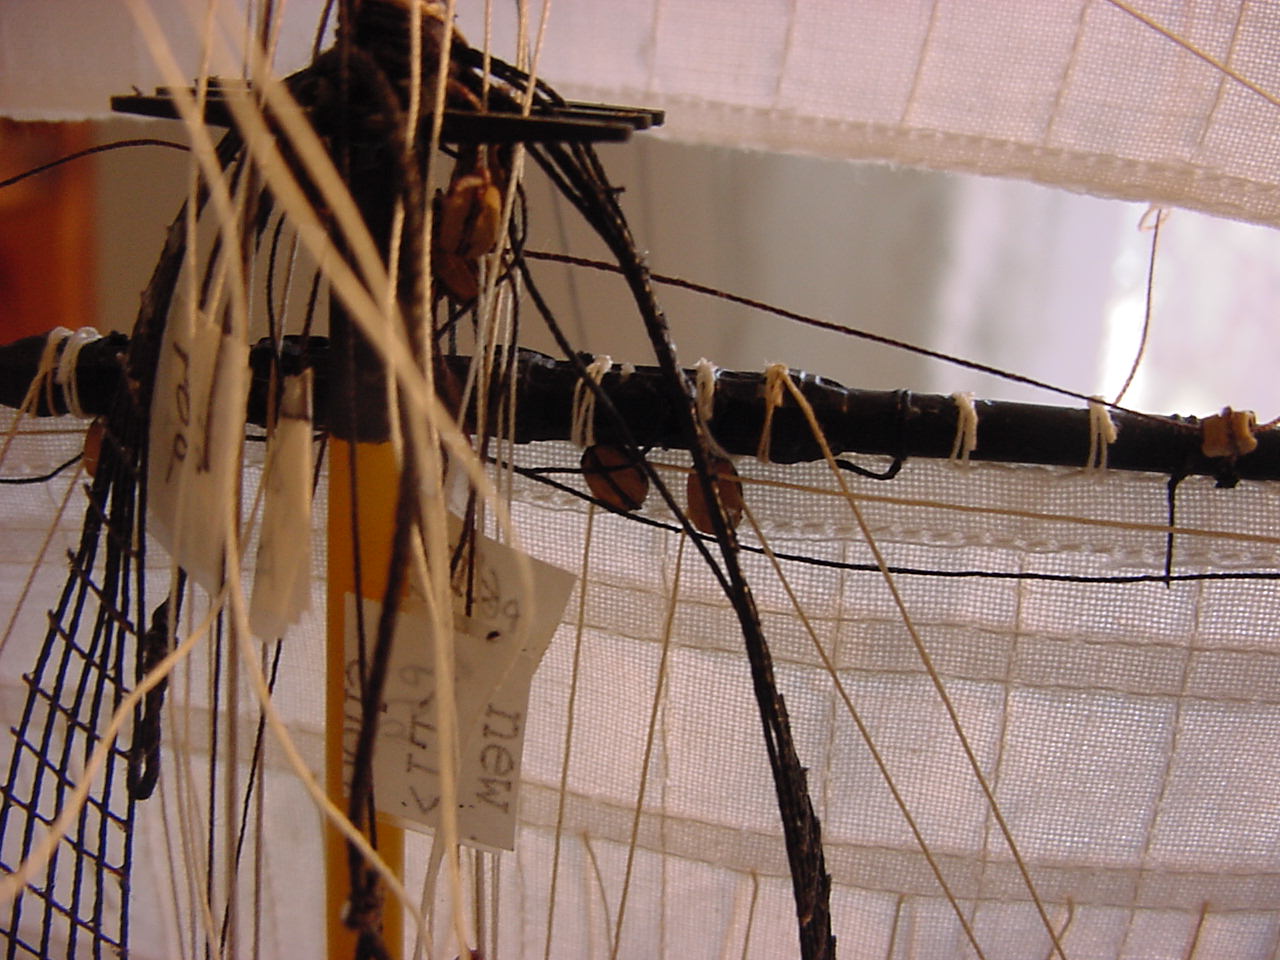
In reviewing my pictures, it looks like I wound the shroud around each upper deadeye, before gluing the lower deadeye, and threading the lanyard (Longridge’s word). I didn’t realize it until I had about the 4th shroud done, that the whole shrouds/ratlines assembly was getting caught up in the running rigging on the topgallant yardarm, and that caused the shrouds not to be at the proper length when I wrapped the shroud around the deadeye. In the below picture, you’ll note that the shrouds have a convex shape, instead of being straight down:

This led to the upper row of deadeyes being at different distances from the the lower deadeyes:

For the previous picture, I had painted the shrouds and upper deadeyes with a thinned amount of flat black paint, to cover up all the glue residue.

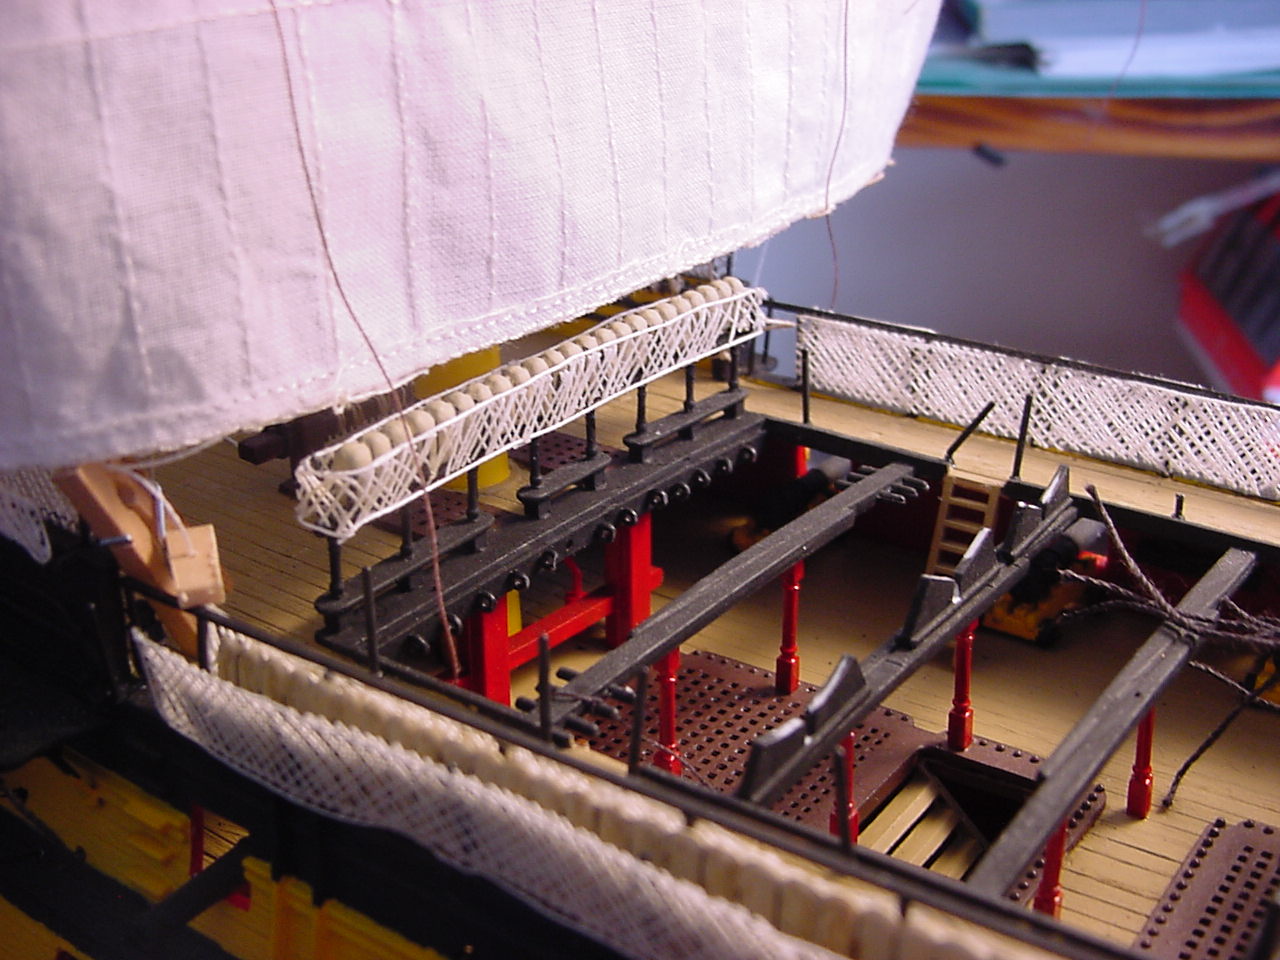
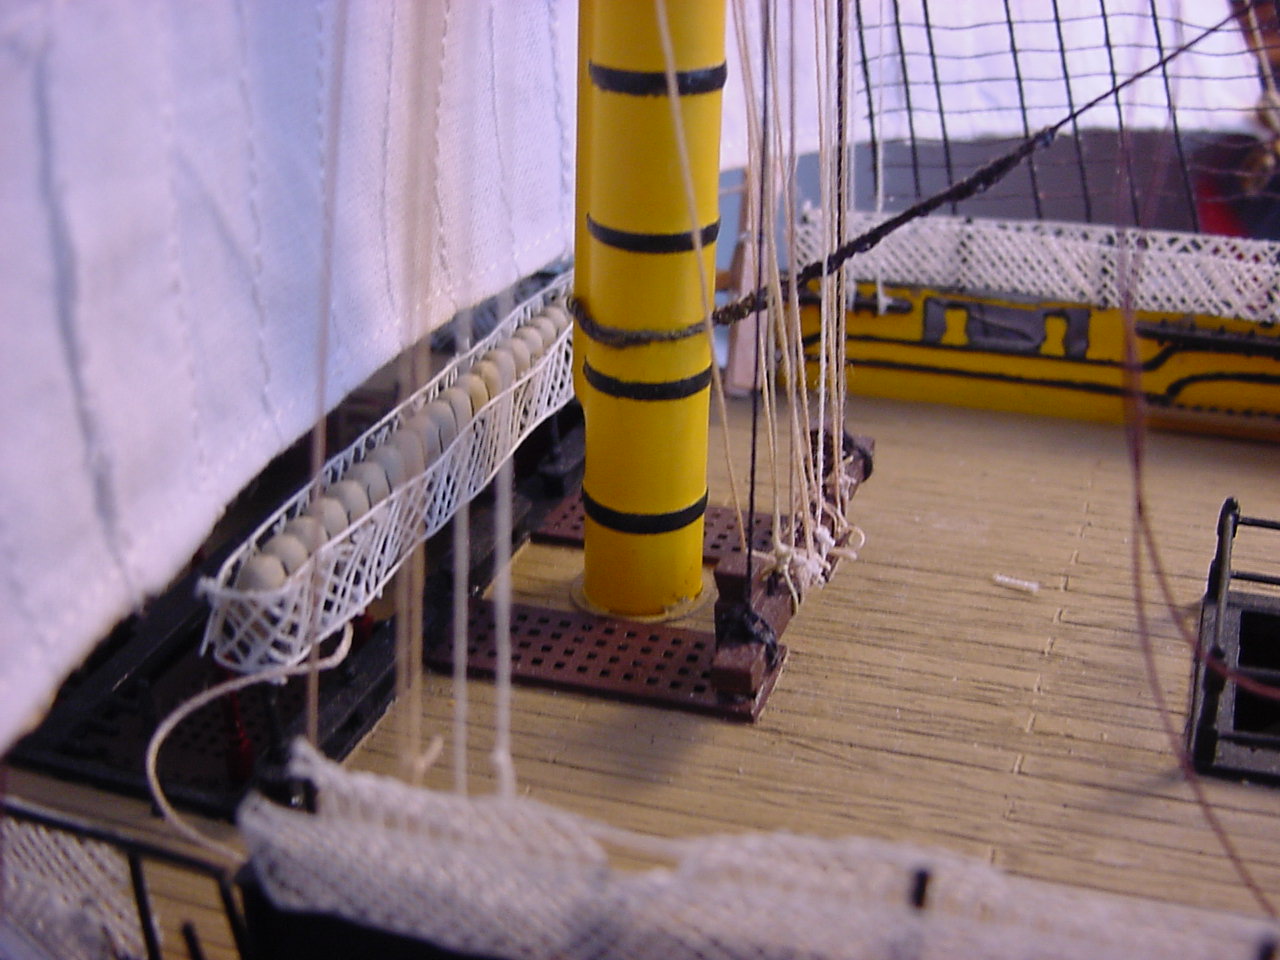
So here’s the shrouds, with the lanyards installed. The piece of white paper just makes things more visible:

And the same pic, without the white paper:

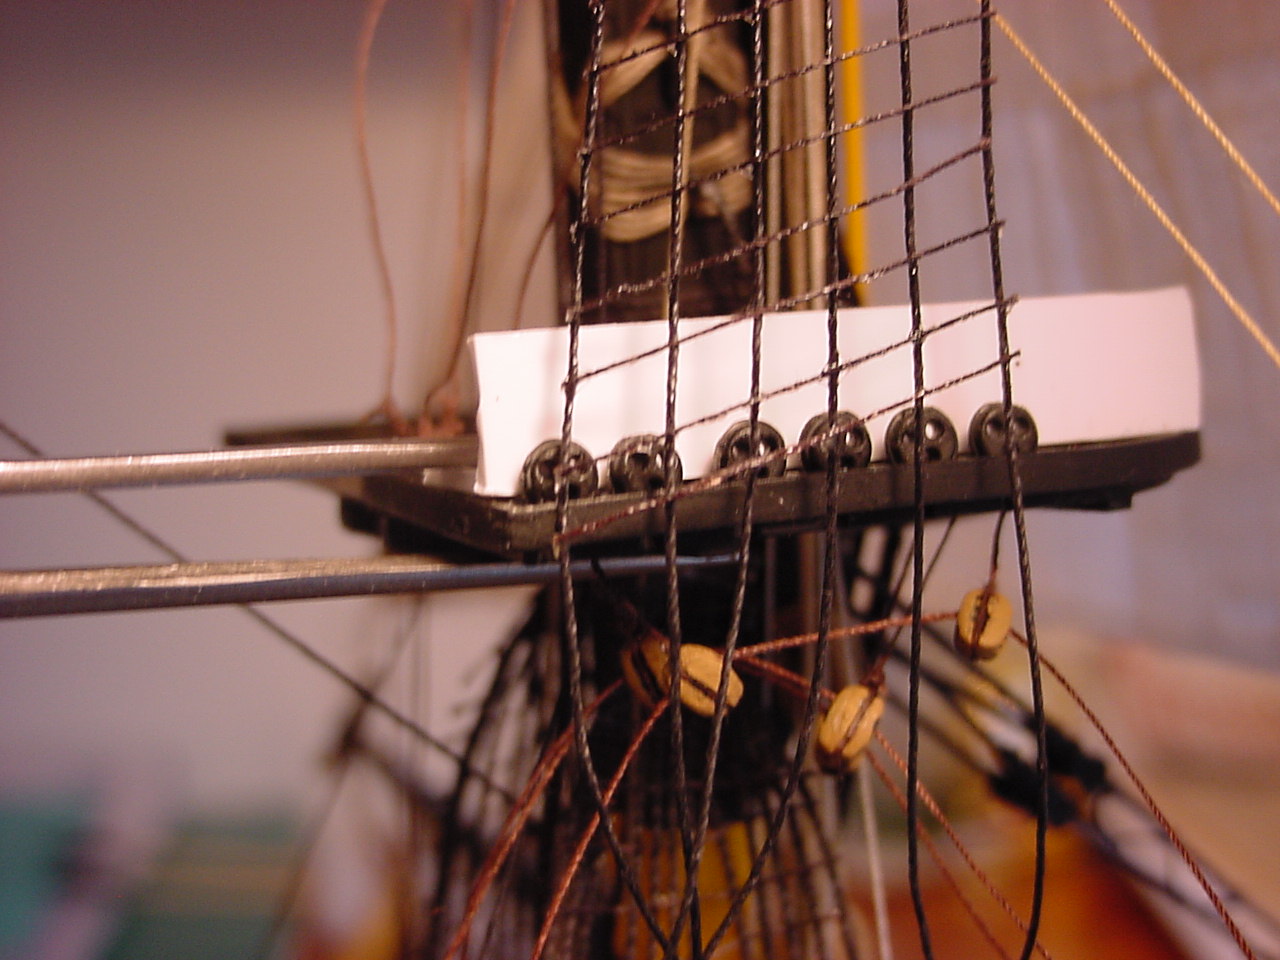
So not being overly pleased with these results, I decided to go with Heller’s instruction, which is to run the lanyards between the deadeyes, before installing the deadeyes. This way, according to Heller, the distance between the upper and lower deadeyes will be correct, or at least, a uniform distance. What I don’t like about their instruction, though, is that it says to tie a knot after the lanyard comes out of the last hole in the lower deadeye. Unfortunately, I’m not sure how you’re supposed to any kind of knot that will secure the lanyard in place. So I once I ran the lanyard through, I decided a drop of glue should hold everything together. The below pic shows the backside of the deadeyes, after installing the lanyard.

So after cutting the deadeyes of the sprue, I installed them on the foretop & wrapped the shroud around the upper deadeye. Unfortunately, everything got all twisted up, and it looked terrible. Plus, the glue didn’t hold the lanyard in place, so I pulled the lanyard out, and re-threaded it. However, because of the twisting of the shroud and deadeye, I decided to re-thread from right to left, instead of left to right. But for some reason, I kept threading the lanyard from backside of the upper deadeye to the backside of the lower deadeye, when it should have gone into the frontside of the deadeye. I didn’t realize this mistake until I had the lanyard threaded through all holes on the deadeyes. So I took the lanyard out, and did the same thing again. So I took the lanyard out (again), and still did the same thing again. Finally, on the 4th attempt, I got the path done correctly. (Now do you understand why I find this particular work so unsatisfying?!)

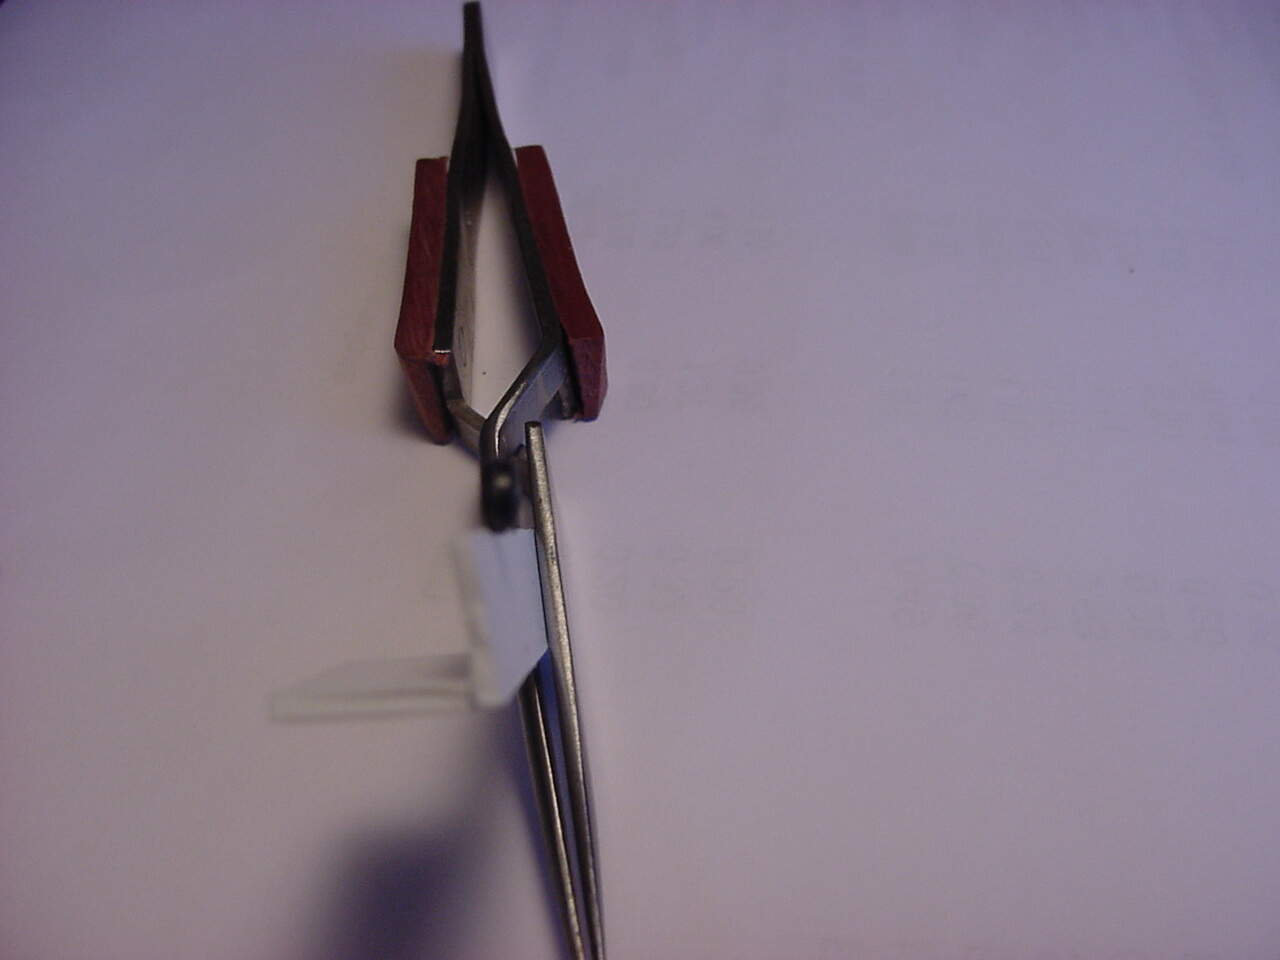
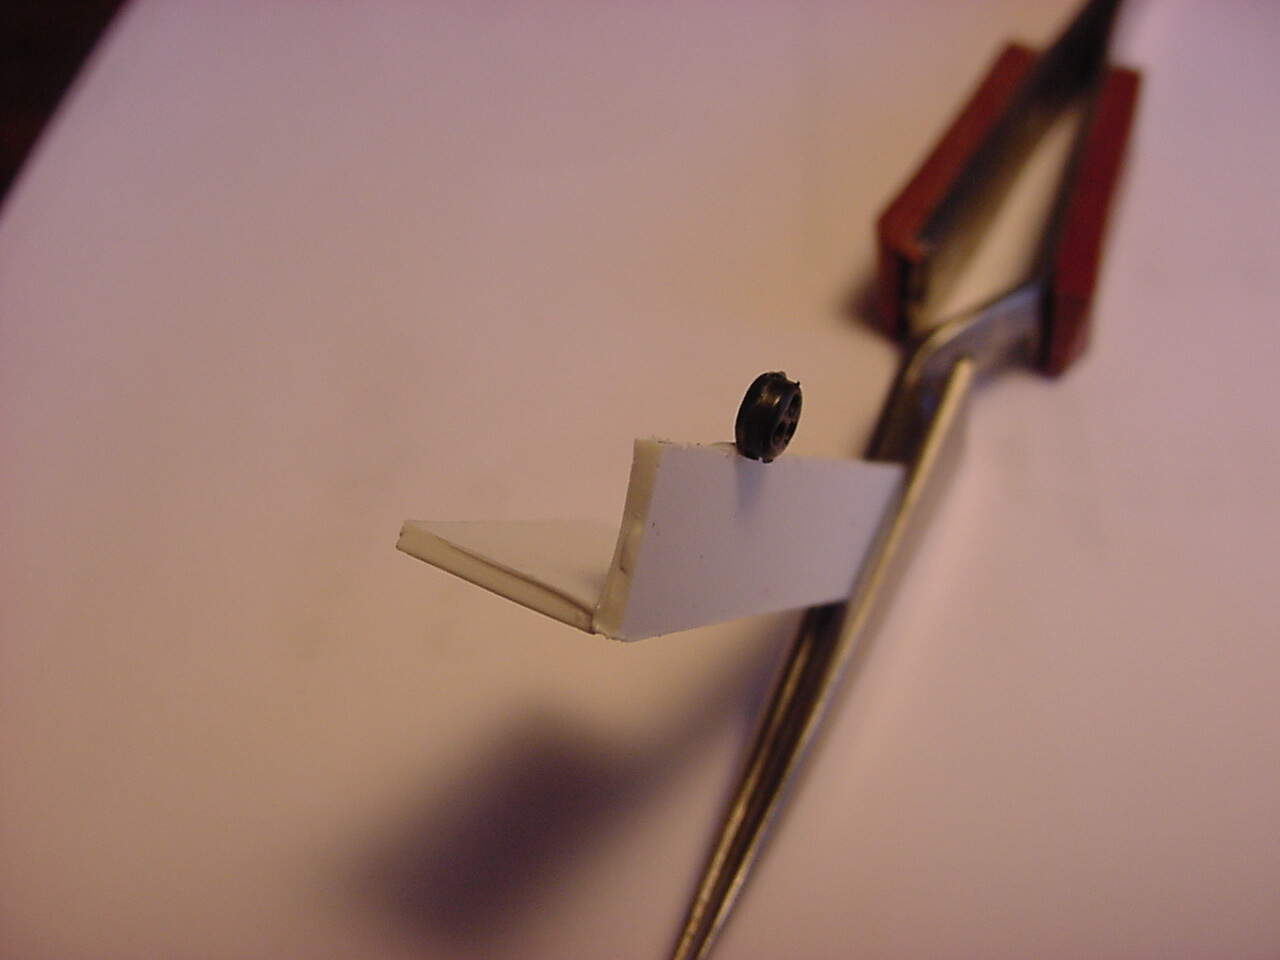
At this point, I decided to go to using my little fixture (or is it a jig?) to hold the lower deadeye in place. But this time, I decided to wrap the shroud around the deadeye, in front of the flange that surrounds the deadeye. The next photo or two shows a lower deadeye lightly glued to my jig, with the flange standing proud of the jig:

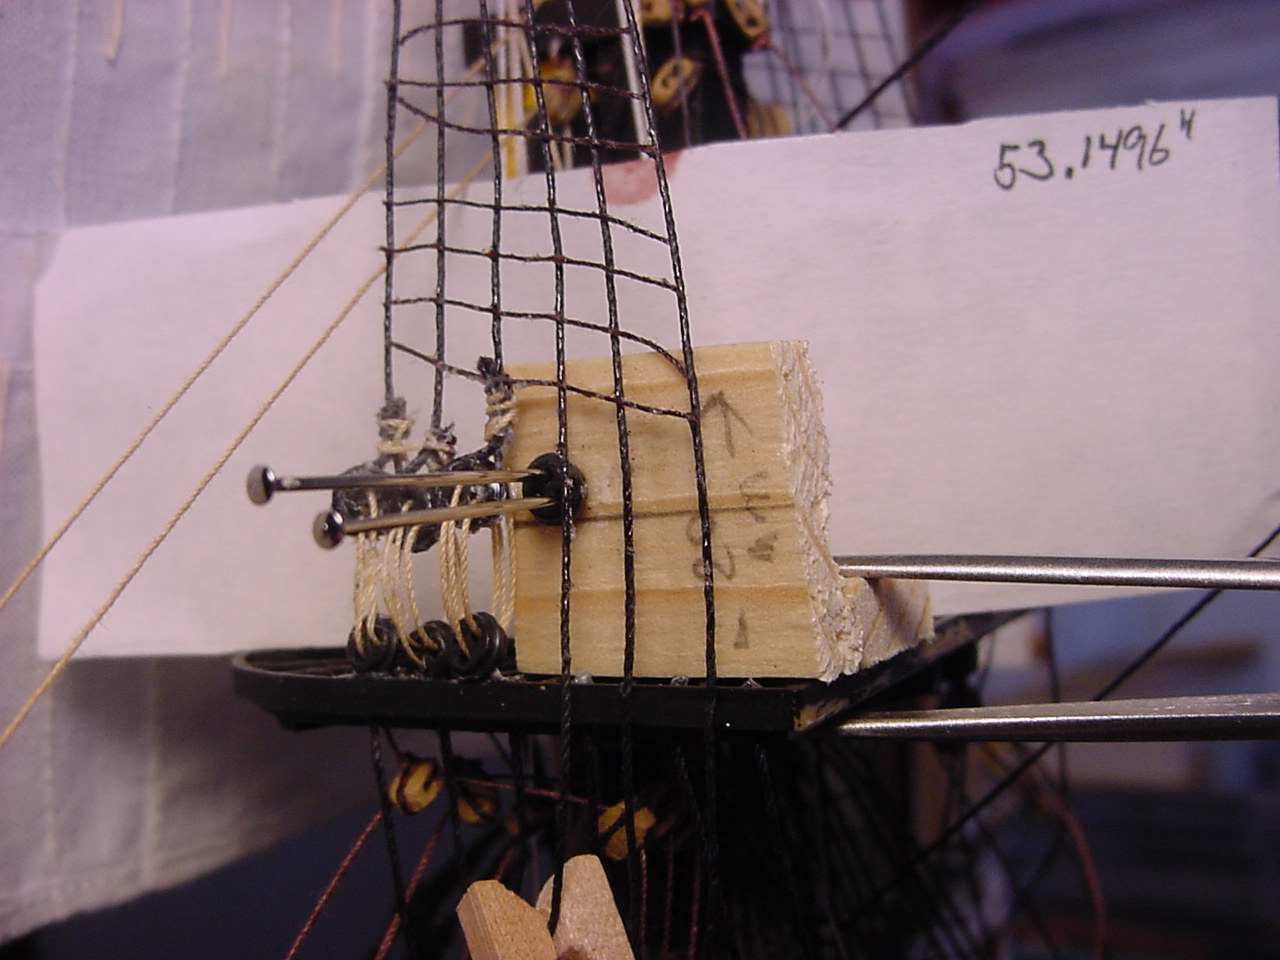
Well, of course, while I was trying to get the shroud wrapped around the deadeye, the deadeye popped of my jig, and I was ready to scream. So I quit what I was doing at the time, and decided to re-group. I came up with the idea (well, actually, I read about it in Longridge’s book) to use a block of wood that will sit upon the top, and I can better fasten the deadeyes to the wood block, and thus give a more consistent height between the upper and lower deadeyes. And to hold the deadeye in place, I’m using safety pins (they’re slightly smaller in diameter than the holes in the deadeyes) to hold the deadeye in place. Here’s the thing in action; the straight pencil line indicates where the bottom of the upper deadeye should be:

I’m not sure if mentioned this previously, but I added the lines that will become the futtock shrouds:

So that’s all for now. I think I have two more deadeye pairs to do on the foremast, then I’ll tackle the same shrouds on the mainmast. And to think, all this work to get the shrouds finished up, is just so I’ll have a place to belay the buntlines for the top & topgallant sails!

Hope all is doing well; I got my first Covid-19 vaccination shot last Saturday. It’s the Pfizer vaccination, so I need to get round 2 of it in April.

Cheers!

Tim

5 Likes

Tim,

Hang in there and take it slow the solutions will come to you. As we all know, one day on the bench and nothing goes right step away. The next day the darn thing goes together as if there were never an issue.

Enjoy your updates.

Mark :beer:

Yes, you’re so right Mark. Still, doing these deadeyes is just a real pain in the patoot. Maybe I should have done this work before adding the yards & sails - there ain’t a whole lot room for my hands to maneuver around.

I noticed in my pictures that, on the starboard side, I put all the upper deadeyes in first, then painted over all the glue residue, then ran the lanyards between the upper & lower deadeyes. However, on the port side, I’ve already put the lanyards in, before doing any touch-up with paint. God, what an idiot I are.

More to come, just not sure when!

Tim

1 Like

Tim,

I just admire your patience with this. I can feel your pain with the shrouds and deadeyes, I’m pretty sure I’d have lost all motivation on the way…
But you’re doing a great job, and eventually all this will pay off! And as Mark says, there are those special days everybody knows, and then, different day, and all is fine. Keep your motivation high and continue with your great work, I truly enjoy reading your build log and see your masterpiece grow!

Cheers
Jan

1 Like