@metalhead85 Thank you. In truth, I am not happy with it. Factory applied Jagdpanzer 38 camouflage had very clean edges. It is somewhat amazing that factory workers could produce such meticulous paint jobs given the war situation. However, I subsequently found pictures of Jagdpanzer 38s with ‘hard but rough edge’ camouflage closely resembling my model. Therefore, I actually did okay. My plan is to build another Jagdpanzer 38, trying for even more precision in the hard edge pattern.
@BringupthePIAT Thank you. In baseball terms, I feel like the Jagdpanzer 38 was a single and the T30 a triple.
With regards painting, we are both at about the same place–journeymen striving to become masters. Exposure to and trying different painting systems helps us.
I highly suggest reading the painting system used by Wade (Armor_Buff). Specifically, he uses a oil paint tinting technique that produces very interesting and pleasing results.
With regards to my painting workflow, it is very much in motion because I constantly try new things but this is what I did for the T30.
T30 upper surfaces:
Airbrush: Black Primer: Cover everything including tight places
Airbrush: Vallejo Russian Air Force Green: Cover everything but do not bother with tight places
Airbrush: Vallejo Russian Air Force Green (85%) + Vallejo Ivory (15%): Broad coverage mottling (Mix is approximate)
Airbrush: Vallejo Russian Air Force Green (70%) + Vallejo Ivory (30%): Medium and small coverage mottling (Mix is approximate; do not over lighten the model)
Airbrush: Vallejo Gloss Clear only where decals go
Decals
Airbrush: Vallejo Matte Clear over decals and whatever
Paint tools, tow cables, and other such things with Vallejo paints.
Very thinned oil paint: Winsor and Newton Umber: get into channels and corners (Try to keep the surface level with the Earth; thinned paint running down a side will pool and do unwanted things; move thinned paint around as needed after most of the thinner evaporates; remove excess paint)
Oil paint thinner: Flood the rest of the surface (This pushes thinned paint away from flat spaces and into channels and corners)
Very thinned oil paint: Buff, Light Mud, Umber, and Yellow Ocher: Apply as little dots in random places: Let it dry a bit: Move it around (This is a technique Wade uses extremely well)
Oil Paint: Buff, Light Mud, Umber, and Yellow Ocher: Apply tiny streaks with a toothpick: After applied, work in the streak with an old brush: Move it around until the result looks good (This is random dings, dirt spots, grime, smudges, and worn paint.)
Oil Paint: Buff, Light Mud, and Ocher: Dry brush onto high surfaces (Be careful not to use too much Buff because it looks super bright in photographs.)
Airbrush: Vallejo Matte Clear over entire model: Do not worry about hard to reach spots–a light coat is usually enough
T30 lower surfaces: As above with three additional steps to simulate ground in dirt
4a) Airbrush: Vallejo Umber: Medium mottling
4b) Airbrush: Vallejo Dark Mud: Light mottling
4c) Airbrush: Vallejo Light Mud: Light mottling
These colors simulate ground in dirt from dark/wet to light/dry. Many different products and procedures can produce the same sort of effect but they all vary in appearance. This specific procedure is artistic, not realistic. (In my opinion, realistic is easier.)
T30 Tires:
Airbrush: Black Primer
Airbrush: Panzer Gray streaking
Airbrush: Lightened Panzer Gray or some other lighter gray as streaking
(Drive Sprockets, Idler Wheel hubs, Return Roller hubs, and Road Wheel hubs use the lower surfaces procedure.)
Airbrush: Vallejo Matte Clear over entire wheel–a light coat is usually enough
T30 Tracks:
Airbrush: Black Primer: Cover everything including tight places
Airbrush: Vallejo Umber: Medium mottling
Airbrush: Vallejo Dark Mud: Light mottling
Airbrush: Vallejo Light Mud: Light mottling
Very thinned oil paint: Winsor and Newton Umber: get into channels and corners (Try to keep the surface level with the Earth; thinned paint running down a side will pool and do unwanted things; move thinned paint around as needed after most of the thinner evaporates; remove excess paint)
Very thinned oil paint: Buff, Light Mud, Umber, and Yellow Ocher: Apply as little dots in random places: Let it dry a bit: Move it around (This is a technique Wade uses extremely well)
Oil Paint: Buff, Light Mud, and Ocher: Dry brush onto high surfaces (Be careful not to use too much Buff because it looks super bright in photographs.)
Airbrush: Vallejo Matte Clear over entire model: Do not worry about hard to reach spots–a light coat is usually enough
Paint: Vallejo Dark Steel: Dry brush on outer track raised faces
Put the model together.
Touch up painting.
Maybe another quick Matte Clear coat in problem spots.
Gloss Clear to simulate lenses. Real lenses are better.
Probably forgot something. I lean into the airbrush much harder than most model builders (and will soon lean into it even harder).
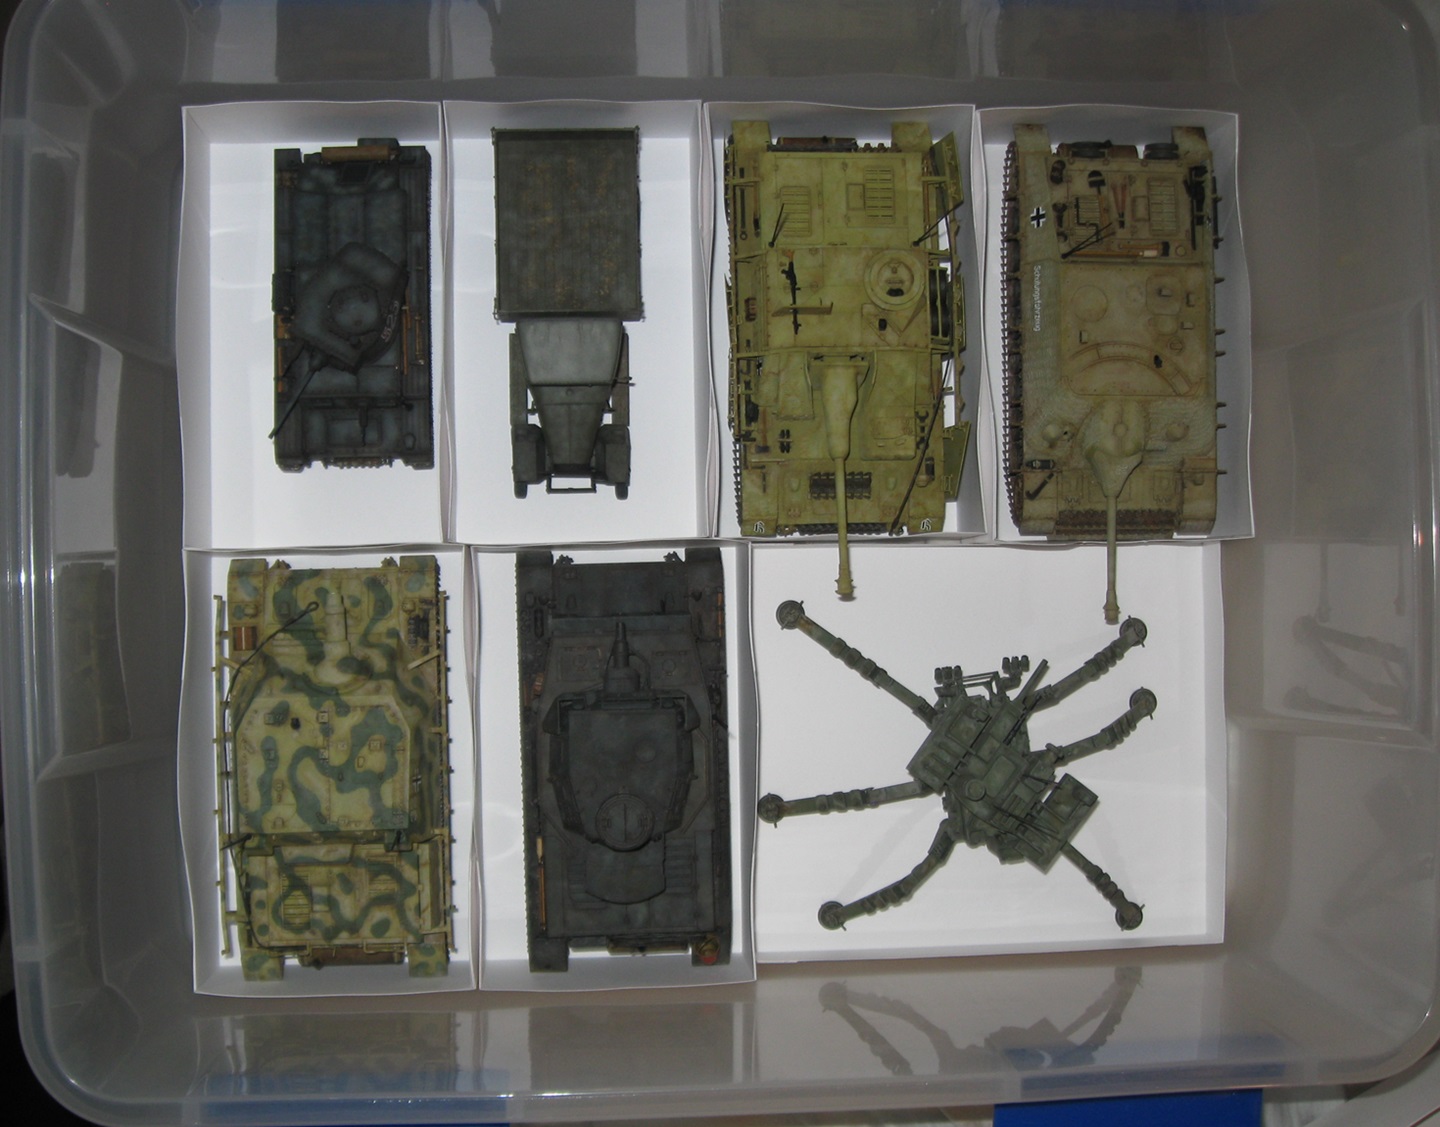
A month has passed since my last entry in this journal. In that time I built new tracks for a Dragon IC Firefly, a Trumpeter KV-1, an Academy M-163, a Tasca Luchs, an Alanger Flammpanzer II, and worked on various other projects. As per the previous post, I now have a decent painting algorithm. My work area includes about a dozen additional projects in some stage of painting. Without intention, I created a miniature factory!
For about a week now, I find myself avoiding the model shop. The weight of two dozen models awaiting paint fills me with a kind of dread. Even with all the hard won know how acquired over the last 18 months, painting is not my favorite activity.
It is a strange thing, needing to dig deep and find the will to finish a project engaged in completely for fun. Building is so easy. Now I face the hardest challenge of all–solving the riddle of paint. Yes, that is a Conan reference.
I know, right? I’m the same way. Sometimes I get into “build mode” and I want nothing to do with an airbrush. Even though I have no airbrush problems and I can paint inside in the comfort of my shop, I’ll want to build several kits sequentially and leave the paint for later. I usually have 2 or 3 that are waiting for paint or weathering. These are WIPs, not Shelf Queens, and have a separate shelf just for them. Even though I’m an airbrush “expert” I just love the build so much.
Sometimes I just build for the fun of it; usually 1:56th plastic wargame figures, some of which are actually too fragile for gaming with but would do for vignettes and dioramas. I’ve just dropped a quarter-grand on individual sprues/frames but at least I didn’t buy any full boxes…
For example: Wargames Atlantic Citizens of Rome - Wargames Emporium
Sometimes I wake up at 2 or 3 in the morning and I’m really awake. So I go across the hall into my shop to my bench. I’ll sit and cut and glue in silence, just reveling in the zen and concentrating on the build. I get a lot done this way and after about an hour I’m ready to go back to bed. I fall asleep immediately. It’s weird.
Matt, I think that was actually the normal for humanity in the past. We did that before the industrial revolution. Probably healthier too as it was what was natural.
My model building holiday is now 25 days old. I usually attack disinterest by starting a new project. This tactic works extremely well but leaves me with dozens of unpainted models. Last month, I tried to force myself to finish open projects, to paint them, but this plan backfired in the face of various painting difficulties. It feels bad not working on the Scale Model Museum, not completing projects at a steady pace, not having something to show for life hours expended.
If a plan is not working, it is time to change the plan. I need a project that requires a lot of building and a minimum of painting. Upon reflection, the two conjectural drones I built last year fit that description rather well.
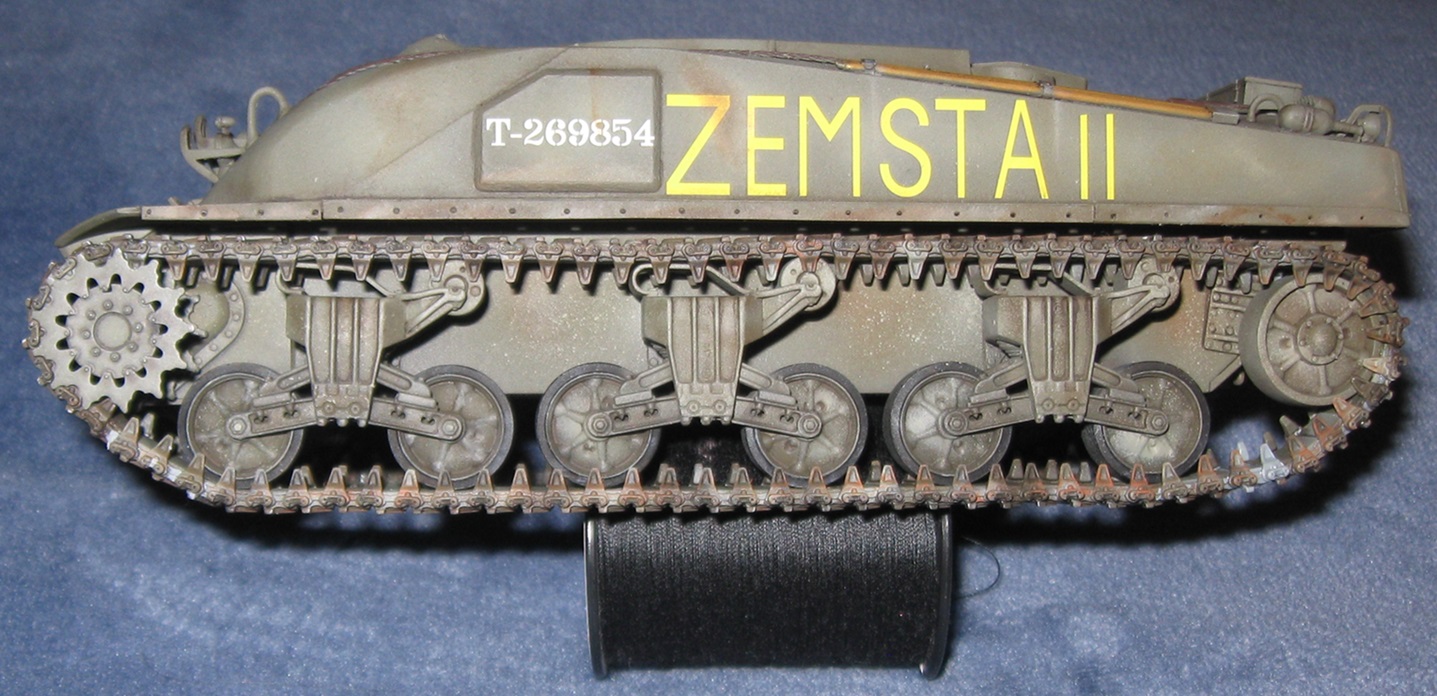
Everything looks fine. I took off the tracks, painted them up, and they shattered. Fine. Whatever. I glued them back together and painted them some more. This morning, I tried to put the tracks on the model.
They shattered again. Fine. Whatever. I glued them together. They shattered in different places. Fine. Whatever. I stuck them on in sections and glued them together. They are too short and completely wonky.
So, my cursed model has now killed three of maybe four sets of after market tracks. The question is, what do I try next?
At this point Doug I would move on to one piece tracks. Sherman tracks are “live tracks”, they curl up on themselves, so there is no sag and they are tight. So, there is no shame in using well detailed one piece tracks. AFV Club and Asuka sell them separately.
The tracks on some of my older models disintegrated and I no longer trust soft plastic anything. I am going to try breaking the existing tracks into segments then gluing them directly to the suspension elements. If that fails, the model will be ruined and I can move on.
I guess the lesson for me is–do not buy any more M3/M4 mediums! Only purchase tanks with single pin tracks. Link and length tracks are also fine.
This model was a step backward from the previous one. Experimentation rarely results in perfection but opens the door to improvement.
Lessons Learned:
This model was completed in 34 days. If I focus, fast projects are possible.
Detail and effects painting are very time intensive and remain my weakest modeling skills. In my quest to improve, I almost always go too far. If I cut back on effects painting, better and faster models should result.
It does not take much reddish brown paint to ruin a model.
My primitive work space needs much better lighting.
My poor eyesight results in sloppy painting.
Wire tow cables look way better than plastic ones with soft details!
Periscopes require more attention.
In 25 months, I am 11 for 22 on campaigns. I need exercise better judgement when choosing campaign projects and put more effort into finishing on time.
This was my entry for Hot Out of the Molds 2025. More pictures of this project appear in that campaign journal.
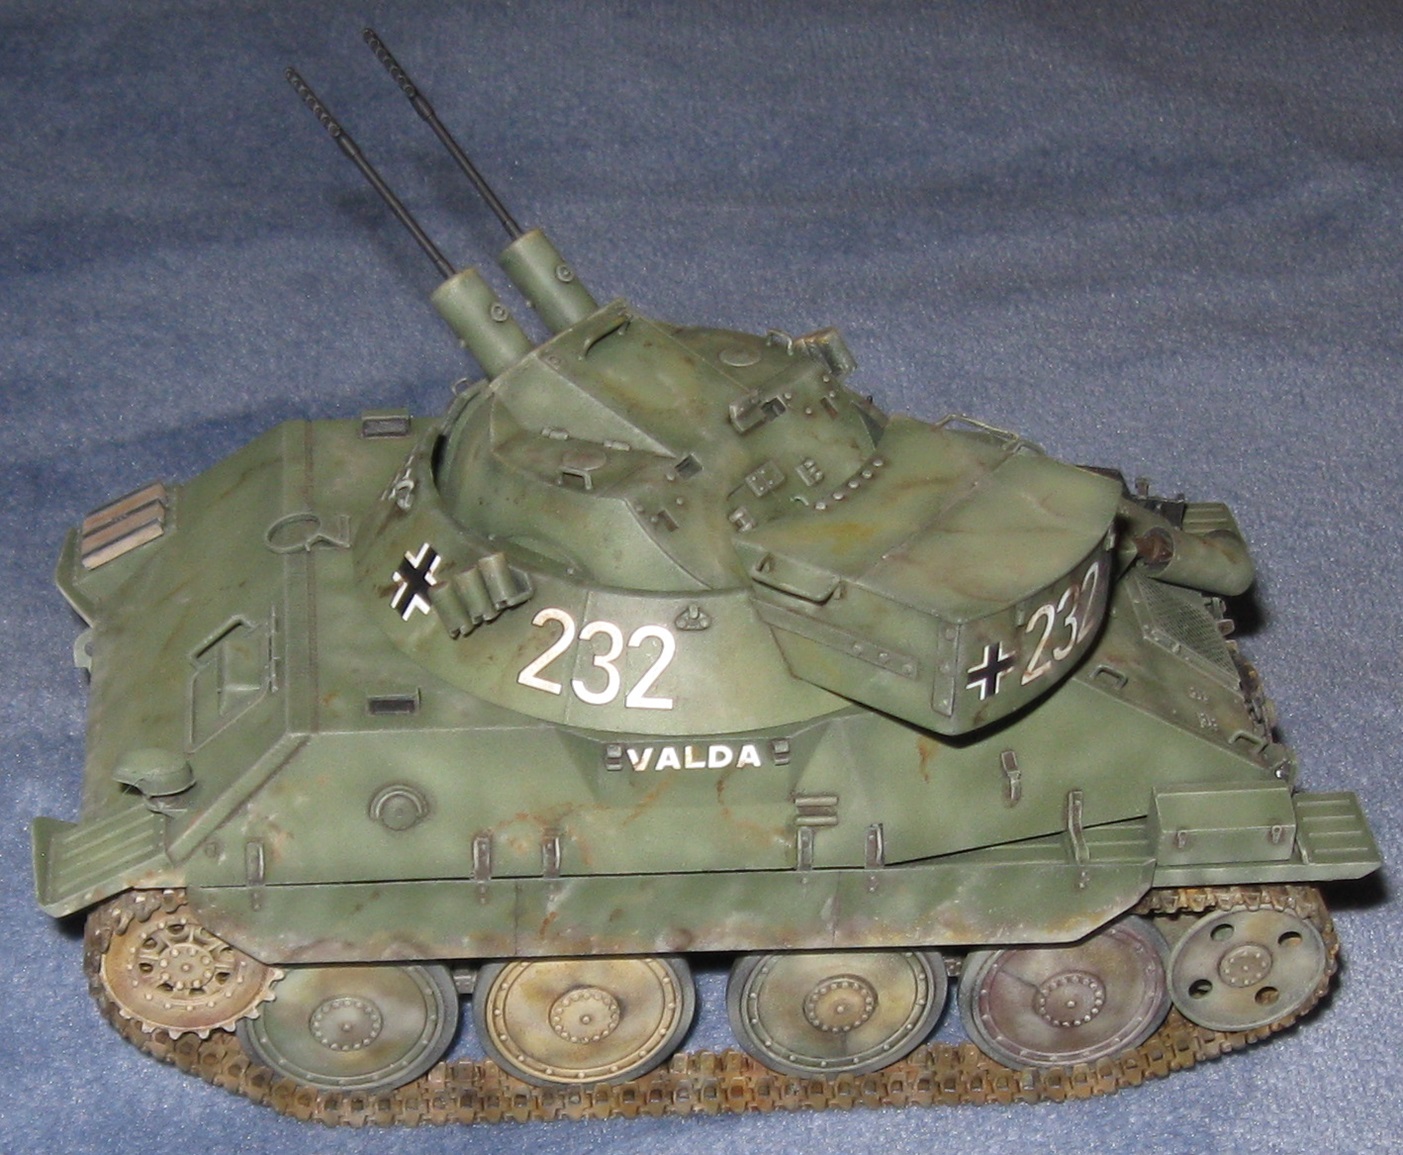
This model was built and painted concurrently with the previous one but turned out much better for two reasons. First, details on the Takom model are more crisp and numerous. That really matters when effects painting. Second, I recognized the problem with red brown paint before working on the hull and turret of the Takom model. Bullet dodged.
Back in 2023, I started developing a airbrush heavy, oil paint heavy painting method for finishing my models. This Flakpanzer 38 Kugelblitz and the T30 Heavy Tank from January are very probably near my best possible result using this method. For my painting to improve, that method must evolve.
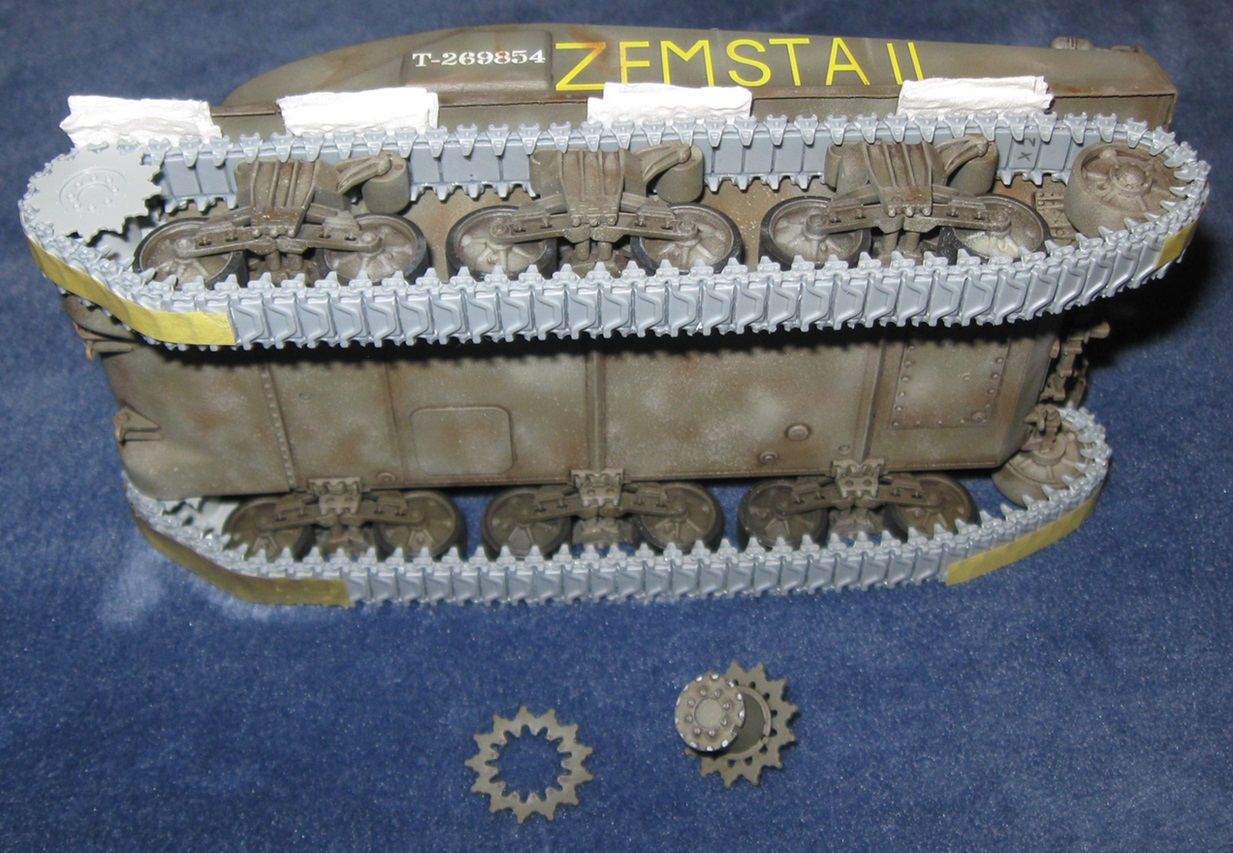
Over many model sessions, I slowly pieced together the shattered tracks for this model, gluing them directly to the running gear to maximize strength.
On the left side of the model, the tracks ended up half a link short. Using various tricks, I squeezed in a whole track block. The machine looks ready to throw a track but that is better than not having tracks.
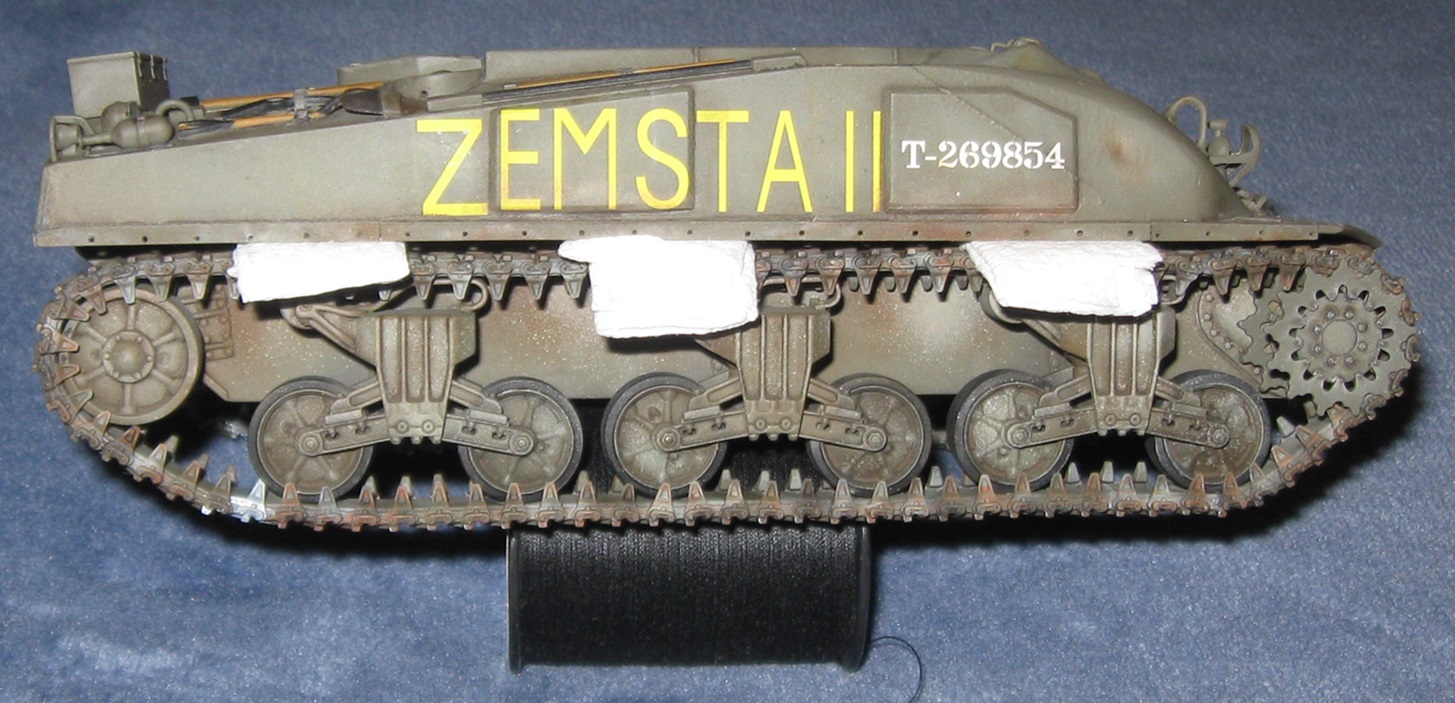
Fitting the right side tracks was far easier and required one entire track block. Again, the machine looks ready to throw a track. The paper towel pads are pushing the top track run down onto the return rollers while glue dries.
With the exception of two antennas, all parts are fitted. The model now requires a few sessions of touch up painting but is otherwise very close to completion. Another option is to turn it into an experiment for chipping, pigments, and splattering.