Heart of the Beast AutoModeler Group Build

Michael,
OMG :trophy: :medal_military:

Iā€™m just speechless at both the quality, complexity, and accuracy of the 1/12 scale MFH (?) kit since I canā€™t find any post with the kits scale nor manufacture actually mentioned. Just looking very carefully at the complexity and detail of the engine throttle linkages, is a reality check between is it real or is it a kit? Honestly, I just canā€™t tell.

But all of this would be for nothing if your skills werenā€™t at the top of the class as it takes a true master modeler to work his/hers magic in the prep and assembly of all those multitude of parts.

Every aspect of the engine and build is just absolutely perfect. To say Iā€™m truly impressed isnā€™t doing justice to your accomplishments to date. Your work is just that good.

Now sure if I mentioned this before, but I was at Watkins Glen way, way back on Oct 1967 for the US F1 GP. Slight drizzle throughout the entire race, but I do remember the Ferrari 312, Gurneyā€™s AAR Eagle, and the Lotus 49ā€™s of Clark & Hill. Only wish I was smart enough to take a million pictures, but film and processing was very expensive back then for a basically always broke college student.

joel
.

@cosimodo , yeah, what Joel said! That looks simply amazing mate. I can almost see the fuel flowing through those lines!

Cheers, D

Thanks Joel and Damian.
It is MFH 1/12. I learnt a lot about assembling these kits from the 8 month battle with the Porsche so while the instructions on this are vaguer (itā€™s an earlier kit) I have a much better idea of whatā€™s going on.

cheers
Michael

Michael,
Youā€™ve got it spot on for sure. Canā€™t wait for your next update.

joel

Progress has slowed somewhat on the Ferrari, but I have had a little time to do some detail work. The dashboard and steering wheel have been assembled, painted and decals applied. The decals were quite thick and out of register, so they took some coaxing with a couple of shots of Mr Mark Softer, but they are down now and ready for some Aqua Gloss and PLW to finish them off.

Cheers, D

1 Like

D,
As usual, your dash and steering wheel look darn good. Just one suggestion for the wheel. The rim is made from some exotic wood back in those days, and had a super high gloss finish. Hence, the reason why most car enthusiasts (including yours truly) wore leather driving gloves so the sweat from your hands didnā€™t cause you to slip off the wheel rim, and just as bad damage, or wear the finish over time.

Donā€™t laugh, but a light coating of Tamiya Clear Orange 1st, then the clear gloss coat will really make quite a difference.

joel

1 Like

Thanks Joel. The steering wheel was painted with Vallejo acrylic Saddle Brown, so Iā€™m still thinking about doing some dry-brushing of a paler colour to give it some life. A coat of clear orange and then gloss is a great idea to finish it off.

Cheers, D

1 Like

D,
Looking forward to your finished interior.

The reason for the Orange clear then the gloss or you can tint the clear gloss as a one step, is because all of the clear gloss varnishes back then had a really strong Orange tint to them as they were Shellac based.

joel

Michael that is some heavy duty building. Very nice work.

Damian progress is progress. You canā€™t keep the pace you were going, you will hurt yourself.:grin:
Looking good.

I was stalled also waiting on scratch building material to arrive. Maybe this week.

Rick

2 Likes

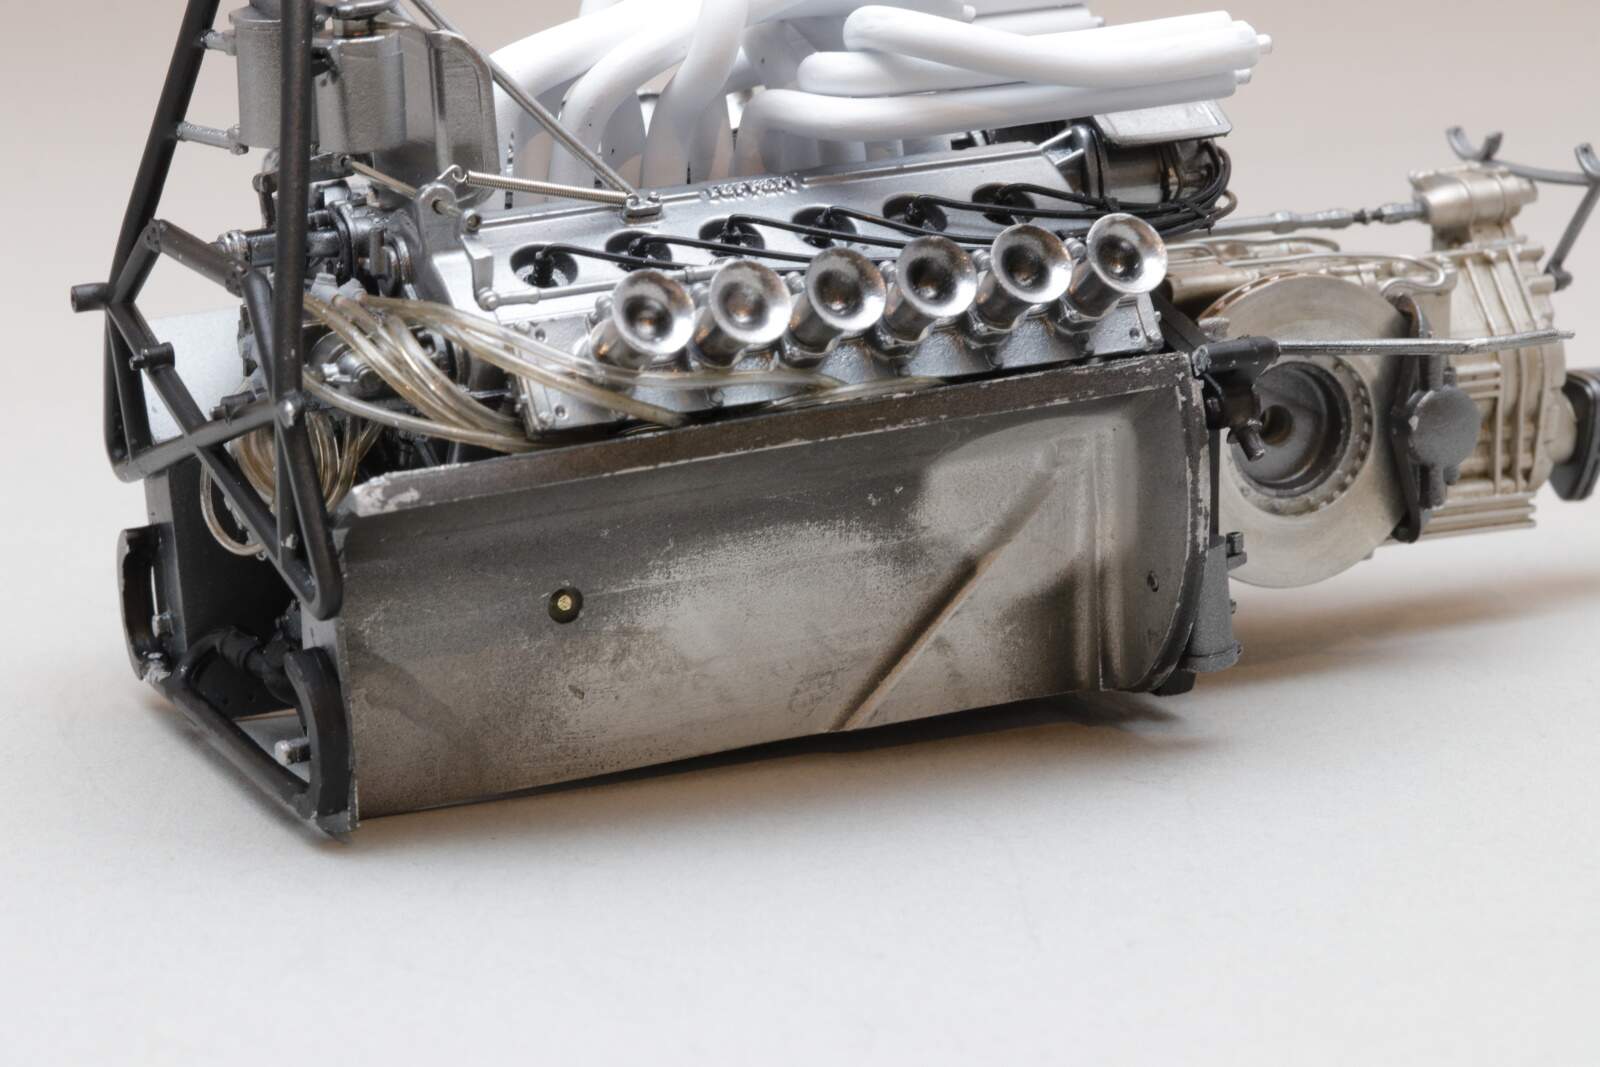
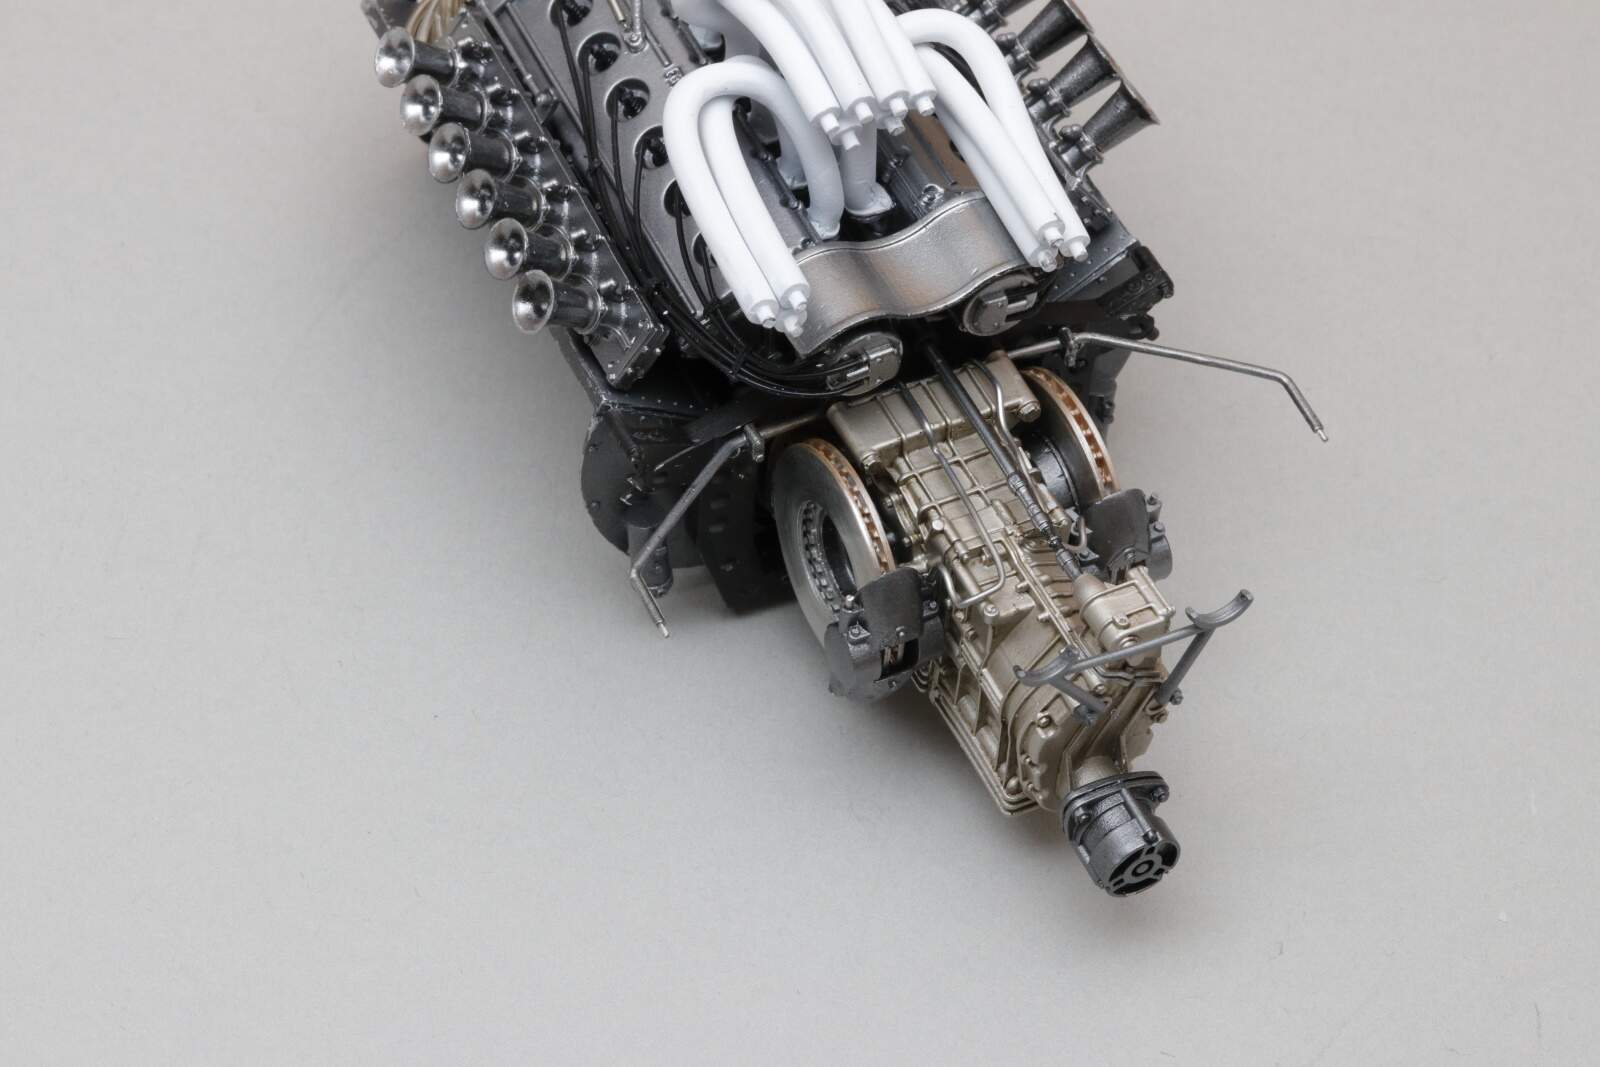
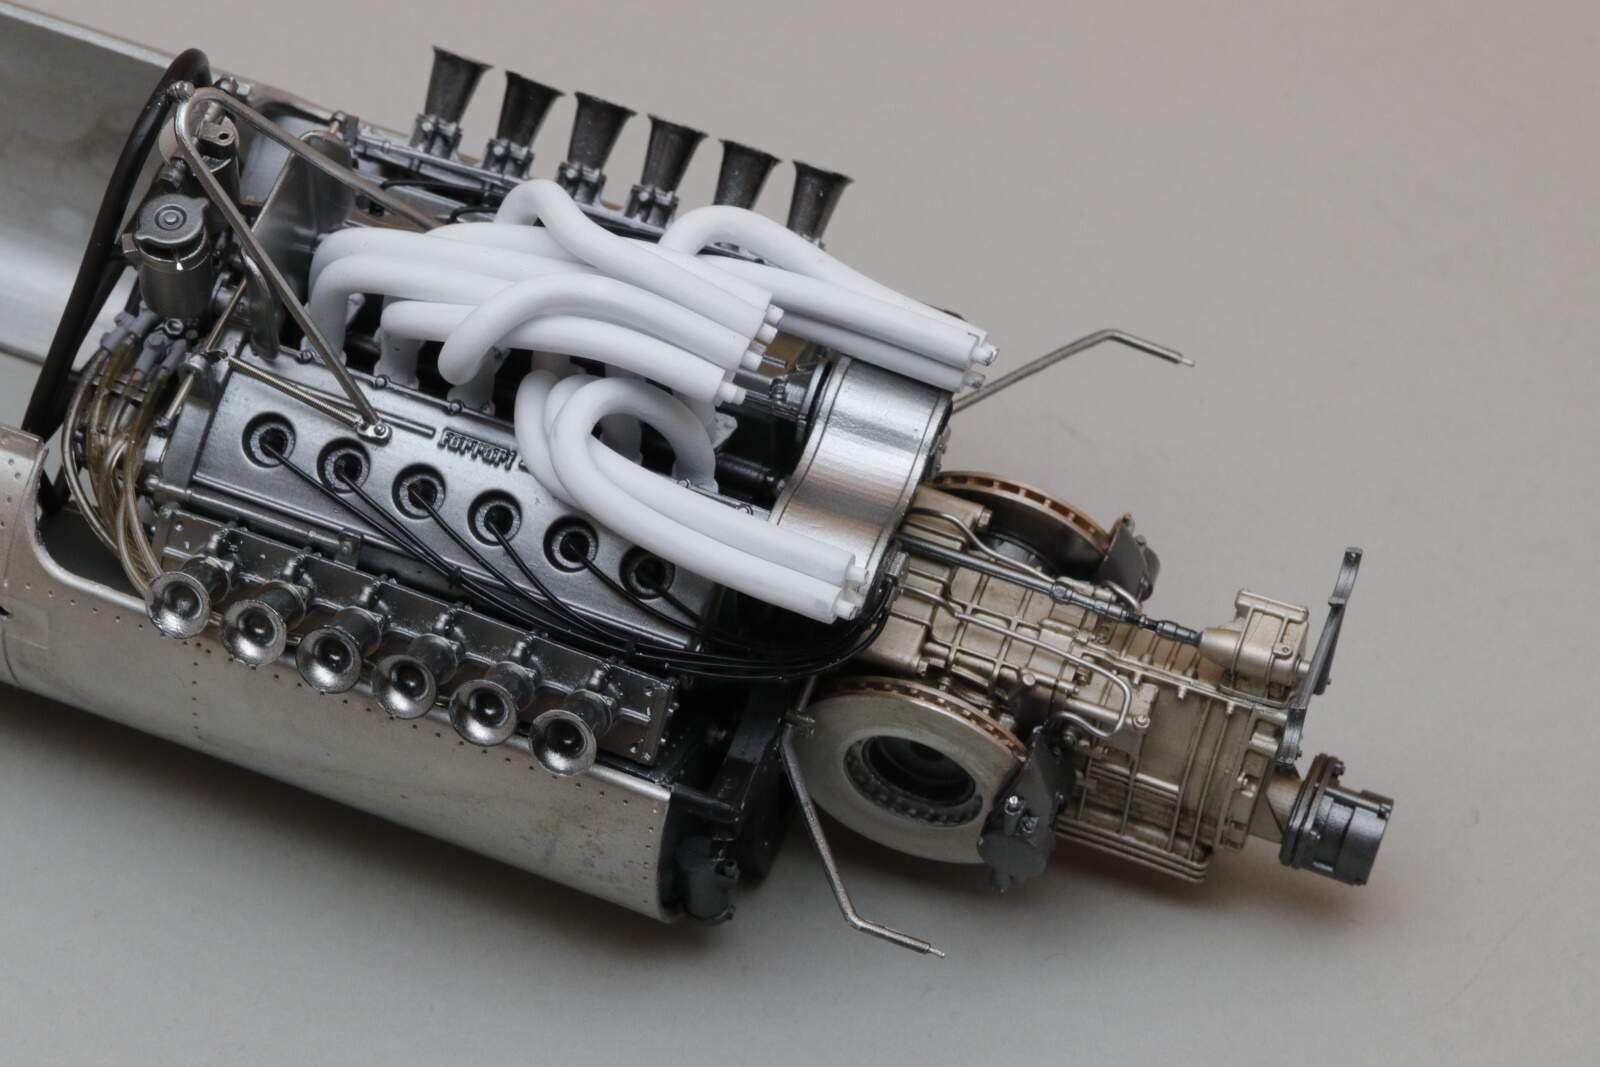
After deciding that my Mojo levels for the Monogram ford Mustang GTP car just wasnā€™t there for the time being, I switched gears and opted to go with the Tamiya Ford Mustang GT4 car instead, which as the Asian trend currently is: a curbside on Steroids. And honestly, unless I was going for a full blownout engine compartment and suspension, these type of kits are fantastic.

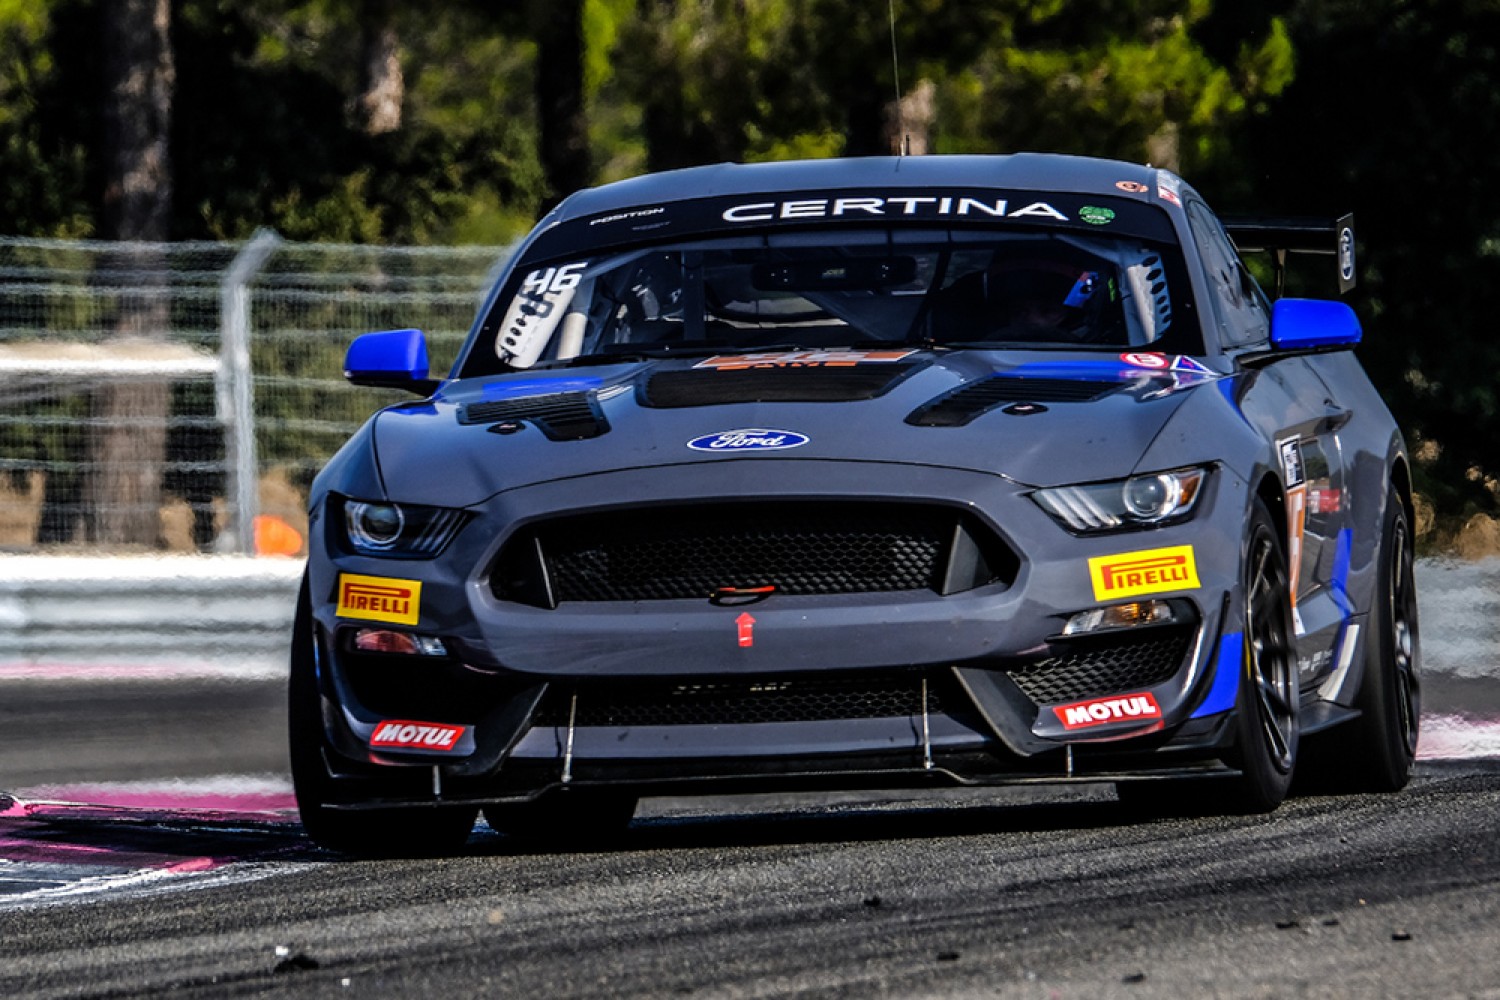
Just as a little history on the car itself which is a little confusing if you ask me. It was jointly designed and engineered by the Ford Performance Div., and Multimatic Motorsports with the inspiration coming from the current Ford Shelby GT350R-C GT4 car. the goal was to design and build a ready to race competitive GT4 race car right out of the box, that would race in the IMSA Continental GT4 Sportscar Challenge, as well as the Pirelli World Challenge GTS/GT4 series, both of which are North American based, as well as being legal for the multitude of European GT4 series.

Ford already had the 2015 GT350R-C Mustang racing in the GT4 IMSA categories, but for 2016 released the Ford Mustang GT4 in a full race version for $100,000 plus (unfortunately, I still canā€™t afford a proper competitive GT4 car), so you just go racing as itā€™s already maxed out for both IMSA classes. Even the infamous weekend warriors reported just how easy it is to drive competitively.

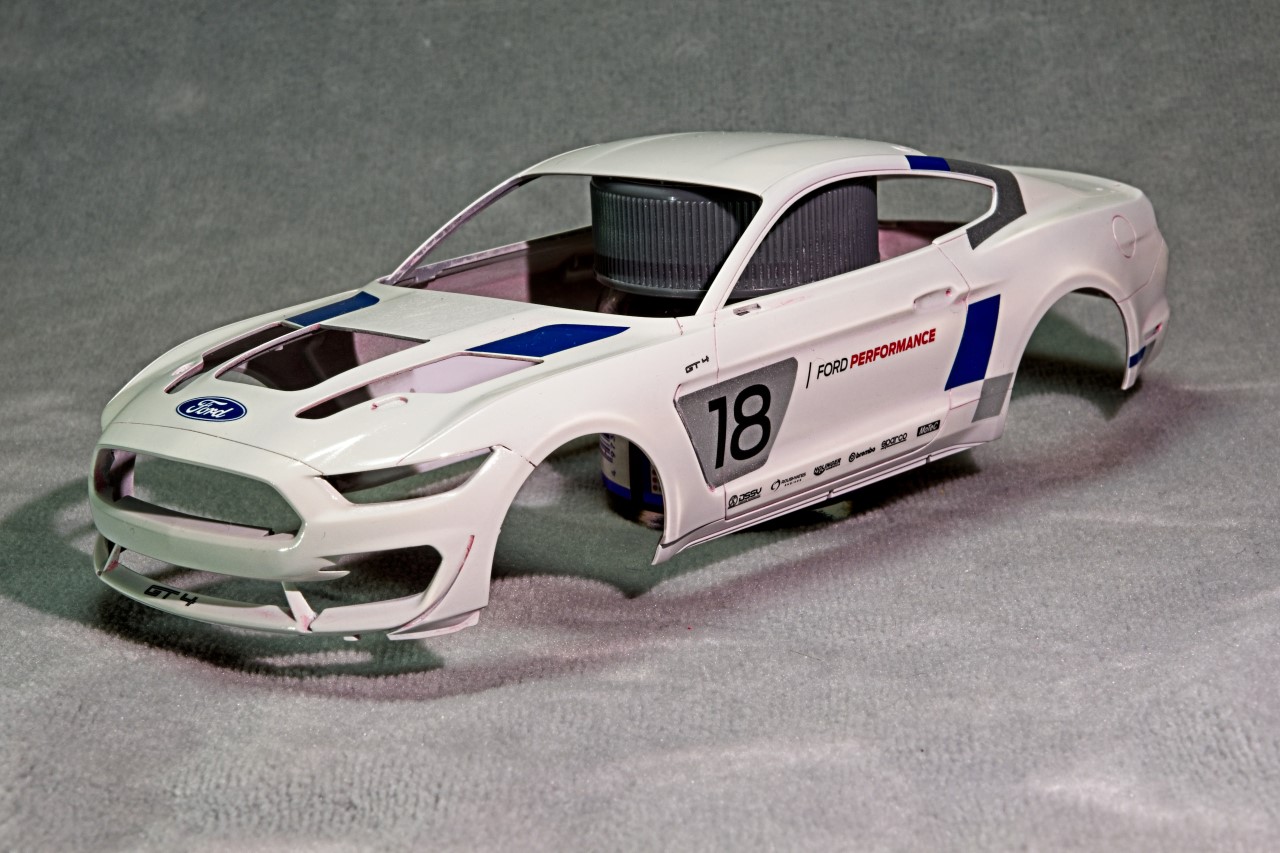
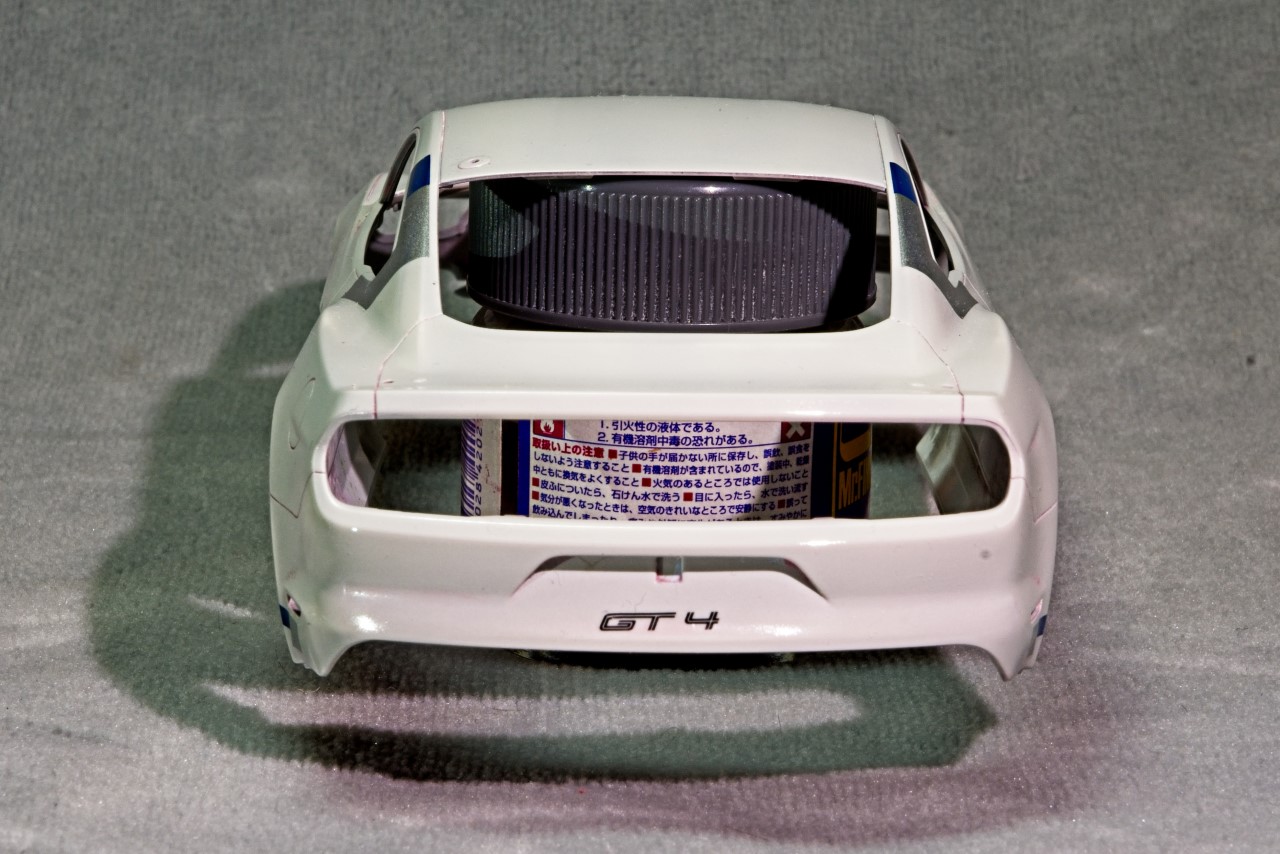
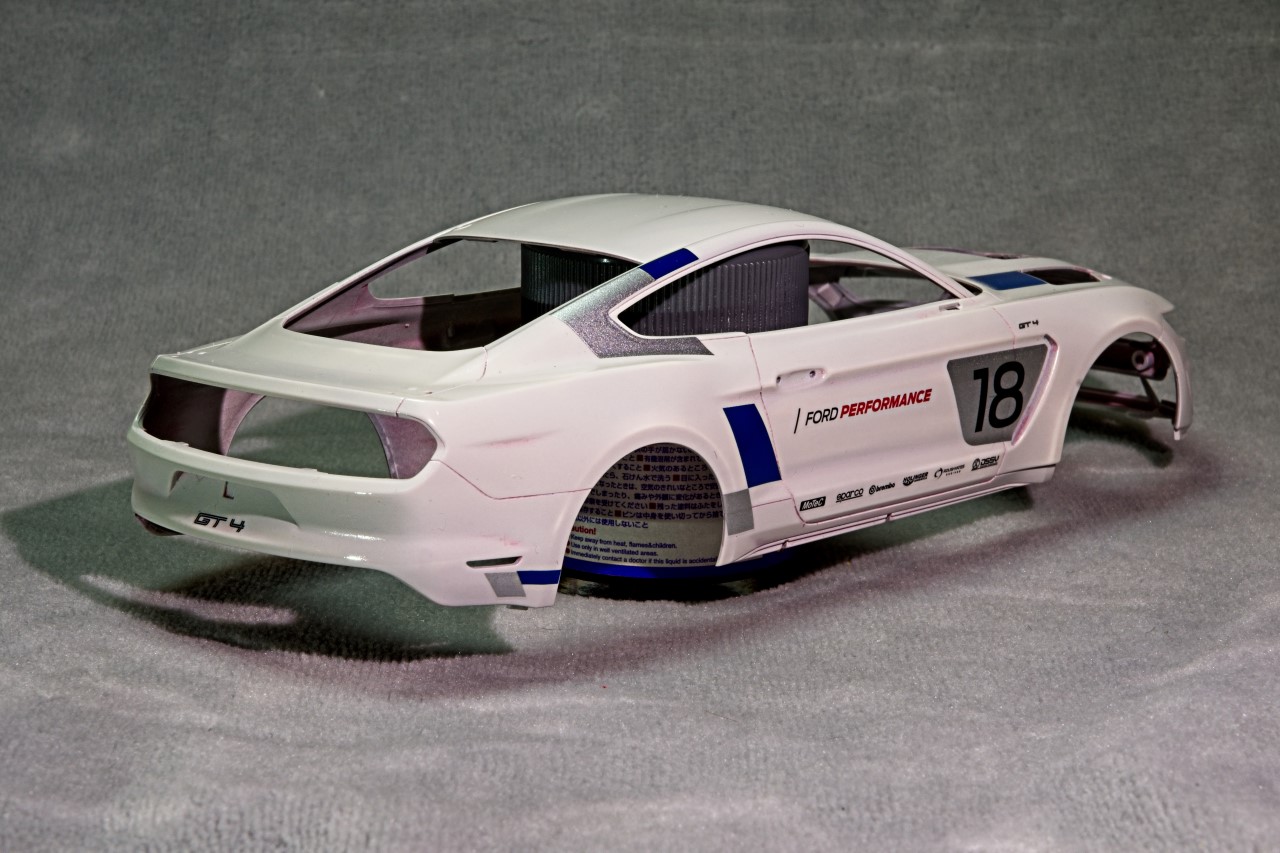
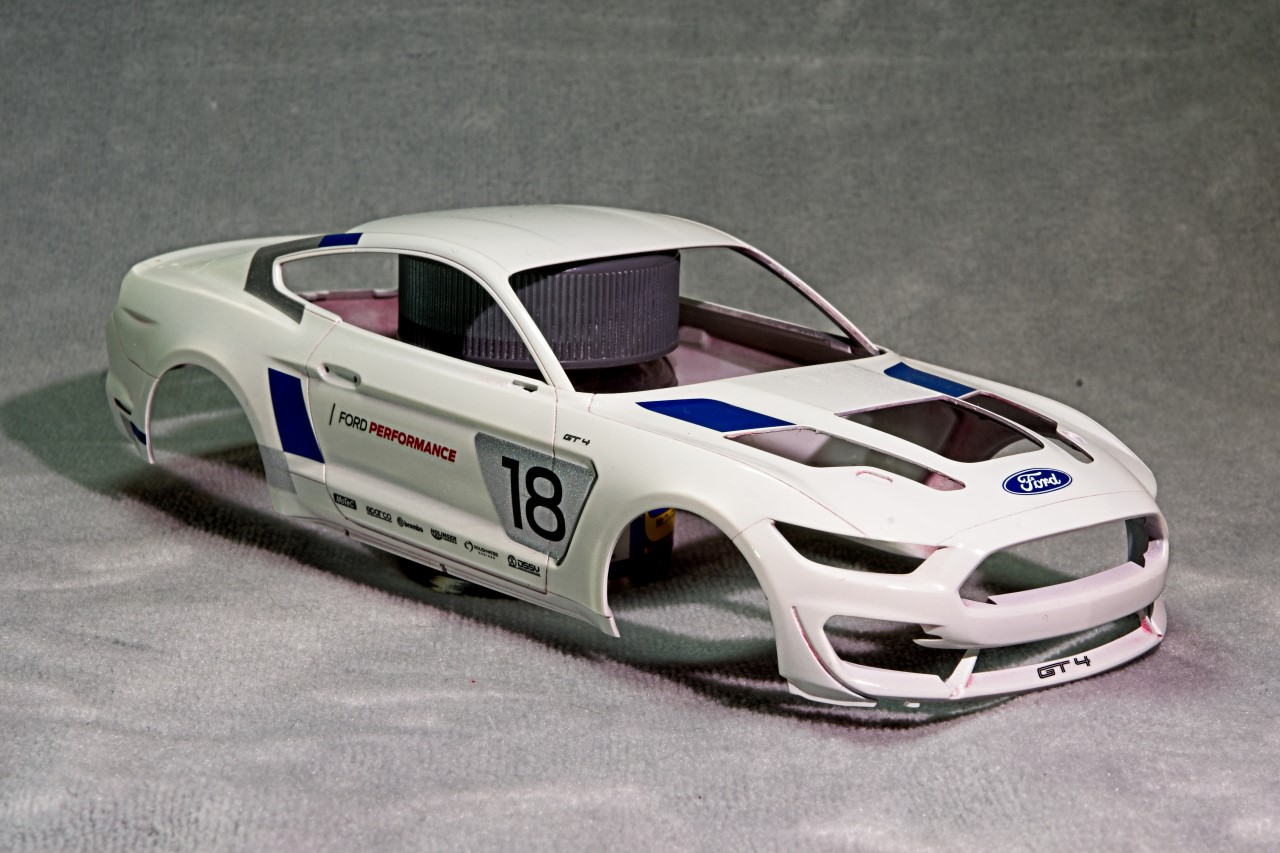
Tamiya produced a kit of the 2016 Multimatic Motorsports team cars; where one was painted gray and the other painted in white.

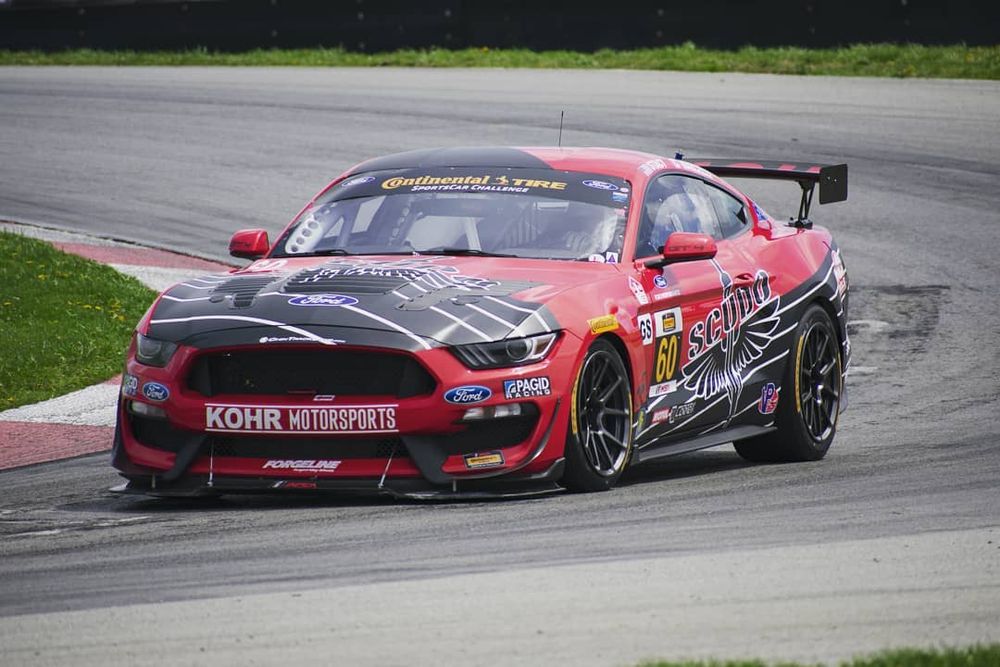
Originally, I was going to go with the 2016 Kohr Motorsports Scudo Mustang with the decals from Indy Cal, but more on that in a bit.

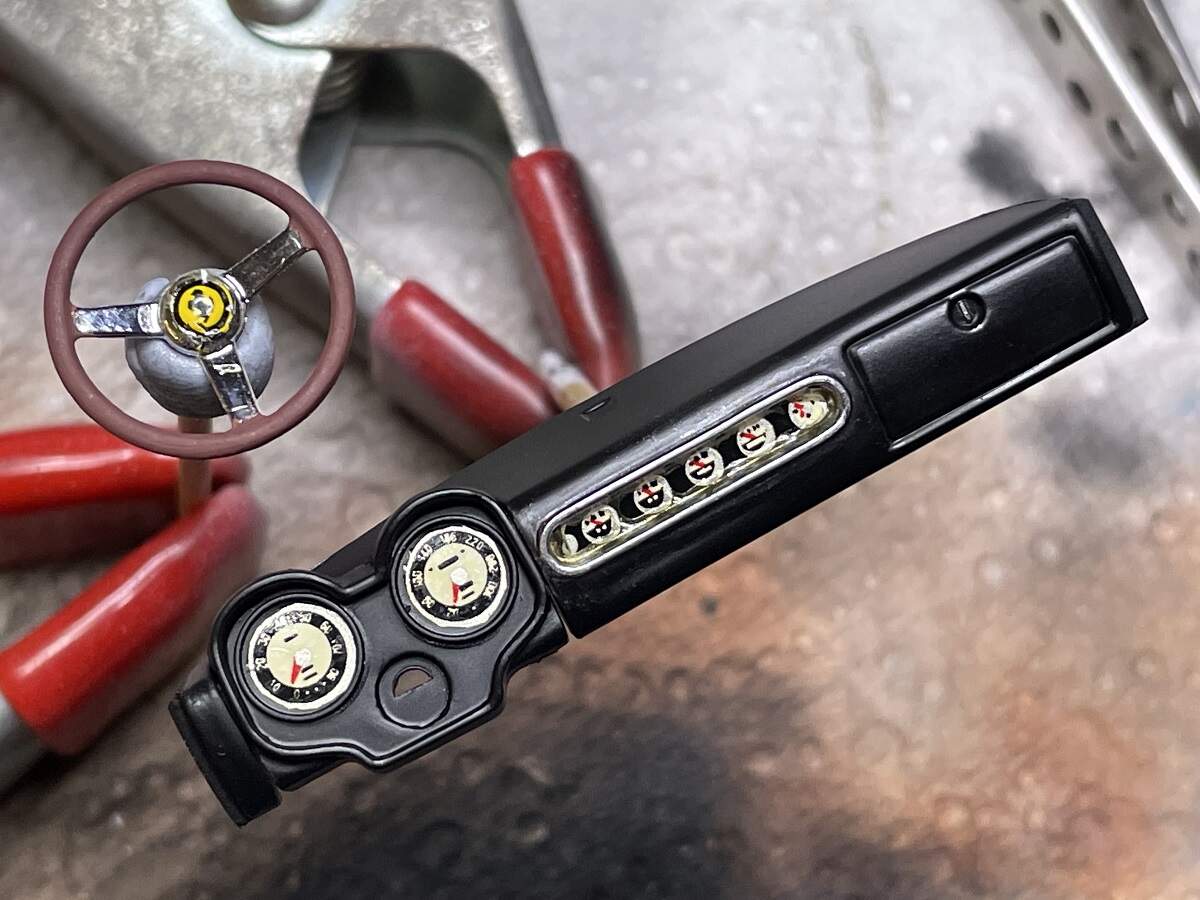
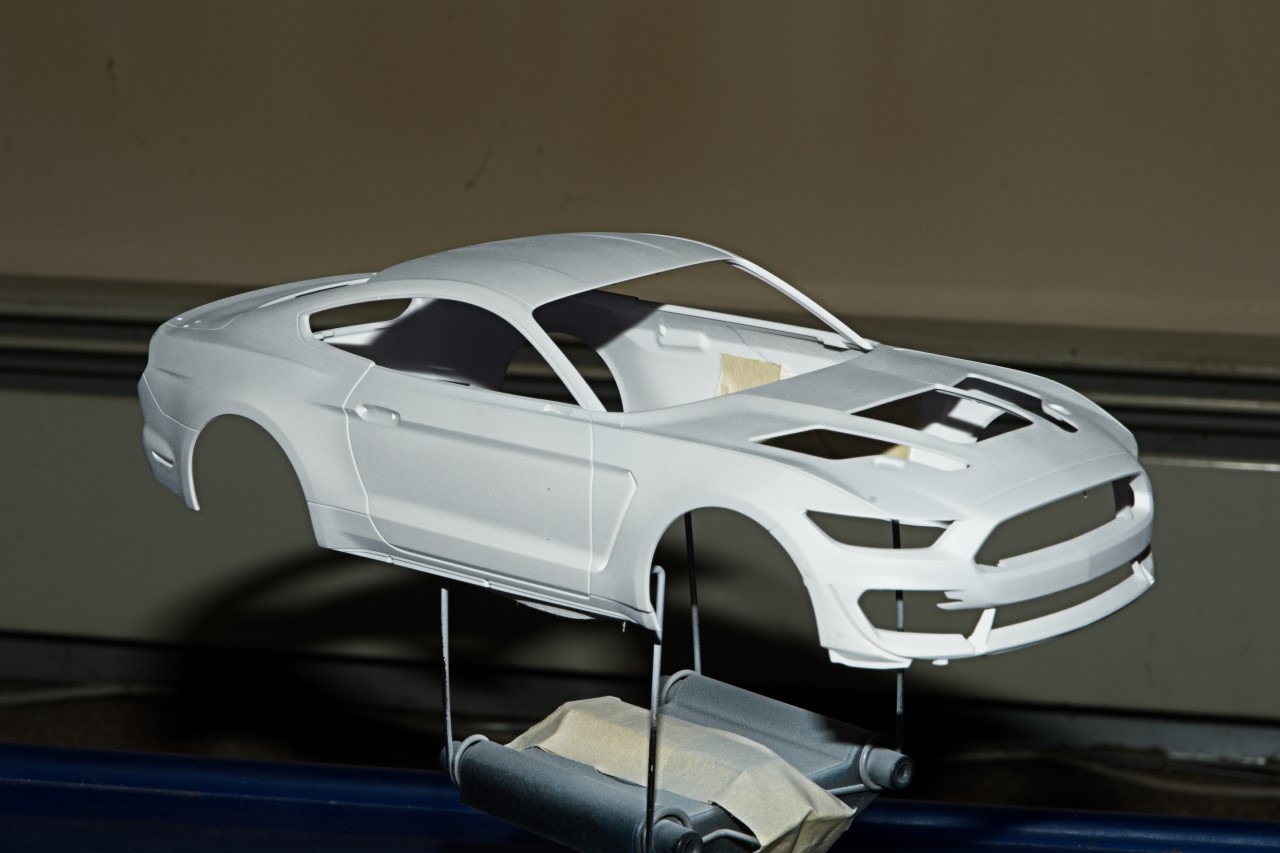
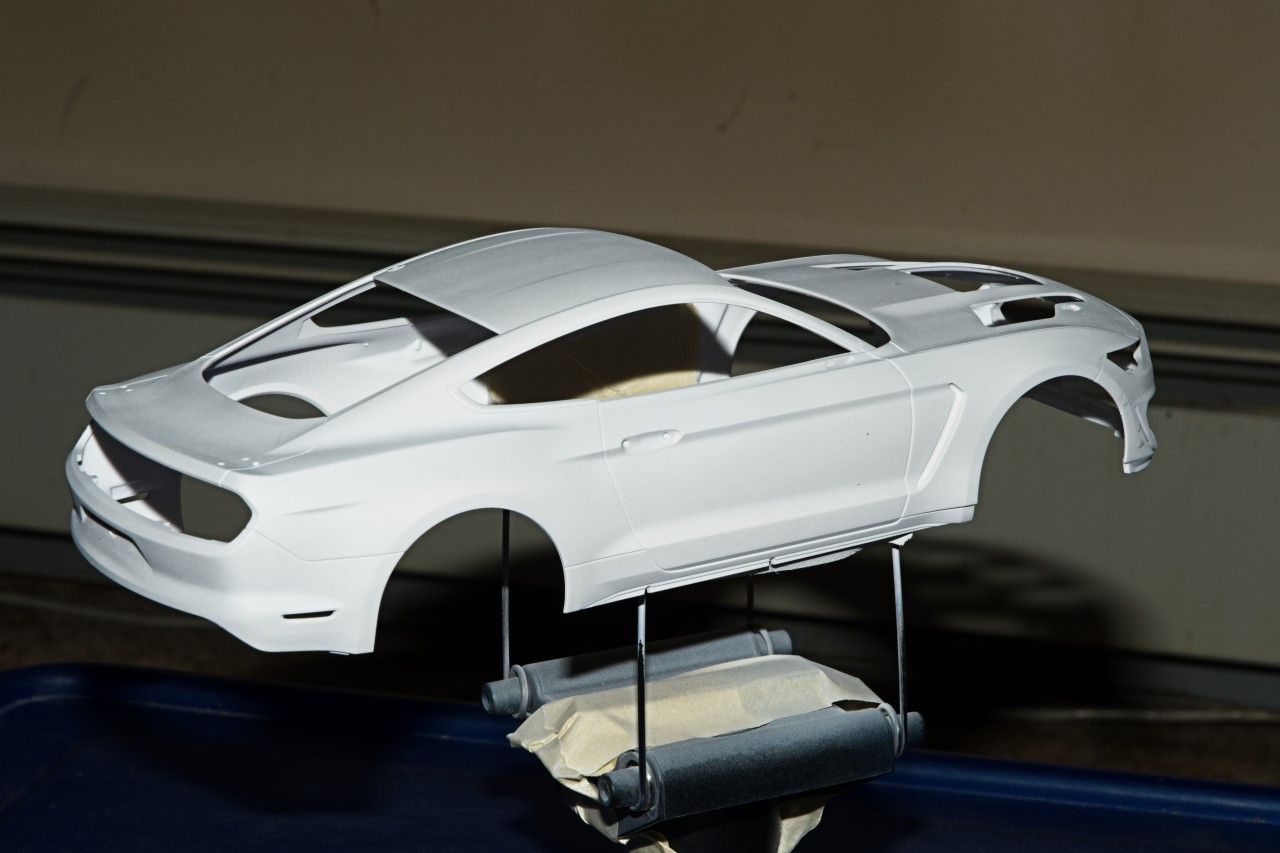
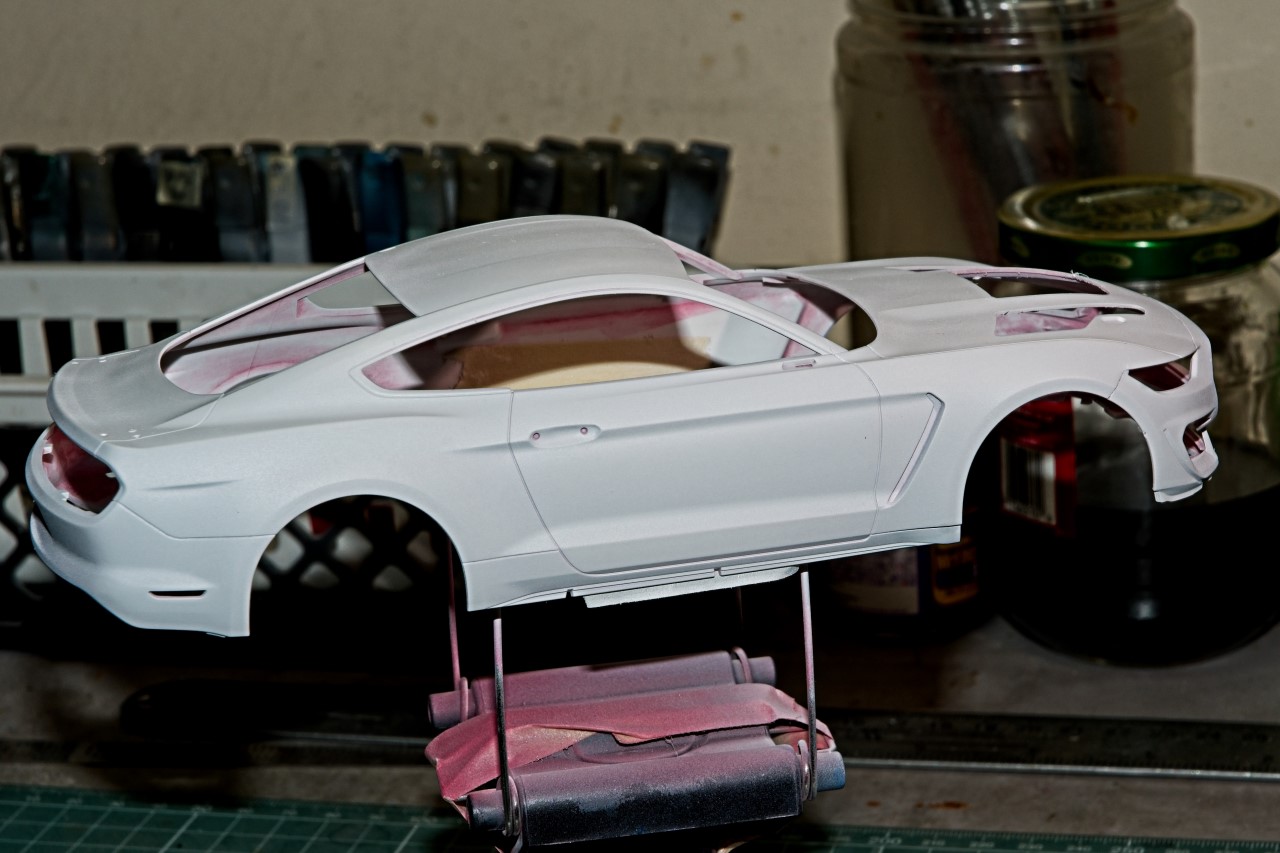
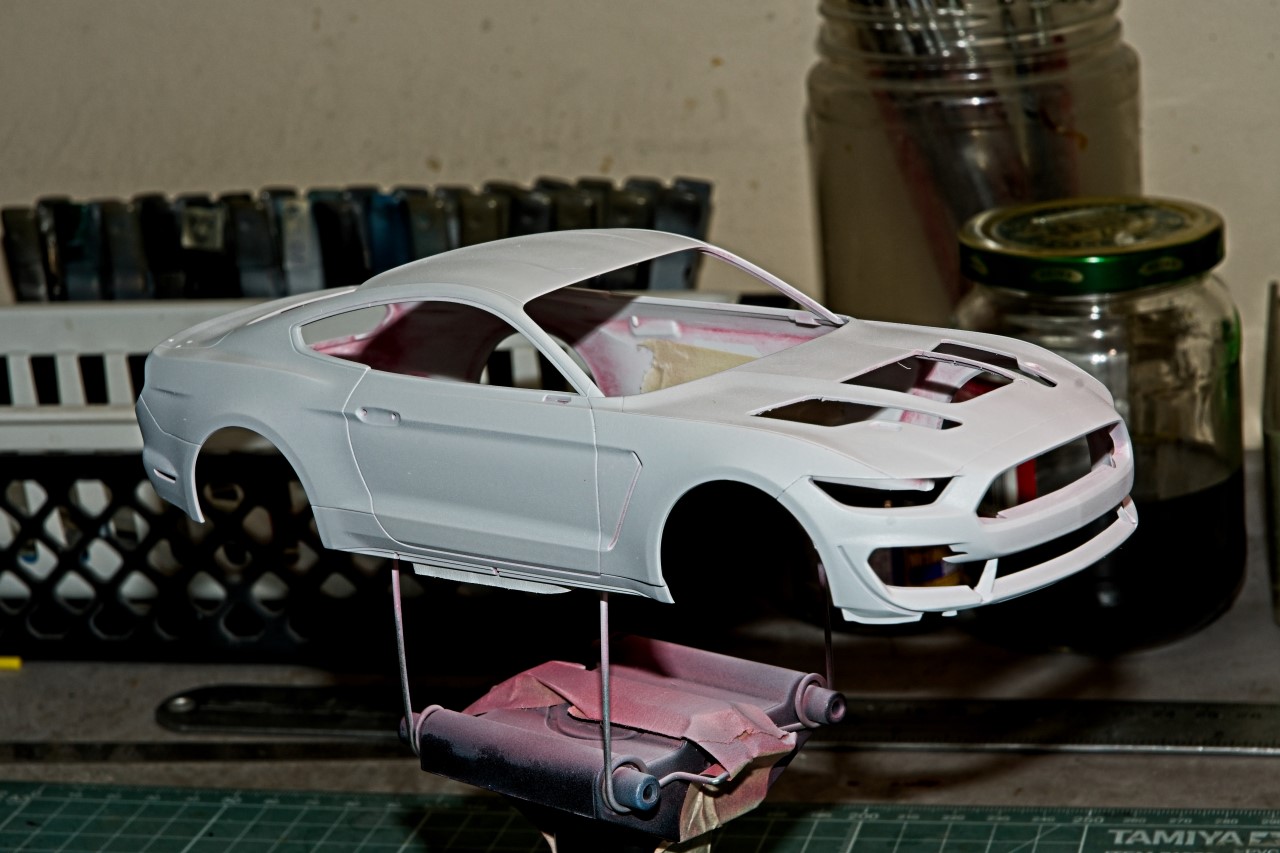
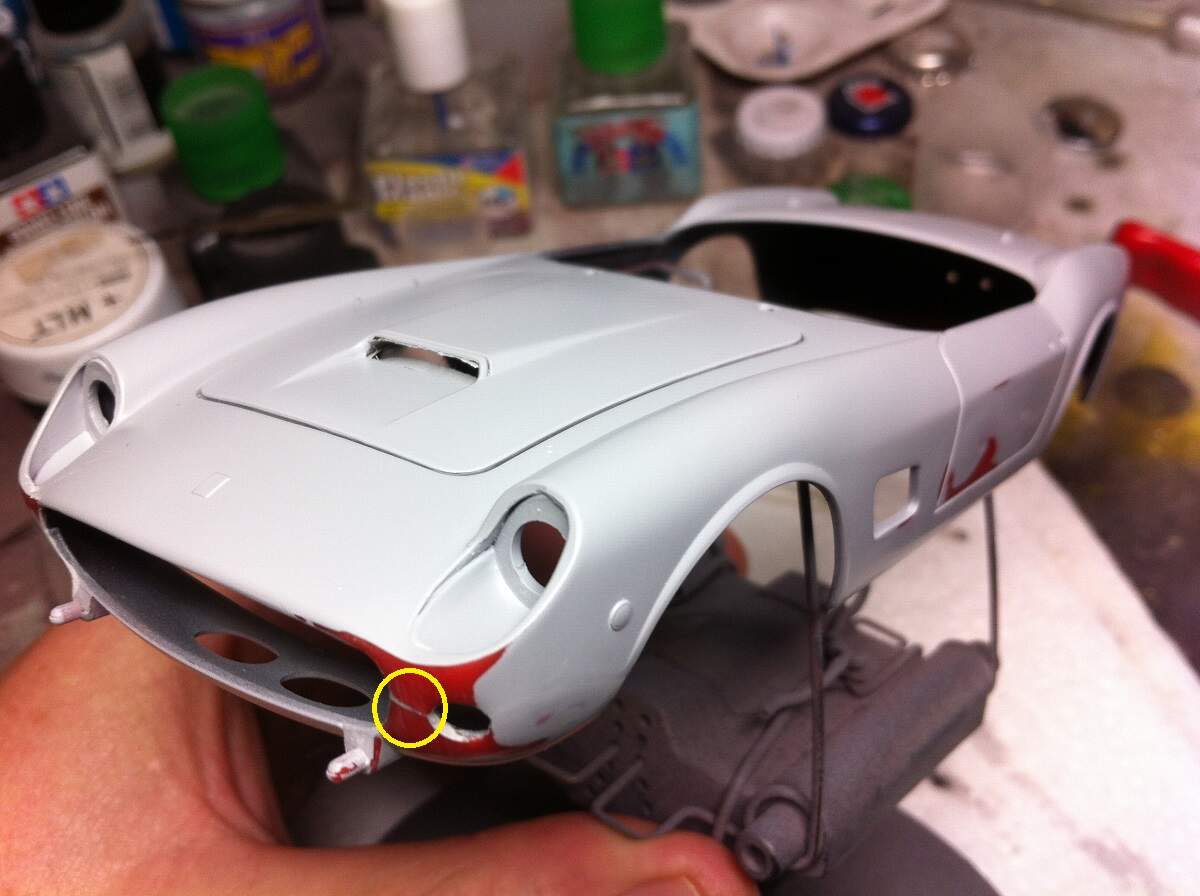
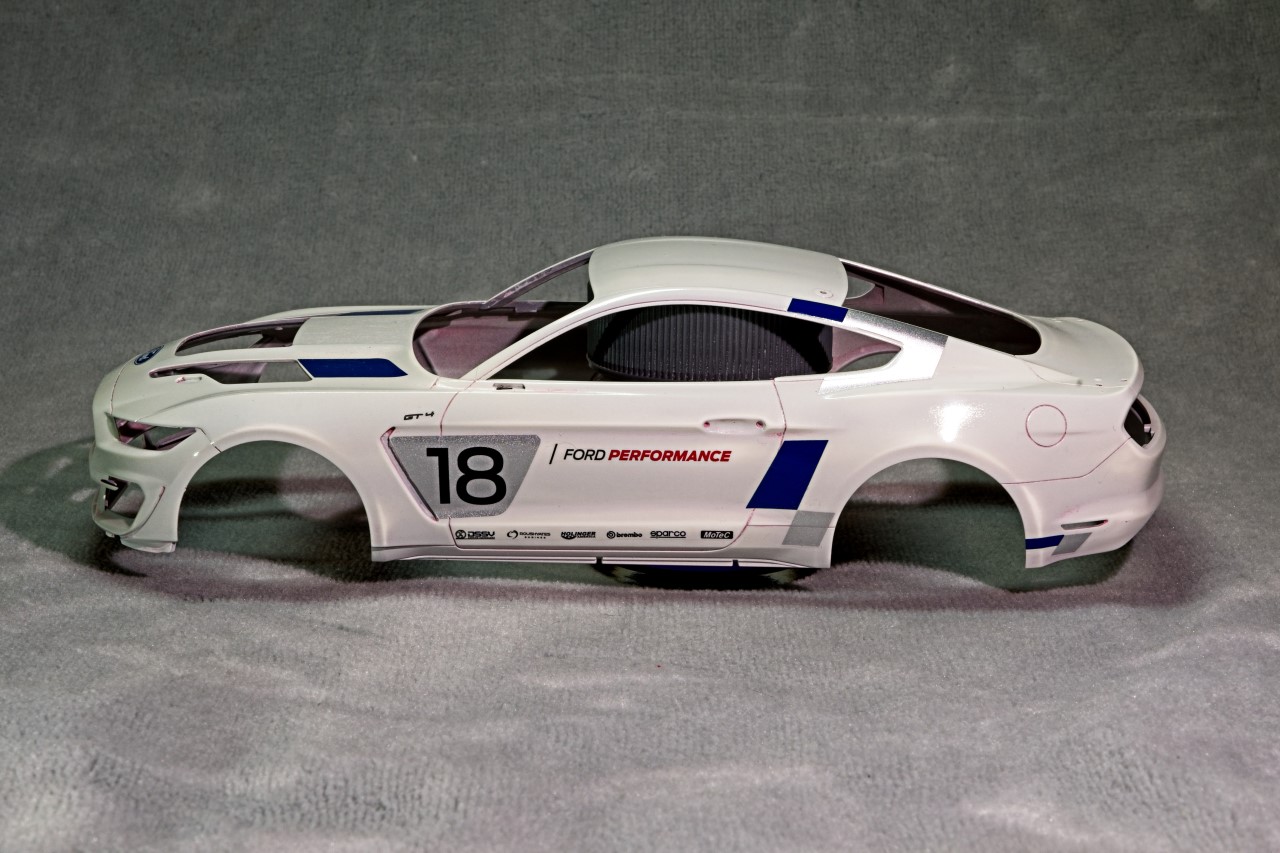
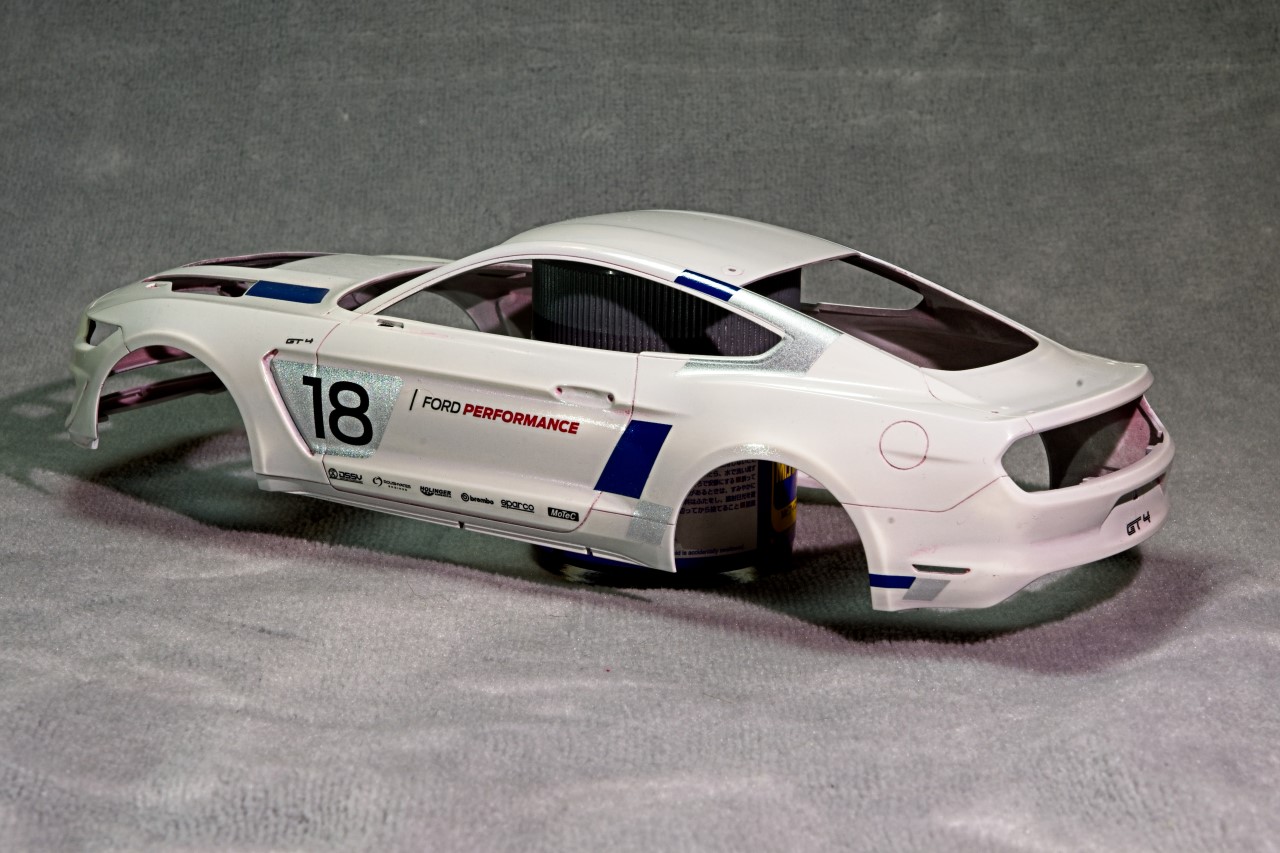
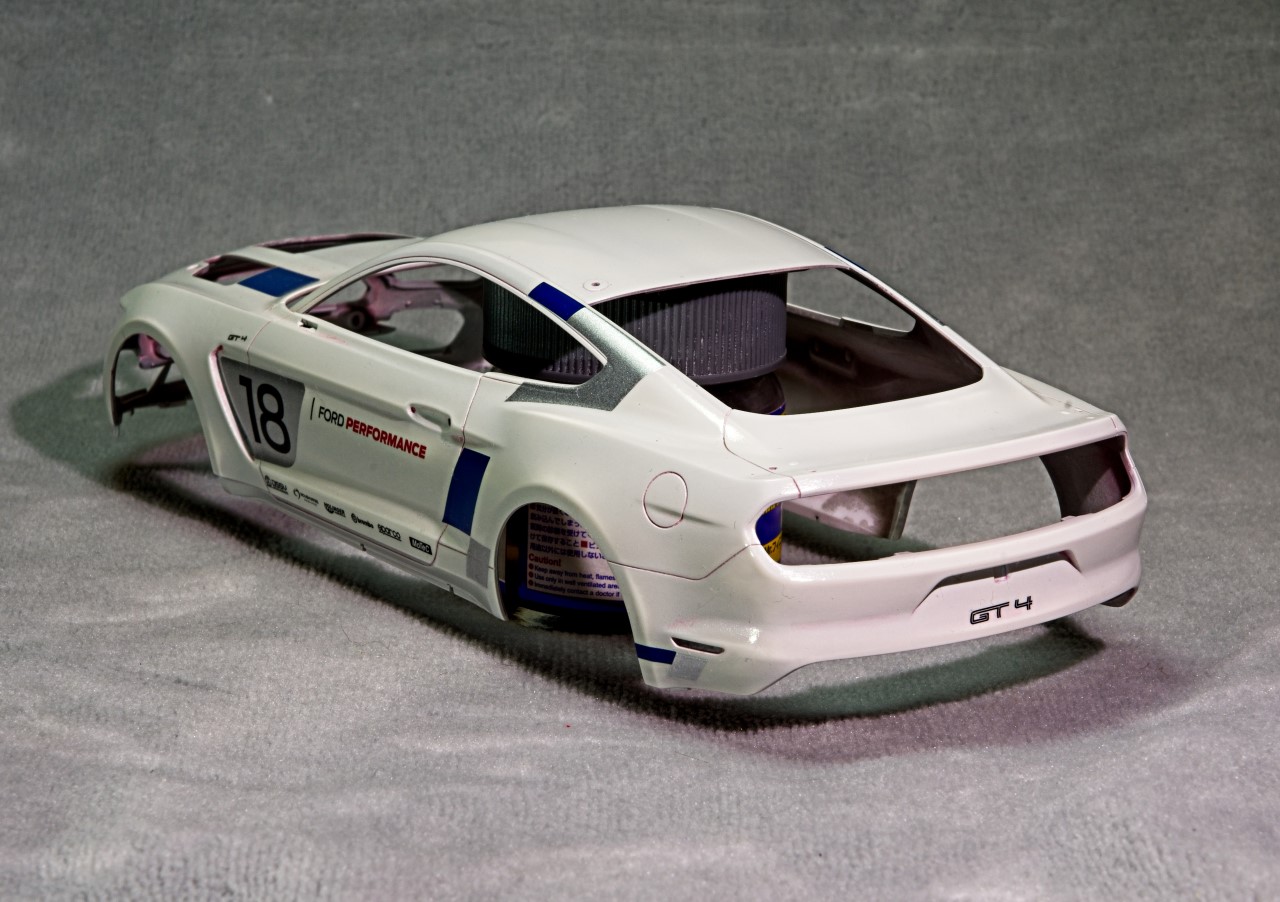
As my usual practice I started with the body assembly right through primer, paint, decaling, polish, & Wax.

Once the body was ready for primer, which is till my own blend of Tamiya Gray & white lacquer primer fill then cut 50/50 with Mr. Thinnerā€™s Leveler 400 thinner. I gave that a full day to cure, then a very light sanding with a Tamiya #3000 sponge and it was color time.

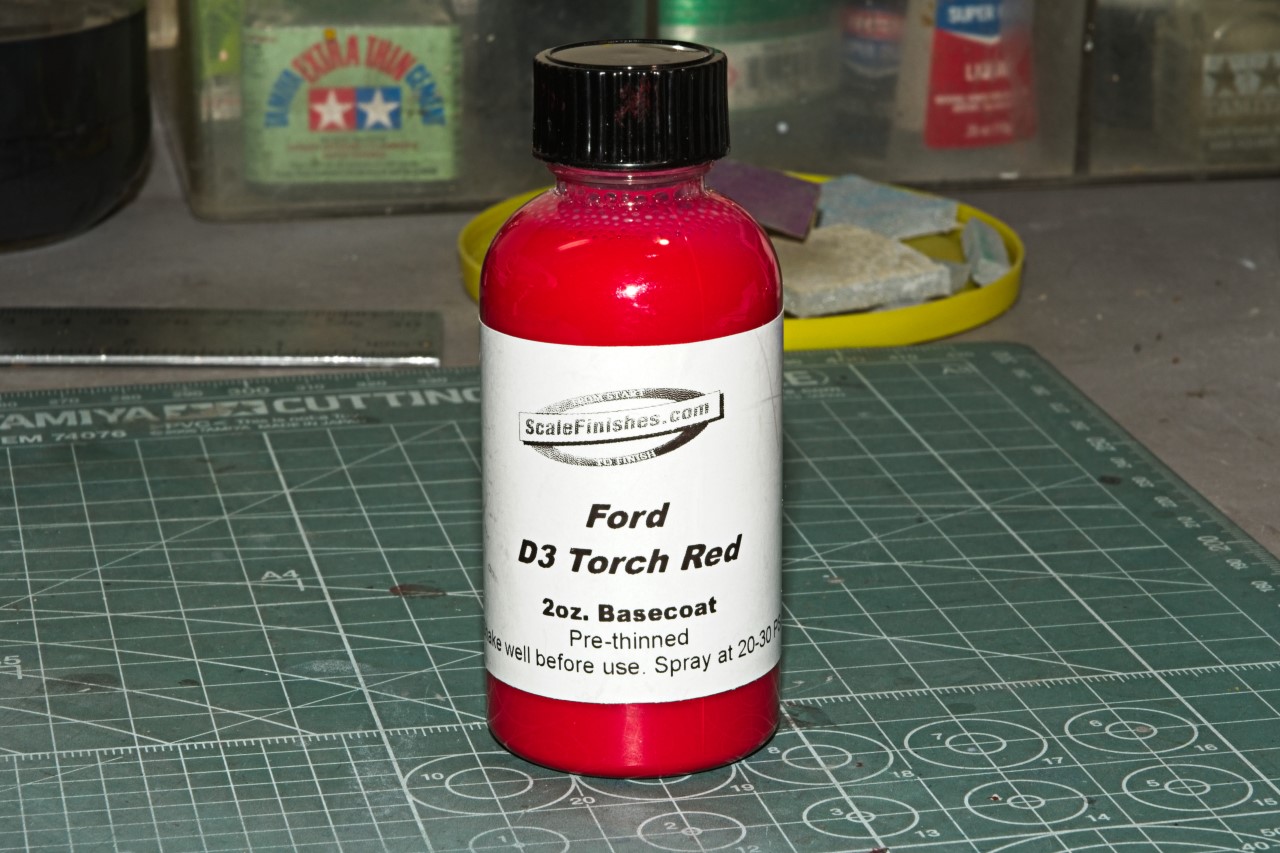
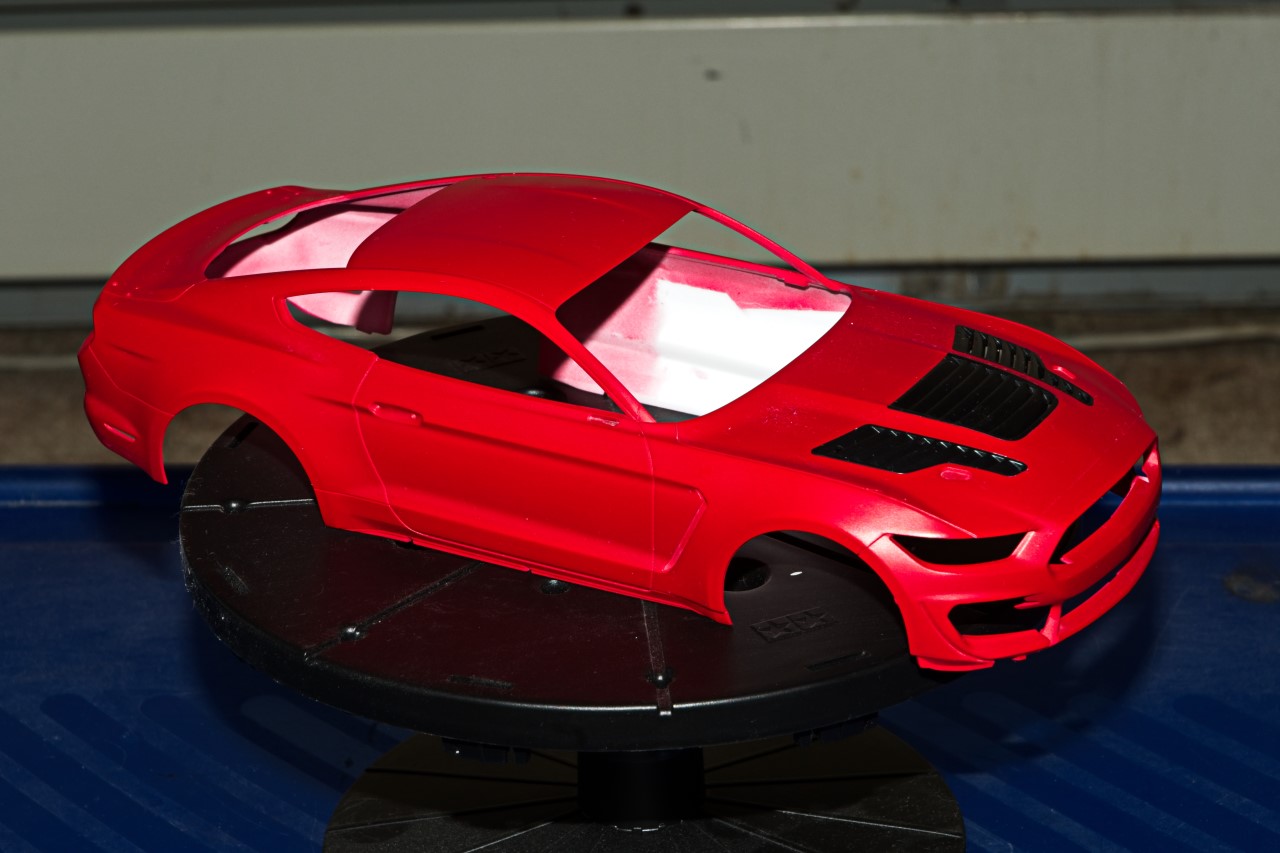
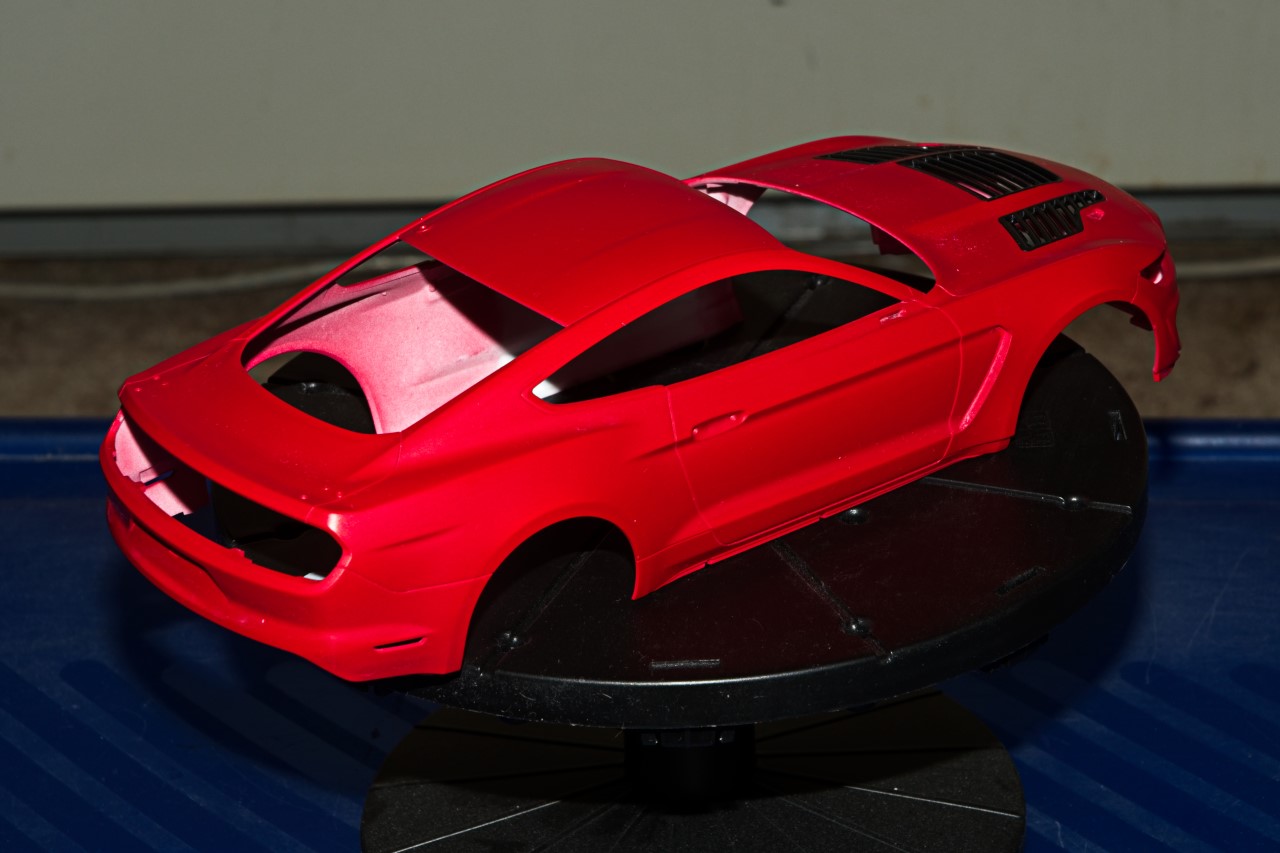
I switched from Gravity to ScaleFinishes for all new colors as well as their super Gloss. I must have a min of 6-9 different shades of Red from Gravity, but still wanted to try the Scale finishes Ford Racing Red lacquer paint thatā€™s pre-thinned. It went on smooth as silk.

Gave the body a good 2 days to cure, then I polished the body with Micro Mesh 6,000, 8,000, & finally 12,000. Now itā€™s decal time.

Iā€™ve been using Indy Calā€™s decals for several years having gone from their Alps printers to their current printer system, making slight adjustments along the way. The quality of the print seemed better, but the decals seemed to be more ā€œstretchyā€ if that makes any sense. The only issue I have is that the sheet is one giant decal, so you have to cut out each decal. Iā€™ve also had issues with trying to cut out clear sections of their decals while theyā€™re still wet as they just stretch, but donā€™t cut.

The decal I started with is the what I considered the hardest decal to apply, the hood decal with the sword. Since the sword will be over several louvers of the center vent, I installed all three hood vents before decaling which was a huge mistake on my part. I spent more then 45 min very carefully cutting away all the clear decal film for the vents, and planned on just laying down the sword over the center vent and when dry coming back cutting and slicing it work it one grill louver at a time. Unfortunately, the decal just wouldnā€™t align properly with the spacing for the two side vents no matter what i tried while trying to keep the decal aligned on the top and left hand side using the hood lines as a guide. The issue after thinking about this for some time is that the decal just stretched out of shape, which is a something that I just didnā€™t plan for. The decal was ruined, and needless to say I was kind of POā€™d at myself. At this point I just threw in the towel as it wasnā€™t working for me. I could have contacted Michael at Indy Cals, and he would have sent me a replacement decal via his Oops policy, but for the time being I decided not to as Michael just answered my email questions about the Orange color on the Gull GT40 Wyler cars. and sent me masks for painting them instead free of charge.

So once again I changed gears, and stripped the body down to bare plastic, and now reprimed.

Instead Iā€™ve opted to go with the Ford Dark Lead Foot Gray from Gravity Multimatic body car which is one of the two schemes offered by Tamiya. Hopefully, the Tamiya decals arenā€™t to thick so I can deal with that issue.

No painting today as itā€™s way to Humid from the all night and morning rain. Once the AC kicks in for the summer season, weather/humidity is no longer an issue till next spring.

joel

1 Like

Iā€™ve had a rough week on the real life front, so not much progress to report, but hopefully back to smooth sailing now!

According to my calendar we are now 1 month in, so itā€™s time for a ā€œState Of Playā€ report.

We have 4 builds well under way, with another 5 floating around the sidelines. Hopefully we can increase those numbers with some more activity and progress coming through.

Roll Call and Running Build Updates below (also in the first post of this thread), as always please let me know fi anything is incorrect:

Cosimodo (Michael) - Ferrari F1 (Monza 1967 Chris Amon) - MFH kit in 1/12 - Engine painted, assembled and detailed
Rick1956 (Rick) - Porsche 904 - Monogram kit in 1/25 - Engine modifications, assembly started
AussieReg (Damian) - Ferrari 250 GT California - Revell kit in 1/24 - Body in primer and fine tuning under way, engine/drivetrain painted and installed, interior painting and detailing started
Joel_W (Joel) - 2020 Ford Mustang GT4 - Tamiya kit in 1/24 with IndyCal decals - Body painted and decals started, hit a snag and body stripped and repainted

Tinbanger (Richard) - Jaguar E-Type - Airfix kit in 1/32
Betheyn (Andy) - Porsche 917K - Fujimi kit in 1/24
Littorio (Luciano) - Alfa Romeo Giulietta Spider 1300 - Italeri kit in 1/24
Forest1000 (David) - Porsche 911 GT3 - Tamiya kit in 1/24
md72 (Mark) - Dodge Challenger (2009) - Revell kit in 1/25

Cheers, D

D,
Really glad that all Home front issues have been solved, and youā€™re back on track, as Iā€™ve missed your posts for sure this past week.

the saga of the Mustang GT4 continues as the painting segment ended up going down a completely different path. Update later this week as itā€™s painted, decaled, and now being Gloss coated with another brand/type of Clear Gloss today.

joel

Well an update for the Ferrari.
I have added a roll bar which also holds the fluids


Havent connected the hoses yet because still need the other end of these to be installed.

1967 was a seminal year for F1 with the advent of the Lotus 49 and the development by Chapman of using the engine, the DFV Cosworth, as a stress member of the chassis.
Ferrari hadnā€™t made the change by Monza and the engine still was supported by a metal chassis the ran the length of the monocoque.
This is the engine end and part of the slow progress has been trying to get the whole chassis, front to back lined up and fitting. No small task when it is all metal.

The engine has also gained a gear box with inboard disc brakes.

and a test fit in the body shell

Rear suspension up next.

cheers
Michael

1 Like

Lacquers love you too man! Very nice.

1 Like

@cosimodo, that is looking absolutely gorgeous mate, love it!

By comparison, Iā€™m still struggling with the body prep on the 250GT. I think itā€™s ready for another shot of primer now, but what a saga! Iā€™ve primed and sanded about 5 times now on the one spot (circled yellow in the pic below).


First up I think there must have been a bubble in the sprue goo, because a small hole opened up under the first shot of primer. I filled it with some MS500, sanded and reprimed, but there was an obvious difference in the texture so I did some more fine sanding and primed again. The handling cracked the join inside the circle so I had to carefully clean the mating surfaces, cement it, sand the join, putty, sand, prime and so on.

In the morning Iā€™m going to shoot primer again and see how it looks. My main aim with this build is to improve my colour coat finish to minimise the ā€œorange peelā€ and sanding required before clear gloss.

Fingers crossed, the next update will have the body ready for the colour coats.

Cheers, D

2 Likes

Michael,
Iā€™m in total awe of your detail painting of the 3.0 liter Ferrari V12 engine as it looks as real as a miniature can possibly get.
Your installation of the roll bar that also carried engine fluids took me by surprise as this is the 1st such use of any tubing in a F1 that Iā€™ve heard of also using it for that purpose, but I really donā€™t recall if back in the 1960ā€™s if there was any regulations to quantities of any engine liquids as there were so many different types and configuration of engines.

Roger Penske during his Camaro racing days in the Trans Am use to cheat all the time with running extra gas through the roll cage of Donahueā€™s car so he could burn more fuel in a given race. BTW, he also Acid dipped the body of Donahueā€™s car so it was literally paper thin, and again much lighter then what it should have been for another big advantage. The other team car was spec all the way, and since they had Identical paint schemes, he just had the numbers and drivers names changed, and ran the 2nd car through tech twice!! Iā€™m sure that the other factory teams all did some of this as well once they caught on. I only mention this as now I know where Penske got these ideas from.

I can only imagine just how difficult it is to get that massive engine/transaxle to fit into the chassis correctly as the soft White metal just bends at the slightest touch. But I have complete confidence in your ability and skills to make it happen.

joel

1 Like

With the completion of the basic body, itā€™s time for the next chapter in my build saga of the Tamiya Ford Mustang GT4.

When I last left you, I had striped the body of the ScaleFinishes Ford Racing Red paint, and reprimed in my own mixture of Tamiya Gray & White primer. A lite sanding with a wet piece of Tamiya 3,000 sponge, and when dried a once over with a tack cloth. The paint of choice was Gravityā€™s Ford Dark Lead Foot Gray, which seems like the color most opted for in all the online builds Iā€™ve seen. So Iā€™d be in very good company. Well things really didnā€™t work out quite as I had planned it.

Iā€™ve always been some what absent minded, and with old age, itā€™s just getting worse. I mixed the paint in the bottle with my brand new Trumpeter electric paint mixer that sure looks just like the old Badger one, but boy does it mix up the paint in no time flat. I didnā€™t bother to replace the bottle cap before I went to place the mixer on one of my paint shelves. Unfortunately for me, I reached right over, or should I say through the top lip of the open bottle, and thereā€™s goes a full bottle of paint. Not only did I loose all of the paint, but the clean up was a real mess and a total time waster. Needless to say I was once again really POā€™d at myself. If Stupidity was a Olympic event, Iā€™d most likely win the Gold hands down.

So now what do I do? I could use Tamiya or Mr. Color German Gray as thatā€™s the actual color that Tamiya calls out on the instructions, and I have both. But comparing them to the Gravity paint left over in the bottle close was about it, neither really matched the Gravity paint, so I once again decided to switch gears. yep, you guessed it, another change of color. I opted to go with Gravityā€™s Ford Wimbledon white as I have 2 1/2 bottles of it. Itā€™s a Ford Mustang color because on the label thereā€™s a earlish Ford Mustang. And with my super light gray primer mix, there shouldnā€™t be much a color shift if any with the White paint.

As usual, I applied the paint in 6 plus lite even coats with my .5mm Grex setup. After a few days, I rubbed out the Color coat with 8,000 then 12,000 Micro Mesh, another wipe with the tack cloth, and proceeded to use the kit decals which worked perfectly.

Boy was I surprised. They werenā€™t those old super thick Tamiya decals, but not really thin either. Still they with laid down over the compound curves with my 3 part decaling process. I gave the decals 2 days to dry, then a wash in warm water, followed by the tack cloth once again. And now came my test of the ScaleFinishes Lacquer 500 Super Gloss clear. Light, even coats with my .5mm setup where I actually lost count, but once it looked right, back into my drying box for a few days.

I was really impressed with the new Clear Gloss. Just a lite wet rubbing with Micro Mesh 8,000 followed by 12,000, then the Gravity 3 part polishing system, and finally the 1st coat of wax. I was more then satisfied with the shell at this stage of the game.

I was really impressed with the new Clear Gloss. Just a lite wet rubbing with Micro Mesh 8,000 followed by 12,000, then the Gravity 3 part polishing system, and finally the 1st coat of wax. I was more then satisfied with the shell at this stage of the game.

Hereā€™s some pictures of what the shell looks like as of now.

joel

2 Likes

Nice Joel, really looks good.
Thought about you over the weekend. Was at a trunk sale (boot sale across the pond) an a guy had a Revell 1/24 Lotus 427 S/C for sale. Snagged that puppy right up. Got home and :sob: found out heā€™d neglected to tell me that the body was missing. :sob:
Since heā€™s local and known to the group, I hope to contact him and see if he still has the body about somewhere. Otherwise, itā€™s a reminder to check the box. :wave:

Mark,
Thanks for your thumbs up, itā€™s always greatly appreciated. Got a ton still to do on the body, but Iā€™m over the hump on the body. At least I think I am. Going to spend some time starting to work on the chassis, suspension, and interior just as a change of pace.

Not sure exactly what kit youā€™re referring to, as i donā€™t recall there ever being a 427 ci Lotus. My guess is itā€™s a Ford Shelby Cobra. That really sucks about not getting the body. If the guy doesnā€™t have it, Iā€™m assuming that heā€™ll refund your money as itā€™s not a buildable kit, and he never disclosed that it was missing.

joel

Youā€™re right, donā€™t know why I called it a Lotus . :roll_eyes: Yes, Iā€™d like my money back or the missing parts. I was upfront about the missing parts on a motorcycle I was trying to get rid of. I donā€™t think it was dishonesty, just think a lot of these guys have sooo many kits (1000-4000???) that they just grab a few and donā€™t think about checking stock before selling. :wave: