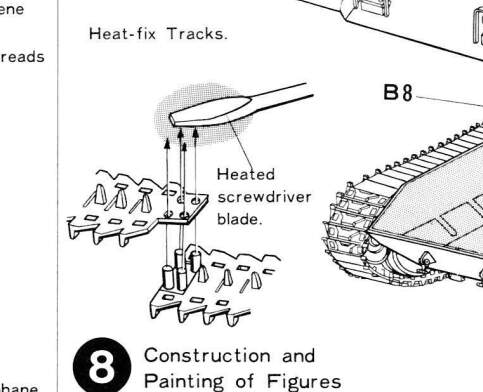
When I built this kit I followed the instructions and then I used dark sewing thread and a needle to reinforce the joint.
The track will be stretched tight since the kit was designed to have an electric motor and be able to move (toy) so you don’t need to “glue” the tracks to the wheels.
The heated tool needs to be narrow to avoid melting other details on the track,
a regular spoon (or table knife) will be too large.
Heat with a small candle, the soot from the candle will help prevent the track
from sticking to the tool.
Sometimes the instructions recommend using the head of a nail.
Hold the nail with pliers or mount the nail to a sturdy stick or piece of wood.
The nail needs to be at least 3 inches long to avoid the heat from burning into the stick/wood.
Install the road wheels after installing the tracks.
The return rollers, the idler and the sprocket (the one with teeth)
are installed first, then the tracks and last the road wheels.
The three center road wheels can be installed before the track.
Remember that the kit is designed to be motorised so the wheels
and axles are strong enough to handle the force from the tracks.
If you get a small cheap “flat” screwdriver (the size used for screwing electrical fittings) it will stand you in good stead. I tend to use the gas cooker ring, holding just the tip in the flame, then pressing onto the track nub to smoosh it like a rivet. Reheat between nubs as it cools down fast.
Those Tamiya tracks won’t be too tight (built one a while back!) so no need to worry about the axles snapping. Other kits from the likes of Italeri are a different matter - they tend to be a bit too tight in my experience.
I use a bent steel nail in an old pin chuck to melt the track joint pins like a rivet head. It’s easy to control and reduces the chance of melting other parts of the track by mistake. I heat it for each pin application and reinforce the joint with staples afterwards.
Two staples parallel to the rubber track length, then a black Sharpie to darken the staples so they won’t stand out, and mounted with the join on the top run where the fenders help hide them, especially with vehicles that have side skirts to hide the join even better.