Boy that is one weird looking rig Nick but you’re building the hell out of it!
3 Likes
Hey Matt, it is out of the ordinary ![]() so a pretty interesting challenge!
so a pretty interesting challenge!
1 Like
Very incredible building. At this rate, you may not know when to stop ![]()
3 Likes
When he starts to add the internal parts to the valve stem on the tires, it’s time to stop! Maybe.
Ken
5 Likes
Precisely ![]()
1 Like
Well guys, haven’t jumped into valve stems just yet ![]()
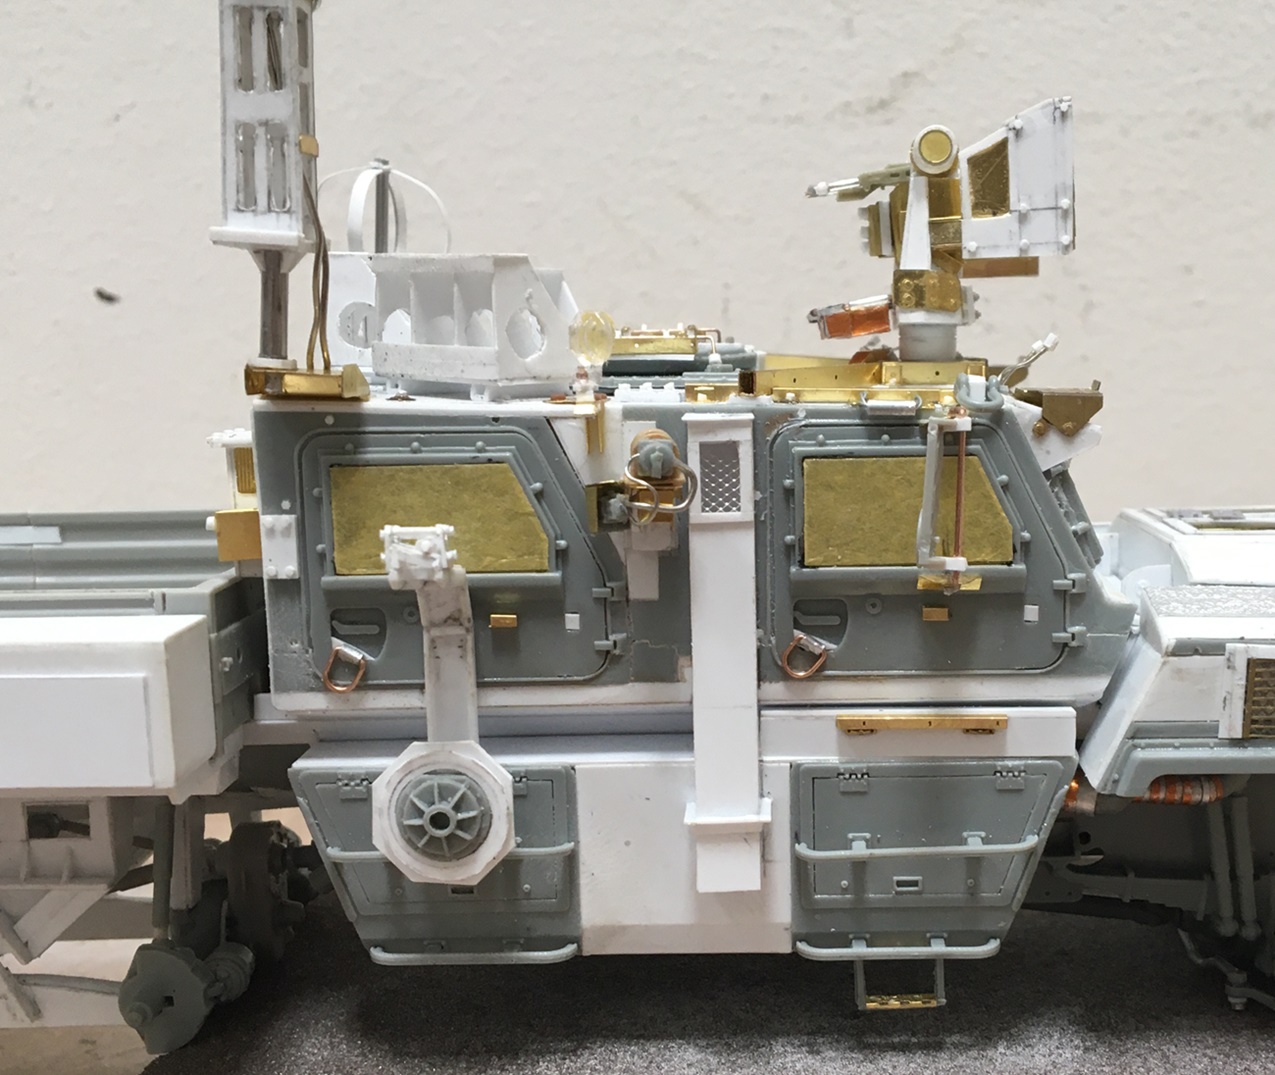
Instead, decided to try my hand at a CROWS, as the real version has one. As an early warning, don’t expect to see a beautifully crafted Live Resin version! Instead, well, a guy went about making one up using the same materials as used so far. This became quite a challenge.
After carving out the plastic piece I had firmly glued to the roof (a piece I previously wrongly guessed might be right for a base), without destroying all the etch work surrounding it, got after it:

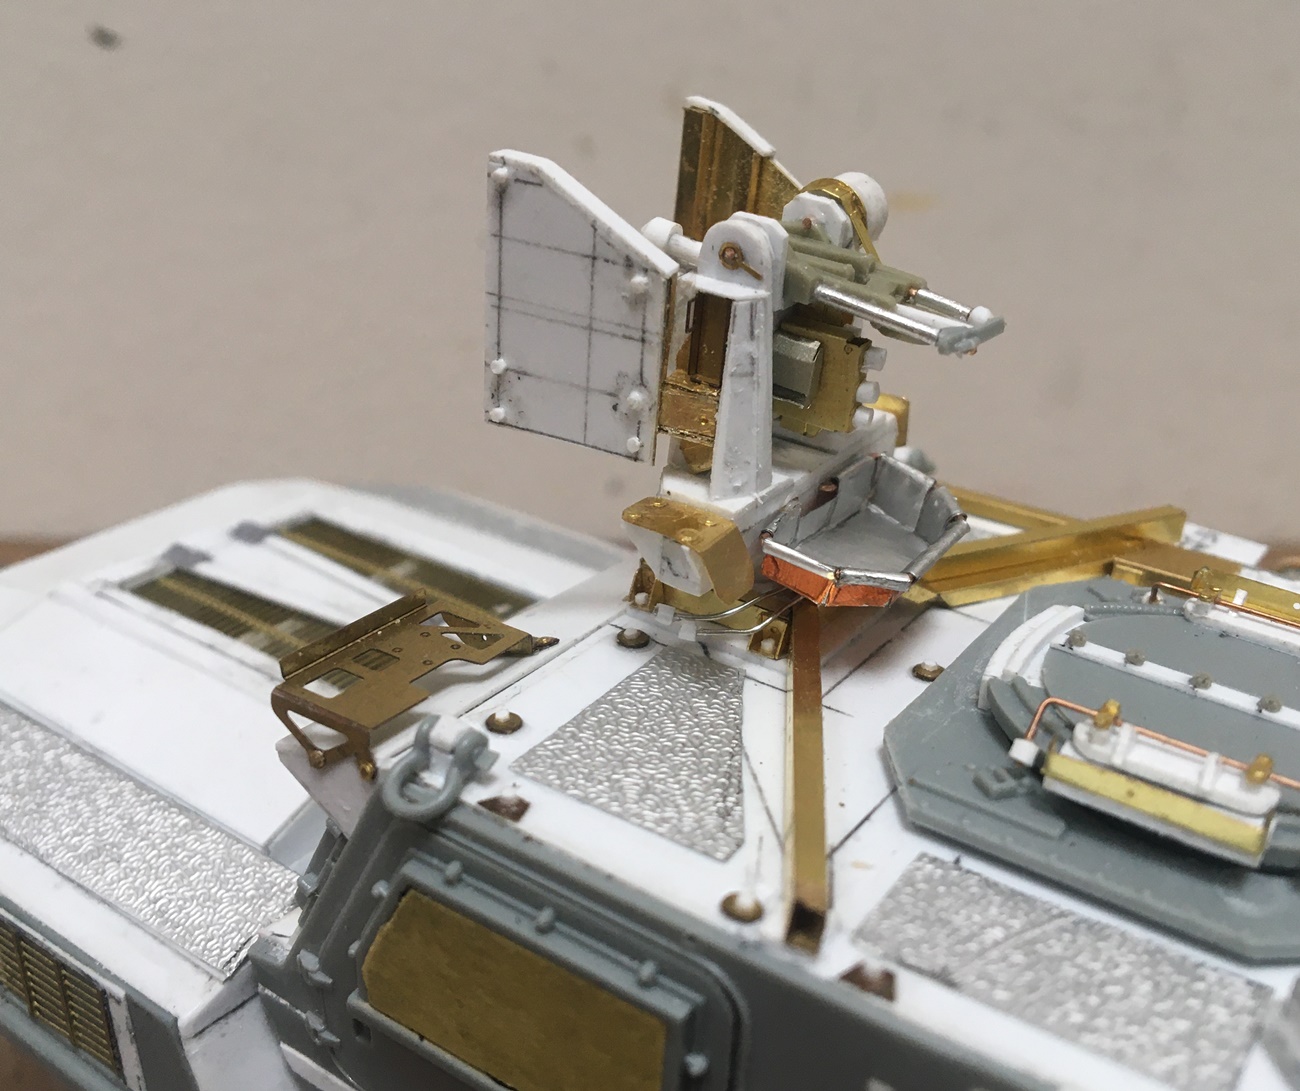
This proved to be pretty hard to build - and get to look within the realm of “right” - I looked at the kit piece I recently installed on the JLTV and several photos.
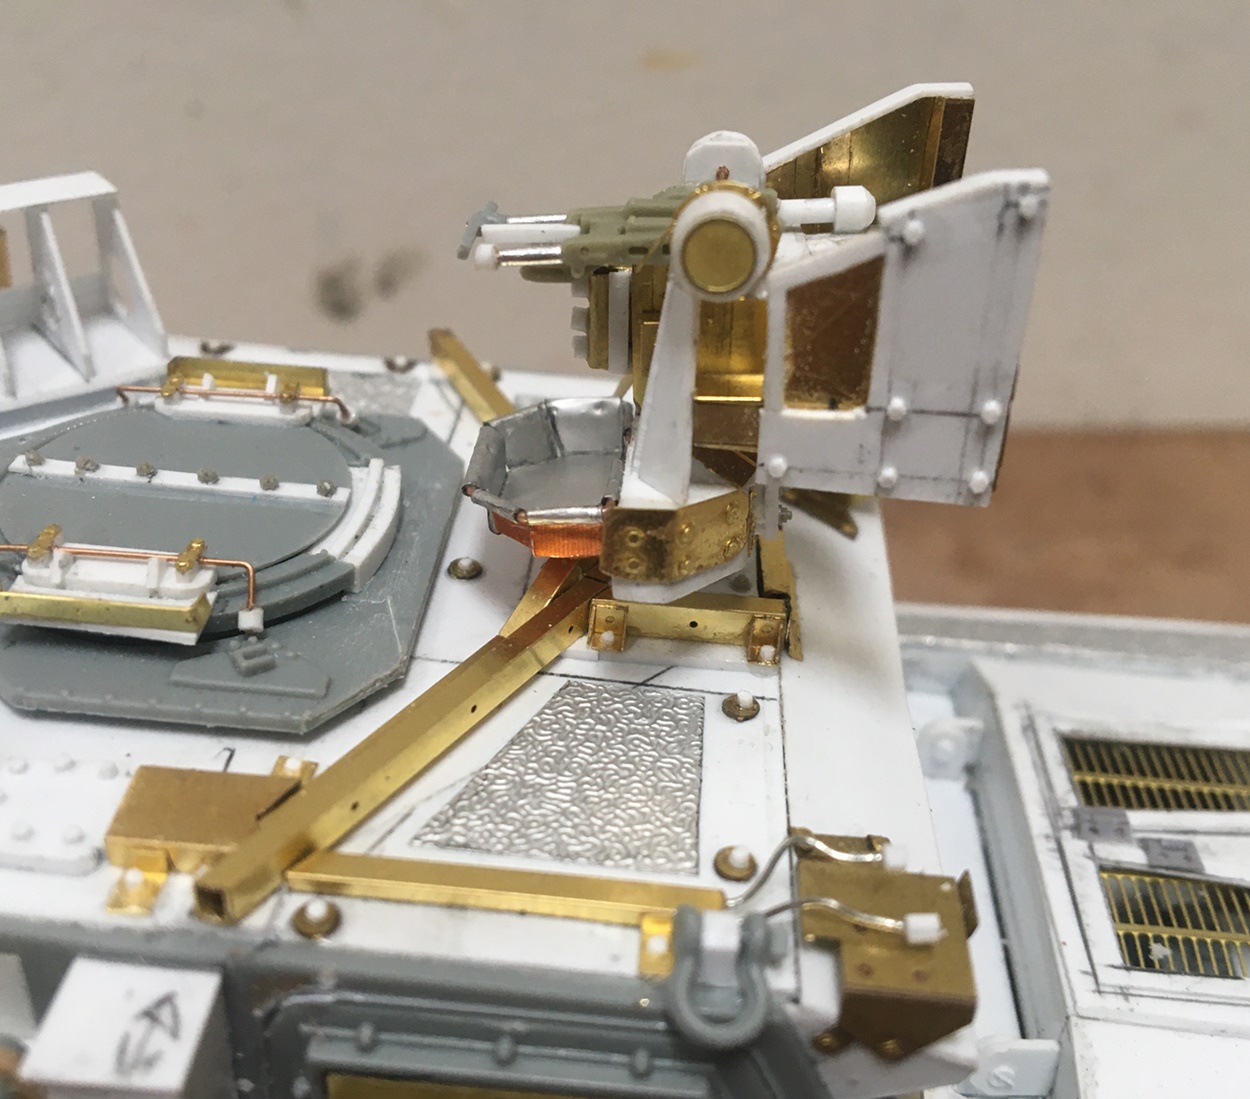
It turns out the shields on the sides are/might be asymmetric and they appear to include an inner metal frame, and what I am speculating is a ballistic exterior - I don’t know, but there are two pieces of surface material on each side.
Next, these are mounted to small towers that are of course, tapered, and the “wings” are slightly canted outward.
The unit that holds the weapon is firmly mounted to the towers, it tilts, and has an internal base that the optics are attached to.
I built a wire frame and inset a piece of carefully cut up lead foil to make the basket.

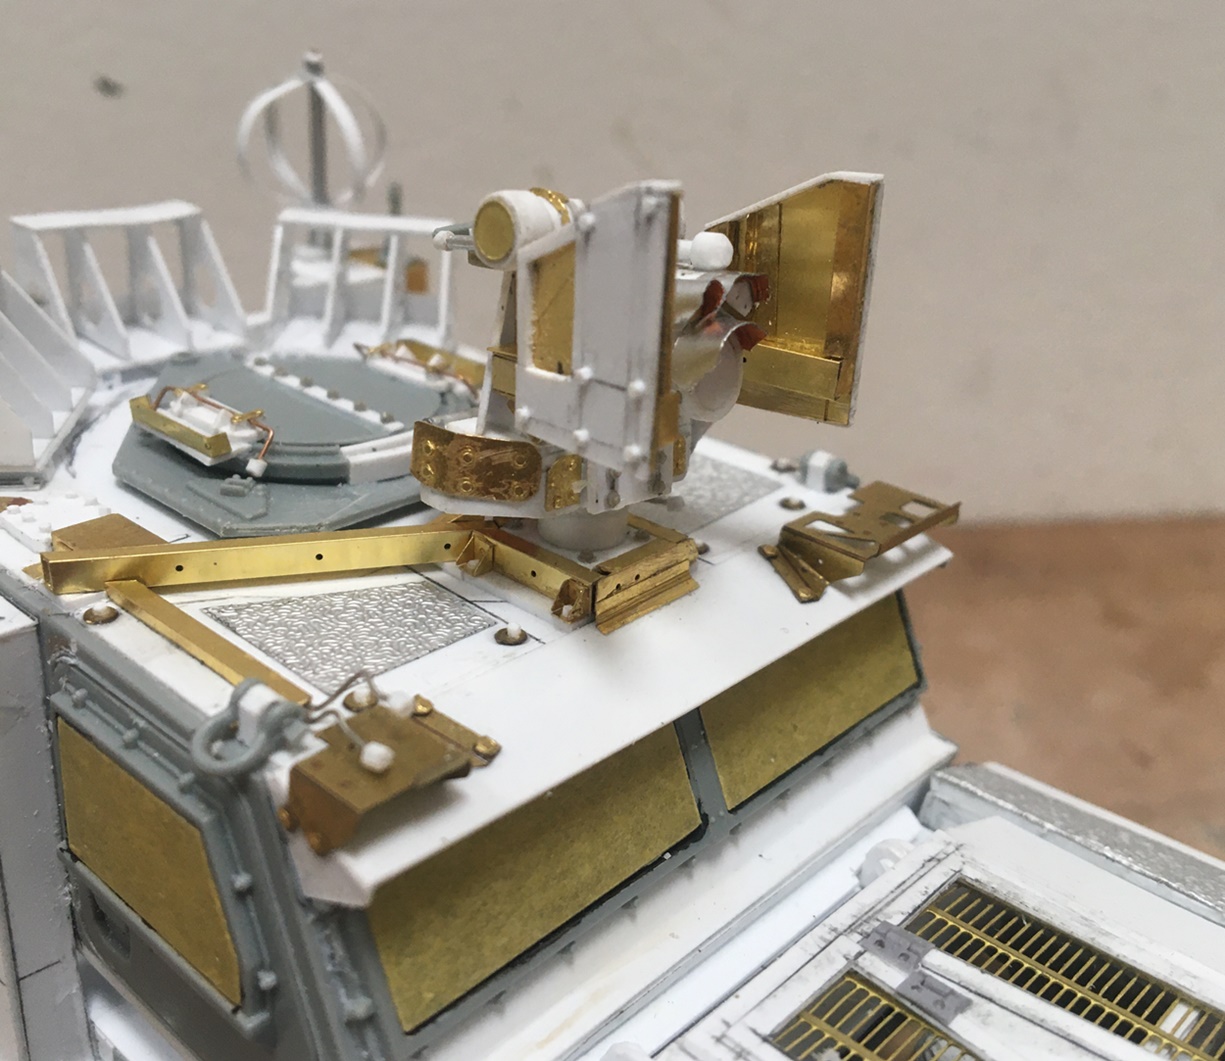
To my surprise and delight, this thing is essentially square and level, neither of which I assumed during the build. This is an odd little piece of modelbuilding, which was hard to hold and visually inspect - yes easy enough to see all of it - but less easy to tell if it was square while trying to hold and not destroy it!
Believe it or not, there are a few other pieces to make for the roof, but I might pass on them for a while as the front end needs some help.
There are some big boxes, on top of the bumper that appear to only house direction/marker lights - but they are really big ![]() so, I’ll make them, and wonder what else they might do. There’s also a housing that wraps part of the winch, and on and on -
so, I’ll make them, and wonder what else they might do. There’s also a housing that wraps part of the winch, and on and on -
So, happy Saturday,
Cheers
Nick
12 Likes
Beautiful work but, Nick, I think you need to speak to someone ![]()
![]()

7 Likes
Crazy-beautiful work. Hey Nick when you’re done could you throw together a replica Omega Speedmaster for me, shouldn’t take you more than an hour or so?
6 Likes
Happy Friday gents,
Ahh, this is indeed the project that keeps giving…me grief. Things are moving right along, but the more I review the walkaround photos from @18bravo, well, the more I see that I need to fix or replace what I did wrong…perfect. Obviously, I don’t have to do anything, except, when I started this, the goal was to make a better version than I did the last time I tried. So, the knife keeps coming out.
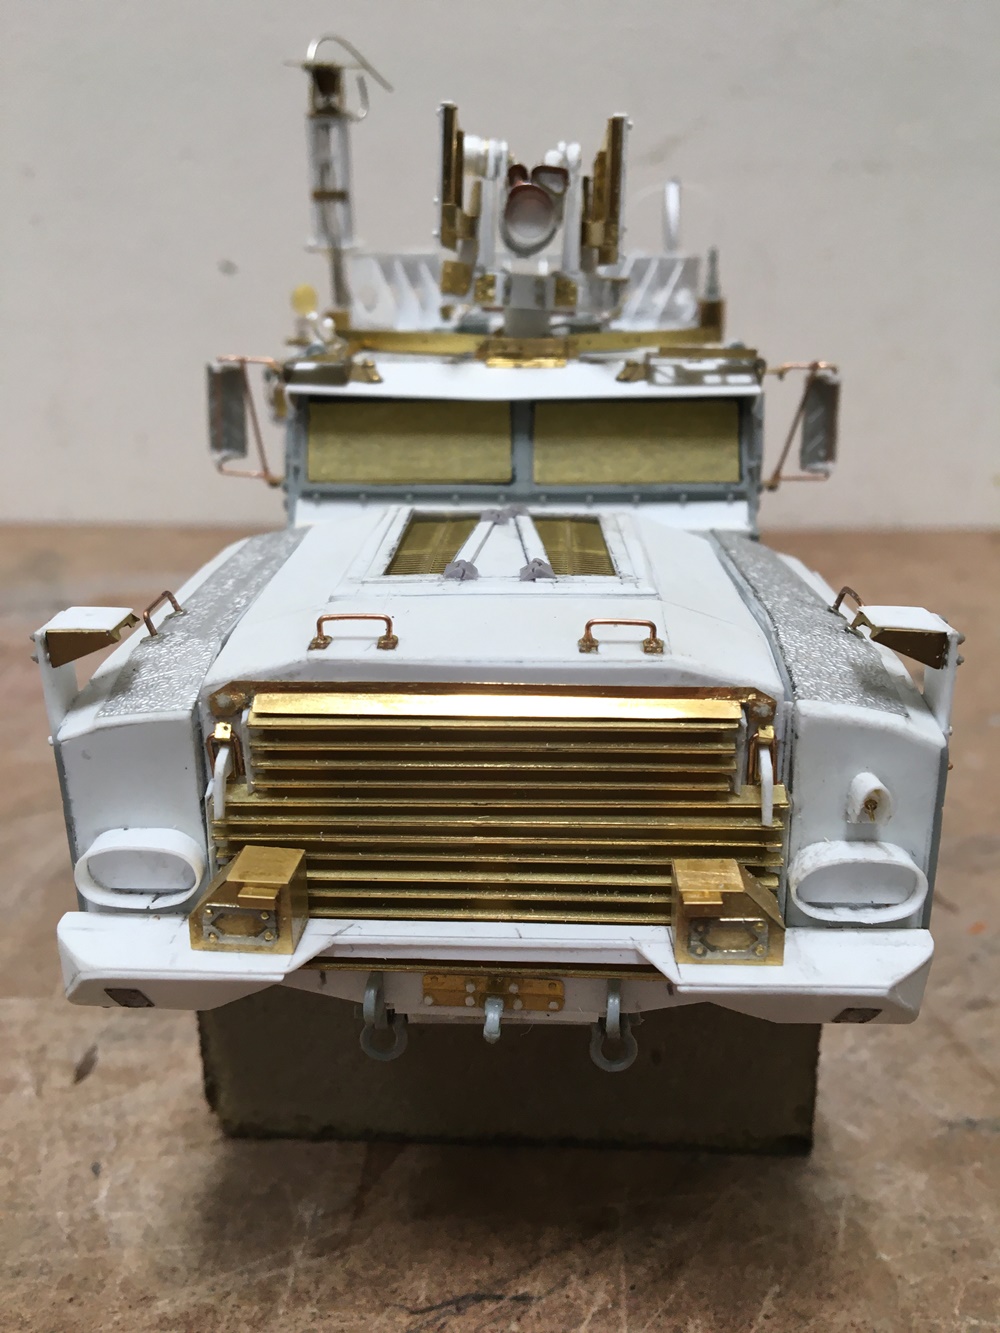
First, the majestic front fenders, and their big vents:
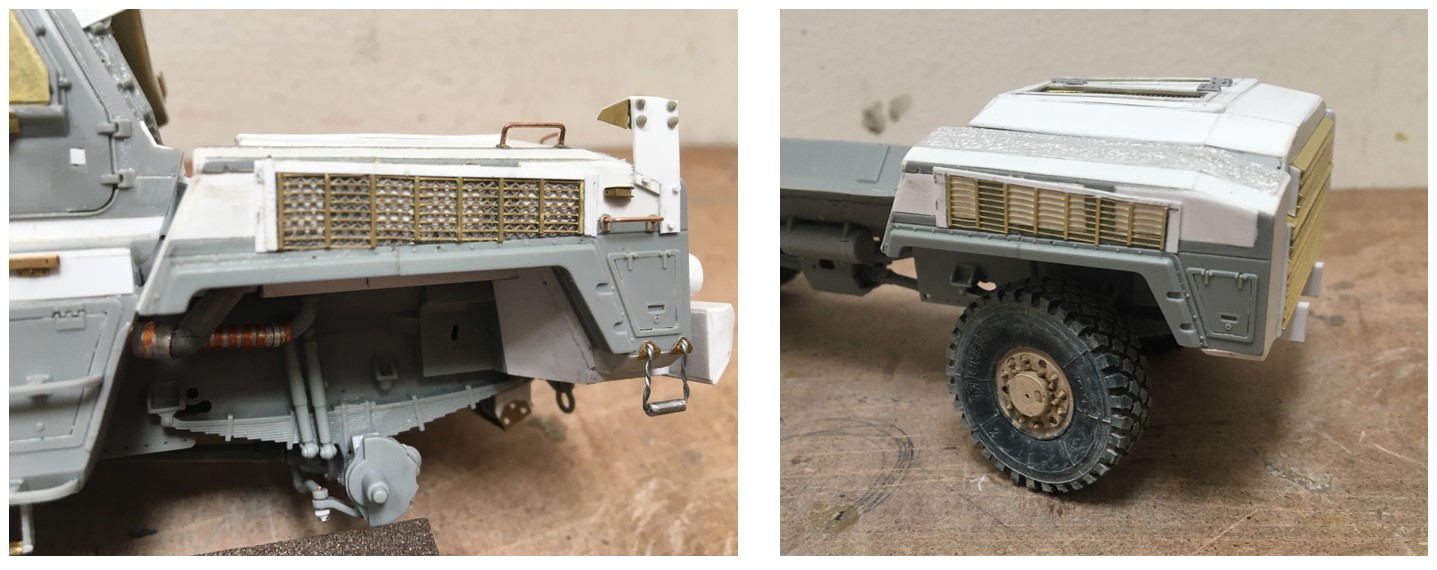
So, a real problem with my last try at this was the mediocre job I did on these big vents.
This time tho, I thought I had it nailed. The pic on the right is how it turned out, and stayed until yesterday afternoon. Ideally I would have just cut out the space behind the vent - all good. Except, what you can’t see is that inside the fender are several “ribs” that provide the structure that allows the overall shape to work - so no cutting.
That said, I really didn’t like just seeing straight through to plastic. This annoyed my enough to get after pulling the louvers off, and adding a second screen within. Tho it’s hard to tell in the photo, it looks a lot better now, in real life. And I’m betting with some paint, will look better still.
Ok - on to other exciting problems:

Well, it turns out the lower portion of the hull steps up, directly behind the alignment of the driver’s door. I figured out the importance of this “step” as I was detailing the lower hull - there is a tilt out bracket, which I think is used as a small storage deck. I made up the little deck with scrap material - easy enough, but then I noticed there is door for the fuel filler on the real truck and I was out of room… ![]()
![]() why??
why??
Well, because the hull gets bigger there - perfect. So, I made mine bigger/taller too, and added the cover to the fuel filler, and since the photo was taken, have reinstalled the bolt heads on the bracket holding the filler door. They are now evenly spaced.
Similar problem on the other side, except, the “step up” is on the forward side:
I have also been adding grab bars and other odds and ends:

I included the photo directly above because at some point, I decided it might be a good idea to fake in an engine. It turns out, with the right light, this was a pretty good idea.
Finally for today, the mirrors:
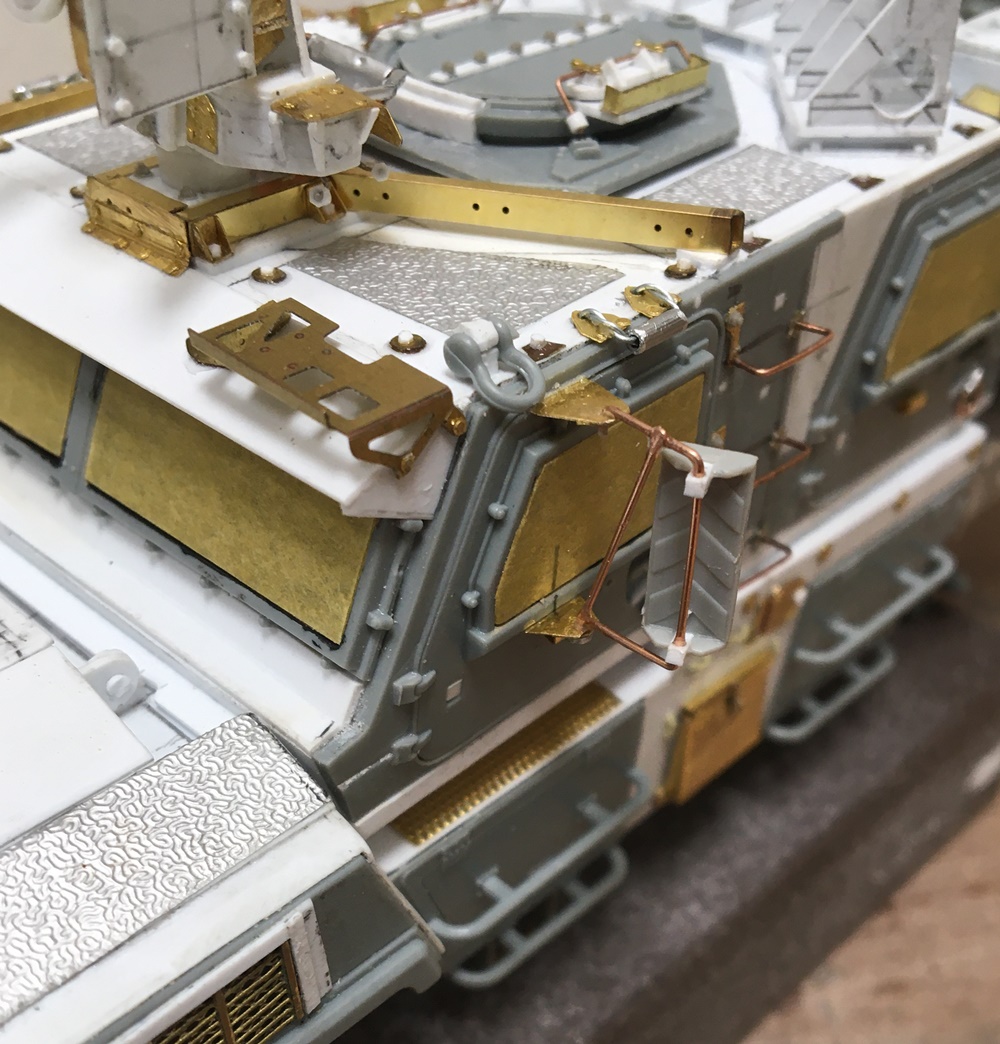
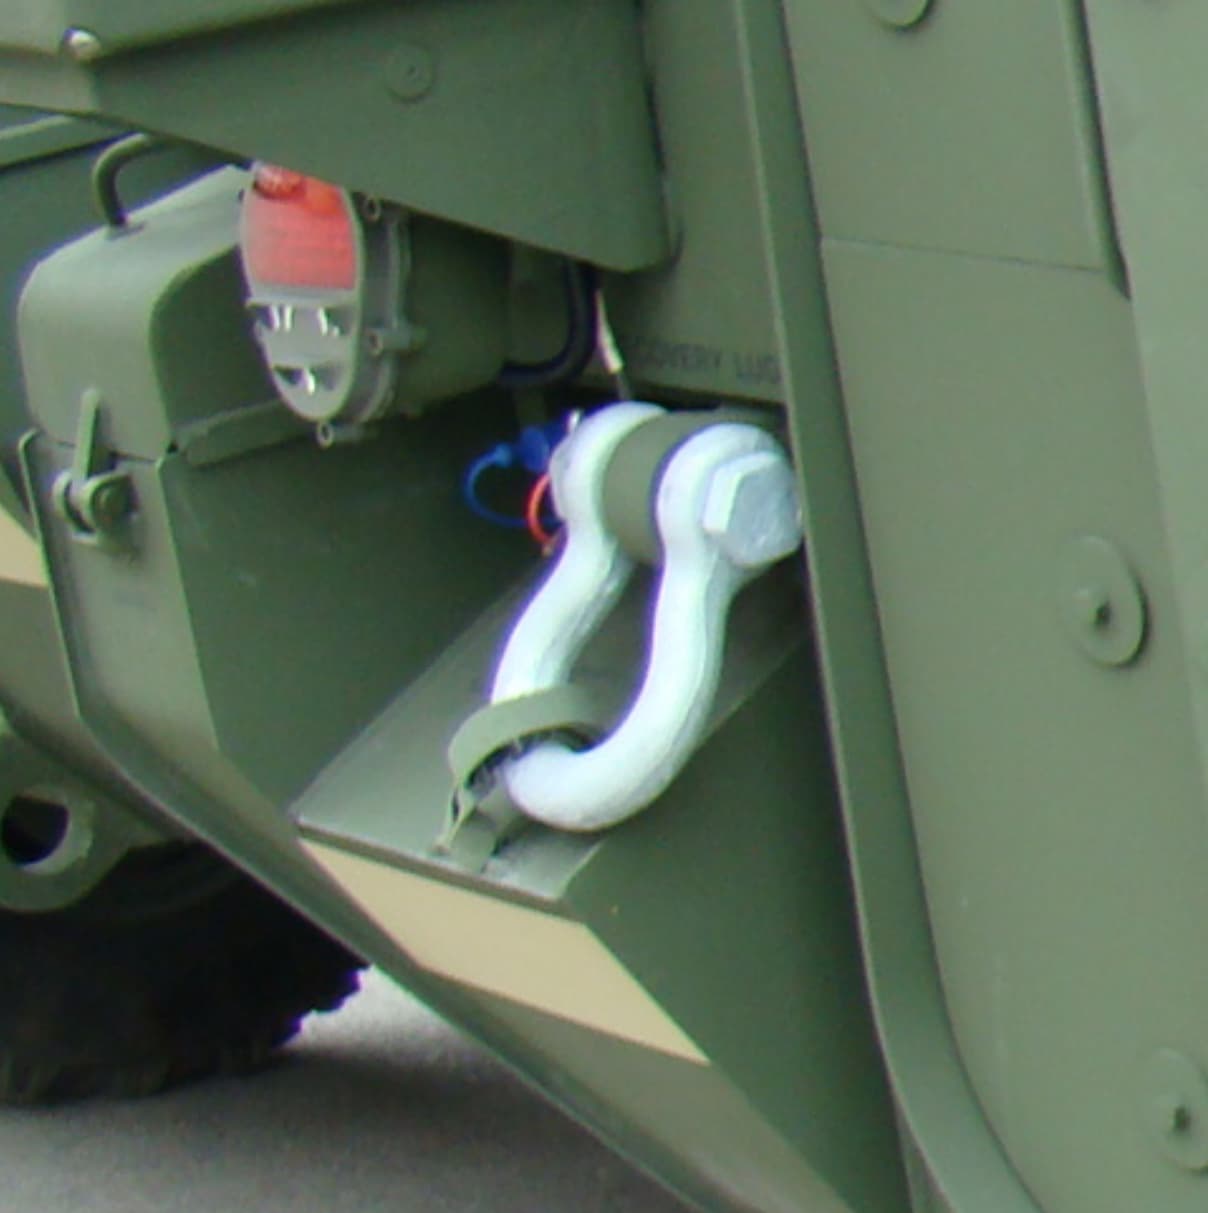
Before I go on, that seam on the shackle…very nice. I’ll try and scape the seam off. You can also see another of the various grab bars, right behind it. It turns out this truck has several of these, which are hung on braided cable, now, mine does too.
Back to the mirrors. I was hoping I might be able to use the parts from the M1083. Well, I used the mirror, which I added some really small evergreen to for mounts, then went on with wire and remnant etch. This took some patience, but it’s done now!
Ok, happy weekend, and thanks for having a look,
Cheers
Nick
15 Likes
Very nice so far. As for the seam - not so fast! This is what I found on my Stryker walk around after less than thirty seconds of searching, and I know I have some that are far worse.
Most of the shackles have some sort of seam however slight, but some are truly monstrous.
4 Likes
That is perfect! No scraping - it’s getting hard to work on the project as it’s now hard to hang onto without breaking stuff off - scraping away is not something I was looking forward to - thanks!
Nick
3 Likes
… about a king-sized bed. ![]()
![]()
Crazy cool! ![]()
—mike
3 Likes
Totally impressive!!! Great scratchbuild skills!!!
2 Likes
This is quite a monk’s work but turns out fantastic!!!
3 Likes
Beautiful , outstanding , complicated , intricate , work , from one miniaturist to another !!!
Really man , that’s some very cool work !!!
5 Likes
Hi model builders,
Seems that it’s time to stop adding things to this truck and paint it up - here are some overall images of how it turned out:
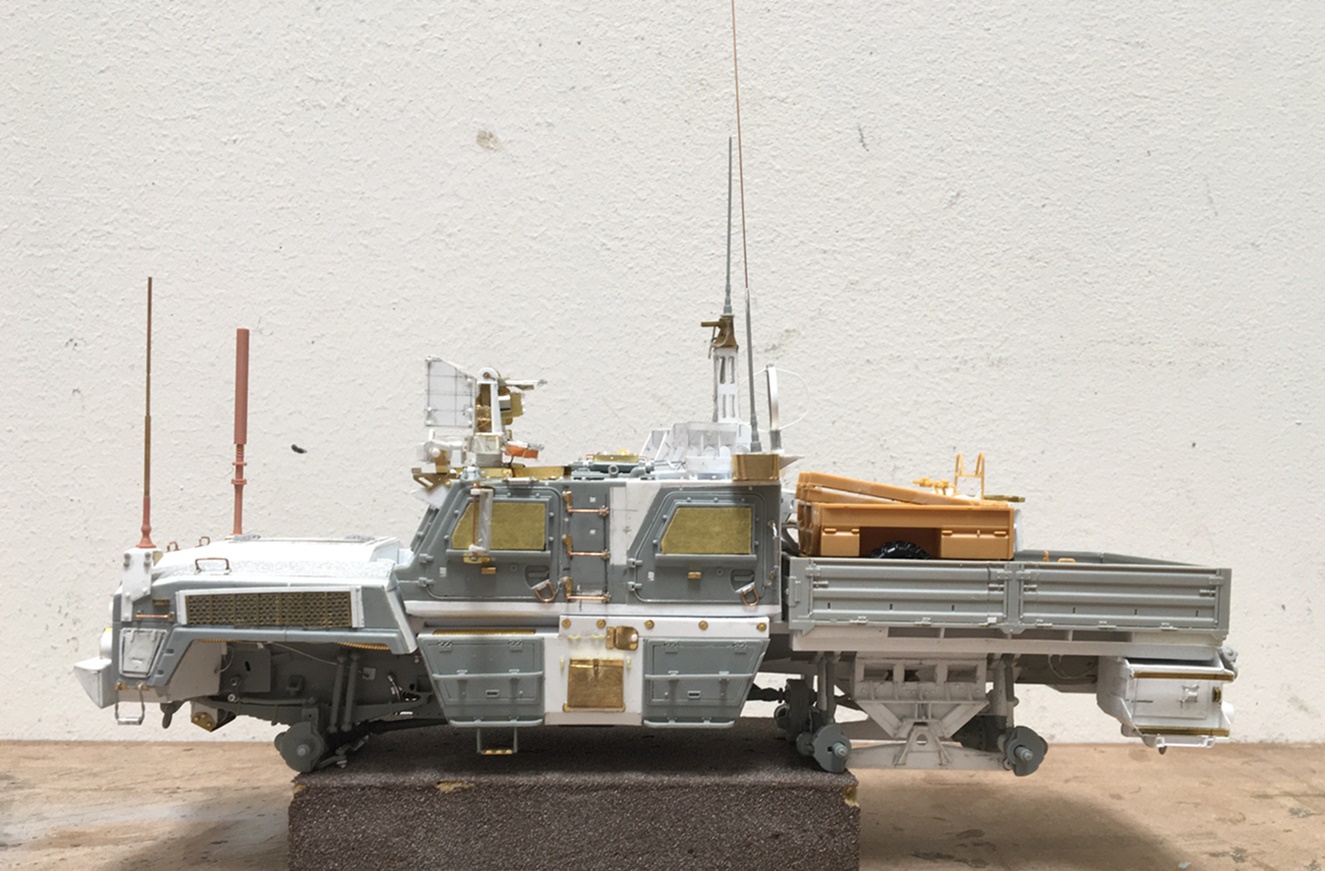

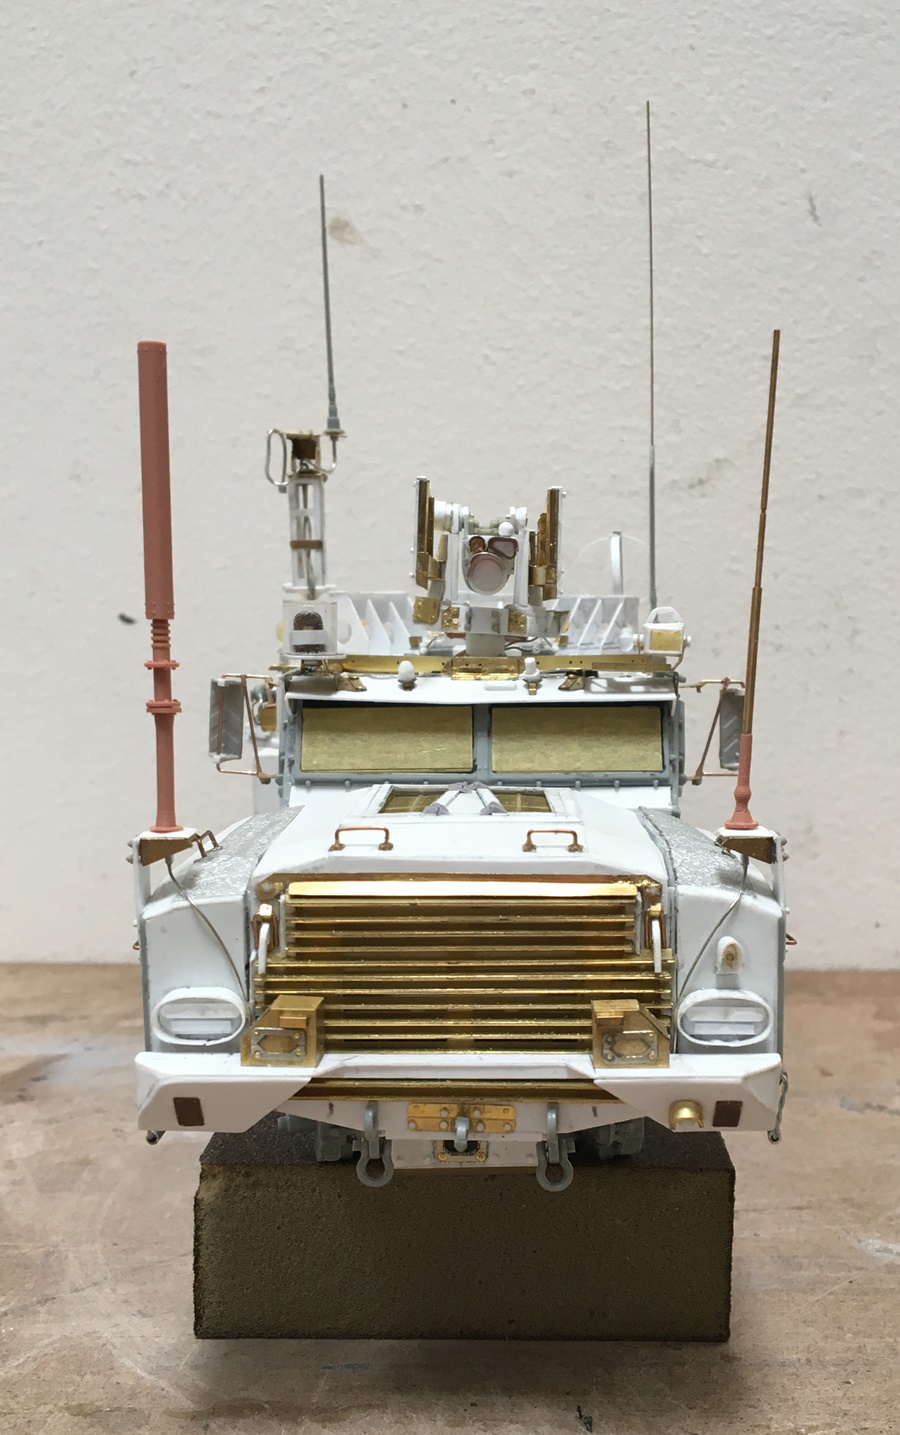
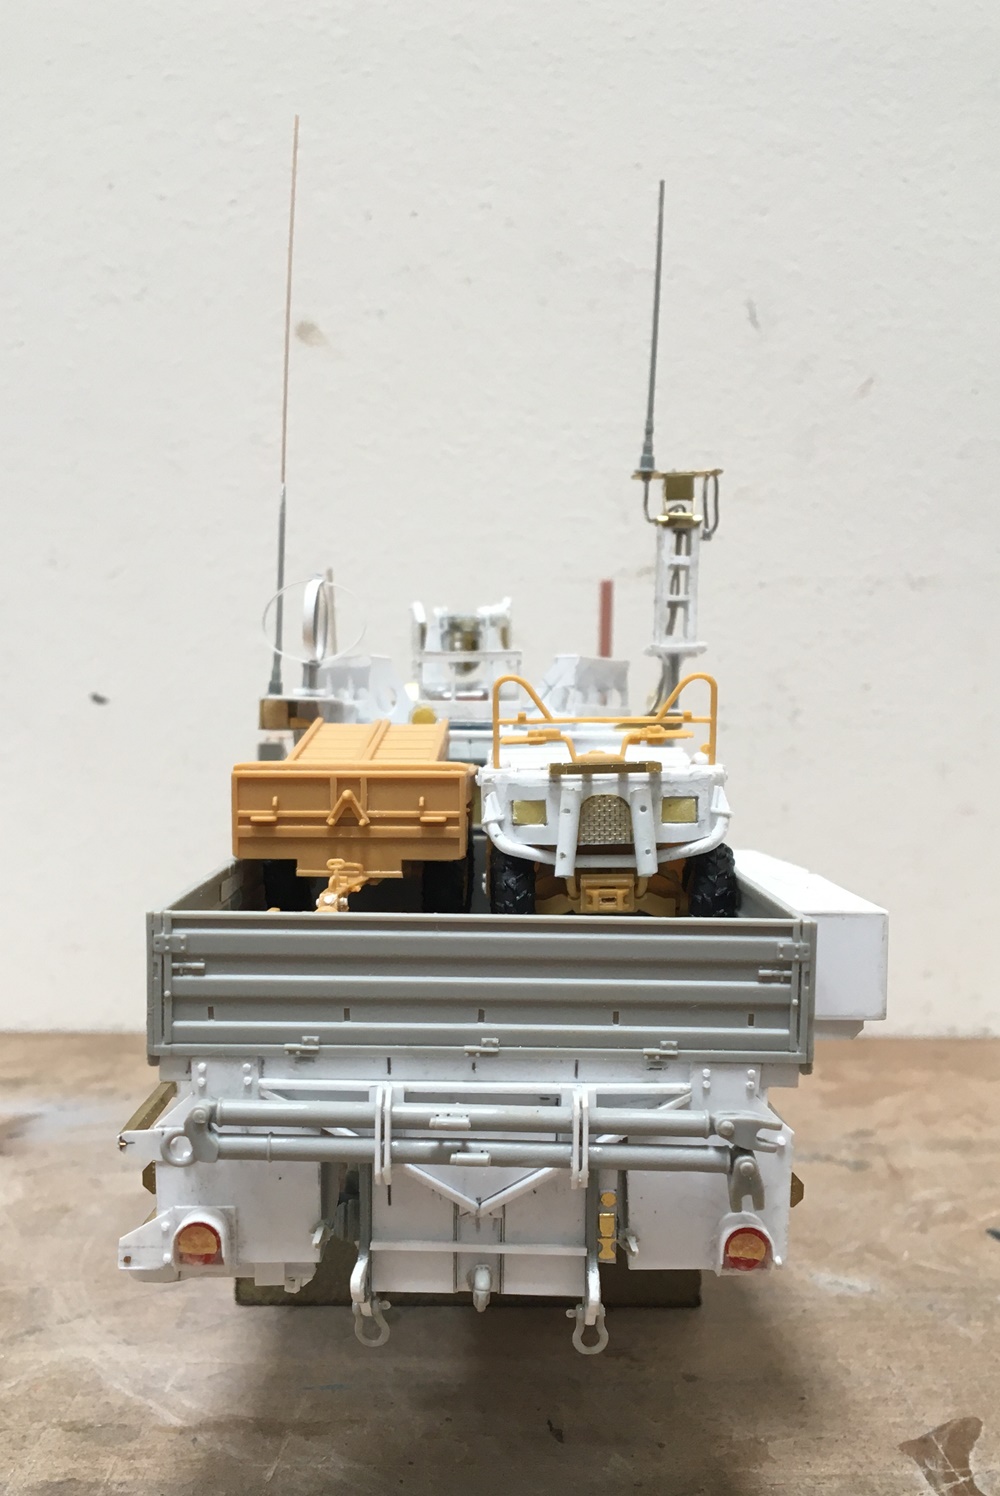
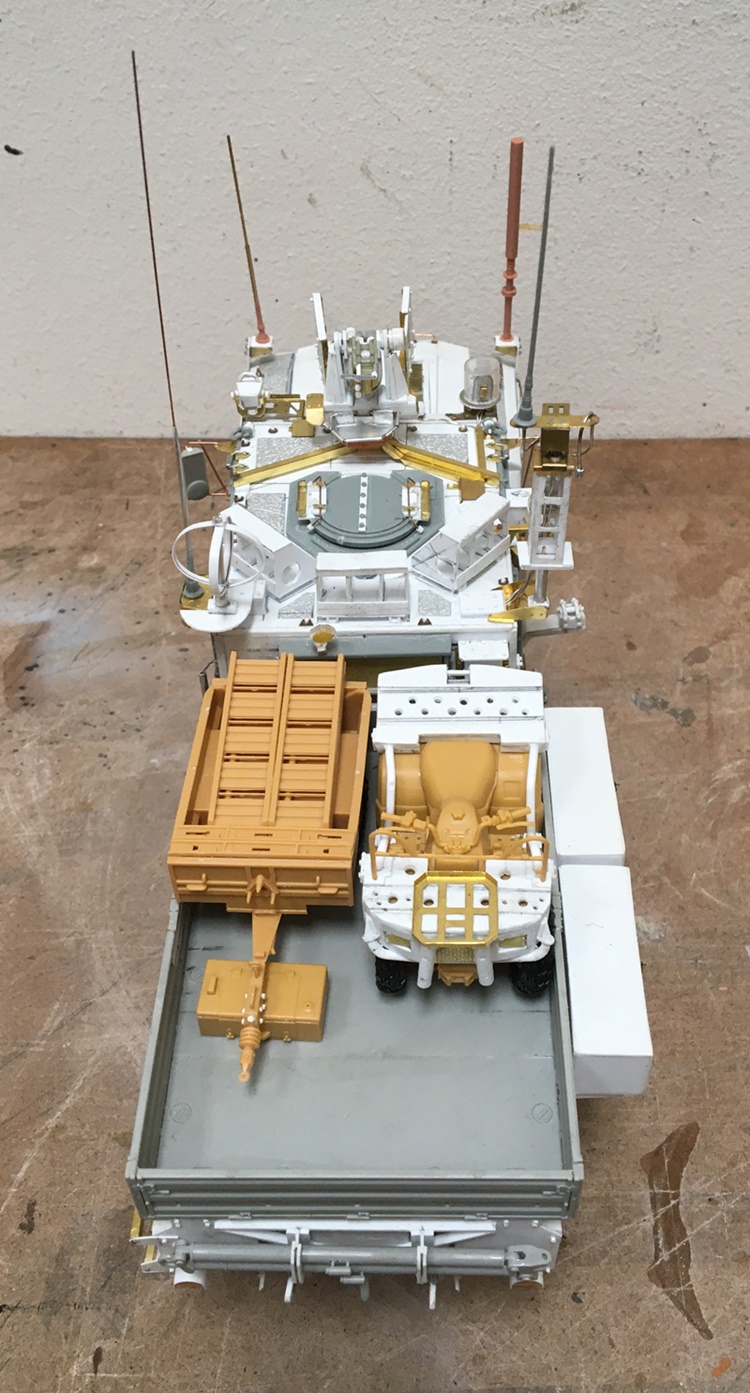

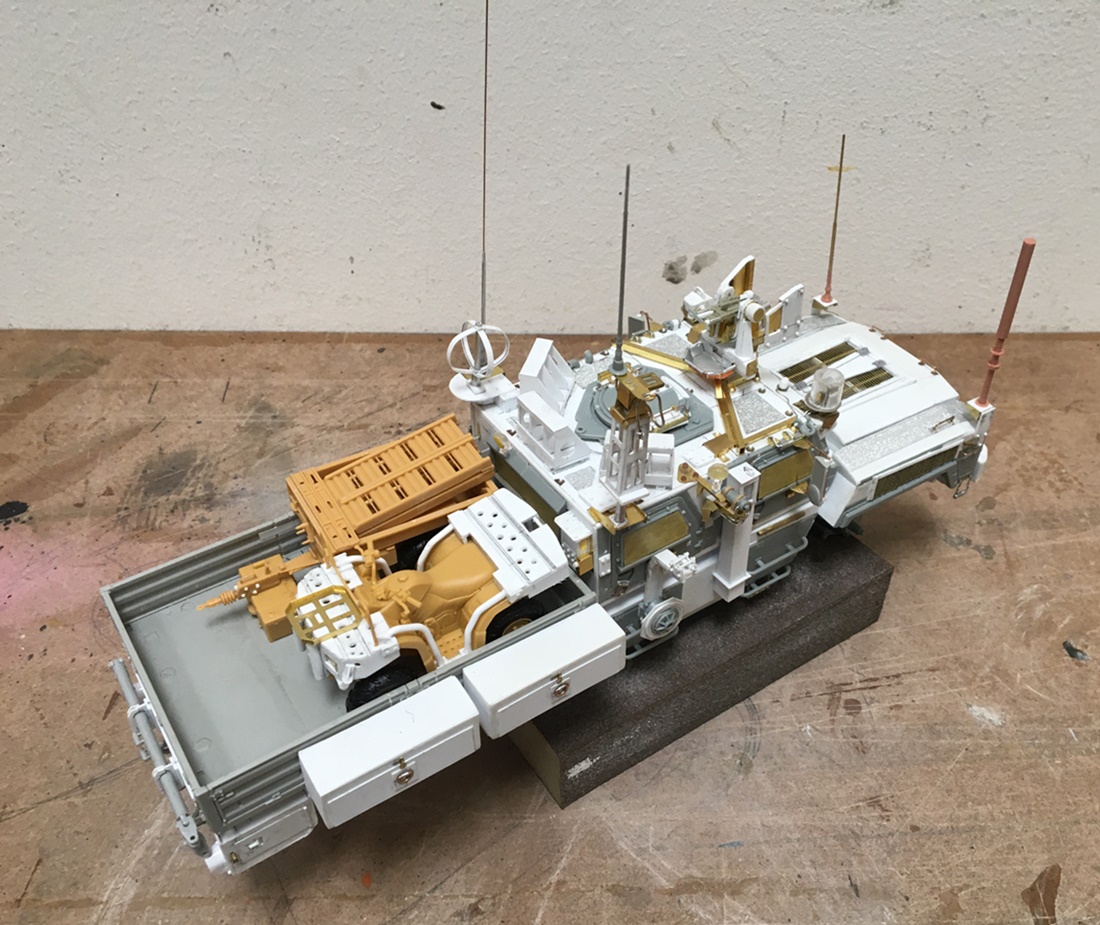
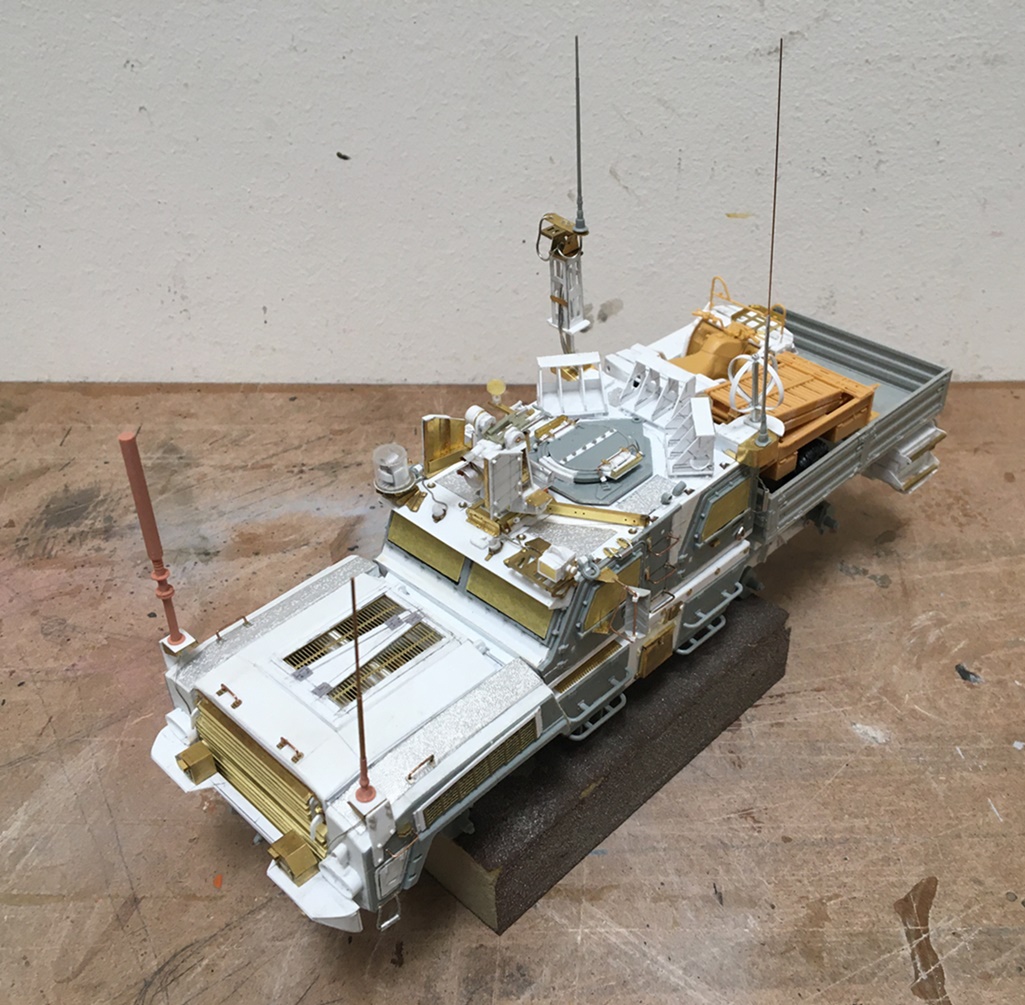
Since the last post I added a variety of sensors and parts over the visor and a variety of other parts lost in obscurity. Also made the quad and trailer - I’m not sure if I will add more to the bed or not. I think there’s plenty to see as is. I might try and bend the left front antenna straight, but might let it go - I don’t want to snap it off!
Thanks for having a look -
Cheers
Nick
16 Likes
Awesome! ![]()
2 Likes
Magnificent!
2 Likes
I would have said that about 200 or 300 parts ago!
Ken
2 Likes
A work of precision Art, in that rare category of “It’ll be a shame to paint it”. And it looks so hefty, by the time everything’s done maybe approaching scale-weight?!
3 Likes