Great, thanks! Hopefully I can use the Academy part as a guide to make a new one for the Tamiya kit.
1 Like
Unfortunately, Academy missed this part and still has laterals in their M113A3 “Iraq 2003” kit. They used the same basic interior sprues as their earlier kits. All they added on the interior is the Kevlar panels on the same sprue as the new exterior parts.
2 Likes
Bent solder, styrene rod. A few other bits of styrene. You won’t even see the mount from the top.
Nice edit by the way, Gino. ![]()
2 Likes
@HeavyArty, @18bravo, Thanks! I don’t know how much of the interior will be seen. The rear ramp on both kits are workable but won’t really have it open and I don’t plan to keep the driver’s hatch open either. I am only going to have the commander’s and rear troop hatches open. I might use the Tamiya figures in one of them. I will just do a basic steering yoke as simple as possible.
1 Like
Change of plans. The Tamiya M113ACAV is now going to be the M113A2 from Just Cause. I will be using the Tamiya interior and adding the Academy internal fuel tank. The Academy internal fuel tank is from the M113A3 kit. I also used the rear fenders from the Academy M113A3 kit. Still a long way to go on it.


The Tamiya M113A2 Desert kit is now an M113A3 from OIF. I am using the BMG shields from the Tamiya ACAV kit. As with the one above, still a lot more to add to it.


4 Likes
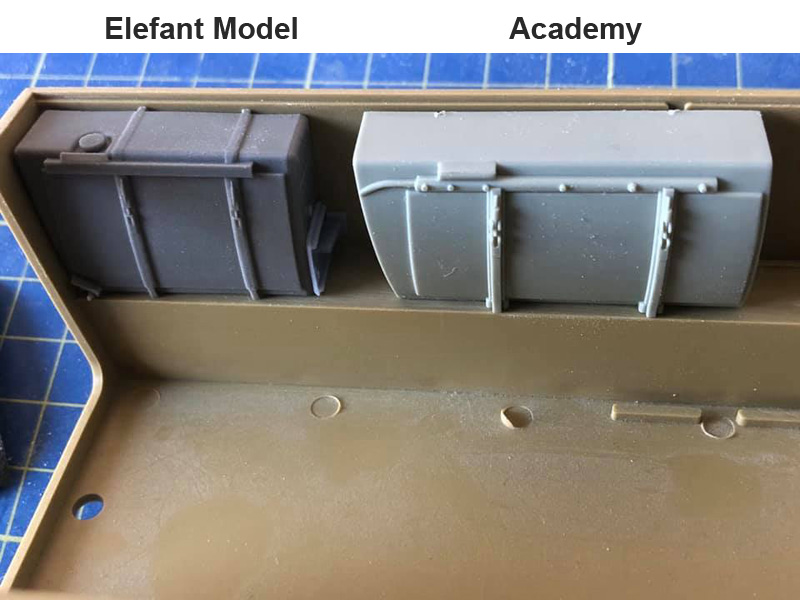
Here’s a side-by-side view of the Academy kit fuel tank and a replacement one from Elephant Model :
if you decide to correct the kit part…
H.P.
3 Likes
Thanks! That is a big difference. I do plan to have the troop hatch open but I probably won’t correct it. I don’t do shows or contests so the Academy part is good enough for me.
1 Like
You won’t see the filler cap in any case. A little judicious sawing and shortening. Save that money for beer.
It looks like one cut in the rear to remove about a kerf’s worth. A little more from the center, and a little in the forward part. The whole thing ends just short of that ejector pin mark. That’s assuming
Elefant got it right, and we know how that can go…
2 Likes
I probably won’t do any corrections. The troop hatch will be open on mine but probably won’t see much of the inside.
1 Like
Removed the upper hull fuel filler cap on the Academy M113A3.

3 Likes
Does anyone have a good picture of the top of an M113 (or related) vehicle showing the tools strapped in place? (Want to get the straps right.)
1 Like
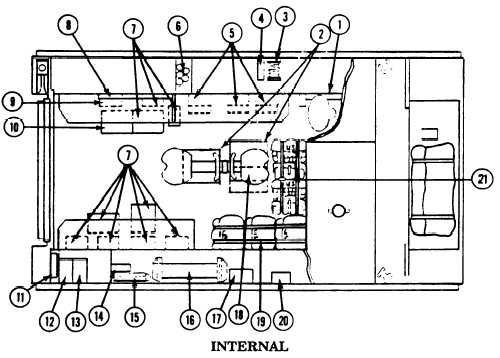
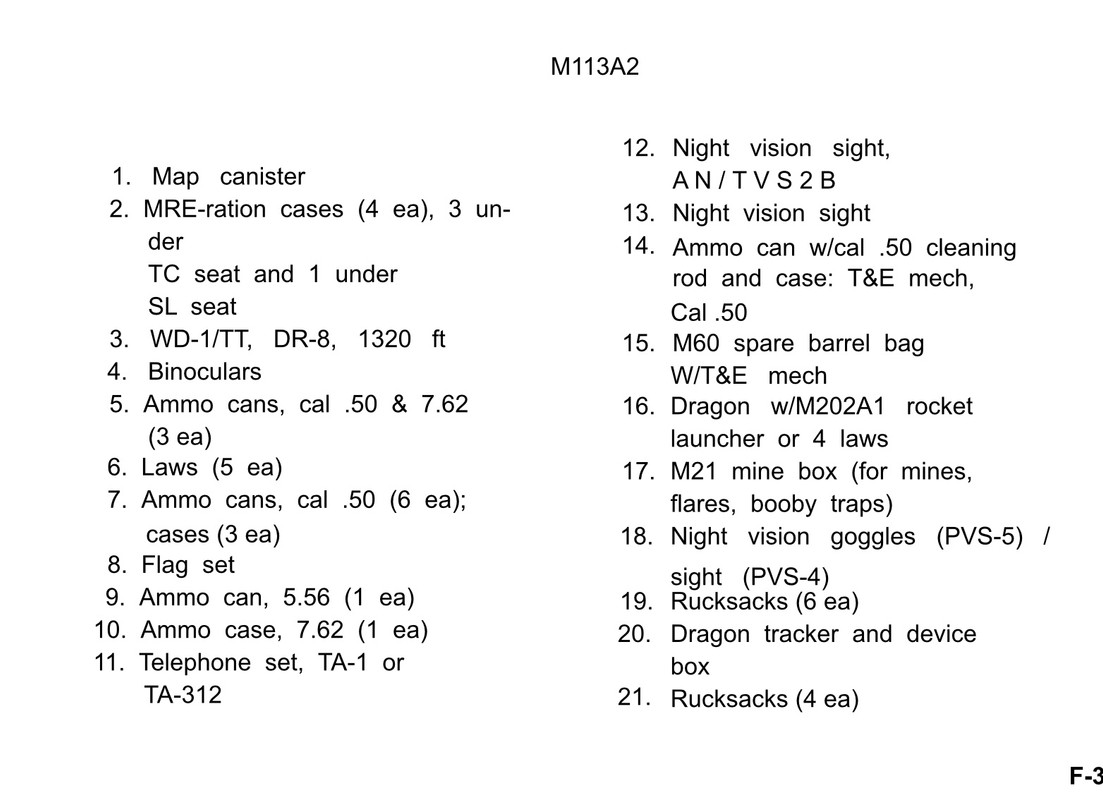
This is the load plan from the operators manual. Spare Dragon rounds go on the right sidewall.
3 Likes
@Damraska I can’t find any images showing the tools strapped in place but this Prime Portal link shows the top where they would go.
This link is to someone else’s build showing the tools strapped on. He said it was a Verlinden set. The image is shown about 1/2 way down the page.
This is the image of their model showing the tools strapped in place.
2 Likes
@Stikpusher Thanks! According to your diagram, the image below shows the area the extra M47 rounds would be stored? Do they just use regular tie down straps? Image found on Prime Portal.

1 Like
Yes, standard GI cargo straps would be used to secure the stowed rounds in place. Interesting how some pioneer tools are tied down in that area on this track in the photo, they belong on the top deck behind the cargo hatch.
3 Likes
@Stikpusher Thanks again!
Here is another image from Prime Portal showing more tools strapped to the wall. I am guessing those are the same type straps that would hold the extra M47 rounds? I could make them from tape.

2 Likes
Motor pool theft was and always will be a thing.
3 Likes
Yeah, you never attach your BII on the outside of the vehicle where they “belong”. They will walk for sure. You always stuff your tools, tow cable, etc. inside in a corner so you have it to turn in later and don’t get Hand Receipted for it.
3 Likes
Oh yes, I know all about the “undocumented” equipment transfers and storing the stuff inside locked tracks in the motor pool. But when heading out to the field, our pioneer tools were always strapped down in their assigned spots.
5 Likes
Regarding the two different size fuel tanks, the gasoline engined M113 had an 80 gallon fuel tank, while the diesel engined M113A1 & M113A2 have a 95 gallon fuel tank. Check the data tables here
2 Likes