Some really tidy work going on here, top notch stuff!
Lot of impressive work here Michael. I bet the side pods and their brackets were difficult with more fussing to come when it’s time for bodywork. Well you knew what may lie ahead when you signed on … LOL
Richard
Michael,
Extraordinary dealing on in the engine bay as from what you’ve said and the pictures, there’s literally not a drop of extra space anywhere. The exhaust headers fit like a glove and both have the same exact alignment. I’d say you did a perfect job on them. And as Richard has mentioned, those side pod supports could have been tricky as well as fiddley to align each set of 3 supports, but you nailed them perfectly.
joel
Thanks for that David. I am glad you like it.
cheers
Michael
Richard, I am pretty sure it’s why I signed on! ![]()
cheers
Michael
Thank you Joel! I have a question related to the sidepods which actually has nothing to do them but is related. I have to fit the skirts and and body panels before attaching the whole mechanism. So while at the LHS I saw some Tamiya LP-9 clear and thought that I would try it since you spoke highly of it. Can you remind me of your approach to its application?
cheers
Michael
And further to Richard’s point about the challenge of these kits, and i know you love these useless numbers, but here we go.
Everybody loves a set of fat Goodyear slicks
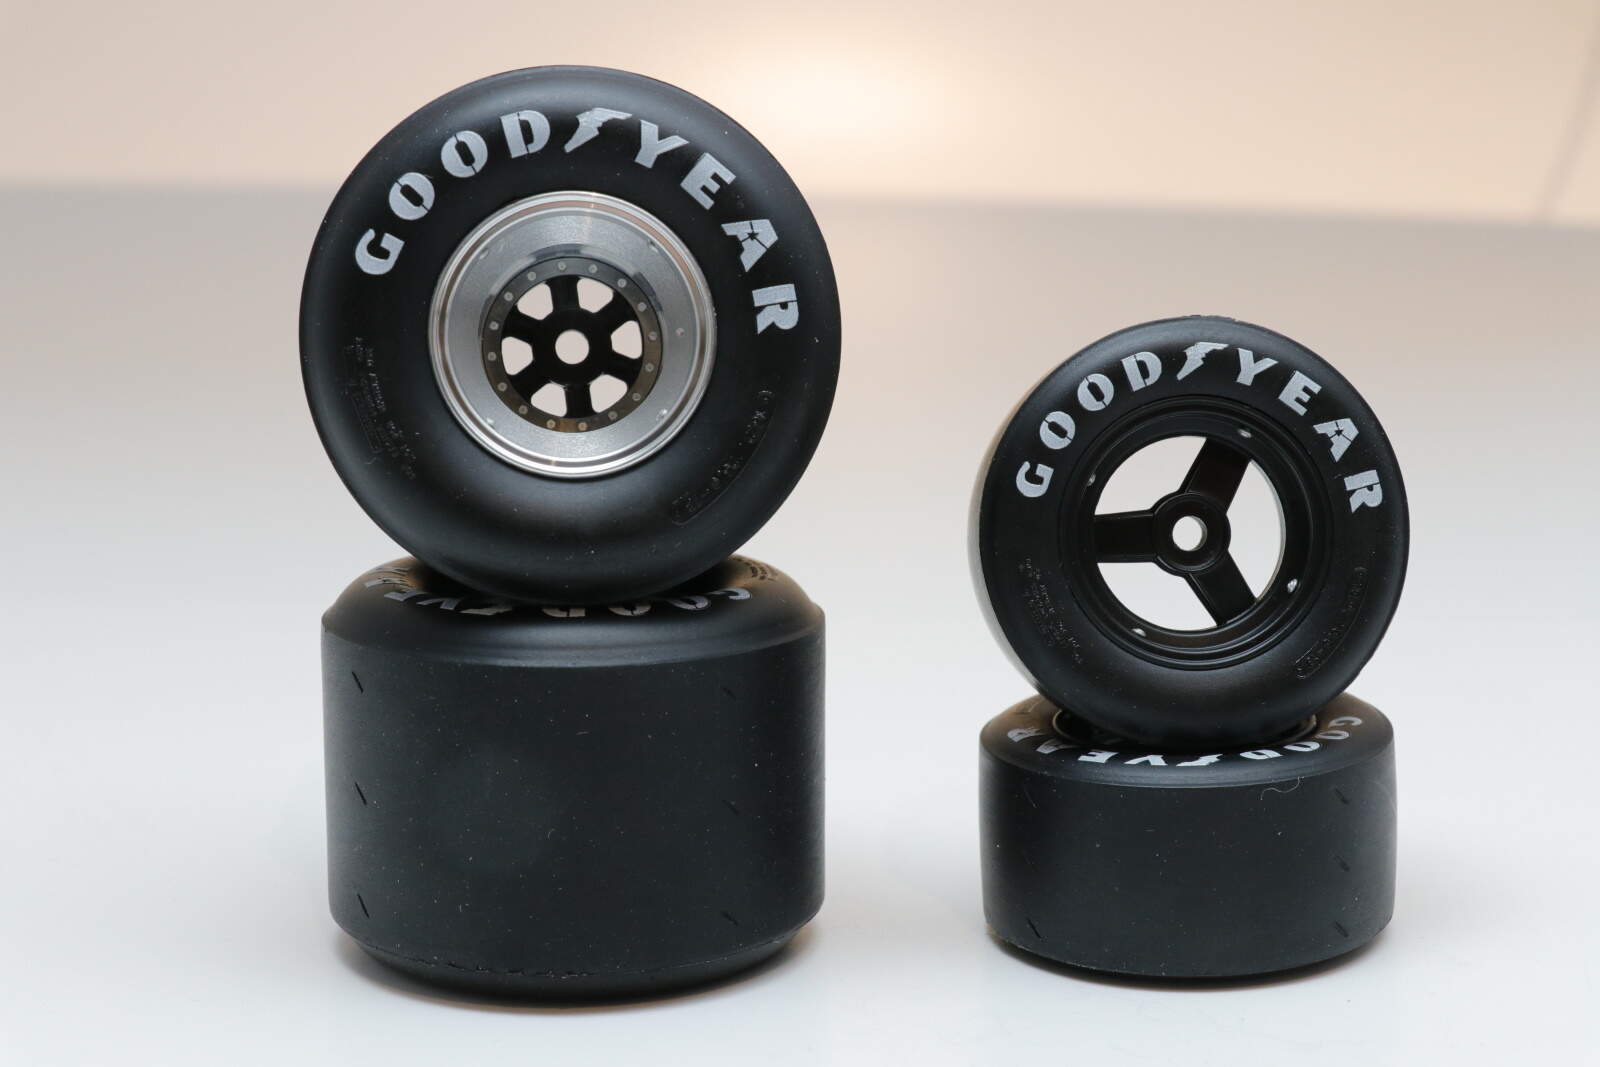
Now if these were Tamiya, you would have a two piece hub and a wheel, so 12 parts. For the MFH version, it took 74 parts for four wheels! Somewhat bolstered by the fact each rear wheel hub centre took 16 bolts to bring it together!

cheers
Michael
3 Likes
Michael,
Those wheels are spectacular. Never saw a set of Tamiya wheels that good. Those bolts and nuts are a real game changer. Besides, where else could you get to spend literally all day just building 4 tires and wheels?
As for the Tamiya LP-9, I thin it 50/50 with Mr.Color Leveling Thinner #400 and air brush it @ 20 psi or so. One good tack coat, one heavier coat, then 2 wet coats. You might want to try to thin the last wet coat another 10% or so. I also prefer to shoot my clear coats with a .5mm setup, but that’s just me.
joel
Somewhat off subject and not meant to derail an excellent thread but I see MFH is about to release their latest subject … Auto Union monster 16 cylinder mid engine GP car . Images seem to indicate that this one will have a resin chassis rather than white metal. Hmmm.
Yes, I saw that. It is definitely one I want - I’d love to build that engine. I am not sure from your Hmmm whether you think that is a good thing or a bad thing. I think the resin chassis is a good idea. I have never had an issue with their resin (except for hearing about your mis-formed body shell louvres) whereas the three kits that have had w/m frames have required considerable adjustment. When I look at your Barchetta all the major components are resin, which I hope makes it an easier build than the Alfetta.
I think the white metal works where strength is required, engine, suspension especially which was always a flaw in the Tamiya 1/12 kits. It also polishes really well, so good for that polished metal look or even the metallic finish as per your BSA single.
It’s great to have these conversations since I don’t know anybody else who has built these kits and understands the challenges.
cheers
Michael
I’m all for them using resin if it does the job better - and a straight chassis is certainly better than a bent one !
As for the strength issues metal rod or structural shapes could be cast in the rails as reinforcements.
I wonder if they are hesitant to use resin in place of white metal at times for fear of some believing it “ cheapens “ the model . I am not one who thinks that way . Like you , I like the white metal where it can be finished to replicate metallic surfaces.
Back to the Auto Union car for a moment. Very unusual engine. Single overhead cam for two banks of cylinders.
The cam acted directly on rockers for the inboard intake valves and had nearly horizontal pushrods for the outboard exhaust valves . I don’t think this arrangement was ever used before or since . I seem to recall that dual rear wheels were tried as well . I wonder if MFH will include that as an option or later release.
Cheers- Richard
I just took a look at the MFH prototype, and it’s certainly an era that’s been neglected for the modeling community, so it should be a popular kit for the shall I say older modeler fraternity.
Since Richard mentioned that the chassis looks to be resin, which does solve the issues of white metal needing considerable work to square up, I do question the strength/rigidity over the long haul. My few experiences with cast resin is that it is extremely brittle, and will snap when least expected to.
Having a metal rod inside both side tubes of the frame certainly would solve those problems. Has MFH ever done this before?
I would love to see both of you build this historical Auto Union car, which basically was a one of a kind design, especially that weird engine configuration. With that said, I’m sure that the cost would be north of the $1,000 ,mark,
joel
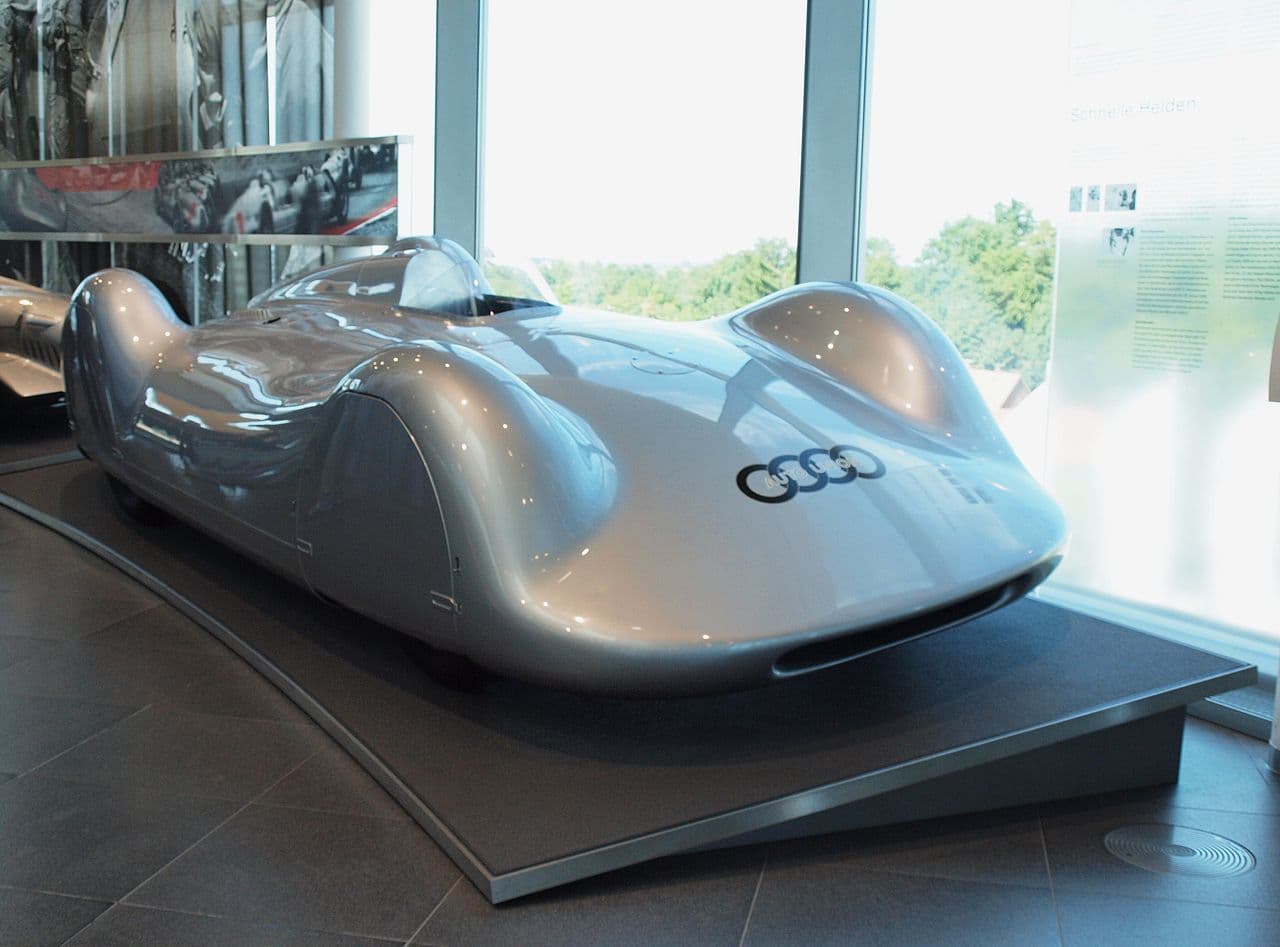
I think that MFH could fashion four cars off this engine/chassis combination. As you mention, the four wheeled rear axle that was used for hill climbing and grip on the dirt roads. Auto Union also built a couple of streamliners cars which look amazing
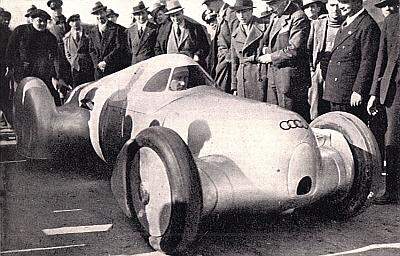
Scan of plate 70 from Eyston, G.E.T.; Lyndon, Barré (1935). Motor Racing and Record Breaking . Originally credited to “Fumagalli”
and this
They’re usually quite good at full utilising the parts to build out series of cars, like the Ferrari 312s and Porsche 917s
cheers
Michael
“so it should be a popular kit for the shall I say older modeler fraternity” - I am sure I qualify Joel. But your other thought about pricing is very relevant. Their pricing for the latest round of re-releases has seen what looks like a 10-15% increase, though given the recent US dollar strength and Yen weakness it shouldn’t be too bad for those in the US. Down under it is going to impact for sure.
cheers
Michael
Michael,
Unfortunately, with today’s inflation, high and going higher almost daily; the cost of fuel, those two factors alone will continue to drive up prices to insane levels.
At some point a percentage of MFH modelers will be forced to walk away from any kit over their personal budget limitations.
joel
Amazing build. So many details to take in.
Lovely work Michael, more really nice details and those wheels just look amazing.
Cheers, D
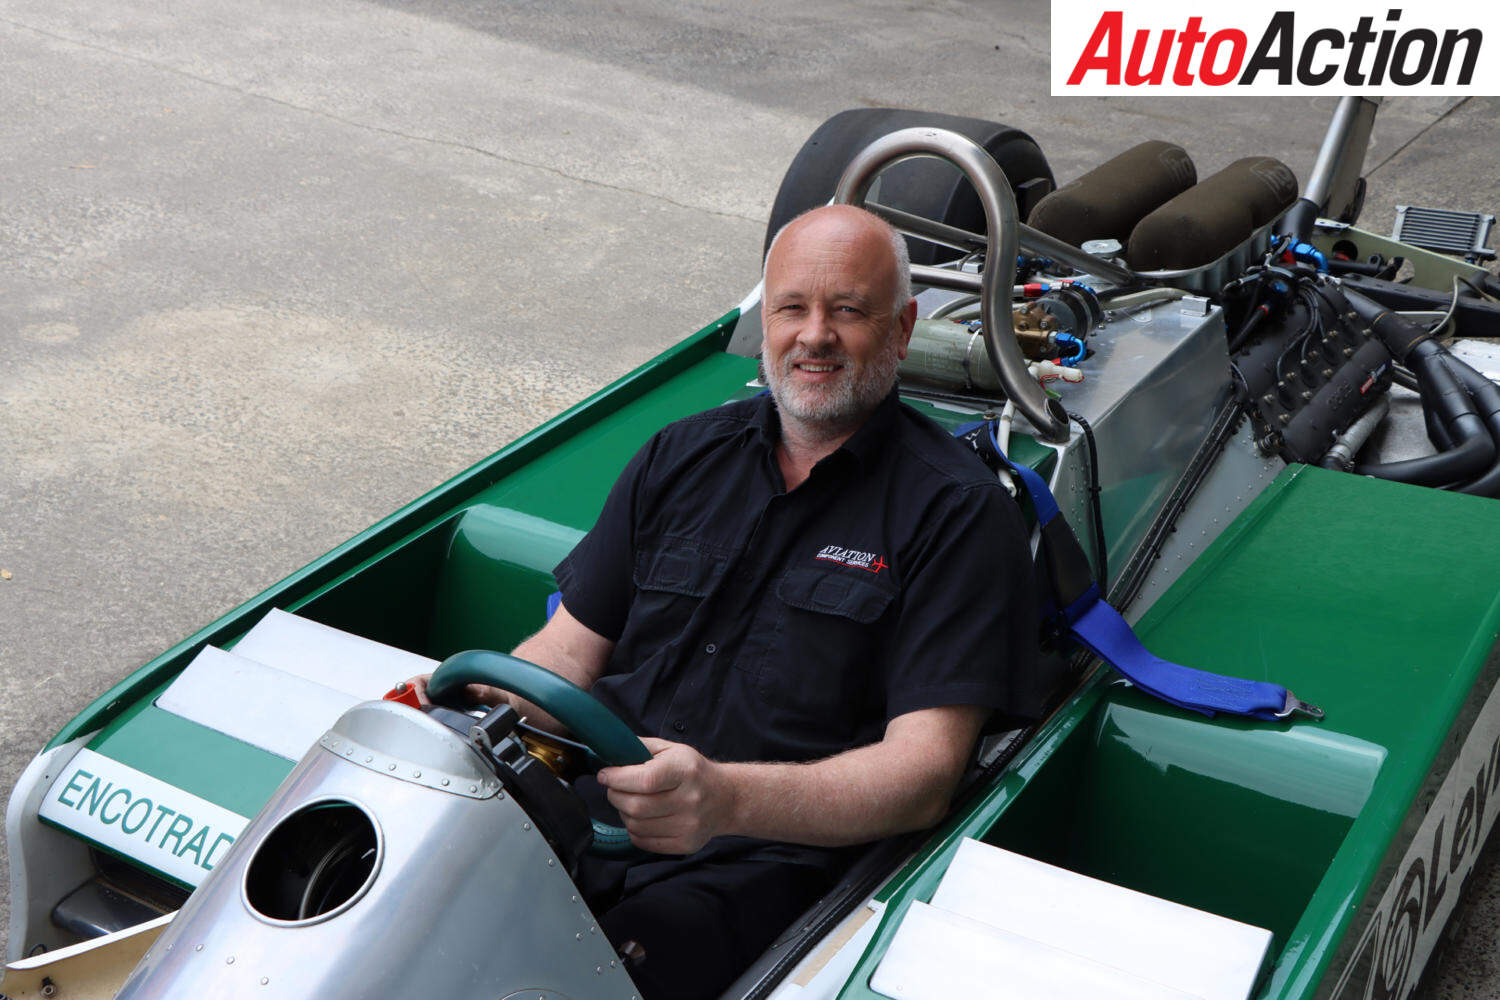
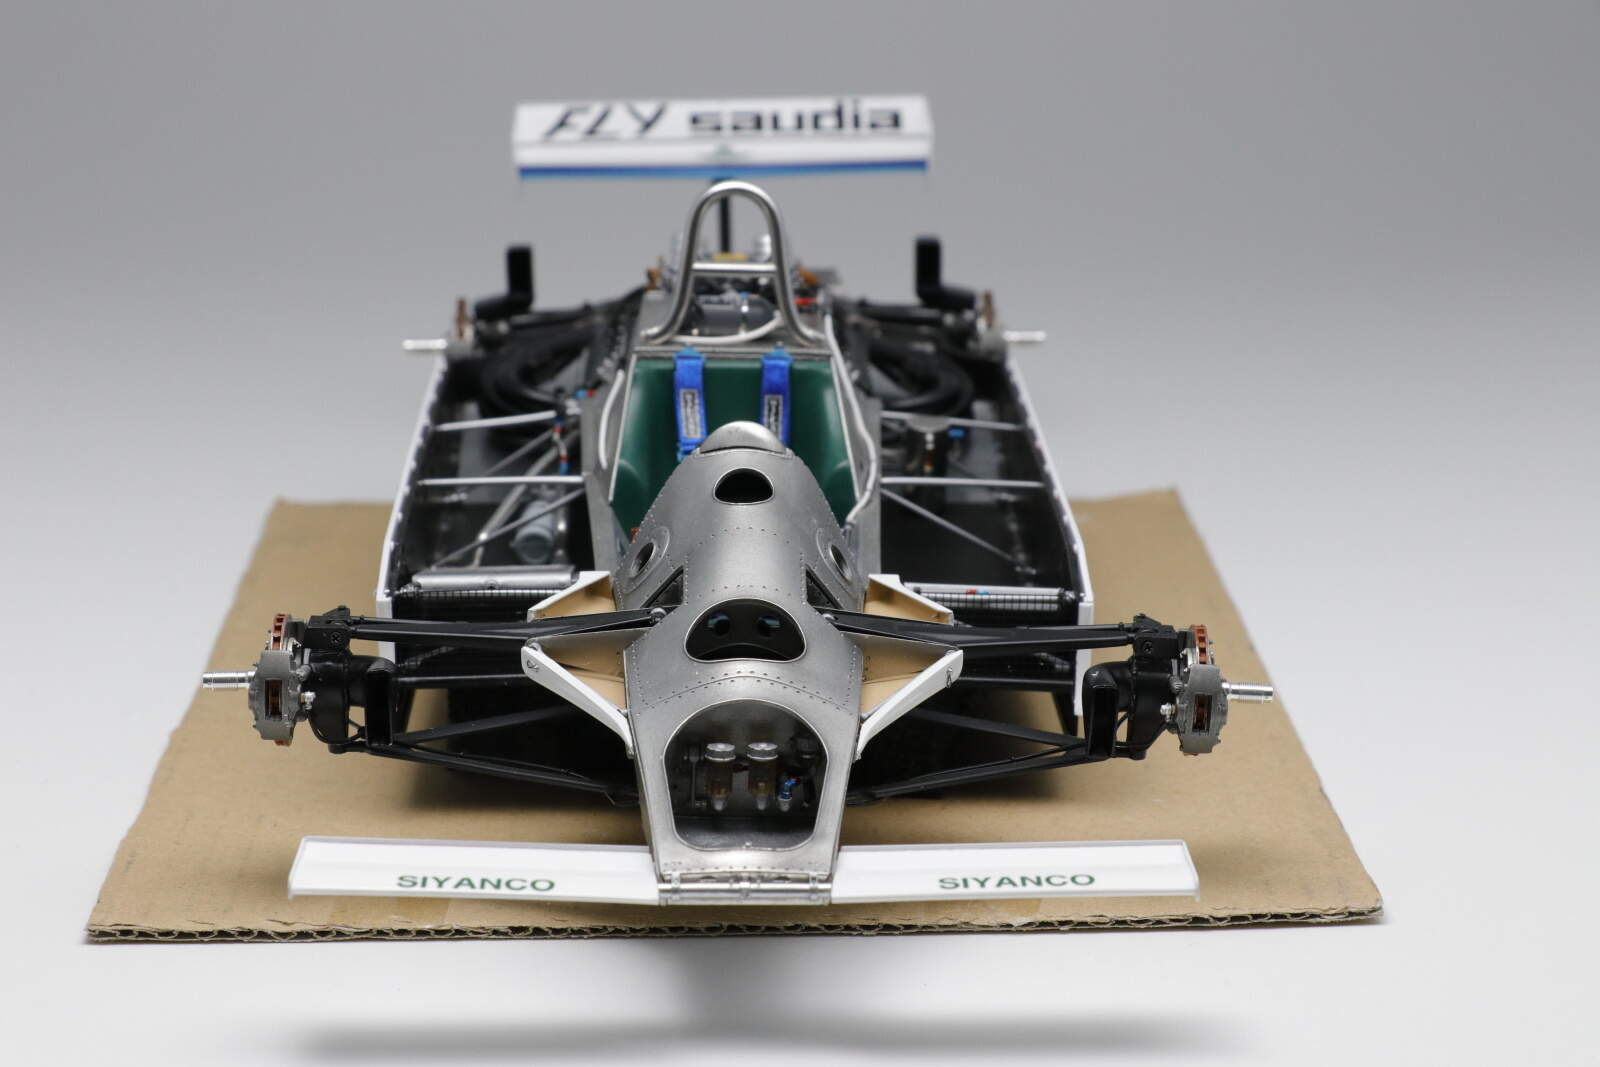
Well I finally had my turn with Covid over the past two weeks which wasn’t great. I thought it maybe good to make some progress modelling but that wasn’t happening. But over the past few days I moved closer to the finish line. Having got the side pods installed it was onto the skirts that provided the ground effect.
They were photoetched and these are the two sides. The top one is the left outside face with the aluminium strips the stops. The bottom, right inside face, had a Saudi green stripe, just to complicate things I am sure.

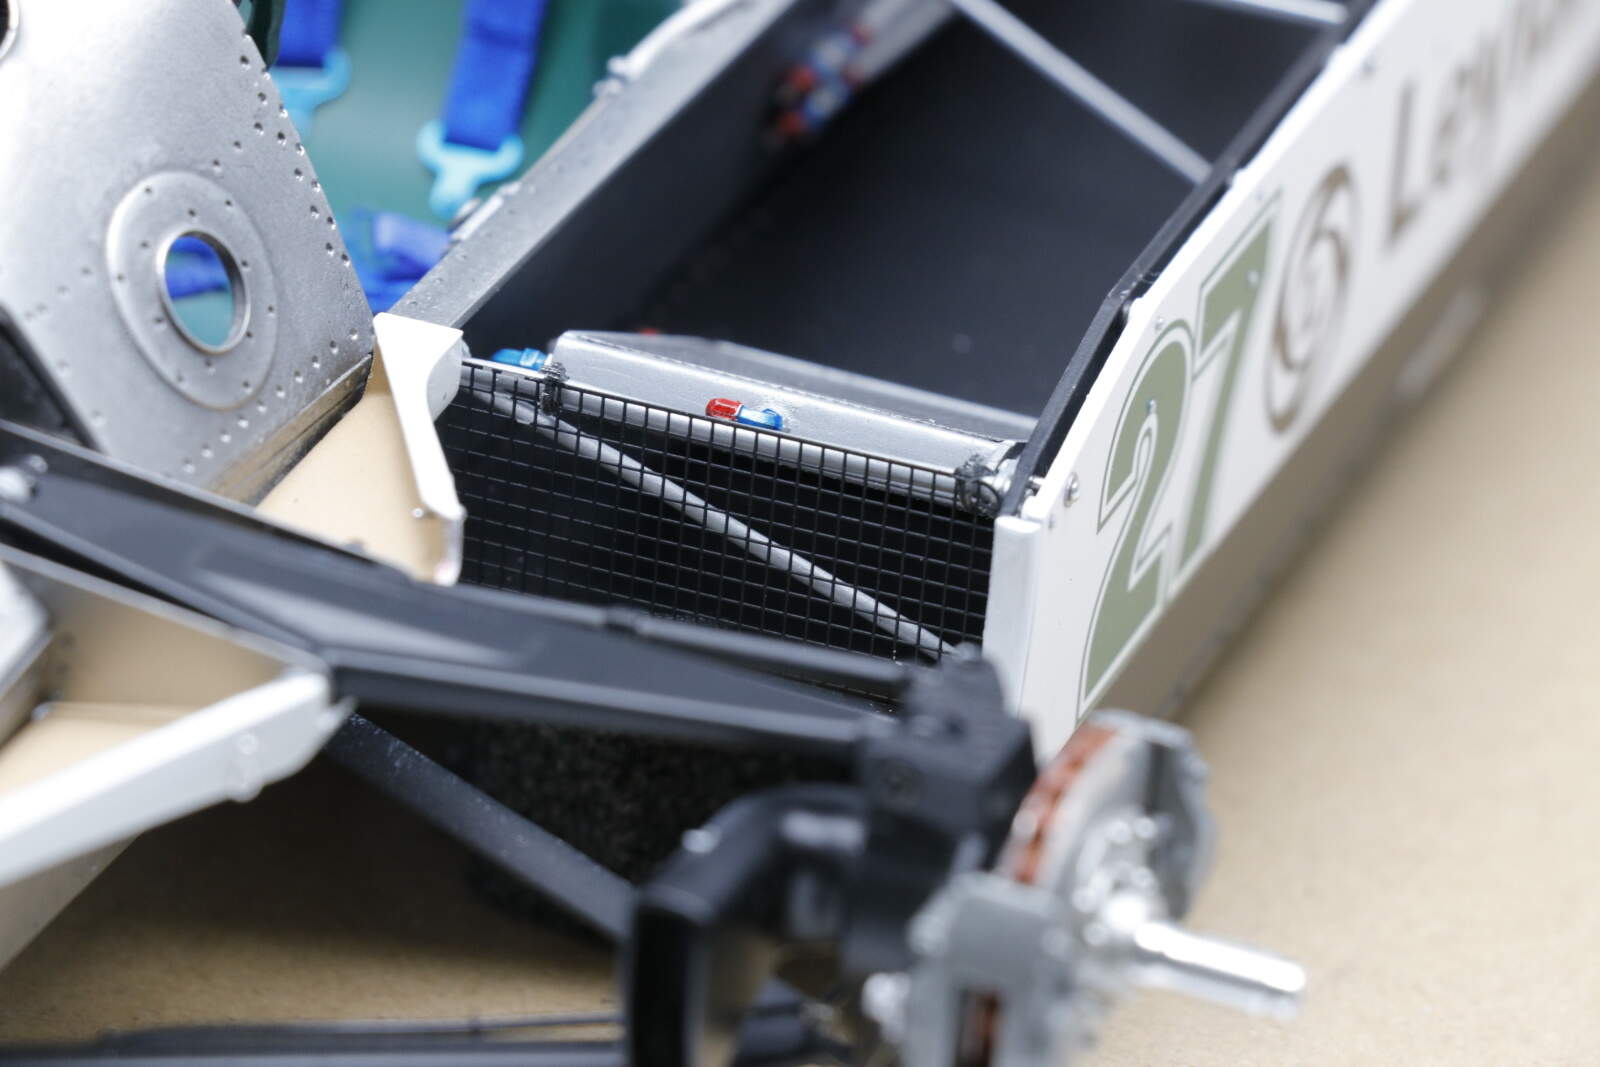
The skirts are held in place by the outer body work and can move up and down. The body work is attached by 20 rivets and four fasteners. The most nervy part was drilling holes through my paint work and decals. I was sure it was going to go wrong somewhere but I managed the 24 holes per side with out a stuff-up. Here you can see the skirts fully extended until the wheels go on.
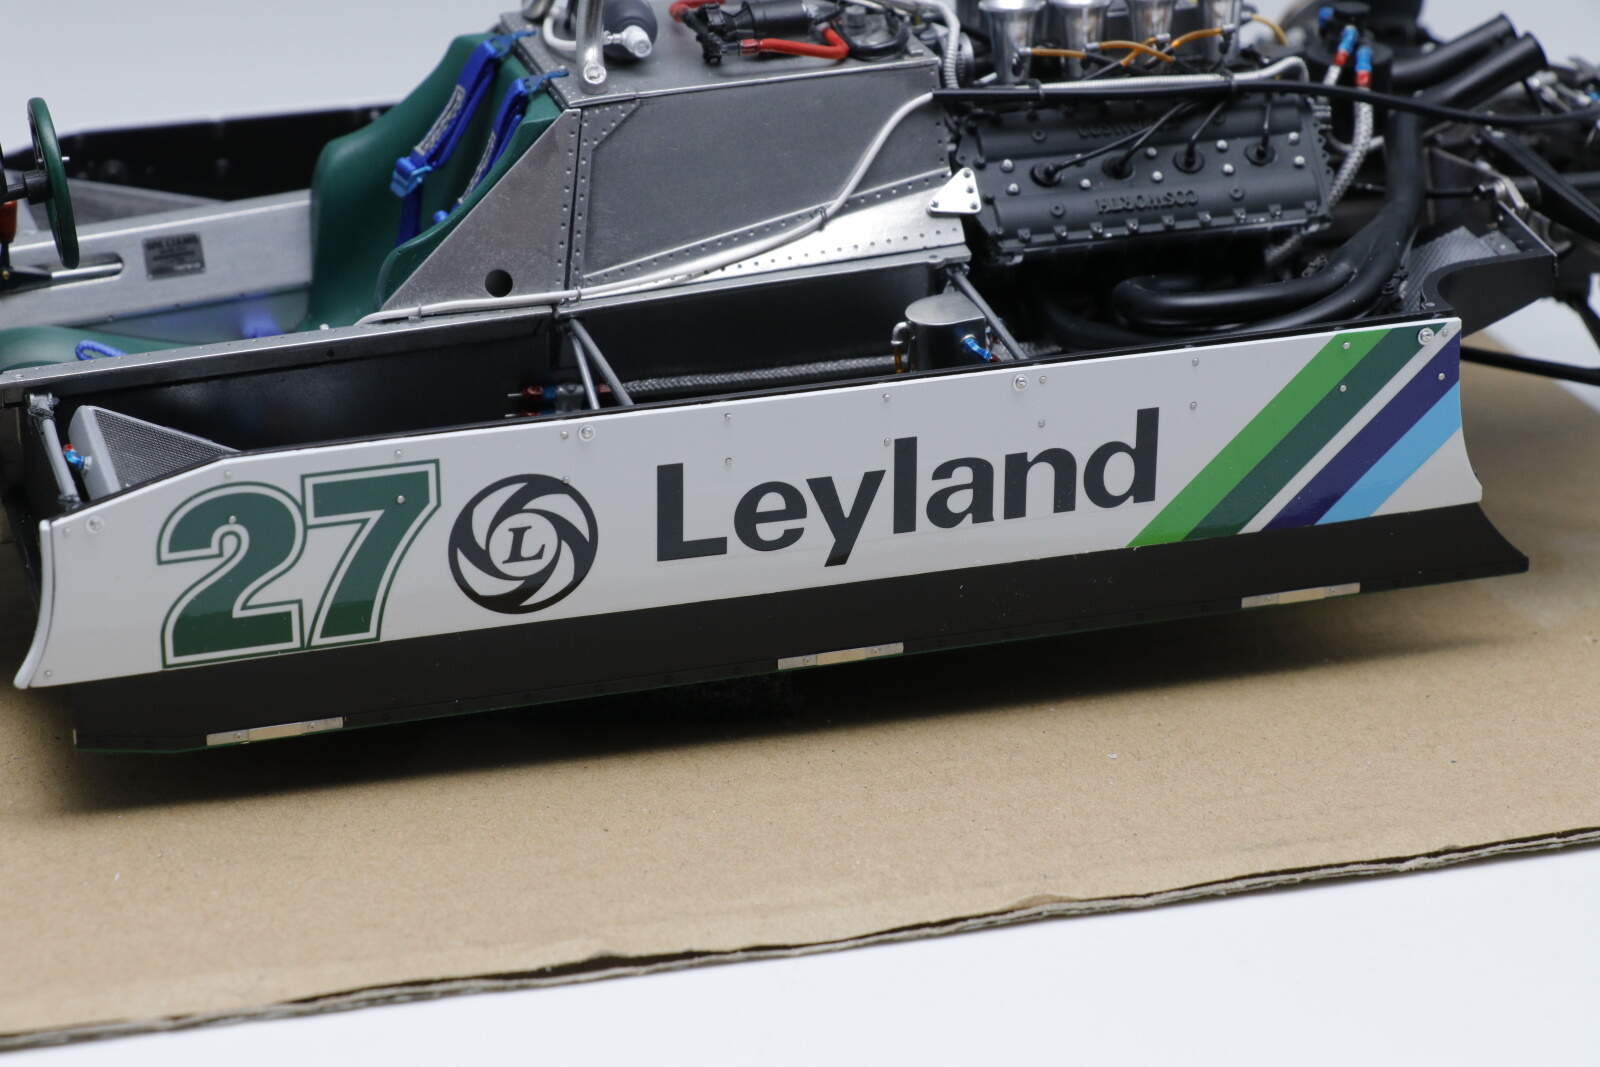
A little touch which I haven’t noticed before on these cars is a mesh screen on the sidepods in front of the radiators to keep rubbish out.
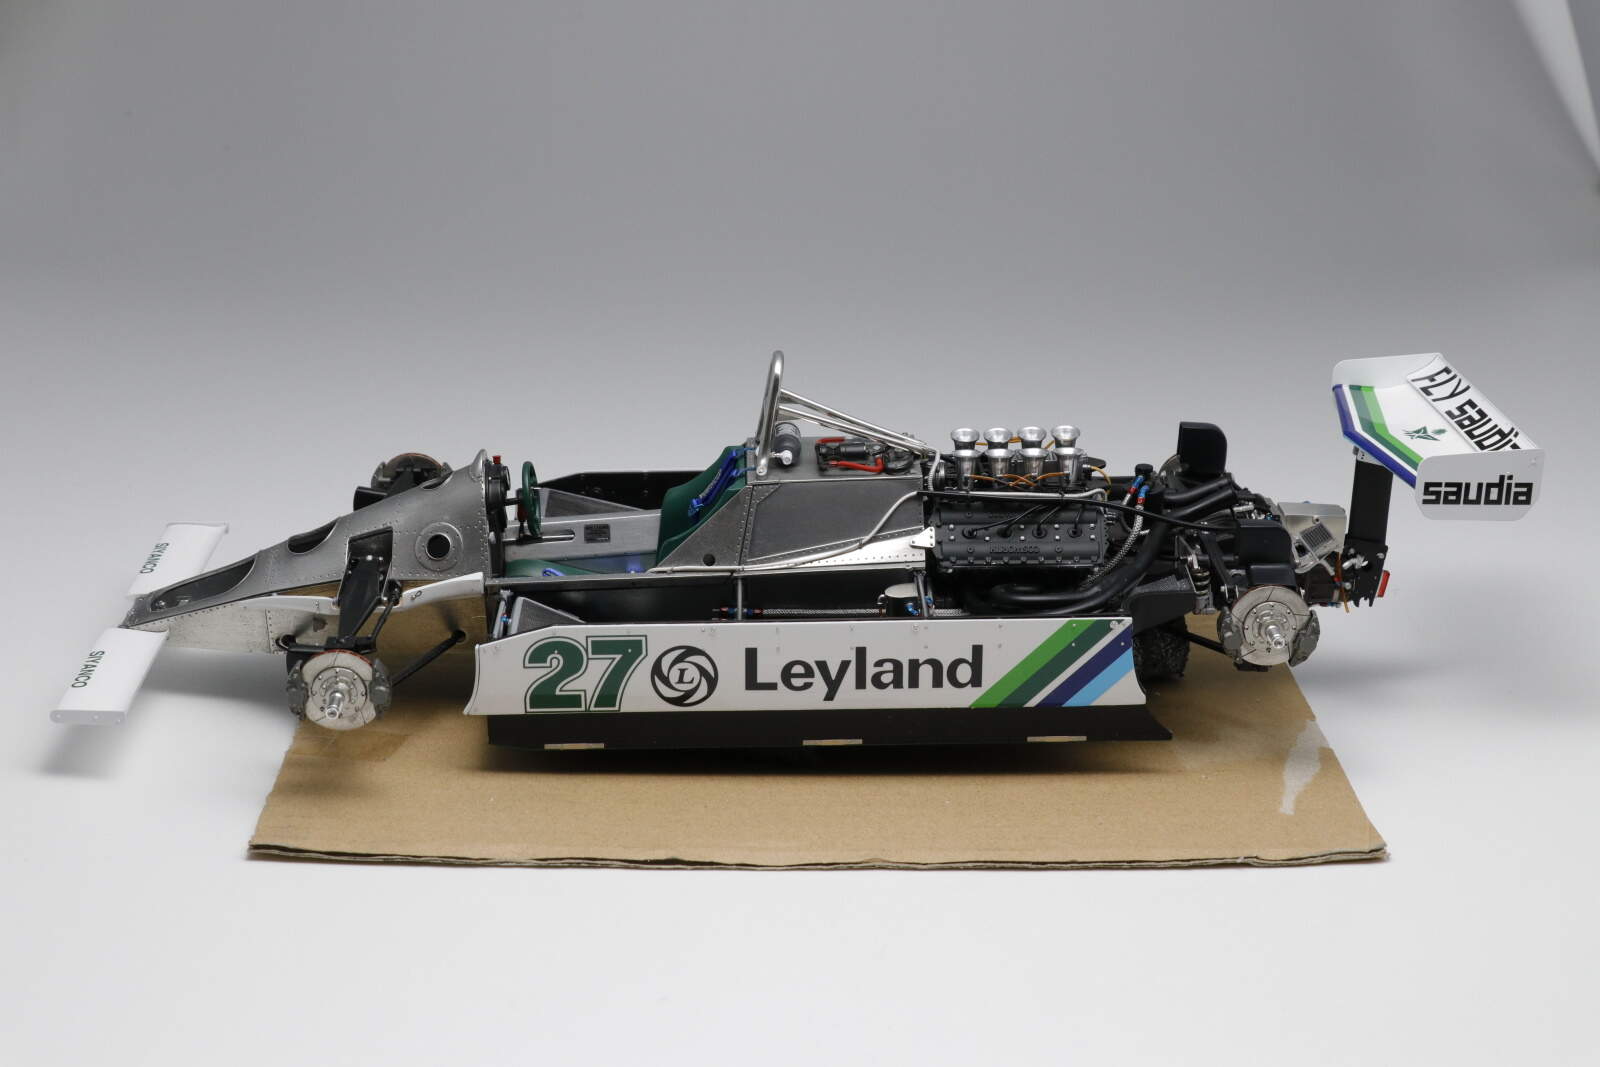
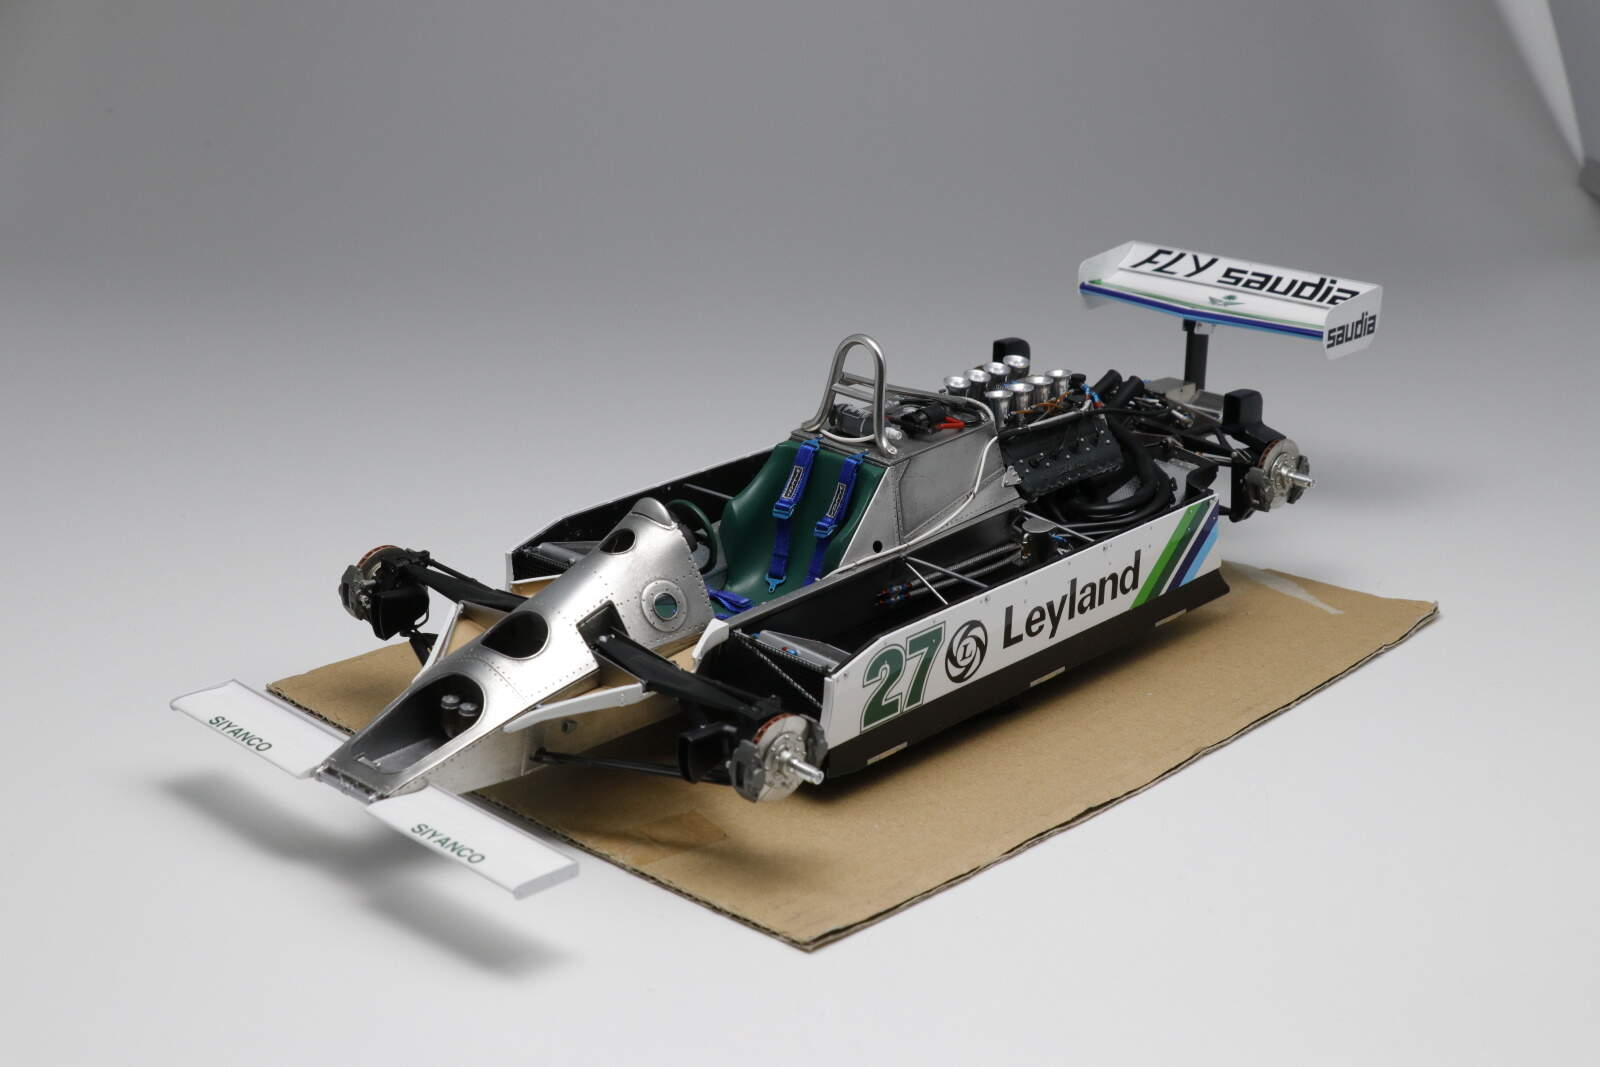
And then stepping back, looking like a racecar now, being prepped for the start.
Just down to the top body shell which comes in four parts with fit somewhat marginal. I will most likely combine to make one piece. That causes it own problems with masking for the green and white. Stay tuned.
cheers
Michael
6 Likes
Beautiful job Michael - well done on drilling through paint work. I feel your pain regarding multi part bodywork.
Michael,
1st and foremost is the news that you’ve recovered from Covid.
the mounting of the side body work with all those holes for the rivets and screws came out absolutely perfect. As for those side skirts, well done as well. They worked so well that the FIA banned them after just one season I believe. Of course chunks of rubber must have always been torn off going over the track surface all the time, ending up in following cars radiators, or hitting the driver in the head/helmet.
As far as i can tell it was quite common to see pit crew members reach into the side pod intakes and remove all sorts of crap that blocked the radiators from cooling air. When and if they added mess screens to that era car, I have simply no idea. But from this one picture of a restoration, there’s no mesh screening in the intake. But being a restoration, it could go either way.
joel