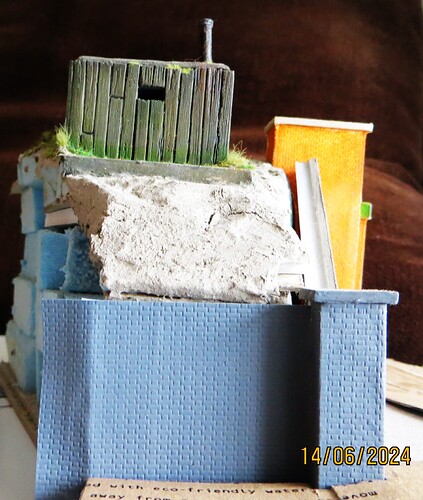
Really nice G. Looks the part and will be a nice addition to the scene. The green moss up the walls is just right and I like the beginnings of the green hue on the abandoned sleepers. ![]()
G, impressive as always.
I have no idea what kind of wood they used, its age, etc. This may be comparing apples to orangutans but railroad ties (sleepers) can ‘season’ to a craggy rugged look:
If the wood was used for the mold to pour the concrete, I would not be suprised if the wood weathered roughly. It seems that construction sites I’ve looked around often reuse wood used for pouring concrete, and roughens up considerably. But I cannot say how the British used it.
The construction of pillboxes required a casing to allow the concrete to be poured and dried in shape, this process is known as shuttering. When built the concrete may be shuttered with wooden boards, corrugated iron sheets or bricks.
Somewhere in Sweden but wood is wood and concrete is concrete.
I doubt that any sane builder would waste nice wood for this purpose,
they would use the cheapest rough cuts and they can get quite rough
straight from the sawmill.
The small scale also requires some exaggeration for this type of detail …
I would offer that Robin’s reference photo above shows the correct degree of wood gain that would appear on a poured concrete structure.
As to the heavily weathered RR ties they have been exposed to the elements for a long time whereas the block house (even if built of heavy wood) would be only 1-2 years old. Far too new to have such weathering.
Hi all,
Not posted for some months now, and haven’t touched this build last October, it’s been sitting gathering dust, and been knocked about by builders who care little for modelling, ![]()
![]() .
.
So thought it might kick-start my mojo if I try to advance the build, ![]()
![]() .
.
I intend to scratch a small element of a building, maybe a corner shop, across from the railway embankment.
Been playing around with a few ideas for creating brick built walls, most methods have proven difficult to replicate uniformly, and all have been injurious to health, some physical, all mental, ![]()
![]() .
.
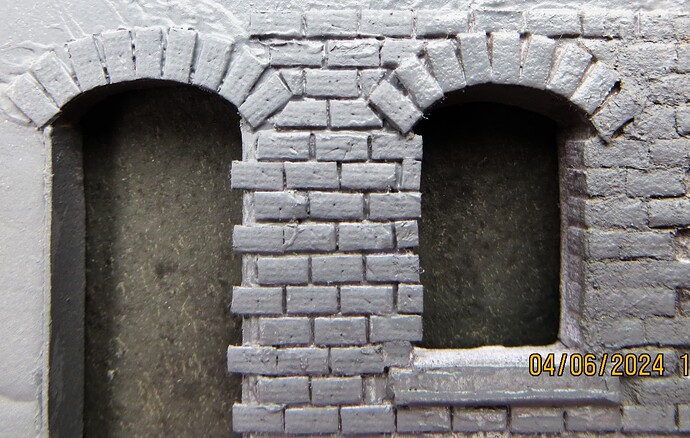
Finally…until a better method is discovered…I’ve created a couple of simple jigs that seem to ensure that I can repeatedly cut the same size card brick. In 1/72nd scale that’s approx. 1mm x 3mm, I then lay them in any pattern I want to replicate, and then cover the area with a thin talc/glue paste (see image below).
The paste application needs some refining, but with practice I think I can achieve something that’ll pass muster, ![]()
![]() .
.
cheers, ![]() ,
,
G
Looks good!
Good to see you back at it G-man. ![]()
![]()
The brickwork looks the part. I’m talking about the brick underneath the plate girder bridge. The latest brick/stone wall is looking good a well.
Somehow I’ve missed several months worth of the thread, so I’m a little late to the party.
Another idea for rivets:
Round, uniform, and variable by using different blades.
So the massive Dio Police G-hunt (drones, K9’s etc) can finally be called off. Great to see you back trailing clouds of um bricks. Sounds like Life’s been intervening, commiserations - I and doubtless others know what that’s like. Anyhow the word is you won’t have to front the Star Chamber provided you finish this dio within the next year or so. Looks like you’ve found a good solution, onwards & upwards ![]()
![]()
Nice to see you back in action again… I hope those ham fisted builders didn’t do too much damage?
Good to see you back at the helm ( hopefully you get that lol) … Brick work is a nice idea and looks great ![]()
Thanks to one and all for their kind words, and welcome backs, ![]()
![]() .
.
G, ![]()
Hi all,
My ‘brick’ manufacturing process mentioned above didn’t really work, it was a tad inconsistent, so went back to a variation on the process used on the original bridge buttress wall, it’s still laborious but, imho, it gives better results.
On the original method I marked out 1mm spaced horizontal lines and 3mm spaced vertical lines in pencil on thin card. I then pressed into the lines with the sharp end of various various small slotted screwdrivers. This did send the eyes a tad funny, all the pencil lines blurring after a while, it was also uncomfortable on the wrist.
This time I’ve purchased a small drawing board, but instead of drawing all the lines with a pencil on card and then ‘punching’ the lines with a screwdriver, I use paper (the board clamp mechanism can’t cope with card thickness) and a metal scriber.
It’s certainly less confusing visually, and more comfortable. It does tend to make the paper distort a bit, so might limit the maximum size before things start to go out of alignment, but I will experiment with different types of paper.
Below are some images of my first attempt.
Gluing the paper to the carcass has to be done gently as the it’s very easy to ‘squash’ the detail, and I’ll need to be careful when painting, both pressure-wise and wetness-wise, so still lessons to be learnt, ![]()
![]() .
.
I have also added some contours to the ground as it was looking a tad flat.
Cheers, ![]() ,
,
G
That paper brick looks amazing, it would be good in 1/35th and in 1/72 it is top notch.
Nice punching G, I’m guessing here but you might want to try this with some trial bits – dampen (water) with a spray or atomiser, lay it onto the surface with whatever glue and (a) let it dry naturally (b) dry it faster with a hair-drier. One of those two should shrink-dry it at the right rate to eliminate any distortion. If that works, presumably you’ll need to seal it to prevent the paper absorbing paint & buckling.
Thanks Robin, much appreciated, ![]()
![]() , though I suspect there’s lots of errors,
, though I suspect there’s lots of errors, ![]() .
.
G, ![]()
Thanks Tim for your kind words and advice, appreciated as always, ![]()
![]() .
.
G, ![]()
Hi all,
Spent this afternoon scribing the ‘wing’ wall brickwork, and following on from Tim’s suggestion I thought I’d spray the paper with canned grey primer as it dries quite quickly.
Both still need trimming, but the primer does seem to have stiffened the paper up, next i need to check if it’s made it more resilient to wetter paints, ![]()
![]() .
.
‘Wing’ wall trimmed and test fitted in-situ.
Cheers, ![]() ,
,
G
I was on the verge of commenting the sloping upper edge of that wing wall and not cutting bricks into small triangles.
Then I searched for pictures and found this photo.
There is also this beauty.
May they serve as confirmation and possibly also as inspiration
That new wall process is very clever… And looks nice … a good equal pattern all over …


