Superb update Tim, groundwork is just brilliant and I still really like the different elevation perspective from front to rear or vice versa, it gives the scene a whole new dimension and gives you a natural path to follow from one area to another. ![]()
2 Likes
That’s brilliant groundwork you’ve done , a great lesson leant , thank you . ![]()
![]()
![]()
2 Likes
Thanks Richard.
1 Like
Thanks Erwin!
2 Likes
Thanks a lot.
1 Like
Thanks Johnny, I had the idea of the elevation from the start to try and give the feel of the Ardennes landscape. It should work even better once the vehicles and figures are in place.
2 Likes
Thanks a lot Peter.
1 Like
A few bits and pieces
Catching up with a few bits and bobs that I have been adding to the scene…
Telegraph / telephone poles
To help carry the viewer from the front / left of the diorama to the rear / right and create a balance to the tree, I decided to go with a telephone pole.
The concrete pole is a classic feature of this part of the continent. Luckily MiniArt have made life a lot easier with their excellent accessory sets which can be built pretty much out of the box.
However, to give them a little more strength (I imagine that adding the wires will be one of the last things I do on the project) I added some brass insulators that I had lying around. A metal bracket from another set adds interest to the side of the farmhouse.
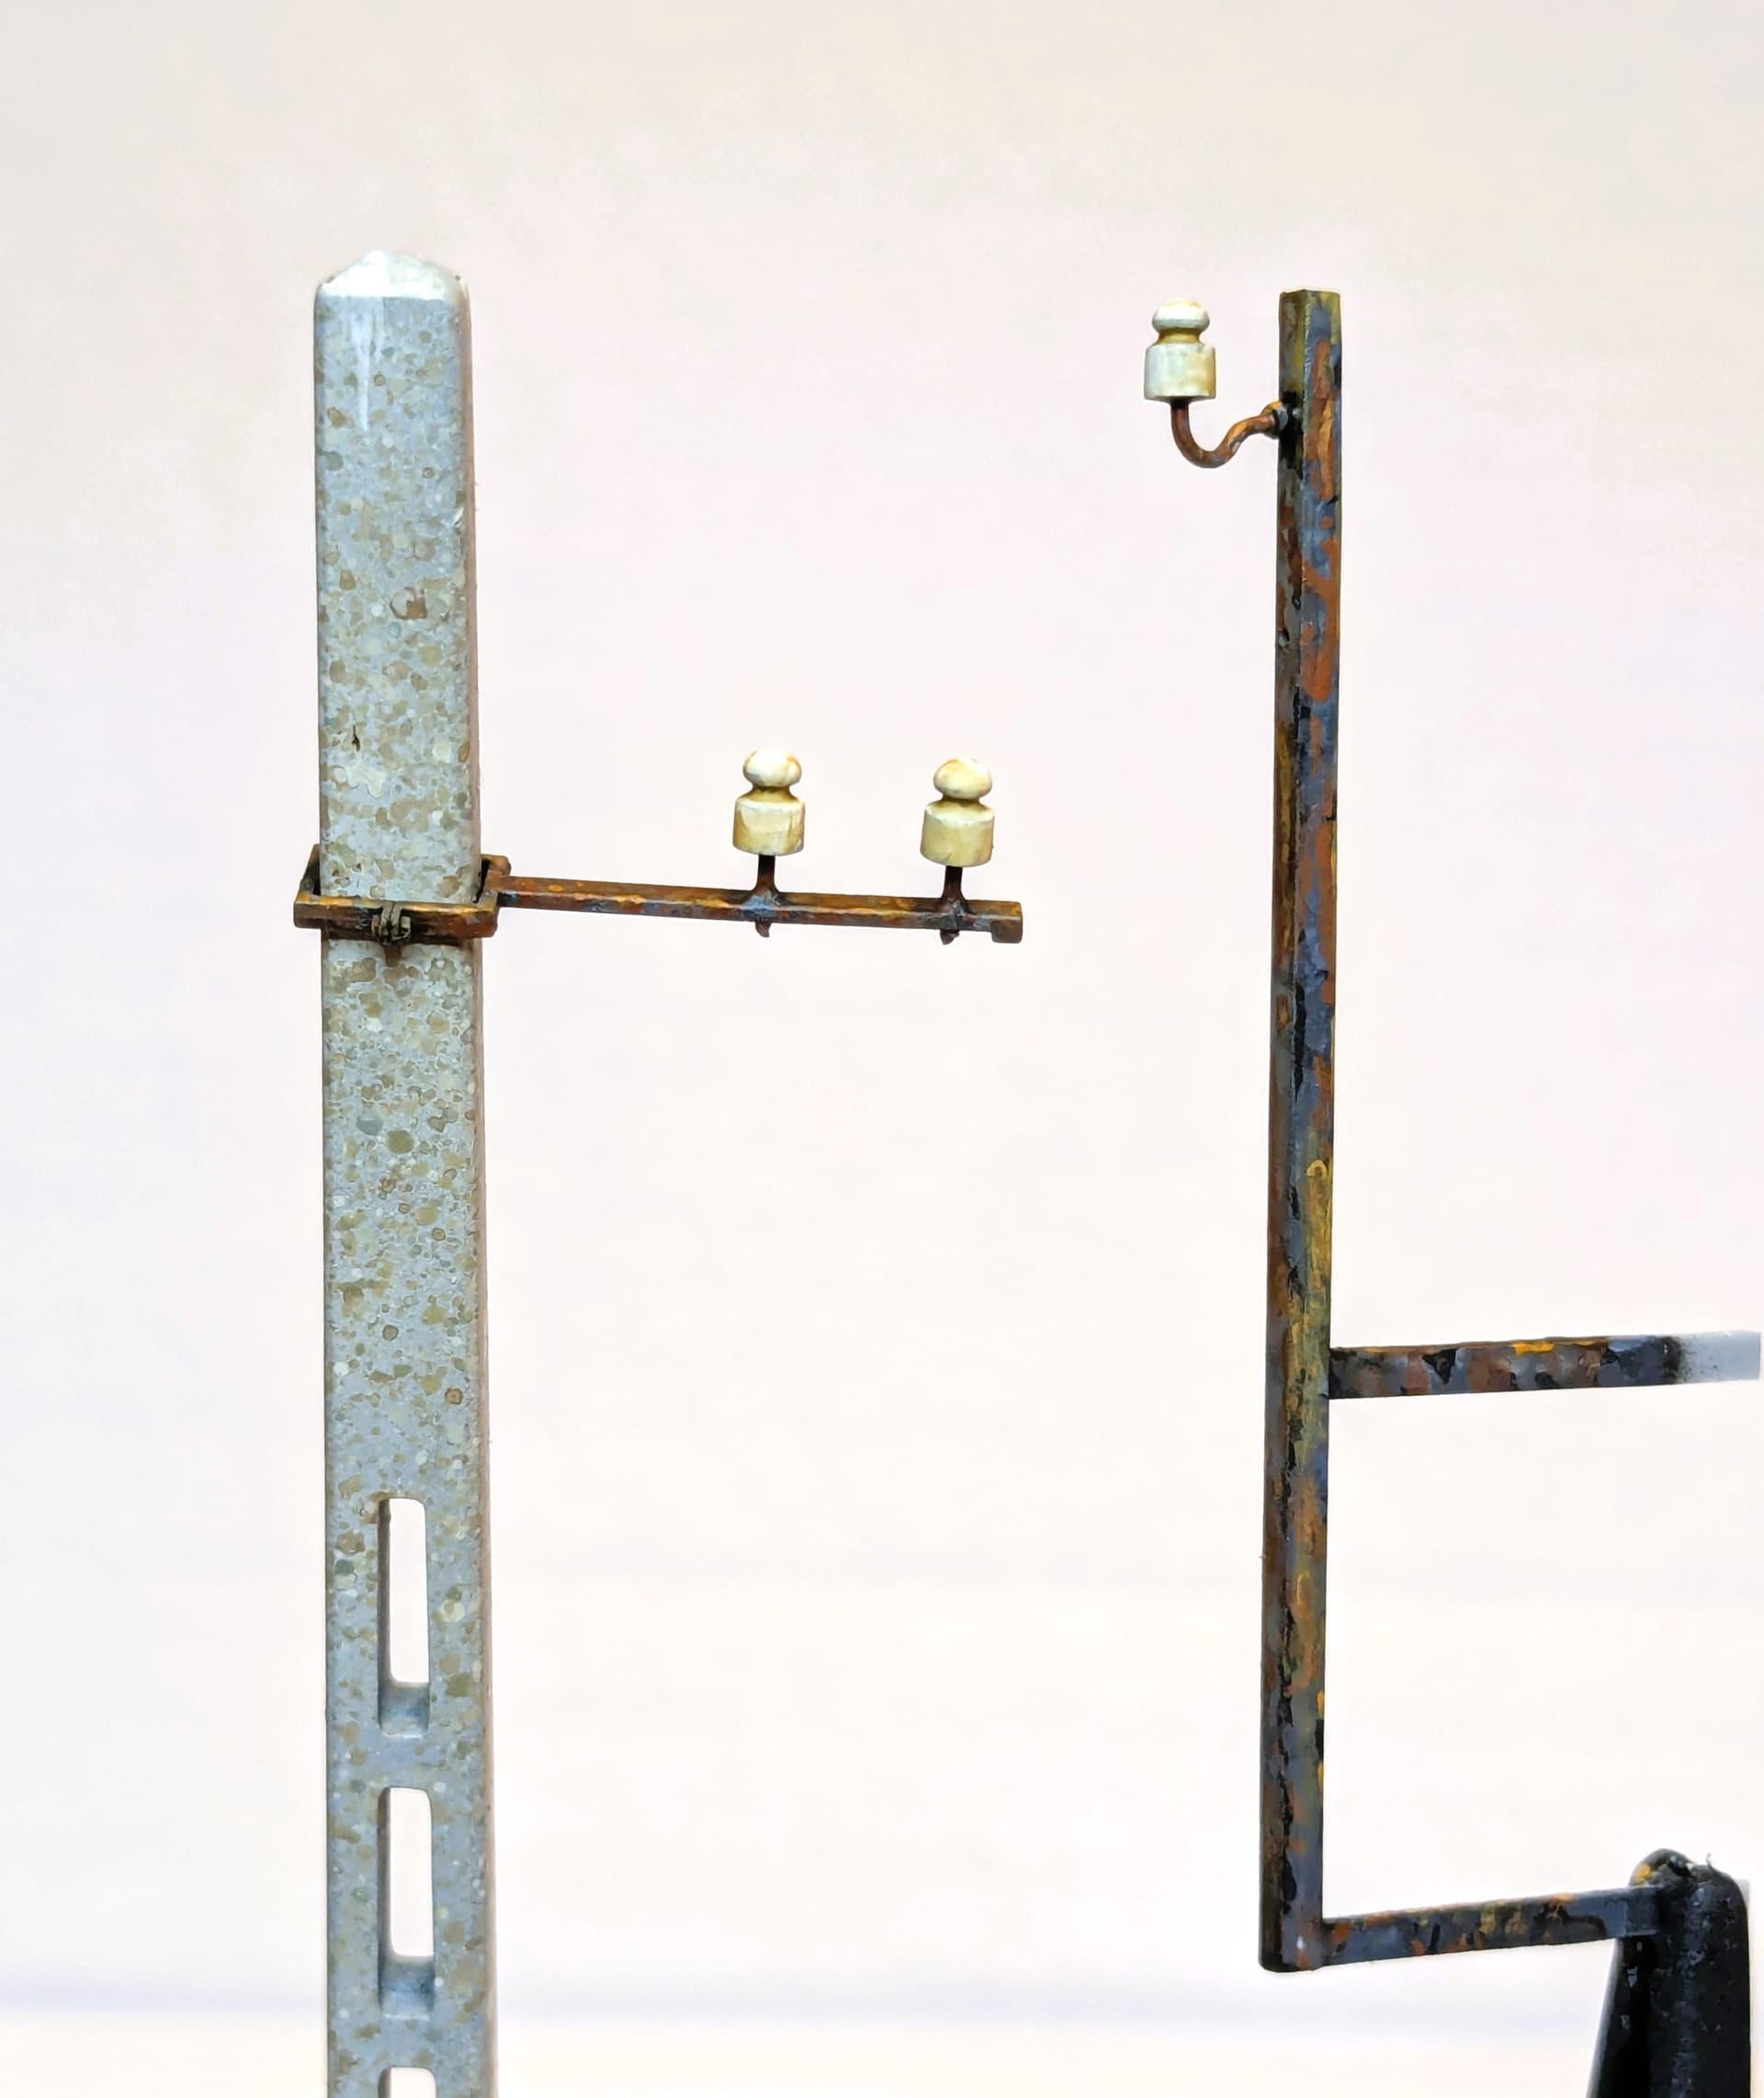
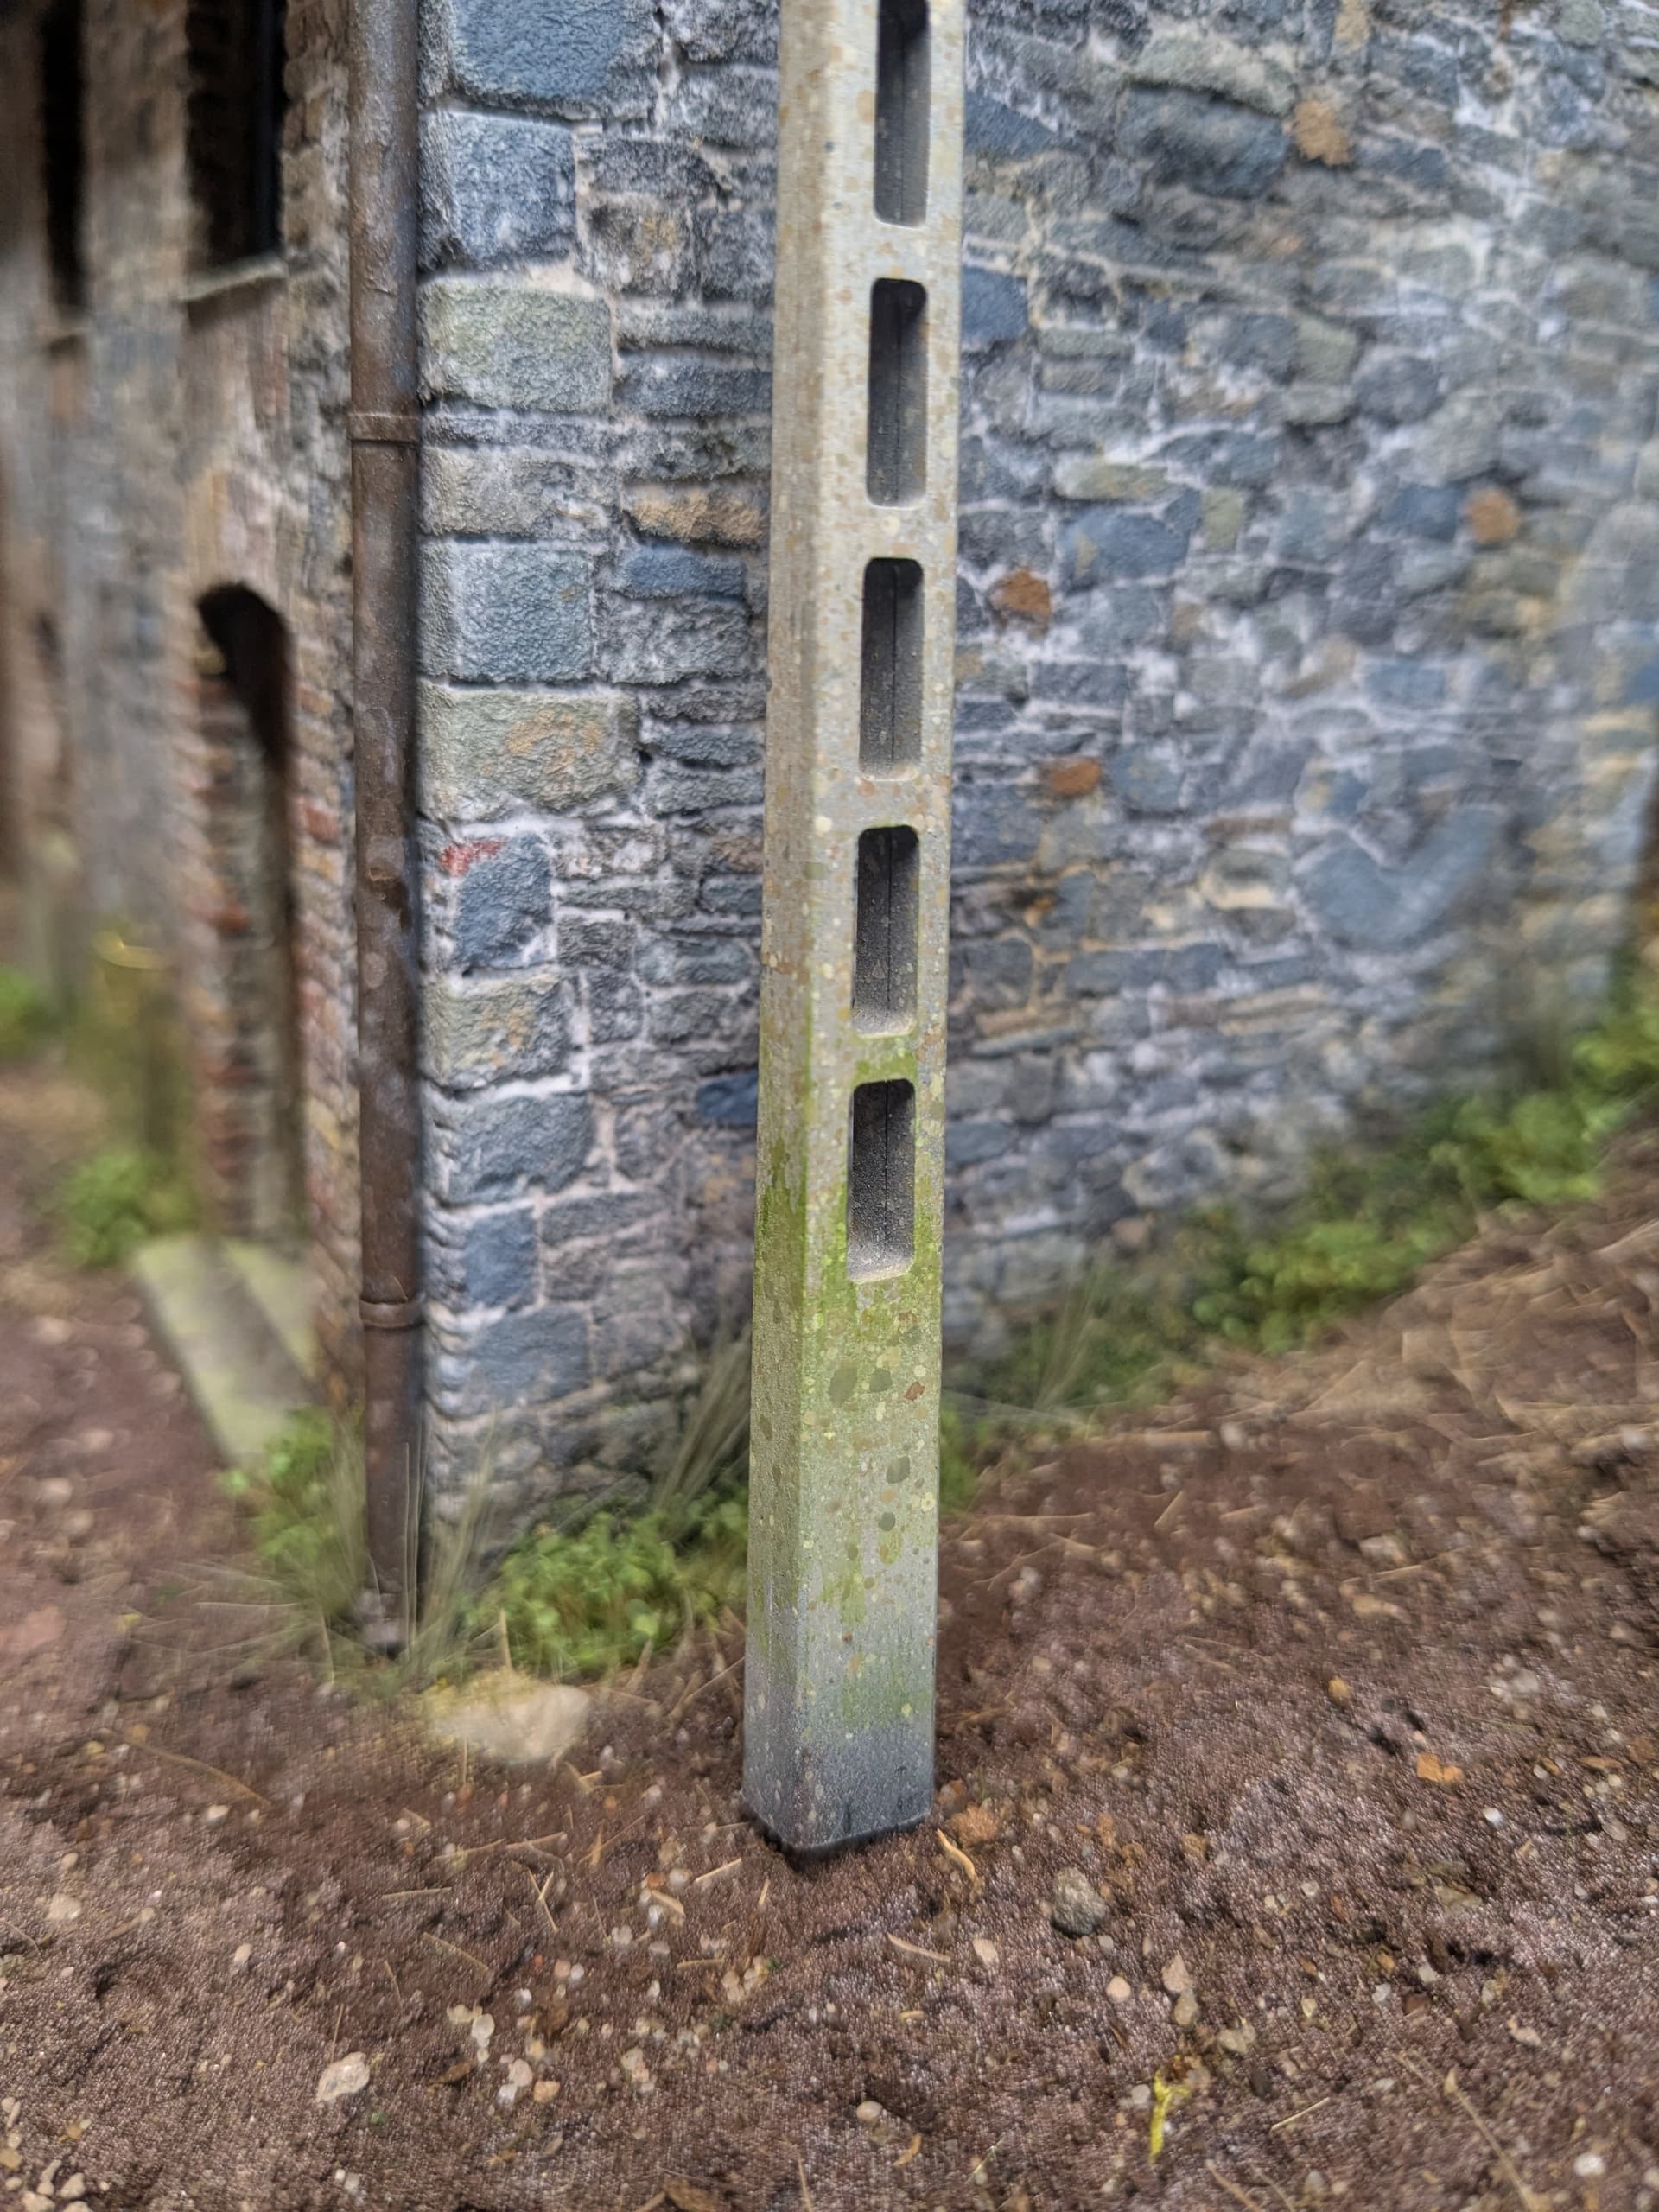
To get the concrete texture on the pole I simply sprayed it a mid-grey colour and then speckled the hell out of it with a range of acrylics and a toothbrush. This method is a lot of fun and works like a dream - as long as you keep the the paints diluted and the speckles small.
For the rusty ironwork I started with a dark grey base, added light grey with a brush and then applied rusty shades with a sponge.
Gutters, drainpipes and wall braces
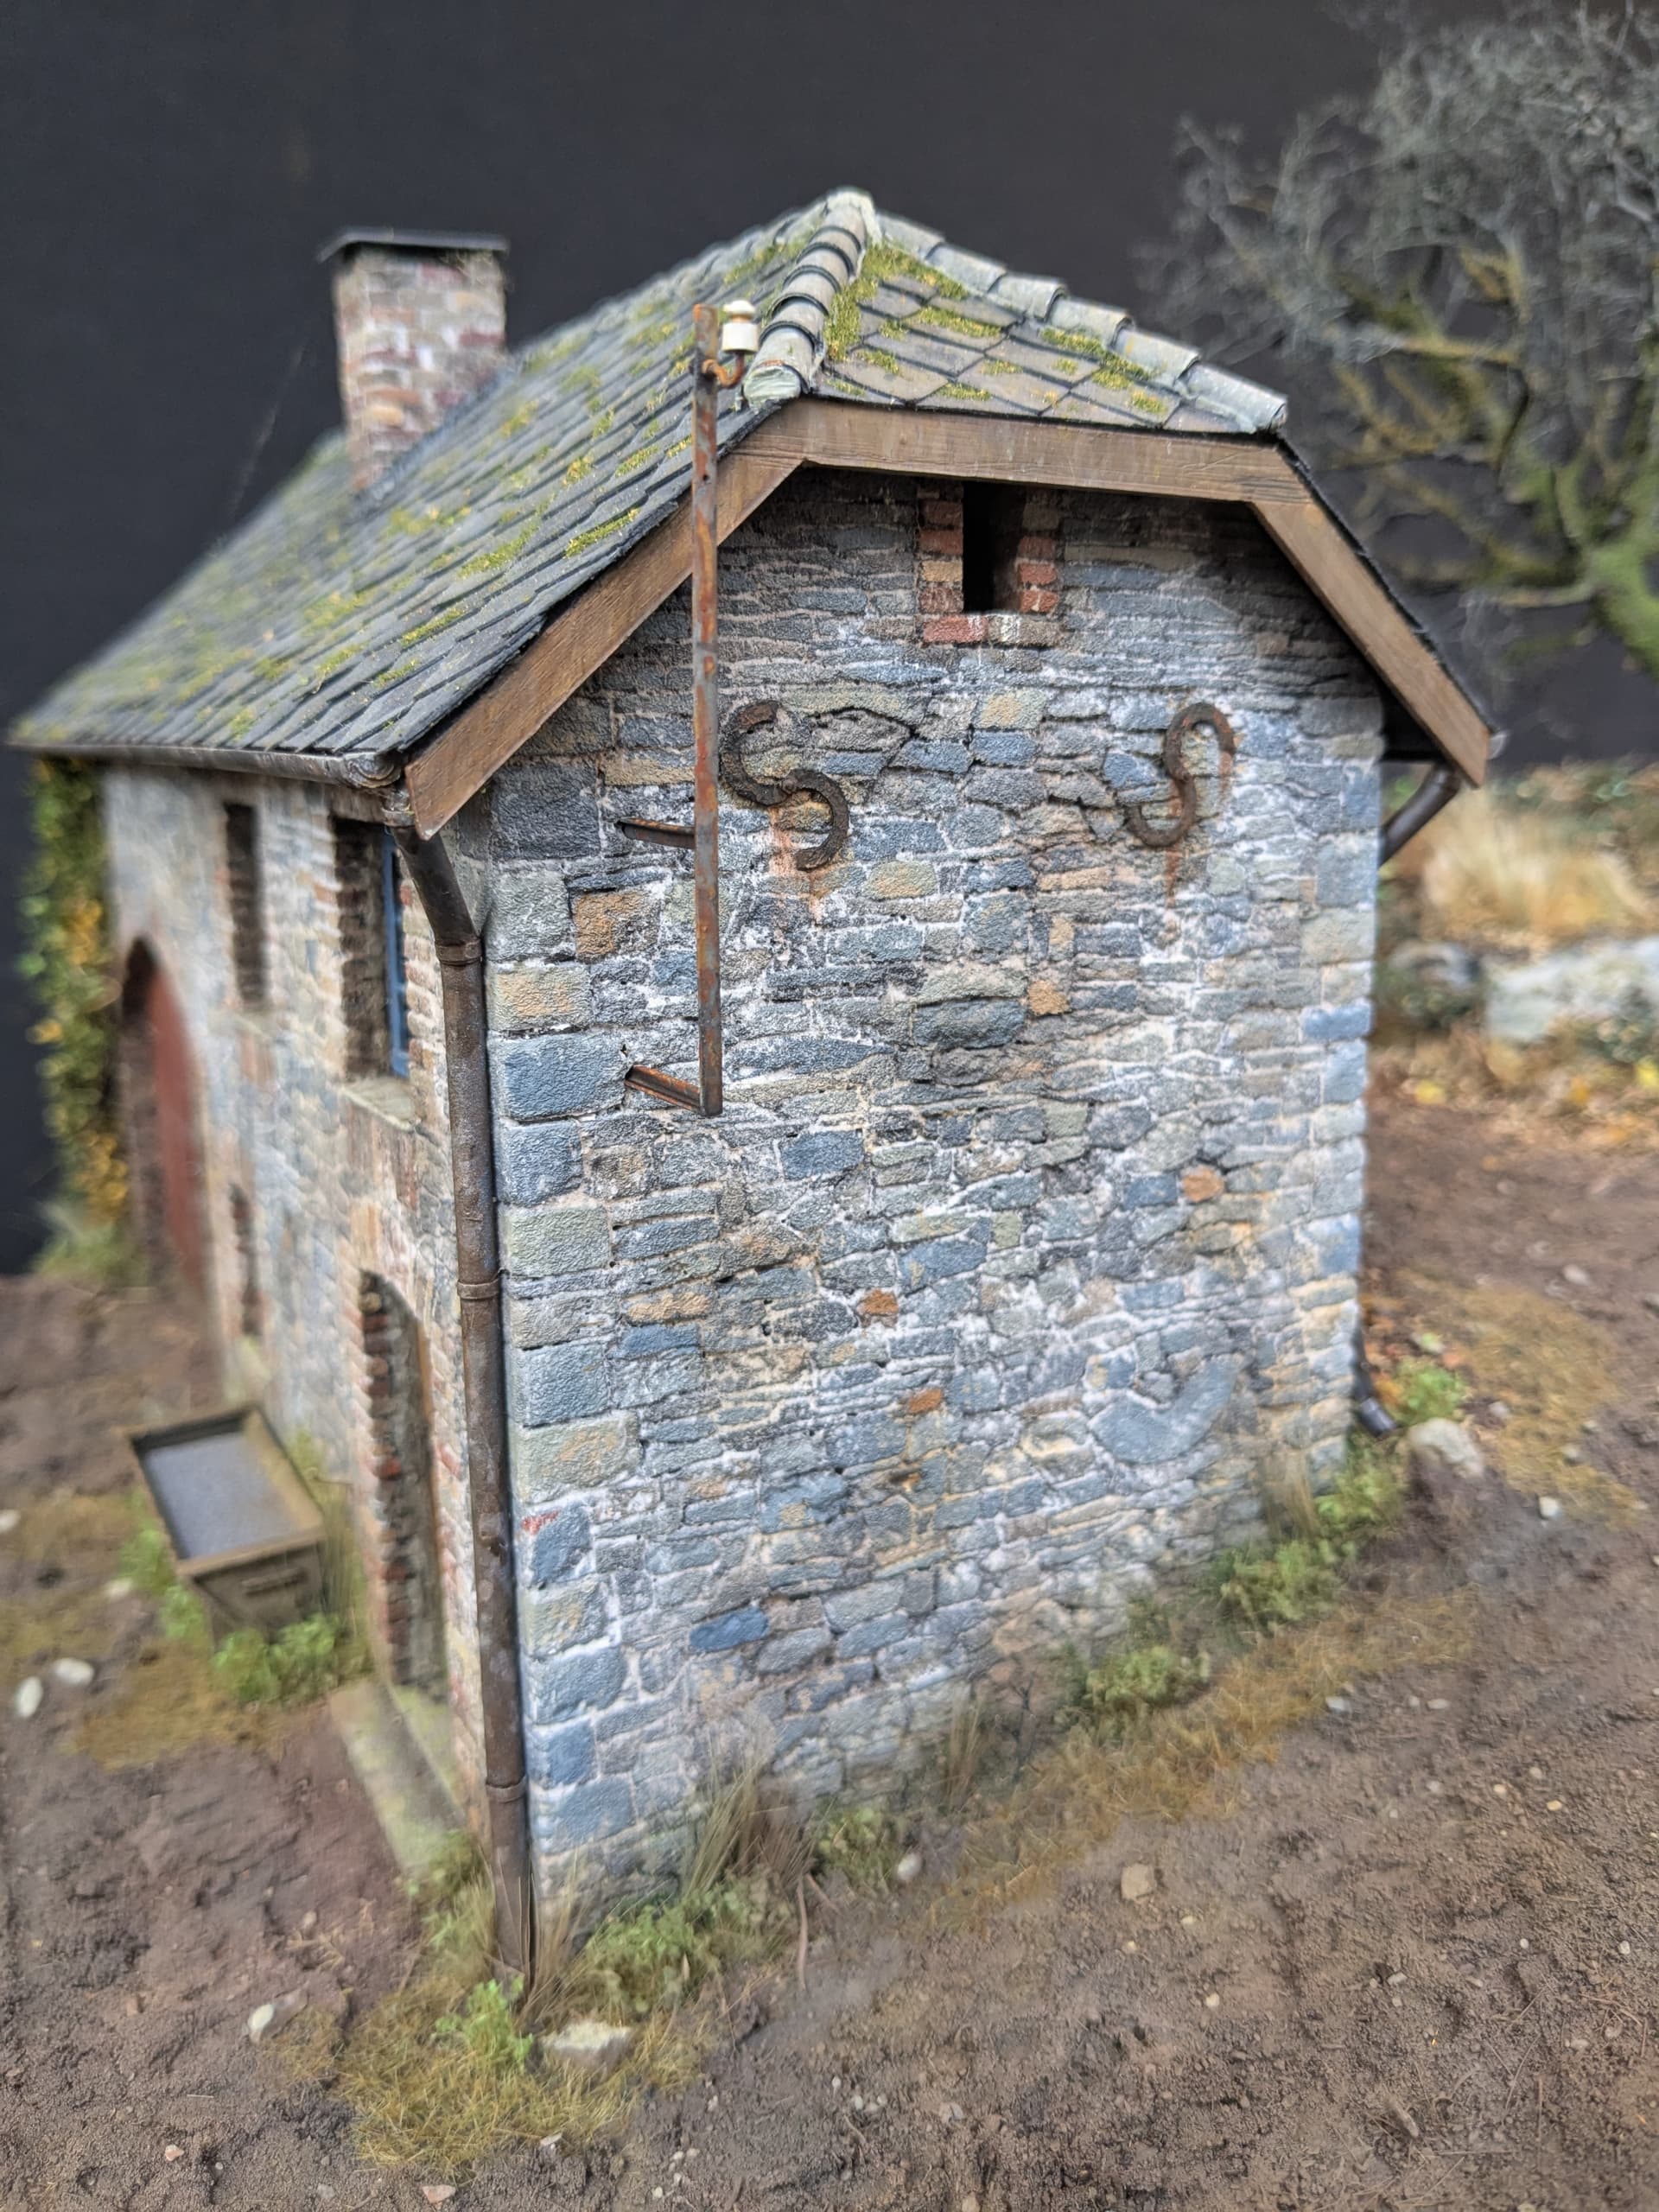

Although MiniArt do make sets for gutters and drainpipes, I always think these look too big for most buildings (especially rural ones). Also, the way that the pipes interact with the undeside of the gutters is often quite specific to the overall structure. So I made my own.
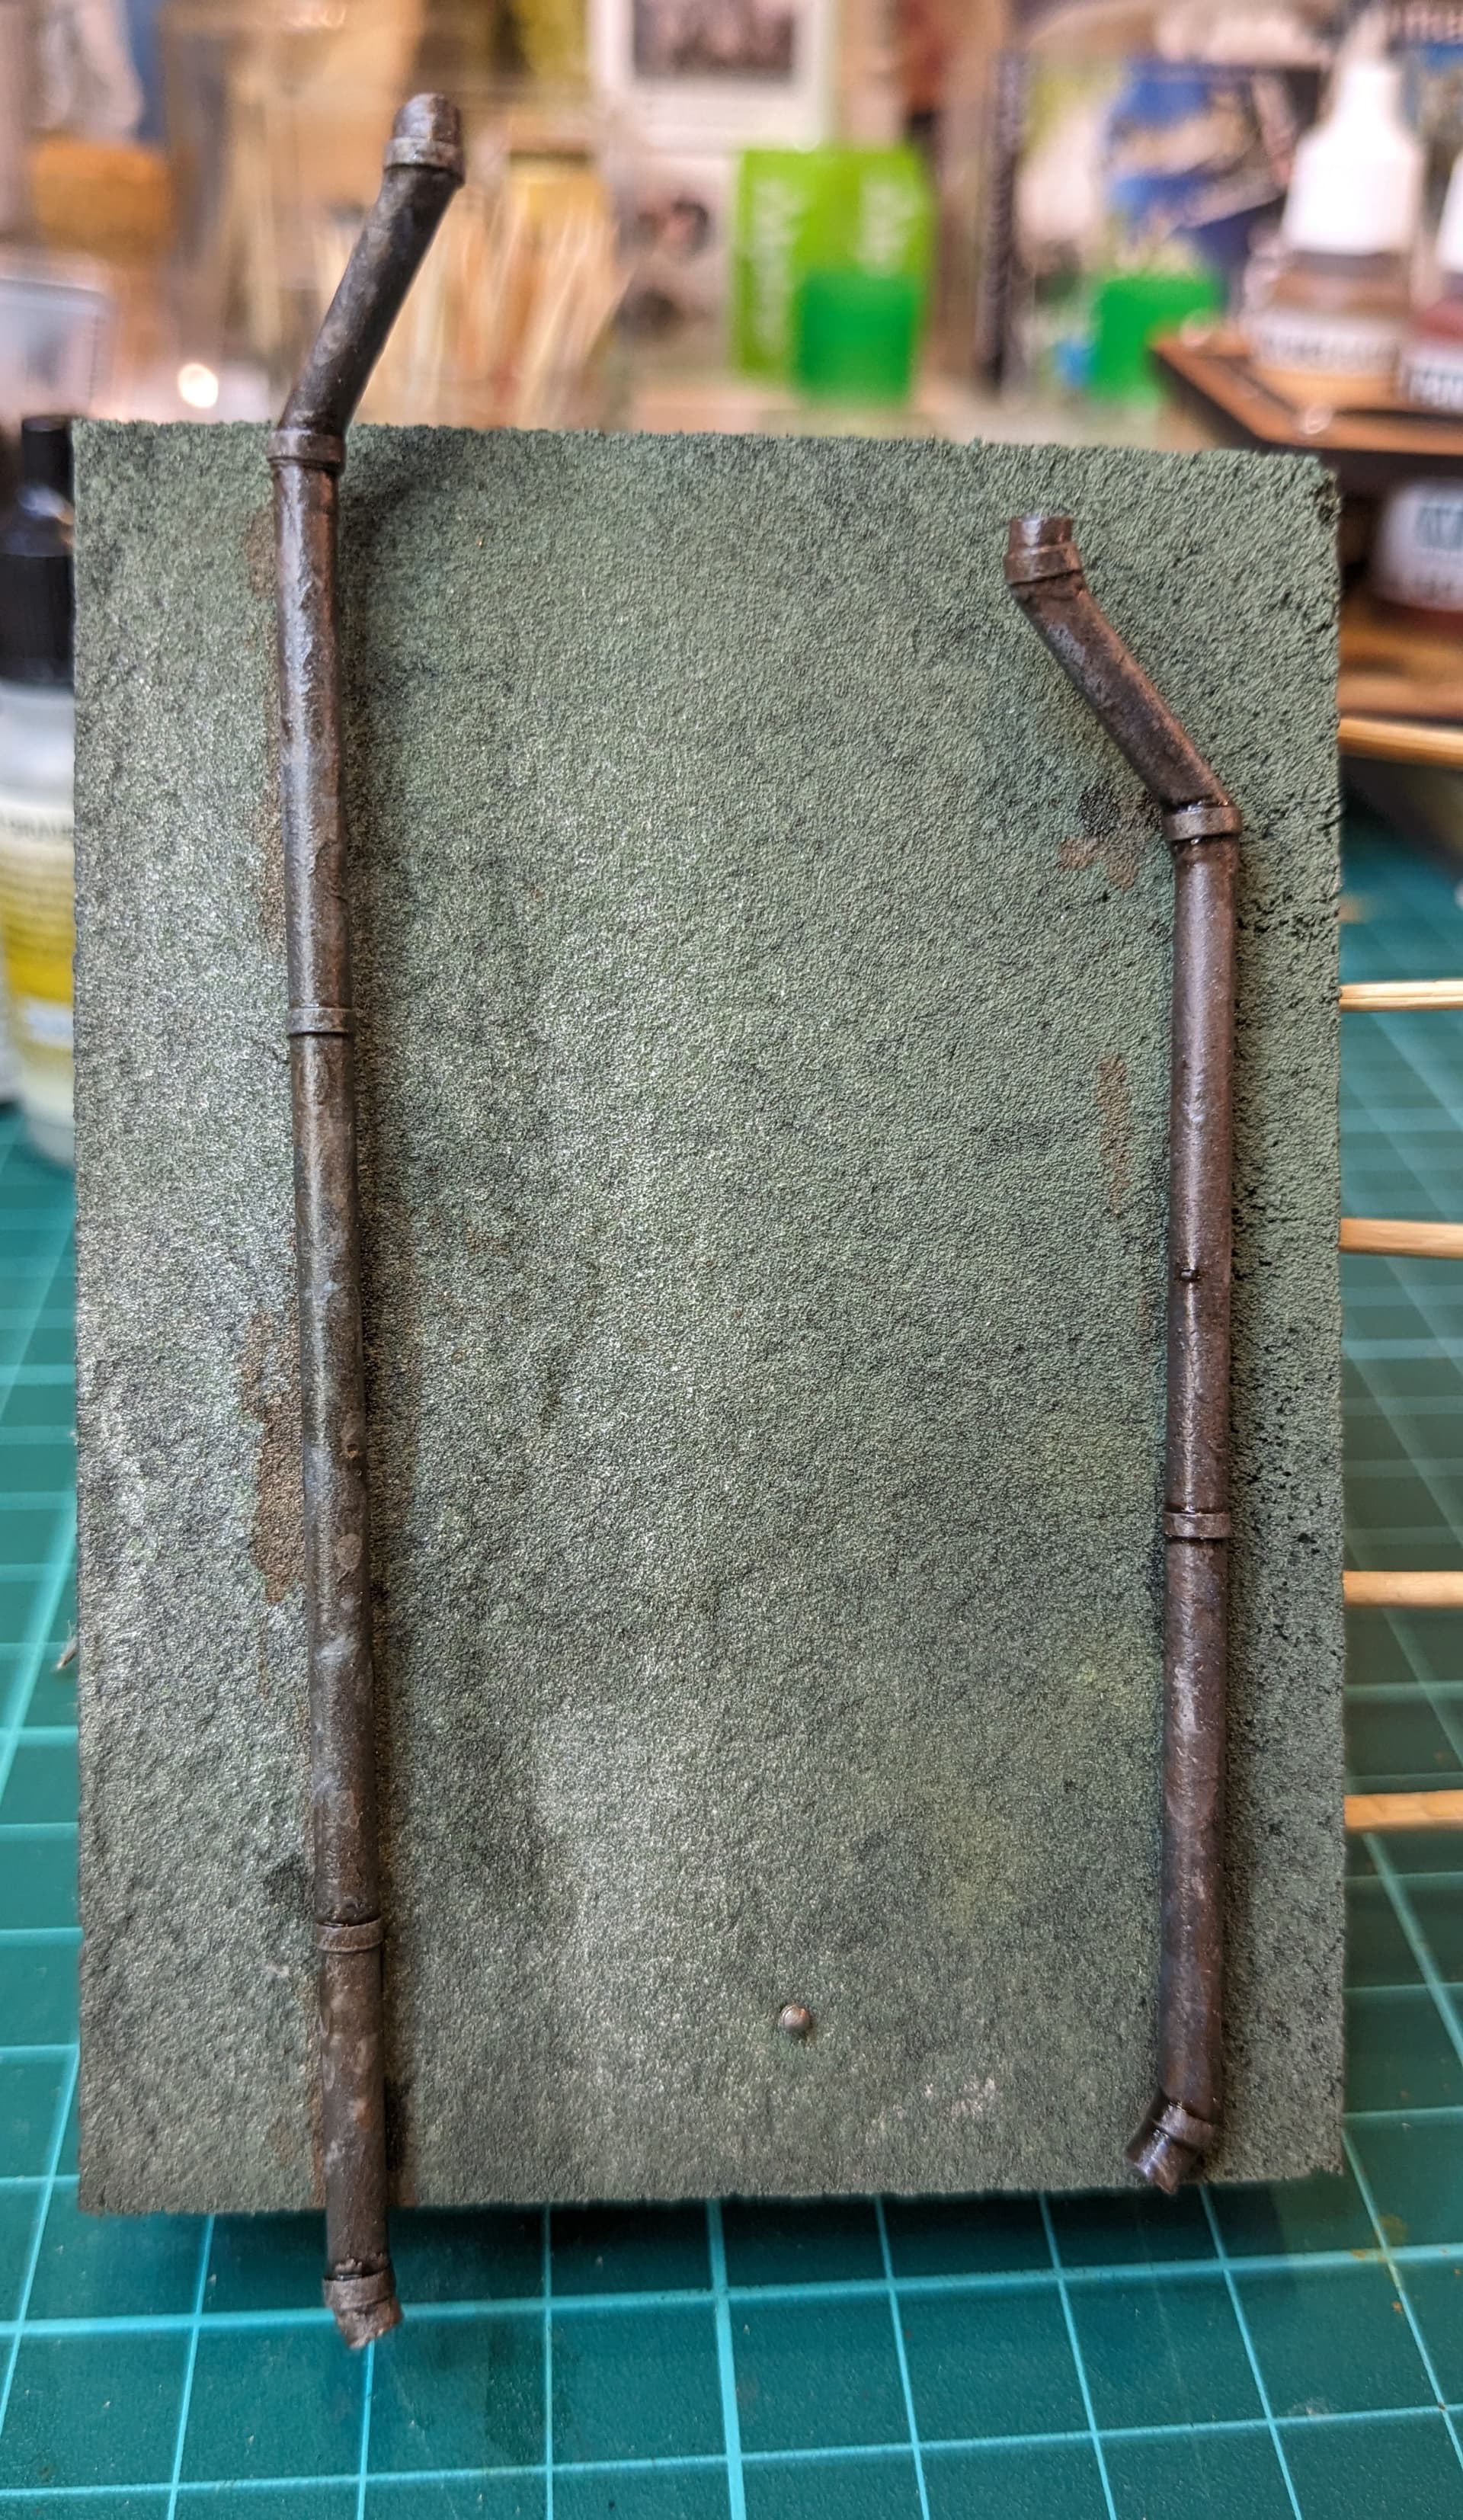
I didn’t take any ‘in action’ shots here, but the process is pretty simple. The gutters were made from ‘U’ shaped plastic card with capped ends and braces from plastic strip. The drainpipes are a bit more complicated, but made using hollow plastic rod. Once I had the basic section lengths worked out they were then attached to each other using pliable wire inserted into each end so that they could be bent into their final shape. The joints were then hidden with strips of masking tape. I think these were airbrushed with a black primer coat before I used the sponge method to colour them with various greys and rust tones.
Oh yes, and the other great thing about drainpipes? They are the perfect way to cover up the joins between the different pieces of foam board met. In fact to hold them in place - and make sure they lined up with the gaps - I glued metal pins into them and simply pushed them into the foam board with a bit of glue.
The final touch for the end wall was the addition of two wall braces.
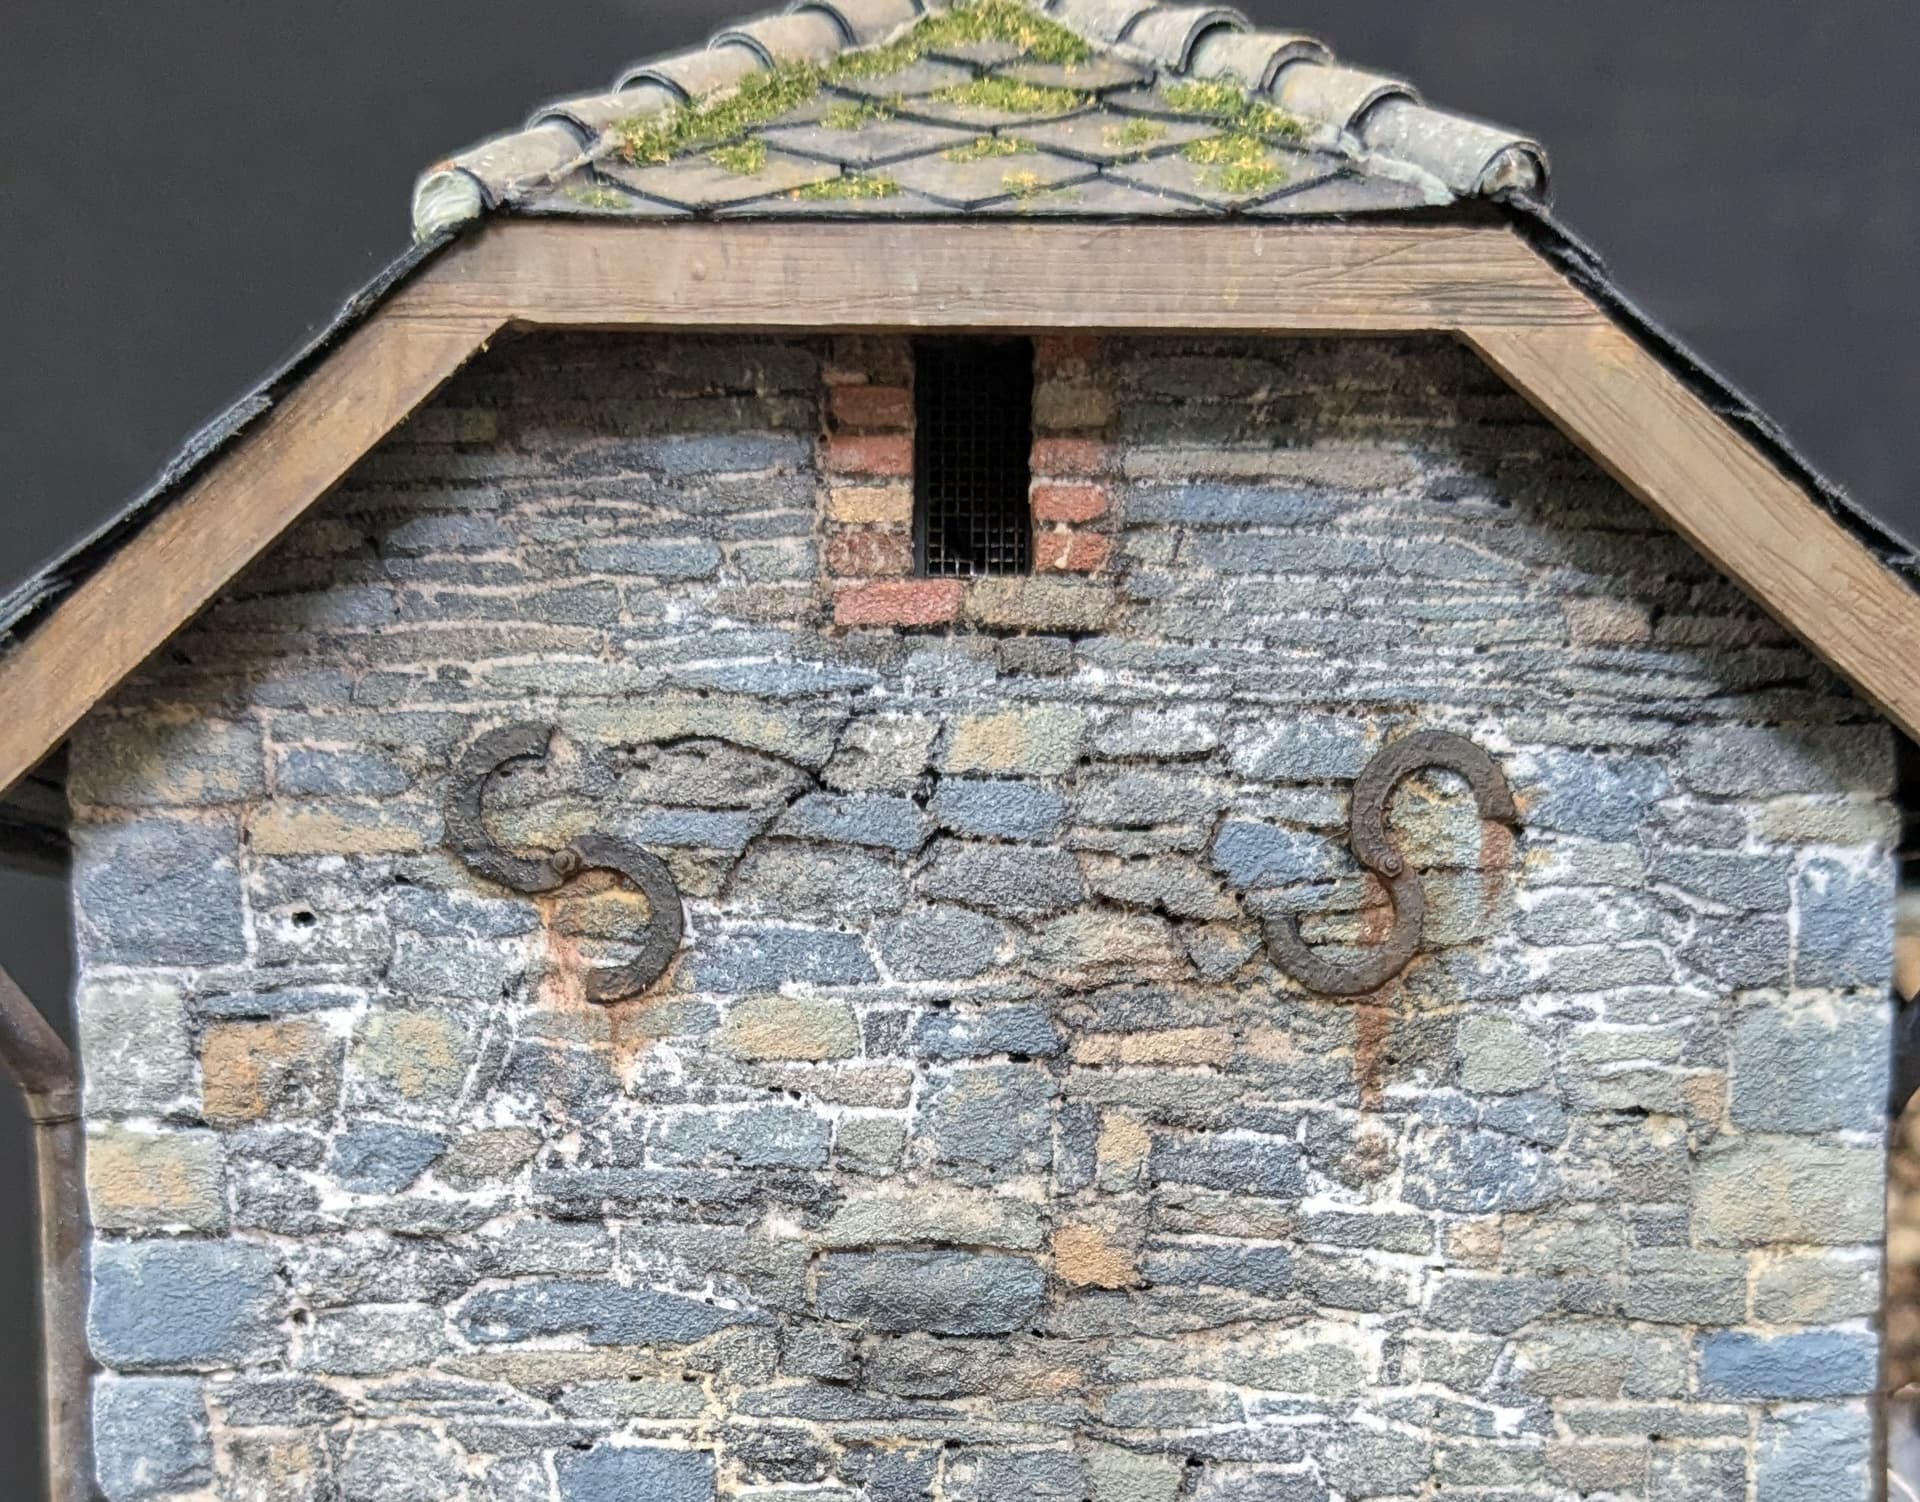
A common sight on old buildings, these come in all shapes and sizes. Although the most common is probably an ‘X’ shape, to be a little different I went for an ‘S’. To make each one I used an ordinary paper hole punch (and a bit of trial and error) to make two adjacent holes in some plastic sheet. I then drew a figure of 8 before cutting out the shape of a large ‘S’ around them. After a textured coating from stippled Mr Surfacer 500, a bolt from the spares box and another sponged paint job, they were simply attached with trusty UHU.
Adding algae
Not to be confused with the moss on the roof, tree and elsewhere, algae is that green discolouration that tends to form on wooden fences, etc in winter time. To be honest, it took me quite a long time to really notice this, because it tends to blend in with the surrounding vegetation - but when you look its actually pretty vivid. So I chose some fairly vivid acrylics to match and applied it with washes and stippling to achieve the desired effect.
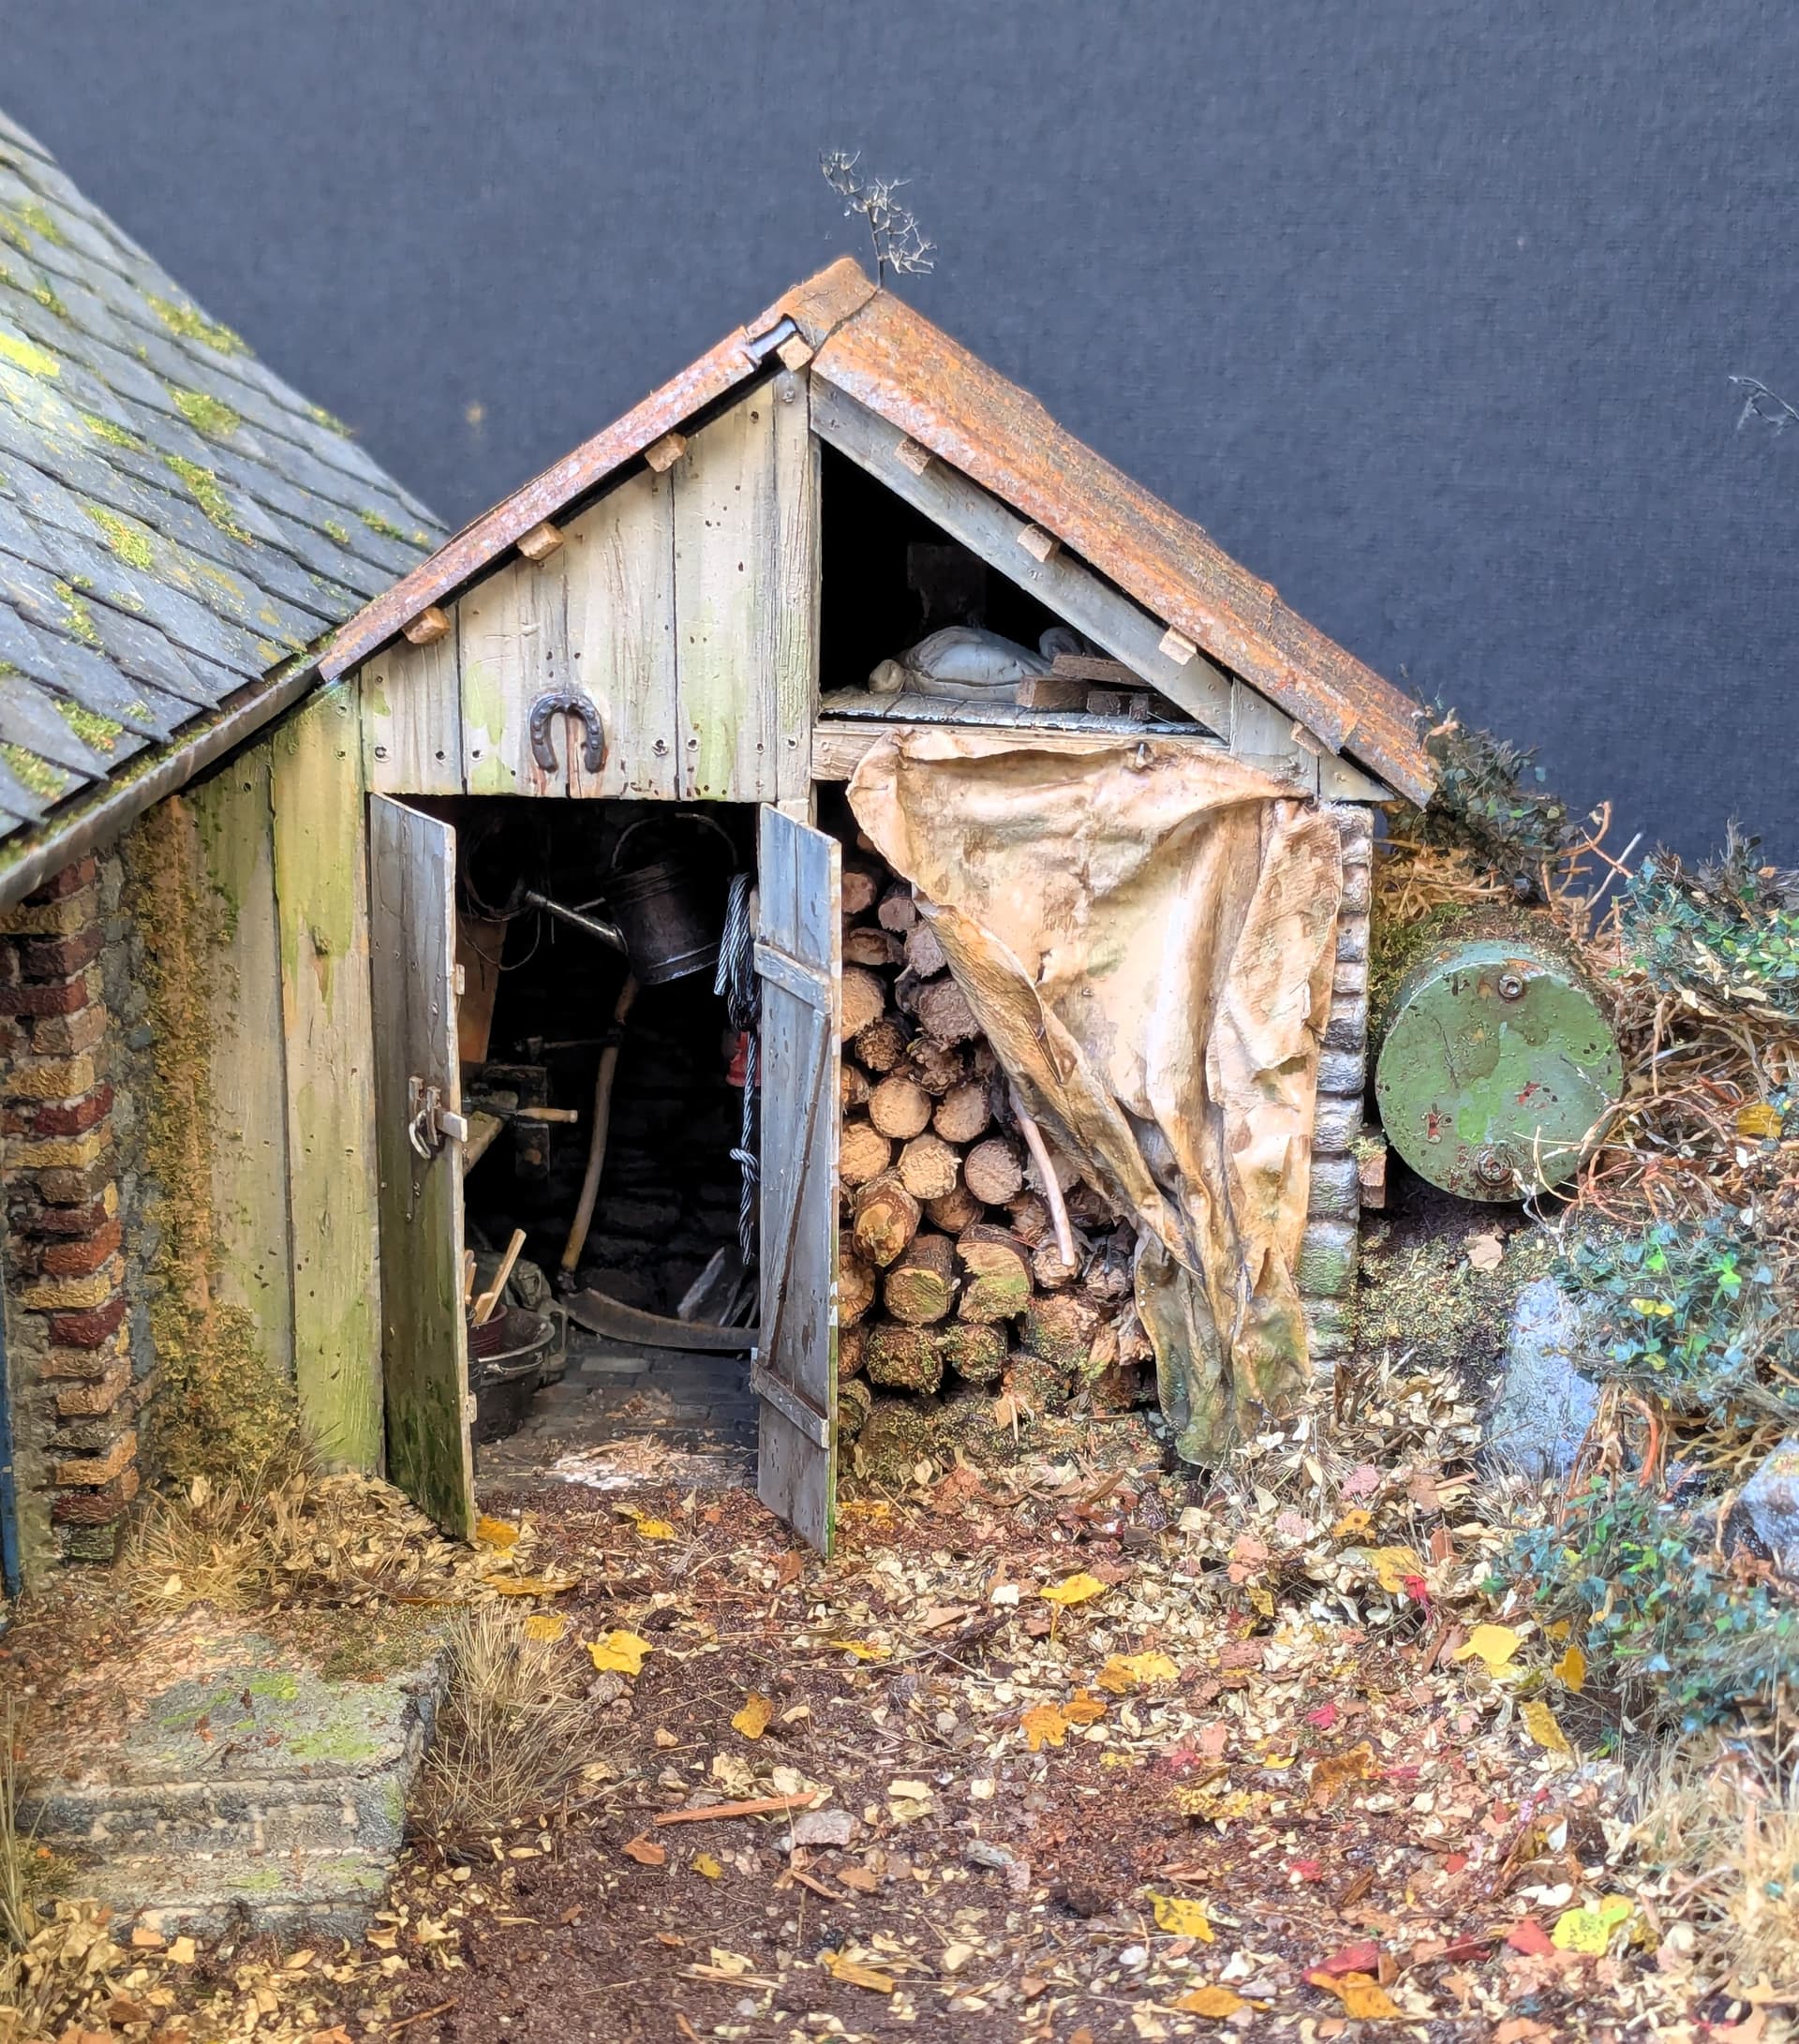
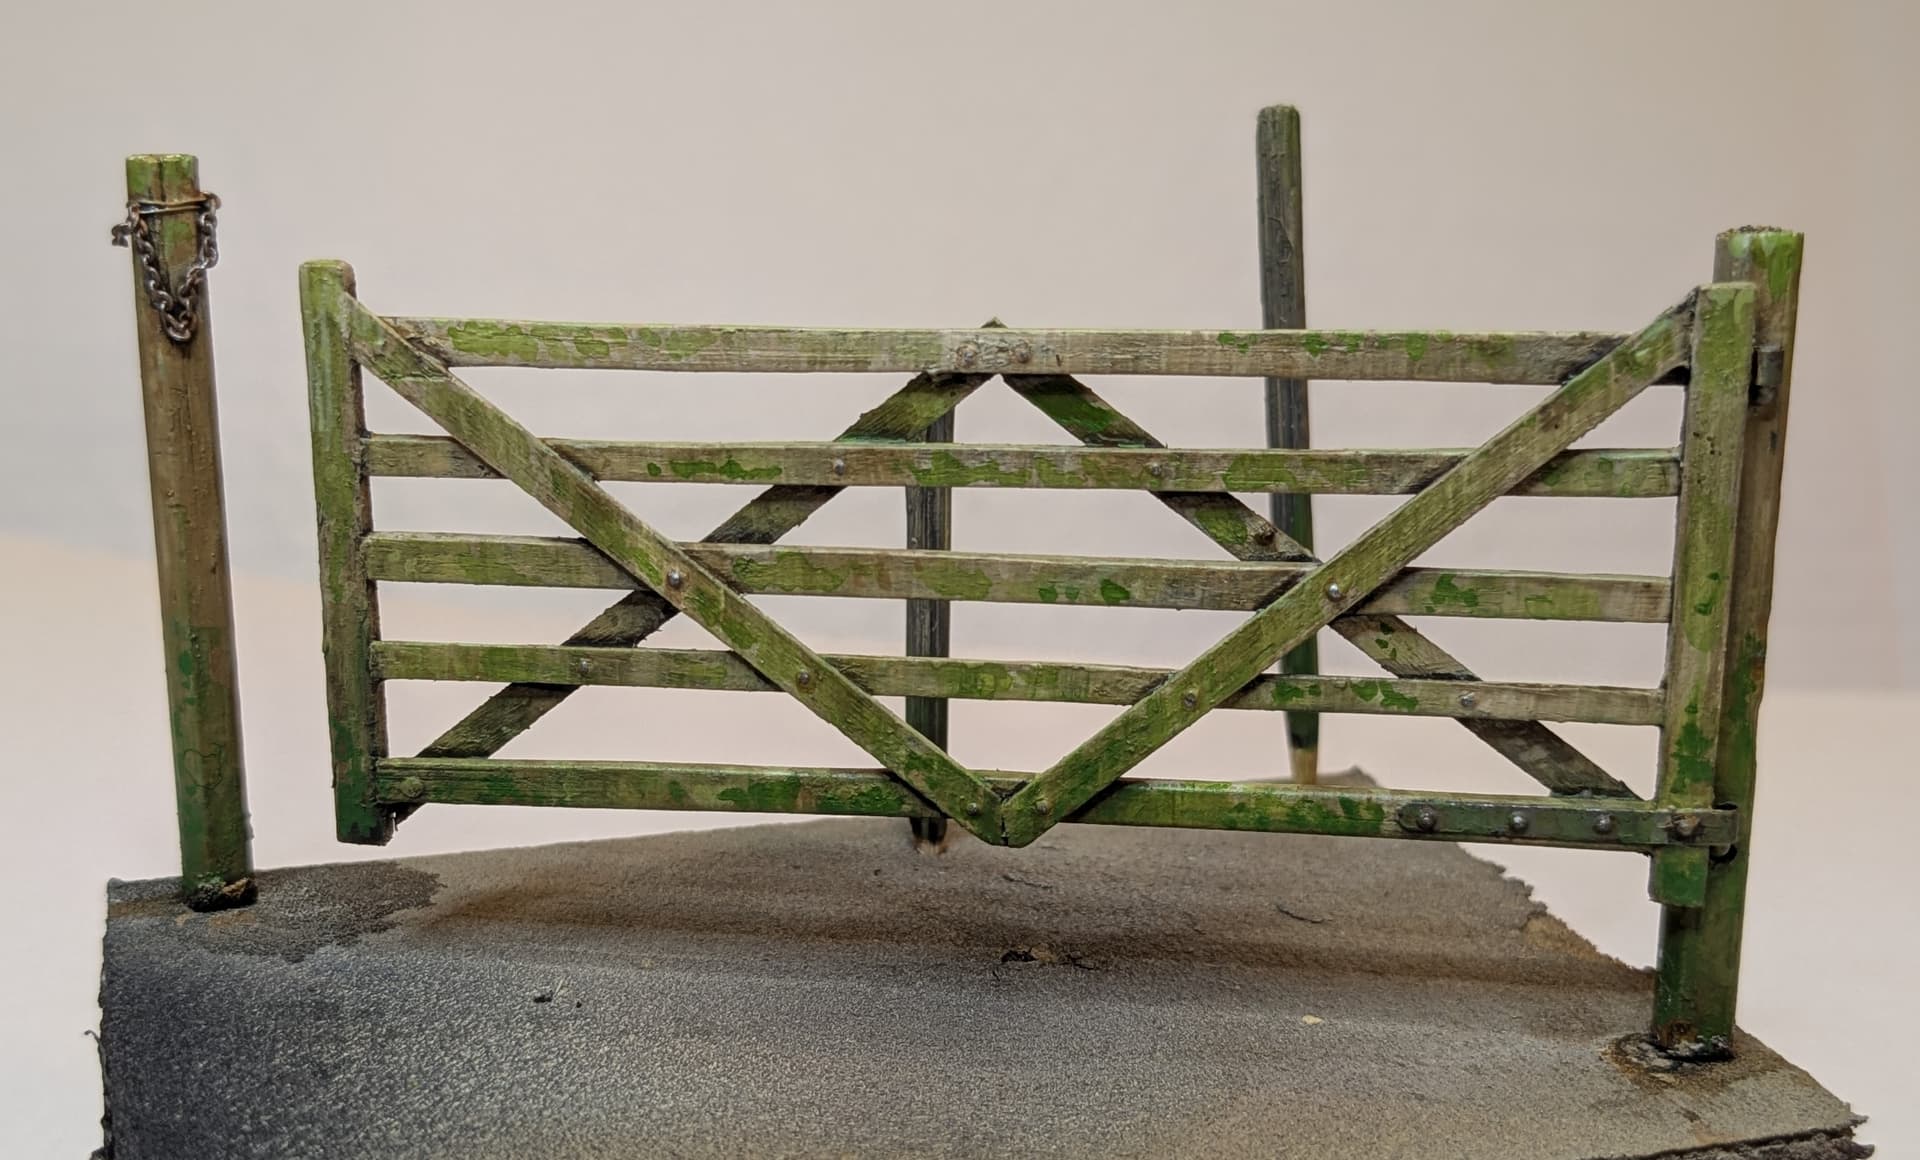
I will probably be adding more of this, but the effect is especially satisfying on the shed, gate and fence posts.
18 Likes
It is indeed a very clever way around attaching branches. I would like to offer two alternatives. After the truck, main limbs, and smaller branches are built I figure out where the sea foam twigs want to be. I then drill a hole into and place a small amount of, either Fibre Paste, or acrylic Modeling Paste into and around the hole. Insert sea foam “branch” and scupt, whichever paste you choose, around the base of the branch to incorporate it into the natural growth of the tree.
The second method I only use where space allows. Drill the hole, dab with ca glue, insert sea foam, dust heavily with baking soda. Done.
Really great work here Tim. I have enjoyed the journey.
5 Likes
Fantastic work. ![]()
Regards Christian
2 Likes
Thanks Evan.
Yes, I agree that’s a good tip - drilling + super glue is probably the safest bet!
I’m not planning another tree anytime soon, but next time I will give it some thought…
1 Like
Thanks Christian!
1 Like
Sd.Kfz 250/1 Ausf B / Neu halftrack in the early stages of the Ardennes Offensive Part 1
I have now reached a point with the diorama where I really need the vehicles to catch up. But first a recap…
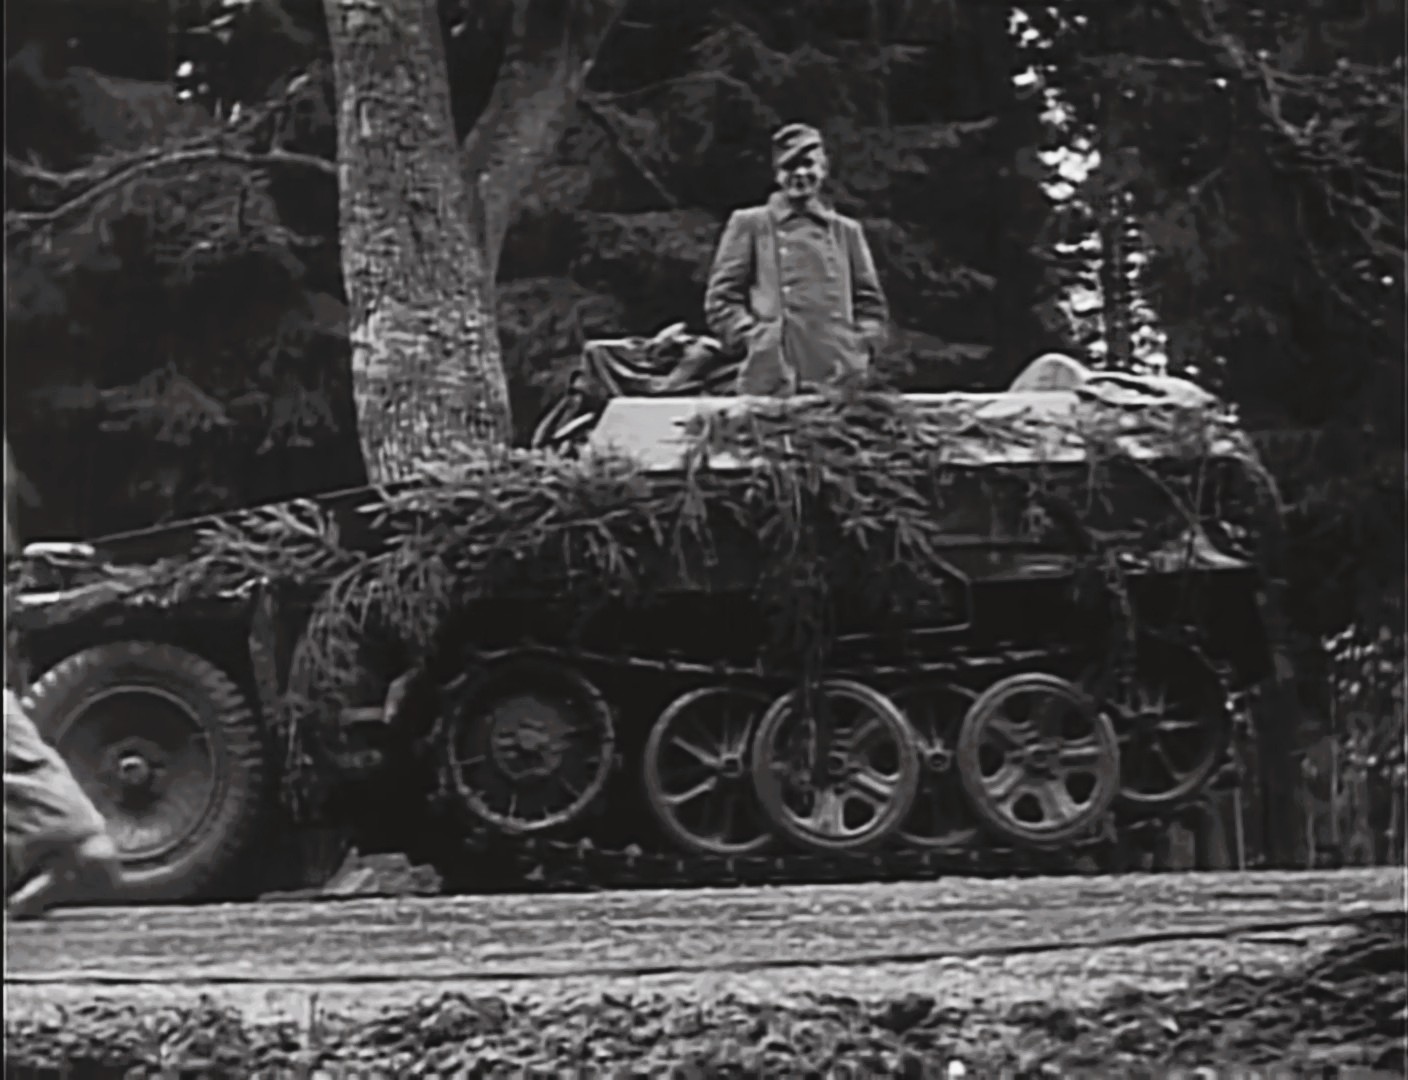
The shot above may not look very exciting, but it has been a huge inspiration for this diorama. A still taken from the well known German newsreel (later captured by the Allies), it shows a heavily camouflaged 250/1 halftrack parked by the side of the road at the Kaiserbaracke Crossroads.
I covered this in detail way, way above but one of the best known parts of this footage is undoubtedly the clip showing a Schwimmwagen parked near a roadsign with a cigar-chomping NCO and driver wearing a flying helmet. The former has often been mis-identified as Joachim Peiper, but his rank patches show that he was an Unterscharführer (or Sergeant) and he has never been identified as far as I know.
Another well known sequence shows Tiger 222 trundling past with a load of Fallschirmjäger aboard. These tank riders would also be photographed at some point sharing cigarettes with the crew.
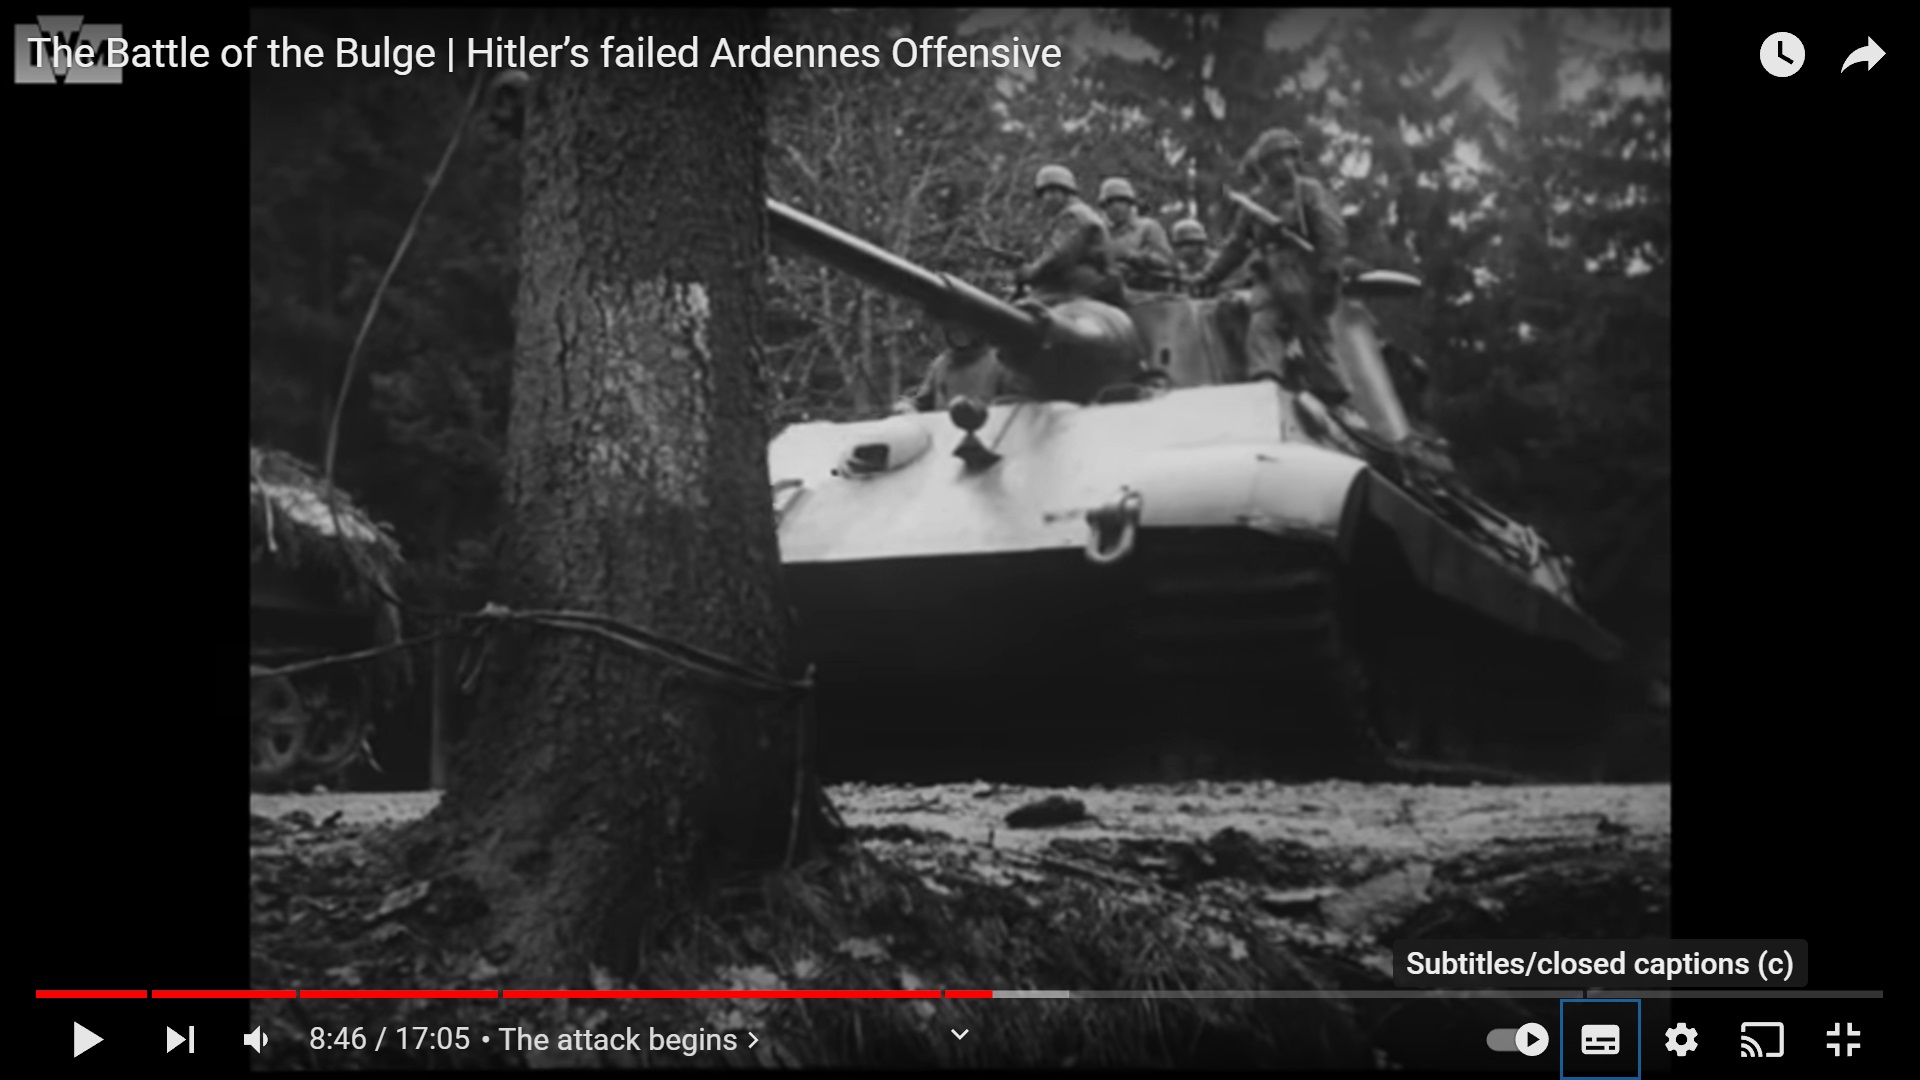
This is probably where some confusion has arisen as to which Kampfgruppe is being shown here, because that Tiger was definitely part of Kampfgruppe Peiper (and ultimately ended up being knocked out near the bridge in Stavelot on the 19th December). However, it had experienced mechanical troubles and at the time it was spotted passing through the Kaiserbaracke crossroads it was simply in the process of catching up!
The date quoted for the footage is 18th December 1944. This appears correct because the crossroads were captured at around 5pm on the 17th (when it would have been dark) and the well known ‘Ambush at Poteau’ (after which more famous images were taken, including shots of a smoking Panzergrenadiers sheltering near knocked out US vehicles) actually occurred at around 7am on the 18th December.
Poteau was only a few miles West of the crossroads and various sources say that this engagement (in which several US vehicles were left abandoned and burning on the road) involved Kampfgruppe Hansen, one of three other Kampfgruppes (along with Knittel and Sandig) that were following in the wake of the spearhead of Kampfgruppe Peiper. Since the vehicles shown in the footage were heading in roughly the same direction, it looks as if they were also part of one of those supporting Kampfgruppes.
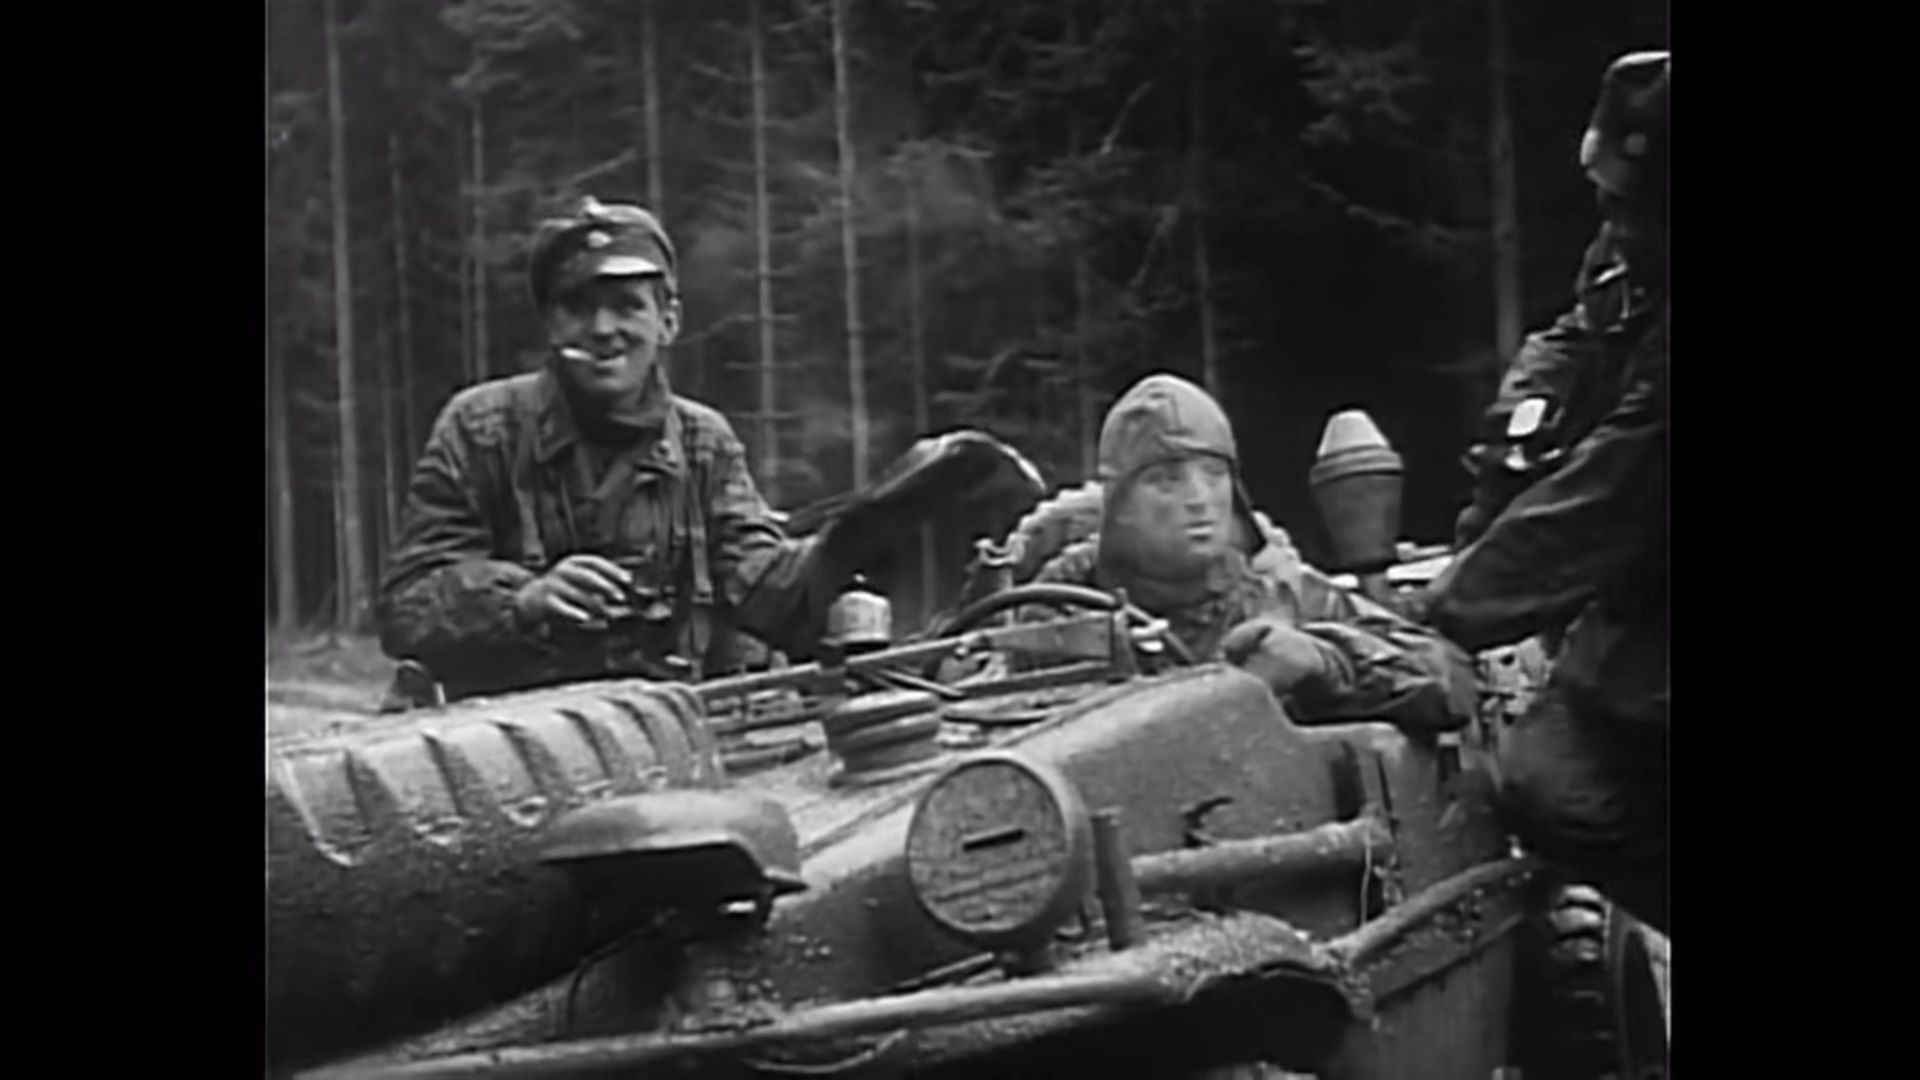
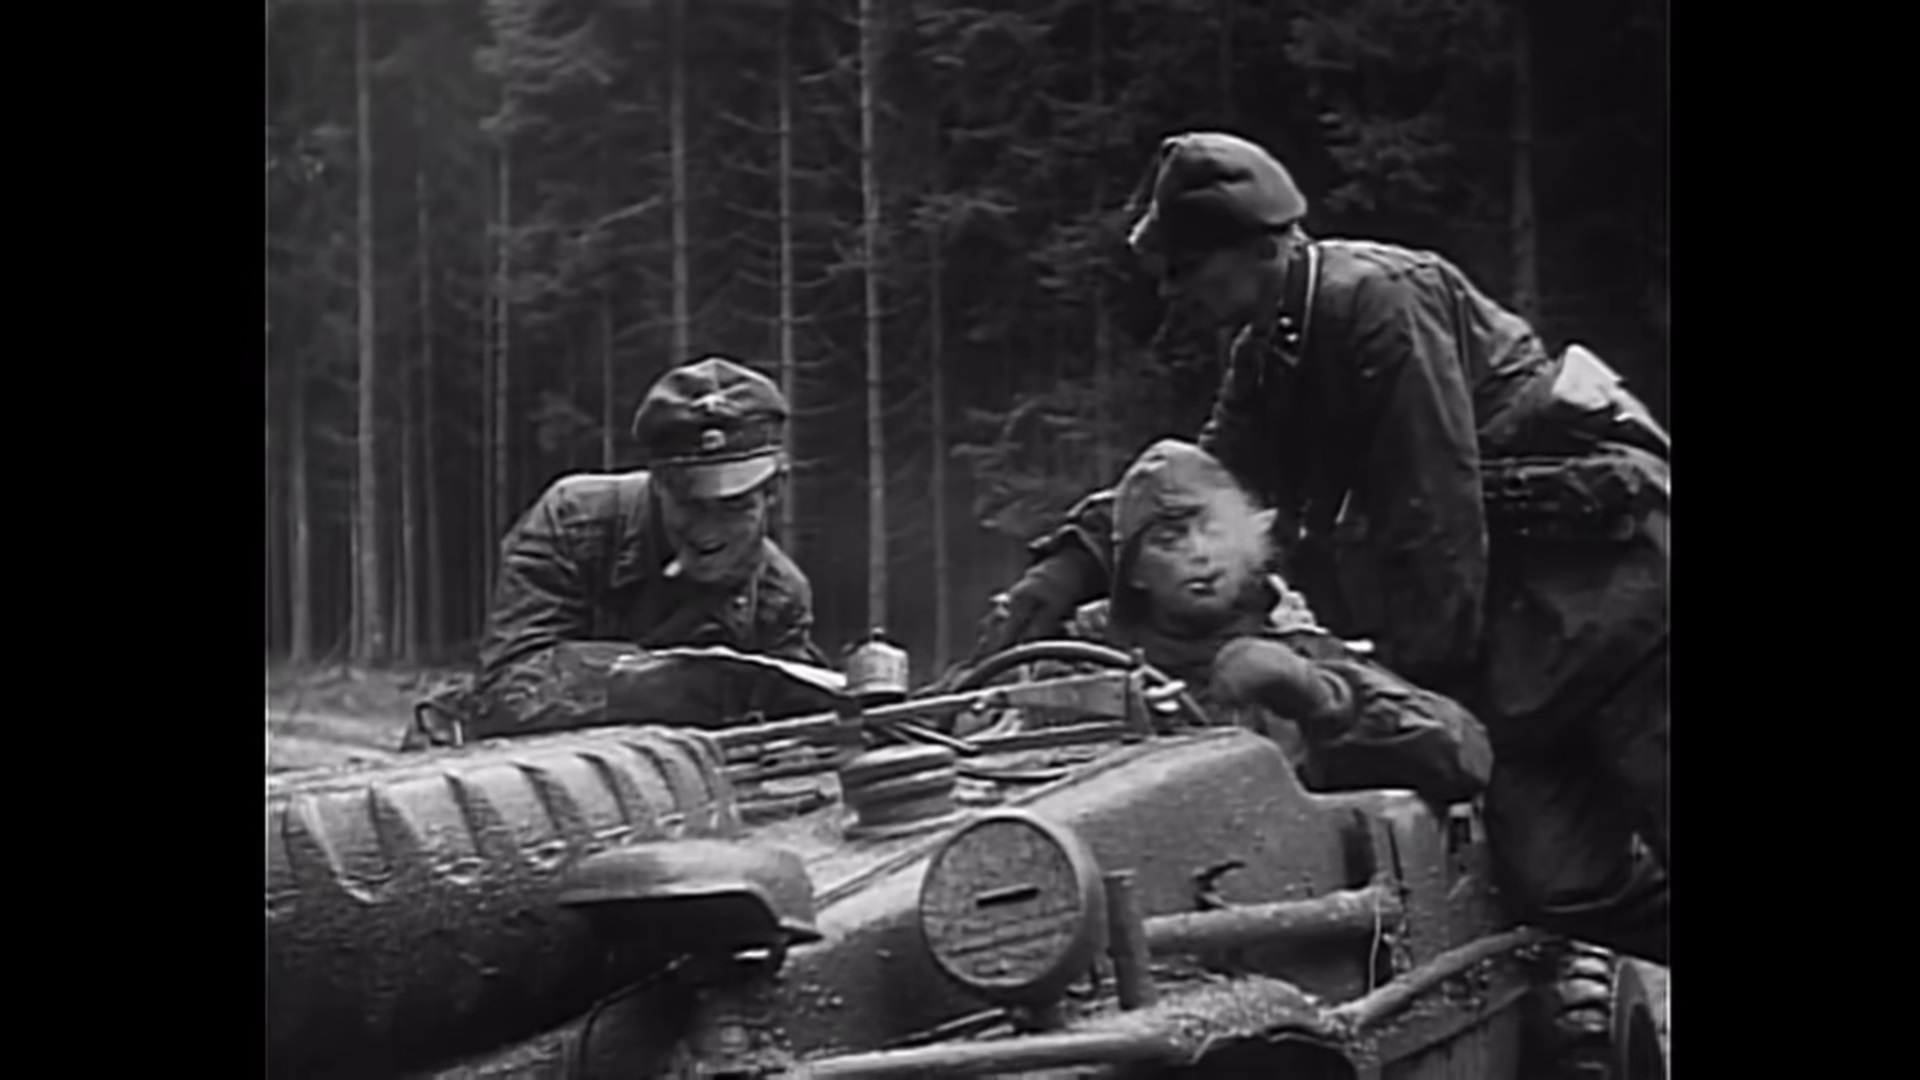
Other clips from the same sequence show Schwimmwagens passing other 250 halftracks.
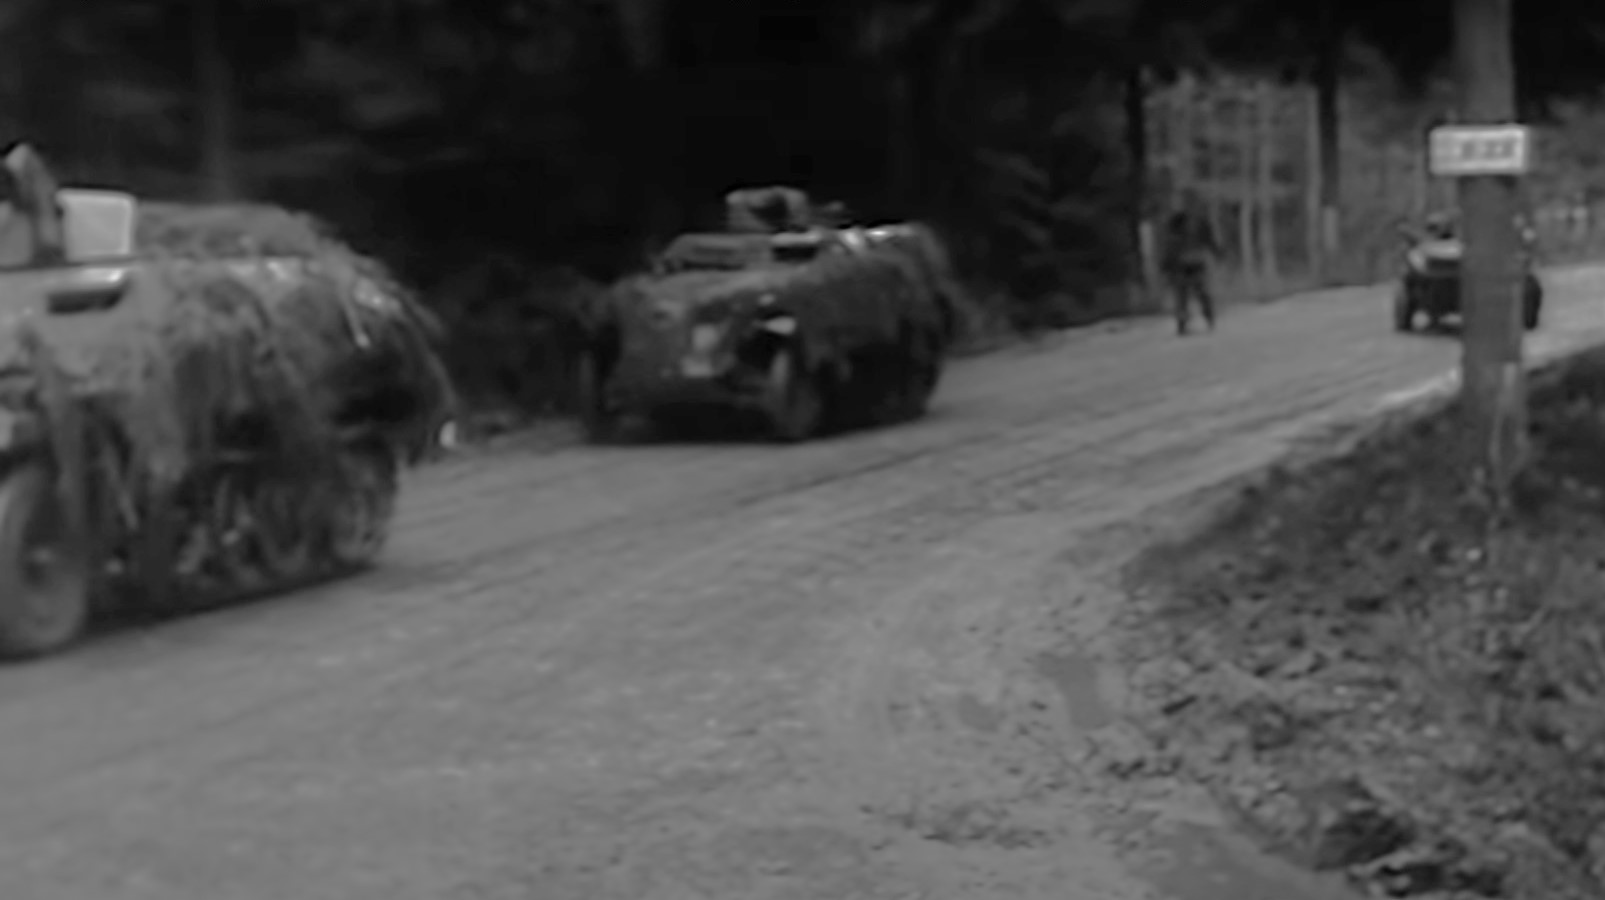
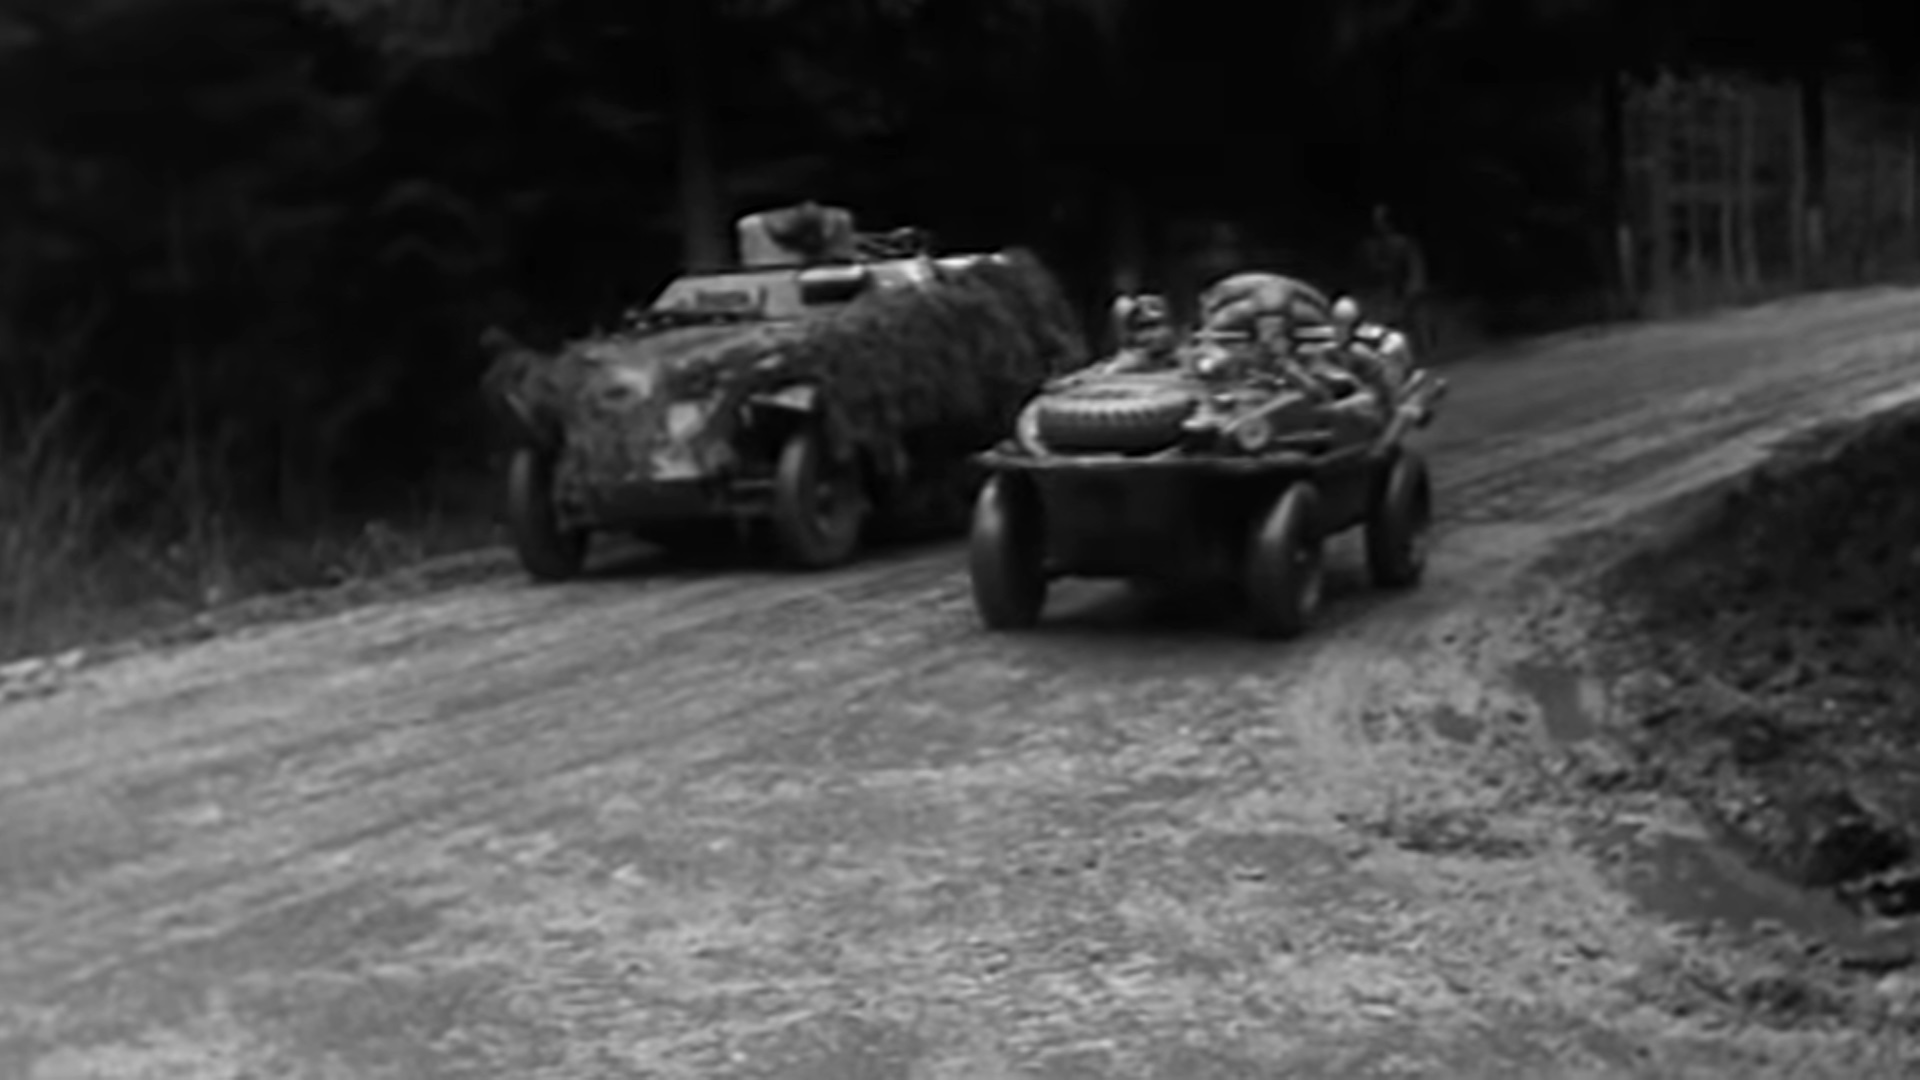
We also see two of the soldiers who were seen conferring over a map with the Schwimmagen in front of the sign post walking past the same parked 250.
So it would appear that the vehicles are all part of the same unit. This makes sense because the 250 was a small, relatively fast and agile vehicle with decent off-road capability and the Schwim was fast and also pretty rugged.
Anyway, the point is this: if we want to see an image of a relatively fresh LSSAH recce group of one of the Kampfgruppe plunging into enemy territory during the early days of the Ardennes offensive then this is it.
Despite the poor quality of the images, some details of the 250 stand out. There is the smiling, greatcoat clad panzergrenadier for a start: morale was high at this point (at least in the lower ranks). Then there is the liberal use of conifers to camouflage the vehicle. It is also notable that the forward-facing MG is covered and the AA pintle mount is still shrouded in the rear part of the canopy which covers the crew compartment. Presumably at this stage the cloud cover was such that noone was worried about Normandy-style Jabo attacks…
Overall, the halftrack appears to be in good condition. I emphasise this, because so many photos that we see of German vehicles in this campaign were taken after much of the fighting was over and show wrecks (often covered in snow). Having said that, the Schwimmwagen already has a smashed windscreen. Perhaps it had already been in action before returning to the rear and was now advancing again?
Next time: I tackle the build!

16 Likes
Nice build up to this stage Tim! Nice analysis too to identify a suitable modelling subject! Lovely work all round!
2 Likes
Thanks Sam. More to come…
1 Like
I don’t think I left any remarks yet but I have been following this build, absolutely love everything so far and taking notes on the work on the house. I’m working on a smaller Stoumont diorama myself and am nearing the point of finishing the structure.
The 250 halftrakcks photographed would indeed be from Schnelle Gruppe Knittel while they were following behind the other KG’s to capitalize on the breakthrough (which didn’t materialize). Timo Worst has an absolutely biblical knowledge on Knittel’s group, between Facebook for the Kinttel Books website almost any question could be answered. I don’t immediately recall, but the KIT’s in that footage could be the ones which ended up with Knittel’s guys.
Looking forward to the next installment!
2 Likes
Sd.Kfz 250/1 Ausf B / Neu halftrack in the early stages of the Ardennes Offensive Part 2
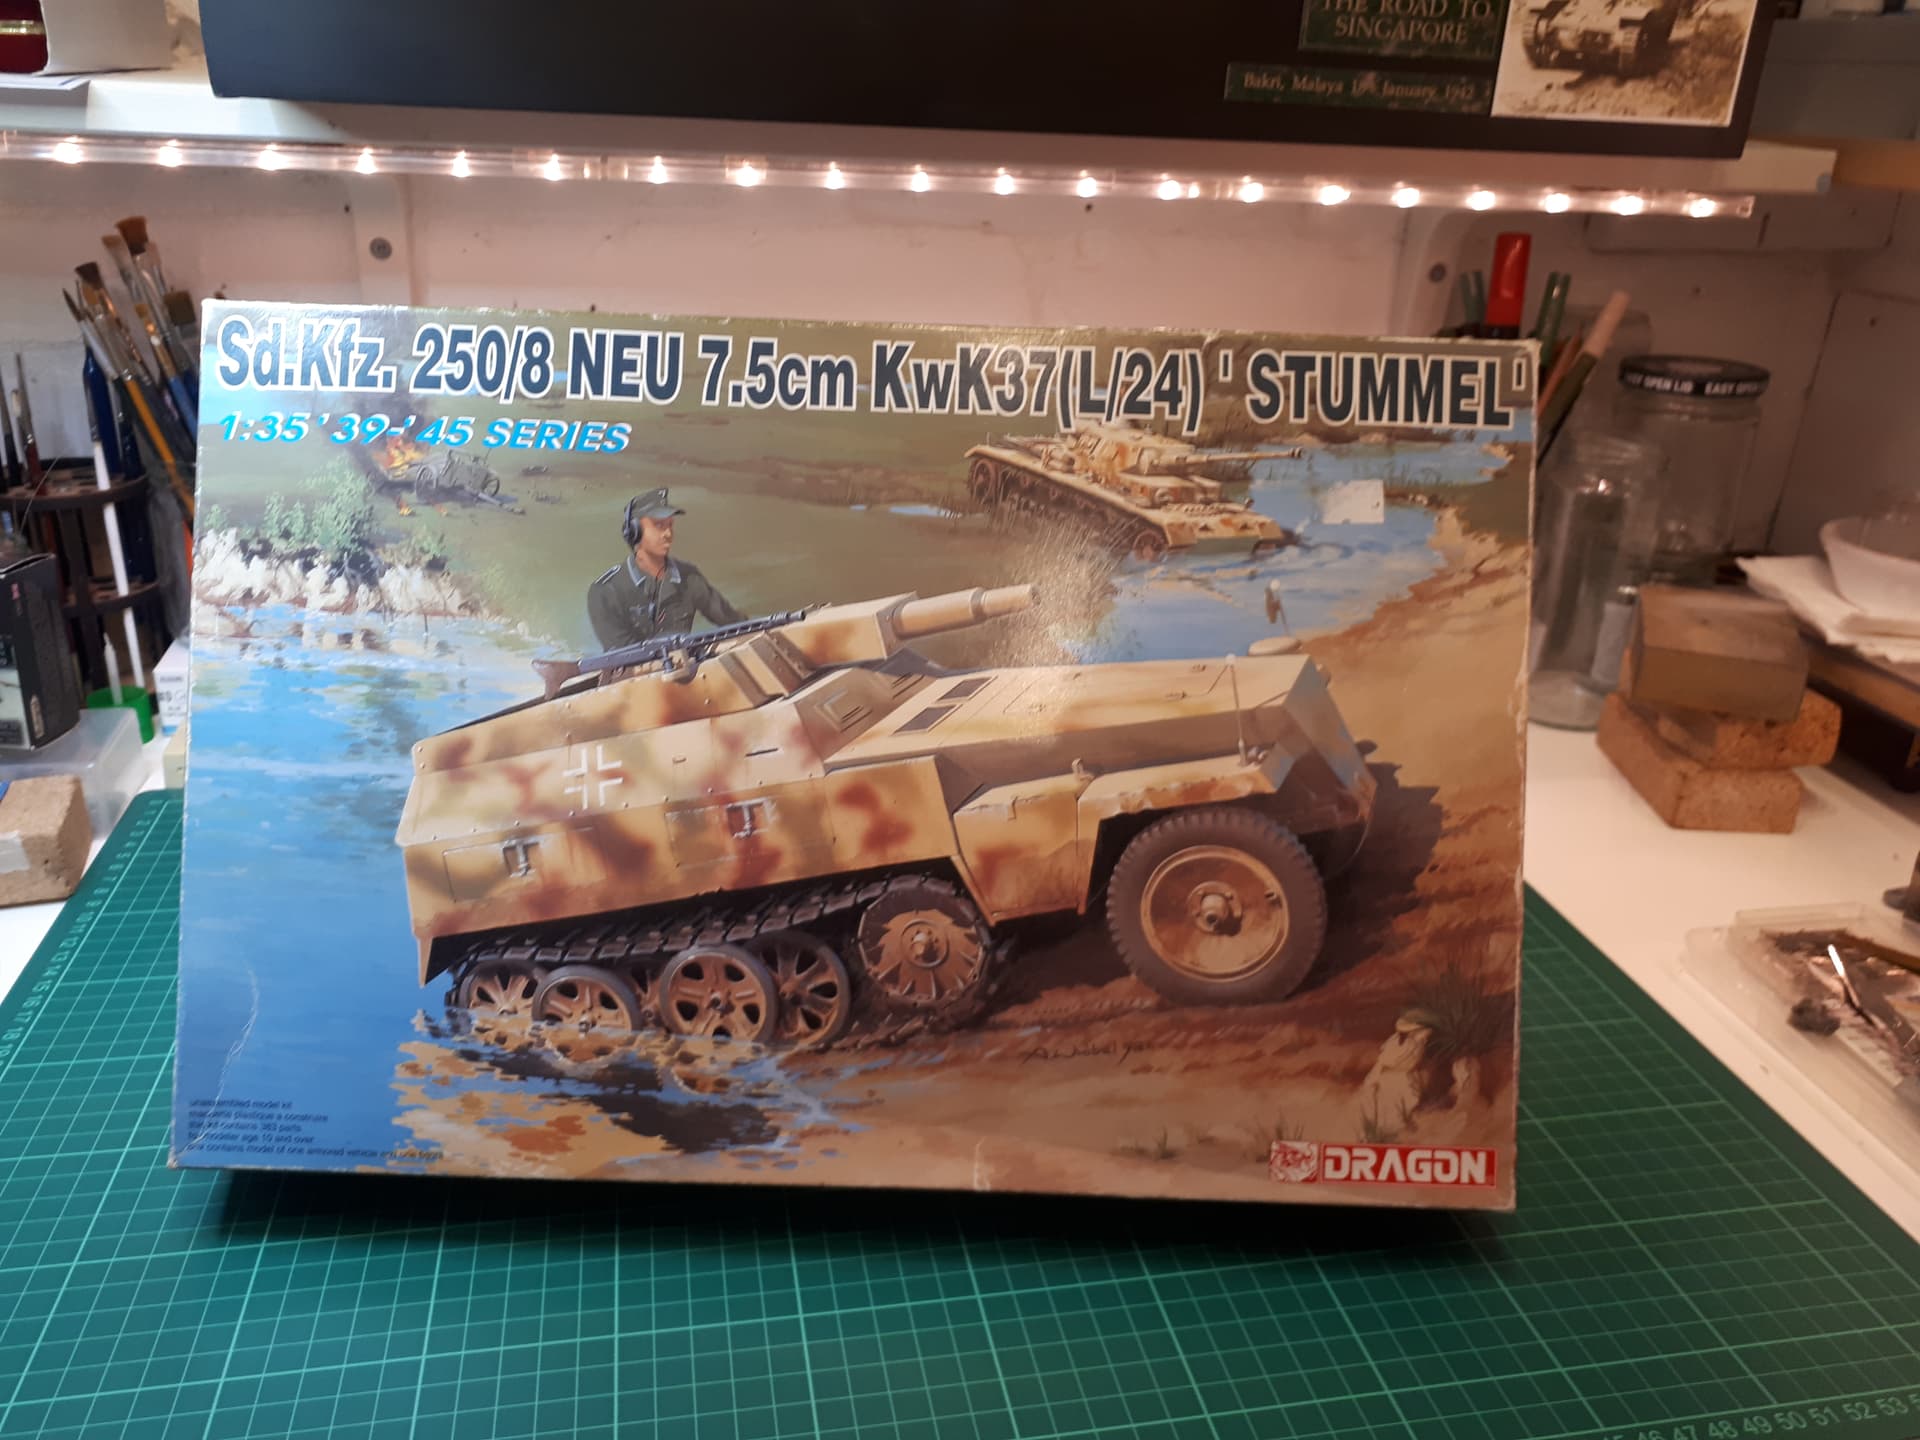
I have to admit that I have long had a soft spot for the Sd.Kfz 250 and the late Ausf B version in particular. It tends to be overshadowed by its much larger cousin the 251, but with its short length and snub nose there is something almost cute about it!
When I was last modelling back in the 80s, when the only kits available were the early Ausf A versions by Tamiya (notably Rommel’s famous ‘Grief’ 250/3 variant with the frame antenna), I even contemplated a partial scratchbuild. Luckily in 1998 Dragon finally got around filling the gap.
The kit I used for my Sd.Kfz 250/1 ‘neu’ halftrack was actually the Dragon 250/8 which I found second hand at IPMS Scale Model World in Telford a couple of years back. Since the kit also includes all the parts for the original 250/1, this didn’t matter.
This kit has actually been released in a number of versions, some under the Cyber Hobby brand and most recently by Das Werk. However, they are essentially the same basic kit with a few add-ons and tweaks.
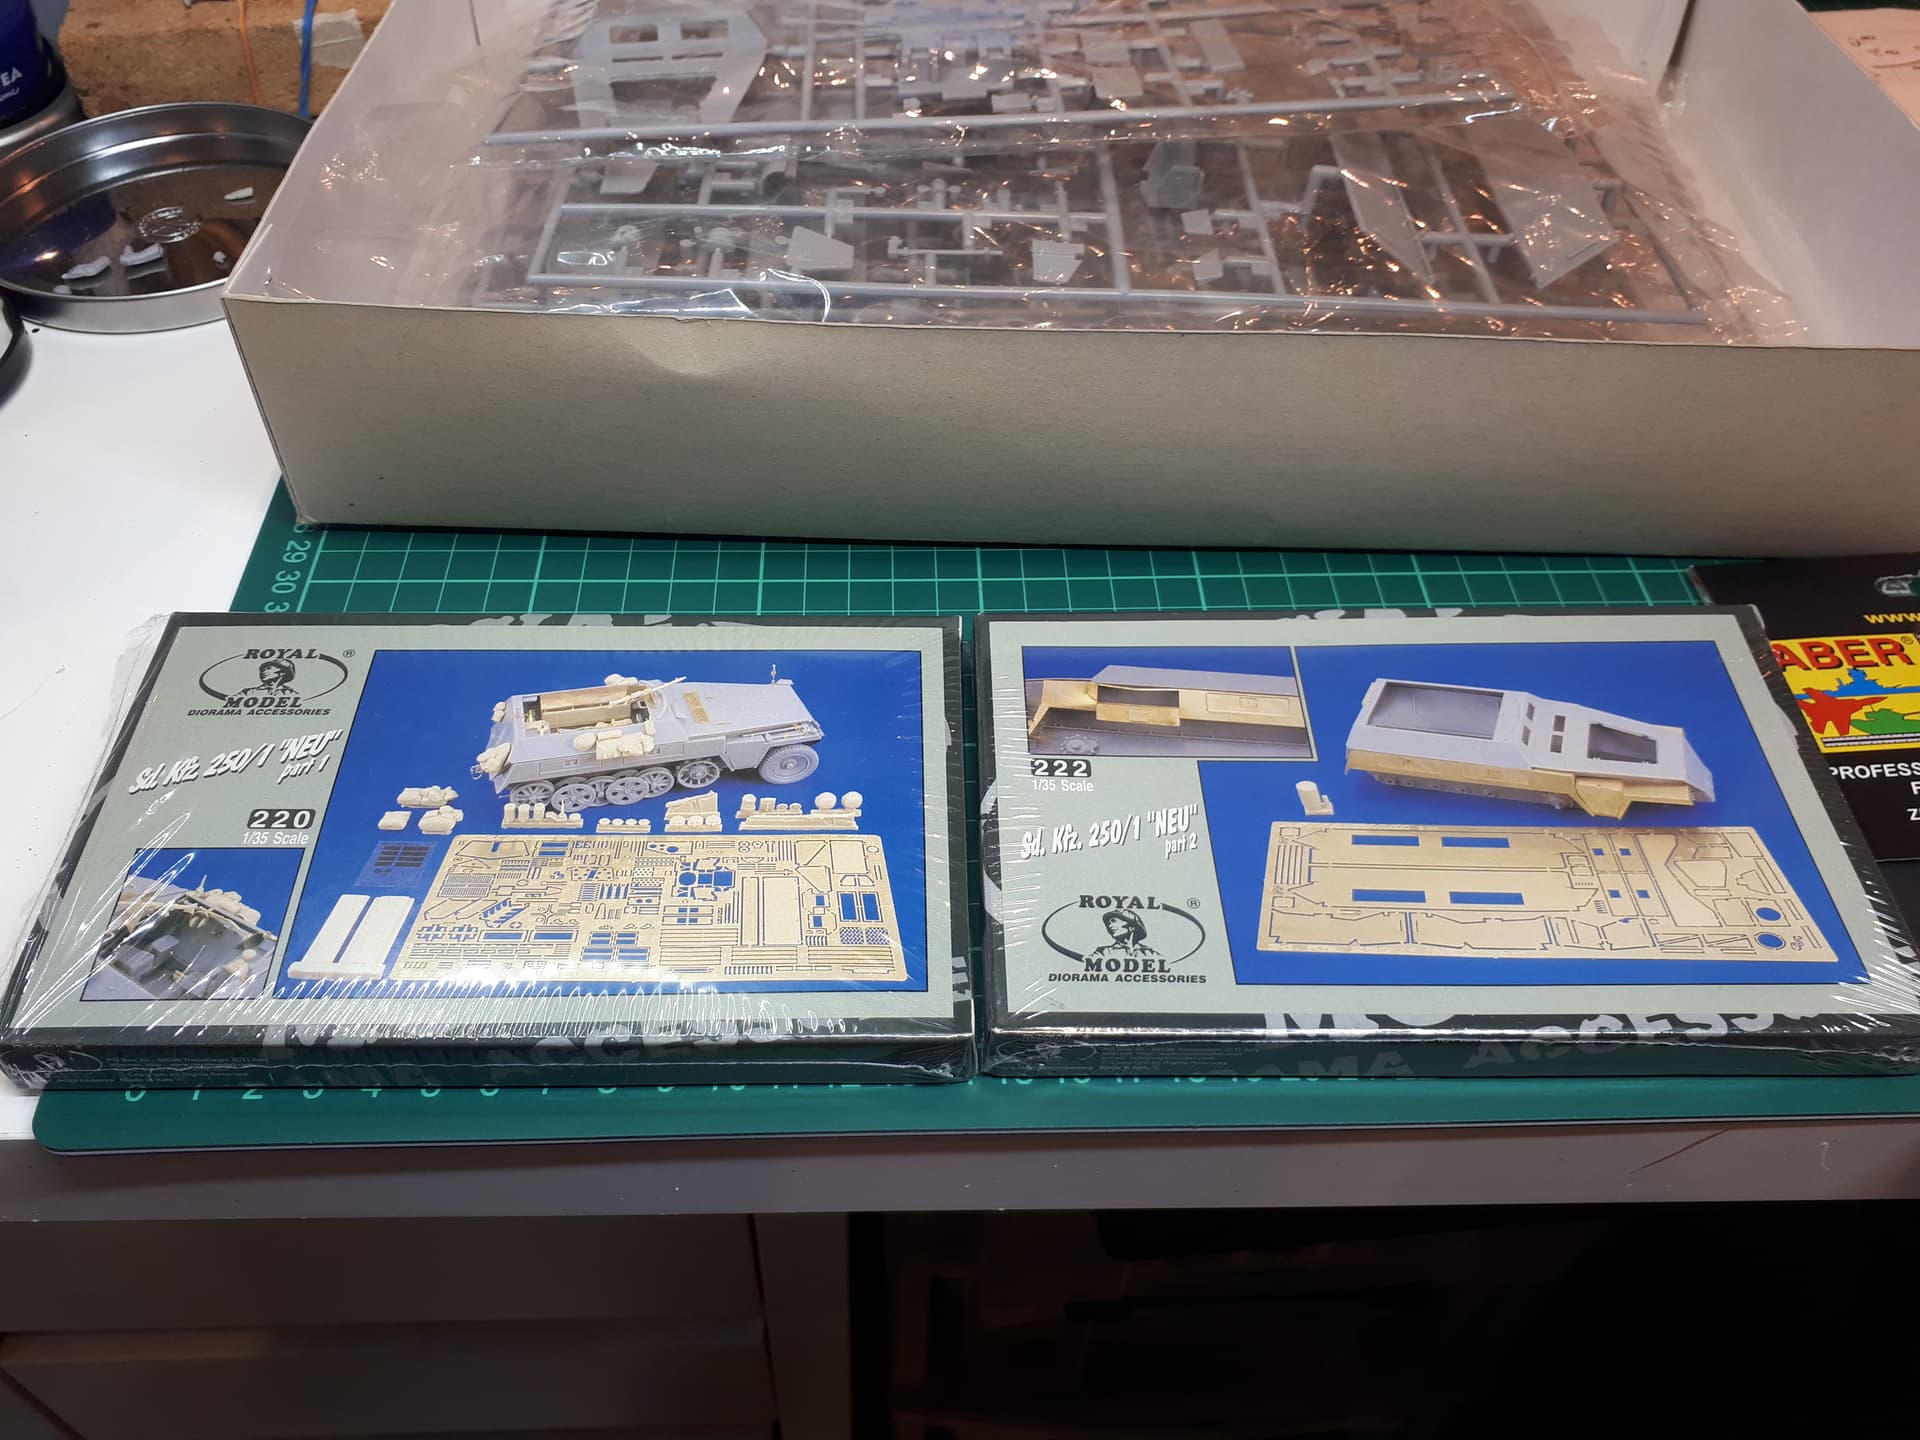
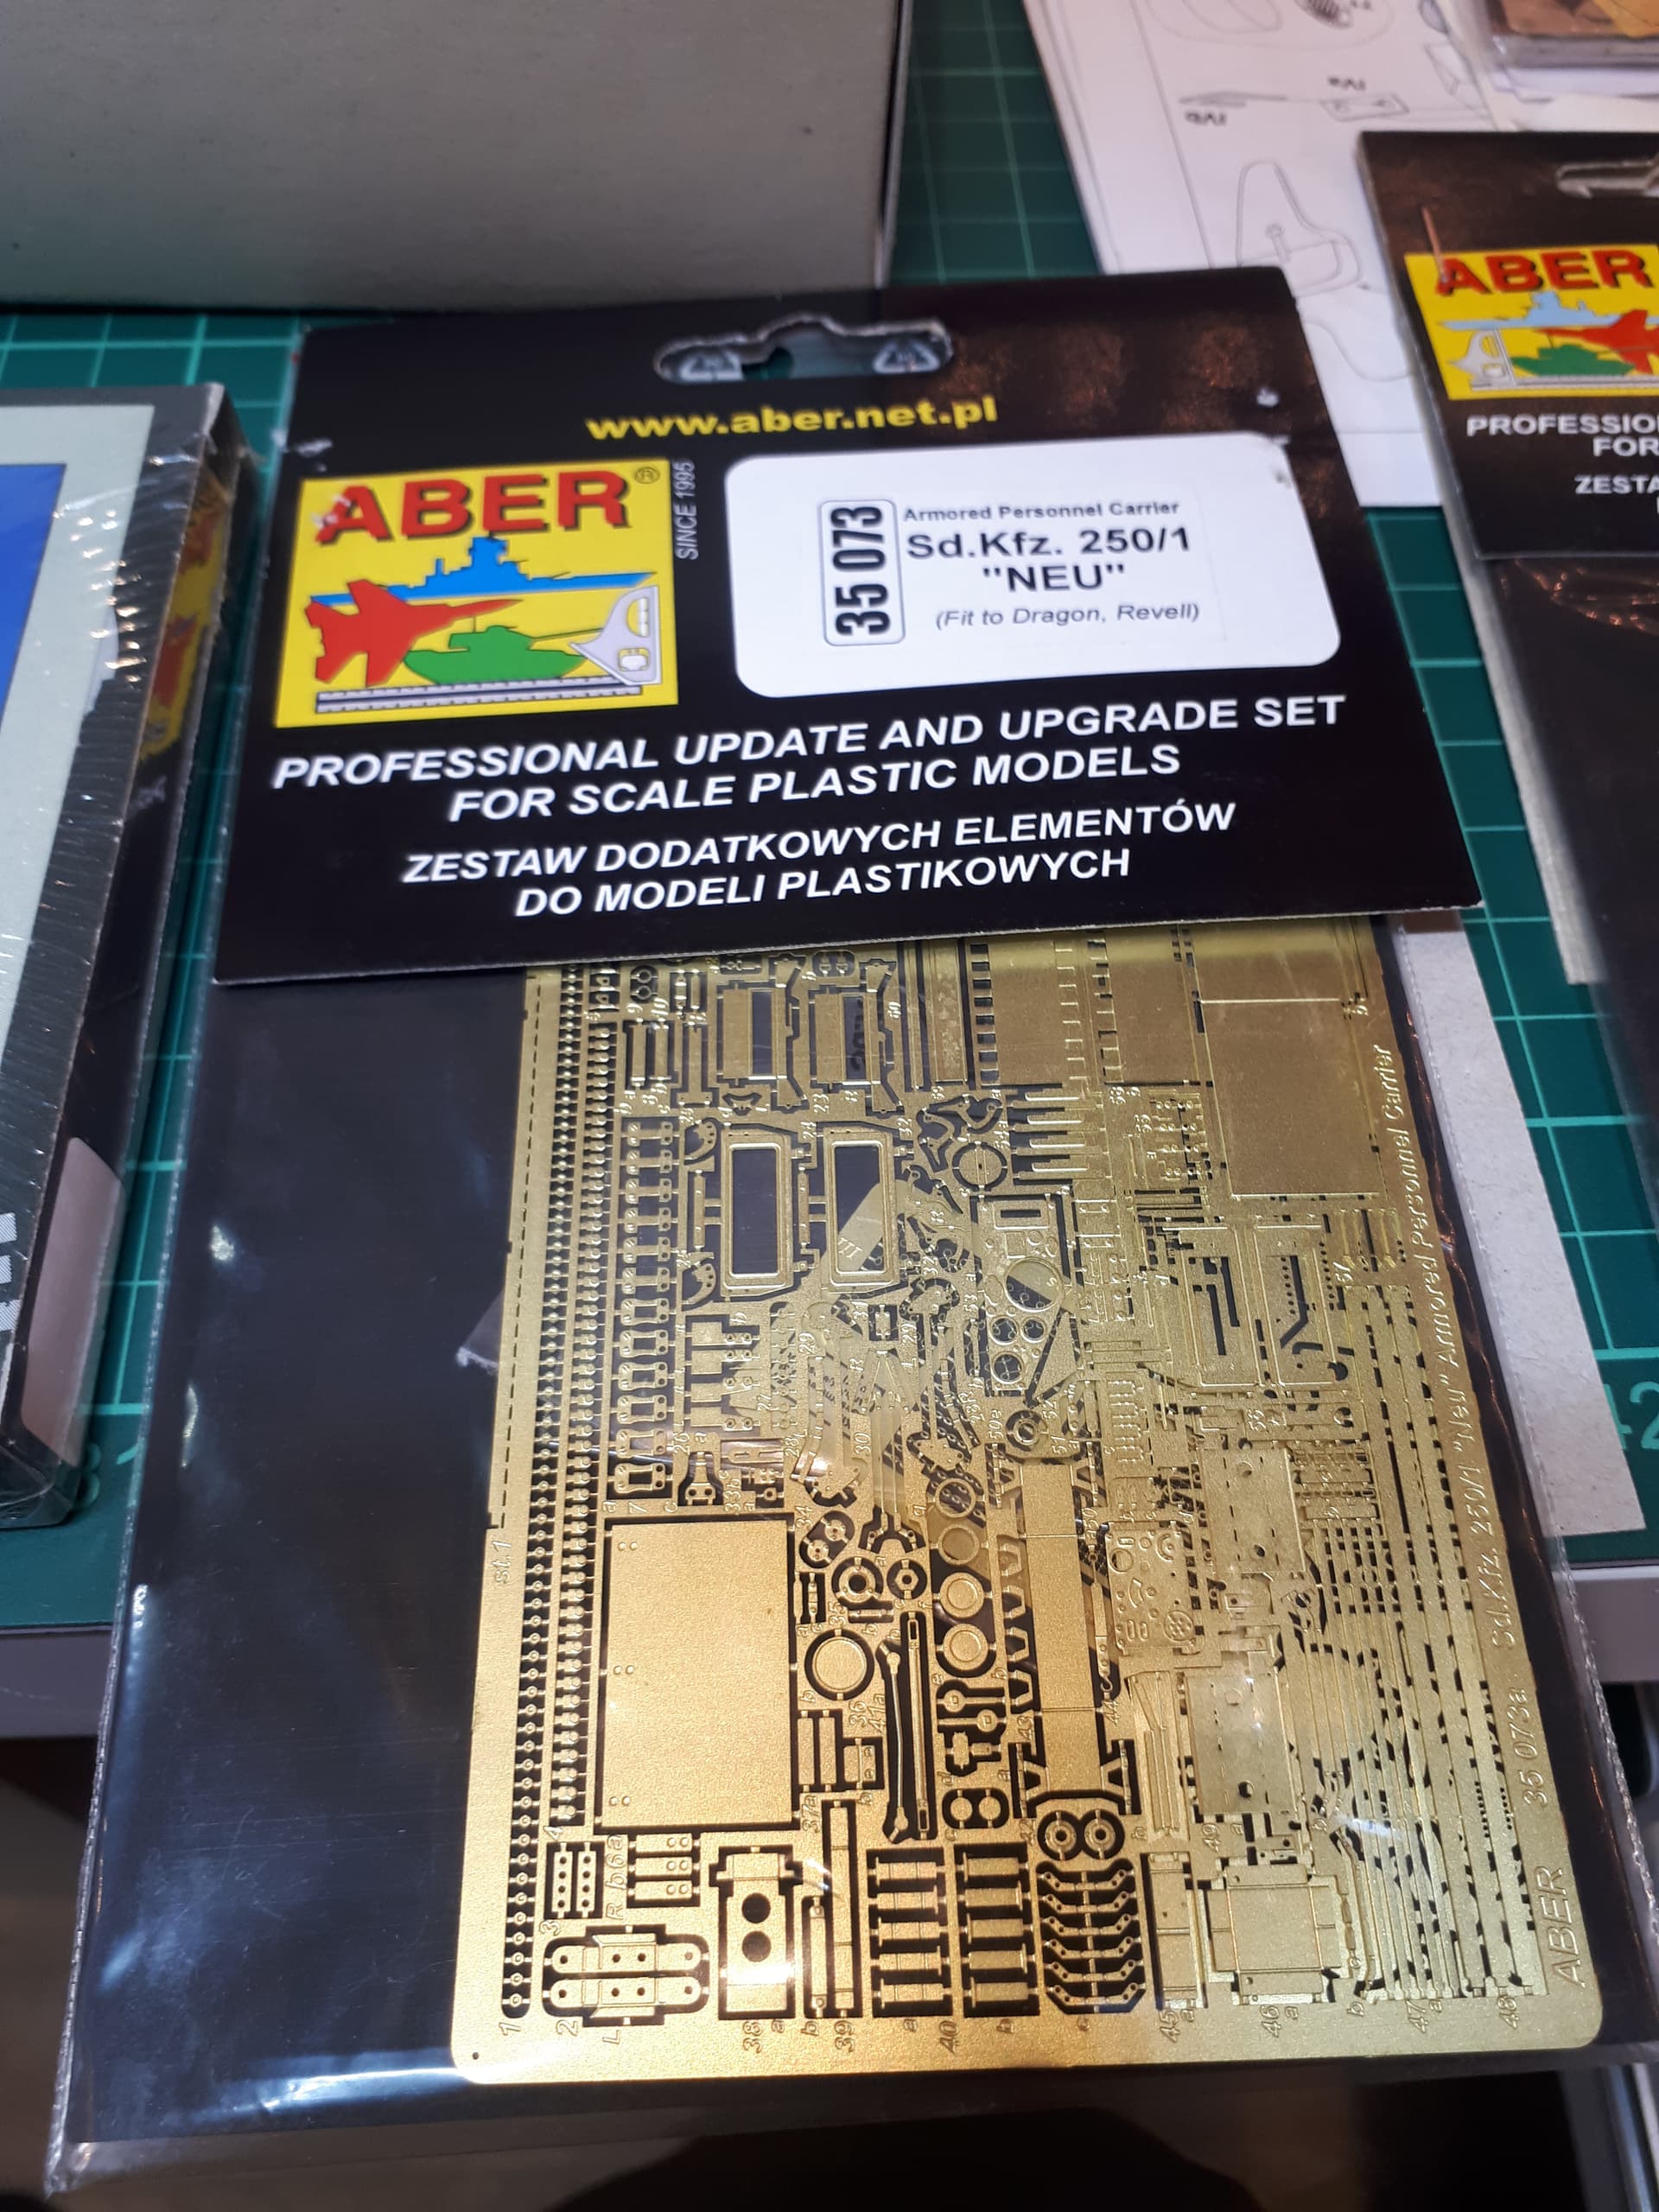
I also sourced some photoetch from both Royal Model and Aber. Some people hate PE and, if I am honest, I would rather avoid it - but sometimes there is nothing that looks as good. I usually buy two sets from different manufacturers so that I have more than one choice when it comes to tricky parts: there’s usually one that’s easier or simpler (and it’s almost never Aber!)
There is the cost factor, I admit. However, as my build rate is barely more than one or two vehicles a year (and there are three on this diorama), I don’t mind spending more on extras. In fact, the RM sets also include quite a lot of resin equipment which makes them quite good value for money.
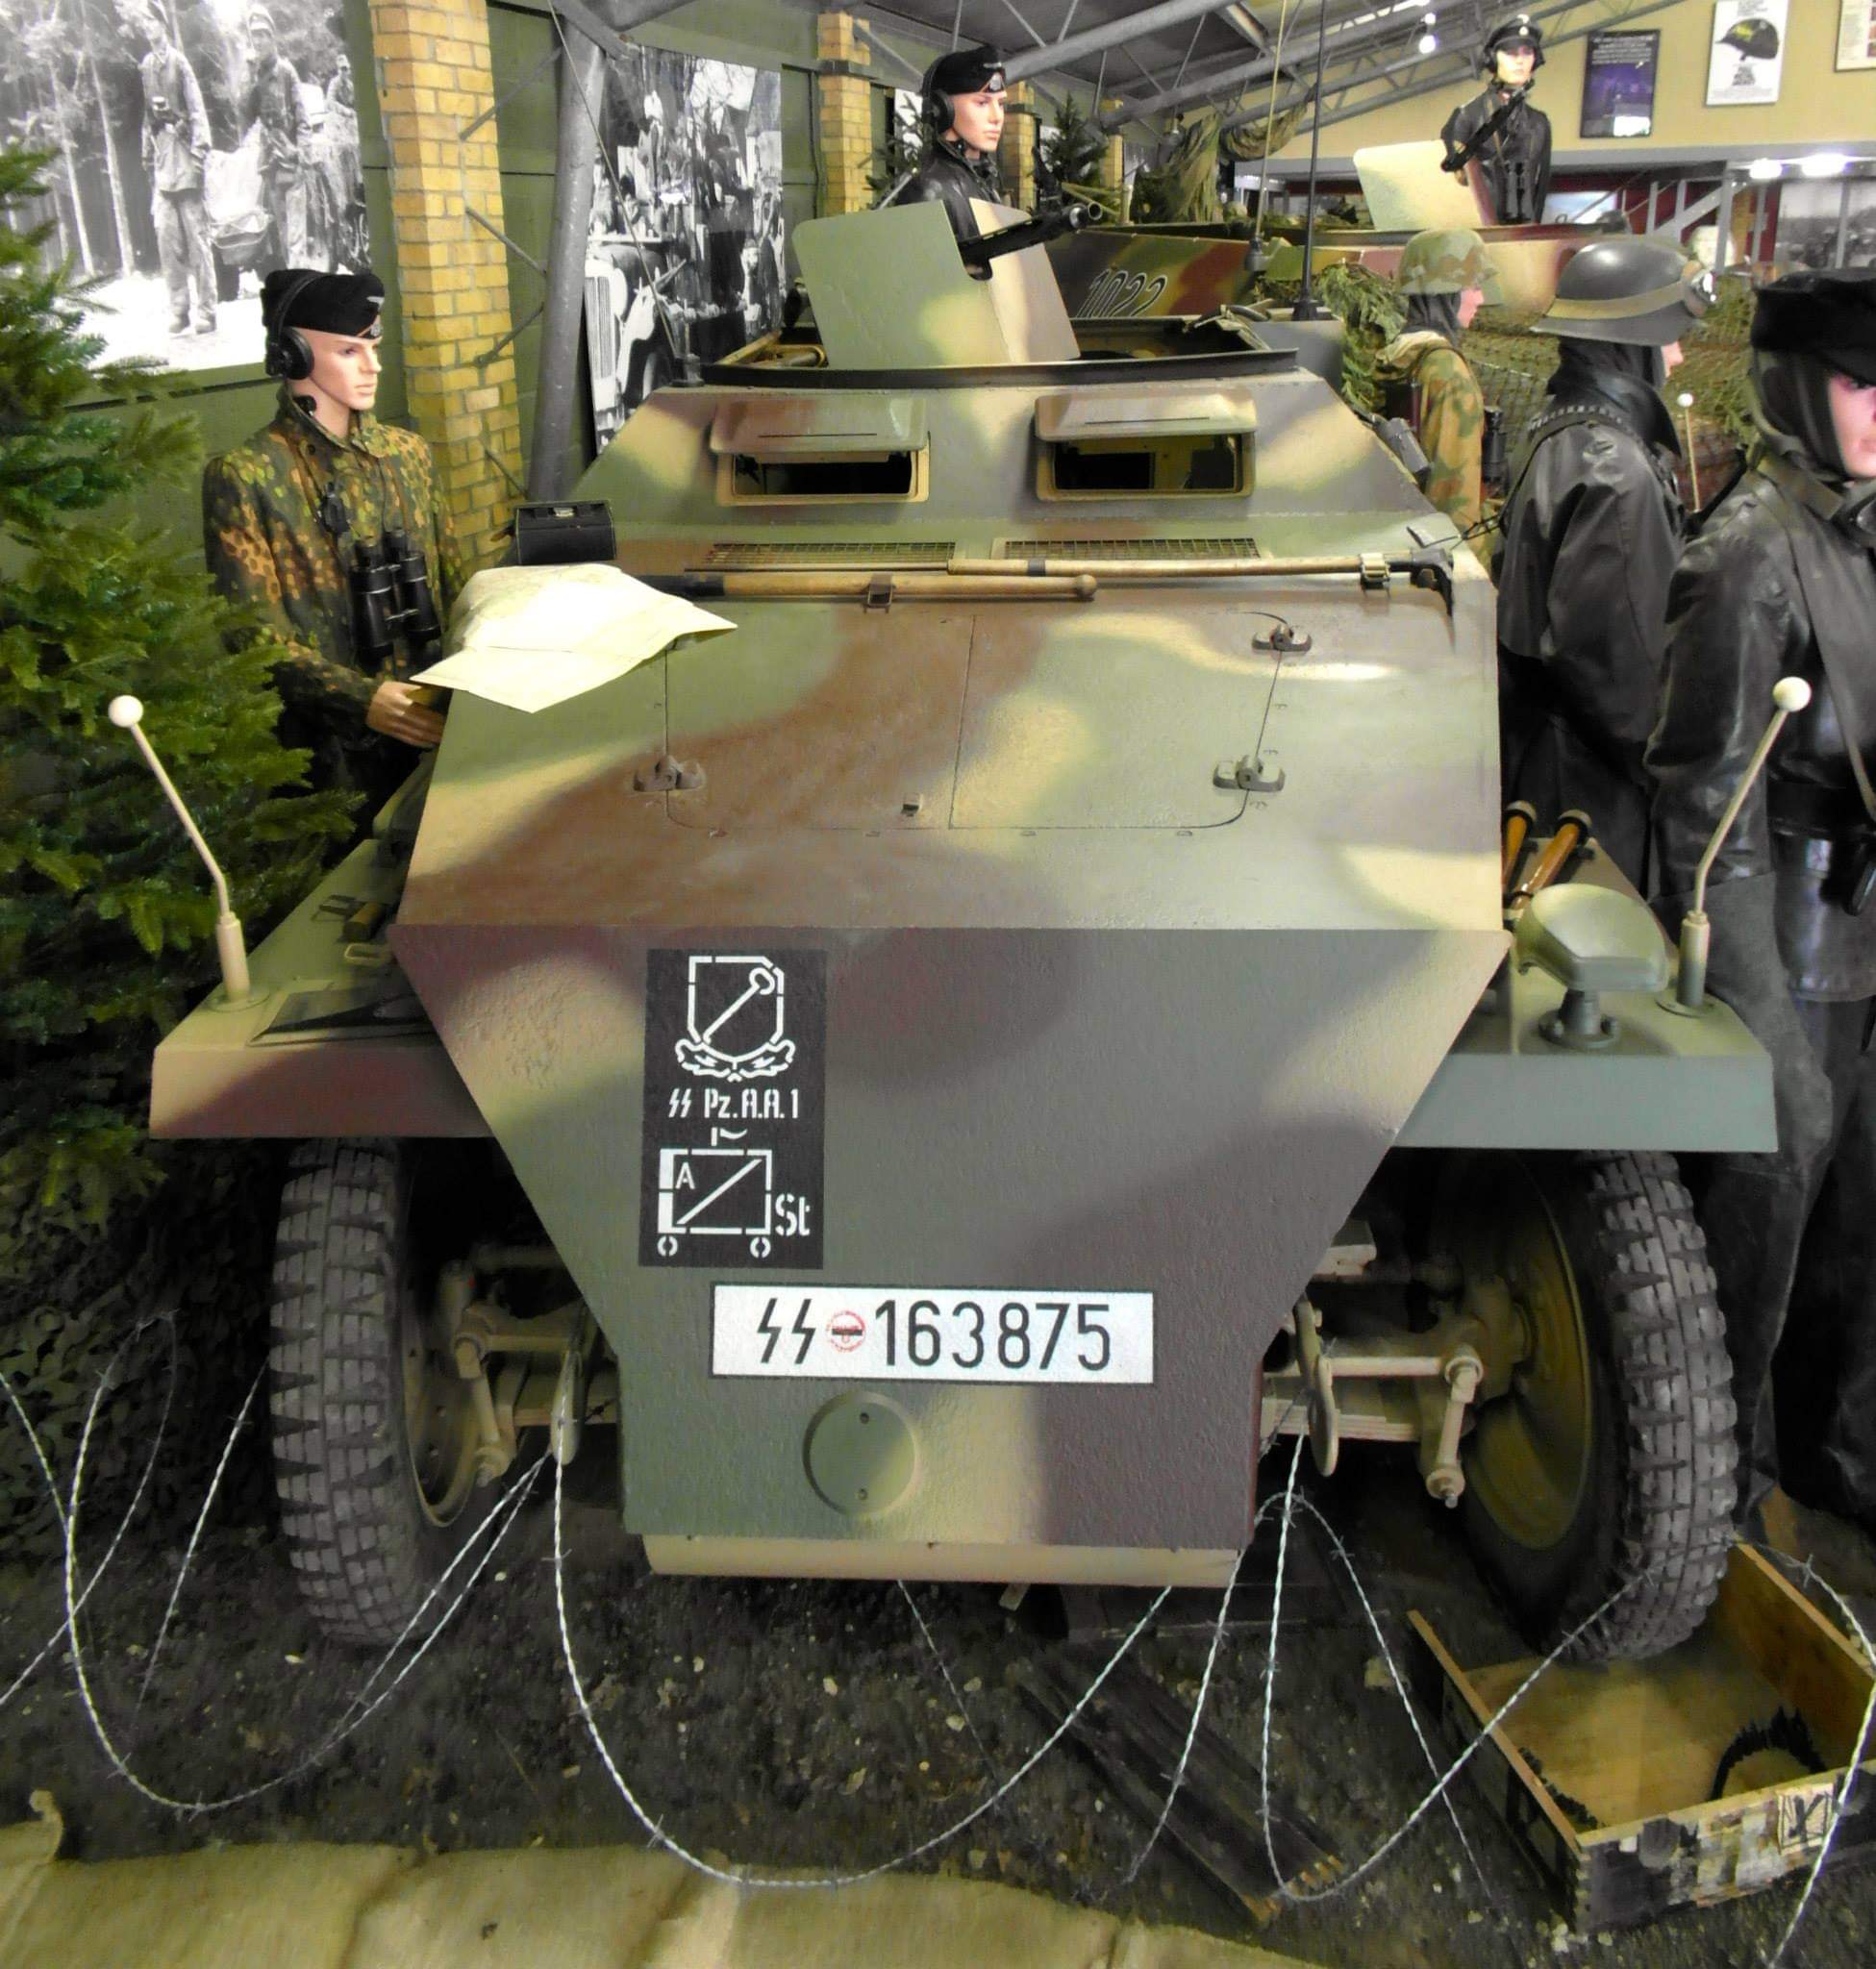
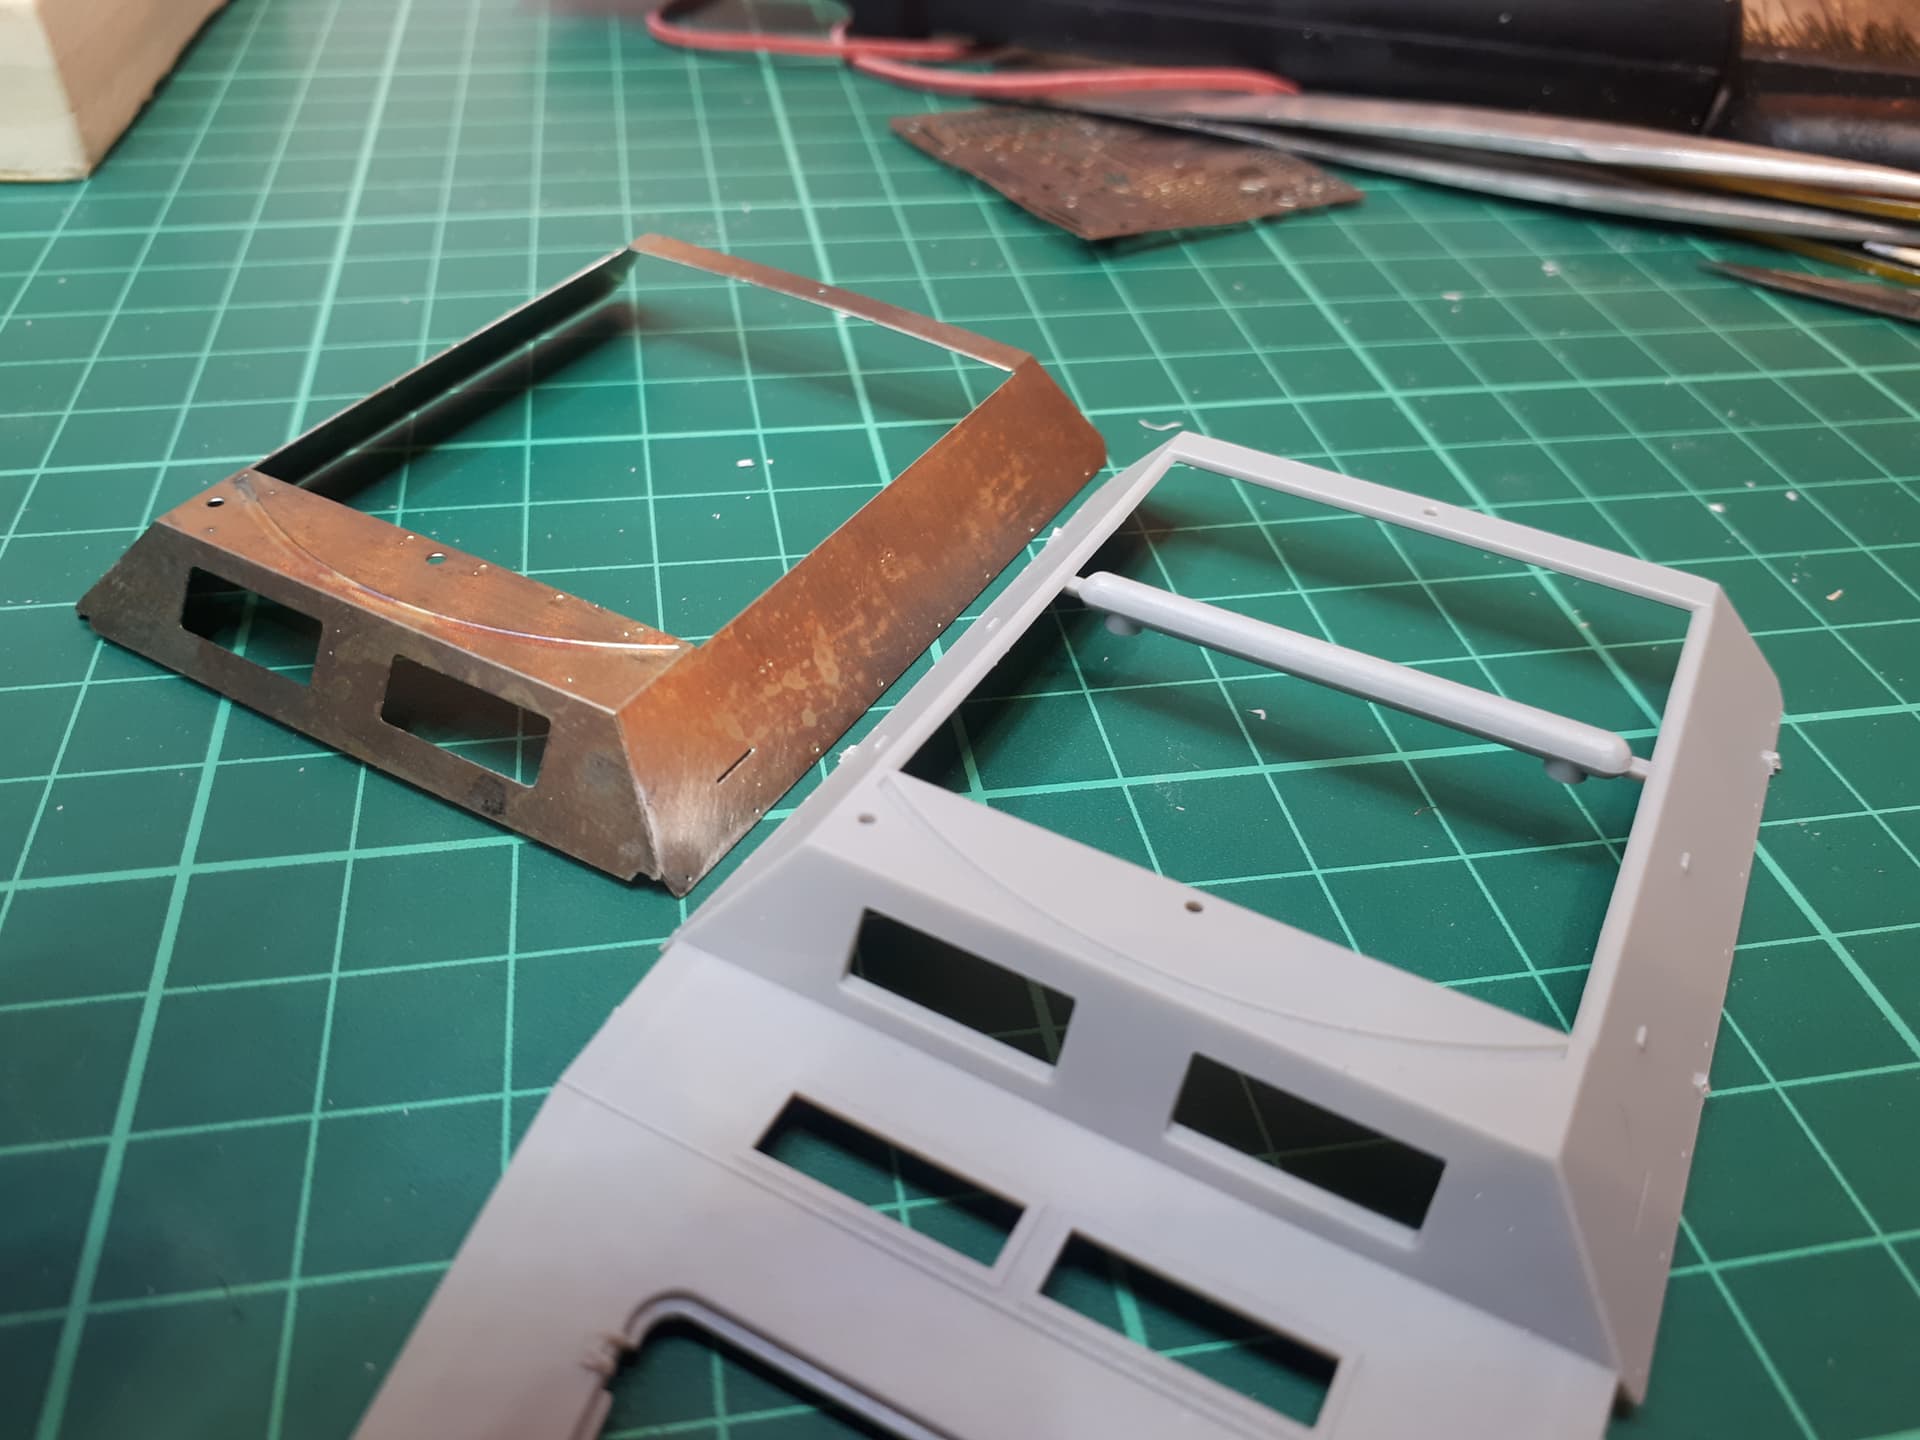
The one place where I think all of the late model 250 kits let themselves down is on the upper side armour. This is far too thick. The real vehicle actually had fairly thin side plates bolstered with internal armour panels. The side vision slits are also poorly defined.
For this reason I highly recommend the Aber set. This is actually etched into thicker metal than their usual sets and it fits the Dragon, etc kit parts really well. The only minor surgery required is to separate the old upper armour from the bonnet.
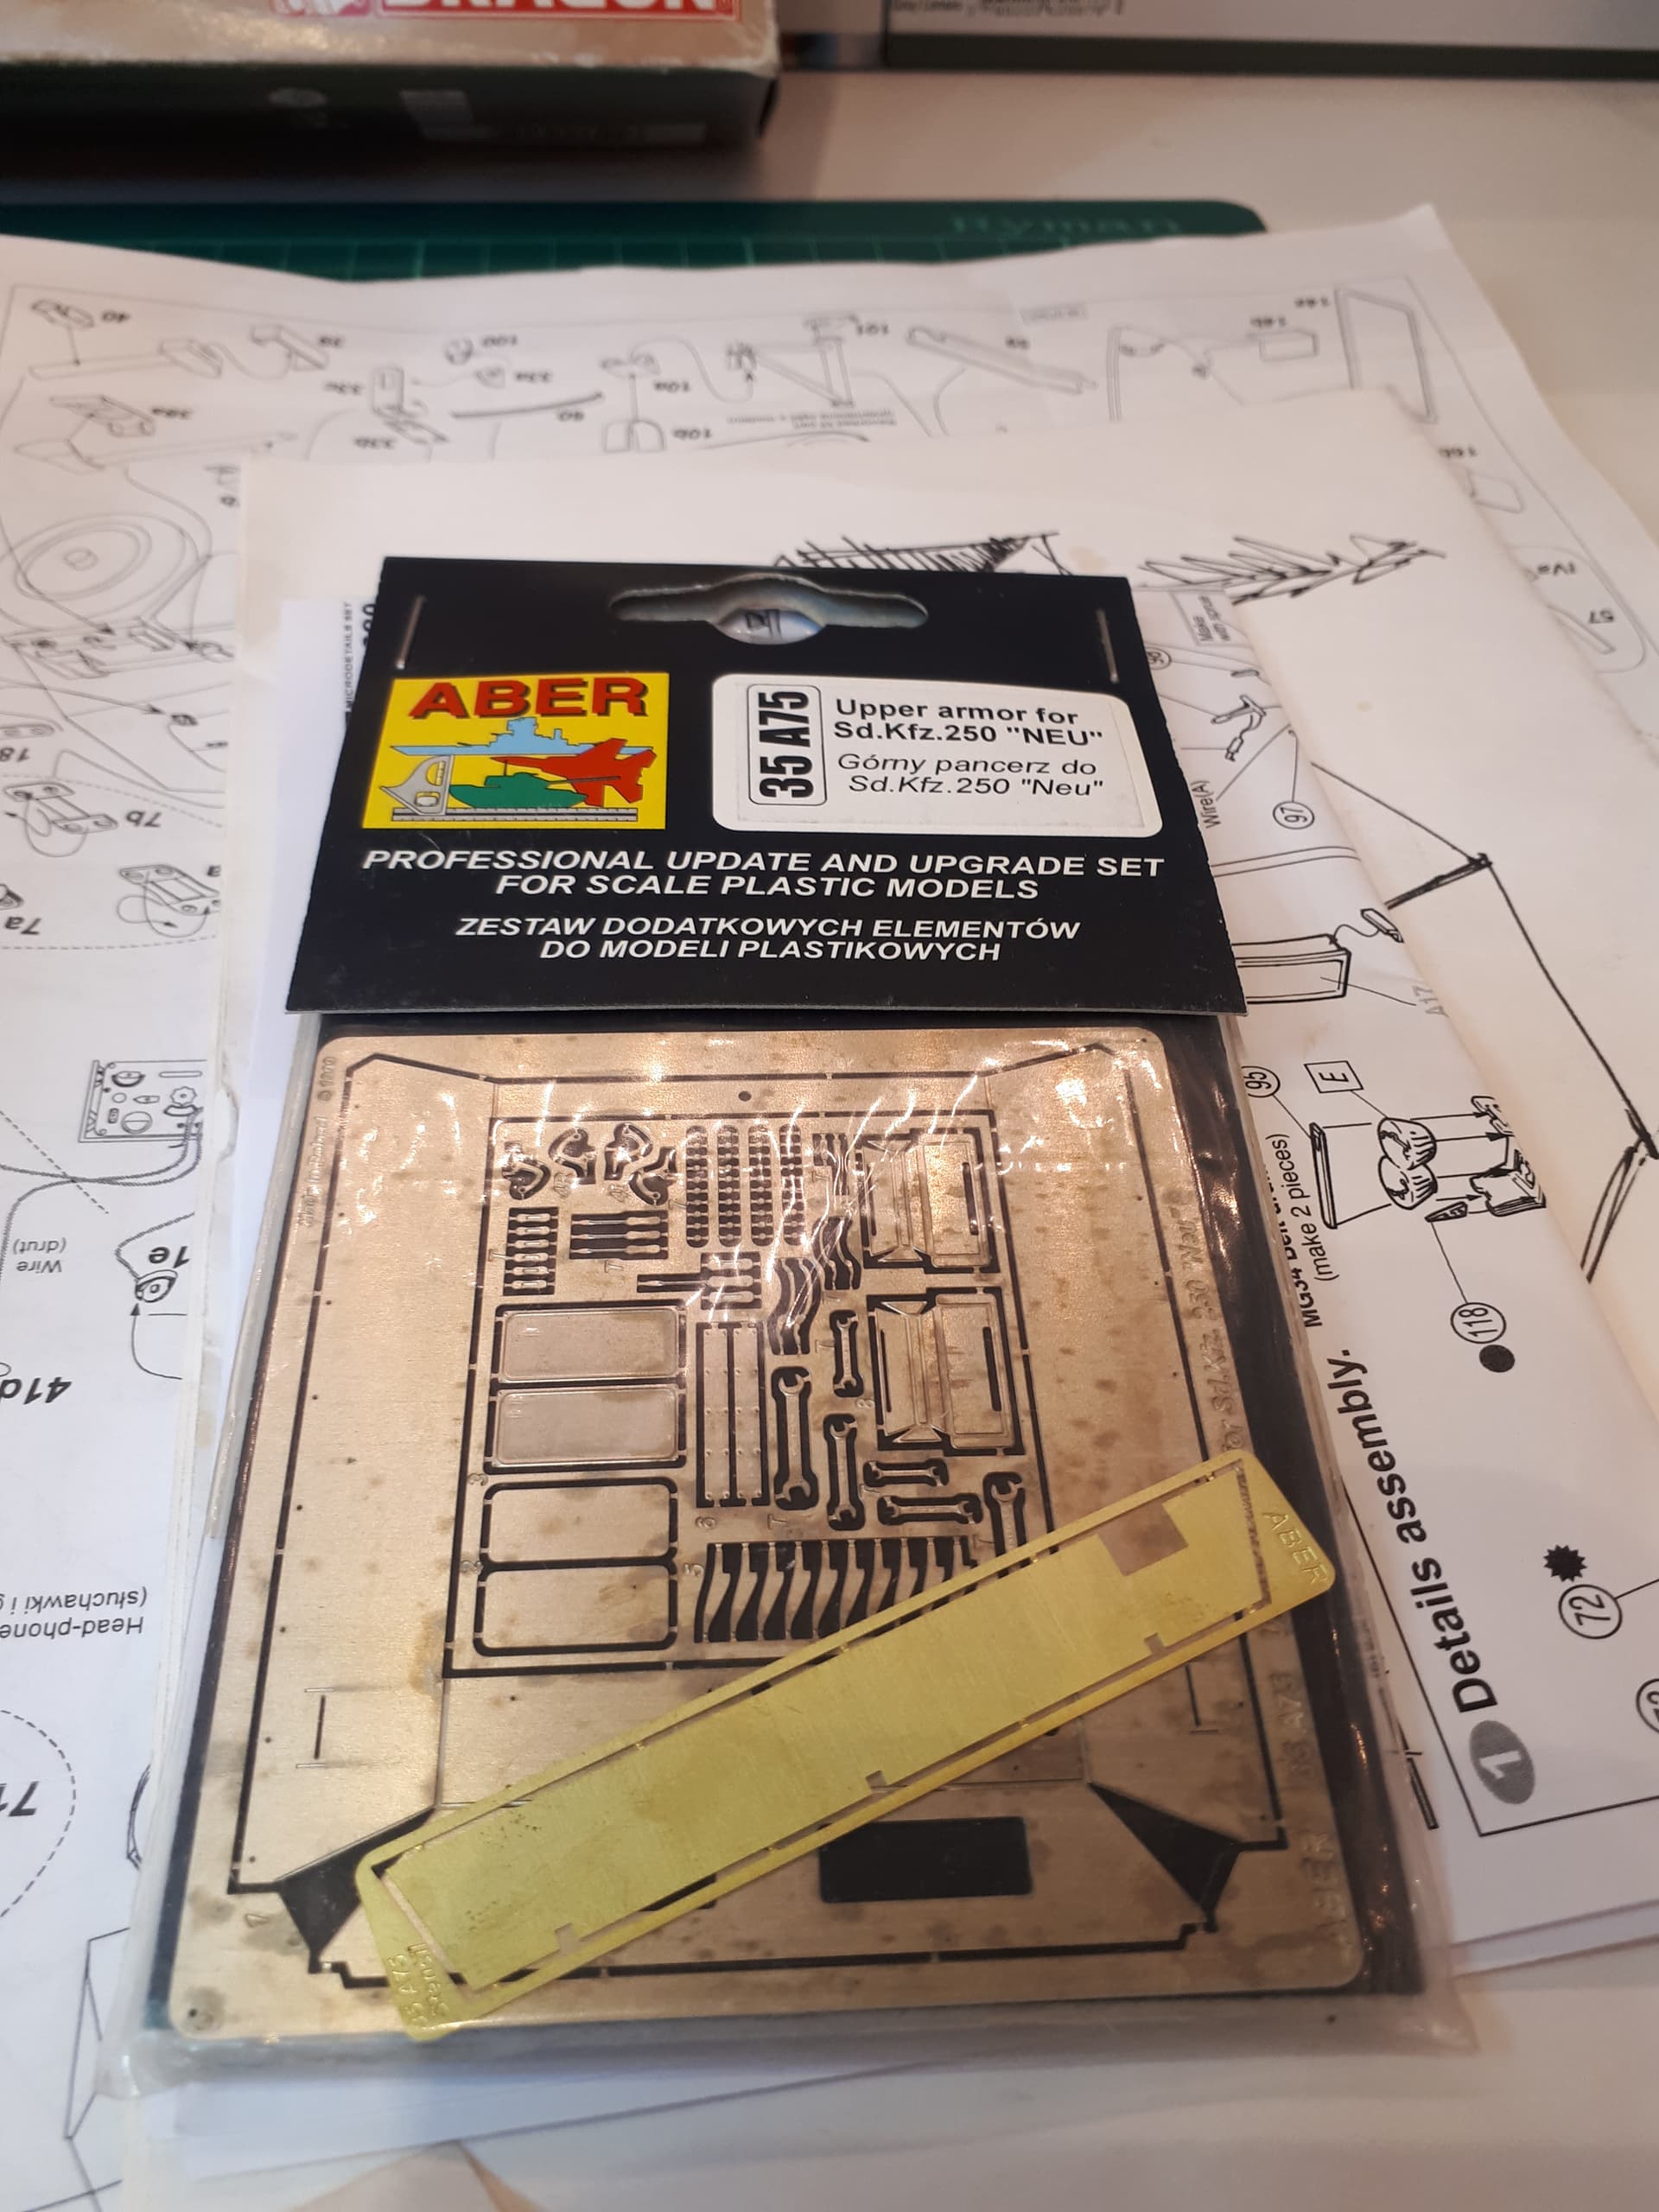
The Aber set also comes with a replacement for the fender tool bin, a set of tools and a shield for the forward MG.
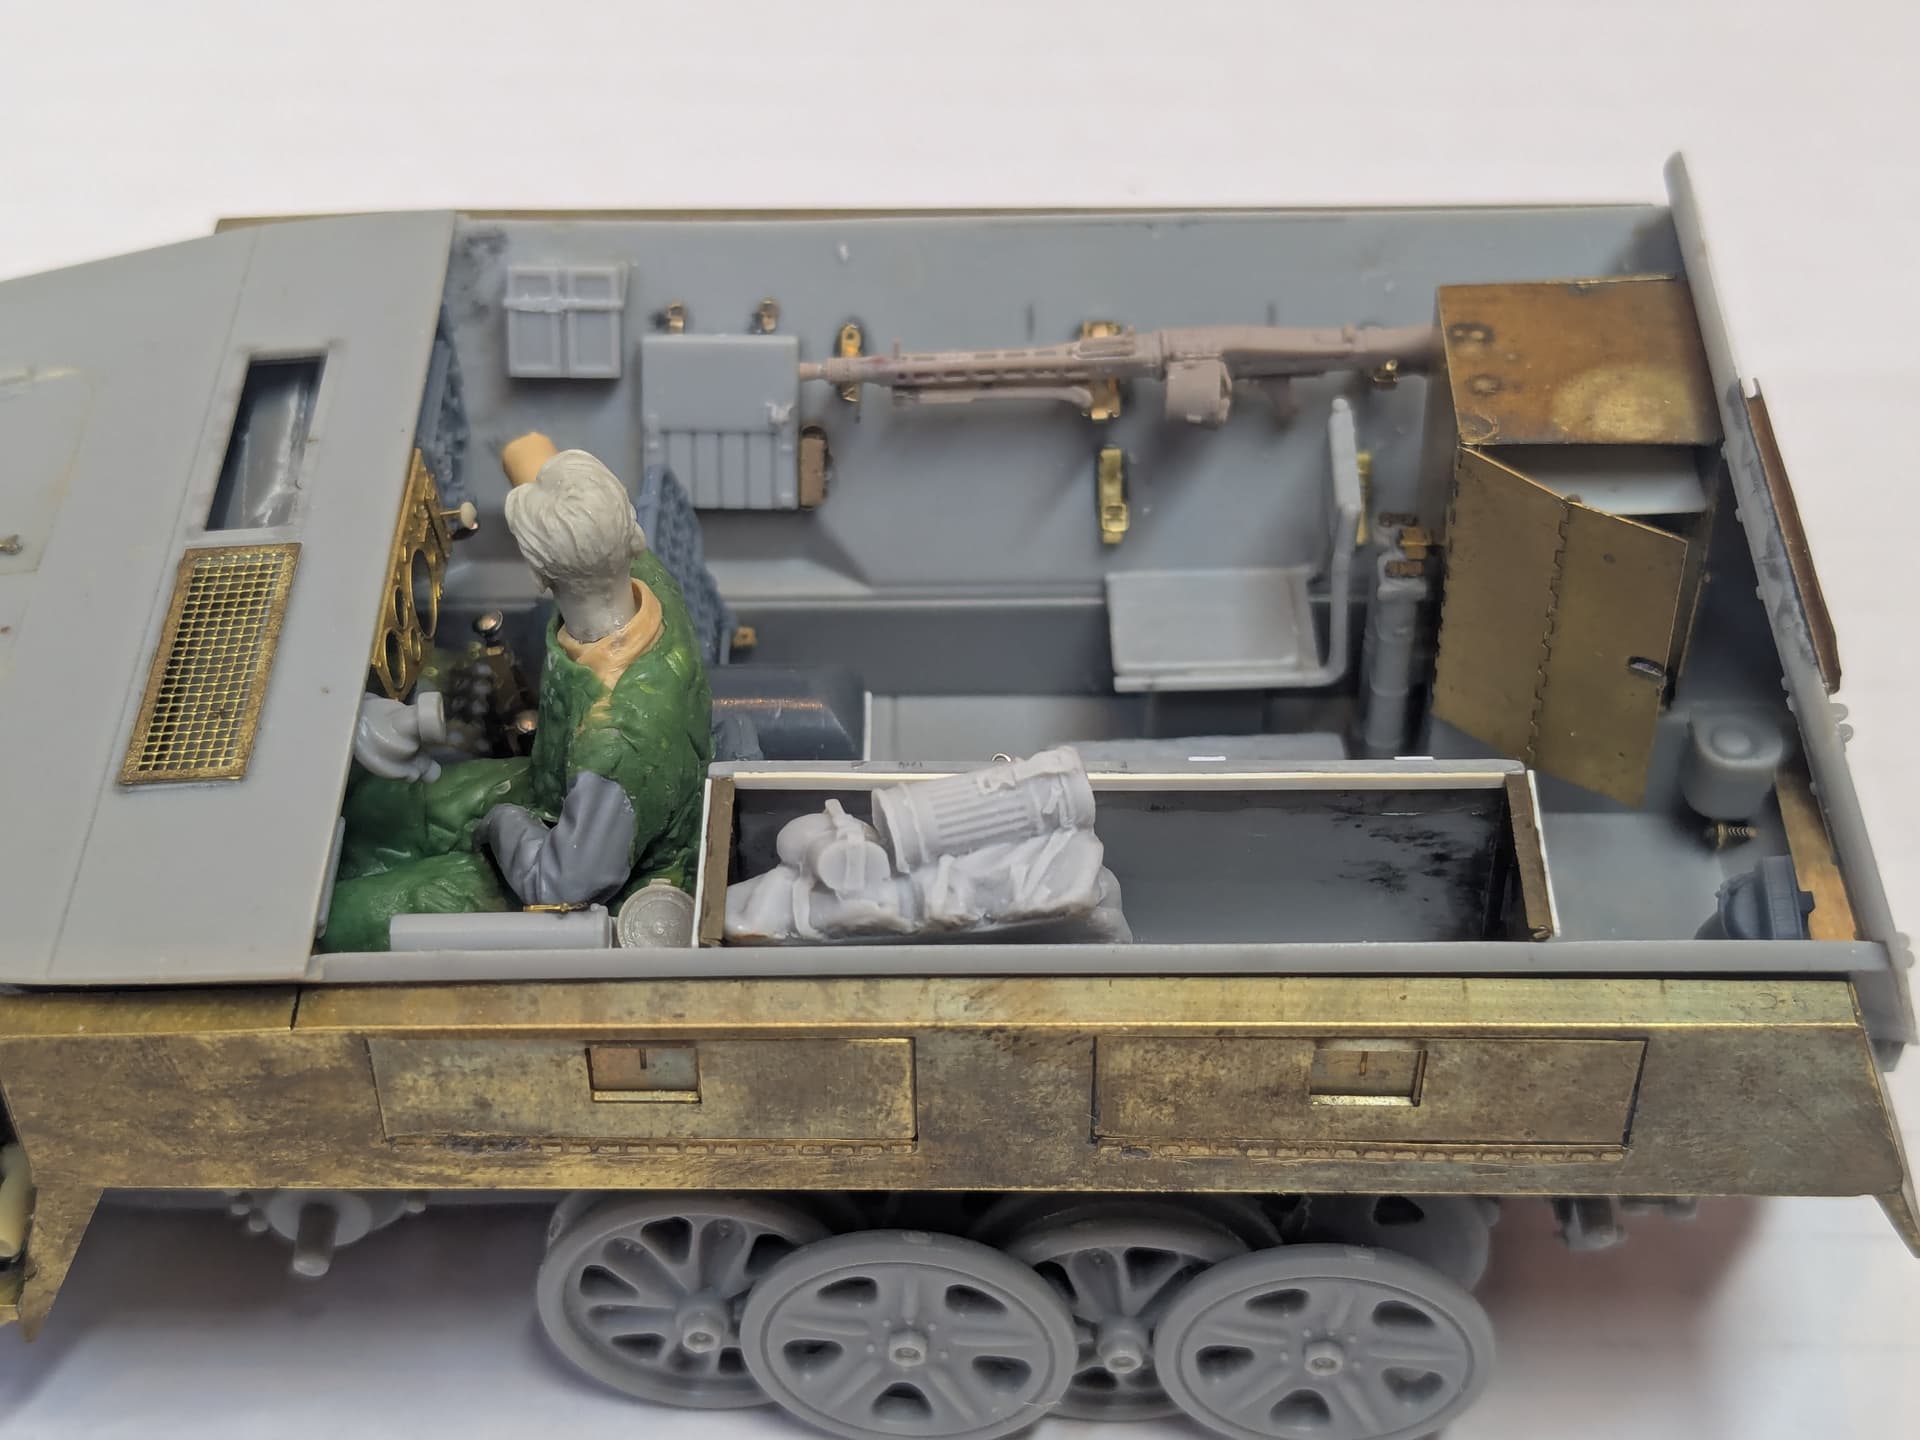
Here is the model after I had done most of the structural PE work:
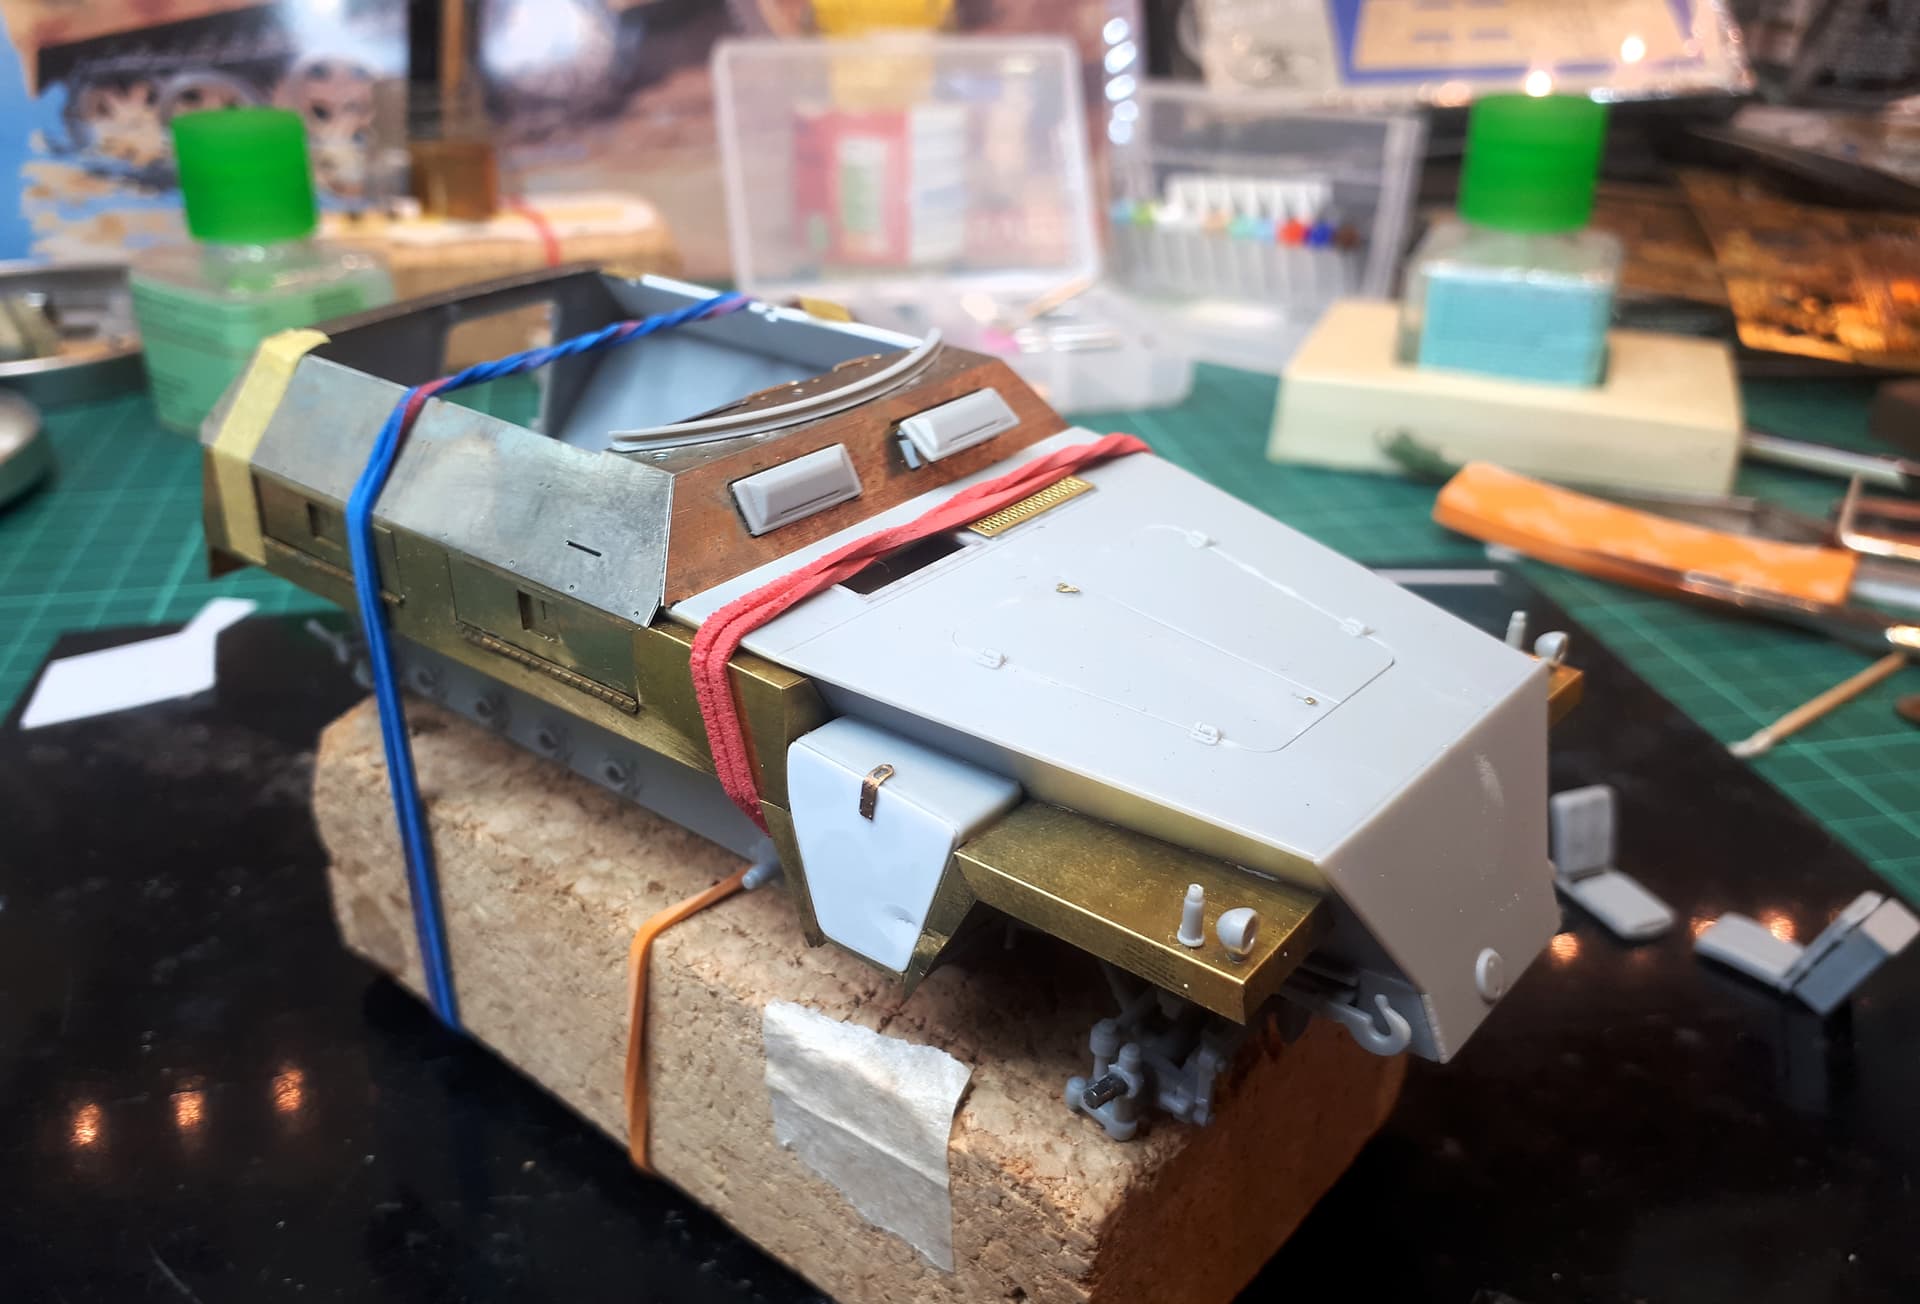
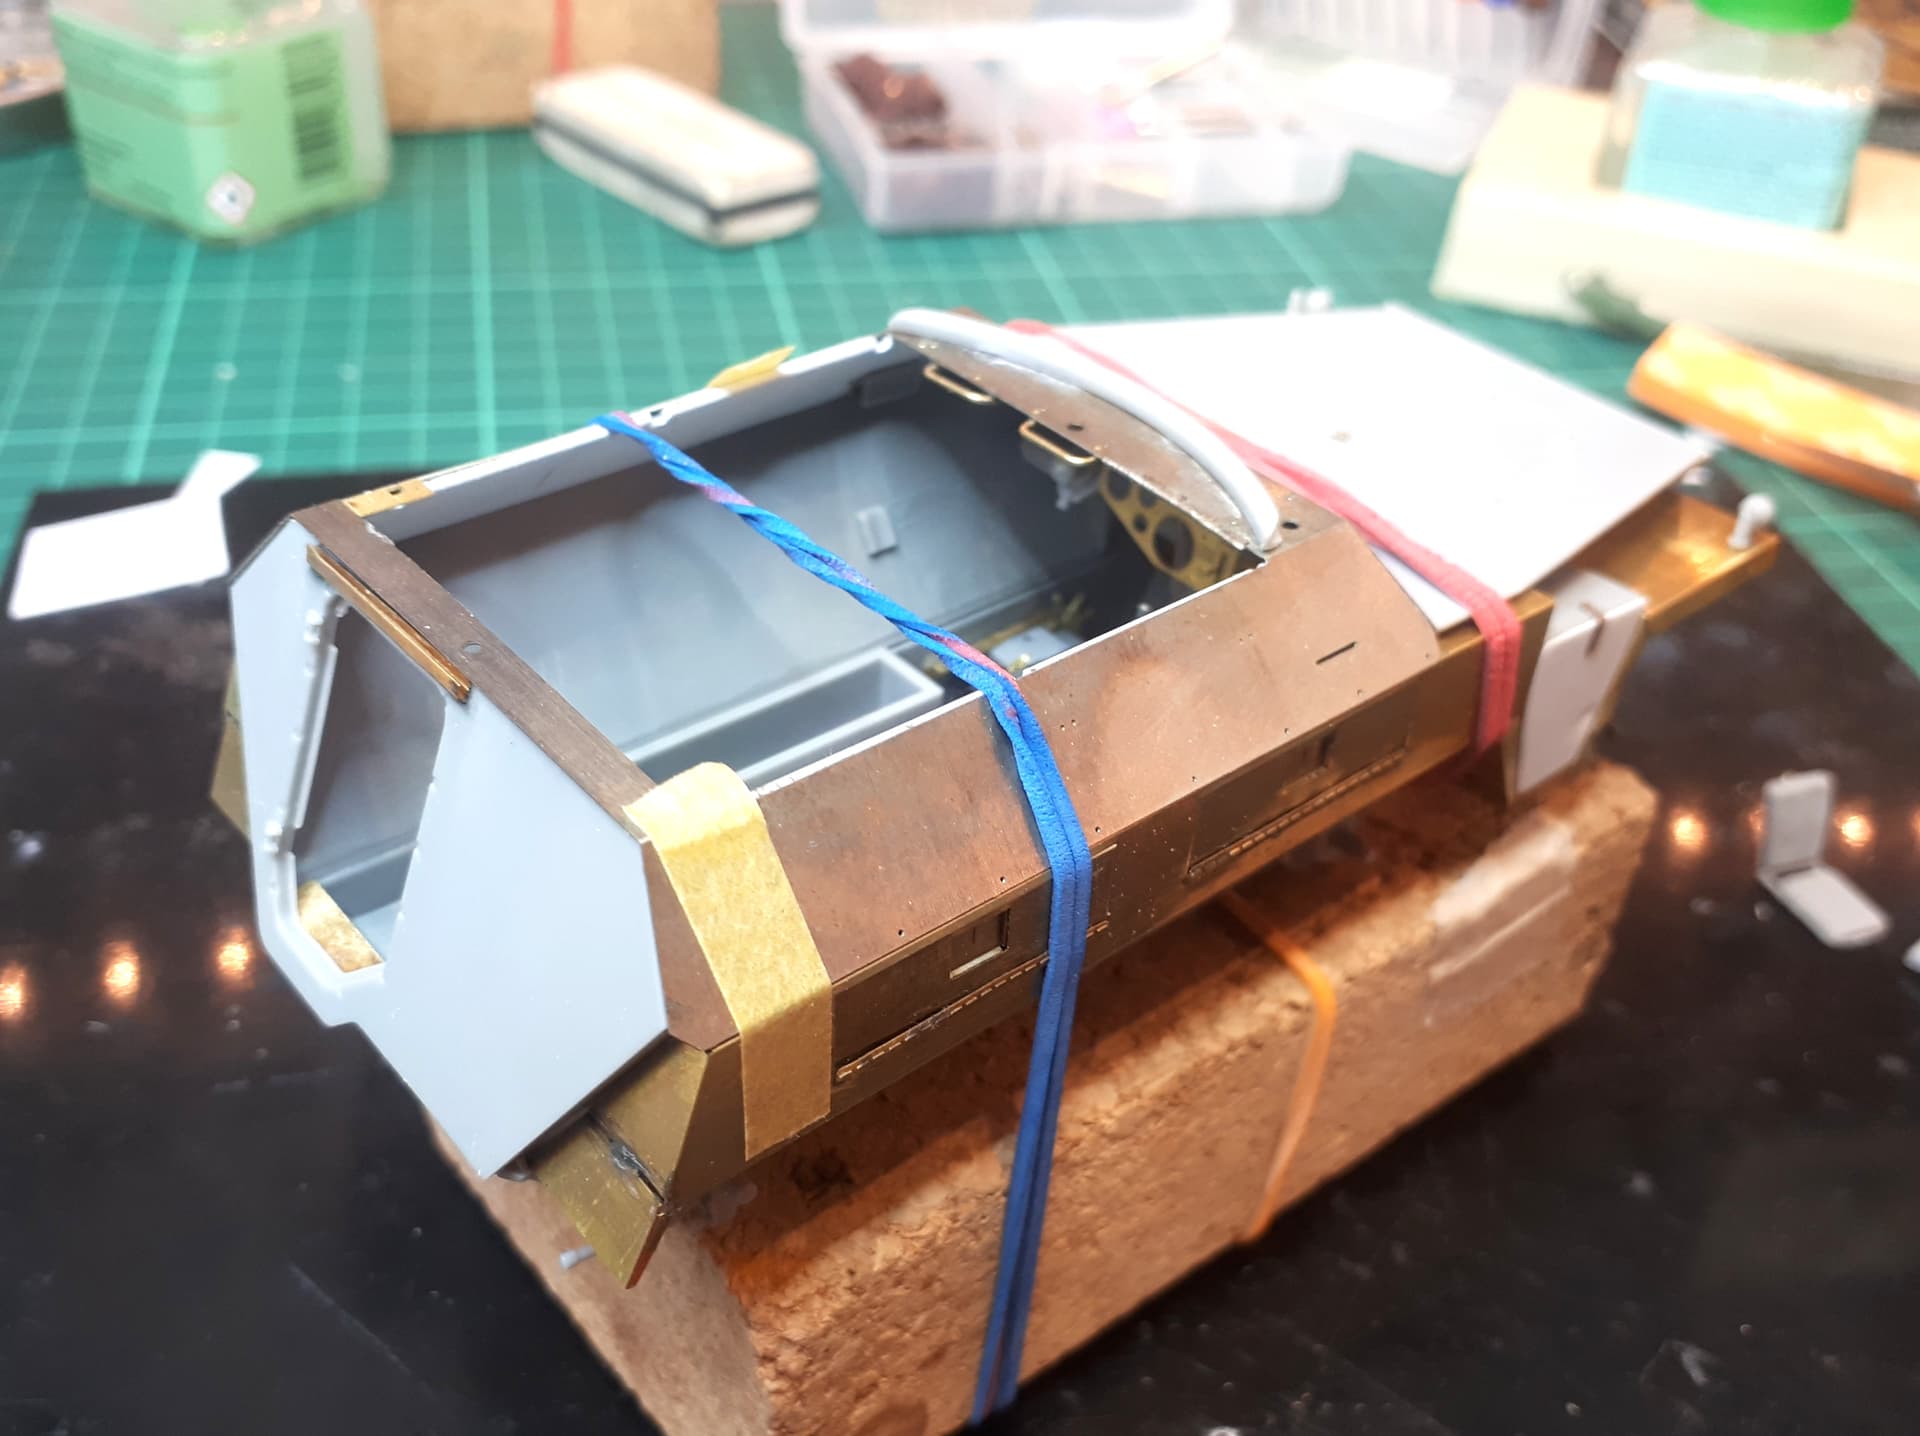
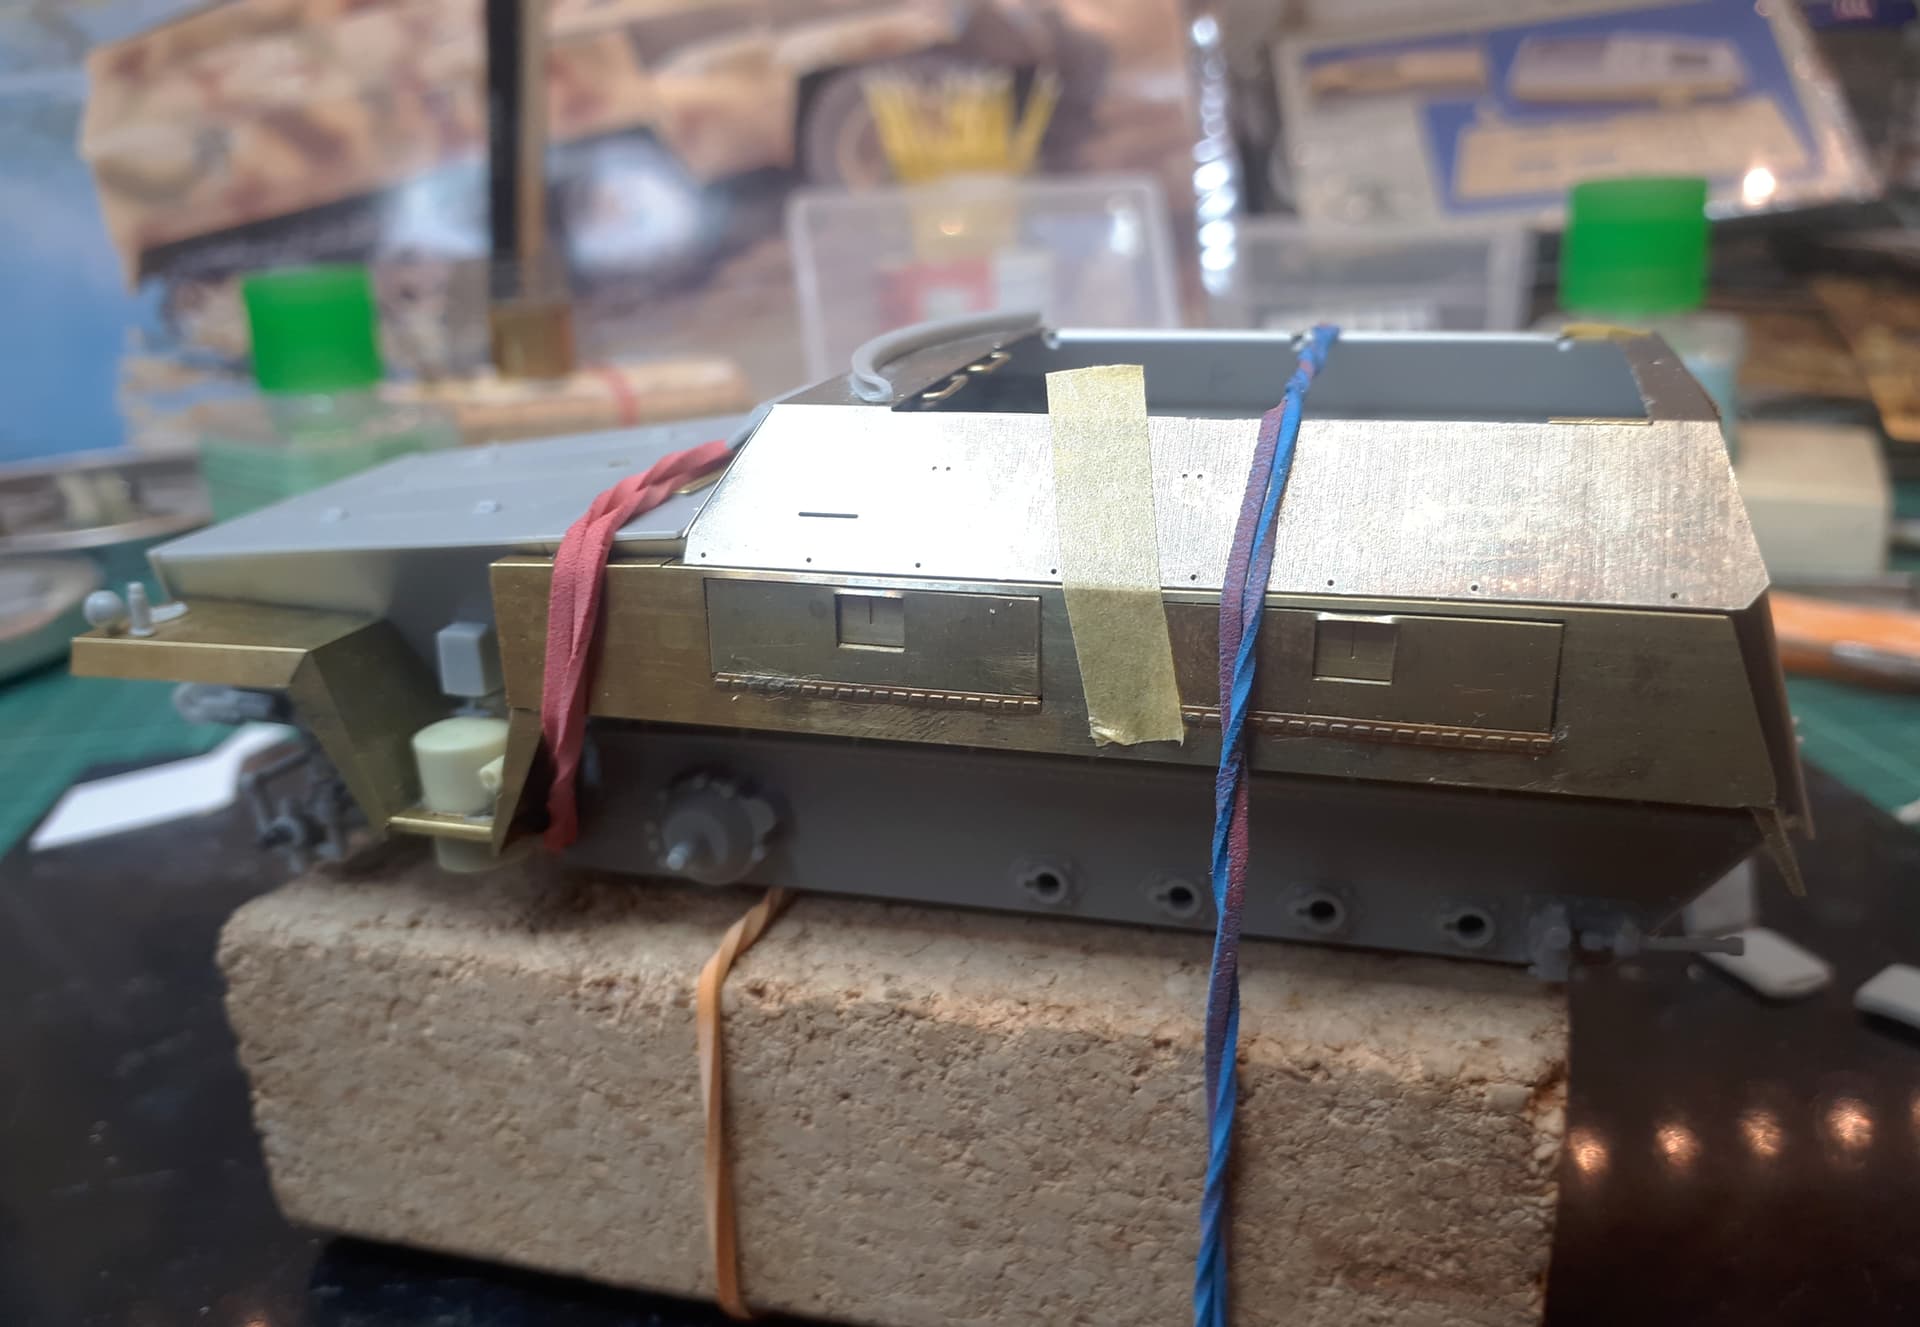
Next up… the interior.
17 Likes
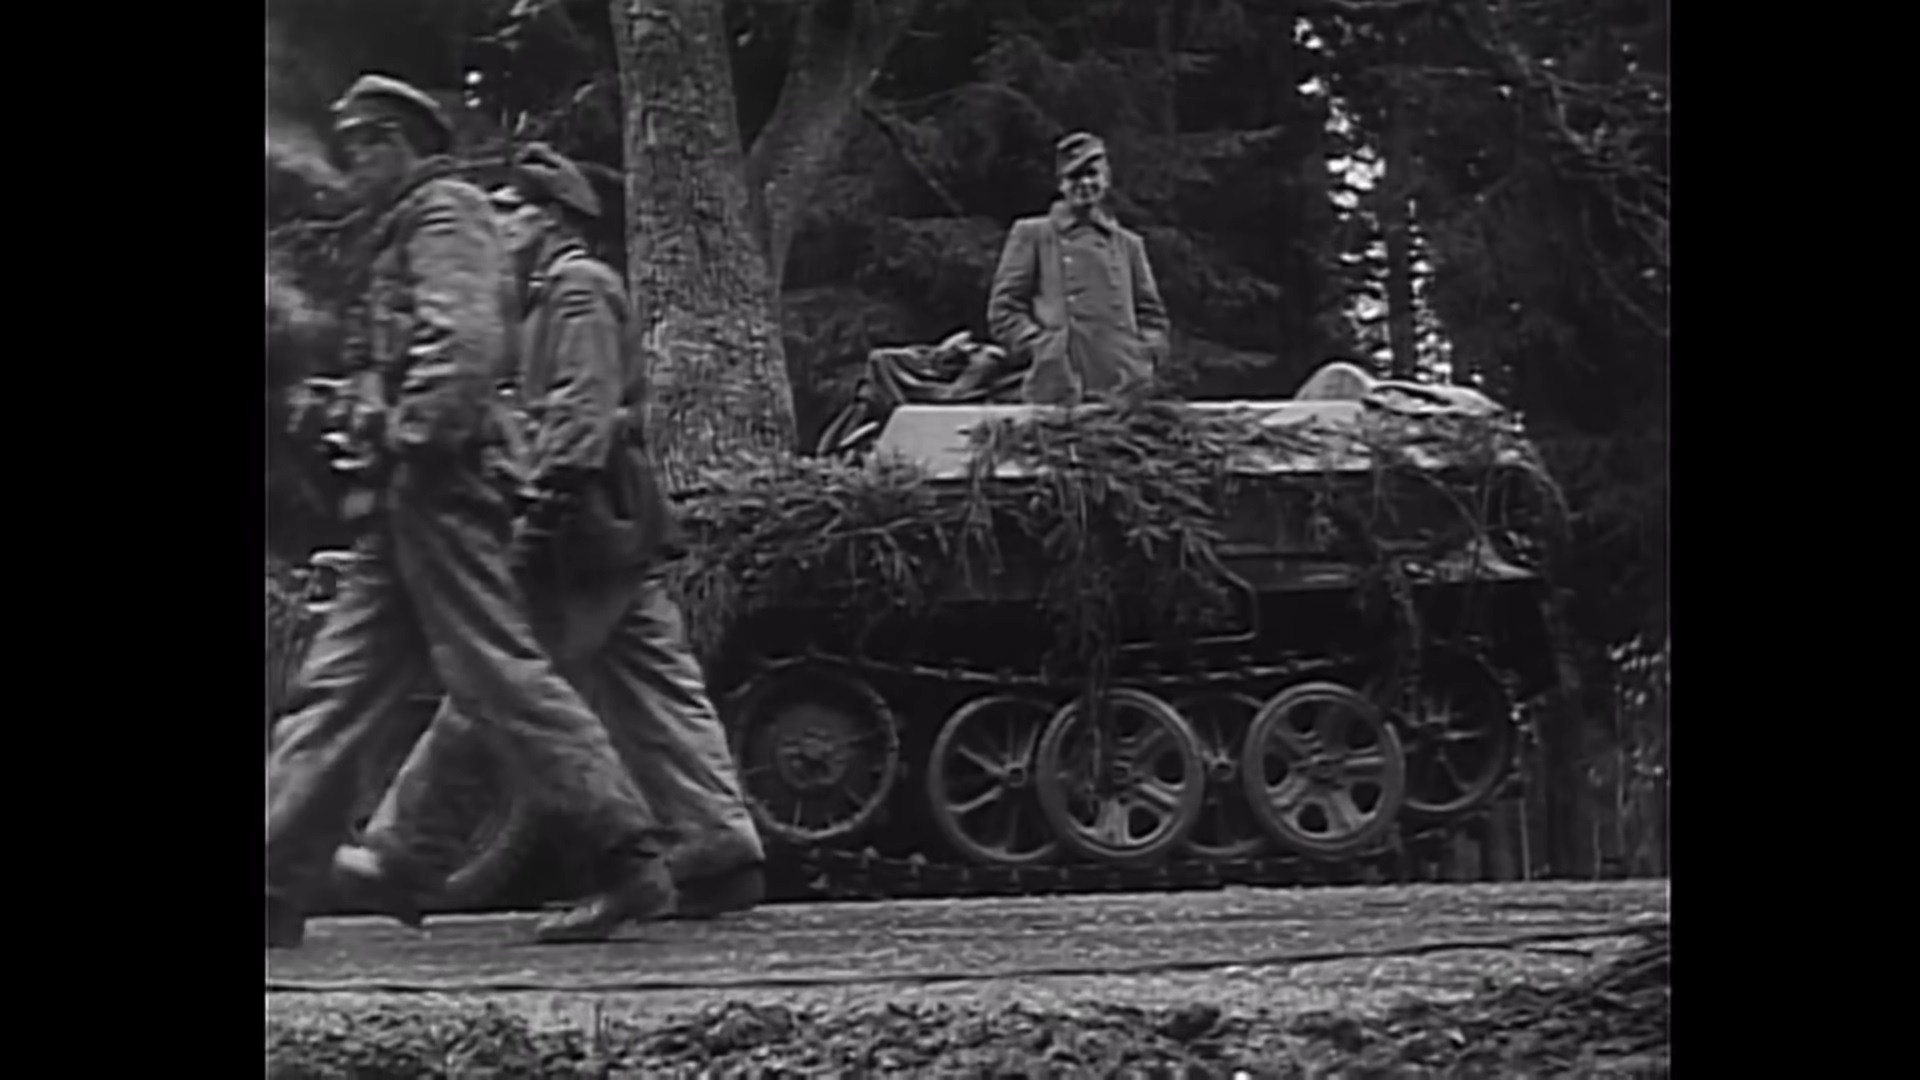
Not to hijack or to self-aggrandize in any way, but that footage brought back a happy memory from way back in I think, 1978, when a gang of us young soldiers - fed up with drinking our own bodyweight in alcohol in garrison every weekend - decided to venture down to the Ardennes, armed only with a copy of a tatty After the Battle magazine. And we found that junction! It was just so evocative - you could taste the history of it all.
A less than perfect photo:
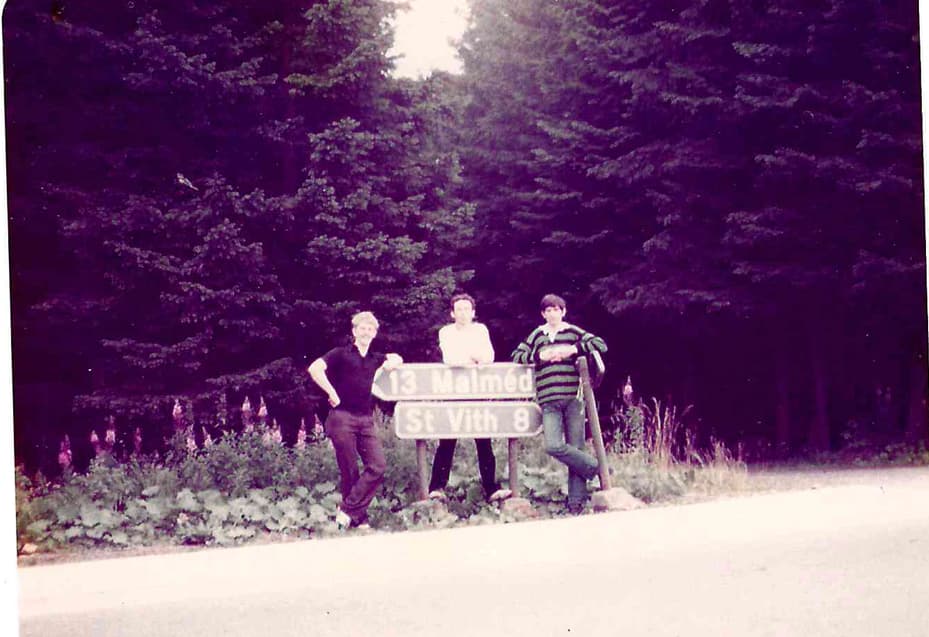
All that youthful enthusiasm - where did it go? Mine, I mean - not the Waffen SS’.
Apologies Tim, just couldn’t help myself; but treading where the interesting have trod is always worthwhile I think(!)
10 Likes
I forgot to mention - cracking build of course!
3 Likes
Thanks Conor,
And thanks for putting me on to Timo. He certainly looks like he knows everything there is to know.
I had not come across his book on Knittel before but I have managed to track down a copy here in the UK. I’m glad that someone other than Peiper is getting some of the spotlight - although, of course, what it illuminates is often far from pretty.
Where do I find him on Facebook?
2 Likes